
HAIFB54CIRS - Cooker HAIER - Free user manual and instructions
Find the device manual for free HAIFB54CIRS HAIER in PDF.
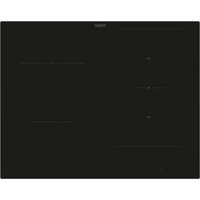


| Product type | Induction hob |
| Brand | Haier |
| Model | HAIFB54CIRS |
| Surface type | Ceramic glass |
| Number of cooking zones | 4 |
| Power supply | 220-240 V / 380-415 V 2N~ |
| Maximum total power | 7.4 kW (adjustable via power management) |
| Number of power levels | 14 levels + Boost (level 15) |
| Special functions | Boost, Pause, Timer (60 min), Child lock, Melt, Simmer, Boil, Full Zone, Varycook |
| Connectivity | Wi-Fi (IEEE 802.11b/g/n), Bluetooth (v4.2, BLE), hOn app |
| Included accessories | Preci Probe wireless thermometer, Ladle |
| Safety | Automatic pan detection, Residual heat indicator (H symbol), Safety shut-off, Child lock |
| Cleaning | Special ceramic glass cleaner, scraper for stubborn dirt |
| Power per zone (front) | Up to 7.4 kW (with Boost) |
| Cut-out dimensions (W x D) | 560 x 490 mm (for 60 cm model) – varies by model |
| Approximate weight | 8-10 kg |
| Spare parts | Available through authorized after-sales service |
| After-sales service | Contact after-sales service (error codes displayed) |
Frequently Asked Questions - HAIFB54CIRS HAIER
User questions about HAIFB54CIRS HAIER
0 question about this device. Answer the ones you know or ask your own.
Ask a new question about this device
Download the instructions for your Cooker in PDF format for free! Find your manual HAIFB54CIRS - HAIER and take your electronic device back in hand. On this page are published all the documents necessary for the use of your device. HAIFB54CIRS by HAIER.
USER MANUAL HAIFB54CIRS HAIER
4 Safety information 9 Product introduction 10 Before starting 13 Operation of product 21 Cooking guidelines 22 Care and cleaning 23 Failure display and inspection 25 Disposal & declaration of conformity 26 Installation
WELCOME
Thank you for choosing our product. To ensure your safety and get the best results, please read this manual carefully, including the safety instructions, and keep it for future reference. Before installing the hob, note the serial number, which you might need for repairs. Check for any damage during transportation and consult a technician if you're unsure before using it. Keep packaging materials away from children.
NOTE: Please note that the hob's accessories may vary depending on the model you purchased.
1.1 GENERAL WARNINGS
- Read these instructions carefully before installing or using this appliance.
- WARNING: If the surface is cracked, switch off the appliance to avoid the possibility of electric shock.
- NEVER try to extinguish a fire with water, but switch off the appliance and then cover flame e.g. with a lid or a fire blanket.
- WARNING: Danger of fire: do not store items on the cooking surfaces.
- WARNING: Use only hob guards designed by the manufacturer of the cooking appliance or indicated by the manufacturer of the appliance in the instructions for use as suitable or hob guards incorporated in the appliance. The use of inappropriate guards can cause accidents.
1.1.1 Use Limitations
- This appliance is not intended for use by persons (including children) with reduced physical, sensory or mental capabilities, or lack of experience and knowledge, unless they have been given supervision or instruction concerning use of the appliance by a person responsible for their safety.
• Children should be supervised to ensure that they do not play with the appliance.
- This appliance can be used by children aged from 8 years and above and persons with reduced physical, sensory or mental capabilities, or lack of experience and knowledge, if they have been given supervision or instruction concerning use of the appliance in a safe way and understand the hazard involved.
• Children shall not play with the appliance.
- Cleaning and user maintenance shall not be made by children without supervision.
- This appliance complies with electromagnetic safety standards. However, persons with cardiac pacemakers or other electrical implants (such as insulin pumps) must consult with their doctor or implant manufacturer before using this appliance to make sure that their implants will not be affected by the electromagnetic field. Failure to follow this advice may result in death.
1.1.2. Use in Accordance With the Intended Use
- This appliance is intended to be used in household and similar applications such as:
- staff kitchen areas in shops, offices and other working environments;
- farm houses;
- by clients in hotels, motels and other residential type environments;
- bed and breakfast type environments.
- Never use your appliance as a work or storage surface.
- Never use your appliance for warming or heating the room.
1.2. INSTALLATION
- If the supply cord is damaged, it must be replaced by the manufacturer, its service agent or similarly qualified persons in order to avoid a hazard.
- Connection to a good earth wiring system is essential and mandatory.
- This appliance is to be properly installed and earthed only by a suitably qualified person.
- Disconnect the appliance from the mains electricity supply before carrying out any work or maintenance on it in order to avoid a hazard, which could result in injury or cuts.
- Please make this information available to the person responsible for installing the appliance as it could reduce your installation costs.
- Failure to install the appliance correctly could invalidate any warranty or liability claims.
1.3 ELECTRICAL WARNINGS
• This appliance should be connected to a circuit which incorporates an isolating switch providing full disconnection from the power supply for all poles under overvoltage category III conditions. Means for disconnection must be in accordance with the wiring rules. - WARNING: in order to avoid any danger caused by the accidental resetting of the thermal interruption device, the appliance should not be powered by an external switching device, such as a timer, or be connected to a circuit that is regularly switched on and off. • The appliance is not intended to be operated by means of an external timer or separate remote-control system. • Alterations to the domestic wiring system must only be made by a qualified electrician. - Failure to follow this advice may result in electrical shock or death.
1.4 USE & MAINTENANCE
- WARNING: The appliance and its accessible parts become hot during use. Care should be taken to avoid touching heating elements. Children less than 8 years of age shall be kept away unless continuously supervised.
- WARNING: Unattended cooking on a hob with fat or oil can be dangerous and may result in fire.
- CAUTION: The cooking process has to be supervised. A short term cooking process has to be supervised continuously.
- Disconnect the appliance from the mains electricity supply before carrying out any work or maintenance on it.
- No combustible material or products should be placed on this appliance at any time.
- Metallic objects such as knives, forks, spoons and lids should not be placed on the hob surface since they can get hot. • A steam cleaner is not to be used.
- Do not use a steam cleaner to clean your cooktop.
- Do not store items on the cooking surfaces.
- Do not let your body, clothing or any item other than suitable cookware contact the Induction glass until the surface is cool.
- Handles of saucepans may be hot to touch. Check saucepan handles do not overhang other cooking zones that are on. Keep handles out of reach of children. Failure to follow this advice could result in burns and scalds.
- The razor-sharp blade of a cooktop scraper is exposed when the safety cover is retracted. Use with extreme care and always store safely and out of reach of children. Failure to use caution could result in injury or cuts.
- Do not place or leave any magnetisable objects (e.g. credit cards, memory cards) or electronic devices (e.g. computers, MP3 players) near the appliance, as they may be affected by its electromagnetic field.
- Do not repair or replace any part of the appliance unless specifically recommended in the manual. All other servicing should be done by a qualified technician.
- Do not place or drop heavy objects on your cooktop.
- Do not use pans with jagged edges or drag pans across the Induction glass surface as this can scratch the glass.
- Do not use scourers or any other harsh abrasive cleaning agents to clean your cooktop, as these can scratch the Induction glass.
- Do not use adapters for cooking vessels.
- WARNING: when one or more cooking zone shut down, the presence of residual heat is indicated by a visual signal on the corresponding zone display, by way of the H symbol. When this symbol is active, be careful not to touch the hob, or there is a risk of burns.
1.5 WARNINGS Wireless Temperature Probe (available depending on the model)
This product is exclusive for hobs appliances. It should only be used as described in this User Manual.
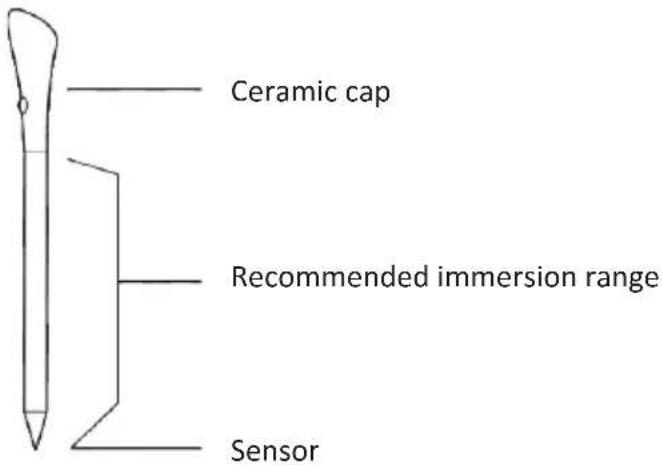
- DO NOT TOUCH Preci Prob WITH BARE HANDS JUST AFTER COOKING. Always wear oven gloves to remove Preci Probe from the food after cooking.
- It is required to FULLY INSERT Preci Probe metal bar properly into the food until the BLACK ceramic EDGE of it during cooking.
insert Preci Probe in the food up to here
- Do not use Heat Feel Sensor in a microwave oven.
- Heat Feel Sensor can be cleaned and washed but do not immerse it long in water.
- This product is not intended for use by persons with ages 12 and under.
- The supplier will not be liable for any damage of Heat Feel Sensor due to misuse of the device.
- Clean the Heat Feel Sensor before the use.
- Probe can work in this range of temperature: 10°C to an internal maximum temperature of 100°C of the metal part. Ceramic part can reach 350°C .
- If the Heat Feel Sensor temperature exceeds 100°C, cooking will stop and the Heat Feel Sensor must be removed from the oven as soon as possible, wearing gloves, to avoid damage to the probe.
2. PRODUCT INTRODUCTION
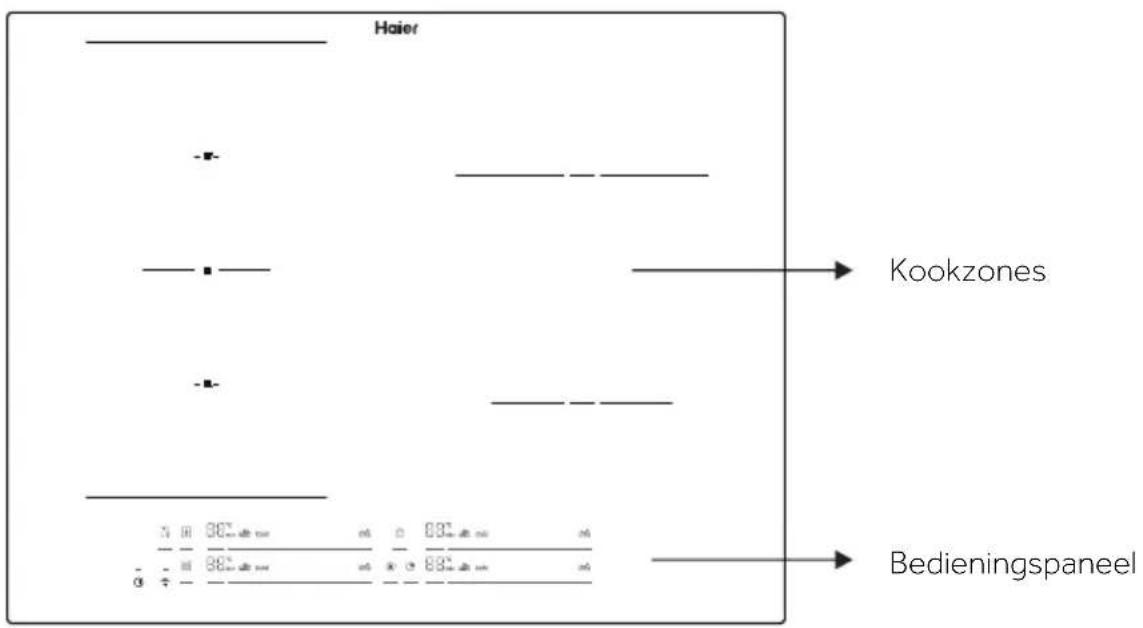
2.1 TOP VIEW OF THE PRODUCT
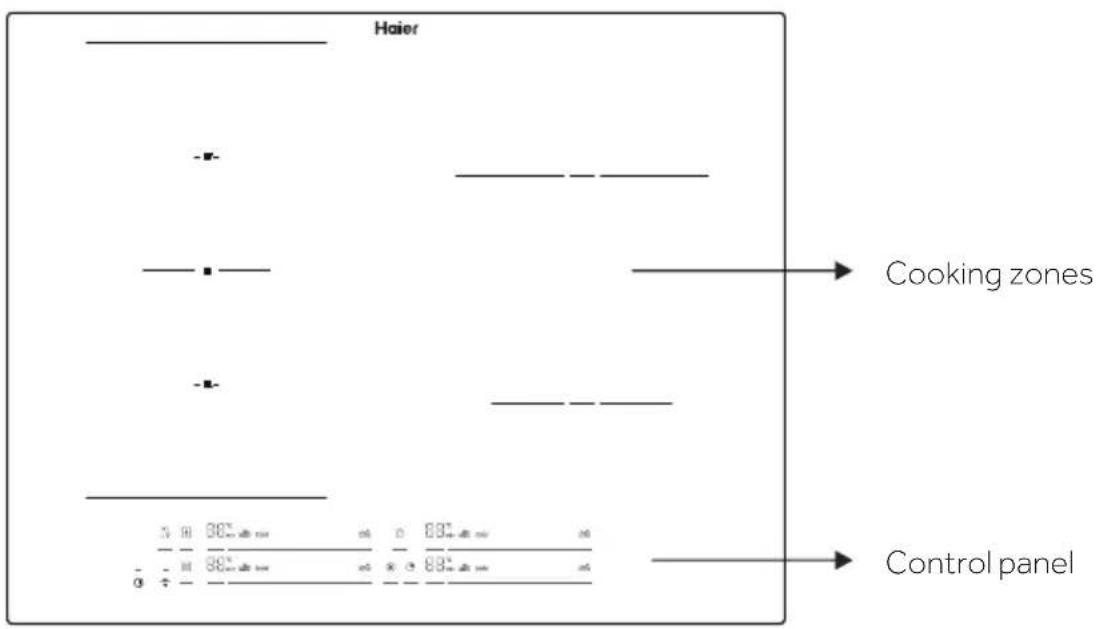
2.2. CONTROL PANEL
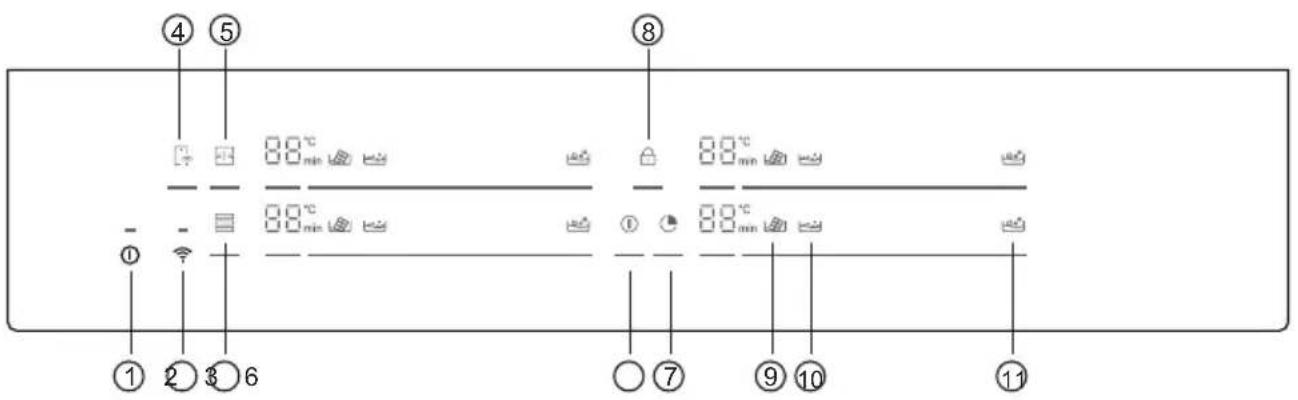
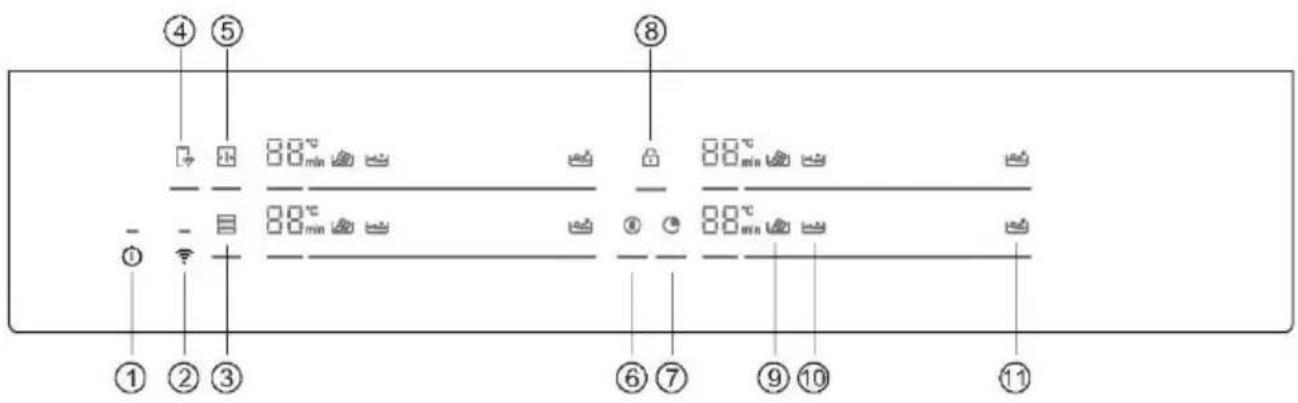
- ON/OFF
- WIFI
- Varycook
- Remote Control
- Full Zone
- Pause
- Timer
- Child lock
- Melting 10. Simmering 11. Boiling
3. BEFORE STARTING
3.1 GENERAL INFORMATION
Before you begin, it is important to know: all functions of this hob are designed in order to comply with the most stringent safety regulations.
For this reason:
- Some functions will be activated, or will be automatically deactivated in absence of pots on the burners or when they are not correctly positioned.
- In other cases, functions will be automatically deactivated after a few seconds when it requires more than one step (e.g. "SWITCHING ON/OFF THE HOB" without "SELECT THE COOKING ZONE").
- In case of longtime use, the appliance may not immediately shut down, even with all the cooking zones off, because it is in the cooling phase; the H symbol appears on the cooking zone display until it is cooled.
Safe activation: the product is activated with the presence of pots on the cooking zone. The heating process does not start or is interrupted if there are no pots or if these are removed.
Pot detector: after the hob is switched on, the product automatically detects the presence of pots on the cooking zones, even before activating them.
Safety shut down: for safety reasons, each cooking zone has a maximum operating time, which depends on the maximum power level set (p.13).
3.2. POWER MANAGEMENT
When product is first used, the hob is set to maximum reachable power. Different power limits can be chosen according with home main supply system by using power management function.
How to set the power management
It is possible to set a maximum power absorption level for the Induction hob, choosing up to different power ranges.
Induction hobs are able to limit themselves automatically in order to work at lower power level, to avoid the risk of overloading.
To enter Power Management Function:
- Turn on the hob, then press at the same time 📄 and Ⓐ.
- The timer indicator will show "P8" which means power level 8. The default mode is on 7.4 kW.
To switch to another level
- Scroll left and right the slider to change the power management level.
- There are 8 power levels, from "P1" to "P8". The timer indicator will show one of them:
| P1 P2 | P3 P4 | P5 P6 | P7 P8 | ||||
| 2kW | 2,5kW | 3kW | 3,5kW | 4,5kW | 5,5kW | 6,8kW | 7,4kW |
Confirmation and Exit Power Management Function
For confirmation, turn off the hob. The power level will be saved automatically. The selected value is permanently stored and remains even after power down of the main supply. To change the power level, repeat the operations described above.
NOTE: depending on the power management selection, some power levels and functions of the cooking zones could be automatically limited so as not to exceed the selected value. In particular, in case of a power management level set to less than 4.5 kW, the Boost function, Varycook, and some cooking preparations with the app may not be selectable.
In particular, the last power level selection can be refused or adjusted according to the available amount of residual power from the previous setting.
3.3. CHOOSING THE RIGHT COOKWARE
3.3.1. Characteristics of the cookware
Use only pots with the induction symbol.
- Only pots with a perfectly flat bottom. Otherwise, the following situations may occur:
- No pot detection;
- Low performance;
- Unwanted noise.
- Only pots with a smooth base, to avoid scratching the hob surface;
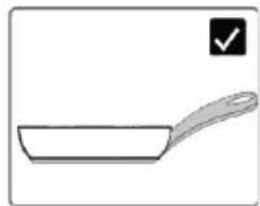
NOTE: avoid as much as possible moving pots on the glass surface to minimize scratches.
Magnet test
Induction cooking uses magnetism to generate heat; pots must therefore contain iron. If you already have a cookware, you can check if the material is magnetic by using a magnet. Pots are suitable if they are magnetically attracted by the magnet.
Cookware made from the following materials are not suitable: pure stainless steel, aluminum or copper without a magnetic base, glass, wood, porcelain, ceramic, earthenware.
3.3.2 Higher quality cookwares
All cookwares with the induction symbol are generally accepted. Depending on the type of bottom, however, the behavior may vary: in particular, the last power level selection can be refused or adjusted according to the available amount of residual power from the previous setting.
When using large cookware with a smaller ferromagnetic element, only the ferromagnetic element heats up. Consequently, heat might not be uniformly distributed.
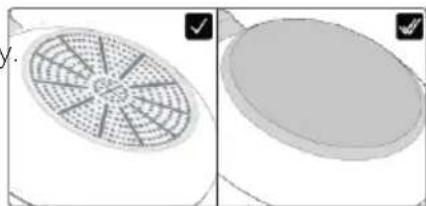
3.3.3. Dimension & placement
Always use the cooking zone that best matches the bottom diameter of the pan. Place the pot making sure it is well centered in the cooking area.
NOTE: it's recommended not to use pans that exceed the perimeter of the cooking zone.
For the correct working of the hob, it's necessary to use pots with the bottom diameter inside the range described in the following table.
min.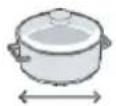 max. max. | 120 mm | 220 mm | 160 mm | 140 mm | 90 mm |
| 220 mm | 220 mm | 200x380 mm | 210 mm | 150 mm |
NOTE: by using a cookware smaller than the minimum required, it could not be detected. While using one bigger than the maximum required, malfunctions or low performances may occur.
ATTENTION: do not put the pot on/near the control panel during cooking or cooling down.
4. OPERATION OF PRODUCT
4.1 HOW THE PRODUCT WORKS

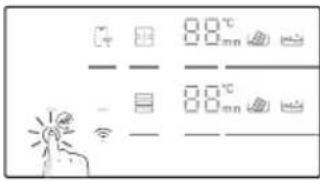
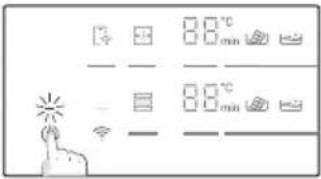
SWITCHING ON/OFF THE HOB
To switch on/off the hob, press and hold for a while. A dedicated sound will indicate the status of the appliance.

SELECT THE COOKING ZONE AND SET THE POWER
The hob can automatically detect the pot once it is placed on the cooking zone by lighting the related zone indicator. There will not be a power level activation at this stage.
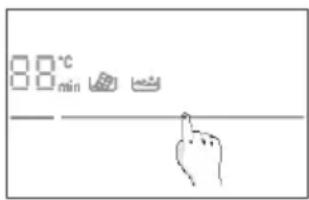
Zone can be selected by pressing the zone indicator.
The power can be set:
Sliding the finger on the slider;
Pressing directly on the right level.
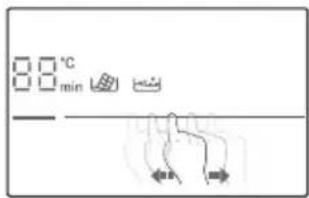
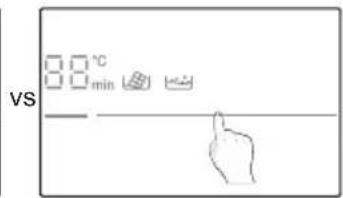
User can change power level during cooking, repeating the same process.
The digits will show the power level set: each cooking zone has a different number of power levels that goes from 1 (min) to 14 (max). Each level has an automatic shut down that could vary from 1h to 8h.
| Power level | 1 2 3 4 5 6 7 8 9 10 11 12 | 13 14 | |||||||||
| Time (h) | 8 8 5 4 3 3 2 2 2 2 2 2 2 1 |
BOOST FUNCTION: it is also possible to choose the rapid heating by pressing the slider in correspondence of the 15.
- The function can be used in any cooking zone;
- After 10 minutes, the boost function automatically switches to level 14.
ATTENTION: after switching on the cooktop or after ending all cookings, if then any power level is set within one minute, the hob switches off.
If the display shows ✕, this means that:
• The pot is not positioned in the selected cooking zone; • The pan is not correctly positioned/not placed at all on the hob; • Pot isn't suitable for the induction; - Dimensions of the pot are smaller than minimum pot diameter requested in the selected zone (p.12). - If suitable pot is not placed within 1 minute cooking zone switches off.
H: once this symbol appears on the digits means that the cooking zone is still hot. When the surface is cooled down to a safe temperature the symbols disappears.
PAUSE
All the hobs can be put in pause by pressing the related key instead of being shut off.
To activate this function press Ⓢ. All the zone indicators will show Ⓢ and cooking is stopped. To deactivate press Ⓢ and previous power settings will be restored.
WARNING: When entering Pause mode, all the controls except the ON/OFF control are disabled. In this way the induction hob can always be turned off with the ON/OFF control in case of emergency.
TIMER
To select timer for one zone, press ⬆ and select the zone. On the digit display appears and, by scrolling the slider left and right, it's possible to adjust the desired timing.
When time is elapsed, the selected cooking zone will be switched off. Timer counts up to 60 min.
A maximum of four timers can be set at the same time, one for each zone.
KEY LOCK
Hob can be locked by pressing to prevent unattended use.
When the appliance is locked, all the controls except the ON/OFF button are disabled.
To activate/deactivate the function press and hold for a while.
These functions can be activated after zone selection:
MELTING
Function used mainly for melting chocolates. After few minutes, when chocolate begins to melt, move to level 1 to keep it liquid without exceeding the ideal temperature.
SIMMERING
Function used for creams, sauce or generic low temperature liquid.
BOILING
Function used for water boiling and boil maintenance.
NOTE: any time cooking related to each function can be adjusted by selecting different power levels close to the suggested one
FULL ZONE
The Full zone is a cooking area that is a combination of more cooking zones in front and rear positions by creating a unique vertical zone. The Full zone, when activated, is controlled with one power level only.
To activate the function press ☐. Only the upper digits will show feedbacks. The lower digits are switched off.
To deactivate long press the zone selector ☐.
Pots shall be placed as indicated in the picture on page 12.

VARYCOOK ZONE
This function is used to pre-set fixed power levels in three different areas according with the position of the pot: high (l.14), medium (l.10), low (l.1).
- If the pot is on the front of Varycook zone, the power level is set to 1;
- If the pot is on the middle of Varycook zone, the power level is set to 1.10;
- If the pot is on the rear of Varycook zone, the power level is set to 1.14.
To activate the function long press the zone selector ☐. Only the upper digits will show feedbacks. The lower digits are switched off.
To deactivate long press the zone selector.
4.2. CONNECT TO hOn APP
Your appliance may be connected to your home wireless network and operated remotely using the app. Connect your appliance to ensure it stays up to date with the latest software and features.
NOTE
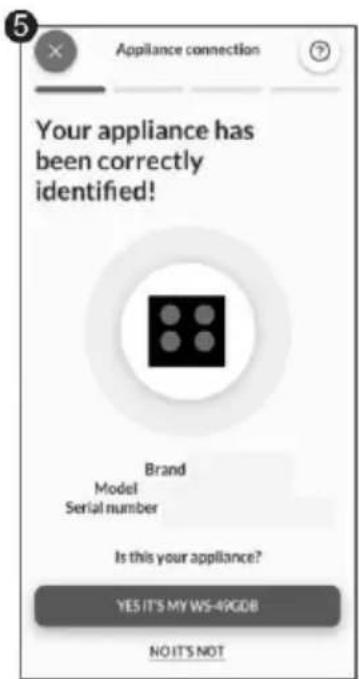
- Once the hob is turned on, the WIFI icons blinks for 30 minutes. During this period it's possible to enroll the product. • Ensure your home Wi-Fi network is turned on. • You will be given step by step guidance on both your appliance and mobile device. • It may take up to 10 minutes to connect your hob.
- For further guidance and troubleshooting, please refer to the app.
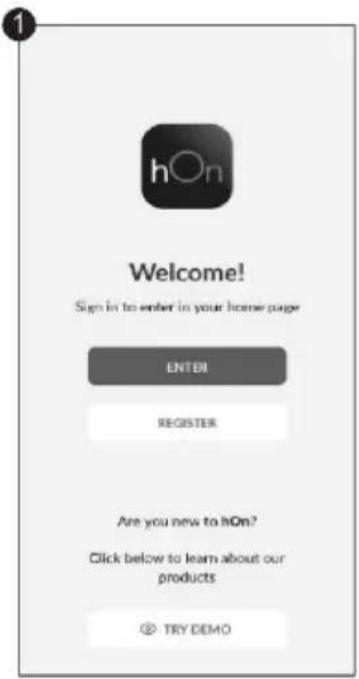
Download hOn App on your smartphone.




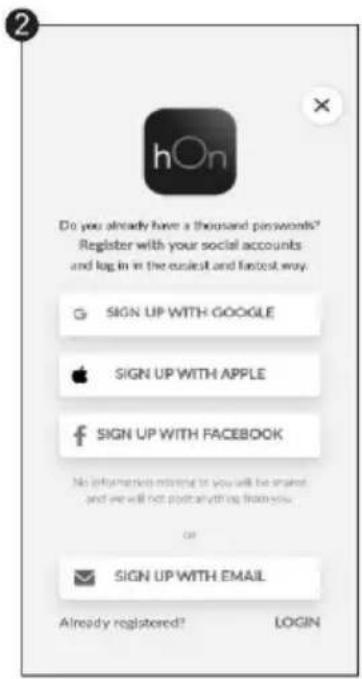
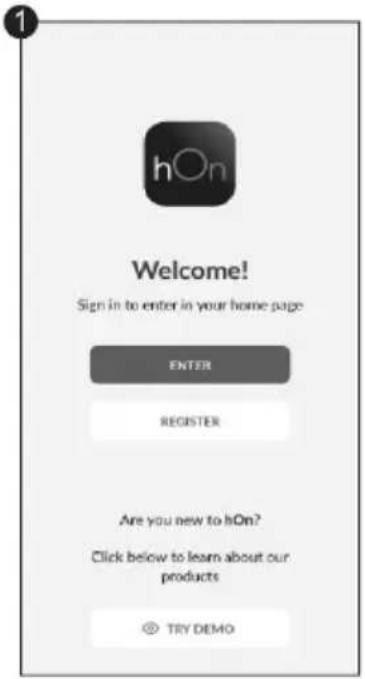
New User Registration
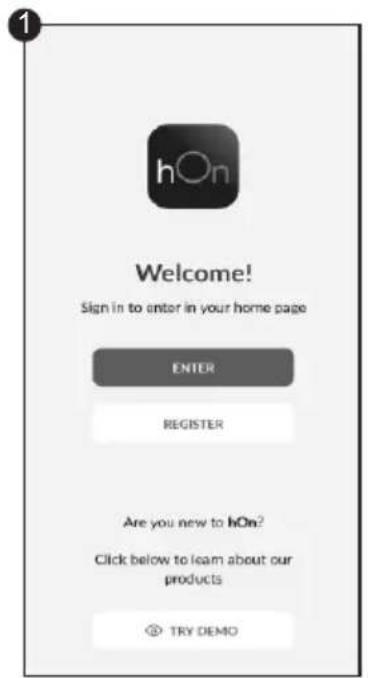
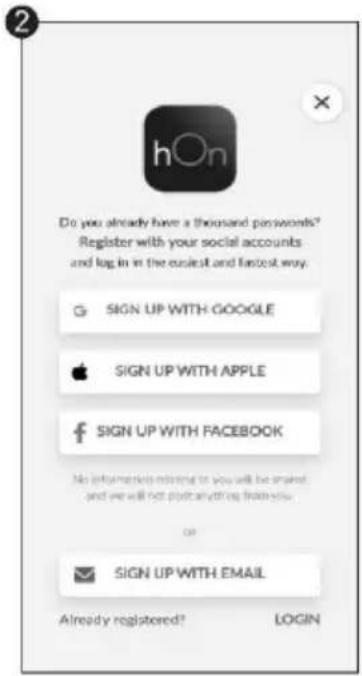
Click on "Register"
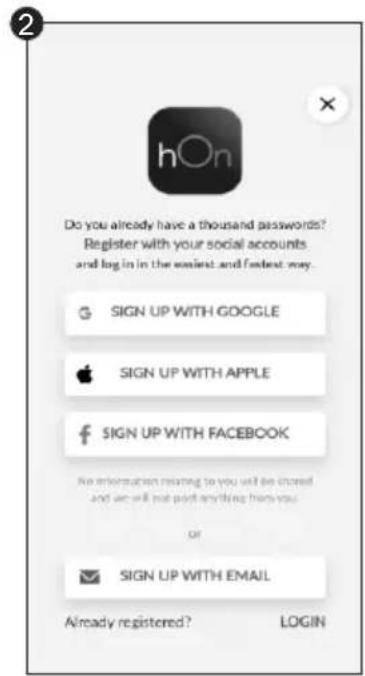
You can register through social accounts or sign up with your personal email
Quick Pair Enrollment
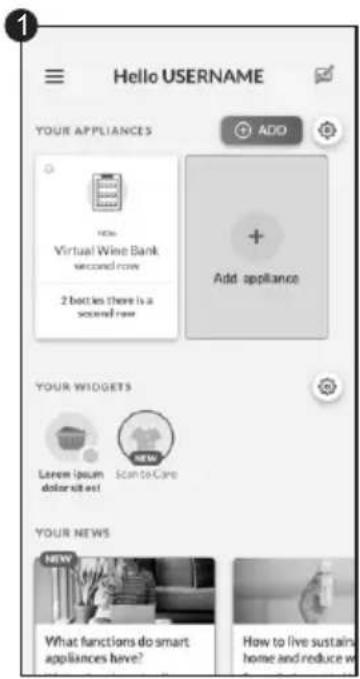
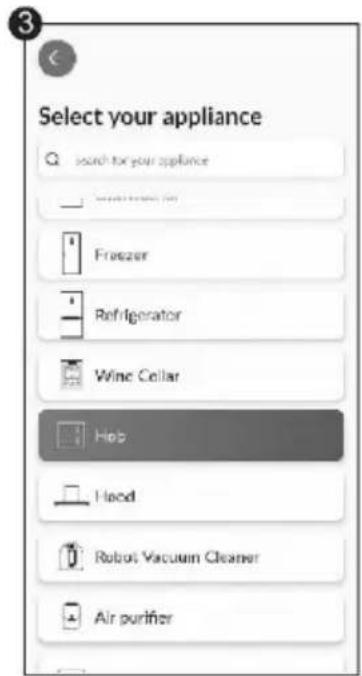
Select "Add appliance"
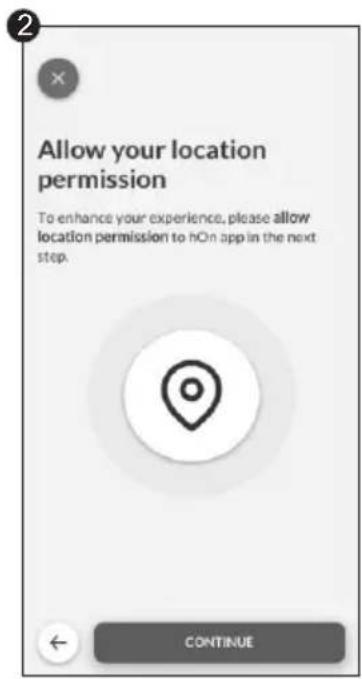
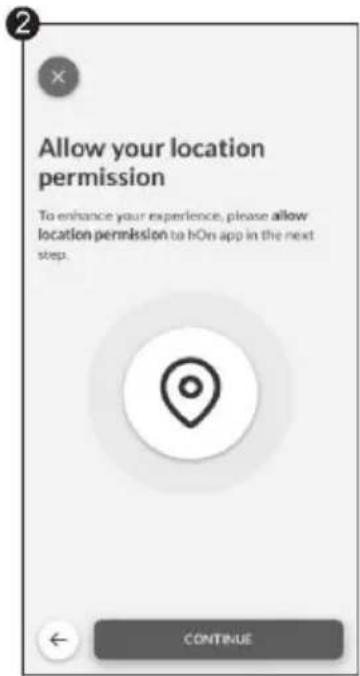
Allow your location permission
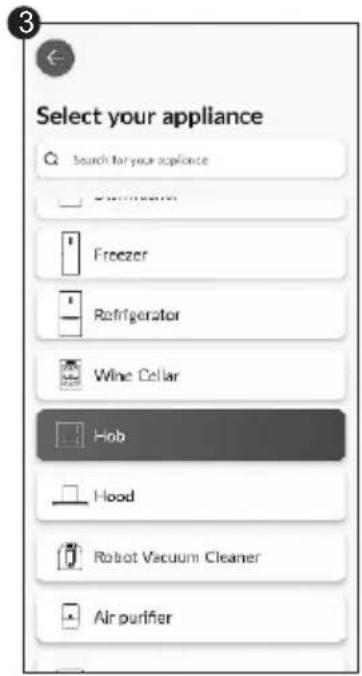
Select Hob from the appliance category
Quick Pair Enrollment
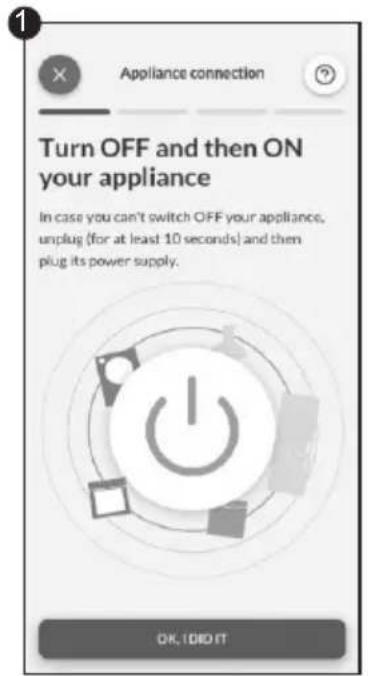
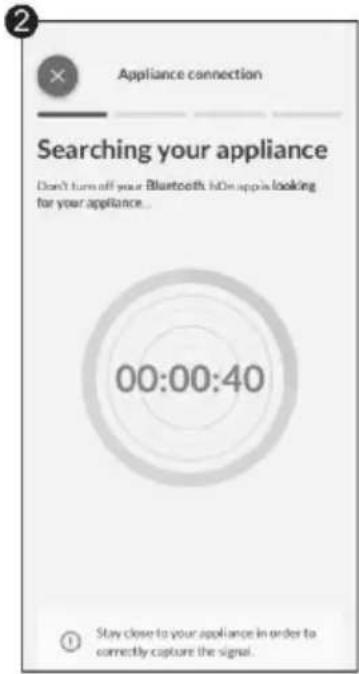
Turn on your appliance; if it is already on, turn it off and on again
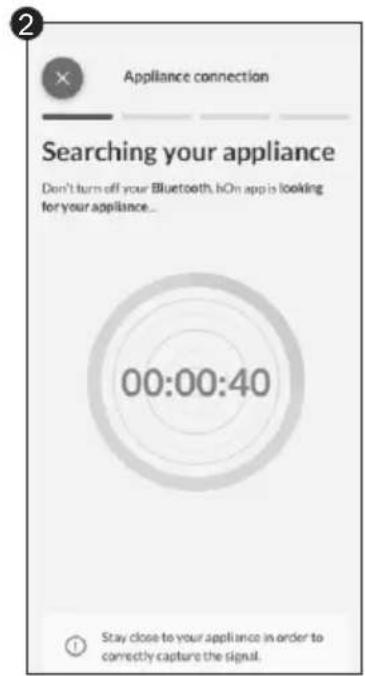
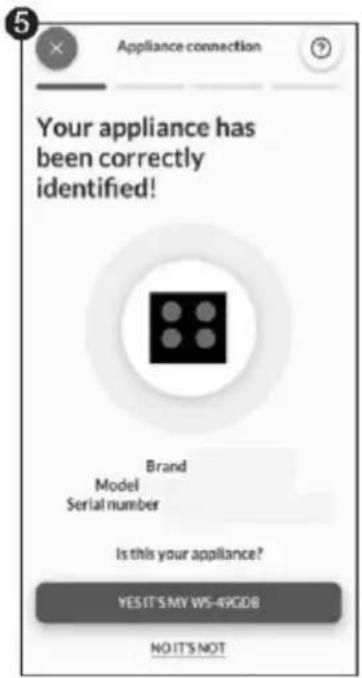
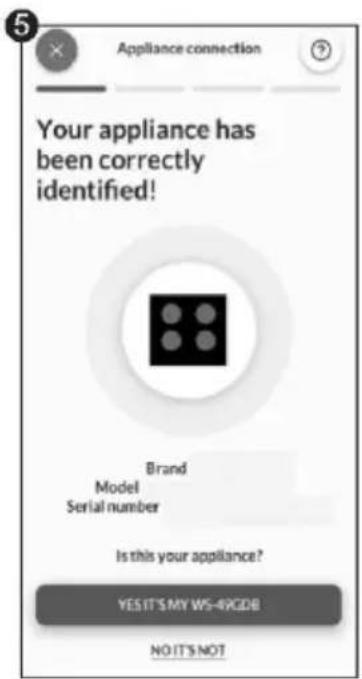
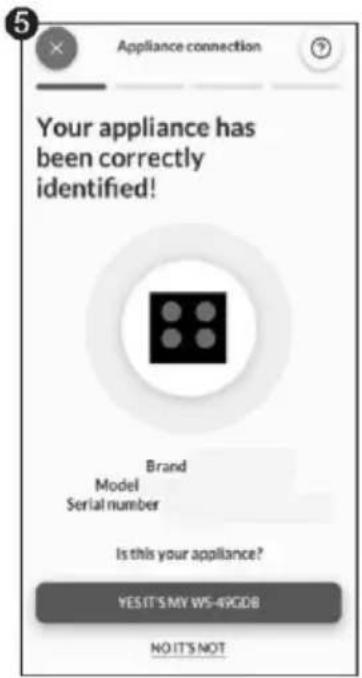
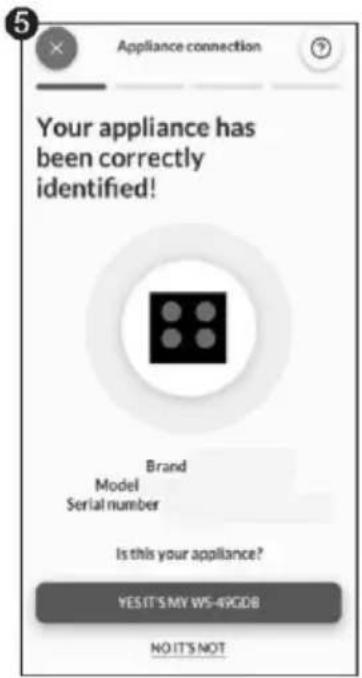
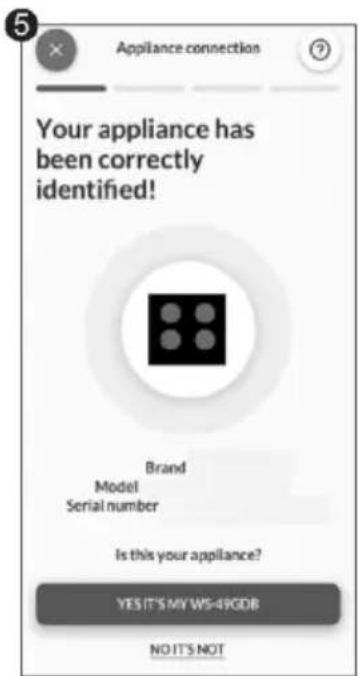
After turning on, the hOn app will start searching for your home appliance
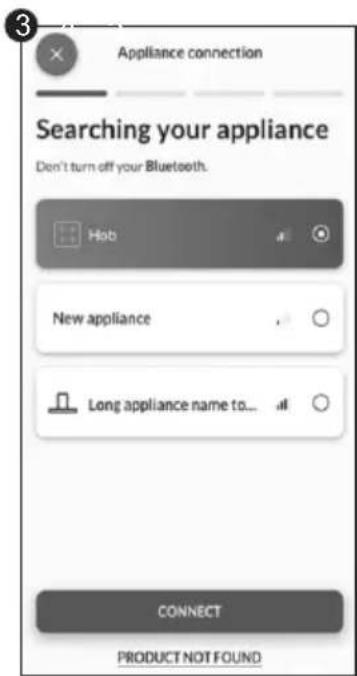
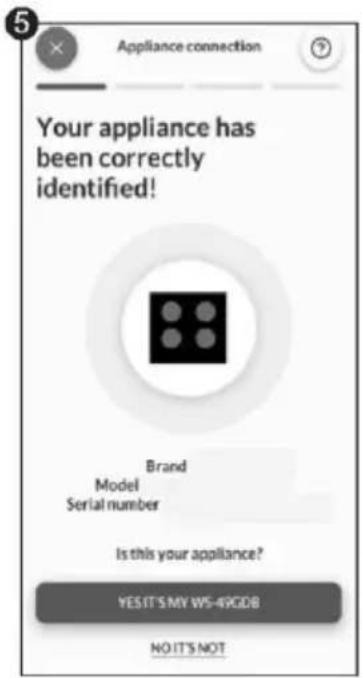
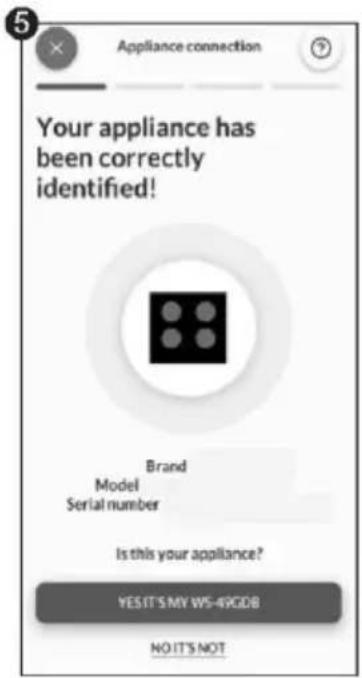
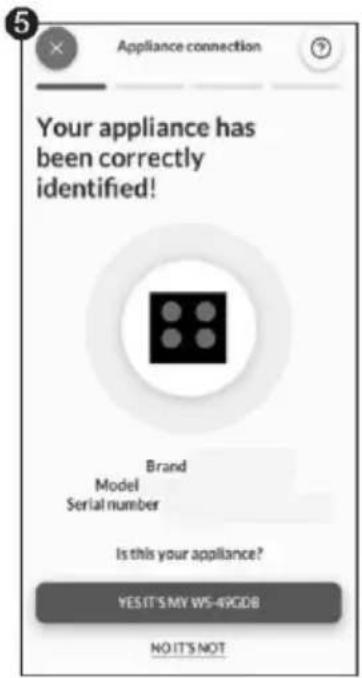
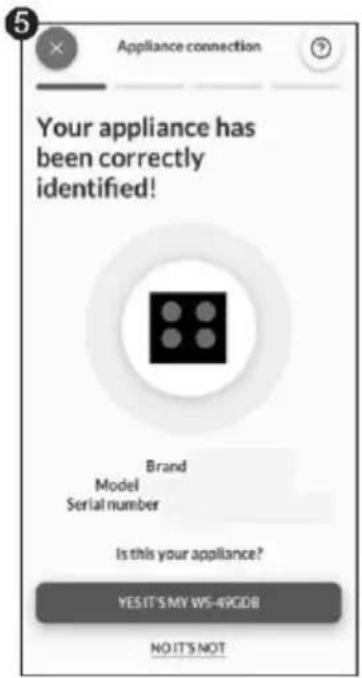
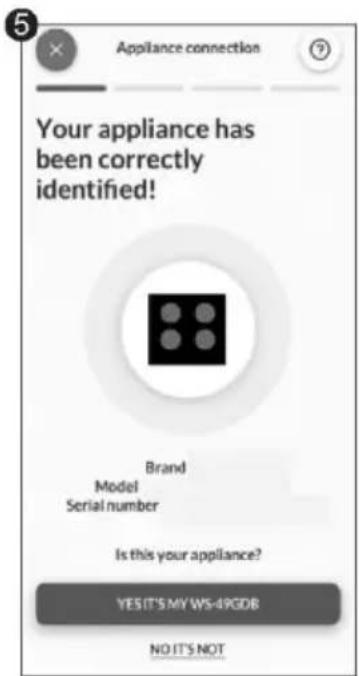
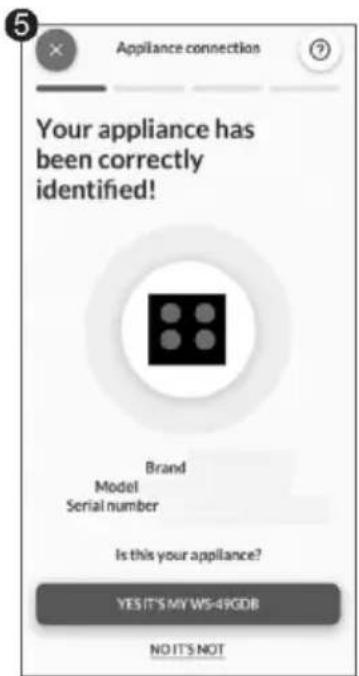
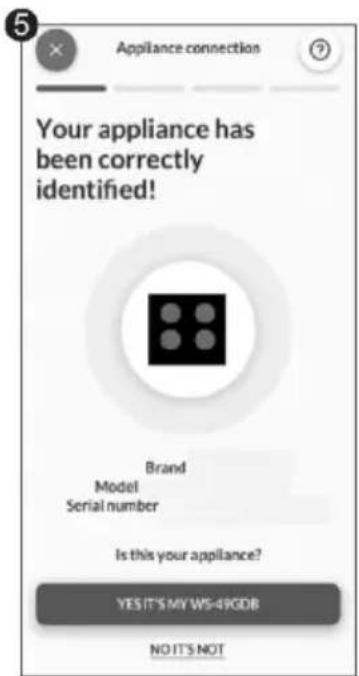
Select your home appliance, tap on "connect" and wait a few seconds
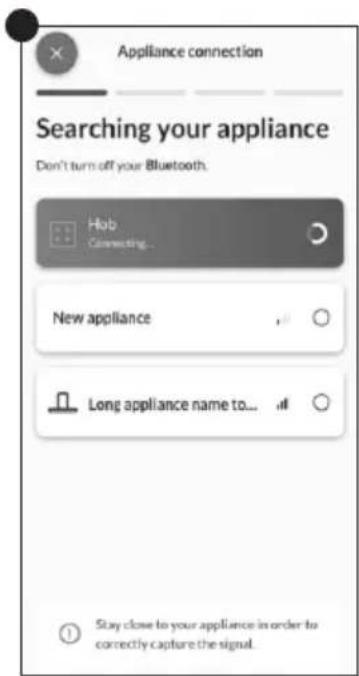
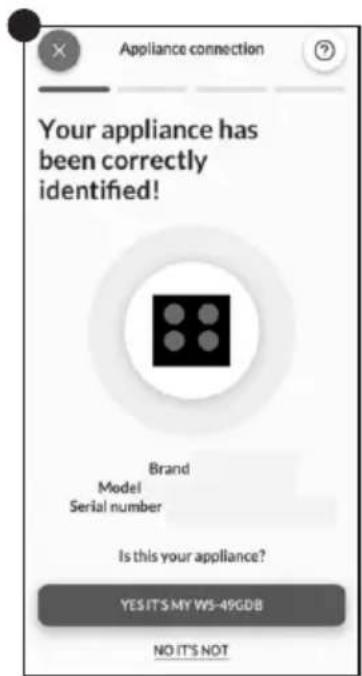
Your Hob will be found and you can display and set functions/recipes through hOn
Choose from the hOn App recipes menu or special programs menu. Follow step by step the indications on the App and when you have finished send the parameters to the hob that will cook for you.
When the hob receives the command from the app, the hob will beep for 2 times and blink for one second to indicate that the instructions have been received.
To start the recipe, press the "My Chef" button.
If you want to get out of "My Chef" function press 3 sec.
*Cooking results may vary due to used cookware.
WIRELESS PARAMETERS
| Technology | Wi-Fi | Bluetooth |
| Standard | IEEE 802.11b/g/n | Bluetooth v4.2, BR / EDR, BLE |
| Frequency Band (s) [MHZ] | 2401÷2483 | 2402÷2480 |
| Maximum Power [mW] | 100 | 10 |
Hereby, Candy Hoover Group Srl declares that the radio equipment is in compliance with Directive 2014/53/EU and with the relevant statutory requirements for the UK market. The full text of the declaration of conformity is available at the following internet address: www.candy-group.com
PRECI PROBE MODEL Et180 WIRELESS PARAMETERS:
| Technology | Bluetooth |
| Standard | Bluetooth v4.0 BLE |
| Frequency Band (s) [MHZ] | 2400÷2480 |
| Maximum Power [mW] | 2.5 -(4dBm) |
4.3 ACCESSORIES
4.3.1. PRECI PROBE & LADLE-Intelligent Wireless Food Thermometer (available depending on the model)
Thank you for purchasing Haier Preci Probe. Please note it works only with Haier induction hob and before using it please read the following instruction and safety notes included in the user manual.
Introduction: Preci Probe is a wireless food thermometer that gives home chefs real-time status inside the food to avoid undercook or overcook disasters and ensuring the perfect result every time. It connects directly to the product. Details and the real-time status of the food can be read from your phone, giving you the best result at your fingertips. For further information on pairing and use tips, please refer to the instructions below.
CHARGE THE PRECI PROBE BEFORE USING:
• Put Preci Probe into the charger and close the cover; - Connect the charger to a USB power source, such as a USB adapter or USB socket of PC/notebook with the USB cable. The charger may not work properly with a power bank because of its auto switch-off function; - LED of the charger will turn on and flash during charging. It will turn off when Preci Probe is fully charged.
PAIR THE PRECI PROBE WITH THE INDUCTION HOB:
• Make sure the hob is turned on and your Preci Probe is fully charged; - Go to the hOn APP from your portable device; - Go to the Recipes section and choose a recipe that uses Preci Probe; - Once you start the recipe by pushing the "Cook with me" button on the appliance, the Preci Probe will connect automatically; • The app lists all available probes that can be selected for the recipe; - The hob display will indicate the name of the selected Preci Probe (ex "1A"); • Now follow the instructions from the hOn APP; - When using the app, if the probe is under 20% of charge, the Timer display will indicate "CH".
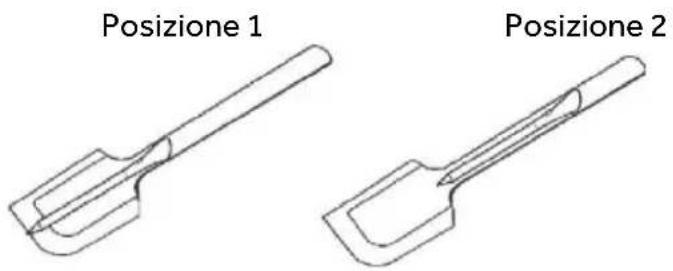
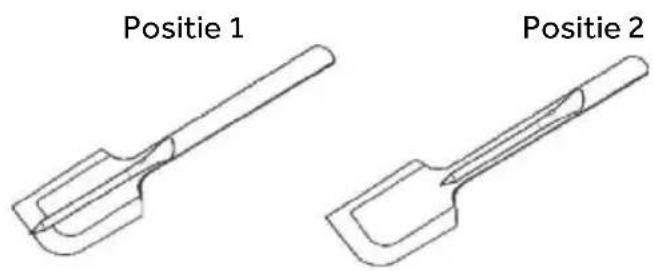
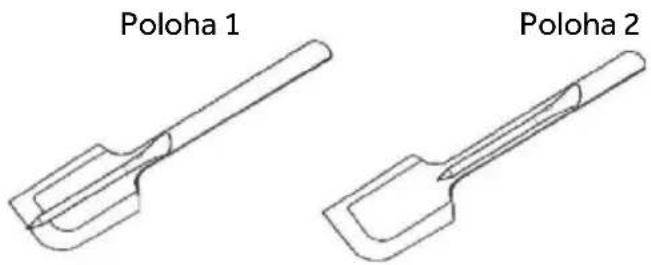
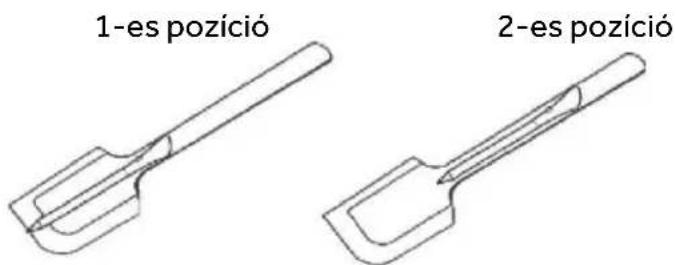
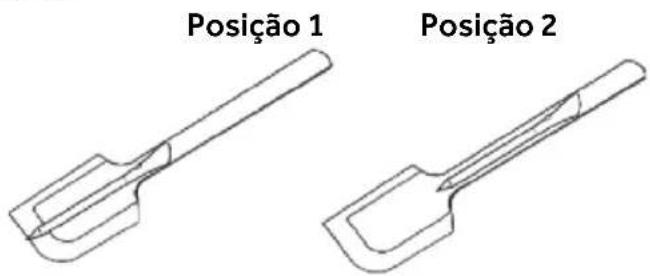
LADLE
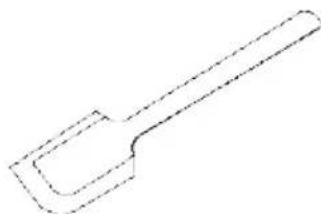
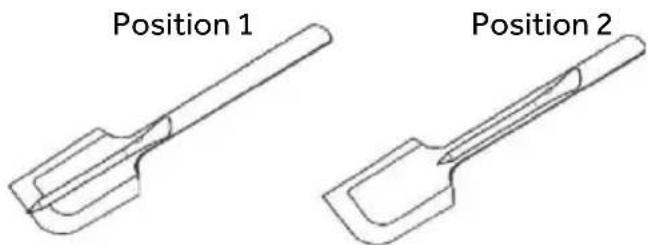
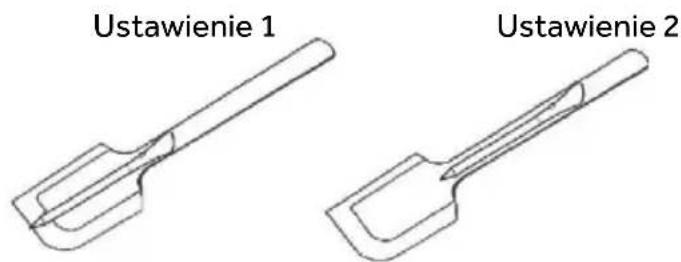
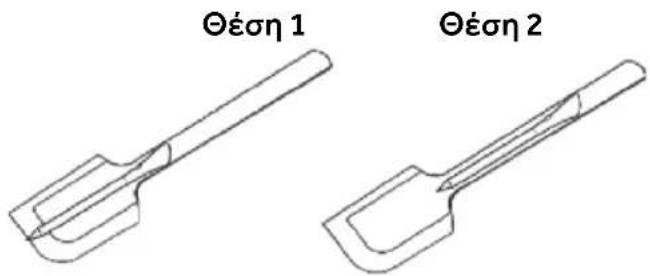
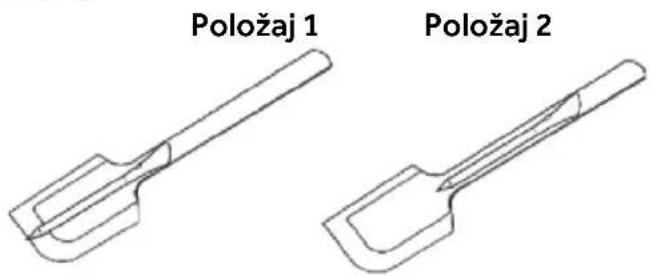
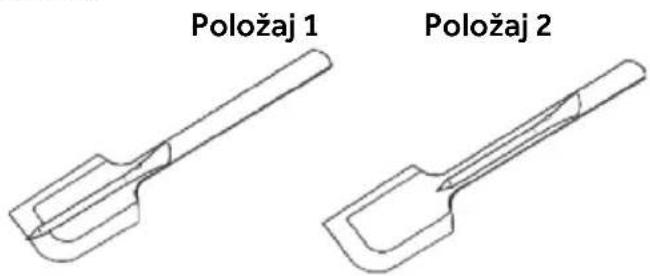
Use the ladle with the probe to stir food during your cooking.
- Clean the ladle before the first use.
- Do not use the ladle on an open flame.
- Do not cut the ladle.
- Do not put the ladle in direct contact with the hot accessible parts of the hob. • Tolerated temperature +220°C
Position 1 Position 2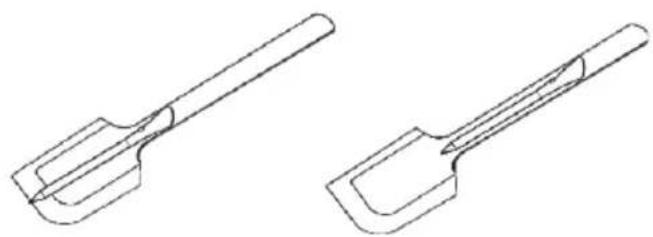
4.4. COOKING PREPARATIONS WITH THE APP
Preci Probe as thermometer
Set in the hOn App the target temperature you want to reach, insert the Preci Probe inside the food or with its accessory inside liquids and you will see the temperature raising from the app until reaching the target temperature.
It will help you to accurately maintain the temperature for all kinds of food. You cannot use it when the Assisted Cooking function operates.
Assisted Cooking: "Cook with me" function
Choose from the hOn App recipes or special programs, follow step by step the preparation and then the hob will automatically set the parameters for the chosen cooking method.
Sous Vide
Type of cooking in which the food is placed in a vacuum bag and cooked in a low temperature water bath.
The food prepared in this way will be more juicy and tender and will keep the nutritional properties intact, making it healthier and tastier.
Go on the hOn App select the category of food, select this type of cooking, insert the bas with the food in the pot with water and the induction hob will set the correct cooking temperature for a perfect result.
Grill
Select the category of food from the hOn App, select this type of cooking and the induction hob will automatically bring the grill to the correct temperature in a predetermined time.
Simmering
The simmering function is ideal for cooking sauces, stews, braised dishes and all preparations with an average long cooking time.
The automatic function you find on the hOn App will gently bring the food to a slightly boiling temperature, keeping it for all the duration of cooking.
Steaming
With the steaming function you can steam food such as vegetables, meat or fish in pots equipped with a steamer basket. Steam cooking is faster than boiling, as it is not immersed in a liquid it disperses less nutrients contained in the food and preserves its vitamin content, improving its taste and structure which will be more compact and pleasant.
If necessary, contact the authorized service center.
5.1 POWER TABLE
| POWER LEVEL | TYPE OF COOKING SUGGESTED USE | |
| 14/15 BOOSTER | Fast Heating, Booster | Ideal for stir-frying, searing, bringing soup to the boil, boiling water |
| 11-13 | Frying, Grilling, Keep Boiling | Ideal for starting cooking, sautéing, cooking pasta, deep frying, grilling |
| 5-10 | Stewing, Cooking | Ideal for preheat stewing, keep gentle boiling, cooking, long & continuos frying (rice, roast, pancakes*) |
| 3-4 | Simmering, Keep Warm, Slow Cooking | Ideal for slow cooking recipes, gentle simmering, cream sauces and liquid |
| 1-2 | Melting, Keep Liquid, Defrosting | Delicate warming for small amounts of food, slow warming, melting & keep liquid chocolate** |
| OFF | - | - |
Continuous frying pancake at level 5-6. **Melting Level 2, when begins to melt, move to level 1 to keep liquid.
5.2. COOKING TABLE
| FOOD CATEGORY | RECIPE | Preheat | Cooking | |
| Heating Phase | Power Level Power Level | |||
| Pasta & rice | Pasta | Heating Water | 14 - 15 6 - 11 | |
| Rice Pudding | Heating Milk | 13 - 15 6 - 8 | ||
| Boiled Rice | Heating Water | 14 - 15 | 6 - 8 | |
| Risotto | Stir-frying & Roasting | 13 - 15 | 6 - 8 | |
| Meat | Roast Meat | Stir-frying & Roasting | 10 - 13 | 6 - 11 |
| Grilled Steak | Preheat Grill | 10 - 13 | 10 - 13 | |
| Sausages & Hamburger | Preheat Grill | 10 - 11 | 10 - 13 | |
| Chicken Pieces | Preheat Pan | 10 - 11 | 6 - 10 | |
| Breaded Steak | Preheat Pan | 6 - 11 | 10 - 13 | |
| Fish | Grilled Fish | Preheat Grill | 10 - 13 | 8 - 10 |
| Fillet Fish | Stir-frying | 10 - 13 | 8 - 10 | |
| Shrimps & Prawns | Stir-frying | 10 - 13 10 - 13 | ||
| Vegetables & legumes | Fresh Frying Potatoes | Heating Oil* | 14 | 11 - 14 |
| Frozen Frying Potatoes | Heating Oil* | 14 | 11 - 14 | |
| Grilled vegetables | Preheat Grill | 6 - 11 | 10 - 13 | |
| Peppers, Zucchini & Eggplant | Preheat Pan | 6 - 11 | 10 - 13 | |
| Eggs & Egg products | Hard Boiled Eggs | Heating Water | 14 - 15 6 - 8 | |
| Fried Eggs | Stir-frying | 10 - 13 | 8 - 10 | |
| Pancakes | Preheat Pan | 6 - 11 | 5 - 7 | |
| Sauces, Creams & Dessert | Tomato Sauces | Heating Sauces | 4 - 6 2 - 4 | |
| Melted Cheese | Melting | 6 - 11 | 2 - 5 | |
| Cream & Custard | Heating Cream | 4 - 6 2 - 4 | ||
| Melted Chocolate | Melting | 1 - 2 1 | ||
| Butter | Melting | 1 - 3 1 - 3 | ||
6.1 GENERAL RECOMMENDATIONS
Regular cleaning can extend the lifecycle of your appliance.
• Clean the hob after each use; • Always use cookware with a clean base; • Scratches on the surface have no effect on how the operates; • Use a special cleaner suitable for the surface of the hob; • Use a special scraper for the glass.
6.2. CLEANING THE HOB
Before procedure with the cleaning, make sure that the cooking zones are turned off. Always remember to follow the recommended cleaning instructions and avoid using abrasive products that could damage the surface of the cooktop.
a) FATTYSOIL
This procedure is recommended for these kinds of scenarios; splatters caused by frying or grilling meat.
- Let the hob cooldown.
- Absorb any excess liquid around the pot with kitchen paper, then remove the pot.
- Clean the cooking surface with a cloth and detergent solution.
- If necessary, clean the hob a second time using hot water and cleaner for induction hob glasses.
b) SUGARYSOIL
This procedure is recommended for foods that, due to their high sugar content, need to be promptly removed to prevent damage to the hob surface (syrups, jams, or preserves).
- When the hob is still warm, absorb any excess liquid around the pot with kitchen paper, then remove the pot.
- If necessary, we recommend using a scraper at an acute angle to remove any remaining residue.
- Clean the cooking surface with a detergent solution and dry it with the kitchen paper.
- If necessary, clean the hob a second time using hot water and cleaner for induction hob glasses.
c) STARCHY SOIL
This cleaning procedure is recommended for these kinds of foods: pasta, rice and potatoes.
- Absorb any excess liquid around the pot with kitchen paper, then remove the pot.
- Let the hob cool down.
- Use a damp cloth to moisten any starch residues. Allow it to sit for a couple of minutes.
- Clean the cooking surface with a cloth and detergent solution. After cleaning, wipe the hob dry with a soft cloth.
- If necessary, clean the hob a second time using hot water and cleaner for induction hob glasses.
NOTE: Please consider these instructions also for water rings, limescale rings, and fat stains.
d) SHINY METALLIC DISCOLORATION
Use a solution of water with vinegar and clean the glass surface with a cloth.
7. FAILURE DISPLAY & INSPECTION
7.1 TROUBLESHOOTING
| Problem | Possible causes | What to do |
| The induction hob cannot be turned on. | No power. | Make sure the induction hob is connected to the power supply. Check whether there is a power outage in your home or area. If the problem persists, call a qualified technician. |
| The touch controls are unresponsive. | The controls are locked. | Unlock the controls by checking the section 'How product works'. |
| The touch controls are difficult to operate. | There might be water residue on the controls, or you might not be applying the correct pressure to the buttons. | Make sure the touch control area is dry and use the right pression when touching the controls. |
| The glass is being scratched. | Rough-edged cookware. Unsuitable, abrasive scourer or cleaning products being used. | Use cookware with flat and smooth bases. See 'Choosing the right cookware' and "Care and cleaning" sections. |
| Some pans make crackling or clicking noises. | This may be caused by the construction of your cookware (layers of different metals vibrating differently). | This is normal for cookware and does not indicate a fault. |
| The induction hob makes a low humming noise when used on a high heat setting. | This is caused by the technology of induction cooking. | This is normal, but the noise should quieten down or disappear completely when you decrease the heat setting. |
| Fan noise coming from the induction hob. | A cooling fan built into your induction hob has come on to prevent the electronics from overheating. It may continue to run even after you've turned the induction hob off. | This is normal and needs no action. Do not switch the power to the induction hob off at the wall while the fan is running. |
| Pans do not become hot and "U" appears in the dis play. | The induction hob cannot detect the pan because it is not suitable for induction cooking. The induction hob cannot detect the pan because it is too small for the cooking zone or not properly centred on it. | Use cookware suitable for induction cooking. See section 'Choosing the right cookware'. Centre the pan and make sure that its base matches the size of the cooking zone. |
| The induction hob or a cooking zone has turned itself off unexpectedly, a tone sounds and an error code is displayed (typically alternating with one or two digits in the cooking timer display). | Technical fault. | Please note down the error letters and numbers, switch the power to the induction hob off at the wall, and contact a qualified technician. |
7.1.2 ERROR CODES
| ERROR CODE | RULE OF DISPLAY | ACTIONS | |
| E0 | Call ASA | ||
| Front left | |||
| E1 | Call ASA | ||
| Front left | |||
| E2 | Call ASA | ||
| Front left | Perform manual configuration via user manual | ||
| E3 | Call ASA | ||
| Call ASA | |||
| Front left | Call ASA | ||
| E4 | Left | Right | Call ASA |
| Call ASA | |||
| Call ASA | |||
| Check mains voltage via user manual, if ok call ASA | |||
| Check mains voltage via user manual, if ok call ASA | |||
| Check mains phase signal and frequency, if ok call ASA | |||
| Check mains cable & differential thermostat, if ok call ASA | |||
| E5 | Wait for cooldown, clean and/or remove foreign bodies | ||
| Front left | Call ASA | ||
| E6 | Cz4 | Cz1 | Call ASA |
| Cz3 Cz2 | Check installation requirements via user manual, if ok call ASA | ||
| E7 | Cz4 | Cz1 | Call ASA |
| Call ASA | |||
| Cz3 Cz2 | Call ASA | ||
| E8 | Cz4 | Cz1 | Check installation requirements via user manual, if ok call ASA |
| Check installation requirements via user manual, if ok call ASA | |||
| Cz3 Cz2 | |||
| E9 | Perform manual configuration via user manual | ||
| Front left | Call ASA | ||
*ASA = Service Center
8. ENVIRONMENTAL PROTECTION & DISPOSAL
8.1 SAVING AND RESPECTING THE ENVIRONMENT
Recommendations for best results:
Use pots and pans with a bottom diameter equal to that of the cooking zone.
Use only pots and pans with flat bottoms.
Where possible, keep the lid on pots during cooking.
Cook vegetables, potatoes, etc. with a minimal amount of water to reduce cooking time.
Use a pressure cooker as it further reduces the energy consumption and cooking time.
consumption and cooking time.
Place the pot in the center of the cooking zone outlined on the hob.
8.2 WASTE MANAGEMENT AND ENVIRONMENTAL PROTECTION
This appliance is labelled in accordance with European Directive 2012/19/EU
regarding electric and electronic appliances (WEEE). The WEEE contain both polluting substances (that can have a negative effect on the environment) and base elements (that can be reused).
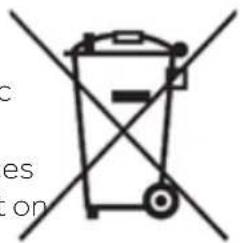
It is important that the WEEE undergo specific treatments to correctly remove and dispose of the pollutants and recover all the materials. Individuals can play an important role in ensuring that the WEEE do not become an environmental problem; it is essential to follow a few basic rules:
- The WEEE should not be treated as domestic waste;
- The WEEE should be taken to dedicated collection areas managed by the town council or a
neregistered company.
In many countries, domestic collections may be available for large WEEEs. When you buy a new appliance, the old one can be returned to the vendor who must accept it free of charge as a one off, as long as the appliance is of an equivalent type and has the same function as the purchased appliance.
9. INSTALLATION
Electrical installation
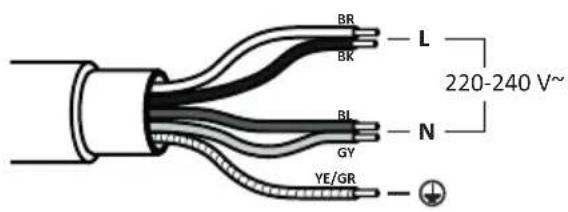
Power supply cable: The device is equipped with a power supply cable that must be connected to the domestic power grid. Identify the various connection options based on the type of domestic power supply from the corresponding diagram. The data plate also indicates the allowable connection voltage for this device and its corresponding power consumption.
220-240V/380-415V 2N~ 220-240V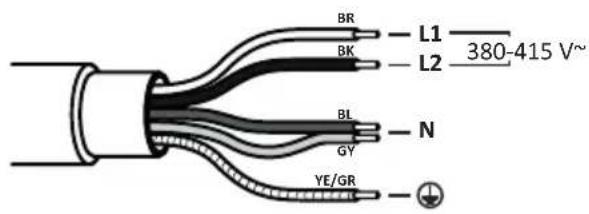
HOB 60-65 cm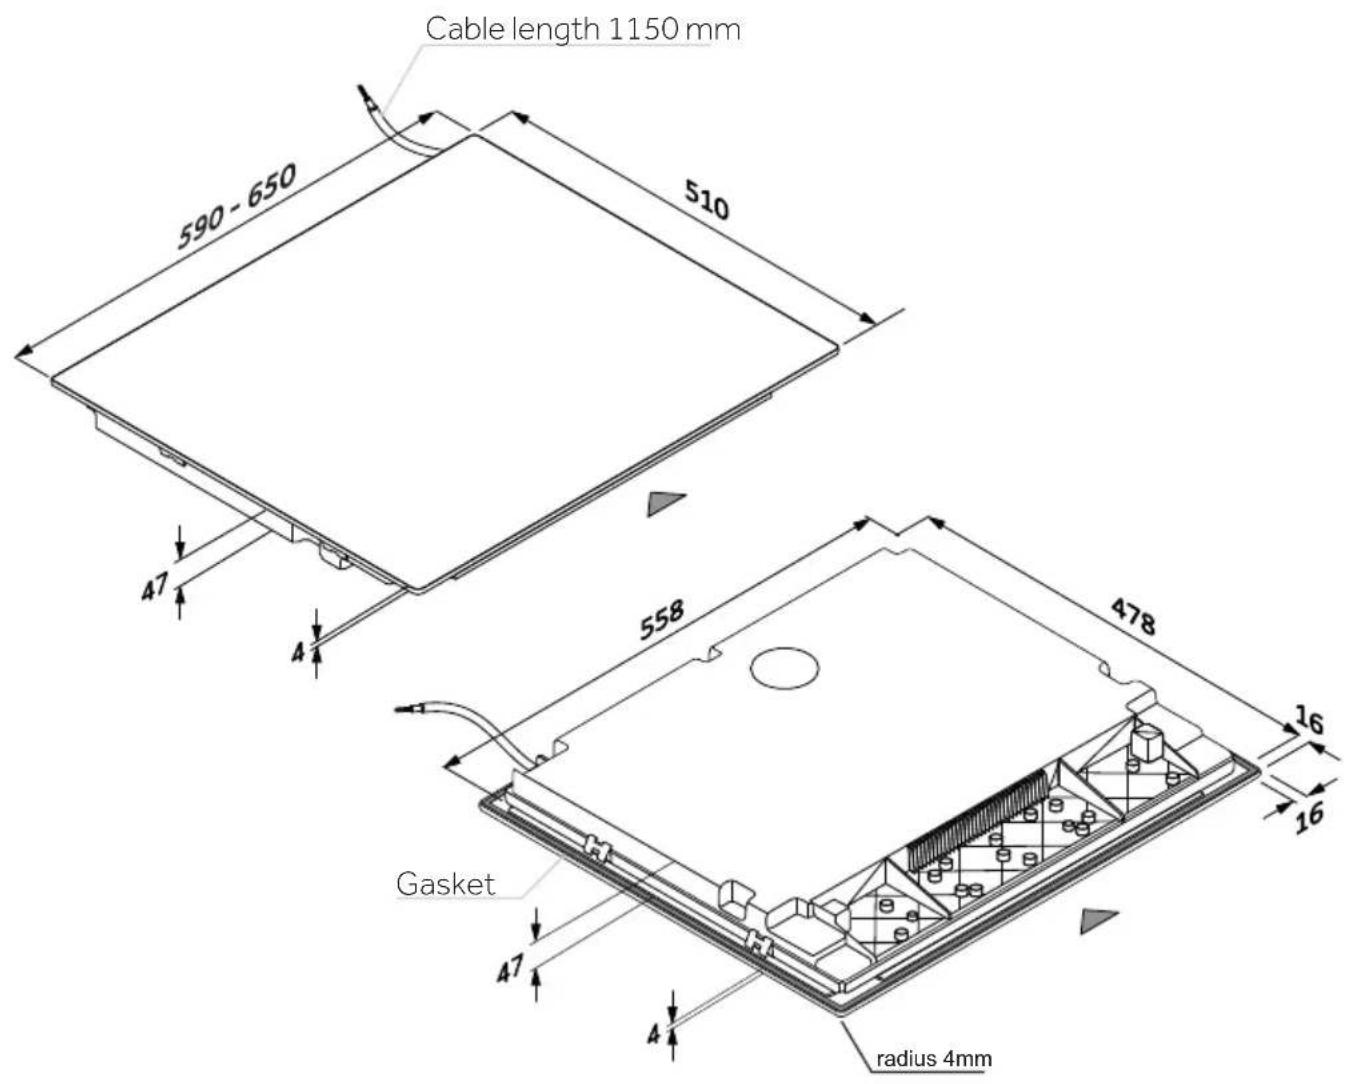
Tools

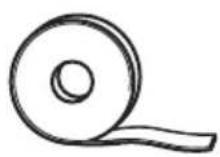
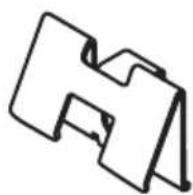
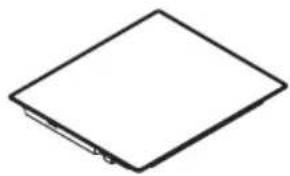
SECTIONS - WIDTH 60 and 65
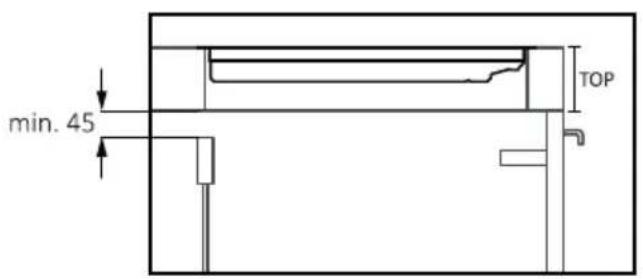
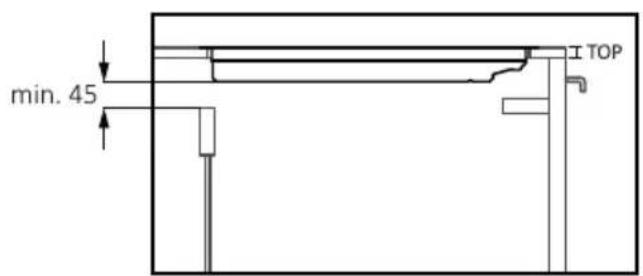
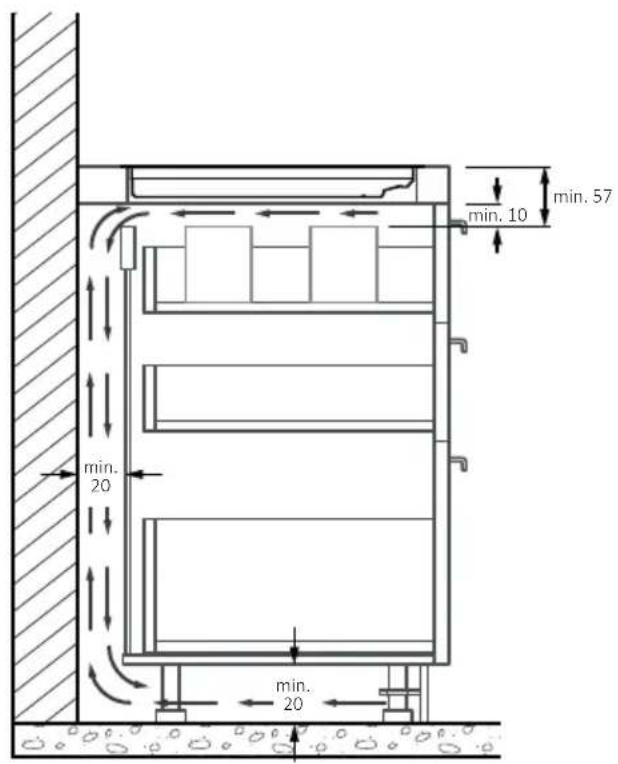
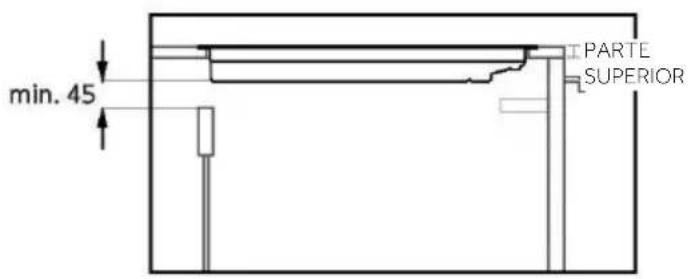
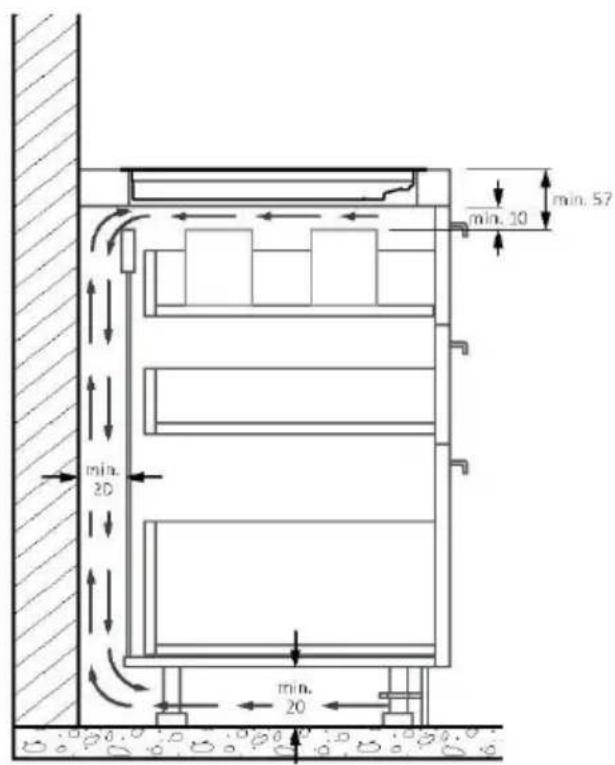
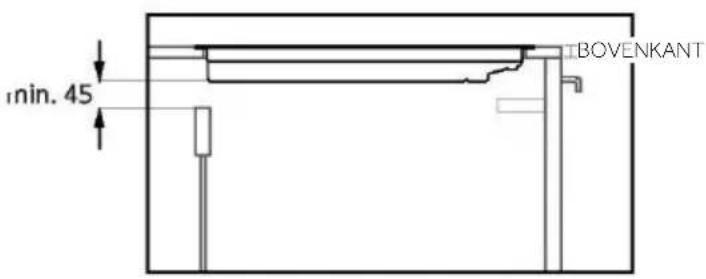
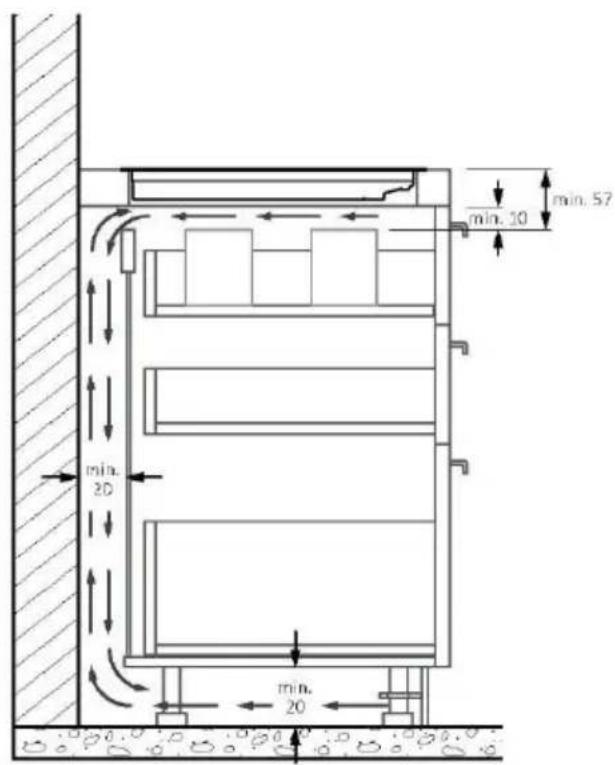
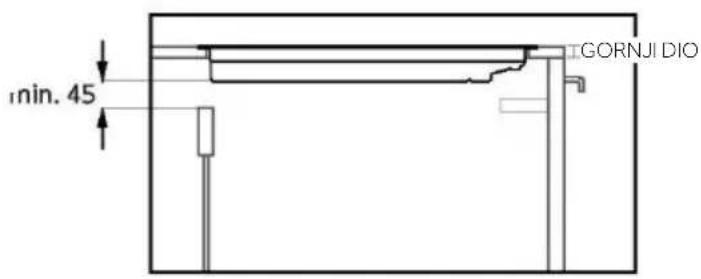
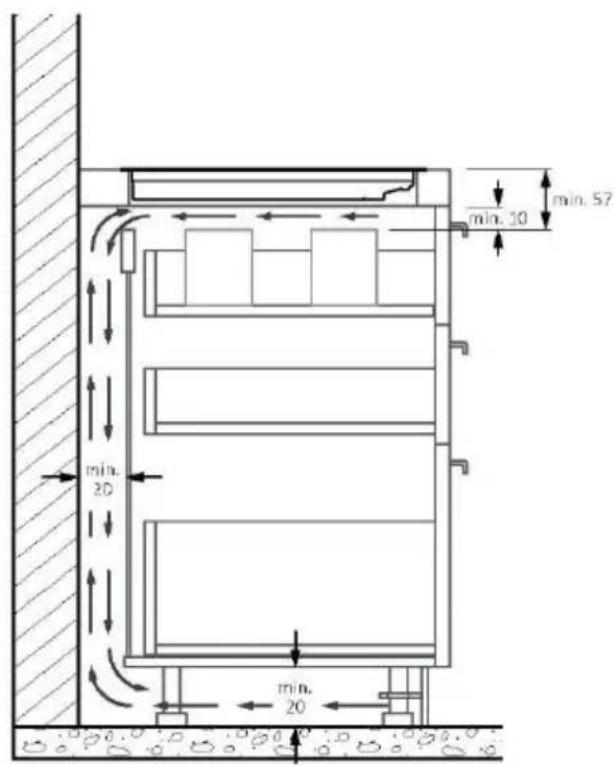
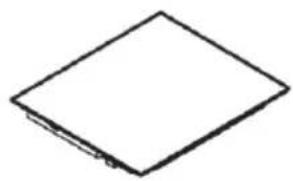
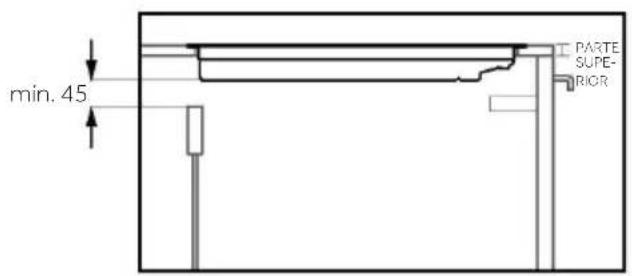
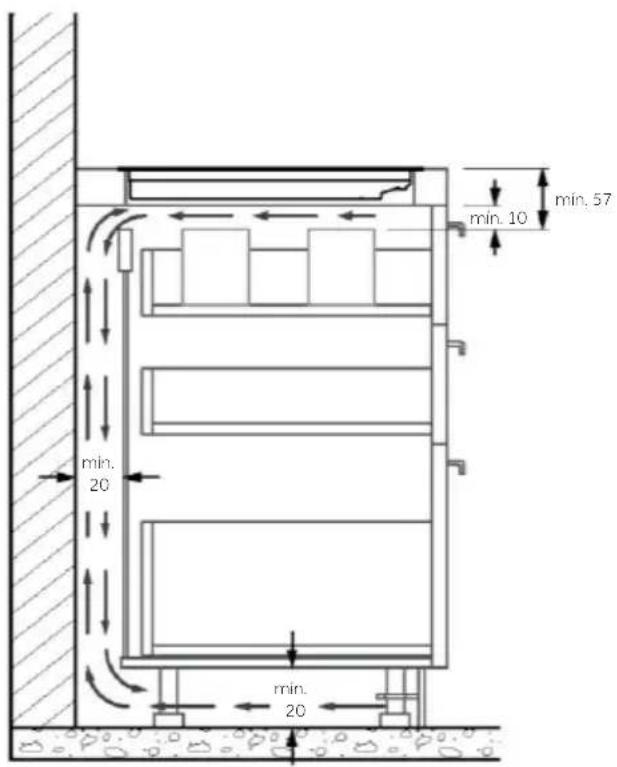
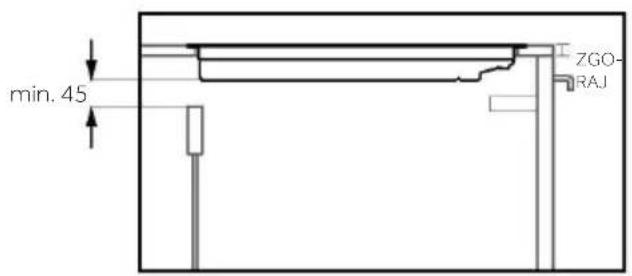
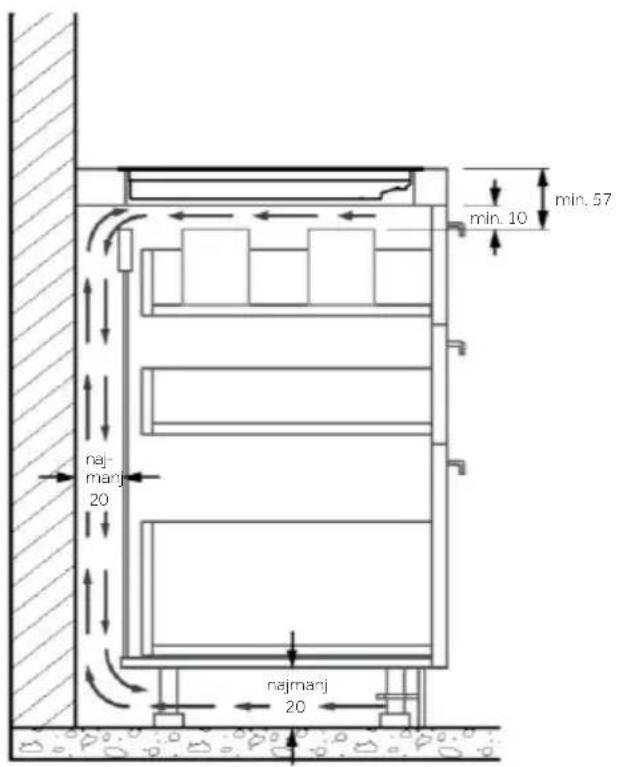
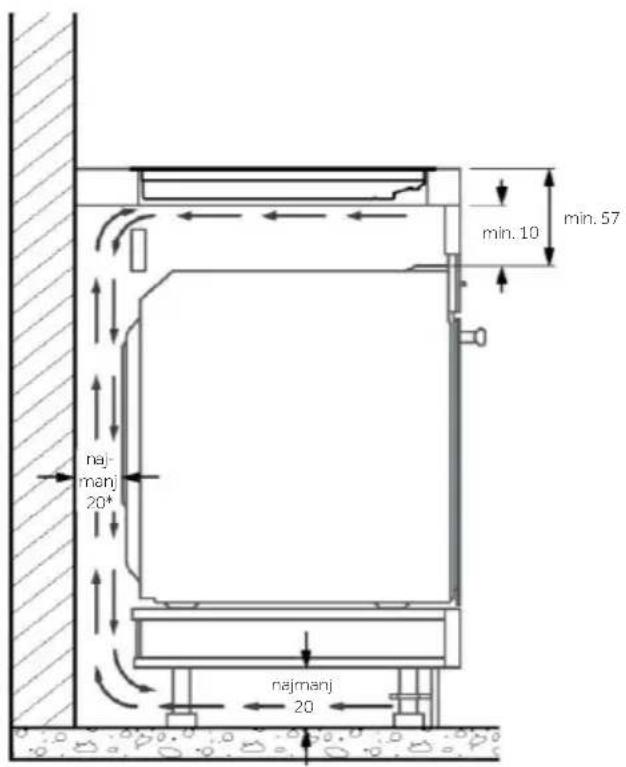
*For proper operation of the appliance, ensure proper airflow beneath the cooktop according to the installation guidelines.
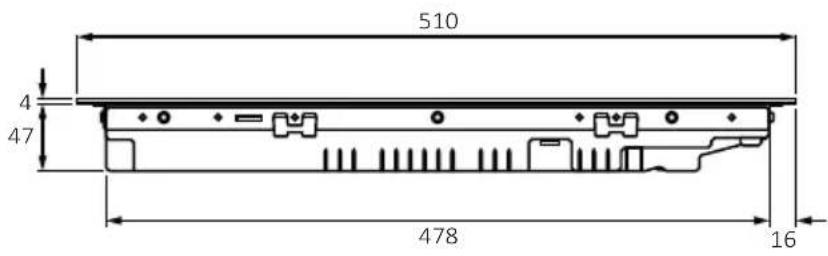
Side view
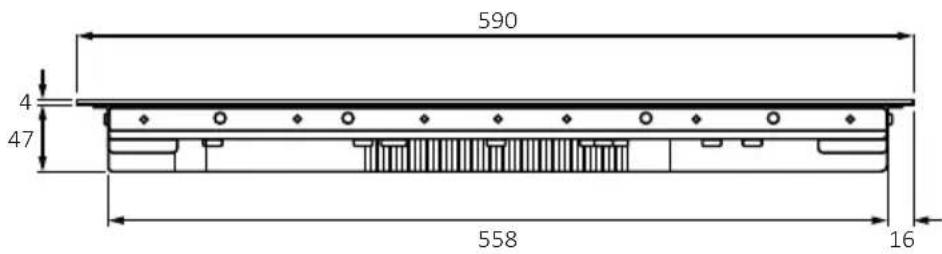
Frontal view
HOB 65 cm
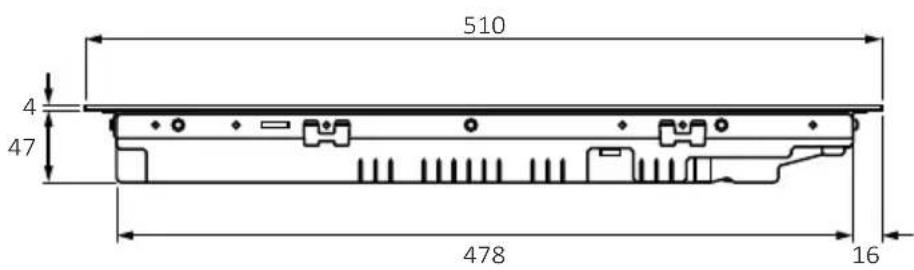
Side view
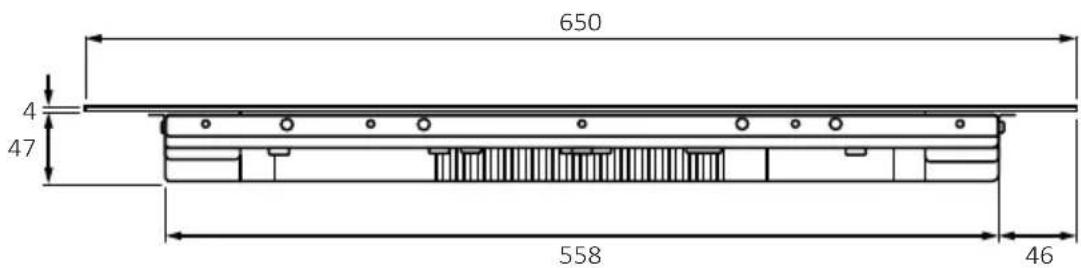
Frontal view
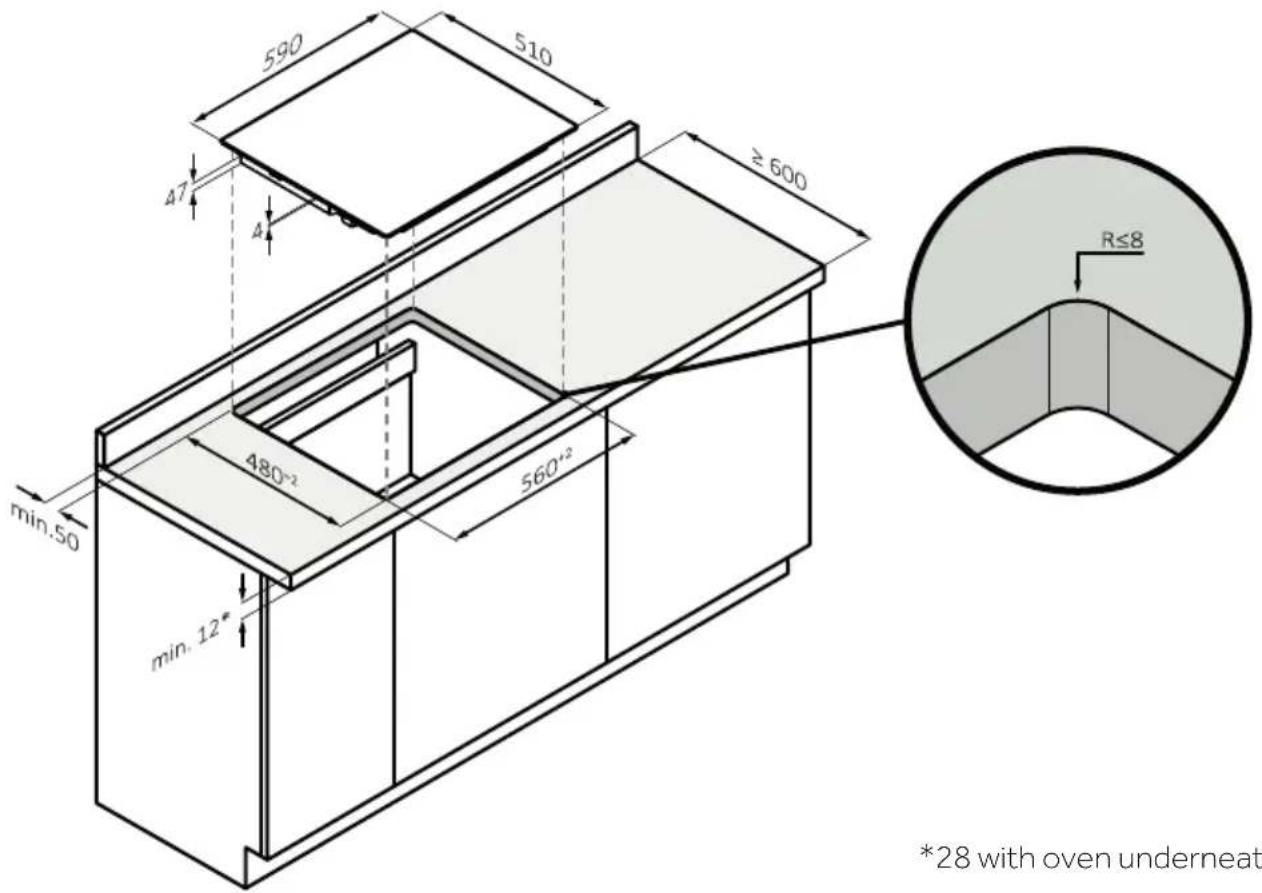
*28 with oven underneath
FLUSH BUILT-IN MEASUREMENTS OF 60
*34 with oven underneath
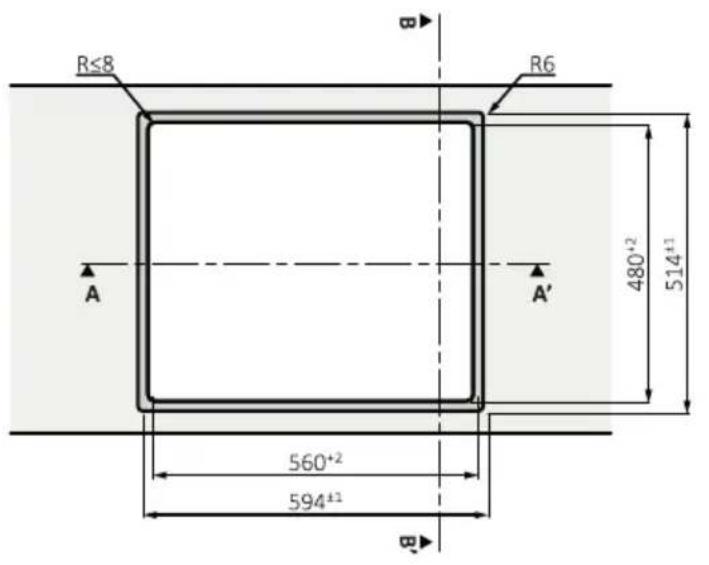
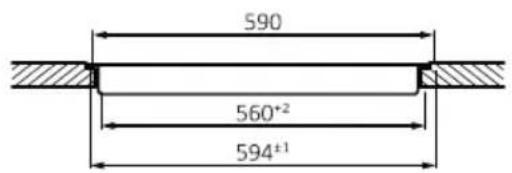
Section AA'
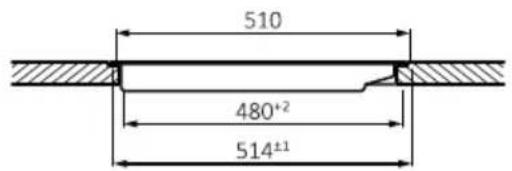
Section BB'
STANDARD BUILT-IN MEASUREMENTS 65 TOP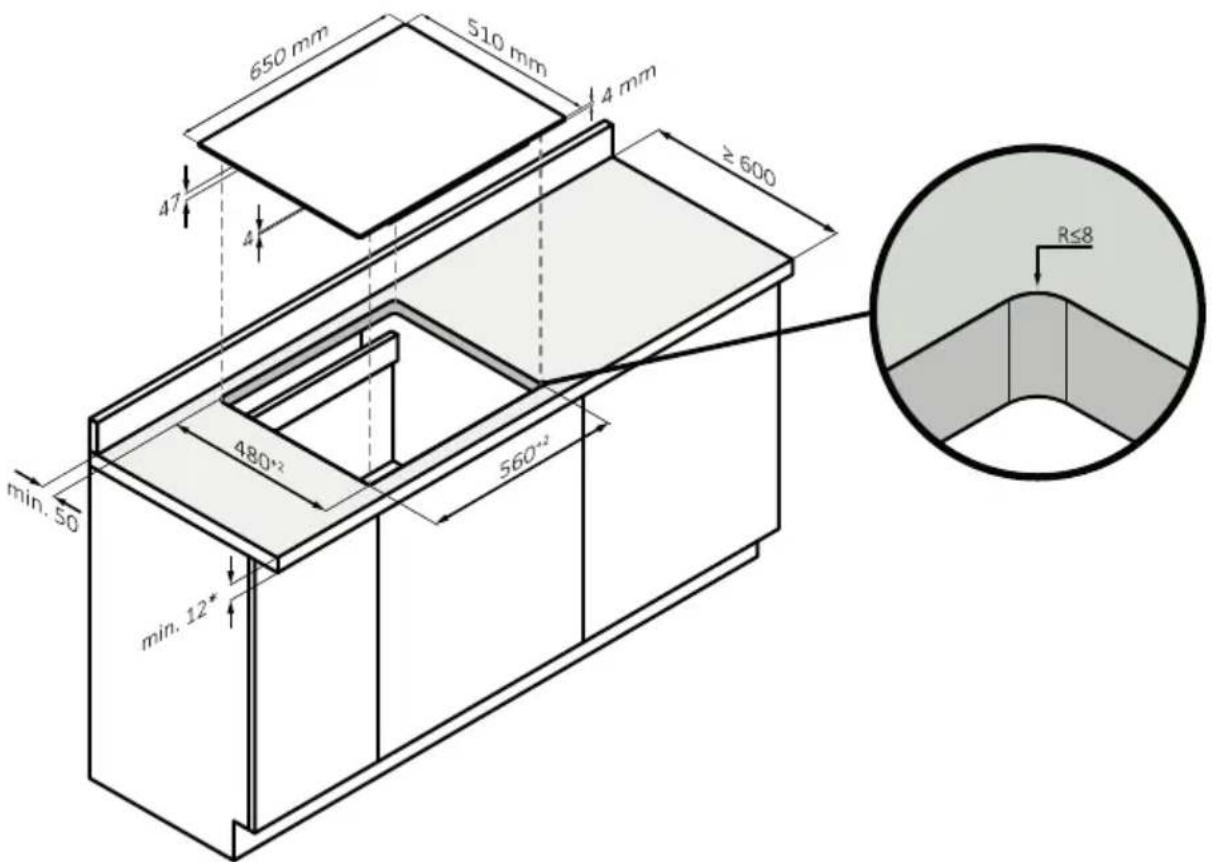
*28 with oven underneath
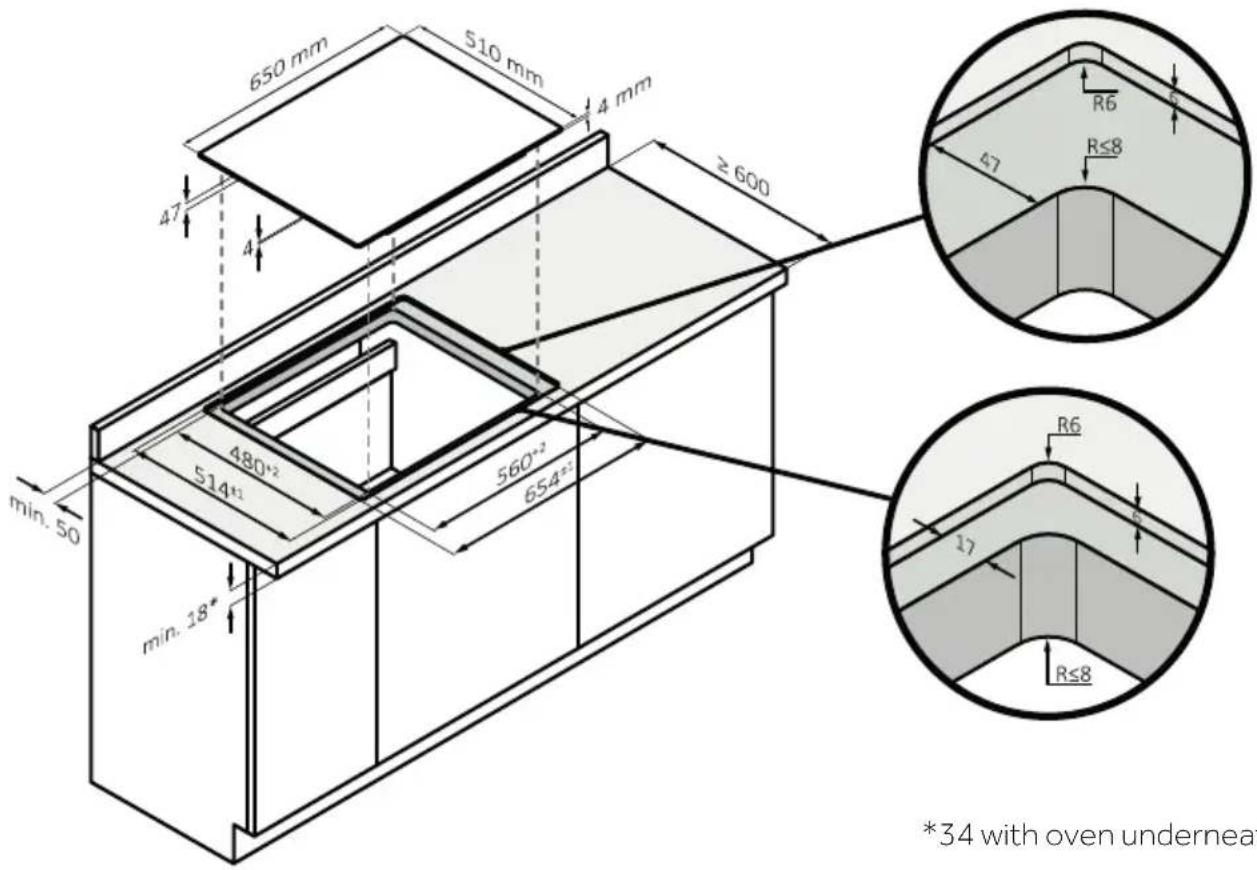
*34 with oven underneath
FLUSH RECESSING MEASUREMENTS OF 65
top view
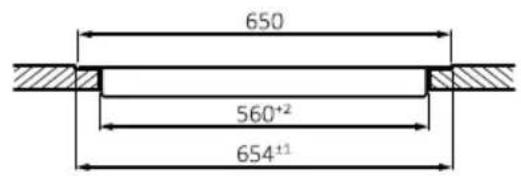
Section AA'
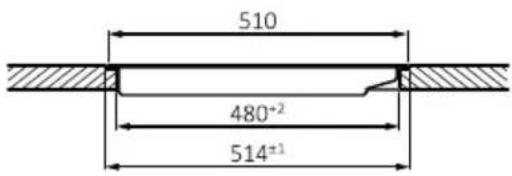
Section BB'
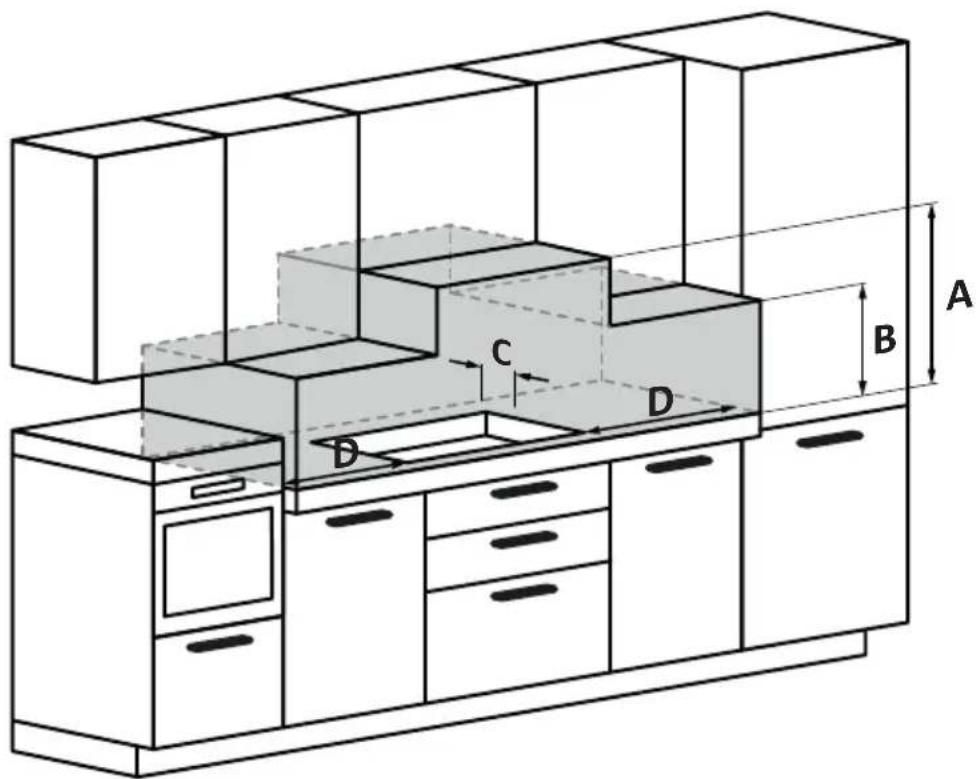
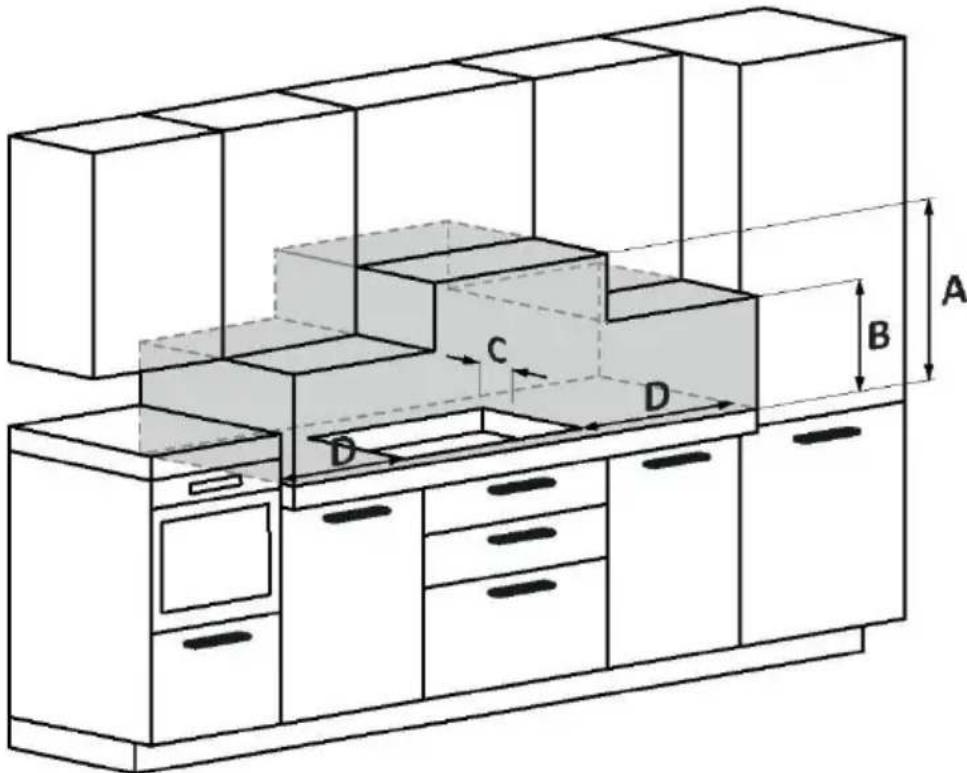
A: We recommend a distance of at least 650mm, but it is preferable to consult the hood user manual;
B: Consider providing a functional space for handling kitchen tools and any steam and condensation produced during food preparation;
C: 35 mm from the recessed hole to the backrest/backrest panel;
D: 35 mm from adjacent furniture (for 60 cm hob);
D: 55 mm from adjacent furniture (for 65 cm hob).

GET IN ON
Google Play

DOWNLOAD ON THE
App Store

EXPLORE IT ON
App Store
Click on "Register".


SECTIONS - WIDTH 60 and 65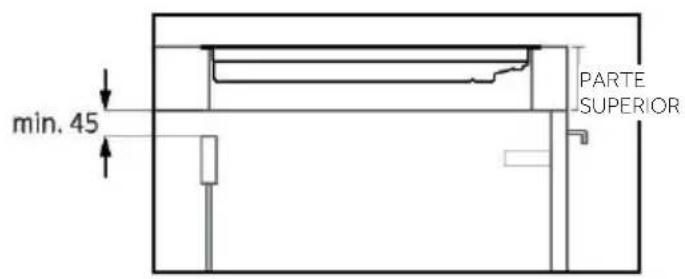


GET IN ON Google Play

DOWNLOAD ON THE App Store

EXPLORE IT ON App Store
WIRELESS CONNECTIVITY
| Tecnologia Wi-Fi Bluetooth | ||
| Standard IEEE 802.11b/g/n Bluetooth v4.2, BR/EDR, BLE | ||
| Bande di frequenza (s) [MHz] 2401÷2483 2402÷2480 | ||
| Potenza massima (mW) 100 10 |

220-240 V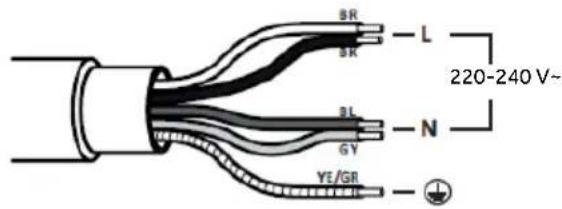
FLUSH MOUNTING DIMENSIONS 60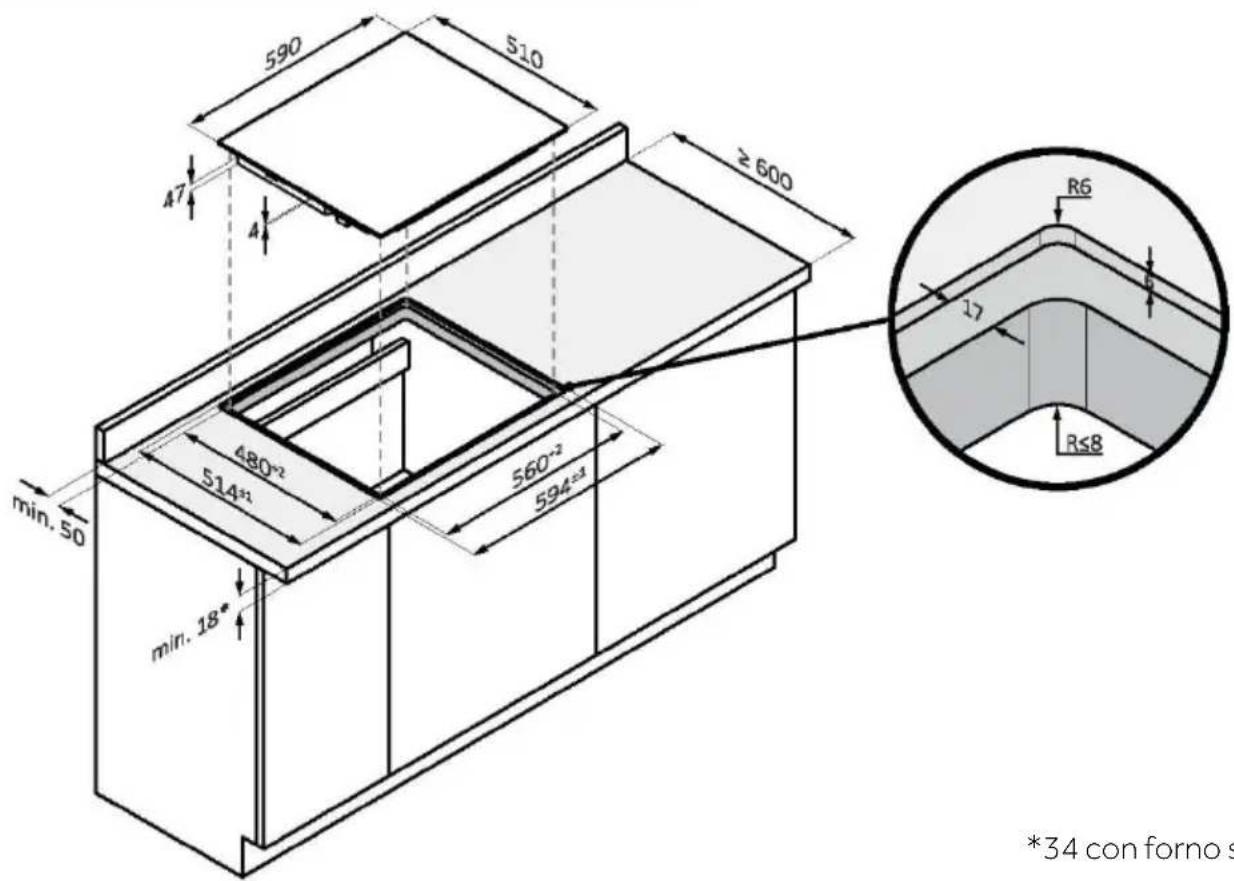
*34 with oven below
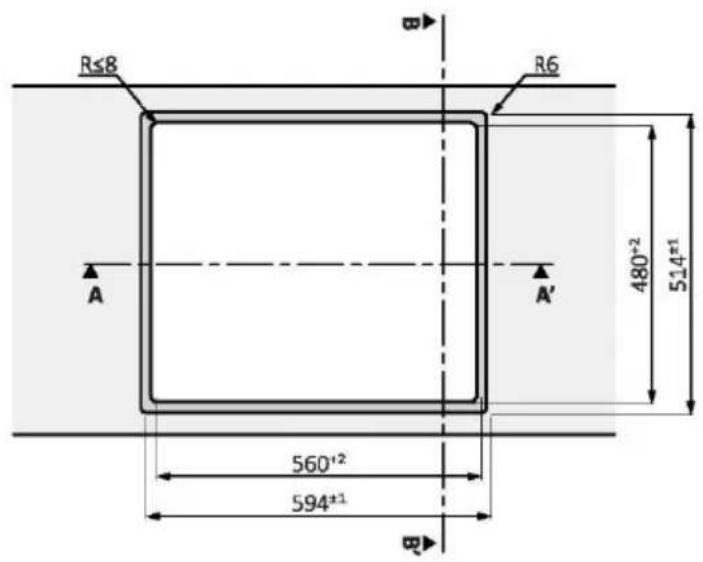
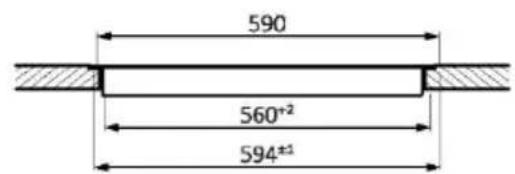
Section AA'
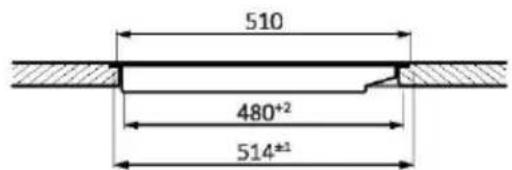
Section BB'
STANDARD DIMENSIONS FOR TOP FLUSH MOUNTING 65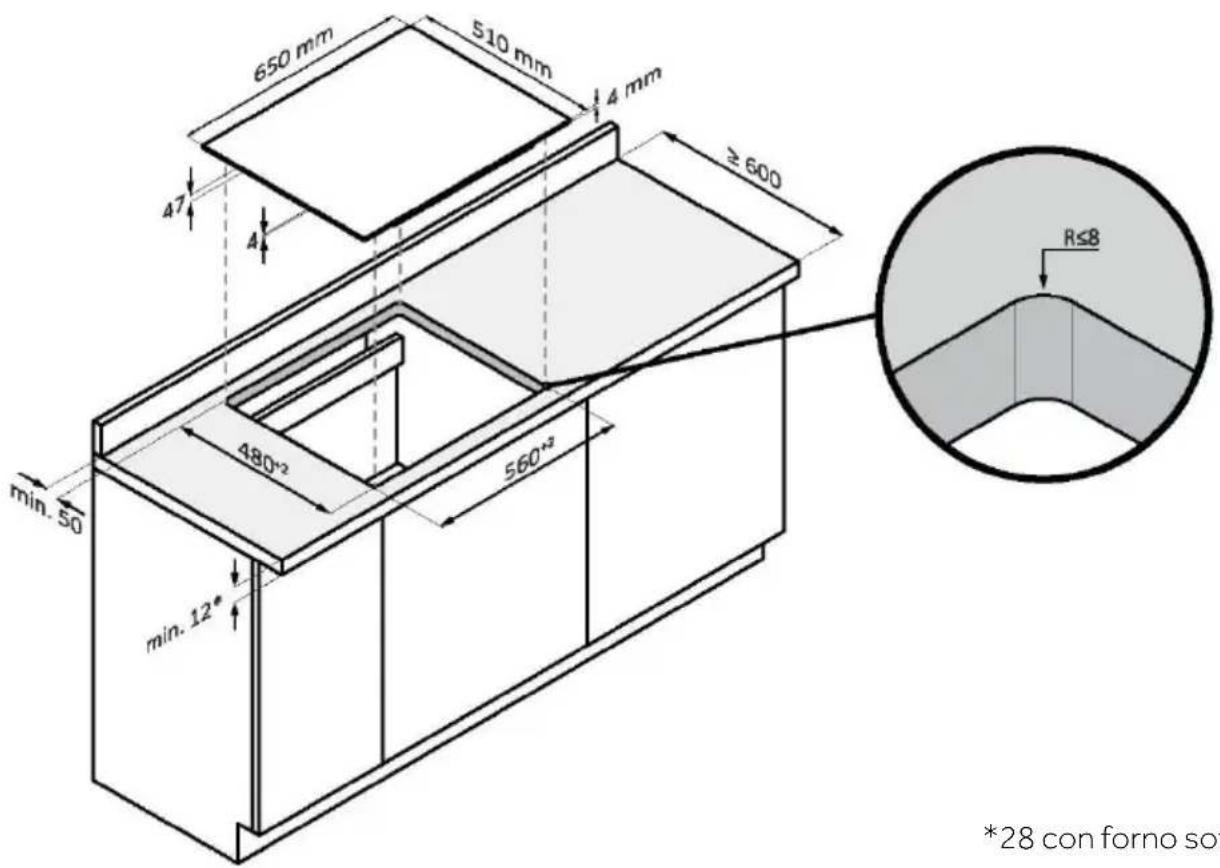
FLUSH MOUNTING DIMENSIONS 65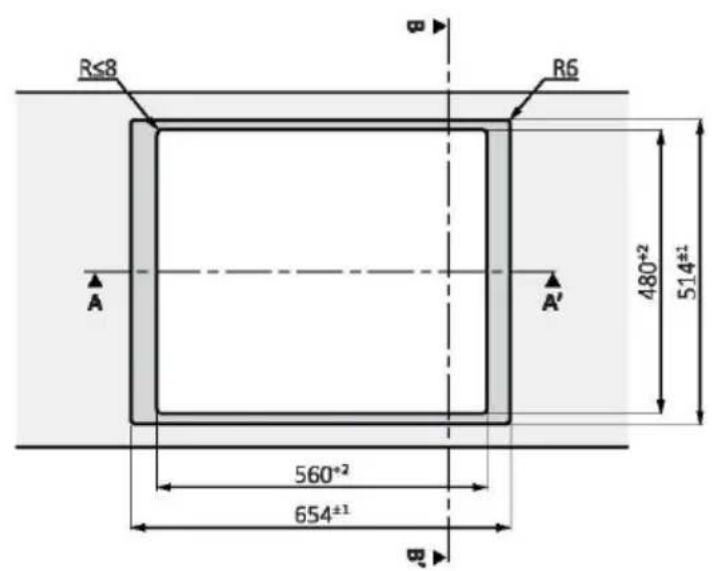
top view
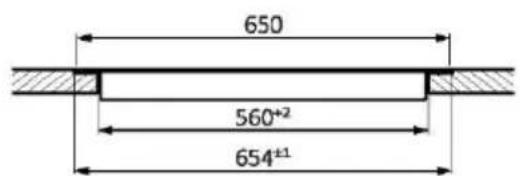
Section AA'
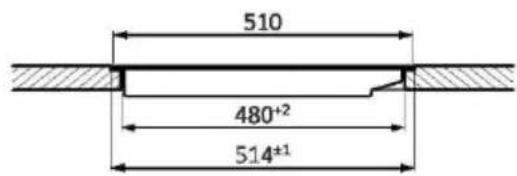
Section BB'

GET IN ON Google Play

DOWNLOAD ON THE App Store

EXPLORE IT ON App Store
Position n° 1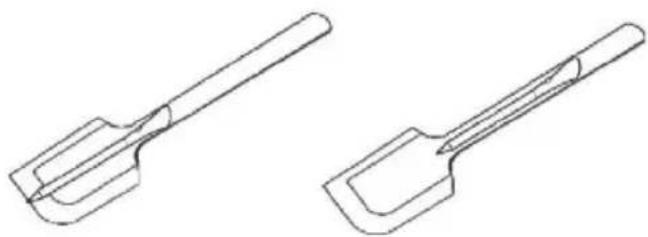
Position n° 2
4.4. CULINARY PREPARATIONS WITH THE APPLICATION

9. INSTALLATION
COOKING PLATE 60-65 cm
GET IN ON
Google Play
DOWNLOAD ON THE App Store
EXPLORE IT ON
App Store

220-240 V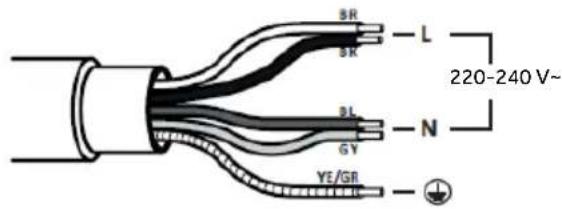
KOCHFELD 60-65 cm
1.1. GENERAL WARNINGS
2. PRODUCT INTRODUCTION
2.1. TOP VIEW OF THE PRODUCT
2.2. CONTROL PANEL
3.2. POWER MANAGEMENT
4. OPERATION OF THE PRODUCT
4.1. HOW THE PRODUCT WORKS
① TURNING THE HOB ON/OFF
88 SELECT THE COOKING ZONE AND SET THE POWER

GET IT ON Google Play

DOWNLOAD ON THE App Store

EXPLORE IT ON App Store

SECTIONS – WIDTH 60 and 65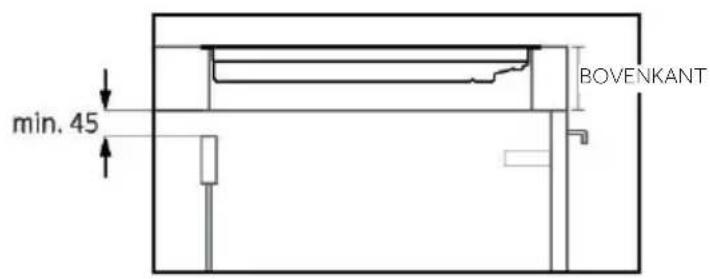
GET IT ON
Google Play
DOWNLOAD ON THE App Store
EXPLORE IT ON
App Store


GET IT ON Google Play

DOWNLOAD ON THE App Store

EXPLORE IT ON App Store
4.4. PREPARING DISHES USING THE APP

COOKING HOB 60–65 cm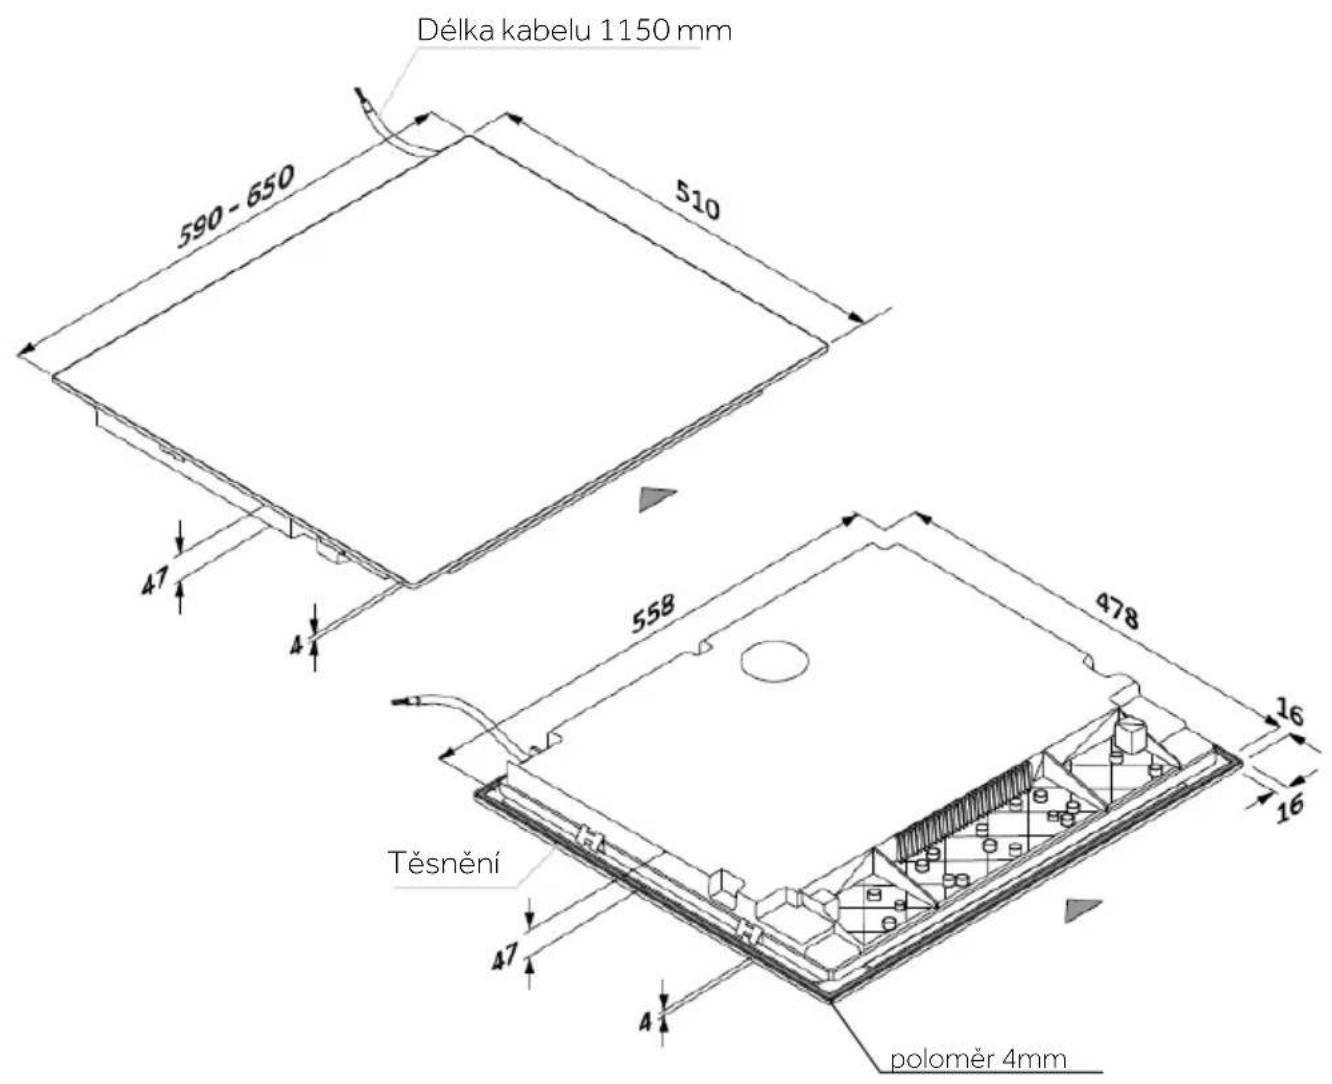
- Use pots with a smooth bottom to avoid scratching the surface of the cooking hob;
GET IN ON
Google Play
DOWNLOAD ON THE App Store
EXPLORE IT ON
App Store
Registering a new user
Click on "Register"
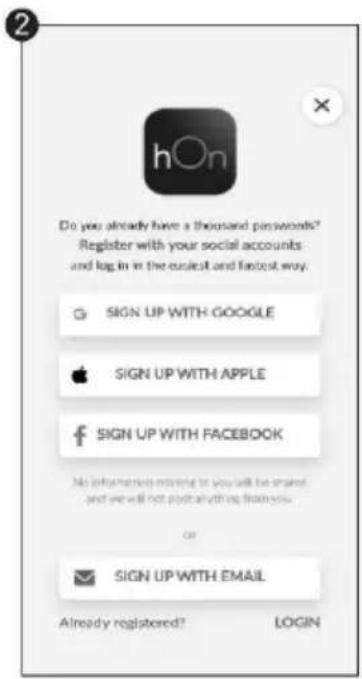
You can register via social media accounts or register with your personal email address
Quick registration for pairing
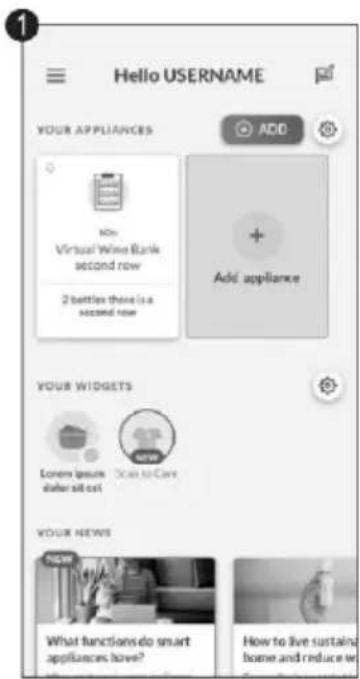
Allow location access permission
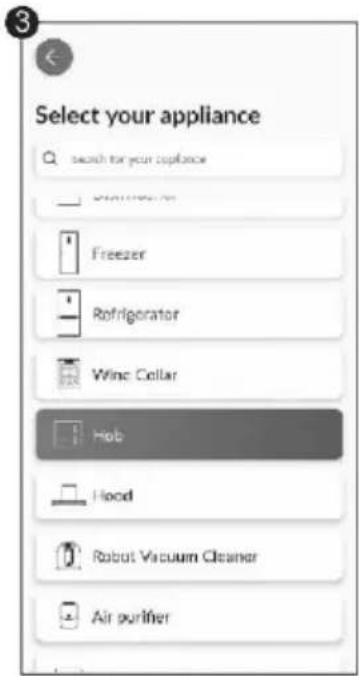
Select the cooking hob from the device category
Quick registration for pairing
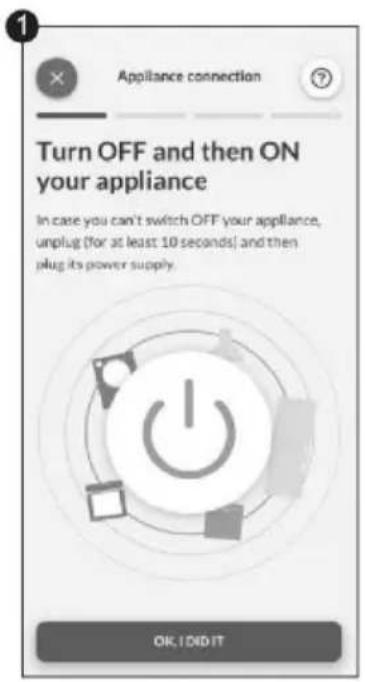
Ceramic cap
Recommended immersion range
Sensor
BEFORE USE, CHARGE THE PROBE AS FOLLOWS:
Position 1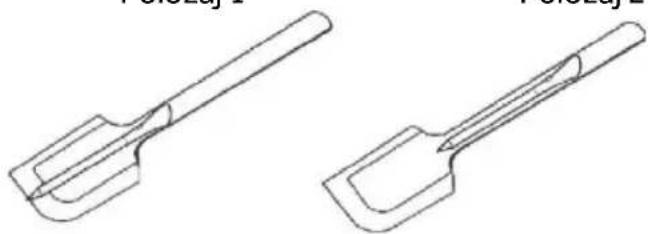
Position 2
4.4. PREPARATIONS FOR COOKING USING THE APP
It is important to treat waste electrical and electronic equipment specially in order to properly remove and dispose of pollutants and recover all materials. Individuals can play an important role in ensuring that waste electrical and electronic equipment (WEEE) does not become an environmental problem. Several basic rules should be followed:
COMPARTMENTS - WIDTH 60 and 65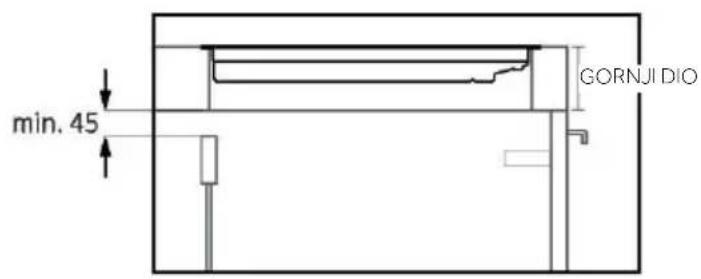
A: We recommend a distance of at least 650 mm, but it is preferable to consult the hood's user manual;
88 SELECT THE COOKING ZONE AND SET THE POWER

GET IN ON Google Play

DOWNLOAD ON THE App Store

EXPLORE IT ON App Store



Capac ceramic
Recommended immersion interval
Sensor
CHARGE THE PRECI PROBE BEFORE USE:
Position 1
Position 2
4.4. COOKING WITH THE APPLICATION
Preci Probe as a thermometer




Register new user
Ceramic lid
VS

Select "Add device"
Ceramic lid
SECTIONS - WIDTH 60 and 65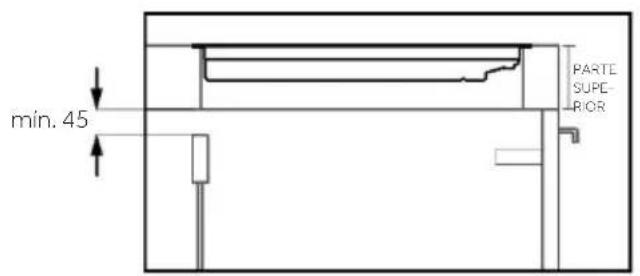
3.3.3. Dimensions and layout
88 SELECTING THE COOKING ZONE AND SETTING THE POWER

Select "Add device".
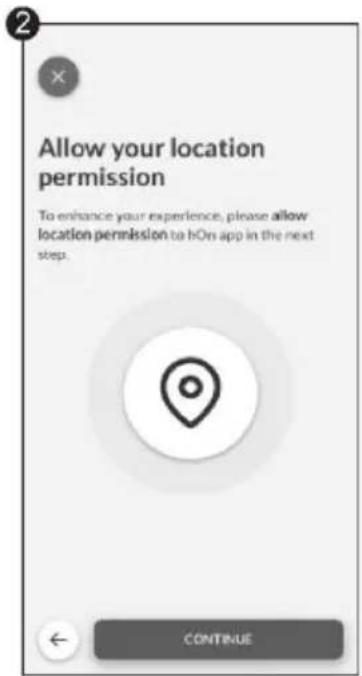
Grant permission for location.
Turn on the appliance; if it is already on, turn it off and on again.
Ceramic lid

SECTIONS – WIDTH 60 and 65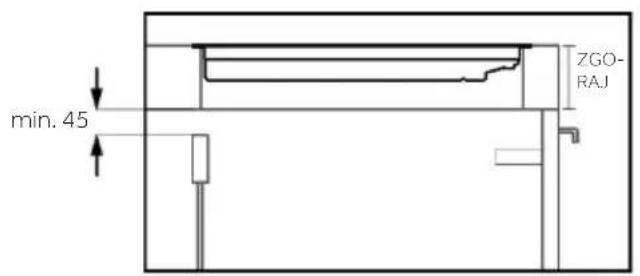
SELECT THE COOKING ZONE AND SET THE POWER
YOU CAN DOWNLOAD IT FROM Google Play
DOWNLOAD IT FROM THE App Store
TRY IT ON THE App Store
New user registration
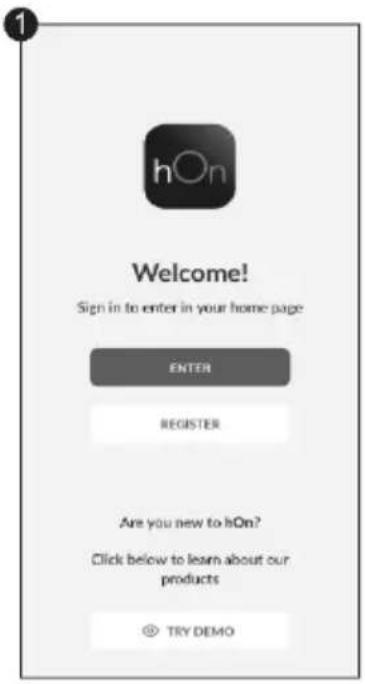
Register using social network accounts or personal email address
After switching on, the hOn app starts searching for your home appliance
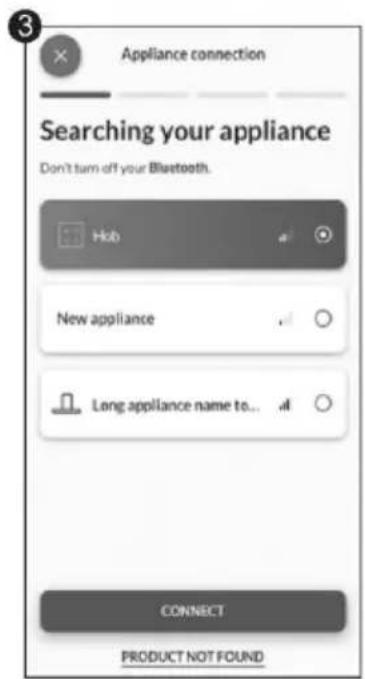
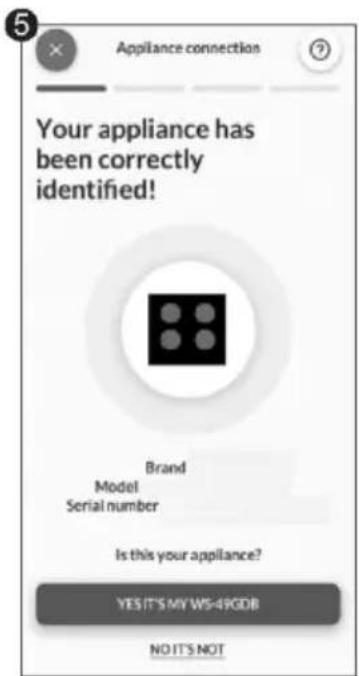
Your cooking hob will be found and you can view and set functions/recipes via the hOn app
Ceramic lid
It is important that WEEE waste undergoes specific treatment in order to properly remove and dispose of pollutants and to reuse all materials. Individuals can play an important role in ensuring that WEEE waste does not become an environmental problem; it is essential to follow a few basic rules:
SECTIONS - WIDTH 60 and 65
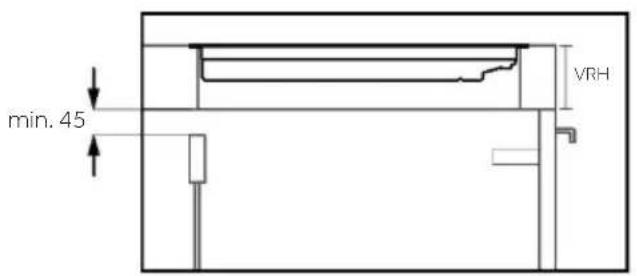
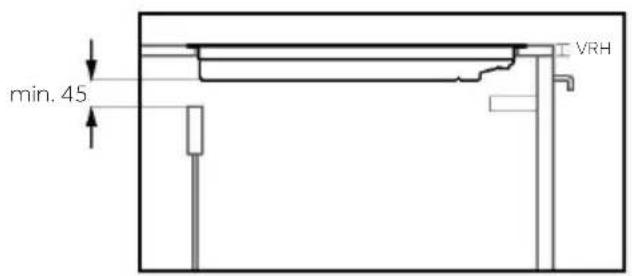
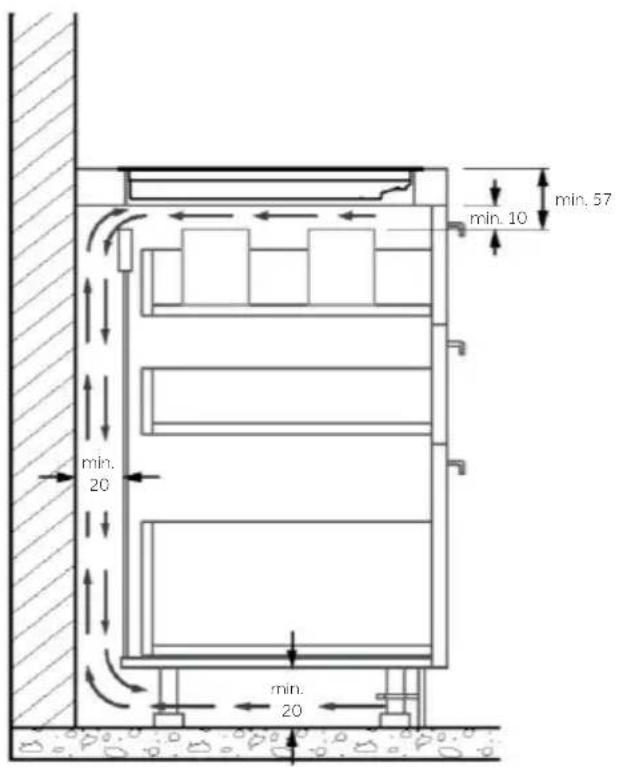
A: We recommend a distance of at least 650 mm, but it is preferable to consult the instructions for use of the extractor hood; B: Consider providing functional space for handling kitchen tools and any steam and condensation produced during food preparation; C: 35 mm from the recessed opening to the back panel/backrest; D: 35 mm from adjacent furniture (for a 60 cm hob); D: 55 mm from adjacent furniture (for a 65 cm hob).
- WELCOME
- GENERAL WARNINGS
- USE LIMITATIONS
- USE IN ACCORDANCE WITH THE INTENDED USE
- INSTALLATION
- ELECTRICAL WARNINGS
- USE & MAINTENANCE
- WARNINGS WIRELESS TEMPERATURE PROBE (AVAILABLE DEPENDING ON THE MODEL)
- PRODUCT INTRODUCTION
- TOP VIEW OF THE PRODUCT
- CONTROL PANEL
- BEFORE STARTING
- GENERAL INFORMATION
- FOR THIS REASON
- POWER MANAGEMENT
- HOW TO SET THE POWER MANAGEMENT
- TO ENTER POWER MANAGEMENT FUNCTION
- TO SWITCH TO ANOTHER LEVEL
- CONFIRMATION AND EXIT POWER MANAGEMENT FUNCTION
- CHOOSING THE RIGHT COOKWARE
- CHARACTERISTICS OF THE COOKWARE
- MAGNET TEST
- HIGHER QUALITY COOKWARES
- DIMENSION & PLACEMENT
- OPERATION OF PRODUCT
- HOW THE PRODUCT WORKS
- SWITCHING ON/OFF THE HOB
- SELECT THE COOKING ZONE AND SET THE POWER
- PAUSE
- TIMER
- KEY LOCK
- MELTING
- SIMMERING
- BOILING
- FULL ZONE
- VARYCOOK ZONE
- CONNECT TO HON APP
- NOTE
- NEW USER REGISTRATION
- QUICK PAIR ENROLLMENT
- WIRELESS PARAMETERS
- PRECI PROBE MODEL ET180 WIRELESS PARAMETERS
- ACCESSORIES
- PRECI PROBE & LADLE-INTELLIGENT WIRELESS FOOD THERMOMETER (AVAILABLE DEPENDING ON THE MODEL)
- CHARGE THE PRECI PROBE BEFORE USING
- PAIR THE PRECI PROBE WITH THE INDUCTION HOB
- LADLE
- COOKING PREPARATIONS WITH THE APP
- PRECI PROBE AS THERMOMETER
- ASSISTED COOKING: "COOK WITH ME" FUNCTION
- SOUS VIDE
- GRILL
- STEAMING
- POWER TABLE
- COOKING TABLE
- GENERAL RECOMMENDATIONS
- CLEANING THE HOB
- FATTYSOIL
- SUGARYSOIL
- STARCHY SOIL
- SHINY METALLIC DISCOLORATION
- FAILURE DISPLAY & INSPECTION
- ERROR CODES
- ENVIRONMENTAL PROTECTION & DISPOSAL
- SAVING AND RESPECTING THE ENVIRONMENT
- WASTE MANAGEMENT AND ENVIRONMENTAL PROTECTION
- ELECTRICAL INSTALLATION
- TOOLS
- SECTIONS - WIDTH 60 AND
- HOB 65 CM
- WIRELESS CONNECTIVITY
- CULINARY PREPARATIONS WITH THE APPLICATION
- KOCHFELD 60-65 CM
- OPERATION OF THE PRODUCT
- ① TURNING THE HOB ON/OFF
- PREPARING DISHES USING THE APP
- REGISTERING A NEW USER
- QUICK REGISTRATION FOR PAIRING
- BEFORE USE, CHARGE THE PROBE AS FOLLOWS
- PREPARATIONS FOR COOKING USING THE APP
- CHARGE THE PRECI PROBE BEFORE USE
- COOKING WITH THE APPLICATION
- PRECI PROBE AS A THERMOMETER
- REGISTER NEW USER
- DIMENSIONS AND LAYOUT
- SELECTING THE COOKING ZONE AND SETTING THE POWER
Brand : HAIER
Model : HAIFB54CIRS
Category : Cooker