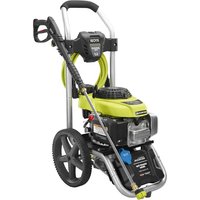
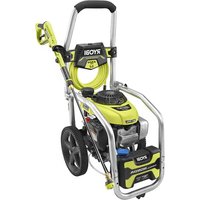
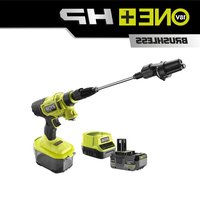
RY40HPPW12 - Pressure washer RYOBI - Free user manual and instructions
Find the device manual for free RY40HPPW12 RYOBI in PDF.

| Product Type | Cordless Pressure Washer |
| Brand | RYOBI |
| Model | RY40HPPW12 |
| Rated Voltage | 40 V DC |
| Maximum Pressure | 1200 PSI (tested per PWMA PW101 standard) |
| Maximum Flow Rate | 3.79 L/min (1.0 GPM) |
| Power Source | 40 V lithium-ion battery (not included) |
| Compatible Battery Type | RYOBI ONE+ 40 V |
| Water Temperature | Cold water only |
| High Pressure Hose Length | 7.6 m (25 ft) |
| Siphon Hose Length | 3 m (10 ft) |
| Included Nozzle Types | Turbo nozzle 15°, soap nozzle (reduced flow) |
| Self-Priming Adapter | Included for non-pressurized water source |
| Auto Stop System | Stops motor as soon as trigger is released |
| Safety | Trigger lock, lockable battery cover |
| Pressure Modes | Selectable Eco and Hi modes |
| Storage | Hose storage hook with velcro strap |
| Filter Maintenance | Removable and cleanable water inlet filters |
| Pump Protector | Recommended to prevent freeze damage |
| Repairability | Replacement parts available via Ryobi service center (1-800-525-2579) |
Frequently Asked Questions - RY40HPPW12 RYOBI
User questions about RY40HPPW12 RYOBI
0 question about this device. Answer the ones you know or ask your own.
Ask a new question about this device
Download the instructions for your Pressure washer in PDF format for free! Find your manual RY40HPPW12 - RYOBI and take your electronic device back in hand. On this page are published all the documents necessary for the use of your device. RY40HPPW12 by RYOBI.
USER MANUAL RY40HPPW12 RYOBI
Important Safety Instructions. 2
Specific Safety Rules 3
Specific Rules for Battery Operation..4
Symbols. 5-6
Features. 6
Assembly. 7-8
Operation. 8-12
■ Maintenance. 13-14
Troubleshooting. 15
Parts Ordering and Service Back Page

WARNING: To reduce the
risk of injury, the user must read and understand the operator's manual before using this product.
SAVE THIS MANUAL FOR
FUTURE REFERENCE
TABLE DES MATIÈRES
See this fold-out section for all of the figures referenced in the operator's manual.
IMPORTANT SAFETY INSTRUCTIONS

WARNING:
Read and understand all instructions. Failure to follow all instructions listed below may result in electric shock, fire and/or serious personal injury.
READ ALL INSTRUCTIONS
- Know your tool. Read the operator's manual carefully. Learn the machine's applications and limitations as well as the specific potential hazards related to this tool.
- Keep guards in place and in working order. Never operate the tool with any guard or cover removed. Make sure all guards are operating properly before each use.
- Remove adjusting keys and wrenches. Form habit of checking to see that keys and adjusting wrenches are removed from tool before turning it on.
To reduce the risk of injury, keep children and visitors away. All visitors should wear safety glasses and be kept a safe distance from work area. - Keep the area of operation clear of all persons, particularly small children, and pets.
Use right tool. Don't force tool or attachment to do a job it was not designed for. Don't use it for a purpose not intended. -
Dress properly. Wear long pants and long sleeves. Do not wear loose clothing, neckties, or jewelry. They can get caught and draw you into moving parts. Rubber gloves and nonskid footwear are recommended when working outdoors. Also wear protective hair covering to contain long hair.
-
Do not operate the equipment while barefoot or when wearing sandals or similar lightweight footwear. Wear protective footwear that will protect your feet and improve your footing on slippery surfaces.
Exercise caution to avoid slipping or falling.
Always wear eye protection with side shields marked to comply with ANSI Z87.1. Following this rule will reduce the risk of serious personal injury. - Don't overreach or stand on a ladder, rooftop, or other unstable support. Keep proper footing and balance at all times.
Use only recommended accessories. The use of improper accessories may cause risk of injury.
Follow the maintenance instructions specified in this manual.
- Check damaged parts. Before further use of the tool, a guard or other part that is damaged should be carefully checked to determine that it will operate properly and perform its intended function. Check for alignment of moving parts, binding of moving parts, breakage of parts, mounting, and any other conditions that may affect its operation. A guard or other part that is damaged must be properly repaired or replaced by a qualified service center to avoid risk of personal injury.
- Never leave tool running unattended. Turn power off and remove battery pack. Don't leave tool until it comes to a complete stop.
Follow manufacturer's recommendations for safe-loading, unloading, transport, and storage of machine.
■ Be thoroughly familiar with controls. Know how to stop the product and bleed pressure quickly. - Keep tool dry, clean, and free from oil and grease. Always use a clean cloth when cleaning. Never use brake fluids, gasoline, petroleum-based products, or any solvents to clean tool.
- Stay alert and exercise control. Watch what you are doing and use common sense. Do not operate tool when you are tired. Do not rush.
- Do not operate the product while under the influence of drugs, alcohol, or any medication.
Check the work area before each uRemove all objects such as rocks, broken glass, nails, wire, or string which can be thrown or become entangled in the machine. - Do not use tool if switch does not turn it off. Have switch replaced by a qualified service center.
Before cleaning, repairing, or inspecting, shut off the motor and make certain all moving parts have stopped. Remove the battery pack to prevent accidental starting. - Avoid dangerous environment. Don't use in damp or wet locations or expose to rain. Keep work area well lit.
Never use in an explosive atmosphere. Normal sparking of the motor could ignite fumes.
Do not operate while smoking or near an open flame. - Do not operate around dry brush, twigs, cloth rags, or other flammable materials.
WARNING: Risk of injection or injury - Do not direct discharge stream at persons.
SPECIFIC SAFETY RULES
- Never direct a water stream toward people or pets, or any electrical device.
Before starting any cleaning operation, close doors and windows. Clear the area to be cleaned of debris, toys, outdoor furniture, or other objects that could create a hazard.
Never pick up or carry a machine while the motor is running.
-
Never start the machine if ice has formed in any part of the equipment.
-
Do not use acids, alkalines, solvents, flammable material, bleaches, or industrial grade solutions in this product. These products can cause physical injuries to the operator and irreversible damage to the machine.
WARNING: High pressure jets can be dangerous if subject to misuse. The jet must not be directed at persons, animals, electrical devices, or the machine itself.
Hold the trigger handle securely with both hands.
Expect the trigger handle to move when the trigger is pulled due to reaction forces. Failure to do so could cause loss of control and injury to yourself and others.
- Never attempt to make any adjustments while the motor is running (except where specifically recommended by the manufacturer).
Protective covers must always cover rotating parts when the motor is running.
Check bolts and nuts for looseness before each use. A loose bolt or nut may cause serious motor problems.
When servicing use only recommended or equivalent replacement parts. Use of any other parts may create a hazard or cause product damage.
ONLY use cold water.
- Never spray close to the surface to be cleaned as you can damage the surface.
After stopping the motor, always pull the trigger on the trigger handle to relieve stored pressure in the high pressure hose. Failure to do so could result in serious personal injury.
- Never use water or any liquids to clean or rinse off your product and do not expose the product to rain. Store indoors in a dry area. Corrosive liquids, water, and chemicals can enter the product's electronic components and/or battery compartment and damage electronic components and/or the battery pack, which can result in a short circuit, increased risk of fire, and serious personal injury. Remove any buildup of dirt and debris by wiping the product clean with a dry cloth occasionally.
For outdoor use only.
Ensure the high pressure hose is properly connected before using the product.
SPECIFIC RULES FOR BATTERY OPERATION
- Do not use battery-operated appliance in rain.
-
Remove or disconnect battery before servicing, cleaning or removing material from the tool.
Use this product only with batteries and chargers listed in tool/appliance/battery pack/charger correlation supplement 988000-842. -
Store idle appliances - When not in use, tool should be stored indoors in a dry, locked place out of the reach of children.
- When battery pack is not in use, keep it away from other metal objects, like paper clips, coins, keys, nails, screws or other small metal objects, that can make a connection from one terminal to another. Shorting the battery terminals together may cause burns or a fire.
- Do not use a battery pack or appliance that is damaged or modified. Damaged or modified batteries may exhibit unpredictable behavior resulting in fire, explosion or risk of injury.
- Do not expose a battery pack or appliance to fire or excessive temperature. Exposure to fire or temperature above 265^ may cause explosion.
- Follow all charging instructions and do not charge the battery pack or appliance outside of the temperature range specified in the instructions. Charging improperly or at temperatures outside of the specified range may damage the battery and increase the risk of fire.
Have servicing performed by a qualified repair person using only identical replacement parts. This will ensure that the safety of the product is maintained. -
Do not dispose of the batteries in a fire. The cell may explode. Check with local codes for possible special disposal instructions.
-
Do not open or mutilate the batteries. Released electrolyte is corrosive and may cause damage to the eyes or skin. It may be toxic if swallowed.
- Do not place battery tools or their batteries near fire or heat. This will reduce the risk of explosion and possibly injury.
Batteries can explode in the presence of a source of ignition, such as a pilot light. To reduce the risk of serious personal injury, never use any cordless product in the presence of open flame. An exploded battery can propel debris and chemicals. If exposed, flush with water immediately. - Do not crush, drop or damage battery pack. Do not use a battery pack or charger that has been dropped or received a sharp blow. A damaged battery is subject to explosion. Properly dispose of a dropped or damaged battery immediately.
Exercise care in handling batteries in order not to short the battery with conducting materials such as rings, bracelets, and keys. The battery or conductor may overheat and cause burns.
Under extreme usage or temperature conditions, battery leakage may occur. If liquid comes in contact with your skin, wash immediately with soap and water. If liquid gets into your eyes, flush them with clean water for at least 10 minutes, then seek immediate medical attention. Following this rule will reduce the risk of serious personal injury. - Save these instructions. Refer to them frequently and use them to instruct others who may use this power tool.
- If you loan someone this power tool, loan them these instructions also.
SAVE THESE INSTRUCTIONS
SYMBOLS
| The following signal words and meanings are intended to explain the levels of risk associated with this product. SYMBOL SIGNAL MEANING | ||
| A | DANGER: | Indicates a hazardous situation, which, if not avoided, will result in death or serious injury. |
| A | WARNING: | Indicates a hazardous situation, which, if not avoided, could result in death or serious injury. |
| A | CAUTION: | Indicates a hazardous situation, that, if not avoided, may result in minor or moderate injury. |
| NOTICE: | (Without Safety Alert Symbol) Indicates information considered important, but not related to a potential injury (e.g. messages relating to property damage). | |
| Some of the following symbols may be used on this product. Please study them and learn their meaning. Proper interpretation of these symbols will allow you to operate the product better and safer. SYMBOL NAME DESIGNATION/EXPLANATION | ||
| Safety Alert Indicates a potential | personal injury hazard. | |
| Read Operator's Manual | To reduce the risk of injury, user must read and understand operator's manual before using this product. | |
| Eye Protection | Always wear eye protection with side shields marked to comply with ANSI Z87.1. | |
| Wet Conditions Alert | Risk of fire and burns. Do not expose battery, battery compartment, or electronic components to rain, water, or liquids. Close cover during use. Do not operate on wet ground. | |
| Risk of Injection | To reduce the risk of injection or injury, never direct a water stream towards people or pets or place any body part in the stream. Leaking hoses and fittings are also capable of causing injection injury. Do not hold hoses or fittings. | |
| Risk of Explosion | Do not spray flammable liquids. Flammable liquids and their vapors are explosive and can cause severe burns or death. | |
| Kickback | To reduce the risk of injury from kickback, hold the spray wand securely with both hands when the machine is on. | |
| Electric Shock Do not use near electric power lines or receptacle outlets. | ||
| Chemical Burns | To reduce the risk of injury or damage, DO NOT USE ACIDS, ALKALINES, BLEACHES, SOLVENTS, FLAMMABLE MATERIAL, OR INDUSTRIAL GRADE SOLUTIONS in this product. | |
| Recycle Symbol | This product uses lithium-ion (Li-ion) batteries. Local, state, or federal laws may prohibit disposal of batteries in ordinary trash. Consult your local waste authority for information regarding available recycling and/or disposal options. | |
SYMBOLS
| Some of the following symbols may be used on this product. Please study them and learn their meaning. Proper interpretation of these symbols will allow you to operate the product better and safer. SYMBOL NAME DESIGNATION/EXPLANATION | ||
| V Volts Voltage | ||
| no | No Load Speed Rotational speed, at no load | |
| .../min Per Minute | Minute Revolutions, strokes, surface | speed, orbits etc., per minute |
FEATURES
PRODUCT SPECIFICATIONS
Motor 40 Volt DC
Maximum Pounds Per Square Inch* 1,200 psi
Maximum Gallons Per Minute 1.0 GPM
*Maximum rating when tested to PWMA standard PW101.
KNOW YOUR PRESSURE WASHER
See Figure 1.
The safe use of this product requires an understanding of the information on the product and in this operator's manual as well as a knowledge of the project you are attempting. Before use of this product, familiarize yourself with all operating features and safety rules.
ECO/HI MODE
ECO/HI mode provides an adjustment in water pressure for stain removal.
HOSE STORAGE
Once the high pressure hose is rolled, hang it on the back of the machine using the hook-and-loop strap to secure in place.
ON/OFF SWITCH
This switch turns the pressure washer on and off.
SIPHON HOSE
The siphon hose with filter gives the user complete portability to pull water from any water source like a pool or a 5 gal. bucket of water.
TOTAL STOP SYSTEM
The pressure washer is equipped with a power-saving feature that causes the motor to stop whenever the trigger handle trigger is released.
TRIGGER HANDLE
The trigger handle has a gripping surface that provides added control of the spray wand and helps reduce fatigue.
TRIGGER WITH LOCK-OUT
Pulling the trigger releases a stream of water for high pressure cleaning. The lock-out provides protection against unauthorized use.
ASSEMBLY
UNPACKING
This product requires assembly.
Carefully remove the product and any accessories from the box. Make sure that all items listed in the Packing List are included.

WARNING:
Do not use this product if any parts in the Packing List are already assembled to your product when you unpack it. Parts on this list are not assembled to the product by the manufacturer and require customer installation. Use of a product that may have been improperly assembled could result in serious personal injury.

WARNING:
Do not attempt to modify this product or create accessories not recommended for use with this product. Any such alteration or modification is misuse and could result in a hazardous condition leading to possible serious personal injury.

WARNING:
Do not insert the battery pack until assembly is complete. Failure to comply could result in accidental starting and possible serious personal injury.
Inspect the product carefully to make sure no breakage or damage occurred during shipping.
- Do not discard the packing material until you have carefully inspected and satisfactorily operated the product.
If any parts are damaged or missing, please call 1-800-525-2579 for assistance.
PACKING LIST
40 Volt Pressure Washer
Handle
Screws (2)
Strap
25 ft. High Pressure Hose
Trigger Handle
Spray Wand
Nozzles (15^ Turbo, Soap)
Self Priming Adapter
Male Quick Connect
10 ft. Quick Connect Siphon Hose w/Filter
Soap Siphon Hose with filter
Operator's Manual

WARNING:
If any parts are damaged or missing do not operate this product until the parts are replaced. Use of this product with damaged or missing parts could result in serious personal injury.
INSTALLING THE CARRYING HANDLE
See Figure 2.

CAUTION:
Be careful to avoid pinching your fingers or hands when installing the handle onto the housing.
Position the carrying handle over the pressure washer with the holes aligned as shown.
Install screws and tighten securely.
CONNECTING THE SPRAY WAND TO THE TRIGGER HANDLE
See Figure 3.
Push the end of the spray wand into the trigger handle and rotate clockwise to secure.
Pull on the spray wand to be certain it is properly secured.
CONNECTING THE HIGH PRESSURE HOSE TO THE TRIGGER HANDLE
See Figure 4.
Screw the collar on the high pressure hose into the trigger handle inlet coupler by turning the hose collar clockwise. Tighten securely.
NOTE: Be careful to avoid cross-threading, which can cause the trigger handle to leak during use.
Pull on the hose to be certain it is properly secured.
ASSEMBLY
CONNECTING THE HIGH PRESSURE HOSE TO THE PUMP
See Figure 5.
NOTE: For additional information, see Connecting the Siphon Hose to the Pressure Washer later in Assembly if you are going to connect to a non-pressurized water source.
- Completely uncoil and straighten the high pressure hose to prevent kinks.
NOTE: See Using the High Pressure Hose in Operation for more information about using the high pressure hose.
Align the collar on the hose to the threaded outlet on the pump.
Install the high pressure hose collar onto the threaded outlet.
Turn the collar clockwise to tighten the hose securely to the pump.
NOTE: Be careful to avoid cross-threading, which can cause the hose to leak during use.
Pull on the hose to be certain it is properly secured.
CONNECTING THE GARDEN HOSE TO THE PRESSURE WASHER (IF USING GARDEN HOSE)
See Figure 6.
NOTICE:
Always observe all local regulations when connecting hoses to the water main. Some areas have restrictions against connecting directly to public drinking water supply to prevent the feedback of chemicals into the drinking water supply. Direct connection through a receiver tank or backflow preventer is usually permitted.
The water supply must come from a water main. NEVER use hot water. Before connecting the garden hose to the pressure washer:
Run water through the hose for 30 seconds to clean any debris from the hose.
Inspect the screen in the water intake.
If the screen is damaged, do not use the machine until the screen has been replaced.
If the screen is dirty, clean it before connecting the garden hose to the machine.
To connect the garden hose to the machine:
Completely uncoil the garden hose or remove completely from reel to prevent kinks.
NOTE: There must be a minimum of 10 feet of unrestricted hose between the pressure washer intake and the hose faucet or shut off valve (such as a "Y" shut off connector).
With the hose faucet turned completely off, attach the end of the garden hose to the water intake. Tighten by hand.
NOTICE:
Do not run the pressure washer without water supply connected and turned on, as this may damage the high pressure seals and decrease pump life. Completely unwind the hose from its reel or coil and make sure the hose is not being restricted by tires, rocks, or any other objects that may lessen or prevent water flow to the pressure washer.
CONNECTING THE SIPHON HOSE TO THE PRESSURE WASHER
See Figures 7 - 8.
The siphon hose can be submerged directly into any fresh water source like a lake, pool, or a 5 gal. bucket for maximum portability
- Completely uncoil and straighten the siphon hose to prevent kinks.
Inspect the screen in the water intake.
If the screen is damaged, do not use the machine until the screen has been replaced.
If the screen is dirty, clean it before connecting the siphon hose to the machine.
Install the male quick connect into the pump inlet on the pressure washer.
Align the quick connect collar on the siphon hose to the male quick connect on the pump inlet.
Push the collar onto the male quick connect until it clicks securely into place.
Pull on the hose to be certain it is properly secured.
Next, remove the high pressure hose from the pump outlet.
- Thread the self priming adapter onto the pump outlet on the pressure washer.
NOTE: The self priming adapter must be installed when using the siphon hose submerged into a non-pressurized water source. Use of the self priming adapter isn't necessary when connecting to a pressurized water supply.
Install the high pressure hose onto the self priming adapter on the pressure washer.
OPERATION

WARNING:
Do not allow familiarity with the product to make you careless. Remember that a careless fraction of a second is sufficient to inflict serious injury.

WARNING:
Always wear eye protection with side shields marked to comply with ANSI Z87.1. Failure to do so could result in objects being thrown into your eyes resulting in possible serious injury.

WARNING:
Do not use any attachments or accessories not recommended by the manufacturer of this product. The use of attachments or accessories not recommended can result in serious personal injury.

WARNING:
Never direct a water stream toward people or pets, or any electrical device. Failure to follow these instructions could result in serious injury, electric shock, or death.
NOTICE:
Before each use, inspect the entire product for damaged, missing, or loose parts such as screws, nuts, bolts, caps, etc. Tighten securely all fasteners and caps and do not operate this product until all missing or damaged parts are replaced. Please call customer service or contact an authorized service center for assistance.
APPLICATIONS
You may use this tool around the house for cleaning most small horizontal or vertical exterior surfaces, smaller exterior objects and structures, and outdoor equipment and tools. * You can:
- Remove dirt from various exterior vertical surfaces such as house exteriors, siding, fences, brick, concrete or stone walls, etc.
- Wash boats, outdoor furniture, powered or non-powered garden equipment, gutters, window screens, grills, play-ground equipment, etc.
*Always test in an inconspicuous area first.
INSTALLING/REMOVING BATTERY PACK(S)
See Figure 9.

WARNING:
Always remove battery pack from your tool when you are assembling parts, making adjustments, cleaning, or when not in use. Removing battery pack will prevent accidental starting that could cause serious personal injury.
To install:
- Open the battery cover by releasing the latch and opening the cover.
- Place the battery pack in the product. Align the raised rib on the battery pack with groove in the battery port.

WARNING:
Make sure the latch on the bottom of the battery pack snaps in place and the battery pack is fully seated and secure in the battery port before beginning operation. Failure to securely seat the battery pack could cause the battery pack to fall out, resulting in serious personal injury.
NOTICE:
When placing battery pack in the tool, be sure raised rib on battery pack aligns with the bottom of the tool and latches into place properly. Improper installation of the battery pack can cause damage to internal components.
- Close the battery cover and fasten the latch to secure the cover.

WARNING:
Do not use the power cleaner unless the battery cover is fully closed and latched. NEVER allow water or chemicals to enter the battery compartment.
To remove:
Unlock and open the battery cover.
- Locate the latch on the bottom of the battery pack and depress to release the battery pack.

WARNING:
Battery tools are always in operating condition. Therefore, switch should always be locked with hands free of the lock-out button when not in use. Remove battery pack when transporting or carrying the tool to avoid accidental starting, which may result in serious injury.
For complete charging instructions, see the operator's manuals for your battery pack and charger.
OPERATION
STARTING AND STOPPING THE PRESSURE WASHER
See Figure 10.
NOTICE:
Do not run the pressure washer without water supply connected and turned on, as this may damage the high pressure seals and decrease pump life. Completely unwind the hose from its reel or coil and make sure the hose is not being restricted by tires, rocks, or any other objects that may lessen or prevent water flow to the pressure washer.
Before starting the motor:
Connect the garden hose (or the siphon hose when using a non-pressurized water source).
NOTE: Make sure the pressure washer's water intake screen is in place and unclogged before connecting.
Turn on the garden hose then pull the trigger to relieve air pressure; hold the trigger until a steady stream of water appears or submerge the siphon hose into the fresh water source.
NOTE: Make sure the faucet is turned on fully and that there are no kinks or leaks in the garden hose. If using the siphon hose, make sure the filter is submerged completely under the surface of the water.
To start the motor:
- With the on/off switch in the off position (O), install the battery pack(s) as previously described.
Put the on/off switch in the position (I) for ECO ON setting or (II) for HI ON.
To stop the motor:
Put the on/off switch in the off position (O).
Pull trigger to release water pressure.
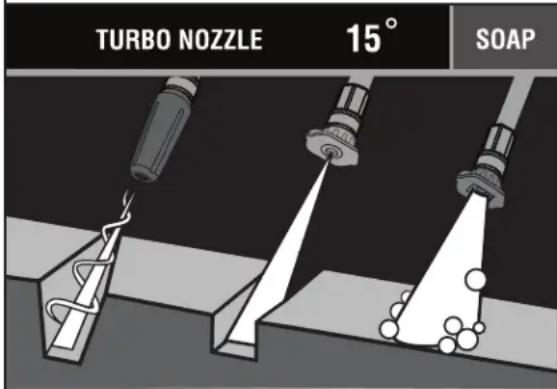
NOZZLE SELECTION GUIDE
ABRASIVE
HIGH PRESSURE (NO SOAP WHEN USING THESE NOZZLES)
LOW PRESSURE (FOR SOAP OR GENTLE RINSE)

Turbo Nozzle
Concrete, Brick, Masonry

Siding, Gutters, House

Fencing, Deck, Patio

Lawn Equipment, Boat, RV

Recommended Nozzle Use With Caution for Certain Applications
OPERATION
NOTE: The pressure washer may be on and the system may have pressure even when the pump and/or motor cannot be heard running. Always use caution around the pressure washer.
USING THE TRIGGER HANDLE
See Figure 11.

WARNING:
Hold the trigger handle securely with both hands. Expect the trigger handle to move when the trigger is pulled due to reaction forces. Failure to do so could cause loss of control and injury to yourself and others.
Pull back and hold the trigger to operate the pressure washer.
- Release the trigger to stop the flow of water through the nozzle.
To engage the lock out:
Push up on the lock out until it clicks into the slot.
To disengage the lock out:
Push the lock out down and into its original position.
Start with the nozzle 1-2 ft. away from the cleaning surface and carefully approach the surface just until the desired level of cleaning is achieved. If the spray is too close it can damage the cleaning surface.
SELECTING THE RIGHT NOZZLE FOR THE JOB
See Figure 12.
Each of the nozzles has a different spray pattern. Before starting any cleaning job, determine the best nozzle for the job. Refer to the Nozzle Selection Guide for more information about which nozzle to choose.

WARNING:
NEVER remove nozzles without first turning off the motor, removing the battery pack, relieving the water pressure in the trigger handle, and locking the lock out on the trigger handle. NEVER point the nozzle at your face or at others. The quick-connect feature contains small springs that could eject the nozzle with some force. Failure to follow these instructions could result in an eye injury or other serious personal injury.
To connect a nozzle to the spray wand:
Turn off the pressure washer, remove the battery pack and shut off the water supply. Pull trigger to release water pressure.
- Engage the lock-out on the trigger handle by pushing up on the lock-out until it clicks into the slot.
Pull back the quick-connect collar.
Push the nozzle into place in the spray wand.
Push the collar forward so that the nozzle is secured properly. Check to see that the nozzle is secure.
To disconnect a nozzle from the spray wand once the cleaning job is complete:
Turn off the pressure washer, remove the battery pack and shut off the water supply. Pull trigger to release water pressure.
■ Engage the lock-out on the trigger handle by pushing up on the lock-out until it clicks into the slot.
Pull back and hold the quick-connect collar.
- Remove the nozzle by pulling it from the quick-connect collar. Place nozzle in the nozzle storage area on the top of the machine.
USING THE HIGH PRESSURE HOSE

WARNING:
Injection hazard. Fully unwrap and straighten high pressure hose prior to and during each use and do not allow it to become kinked. The high pressure hose features an outer covering that provides strength to the hose. If the outer covering becomes damaged, stop using the hose and replace it immediately. A kinked or damaged hose can develop a high pressure leak and result in a possible injection or other serious personal injury.
To prevent damage to the outer covering:
Inspect the hose before every use.
Fully unwrap and straighten hose before use.
Do not allow the high pressure hose to be kinked.
- Keep hose away from hot surfaces and sharp edges.
Do not pull unit by high pressure hose.
- Do not allow hose to be crushed or wrapped around objects.
WASHING WITH DETERGENT
See Figures 13 - 14.
As sold, this unit is designed for use with "downstream" pressure washer detergents. To convert for use with "upstream" detergents, contact customer service or an authorized customer service center for more information.
NOTICE:
USE ONLY DETERGENTS DESIGNED FOR PRESSURE WASHERS. Do not use household detergents, acids, alkalines, bleaches, solvents, flammable material, or industrial grade solutions, which can damage the pump or cause property damage. Many detergents may require mixing prior to use. Prepare cleaning solution as instructed on the solution bottle. Always test in an inconspicuous area before beginning.
OPERATION
Remove the battery pack.
Place the open end of the soap injection hose over the barbed fitting on the pump.
Place the filter end of the soap injection hose in the bottom of the detergent bottle/container.
NOTE: The machine setting of this unit is 20:1, which usually allows the use of 1 gallon pressure washer detergent without further dilution. Check your detergent instructions to be sure additional dilution is not necessary.
Install the blue or black soap nozzle on the spray wand.
Reinstall the battery pack and turn the pressure washer on.
Squeeze the trigger and wait approximately 5 seconds for the detergent to appear.
Spray the detergent on a dry surface using long, even, overlapping strokes. To prevent streaking, do not allow detergent to dry on the surface.
Before shutting off the motor:
- Place the soap injection hose with filter in a bucket of clean water.
Spray the clear water through the spray wand until the tank is empty.
If any soap remains in the spray, repeat with a second tank of clean water.
Shut off the motor.
NOTE: Shutting off the motor will not relieve pressure in the system. Pull trigger to release water pressure.
RINSING WITH THE PRESSURE WASHER
Turn off the pressure washer and shut off the water supply. Pull trigger to release water pressure.
■ Engage the lock out on the trigger handle by pushing up on the lock out until it clicks into the slot.
- Remove the soap nozzle by placing hand over nozzle then pulling back the quick-connect collar. Place soap nozzle in the nozzle storage area on the machine.
- Select the right nozzle for the job. See the chart shown earlier in the manual to select the appropriate nozzle.
Start at the top of the area to be rinsed and work down, overlapping the strokes.
USING PUMP PROTECTOR
See Figure 15.
Regular use of a commercially available pump protector prolongs the life of the pressure washer by removing hard water mineral deposits, lubricating pump seals and pistons, and preventing freeze damage. Pump protector should be added to the unit after every use and before storage. Pump protector can be purchased at the retailer where you purchased your pressure washer, or by calling customer service.
The instructions that follow are typical for adding pump protector but you should always verify the specific instructions provided by the manufacturer of the pump protector used.
Turn off the pressure washer motor, remove the battery pack, and shut off the water supply. Pull trigger to release water pressure.
Disconnect all hoses.
- Unscrew threaded top from pump protector bottle and remove paper seal from bottle. Reinstall top on bottle and tighten securely.
NOTE: The rubber seal should remain inside the threaded top. If it comes out, be sure to replace before reinstalling the top.
- Remove bottle cap and attach threaded end of bottle securely to pressure washer pump water intake.
Squeeze bottle to inject contents into pump.
Pump is protected when the protector fluid exits the pump outlet.
MOVING THE PRESSURE WASHER
Turn the pressure washer off. Point nozzle in a safe direction and pull trigger to release water pressure.
Remove the battery pack.
Using the carrying handle, get a firm grasp of the unit. Lift the unit into a safe and comfortable carrying position. Move machine to the desired location.
DO NOT attempt to move the unit by pulling on any of the hoses.
MAINTENANCE

WARNING:
Before inspecting, cleaning, or servicing the machine, shut off motor, wait for all moving parts to stop, remove the battery pack, and pull trigger to release water pressure. Failure to follow these instructions can result in serious personal injury or property damage.

WARNING:
Always wear eye protection with side shields marked to comply with ANSI Z87.1. Failure to do so could result in objects being thrown into your eyes, resulting in possible serious injury.

WARNING:
When servicing, use only identical replacement parts. Use of any other parts could create a hazard or cause product damage.

WARNING:
Never use water or any liquids to clean or rinse off your product and do not expose the product to rain. Store indoors in a dry area. Corrosive liquids, water, and chemicals can enter the product's electronic components and/or battery compartment and damage electronic components and/or the battery pack, which can result in a short circuit, increased risk of fire, and serious personal injury. Remove any buildup of dirt and debris by wiping the product clean with a dry cloth occasionally.
NOTICE:
Periodically inspect the entire product for damaged, missing, or loose parts such as screws, nuts, bolts, caps, etc. Tighten securely all fasteners and caps and do not operate this product until all missing or damaged parts are replaced. Please call customer service or contact an authorized service center for assistance.
GENERAL MAINTENANCE
Avoid using solvents when cleaning plastic parts. Most plastics are susceptible to damage from various types of commercial solvents and may be damaged by their use. Use clean cloths to remove dirt, dust, oil, grease, etc.

WARNING:
Do not at any time let brake fluids, gasoline, petroleum-based products, penetrating oils, etc., come in contact with plastic parts. Chemicals can damage, weaken, or destroy plastic which could result in serious personal injury.
PUMP LUBRICATION
The pump on this unit is lubricated with a sufficient amount of high grade lubricant for the life of the unit under normal operating conditions. Therefore, no further lubrication is required.
PUMP MAINTENANCE
Routinely make a visual inspection of the pump. If you notice any leaking of lubricant around the pump seals, take the pressure washer to an authorized service center for repair.
There are no user serviceable parts to the pressure washer pump. Any attempt to service or alter the pump may damage the pressure washer and void your product warranty.
NOZZLE MAINTENANCE
See Figure 16.
Excessive pump pressure (a pulsing sensation felt while squeezing the trigger) may be the result of a clogged or dirty nozzle.
Turn off the pressure washer and shut off the water supply. Pull trigger to release water pressure.
Remove the battery pack.
Remove the nozzle from the spray wand.

WARNING:
NEVER remove nozzles without first turning off the motor, relieving the water pressure in the trigger handle, and locking the lock out on the trigger handle. NEVER point the nozzle at your face or at others. The quick-connect feature contains small springs that could eject the nozzle with some force. Failure to follow these instructions could result in an eye injury or other serious personal injury.
To free any foreign materials clogging or restricting the nozzle, blow out or remove debris with a straightened paper clip or fine needle (not included).
Using a garden hose, flush debris out of nozzle by back flushing (running the water through the nozzle backwards or from the outside to the inside).
Reconnect the nozzle to the spray wand.
Reinstall the battery pack.
MAINTENANCE
STORING THE PRESSURE WASHER
See Figure 17.
NOTE: Regular use of pump protector will give you better performance of the unit and increase the life of the pump.
Store in a dry, covered area where the weather can't damage it. It is important to store this product in a frost-free area. Always empty water from all hoses and the pump before storing.
Make sure the on/off switch is in the off (O) position.
Remove the battery and store in a secure location out of the reach of children.
Disconnect all hoses.
Neatly coil the hoses and store with hook-and-loop strap.
Tilt the unit as shown to allow any remaining water in the pump to drain from the water inlet.
NOTICE:
If the location where your pressure washer is stored will fall below 32^ , the use of a pump protector is required before storing to prevent freeze damage. Freeze damage will void your warranty.
Store the unit and accessories in an area that does not reach freezing temperatures. Do not store near furnace or other sources of heat that could dry out the pump seals.
This product has a five-year limited warranty for personal, family, or household use (90 days for business or commercial use). For warranty details, visit www.ryobitools.com or call (toll free) 1-800-525-2579.
TROUBLESHOOTING
| PROBLEM POSSIBLE CAUSE SOLUTION | ||
| Pressure washer does not start when trigger is depressed | Battery pack not installed | Install a battery. |
| Battery is low in charge | Charge the battery. | |
| The on/off switch is in the off position (O) | Put the on/off switch in the position (I) ECO. | |
| Pump doesn't produce pressure Inadequate water supply | Trigger handle leaks | Provide adequate water flow. |
| Nozzle is clogged | Check connections and / or replace trigger handle. | |
| Pump is faulty | Clean nozzle. | |
| Air in line | Contact authorized service center. | |
| Water inlet filter is clogged or dirty | Squeeze trigger on trigger handle to remove air from line. | |
| Remove the water inlet filter, rinse with warm water, then replace in unit. | ||
| Machine doesn't reach high pressure | Diameter of garden hose is too small | Replace with 3/4 in. garden hose. |
| Water supply is restricted | Check garden hose for kinks, leaks, and blockages. | |
| Not enough inlet water | Open water source full force. | |
| Hose is leaking | Replace hose. | |
| Kink in hose | Eliminate kinks in hose. | |
| No detergent Water supply is inadequate | Clogged | Check garden hose for kinks, leaks and blockages. |
| Wrong nozzle is attached | Attach blue or black soap nozzle. | |
| Detergent fails to mix with spray High pressure nozzle attached | Soap injection hose not properly submerged | Use blue or black soap nozzle to apply detergent |
| Insert soap injection hose into soap container | ||
| Wand leaks | O-ring needs replacing | Replace o-ring. If this does not correct the problem, contact your authorized service center to purchase a new wand. |
NOTES / NOTAS
INSTRUCTIONS IMPORTANTES CONCERNANT LA SÉCURITÉ

AVERTISSEMENT :
The siphon hose can be submerged directly into any fresh water source like a lake, pool, or a 5 gal. bucket for maximum portability
The siphon hose can be submerged directly into any fresh water source like a lake, pool, or a 5 gal. bucket for maximum portability
No permitted that you can use the equipment. No permit to use the equipment without a head start.

ADVERTENCIA:
- PARTS AND SERVICE: Prior to requesting service or purchasing replacement parts, please obtain your item, manufacturing, and serial numbers from the product data plate.
ITEM NO.* MANUFACTURING NO.
SERIAL NO.
- Model/item number on product may have additional letters at the end. These letters designate manufacturing information and should be provided when calling for service.
HOW TO OBTAIN REPLACEMENT PARTS: Replacement parts can be purchased online at www.ryobotools.com or by calling 1-800-525-2579. Replacement parts can also be obtained at one of our service centers.
HOW TO LOCATE A SERVICE CENTER: Service centers can be located online at www.ryobotools.com or by calling 1-800-525-2579.
HOW TO OBTAIN CUSTOMER OR TECHNICAL SUPPORT: To obtain customer or technical support please contact us at 1-800-525-2579.
RYOBI is a trademark of Ryobi Limited and is used pursuant to a license granted by Ryobi Limited.