82-0330-W - Mincer Weston - Free user manual and instructions
Find the device manual for free 82-0330-W Weston in PDF.

User questions about 82-0330-W Weston
0 question about this device. Answer the ones you know or ask your own.
Ask a new question about this device
Download the instructions for your Mincer in PDF format for free! Find your manual 82-0330-W - Weston and take your electronic device back in hand. On this page are published all the documents necessary for the use of your device. 82-0330-W by Weston.
USER MANUAL 82-0330-W Weston
Visit WestonBrands.com for our complete line of products and Use and Care Guides - as well as delicious recipes, tips, and to register your product online.
When using electrical appliances, basic safety precautions should always be followed to reduce the risk of fire, electric shock, and/or injury to persons, including the following:
- Read all instructions.
- This appliance is not intended for use by persons with reduced physical, sensory, or mental capabilities, or lack of experience and knowledge, unless they are closely supervised and instructed concerning use of the appliance by a person responsible for their safety.
- This appliance shall not be used by children. Keep the appliance and its cord out of reach of children.
- Close supervision is necessary when any appliance is used near children. Children should be supervised to ensure that they do not play with the appliance.
- To protect against risk of electrical shock, do not put cord, plug, base, or motor in water or other liquid.
- Turn the appliance OFF(), then unplug from outlet when not in use, before putting on or taking off parts, and before cleaning. To unplug, grasp the plug and pull from the outlet. Never pull from the power cord.
- Plug the grinder into a standard 120 Volt, 60Hz wall outlet. Check if the voltage indicated on the appliance corresponds to the local voltage before you connect the appliance.
- Do not operate any appliance with a damaged supply cord or plug, or after the appliance malfunctions or has been dropped or damaged in any manner. Supply cord replacement and repairs must be conducted by the manufacturer, its service agent, or similarly qualified persons in order to avoid a hazard. Call the provided technical service number for information on examination, repair, or adjustment.
- The use of attachments not recommended or sold by the appliance manufacturer may cause fire, electric shock, or injury.
-
Do not use outdoors.
-
Do not let cord hang over edge of table or counter or touch hot surfaces, including stove.
- Check that the appliance is OFF (O) before plugging cord into wall outlet. To disconnect, turn the control to OFF (O) then remove plug from wall outlet. To unplag, grasp the plug and pull from the outlet. Never pull from the power cord.
- Do not use the grinder without the tray/safety guard secured into place.
- Never feed food by hand. Always use the provided food pusher. Keep fingers clear of the auger and cutting blades at all times. Never reach into the grinder. Doing so may cause serious injury.
- Never use fingers to scrape food away from the grinding p while the grinder is in operation. Severe injury may result.
- Never operate the grinder unattended. Be safe. Disconnect the grinder from power source before leaving the work area.
- Avoid contacting moving parts. Never feed food by hand. Always use food Stomper.
- To reduce the risk of severe personal injury, and/or damage to the grinder, tie back loose hair and clothing, and roll up long sleeves before operating the grinder. Remove ties, rings, watches, bracelets, or other jewelry before operating the grinder.
- Be sure the grinder is on a stable work surface. Be sure all the grinder feet are stable.
- Do not place on or near a hot gas or electric burner, or in a heated oven.
- Do not run grinder without meat in the head. Severe damage to the head and auger may occur.
-
Wear eye protection. Wear safety glasses. Everyday eyeglasses are not safety glasses. Safety glasses conform to ANSI Z87.1 requirements. NOTE: Approved safety glasses have Z87 printed or stamped on them.
-
Do not use appliance for other than intended purpose.
- Do not attempt to operate the grinder if the grinder itself is cold. The grinder temperature should be at least 45^ (7^) before beginning.
- The gear housing and the motor cover may become hot during operation. This is normal. Do not touch these parts during operation or until they cool after use.
- WARNING! Busted, splintered bones can get into the digestive tract of a pet and cause severe damage, even death by puncturing the walls of the intestines or even the stomach.
-
This meat grinder is capable of grinding smaller, softer animal bones such as rabbit, whole chickens or chicken quarters, and other birds, due to both the power and all-metal construction of the units.
-
Avoid grinding large, dense animal bones as they are very difficult to process (i.e., bones one would find in large game, pigs, or cows).
- Grinding blade is sharp. Handle carefully.
- CAUTION! In order to avoid a hazard due to inadvertent resetting of the thermal cut-out, this appliance must not be supplied through an external switching device, such as a timer, or connected to a circuit that is regularly switched on and off by the utility.
SAVE THESE INSTRUCTIONS
Other Consumer Safety Information
This appliance is intended for household use only.
WARNING Entanglement Hazard: To avoid serious injury, do not reach into grinder inlet. Always use food pusher. Do not operate without tray in place.
WARNING Electrical Shock Hazard: This appliance is provided with a polarized plug (one wide blade) to reduce the risk of electric shock. The plug fits only one way into a polarized outlet. Do not defeat the safety purpose of the plug by modifying the plug in any way or by using an adapter. If the plug does not fit fully into the outlet, reverse the plug. If it still does not fit, have an electrician replace the outlet.
The length of the cord used on this appliance was selected to reduce the hazards of becoming tangled in or tripping over a longer cord. If a longer cord is necessary, an approved extension cord may be used. The electrical rating of the extension cord must be equal to or greater than the rating of the appliance. Care must be taken to arrange the extension cord so that it will not drape over the countertop or tabletop where it can be pulled on by children or accidentally tripped over.
Carry the unit by the motor housing with both hands. Do not carry by the tray or neck.
Parts and Features
BEFORE FIRST USE: Wash all removable parts in hot, soapy water. Rinse and dry.
To order parts: WestonBrands.com
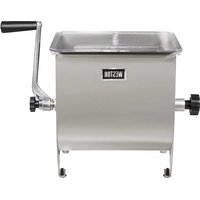
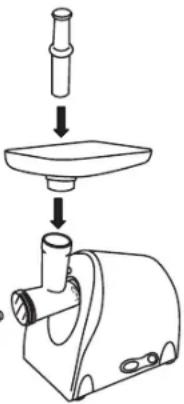
Grinder Assembly
WARNING Entanglement Hazard.
Disconnect power before cleaning, disassembling, or assembling.
- Unplug.
- Remove the ring nut, grinding plate, grinder blade, and auger from the grinder head before installing the grinder head to the base.
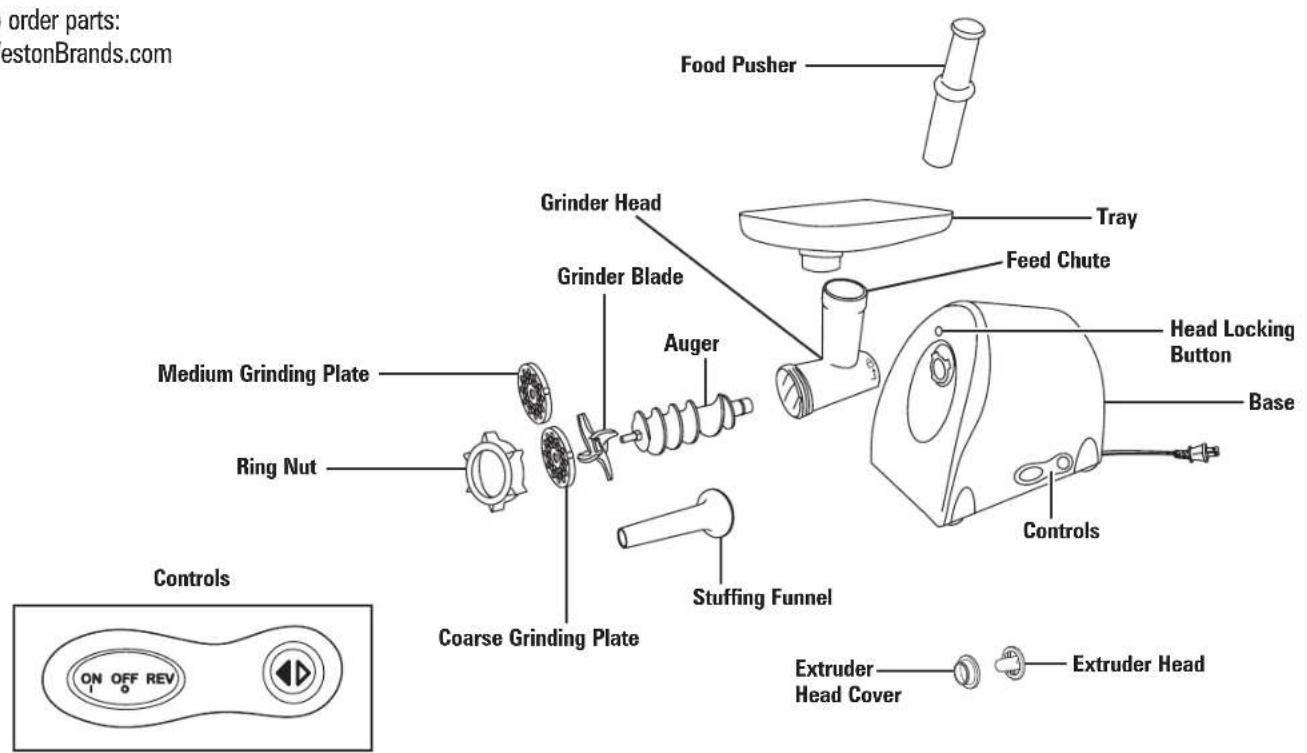
- Align notches on the grinder head with the tabs on the base.
- Press the grinder head against the motor and rotate it counterclockwise until it locks into place.
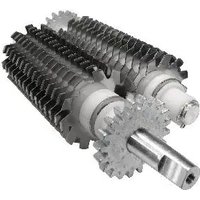
- Insert the auger into the grinder head, auger driver end first.
- Place the grinder blade onto the square portion of the auger pin. The cutting edges (flat side) of the blade should be facing out.
- Place the grinding plate of your choice onto the auger pin. Make sure the notch of the grinder plate fits into the positioning pin of the grinder head.
- Turn the ring nut clockwise onto the threaded end of the grinder head until it touches the grinder plate and is snug. DO NOT overtighten the ring nut.
- Place the tray on the upright part of the grinder head. NEVER use the grinder without the tray installed.

How to Grind
WARNING Entanglement Hazard.
To avoid serious injury do not reach into grinder inlet. Always use food pusher. Do not operate without Tray in place.
- Follow the "Grinder Assembly" instructions to fully assembly the grinder including the tray. NOTE: It is best to grind the meat using the coarse, 7-mm grinding plate first. If a finer grind of meat is desired, run the coarse ground meat through the grinder a second time using the medium, 5-mm grinding plate.
- Trim the meat of all cords, tendons, bones, shot, etc.
- For best results, be sure that all meat has been chilled to between 32^ - 34^ (0^ - 1^) before grinding. DO NOT ALLOW MEAT TO SIT OUT AT ROOM TEMPERATURE LONGER THAN ABSOLUTELY NEEDED. Closely follow the "Food outlined by the USDA at https://w
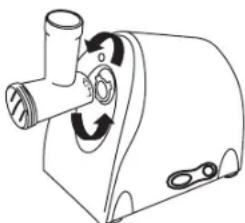
- Cut meat into sizes small enough to fit into the feed chute, approximately 1'' (2.5 cm) cubes.
- Place cubed meat to be ground into the tray. Do not overfill the tray; place just enough meat to leave the feed chute area open.
- Place a dish or bowl to collect the ground meat at the end of the grinder head.
- Make sure the grinder is in the OFF (position. Plug into outlet.
- Make sure the grinder is in the FWD position by pressing the (FORWARD) switch.
- Press ON (-) the grinder button. Carefully start feeding cubes of meat into the feed chute. ONLY USE THE FOOD PUSHER TO PUSH MEAT INTO THE HEAD. DO NOT USE YOUR FINGERS OR ANY OTHER OBJECT.
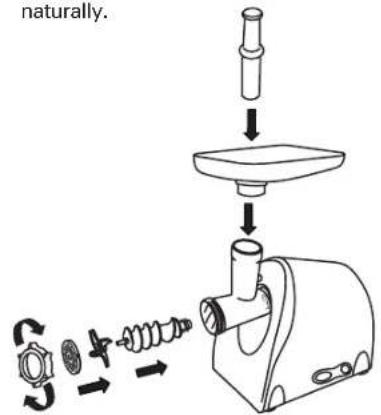
Stuffer Assembly
WARNING Entanglement Hazard.
Disconnect power before cleaning, disassembling or assembling.
1. Unplug
2. Remove the ring nut, grinding plate, grinder blade, and auger from the grinder head before installing the grinder head to the base.
3. Align notches on the grinder head with the tabs on the base.
4. Press the grinder head against the motor and rotate it counterclockwise until it locks into place.
5. Insert the auger into the grinder head, auger driver end first.
6. Place the grinder blade onto the square portion of the auger pin. The cutting edges (flat side) of the blade should be facing out.
7. Place the grinding plate of your choice onto the auger pin. Make sure the notch of the grinder plate fits into the positioning pin of the grinder head.
8. Insert the stuffing funnel through the ring nut and then onto the grinder head.
9. Turn the ring nut clockwise onto the threaded end of the grinder head until it touches the stuffing funnel. DO NOT overtighten the ring nut.
10. Place the tray on the upright part of the grinder head. NEVER use the grinder without the tray installed.
How to Stuff
WARNING Entanglement Hazard. To avoid serious injury do not reach into grinder inlet. Always use food pusher. Do not operate without tray in place.
- After grinding the meat following the "How to Grind" instructions, mix the ground meat with the sausage seasonings.
- Follow the "Stuffer Assembly" instructions to fully assemble the grinder as a stuffer including the tray. NOTE: While one person can stuff sausage with this grinder, it is recommended that two people perform this operation.
- Place seasoned ground meat into the tray. Do not overfill the tray; place just enough meat to leave the feed chute area open.
- Slide a sausage casing over the stuffing funnel.
- Slide 4^ - 6^ (10.2-15.2 cm) of casing from the end of the stuffing funnel and tie a knot in the end of the casing. If you are using large-diameter fibrous casing, hold the closed end of the casing tightly against the end of the stuffing funnel.
- Make sure the grinder is in the OFF (position. Plug into outlet.
- Make sure the grinder is in the FWD position by pressing the red (FORWARD) switch.
- Press ON (-) the grinder button. Carefully start feeding ground meat into the feed chute. ONLY USE THE FOOD PUSHER TO PUSH MEAT INTO THE HEAD. DO NOT USE YOUR FINGERS OR ANY OTHER OBJECT.
How to Stuff (cont.)
- Hold the casing in place with one hand while feeding the sausage mixture through the grinder. As the meat fills the casing, gently lay it on a clean, dry surface. NOTE: When using natural casings, use a wet surface.
- Do not fill the last 3^n - 4^n (8-10 cm) of casing. After the entire length of casing has been stuffed, twist the open end to close and then tie off the ends of the casing tightly to close. Twist into links.
- When stuffing sausage, fill the casing slowly to avoid air pockets. If air pockets do appear in the sausage, use a pin to prick the bubbles. The small holes will seal naturally.
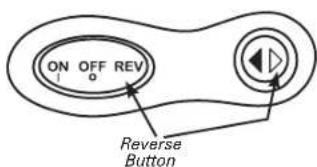
Using the Reverse Function
The reverse function only should be used for brief periods of time to help clear a jam.
- Allow the grinder motor to come to a COMPLETE STOP before engaging in REV (reverse).
- Push the REVERSE button; then press the REV switch. NOTE: NEVER operate the grinder in reverse for more than 5 seconds.
- If the grinder remains jammed after using the reverse function, turn the grinder to the OFF (O) position. Unplug. Disassemble the grinder head and clean it according to the "Care and Cleaning" instructions. Reassemble the grinder and follow the "How to Grind/How to Stuff" instructions.
Tips
- Any time that you change the grinding plates, the head should be removed COMPLETELY to prevent pushing meat back into the motor drive shaft housing.
- To prevent overheating, do not operate the grinder for more than 15 minutes at a time. Allow the grinder to cool periodically.
DO NOT overtighten the front ring nut. It should be firmly tight. - Make sure the grinder blade lays flat on the grinder plate.
- DO NOT operate the grinder without meat in the head. Running the grinder while dry could damage the head and auger.
- Always lubricate the head, grinding plate, and grinding blade with a food-grade silicone spray after cleaning.
- DO NOT grind bones or other hard objects.
Care and Cleaning
WARNING Electrical Shock Hazard. Disconnect power before cleaning, disassembling, or assembling. Do not immerse cord, plug, or motor in water or other liquid.
- Unplug from outlet.
- Unscrew the ring nut and remove all parts from the grinder head.
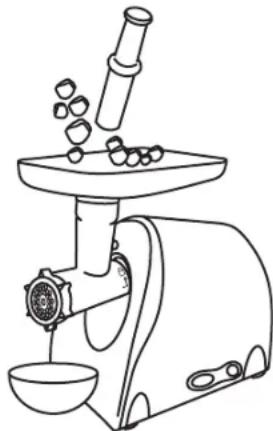
- To remove the grinder head, press the head locking button and turn the grinder head clockwise.
- Wash all parts that come in contact with food in hot soapy water. Rinse and dry. The grinder parts are not dishwasher-safe. DO NOT use bleach.
- Fully lubricate the grinder head, grinding plates, and the grinder blade with food-grade silicone spray before and after each use.
- Clean the main body with a soft damp towel. Dry. DO NOT immerse the main body of the grinder in water or other liquids.
WESTON
ONE-YEAR LIMITED WARRANTY
This warranty applies to products purchased and used in the U.S. and Canada. This is the only express warranty for this product and is in lieu of any other warranty or condition.
This product is warranted to be free from defects in material and workmanship for a period of one (1) year from the date of original purchase. During this period, your exclusive remedy is repair or replacement of this product or any component found to be defective, at our option. If the product or component is no longer available, we will replace with a similar one of equal or greater value.
This warranty does not cover unauthorized repairs or service to products, products sold "as-is" by retailers, glass, filters, wear from normal use, use not in conformity with the printed directions, or damage to the product resulting from accident, alteration, abuse, or misuse. This warranty extends only to the original consumer purchaser or gift recipient and is not transferable. Keep the original sales receipt, as proof of purchase is required to make a warranty claim. This warranty is void if the product is subjected to any voltage and waveform other than as specified on the rating label (e.g., 120V ~ 60 Hz).
We exclude all claims for special, incidental and consequential damages caused by breach of express or implied warranty. All liability is limited to the amount of the purchase price. Every implied warranty, including any statutory warranty or condition of merchantability or fitness for a particular purpose, is disclaimed except to the extent prohibited by law, in which case such warranty or condition is limited to the duration of this written warranty.
This warranty gives you specific legal rights. You may have other legal rights that vary depending on where you live. Some states or provinces do not allow limitations on implied warranties or special, incidental, or consequential damages, so the foregoing limitations may not apply to you.
To make a warranty claim, do not return this appliance to the store. Visit WestonBrands.com. For faster service, locate the model, type, and series numbers on your appliance.