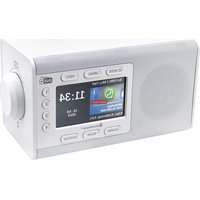
DAB900 - Radio Soundmaster - Free user manual and instructions
Find the device manual for free DAB900 Soundmaster in PDF.


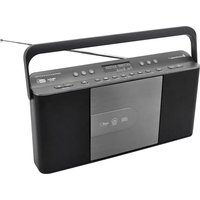
| Product Type | DAB+/FM Digital Radio with Bluetooth |
| Brand | Soundmaster |
| Model | DAB900 |
| Dimensions (approx.) | 200 x 120 x 80 mm |
| Weight (approx.) | 0.5 kg |
| Power Supply | AC mains adapter (230 V~, 50 Hz) or batteries (not included) |
| Power Consumption | Low in standby; adjustable backlight |
| Reception Bands | DAB+ (Band III), FM 87.5-108 MHz |
| Bluetooth | Yes, version 5.0 (estimated), range approx. 10 m |
| Speaker | Built-in speaker, mono |
| Audio Output Power | Approx. 2 W RMS |
| Display | Backlit LCD screen, station information display |
| Main Functions | Automatic DAB/FM scan, 4 direct presets, dual alarm, standby, timer, line/headphone output |
| Presets | 4 direct buttons (1-4) for DAB and FM stations |
| Alarm | Dual alarm with source selection (DAB, FM, buzzer), snooze up to 30 min |
| Sleep Timer | Yes, up to 120 minutes in 5-minute increments |
| Connectors | DC jack (power), 3.5 mm headphone jack, 3.5 mm line jack, USB-C port (update only) |
| Antenna | Telescopic DAB/FM antenna |
| Care and Cleaning | Clean with a dry cloth, no abrasive or detergent |
| Safety | Do not open the device (risk of electric shock), avoid moisture, do not block ventilation grilles |
| Operating Temperature | Temperate climate only, do not expose to excessive heat |
| Package Contents | Radio, mains adapter, instruction manual |
Frequently Asked Questions - DAB900 Soundmaster
User questions about DAB900 Soundmaster
0 question about this device. Answer the ones you know or ask your own.
Ask a new question about this device
Download the instructions for your Radio in PDF format for free! Find your manual DAB900 - Soundmaster and take your electronic device back in hand. On this page are published all the documents necessary for the use of your device. DAB900 by Soundmaster.
USER MANUAL DAB900 Soundmaster
Do not dispose of this product with the normal household waste at the end of its life cycle. Return it to a collection point for the recycling of electrical and electronic devices. This is indicated by the symbol on the product, user manual or packaging
The materials are recyclable according to their labeling. By reusing materials or other forms of recycling old devices and packaging, you are making an important contribution to protecting our environment. If necessary, remove batteries and personal data before disposal free of charge and ask your local authority about the responsible disposal point.
| 3 | WARNING Risk of electric shock Do not open! | 1 |
| Caution: To reduce the risk of electric shock, do not remove the cover (or back). There are no user serviceable parts inside. Refer servicing to qualified service personnel. | ||

This symbol indicates the presence of dangerous voltage inside the enclosure, sufficient enough to cause electric shock.
This symbol indicates the presence of important operating and maintenance instructions for the device
Used batteries are hazardous waste and NOT to be disposed of with the household waste! As a consumer you are legally obligated to return all batteries for environmentally responsible recycling - no matter whether or not the batteries contain harmful substances*)
Return batteries free of charge to public collection points in your community or shops selling batteries of the respective kind. Only return fully discharged batteries *) marked Cd = cadmium, Hg = mercury, Pb = lead
- Only use mercury and cadmium-free batteries.
- Used batteries are hazardous waste and NOT to be disposed of with the household waste!!!
- Keep batteries away from children. Children might swallow batteries.
- Contact a physician immediately if a battery was swallowed.
- Check your batteries regularly to avoid battery leakage.
- Batteries shall not be exposed to excessive heat such as sunshine, fire or the like.
- CAUTION: Danger of explosion if battery is incorrectly replaced
- Replace only with the same or equivalent type
To prevent possible hearing damage, do not listen at high volume levels for long periods
- Use the device in dry indoor environments only.
- Protect the device from humidity.
- This apparatus is for moderate climates areas use, not suitable for use in tropical climates countries.
- No objects filled with liquids, such as vases, shall be placed on the apparatus.
Safety, Environmental and Setup Instructions
- The mains plug or an appliance coupler is used as the disconnect device, the disconnect devices shall remain readily operable.
- Connect this device to a properly installed and earthed wall outlet only. Make sure the mains voltage corresponds with the specifications on the rating plate.
- Make sure the mains cable stays dry during operation. Do not pinch or damage the mains cable in any way.
- A damaged mains cable or plug must immediately be replaced by an authorized service center.
- In case of lightning, immediately disconnect the device from the mains supply.
Children should be supervised by parents when using the device. - Clean the device with a dry cloth only.
- Do NOT use CLEANING AGENTS or ABRASIVE CLOTHS!
- Do not expose the device to direct sunlight or other heat sources.
- Install the device at a location with sufficient ventilation in order to prevent heat accumulation.
- Do not cover the ventilation openings!
- Install the device at a safe and vibration-free location.
- Install the device as far away as possible from computers and microwave units; otherwise radio reception may be disturbed.
- Do not open or repair the enclosure. It is not safe to do so and will void your warranty. Repairs only by authorized service/ customer center.
- No naked flame sources, such as lighted candles, should be placed on the unit.
- When you are necessary to ship the unit store it in its original package. Save the package for this purpose.
- In case of malfunction due to electrostatic discharge or fast transient (burst), remove and reconnect the power supply.
- If the unit is not using for a long period of time, disconnect it from the power supply by unplugging the power plug. This is to avoid the risk of fire.
LOCATION OF CONTROLS
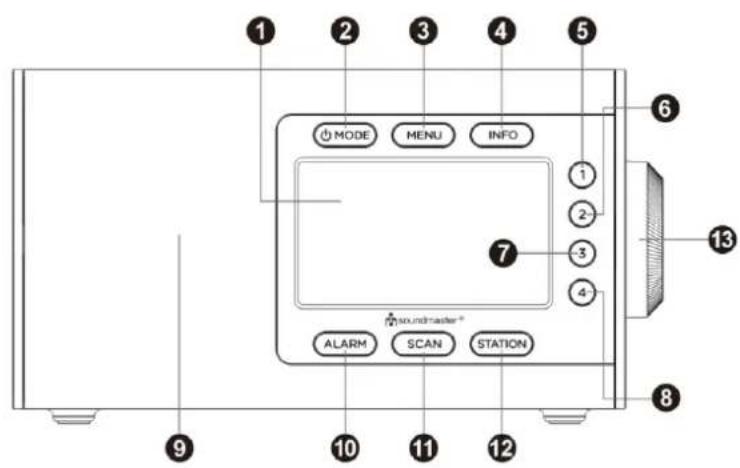
1 LCD Display
2 On/off/Mode selection
3 Open system menu
4 INFO Shows station information
5 1 Favorite 1 button
6 2 Favorite 2 button
7 3 Favorite 3 button
8 4 Favorite 4 button
9 Speaker
10 Alarm setting & activation
11 Starting DAB & FM scan
12 DABFM station list
13 NAVIGATION/OK/VOLUME
Turn for navigate in the menu Press to confirm selection Turn for volume adjustment
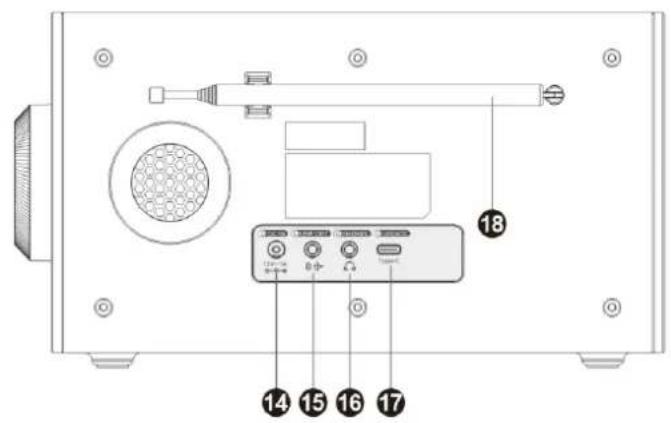
14 DC jack
15 3.5 mm Line Out jack
16 3.5 mm Headphone jack
17 USB-C jack (for update only)
18 DAB/FM Antenna
CONTENT OF DELIVERY
Main unit
Instruction manual
AC power supply
INSTALLATION
POWER SUPPLY
Ensure that the voltage is the same as that indicated on the power supply identification plate.
Connect the supplied AC power supply to a properly installed safety power socket and the plug of the cable into the DC IN socket at the back side of the unit.
Extend completely the telescopic antenna and adjust for best DAB and FM reception.
Initial settings after first switch on, you can select below options:
Each option can select by turn and confirmed by pressing "NAVIGATION / OK / VOLUME".
- Select the desired operating language
- Have 12- or 24-hours' time indication
The radio station announcement style and screen saver slide show
After the setting completed DAB scan will be done and search all available stations
- During the scan the display show the number of found stations.
After the scan has finished, the unit will play the first alphanumericly found station.
BASIC OPERATIONS
POWER ON / OFF
Press MODE to turn the unit on.
Press and hold MODE to turn off the unit in standby mode.
SELECTING MODES
During playing mode, press the MODE repeatedly to select the modes.
ADJUSTING VOLUME
Turn "NAVIGATION / OK / VOLUME" for adjust the volume.
DAB
Switch on and choose the DAB mode.
Press STATION to open the DAB station list, rotate "NAVIGATION / OK / VOLUME" to choose, press it to confirm the required station.
Note:
If there is no DAB+ reception at any time, change the position of the unit or adjust the antenna. Press and hold SCAN to start full scan again.
If DAB reception is poor, dropouts may occur or the sound will be muted.
Change the position to improve the reception.
DAB STATION INFORMATION
Press INFO repeatedly to cycle through the following information (if available).
Program type (PTY) Ensemble name & Frequency
Bitrate codec Dynamic label segment (DLS)
Press "NAVIGATION / OK / VOLUME" for zoom DAB slide show.
FM
Switch on and select the FM mode.
AUTOMATIC STATION STORAGE
To start the automatic station storage press and hold SCAN
The radio automatically saves every found station to the FM station list.
Press STATION to open the FM station list, rotate "NAVIGATION / OK / VOLUME" to choose, press it to confirm the required station.
MANUAL/AUTOMATIC TUNE
Press "NAVIGATION / OK / VOLUME" to open FM tuning mode, turn it to adjust the reception frequency in 50kHz steps.
When you press in FM tuning mode the FM search is starting and it is stopping at the next available station.
Press "NAVIGATION / OK / VOLUME" to go back to volume adjustment.
DAB & FM PRESET STATIONS
You can also store desired radio station directly to preset station buttons "1 - 4". To do this, select the desired radio station press and hold the corresponding station button pressed until "Preset # stored" appears on the display.
DAB & FM RECALL PRESET STATIONS
To call up a saved preset station, press the corresponding preset station button on the device.
BLUETOOTH
- Switch the unit on and select Bluetooth mode, the display shows "Pairing".
- The Bluetooth symbol on LCD display will flash while the device is searching for a Bluetooth signal.
- Start the device scan on your mobile device and select [DAB900] on your mobile device.
- After successful pairing the display shown "Connected"
- You can now stream over your mobile device.
- You can use the Preset buttons to track control.
1 = Skip backwards 2 = Play
3 = Pause 4 = Skip forward
Note: When unit is 15 minutes in pause it will switch automatically in standby mode.
HEADPHONE
During usual operation insert the earphone's cable (not included) into the matching 'PHONES' socket of the unit. Now you can hear the sound exported to your earphones.
Note: Adjust the volume lever lower during the PHONES operation.
To prevent possible hearing damage, do not listen at high volume levels for long periods.
LINE OUT
You can connect the unit to an external amplifier or record player (such as a tape recorder) via the line out jack. To do this, connect the device with 3.5mm cable.
ALARM
- Press ALARM, select with "NAVIGATION / OK / VOLUME" Alarm 1 or 2 for setting and confirm by press NAVIGATION/OK/VOLUME
(NOTE: each option can be selected by turning "NAVIGATION / OK / VOLUME" and confirmed by pressing "NAVIGATION / OK / VOLUME" and go to the next setting step)
- Select "ON" to enable Alarm 1 or 2
- Set the Alarm time with hours and minutes.
- Select the alarm frequency:
Daily every day
Once wake up once at the set alarm time
Mo - Fr Monday to Friday
Sa - Su Saturday and Sunday
Select Day specific days from Monday to Sunday can selected
- Source (DAB; FM; Buzzer)
- Preset 1-4 (only when DAB or FM is selected)
- Volume (during Alarm the volume is increasing to the set value)
- Duration (no shut down up to 120 minutes in 5 minutes steps.
Same setting routine as for Alarm 2
ENABLE / DISABLE ALARM
Press and hold ALARM to toggle enable / disable the Alarm 1/2 in following cycles:
Frist: ALARM 1 ON
Second: ALARM 1 & 2 ON
Third: ALARM 2 ON
Fourth:ALARM1&2OFF
When the Alarm is set to ON the relevant icon is visible in the display.
SNOOZE
When alarm sounds, press "NAVIGATION / OK / VOLUME" to temporarily suspend the alarm. The alarm sounds again after 5 minutes. When you press "NAVIGATION / OK / VOLUME" repeatedly to Snooze time will be enlarged up to max 30 minutes.
TURN OFF ALARM
When alarm sound, press MODE to turn off the alarm sound.
SYSTEM MENU
- Press MENU to access menu.
- Turn "NAVIGATION / OK / VOLUME" to toggle through the menu
- Press "NAVIGATION / OK / VOLUME" to confirm the selected option
- Press (MENU) again to exit the menu level.
| ICON | DESCRIPTION | AVAILABLE OPTIONS |
| Standby display backlight | Set backlight from 01 -100% When set to high value there is a warning for higher stand by power consumption | |
| Time indication | Select time announcement 12- or 24-hour style | |
| Screen display | Select between text only, image text & image with subtitles. When screens saver option is enabled, the display is zooming to DAB slideshow after the set time. | |
| Language | Select between German; English; Français; Italian | |
| Set time/date | Manual time / date setting | |
| Software version | Shows the software version | |
| Factory reset | Set unit to factory default |
The current version of the manual can be downloaded from www.soundmaster.de
Technical changes and misprints reserved.
Copyright by Woerlein GmbH, 90556 Cadolzburg, www.soundmaster.de
Duplication only with the permission of Woerlein GmbH
CE

PROTECTION DE L'ENVIRONNEMENT

3 = Pause 4 = Saut avant
WEKKER INSCHAKELEN/UITSCHAKELEN
Cadolzburg, www.soundmaster.de
Hereby, Wörlein GmbH declares that this device is in compliance with the essential requirements and other relevant provisions of Directive 2014/53/EU.
A copy of the declaration of conformity can be obtained from the above address.

- To prevent possible hearing damage, do not listen at high volume levels for long periods
- LOCATION OF CONTROLS
- CONTENT OF DELIVERY
- INSTALLATION
- POWER SUPPLY
- Initial settings after first switch on, you can select below options:
- BASIC OPERATIONS
- POWER ON / OFF
- SELECTING MODES
- ADJUSTING VOLUME
- DAB
- Note:
- DAB STATION INFORMATION
- FM
- AUTOMATIC STATION STORAGE
- MANUAL/AUTOMATIC TUNE
- DAB & FM PRESET STATIONS
- DAB & FM RECALL PRESET STATIONS
- BLUETOOTH
- HEADPHONE
- LINE OUT
- ALARM
- ENABLE / DISABLE ALARM
- SNOOZE
- TURN OFF ALARM
- SYSTEM MENU
- PROTECTION DE L'ENVIRONNEMENT
- WEKKER INSCHAKELEN/UITSCHAKELEN
Brand : Soundmaster
Model : DAB900
Category : Radio