
MOD-54 - Vacuum Cleaner MPM - Free user manual and instructions
Find the device manual for free MOD-54 MPM in PDF.

| Product Type | Canister Vacuum Cleaner |
| Brand | MPM |
| Model | MOD-54 |
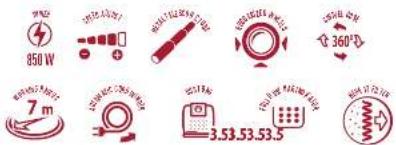
| Power Supply | Mains, 220-240 V ~ 50/60 Hz (estimated) |
| Power Cord Length | 5 m |
| Operating Radius | 7 m |
| Filtration Type | HEPA 13 filter, motor filter, exhaust filter |
| Dust Bag Capacity | Not specified (disposable or textile bag) |
| Power Adjustment | Rotary dial (MIN to MAX) |
| Bag Full Indicator | Yes, red visual indicator |
| Cord Rewind | Yes, with button |
| Included Accessories | Floor and carpet brush, parquet brush, crevice nozzle, upholstery nozzle |
| Suction Tube | Metal telescopic tube |
| Noise Level | Not specified |
| Weight | Not specified |
| Dimensions | Not specified |
| Usage | Domestic, dry surfaces only |
| Routine Maintenance | Empty bag, clean filters (do not wash) |
| Safety Instructions | Do not vacuum liquids, sharp objects, heat sources |
| Warranty | Not specified |
Frequently Asked Questions - MOD-54 MPM
User questions about MOD-54 MPM
0 question about this device. Answer the ones you know or ask your own.
Ask a new question about this device
Download the instructions for your Vacuum Cleaner in PDF format for free! Find your manual MOD-54 - MPM and take your electronic device back in hand. On this page are published all the documents necessary for the use of your device. MOD-54 by MPM.
USER MANUAL MOD-54 MPM
EN We wish you satisfaction from using the product and invite you to check a wide range of other MPM appliances
natural_image
Black vacuum cleaner with handle and control knob (no visible text or symbols)MOD-54
SACIOVY VYSAVAC STA.NSAUSGRIFUTT KOTT DEGATO-VMIMEJA DAGRATI COVTR ASPRADORA DE BOLSA ASR RATEUR EN SAC ZSÁNOS PORSZIVO ASFIRAPOLVERE CON SACCO SIURELYS SU MA SEILU NAISA PUTELLI SUCIELS ST OZUCHE IN ZAK ODIL RZACZ WORKOWY ASPIRATOR CU SAC TIEMIECOC O MELINOM VRECKOVY VYSAVAC THIIOCOC 3 MILLIONUM
NAVOD K OBSUZE
DE BLDILNUNGSANLLITUNG
KASJTUSJUI LND 14
EN USER MANUAL 9
ES MANUALD INSTRUCCIONLS 24
FR MANUEL DE L'UTILISATEUR 30
HU HASZNÁLATI JTASÍTÁS 36
IT MANUALE D USO 41
LT VARTOTOJOVADOVAS 47
LV IIFOTAJIAROKASGRAMATA 52
NL CCRUKERSI HANDLEDING 57
PL INSTRUKCJA OBSLUGI 63
RO MANUAL OF UTILIZATION 69
RU ИНСТРУКЦИЯ ПО ОБСЛУЖИВАЛИЮ 74
SK POLIŽ VATFISKA PRUČKA 80
UA ПОСИБНИК КОРИСТУВАЧА 86
MPM agd S.A.
PŘED PRVNÍM POUŽITÍM SE SEZNAMTE S OBSAHEM NÁVODU K OBLSUZE
-Read the instructions carefully before use.
-Always unplug when the appliance is not in use or before cleaning it.
- Check that the power parameters on the appliance's rating plate correspond to the parameters of your power supply network.
- Do not hang the cable on sharp edges or allow it to come into contact with hot surfaces.
- Never pull on the cable to disconnect the appliance from the power source.
-Never leave the vacuum cleaner switched on unattended.
-Take special care when children are near the appliance.
- Do not let the vacuum cleaner ride on the mains cable, as this can damage the cable's insulation cover.
- Do not attempt to use the vacuum cleaner if you suspect any technical fault.
- Never use an appliance, including one with a damaged cord or plug, in which case have it repaired at an authorised service centre.
-Use of accessories not recommended by the manufacturer may cause damage to the appliance, personal injury or fire.
-Take extra care when operating the vacuum cleaner on stairs.
- Do not immerse the appliance, cord or plug in water or other liquids; the power cord and plug must always be dry.
-Do not use the vacuum cleaner to pick up flammable and corrosive liquids, solvents, matches, ashes, cigarette butts, oils, sharp objects, etc. This can damage the appliance or even cause fire! Do not vacuum near flammable liquids or substances either!
-Keep the vacuum cleaner away from all heat sources (radiators, cookers, etc.) due to its plastic housing.
-Do not block the vacuum cleaner inlet and outlet openings!
-The appliance is intended for domestic use only.
- This equipment may be used by children of at least 8 years of age and by persons of diminished physical, mental capacity and lack of experience and knowledge of the equipment if supervision or instruction is provided regarding the safe use of the equipment so that the hazards involved are understood. Unsupervised children should not perform cleaning and maintenance of the equipment.
- The appliance is not a toy and should not be used as such by children.
-Keep the device and its cord out of reach of children under 8 years of age. - Do not vacuum people or pets, and take particular care not to bring the nozzle close to your eyes or ears.
- Switch off the appliance and disconnect its power supply before the replacement.
- Do not vacuum without the bag and the filters, or if they are damaged.
-Check the suction hose, pipes and nozzles – remove debris inside.
-Use the vacuum cleaner only indoors and only for vacuuming dry surfaces. Dry wet cleaned carpets before vacuuming. - For the safety of children, please do not leave freely accessible parts of the packaging (plastic bags, cardboard boxes, polystyrene, etc.).
- WARNING! Do not allow children to play with the film. Danger of suffocation!
DESCRIPTION OF THE APPLIANCE
- On / off switch
- Power cord retractor button
- Suction power regulator
- Dust bag fill indicator
- Top cover
- Upper lid opening button
- Carrying handle
- Outlet filter cover
- Exhaust filter
- Hepa 13 filter
- Rack for the dust bag
- Dust bag
-
Motor filter protection grille
-
Motor filter
- Crevice nozzle compartment
- Power cable
- Suction hose connection hole
- Suction hose with handle
- Telescopic metal tube
- Parking handle
- Vacuum Cleaner wheels
- Floor and carpet brush
- Parquet brush
- Crevice attachment
- Long crevice attachment
- Furniture attachment
ELECTROSTATICS
Vacuuming certain surfaces in low humidity conditions may cause the unit to become slightly electrified. This is a natural phenomenon, which does not damage the appliance and is not a defect.
In order to minimise this phenomenon, it is recommended to:
- discharge the appliance by frequently touching metal objects in the room with the tube,
- increase air humidity in the room,
- use generally available anti-electrostatic agents.
ASSEMBLY OF THE APPLIANCE
- Unpack the appliance and remove all fillers, stickers and bags.
- Check whether the dust bag and all filters are properly assembled on the vacuum cleaner. The detailed description of the assembly and disassembly can be found in chapters: "EMPTYING THE DUST BAG" and "CLEANING AND REPLACEMENT OF FILTERS".
- Press two latches located at the end of the suction hose (18), then insert the hose into the hole (17) and release the latches. In order to disassemble these elements press the latch and remove the hose (18) from the hole (17).
- Connect the telescopic tube (19) to the other side of the suction hose with the handle. Put one of the attachments (22), (23), (24), (25), or (26) on the end of the tube. The length of the telescopic tube can be adjusted by pressing the button on the tube and extending/retracting the tube according to the user's needs.
USING THE APPLIANCE
- Before switching on the vacuum cleaner, unfold the power cord (16) to the appropriate length and insert the plug into the mains socket. The yellow sign on the power cord means the optimal length. Do not extend the cord beyond the red marking! When unfolding the cord, do not press the cord retractor button (2).
- Press the switch (1) to switch on the vacuum cleaner.
CAUTION! It is recommended to set the suction power regulator (3) to MIN before switching the vacuum cleaner on!
- During the operation of the appliance, select the optimal suction power with the suction power regulator (3).
- Follow the rule that we use the lowest power for delicate surfaces (MIN), gradually increasing it for carpets and floors with heavy soiling (MAX).
- Keep the dust bag level under regular control. The overfilling of the bag will result in the weakening of the suction power and the fast soiling of the filters.
CAUTION! If the suction pipe is clogged or the dust bag is filled to the maximum, the bag fill indicator will turn red. It is then necessary to empty the dust bag or remove the cause of the clogged suction pipe.
- To retract the power cord, press the cord retractor button (2) with one hand and hold the cord with the other hand to prevent sudden shuffling that could damage the cord.
- In order to position the appliance in an optimal way after work, use the parking catch (20) located in the rear part of the vacuum cleaner. Place the rail at the back of the floor-carpet brush with the connected suction hose and telescopic tube on the parking catch. The second catch, which facilitates the storage of the vacuum cleaner in the vertical position is located underneath the appliance.
DESCRIPTION OF ACCESSORIES
FLOOR AND CARPET BRUSH
It is designed for the cleaning of large and flat surfaces. It is equipped with wheels which facilitate movement in hard-to-reach areas and a flexible joint which connects it to the suction hose, allowing it to be guided at different angles. When the button on the top of the attachment is pressed (switching it to the brush mode), a row of stiff bristles will appear on the underside of the attachment, allowing hard floors to be cleaned.
PARQUET BRUSH
It is designed for vacuuming scratch-prone surfaces such as wooden floors, parquet floors and floor panels.
CREVICE ATTACHMENT AND LONG CREVICE ATTACHMENT
It is used for cleaning hard-to-reach areas such as corners of rooms, next to and under furniture and in folds and crevices. It is also perfect for cleaning computer keyboards, drawers, radiators or window frames.
FURNITURE ATTACHMENT
It is designed for collecting dust and removing dirt from flat surfaces, furniture, upholstery and mattresses. Owing to its smaller size, it proves its value in vacuuming hard-to-reach areas, where the floor-carpet brush does not fit. By attaching a bristle brush to the attachment, we get a tool that facilitates the vacuuming of, for example, blinds, furniture, soft surfaces such as seat upholstery, chair upholstery, creases in soft furniture such as pouffes, sofas, couches or particularly delicate objects such as lampshades.
In order to empty the dust bag, switch off the vacuum cleaner, disconnect it from the power source, unhook the suction hose (18), then open the top cover (5) using the button (6) and remove the bag with the rack. Then slide the bag out of the rack (11) and over the waste bin remove the plastic seam sealing the bag. Once the bag has been emptied, the seam sealing the bag should be reattached, the bag inserted into the rack and the rack fitted to the vacuum cleaner. Finally, close the upper cover (5).
CLEANING AND REPLACEMENT OF AIR FILTERS
Every now and then, normal operation of the vacuum cleaner requires the replacement or cleaning of the filter that covers the motor on the dust bag side and the filters at the air outlet. Therefore, disconnect the appliance from the power source and remove the suction pipe.
- Open the upper cover (5), remove the dust bag (12), then open the motor filter protection grille (13) and remove the motor filter (14) from the grille.
- Remove the filter cover (8) and gently pull out the outlet filter (9) and the Hepa 13 filter (10).
- Remove dust from the removed filters using fine bristles. Do not immerse or wash filters in water or other liquids.
- Clean the filter inserts every month or more frequently (depending on the frequency of use). If any of the inserts is too dirty or damaged, replace it with a new one.
- After cleaning, fit the filters in their places.
CLEANING AND MAINTENANCE
- Clean the housing of the vacuum cleaner and the rest of its external components from time to time with a damp cloth. This will help keep the appliance looking good.
- Sharp objects and all kinds of strong cleaning agents (e.g. solvents) must not be used for this purpose, as this will permanently damage the vacuum cleaner housing.
- In the case of air filters and the dust bag, act in accordance with the above-mentioned hints.
IN CASE OF FAILURE
Type of failure: Possible causes: Tips:
| front cover not closed properly | the dust bag is not inserted or it is inserted improperly | instal the dust bag properly |
| overheating of the vacuum cleaner housing | Slight heating of the housing is normal; if it gets very hot, switch off the vacuum cleaner and contact the service centre | |
| heavily soiled filters clean or replace the filters | ||
| low suction power | filled up dust bag replace the dust bag or empty the textilebag | |
| clogged hose or extension pipe remove any objects that block the hose or pipe |
TECHNICAL DATA
Technical specifications are given on the product nameplate.
Length of mains cable: 5 m
Range of the vacuum cleaner: 7 m

CAUTION! MPM agd S.A. reserves the right to technical changes.
Proper disposal of the product (waste electrical and electronic equipment)
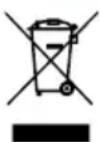
Marking on the product indicates that after the service-life of the product expires, it should not be disposed with other type of municipal waste. Used equipment may have a negative impact on the environment and health of people due to potentially containing hazardous substances, mixtures and components.
Mixing electric waste with other types of waste or disassembling those in an unprofessional manner may cause a release of substances that are hazardous to the environment and health. Used equipment should
be handed-over to a point for collection of electric waste. In order to obtain detailed information regarding the electric waste collection points, the user should contact the municipal point of electric waste collection or used equipment processing department.
ANTES DEL PRIMER USO, LEE ATENTAMENTE LAS INSTRUCCIONES DE FUNCIONAMIENTO
ATTACCO A FESSURA E ATTACCO A FESSURA LUNGA
BESCHRIJVING VAN HET APPARAAT
INSTALLATIE VAN HET APPARAAT
ACCESSOIRE BESCHRIJVING:
VLOER- EN TAPIJTBORSTEL
- MOD-54
- PŘED PRVNÍM POUŽITÍM SE SEZNAMTE S OBSAHEM NÁVODU K OBLSUZE
- DESCRIPTION OF THE APPLIANCE
- ELECTROSTATICS
- ASSEMBLY OF THE APPLIANCE
- USING THE APPLIANCE
- CAUTION! It is recommended to set the suction power regulator (3) to MIN before switching the vacuum cleaner on!
- CAUTION! If the suction pipe is clogged or the dust bag is filled to the maximum, the bag fill indicator will turn red. It is then necessary to empty the dust bag or remove the cause of the clogged suction pipe.
- DESCRIPTION OF ACCESSORIES
- FLOOR AND CARPET BRUSH
- PARQUET BRUSH
- CREVICE ATTACHMENT AND LONG CREVICE ATTACHMENT
- FURNITURE ATTACHMENT
- CLEANING AND REPLACEMENT OF AIR FILTERS
- CLEANING AND MAINTENANCE
- IN CASE OF FAILURE
- TECHNICAL DATA
- Proper disposal of the product (waste electrical and electronic equipment)
- ANTES DEL PRIMER USO, LEE ATENTAMENTE LAS INSTRUCCIONES DE FUNCIONAMIENTO
- ATTACCO A FESSURA E ATTACCO A FESSURA LUNGA
- BESCHRIJVING VAN HET APPARAAT
- INSTALLATIE VAN HET APPARAAT
- ACCESSOIRE BESCHRIJVING:
- VLOER- EN TAPIJTBORSTEL
Brand : MPM
Model : MOD-54
Category : Vacuum Cleaner