WS 2050 WP - Lighting BRENNENSTUHL - Free user manual and instructions
Find the device manual for free WS 2050 WP BRENNENSTUHL in PDF.

| Product Type | LED projector with motion detector |
| Brand | Brennenstuhl |
| Model | WS 2050 WP |
| Category | Outdoor lighting |
| Rated voltage | 220-240 V~ 50/60 Hz |
| Power consumption | 20.5 W |
| Max current | 0.12 A |
| Power factor | 0.9 |
| Protection rating | IP44 |
| Protection class | I |
| Dimensions (L x W x H) | 165 x 170 x 183 mm |
| Weight | 0.63 kg |
| Maximum projection area | 115.5 cm² |
| Motion detector (PIR) | Yes, adjustable in sensitivity and duration |
| Temperature range | -20°C to +40°C |
| Maximum mounting height | 3 m |
| Recommended mounting height (with detector) | 2.5 m |
| Adjustable lighting duration | 10 seconds to 4 minutes |
| Light source | Non-replaceable LED (replace entire unit) |
| Package contents | Projector, instruction manual, screws, wall plugs, washers, connection plate, clamp |
| Maintenance | No maintenance required; do not open |
| Cleaning | Dry or slightly damp cloth, without solvent |
| Disposal | In accordance with WEEE Directive 2012/19/EC, do not dispose of with household waste |
| Manufacturer | H. Brennenstuhl S.A.S., 4 rue de Bruxelles, F-67170 Bernolsheim |
Frequently Asked Questions - WS 2050 WP BRENNENSTUHL
User questions about WS 2050 WP BRENNENSTUHL
0 question about this device. Answer the ones you know or ask your own.
Ask a new question about this device
Download the instructions for your Lighting in PDF format for free! Find your manual WS 2050 WP - BRENNENSTUHL and take your electronic device back in hand. On this page are published all the documents necessary for the use of your device. WS 2050 WP by BRENNENSTUHL.
USER MANUAL WS 2050 WP BRENNENSTUHL
EN Operating instructions 7
FR Mode d'emploi 10
Operating Instructions LED Spotlight
WS 2050 S / WS 2050 W
WS 2050 SP / WS 2050 WP
Attention: Before using the product, please carefully read the operating instructions and store them in a proper location!
SAFETY INSTRUCTIONS
- Always check the product for damage before use. Never use the product in case of any damage. If this is the case, please refer to an electrician or the manufacturer's service address.

Non-compliance poses a risk of fatal injury from electrical current!
- Do not use the product in potentially explosive atmospheres – danger of death!
- Keep the floodlight away from children. Children are not aware of the risks imposed by electric current.
Please never look directly into the light.
- A destroyed protective cover cannot be replaced. The floodlight has to be disposed of.
- The spotlight must be installed and serviced by a qualified technician.
- Electrical installations may be performed only in compliance with safety regulations (VDE 0100 for Germany).
- A VDE-certified connection line must be used for the connection.
- The spotlight must be properly grounded (with protection class I).
- If the connection box is damaged, it has to be replaced by a qualified expert.
• Always switch off the power supply before installation. Caution: electric shock.
- Observe the recommended mounting heights (see under Mounting).

Not suitable for applications with external dimmers.
TECHNICAL DATA
Protection class: I
Protection type: IP 44
Temperature range: -20 °C to +40 °C
| Type WS 2050 S WS 2050 | W WS 2050 SP WS 2050 | WP | ||
| Motion detector No No Yes | Yes | |||
| Rated voltage | 220-240 V~ 50/60 Hz | 220-240 V~ 50/60 Hz | 220-240 V~ 50/60 Hz | 220-240 V~ 50/60 Hz |
| Max. current | 0,12 A | 0,12 A | 0,12 A | 0,12 A |
| Power factor | 0,9 | 0,9 | 0,9 | 0,9 |
| Input power | 20,5 W | 20,5 W | 20,5 W | 20,5 W |
| Dimensions L x W x H | 165 x 170 x 140 mm | 165 x 170 x 140 mm | 165 x 170 x 183 mm | 165 x 170 x 183 mm |
| Weight | 0,53 kg | 0,53 kg | 0,63 kg | 0,63 kg |
| Max projected area | 115,5 cm ^2 | 115,5 cm ^2 | 115,5 cm ^2 | 115,5 cm ^2 |
This product is suitable for outdoor lighting purposes.
INSTALLATION AND CONNECTION TO POWER SUPPLY
- Always switch off the power supply before installation.
- The spotlight must be mounted at a height of less than 3 m. Recommended mounting height for models with motion detectors is 2.5 m.
- To fix the mounting plate to the wall, follow the steps (fig. 2-4).
- Open the sleeve of the connection plug on the back of the light (fig. 1).
- Feed the connecting cable through the sealed plug sleeve and connect the strands to the luster terminal of the input plug (fig. 5).
- Connect the spotlight to the mounting plate and tighten the screw (fig. 6).
- Align the spotlight head.
- Switch on the power supply again.
ADJUSTING THE SPOTLIGHT WITH MOTION DETECTOR (PIR)
The motion detector has a built-in sensor that can distinguish between daylight and darkness. The (★) position indicates that the connected light is switched on by the motion detector during the day and night.
The ( ) position indicates that the connected luminaire is only switched on by the motion detector during the night. You can set the desired light intensity at which the light is to be switched on using the SENS rotary knob.
SETTING THE LIGHT DURATION
The light duration is the time period for which the motion detector leaves the light on after it has been activated. The lighting time can be set from approx. 10 seconds to approx. 4 minutes. Turning the TIME knob from (+) to (-) reduces the light duration.
Attention: Each time a movement is detected, this period starts again from the beginning.
SCOPE OF DELIVERY
LED-spotlight, operating instructions, screws, dowels, washers, mounting plate, clamp.
MAINTENANCE
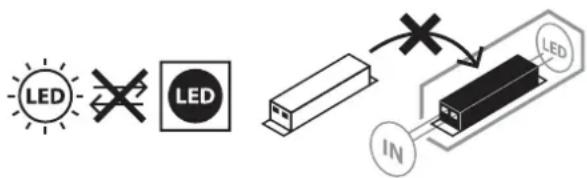
ATTENTION: The LED lamp does not contain components that require maintenance.
The light source in this lamp cannot be replaced; if the light source has reached the end of its service life, the entire lamp has to be replaced. The lamp may not be opened.
CLEANING
Before cleaning, disconnect the floodlight from the mains power.
Do not use solvents, caustic cleaning agents or similar products.
Only use a dry or slightly moistened cloth for cleaning.
DISPOSAL
Dispose of electric appliances in an environmentally friendly manner! Electric appliances must not be disposed of in household waste!
The European Directive 2012/19/EU on Waste Electrical and Electronic Equipment rules that used electric appliances should be collected separately and recycled in an environmentally friendly manner.
For possibilities of disposal of the used appliance, please contact your local or municipal administration.

EU DECLARATION OF CONFORMITY

UK DECLARATION OF CONFORMITY
The declaration of conformity is deposited with the manufacturer.
ADRESSES
For more information please visit the Service/FAQ section on our homepage, www.brennenstuhl.com.

DÉCLARATION DE CONFORMITÉ UE
NASTAVENÍ DOBY SVÍCENÍ
TÄHELEPANU: LED-latern ei sisalda