Castello M4 - Parasol Glatz - Free user manual and instructions
Find the device manual for free Castello M4 Glatz in PDF.


User questions about Castello M4 Glatz
0 question about this device. Answer the ones you know or ask your own.
Ask a new question about this device
Download the instructions for your Parasol in PDF format for free! Find your manual Castello M4 - Glatz and take your electronic device back in hand. On this page are published all the documents necessary for the use of your device. Castello M4 by Glatz.
USER MANUAL Castello M4 Glatz
natural_image
Line drawing of two outdoor umbrellas with different canopy designs (no text or symbols)Montage- und Gebrauchsanleitung / Instructions for Installation and Use / Notice de montage et d'utilisation / Istruzioni per il montaggio e per l'uso
Glatz
DE INFORMATIONSSERVICE
Thank you very much for purchasing a product from Glatz!
If you would like further information with regard to safety as well as the shade anchoring, please get in touch with your specialist dealer or directly with: Glatz AG, Neuhofstrasse 12, 8500 Frauenfeld / Switzerland – www.glatz.ch
You can find the answers to the most frequent questions about our products on our homepage www.glatz.ch under the key word FAQ (frequently asked questions).
We reserve the right to make technical alterations. Printed on 100% chlorine-free paper. For the benefit of our environment.
FR SERVICE D'INFORMATIONS
1. Safety regulations 12
1.1 Use of the shades 12
1.2 Anchorage 12
1.3 Electrical installation 12
1.4 Kindly note the following 12
2. Scope of supply 13
2.1 Client's work 13
2.2 Options 13
2.3 Possibilities of anchorage 13
3. Fitting 13
3.1 Setting the sunshade 13
4. Disassembling 13
4.1 Bringing down the sunshade 13
5. Operation 14
5.1 Opening the sunshade CASTELLO ^® M4 14
5.2 Closing the sunshade CASTELLO ^® M4 14
5.3 Opening the sunshade CASTELLO ^® K4 15
5.4 Closing the sunshade CASTELLO ^® K4 15
5.5 Notes on the wind 16
6. Maintenance and care 17
6.1 Cleaning 17
6.2 Frame 17
6.3 Shade tensioning 17
6.4 Hibernation 17
TABLE DES MATIÈRES | FR
1. SAFETY REGULATIONS
The safety instructions, together with the technical information for the fitting and operation, form the basis for using the shades without danger. They are to be read through before installing an using the shades, to be obeyed and to kept in a save place for later need.

- Any disregard of safety regulations and the instructions for erection and operation can result in serious damage to people and material for which the manufacturer expressly refuses to accept any liability or obligation under warranty!
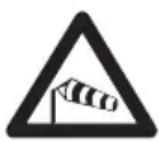
- If the wind freshens up or gales gusts are approaching, the sunshade must be shut.
- Unsupervised sunshades must not be left open.
A unexpected stormy wind could cause heavy damages!
1.1 Use of the shades
The Glatz large shades are intended exclusively as weather resistant sun protection. The wind resistance of the extended shade is limited and the details on this presuppose an anchorage in accordance with the instructions. Movable bases are less stable than bases which are fixed to the ground.
1.2 Anchorage
The ground anchorage is to be fitted in accordance with the technical information in “Fitting Instructions Ground Socket” and “Fitting Instructions Mounting Plate” respectively. Please take note of the
dimensions for the shade type concerned and its sizes. Fitting has to be carried out by a person with the necessary specialist construction knowledge. The version is to be in concrete or in a material of like strength. Local regulations are to be observed.
1.3 Electrical installation
Shades with electric equipment must be connected by a recognised specialist fitter in accordance with the fitting instructions and connected to the mains power supply in accordance with local regulations.
1.4 Kindly note the following
- Be sure to comply with the operating instructions.
- Never place the large shade unsecured against a wall, it could slip away and tip over.
- Before opening or closing the shade, check that there are no obstacles in the operating area.
- The shade must not be altered or draped with a different material. The stability in wind and closing function may deteriorate.
- Use the shade only in a undamaged state and take notice of any faults.
- Use only original Glatz accessories and spares in order to have the guarantee for full safety, unspoilt convenience and perfect functioning.
- When fitting or removing a protective sleeve, if necessary use a free-standing, stable climbing aid. Make sure that this can neither tip over or slip away.
- If used in exposed locations, for example near the coast or in regions with heavy winds, increased wear is to be expected. In these cases, we recommend more intensive maintenance.
2. SCOPE OF SUPPLY
- Shade ready assembled with binding belt
- Upright tube with cover plate fitted to the mast
- 5 anchorage bolts M 10
2.1 Client's work
- Fitting the ground socket
• Electricity supply - Set up the sunshade
2.2 Options
• Incorporated lightening for Glatz large shades
- Protective cover with/without zip and rod
2.3 Possibilities of anchorage
• Ground socket M4 with cover
- Mounting plate M4
- Mounting plate special M4 for isolated grounds
- Movable base

In order to ensure that the static conditions for the fixing are fulfilled, it is essential to consult the user manual for the relevant ground fixing.
3. FITTING
3.1 Setting up the sunshade (Two adults are required. The installation on the base occurs pursuant to the instructions for the ground socket provided below.)
- Attach the upright tube to the ground socket with 5 anchorage screws.
- Push the cover plate of the ground socket over the pole.
- Lift the cover at approx. 30^ and centre the pole on the upright tube.
- Carefully raise the sunshade until the pole slides over the upright tube.
- Insert and tighten the upper connecting pin (without traverse bore), making sure that the cover plate is underneath the connecting pin.
- Loosen the anchorage screw a little and turn the sunshade to the required position.
- If the sunshade is not vertical adjust it using the levelling screws (on the upright tube).
- Tighten the anchorage crews again.
- Lower the cover plate, insert the lower connecting pin (with traverse bore) and tighten.
- Secure with lock if necessary.
4. DISASSEMBLING
4.1 Bringing down the sunshade (Two adults are required.)
- Ensure sufficient space is provided for the sunshade when removed.
- Hold the sunshade in a vertical position and remove the anchorage screws.
- Carefully bring down the sunshade along with the upright tube.
EN | 14
5. OPERATION
5.1 Opening the sunshade CASTELLO ^® M4
- Remove the binding belt.
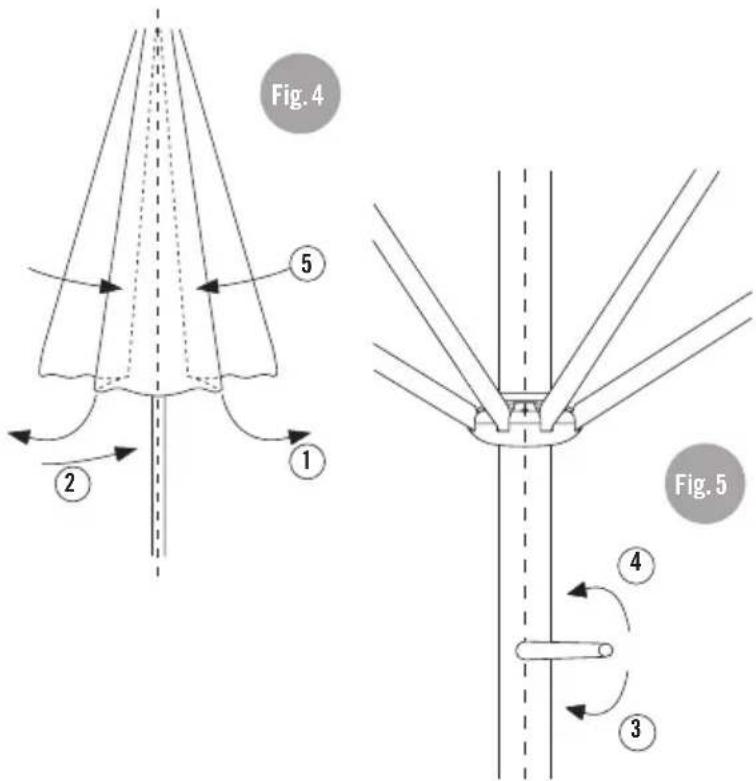
- Pre-spread the shade by loosing the roof struts and the cloth outwards (1).
- Go close to the mast and push the slider (2) up slowly (air resistance) until the approaching tensioning lever is in grasping distance.
- While one hand continues to lift the slider draw down the tensioning lever with the other hand.
- Insert the lever tip into the opening in the slider and kick down (3).
5.2 Closing the sunshade CASTELLO® M4
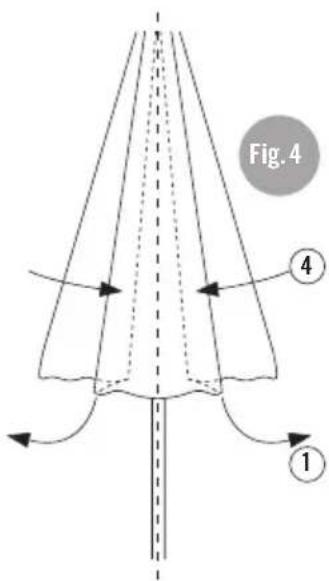
- Release the tensioning lever (3).
- Pull the slider (2) downwards.
- Fold the shade together completely by pushing the roof struts close to the mast (4).
- Wrap the cloth around the shade and secure with the binding belt.
- If wanted, pull over the protective cover and tie it.
text_image
Fig. 4 ④ ①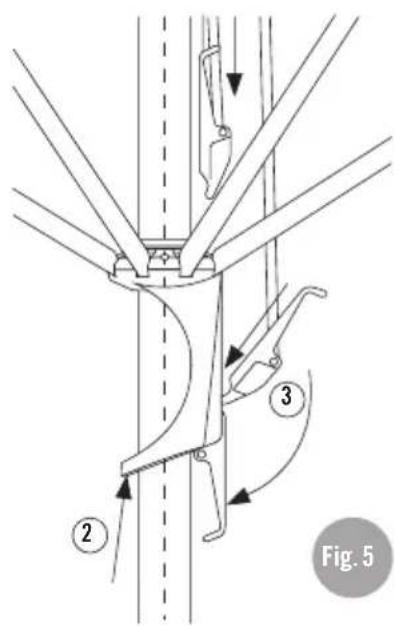
text_image
Fig. 5
- If the wind freshens up, close the sunshade.
- Unsupervised sunshades must not be left open.
5.3 Opening the sunshade CASTELLO ^® K4
- Remove the binding belt.
- Pre-spread the shade by pushing the roof struts and the cloth outwards slightly (1).
- Go close to the mast and push the hand crank into the gear until it reaches the stop position (2).
- Rotate clockwise (3) until the sunshade is extended.
- Take out the hand crank if necessary. The gear lock keeps the sunshade extended.
(For sunshades with light, heating and/or a motor, please refer to the applicable fitting and operating instructions.)
5.4 Closing the sunshade CASTELLO ^® K4
- Turn crank anticlockwise (4) until the shade is closed.
- Fold the shade together completely by pushing the roof struts close to the mast (5).
- Wrap the cloth around the shade and secure with the binding belt.
- If wanted, pull over the protective cover and tie it.
text_image
Fig. 4 ⑤ ② ① Fig. 5 ④ ③
- If the wind freshens up, close the sunshade.
- Unsupervised sunshades must not be left open.
EN|16
5.5 Notes on the wind
5.5.1 Parasol membrane on acrylic fibre
The membrane, which is made from high-quality, solution-dyed acrylic fibre, is exceptional due to its outstanding properties such as:
• Ultimate outdoor durability
doesn't rot due to dampness or fungal attacks
• Ultimate colour fastness
won't be bleached by UV rays
• Ultimate UV protection for those under the umbrella
Reduction of UV rays
The “only” disadvantage of relevance is the acrylic fibre, which is sensitive to abrasions. Both Glatz and our fabric supplier have been unable to eliminate this weakness.
If you handle the umbrella properly in day-to-day use, abrasion damage can be avoided. The following advice helps.
^1 As Glatz cannot monitor the proper treatment of the umbrella coating, any damage caused by abrasion (rubbing) lies outside the regular warranty!
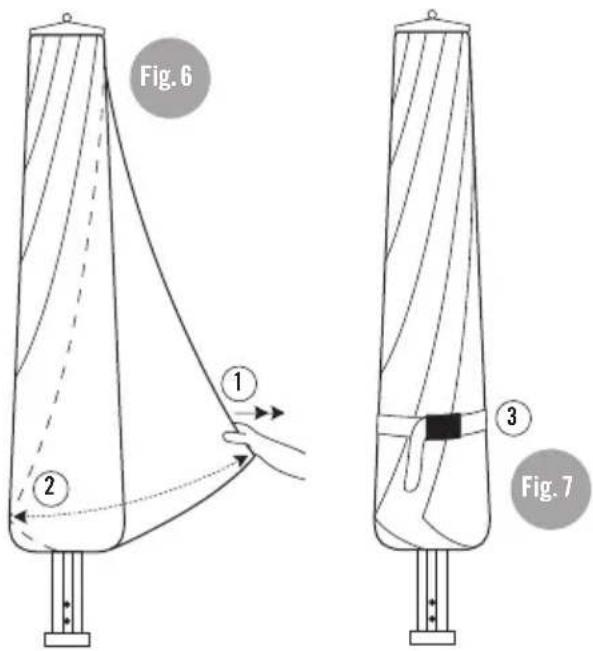
5.5.2 Correct winding-up of umbrella
Avoid clamping, abrasions and premature wear and tear caused by strong flapping of the material in the case of wind.
(1) After closing the umbrella, pull out all the lengths of material individually and completely between the struts.
(2) Wind up the lengths of material in tight layers on the umbrella pole.
(3) With the provided belt, secure the wound-up lengths of fabric well. (The material should not flap in the wind)
text_image
Fig. 6 ① ② ③ Fig. 75.5.3 Regions affected by frequent wind or strong winds
In autumn, after the end of the season, dismantle the umbrella and store in a dry place.
5.5.4 Erecting of new umbrellas
Do not erect new umbrellas in autumn. Only set up new umbrellas in spring before the start of the season.
5.5.5 Using the protective cover (option)
The protective cover should be completely closed and tied with rope. You should avoid letting the protective cover flap about.
6. MAINTENANCE AND CARE
6.1 Cleaning
The cloth can be cleaned with lukewarm water with fine detergent. Use a sponge or soft brush. Rinse down wit ample clear water. If necessary re-impregnate with a proprietary spray.
In the event of heavy rain, new shades may let a little spray through. This phenomenon will disappear again after a few days.
6.2 Frame
The frame can be rubbed down with water. The coating colours can be freshened up with car polish. Paint damage can be made good using the paint repair kit available from Glatz.
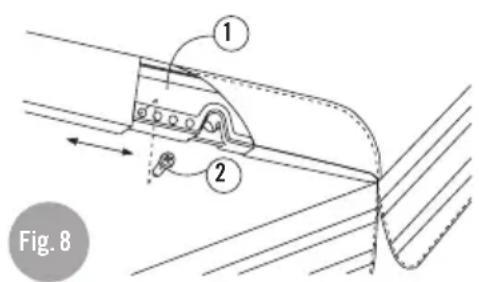
6.3 Shade tensioning
A well tensioned shade is more stable in the wind and remains lovely longer. If necessary, the roof strut extensions (1) can be pulled out further. This is best done when the shade is half closed. Insert the stop screws (2) accordingly and screw it.
text_image
1 2 Fig. 86.4 Hibernation
Store the sunshade on a dry place. Check the product visually and the proper functions before re-fitting

If any deformations, tears or wobbly connecting points should appear as a result of exposure to extreme strains, the sunshade should undergo an overhaul by a specialist before being put into use.