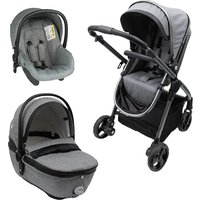
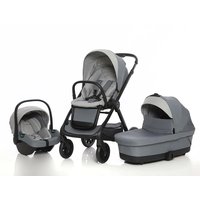
USER MANUAL Metropolitan Pro Giordani
Manufactured by:
FUJIAN O'SK BABY AND CHILDREN PRODUCTS CORP.,LTD
Xingtai Industrial zone, Changtai County,
Zhangzhou city, Fujian Province, China
Imported and distributed by PRG S.p.A. Via delle Primule, 5 - 20815 Cogliate (MB) Italy
METROPOLITAN PRO
KEEP FOR FUTURE REFERENCE, READ CAREFULLY.
GR
ΣΗΜΑΝΤΙΚΟ!

COMPONENTI
A Handle reversible adjuster
B Front handrail
C Adjustable footrest button
D Front wheel quick-release button
E Front wheel locking lever
F Front wheel
G Basket
H Hood
1 Adjustable handle button
L Seat height adjuster
M Front handrail button
N Seat reversible adjuster
0 Footrest
P Folding hook
Q Rearwheel
R Rear wheel quick-release button
E COMPONENTES
A Rear wheels x2
B Front wheels x2
C Front handrail x1
D Stroller frame x1
E Seat unit x1
F Changing table bag
E CONTENIDO
natural_image
Mechanical device with articulated arms and blue components (no visible text or symbols)
1b
natural_image
Close-up of a robotic arm with a hand pressing a button, no visible text or symbols
natural_image
Mechanical device with articulated arm and blue base, showing motion arrow (no text or symbols)
1d
natural_image
Illustration of a mechanical support device with a blue base and metal lever (no text or symbols)
natural_image
Close-up of a person using a stroller to adjust the wheel (no text or symbols visible)
natural_image
Close-up of a hand holding a mechanical component with a green arrow indicating direction (no text or symbols visible)
natural_image
Person adjusting a medical device with a green arrow indicating rotation (no text or symbols visible)
natural_image
Top-down view of a car with visible roof and side panel (no text or symbols)
natural_image
Close-up of a hand adjusting a mechanical component with a green arrow indicating direction (no text or symbols visible)
natural_image
Close-up of a hand holding a metallic object with a green arrow pointing to it, no visible text or symbols
natural_image
Close-up of a person using a medical crissemis device with a green arrow indicating a downward motion (no text or symbols visible)
natural_image
Close-up of hands adjusting a medical device with a green lock icon (no text or symbols visible)
natural_image
Person operating a whiteboard-mounted device with a green arrow indicating direction (no text or symbols visible)
natural_image
Close-up of a metallic robotic arm holding a transparent triangular object, no visible text or symbols

natural_image
Close-up of a person using a tool on a mechanical device (no visible text or symbols)
natural_image
Close-up of a mechanical component with labeled parts (C, D) and an arrow indicating direction, no readable text or symbols present.
natural_image
Close-up of a mechanical component with a lever and bracket (no visible text or symbols)
natural_image
Close-up of a mechanical component with a green arrow pointing to a detail (no text or symbols visible)
natural_image
Close-up of a blue bag with internal compartments and a green arrow indicating rotation (no text or symbols)
natural_image
Close-up of a car seatbelt with a green arrow pointing to the seat area and a magnified inset showing a detail (no text or symbols)
natural_image
Close-up of hands holding a small object with a green arrow pointing to it, no visible text or symbols
natural_image
Close-up of a blue athletic bag with a white strap and a green arrow indicating rotation (no text or symbols)
flowchart
graph LR
    A["13a"] --> B["13b/13c"]
    B --> C["13d"]
    style A fill:#f9f,stroke:#333
    style B fill:#ccf,stroke:#333
    style C fill:#cfc,stroke:#333
natural_image
Close-up of a mechanical device with a gasket and handle, no visible text or symbols
natural_image
Close-up of a hand adjusting a stroller with a green arrow indicating motion (no text or symbols visible)
natural_image
Close-up of a hand adjusting a mechanical component with a green arrow indicating direction (no text or symbols visible)
natural_image
Close-up of a baby stroller with wheels and a hand adjusting the wheel (no visible text or symbols)
natural_image
Close-up of a hand adjusting a stroller with a green arrow indicating motion (no text or symbols visible)
natural_image
Close-up of a cartoon bear face with white head and black fur, marked with blue circles (no text or symbols)
natural_image
Interior view of a car seat with two blue seats and straps (no text or symbols visible)
natural_image
Interior view of a baby stroller with white seat and black buttons, showing a close-up of the door (no text or symbols visible)
natural_image
Close-up of a baby stroller with hands adjusting the seat (no visible text or symbols)
natural_image
Close-up of hands adjusting a blue plastic bag with arrows indicating motion (no text or symbols)
natural_image
Close-up of a baby seat with a green arrow indicating a downward motion (no text or symbols visible)



natural_image
Illustration of a baby stroller with a 31a height indicator and a bag (no text or symbols on the device itself)
natural_image
Illustration of a baby stroller with wheels and handle (no text or symbols)
natural_image
Illustration of a stroller with a magnified inset showing the handle mechanism (no text or symbols)
natural_image
Two views of a small wheeled scooter with wheels, shown from front and side angles (no text or symbols visible)
NAVICELLA - CARRYCOT - CAPAZO - ALCOFA
PORTE-BÉBÉ - DRAAGMAND - NACELLE
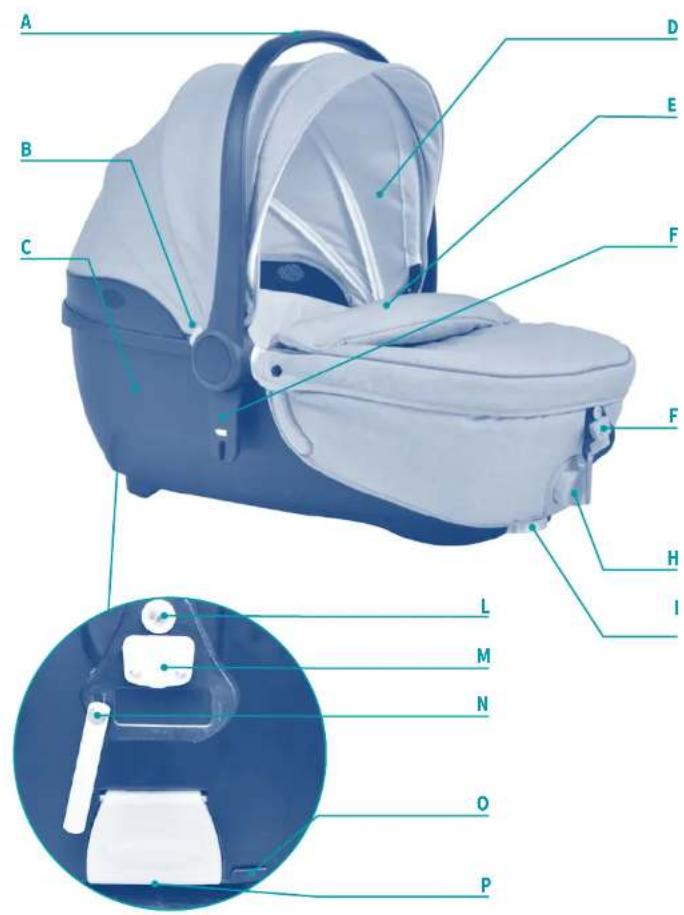
COMPONENTI
G Metal car connector
H Backrest adjuster
1 Breath hole adjuster
L Fixed plastic
M Positioning plastic
N Lever
Second lock
P Carrycot release button
E COMPONENTES
A Manillar de transporte
L Vast plastic element
natural_image
Close-up of a hand adjusting a blue car interior with a green arrow indicating motion (no text or symbols visible)
natural_image
Close-up of a person adjusting a white chair seat with a green arrow indicating the motion (no text or symbols visible)
natural_image
Close-up of a garment being adjusted with a blue arrow and magnified detail (no text or symbols visible)
natural_image
Blue and white baby stroller with folded backrest (no text or symbols visible)
natural_image
Close-up of a person adjusting a white garment with a flashlight and a green arrow indicating the step (no text or symbols visible)
natural_image
Close-up of a hand pressing down on a white garment with a green arrow indicating the motion (no text or symbols visible)
natural_image
Blue and white baby stroller with a handle, shown in side profile (no text or symbols visible)
natural_image
Product photo of a blue and white baby shower device with a green arrow indicating rotation (no text or symbols)
natural_image
Close-up of a baby bottle with a white fabric cover and blue body (no text or symbols visible)
natural_image
Blue and white baby seat with folded offers and a 35b label (no text or symbols on the main subject)
natural_image
Illustration of a baby seat with a blue and white body, showing a fold change indicated by an arrow (no text or symbols present)
natural_image
Two-step photo showing hands performing a circular tool manipulation on a white object, labeled 39a and 39b (no text or symbols on the objects themselves)
natural_image
Close-up of a blue and white object with a circular hole, possibly a shoe or container (no visible text or symbols)
natural_image
Illustration of a baby seat with numbered guide bands (1–4) and a 37a circular label, no text or symbols present.
natural_image
Close-up of a robotic hand holding a blue mechanical component, labeled A and B (no text or symbols on the object itself)
natural_image
Close-up of hands performing a medical procedure on a patient's abdomen, with arrows indicating direction (no text or symbols)
natural_image
Close-up of a blue mechanical clamp securing a white circular component (no text or symbols visible)
natural_image
Close-up of a mechanical clamp or bracket with a white cylindrical component inserted, against a dark background (no visible text or symbols)
natural_image
Close-up of a person's hands using a tool to grip a small object, with a green arrow pointing to the object (no visible text or symbols)
natural_image
Close-up of a metallic mesh cable inserted into a tiled room (no text or symbols visible)
41a
Sodile posteriore
Back seat
Asiento trasero
davico paiximo,
Achterbank
Siège antère
natural_image
Diagram of a cable or suspension system with dashed lines indicating motion paths (no text or symbols)
Se la navicella è montata in un'auto con sodile posteriore a due posti, collocarla tra i due sodili del veicolo.
The carryot must be placed between the seats of the vehicle when installed in the two-backseat car.
Si se monta al capazo en un cache con el asiento trasero dividido
en dos plazas, debe ser colocado entre los dos asientos del vehículo.
Se a alcota for instalada num automóvel equipado com um banco posterior
de dois lugares, colaque-a entre os dois bancos do veículo.
Αν το porte-bèbė zīnən στερομμένο στο αστοκίητο φε πιω καθίομα δύο θέσειν, τοποδετήσε το ανύμεσα στο δύο καθίοματα.
Wanneer de draagmand op een achterbank met twee zitplaatsen in de auto is gemonteerd zet u hem tussen de twee autozittingen.
Si on monte la nacelle dans une voiture avec un siège arrière à deux places, la placer entre les deux sièges du véhicule.
natural_image
Close-up of a robotic arm holding a small electronic device with a green arrow pointing to it (no visible text or symbols)
natural_image
Close-up of a white propeller with a green arrow pointing to its side (no text or symbols visible)
41b
5edile posteriore
Back seat
Asiento trasera
Banco postander
Провк Квесторе
The following
(2) 10.4.3.
natural_image
Diagram of a cylindrical object with two side connectors and dotted lines indicating internal structure (no text or symbols)
Se la navicella è montata in un'auto con sedile posteriore a tre posti, coliocaria sul sedile centrale del veicolo.
The carrycot must be placed on the central back seat of the vehicle when installed in the three-backseat car.
Si se monta el caparo en un coche con el asiento trasero dividido en tres plazas, debe ser colocado sobre el asiento central del vehículo.
Se a alcoía for instalada num automóvel equipado com um banco posterior de três lugares, coloque-a no banco central do veículo.
Ay to porte- bébé s'iva stereuipivo oto astokineto os piou káthoua trpiv
θέστον, tonolstýte to anúuota oto kentrokó káthoua.
Wanneer de draagmand op een achterzitting met drie zitplaatsen in de auto is gemonteerd zet u hem op de middelste autozitting.
Si on monte la nacelle dans une voiture avec un siège arrière à trois places, la placer sur le siège central du véhicule.
natural_image
Close-up of a gloved hand holding a white textured fabric with a green downward arrow indicating a reduction or inspection (no text or symbols visible)
natural_image
Close-up of hands holding a small cylindrical object with a white top, possibly a mechanical or electronic component (no visible text or symbols)
natural_image
Interior view of a white car seatbelt device with a 42g load tag (no text or symbols on the device itself)
natural_image
Close-up of a gloved hand holding a white mechanical component with green arrows indicating motion (no text or symbols visible)
natural_image
Close-up of a hand holding a small white object over a blue container, with a green curved arrow indicating rotation (no text or symbols visible)
natural_image
Interior view of a robotic arm with gear and control buttons (no text or symbols visible)
natural_image
Close-up of a mechanical clamp or bracket component with a white cylindrical pin and two circular holes, mounted on a dark metal frame (no text or symbols visible)
natural_image
Close-up of a hand holding a small white object over a blue container with circular wells, no visible text or symbols.
natural_image
Interior view of a modern kitchen appliance with a white decorative ceiling fixture (no visible text or symbols)
natural_image
Interior view of a medical or laboratory setting with two views: top shows a blue-and-white patterned rectangle, bottom shows a white rectangular object with blue markings (no visible text or symbols)
SEGGIOLINO PER AUTO GR 0+ - CAR SEAT GR 0+
SILLA DE AUTO GR 0+ - CADEIRA DE SEGURANÇA GR 0+
KAΘΙΣΜΑ ΑΥΤΟΚΙΝΗΤΟΥ GR0+ - AUTOSTOELTJE GR 0+
SIÈGE AUTO GR 0+
30 31
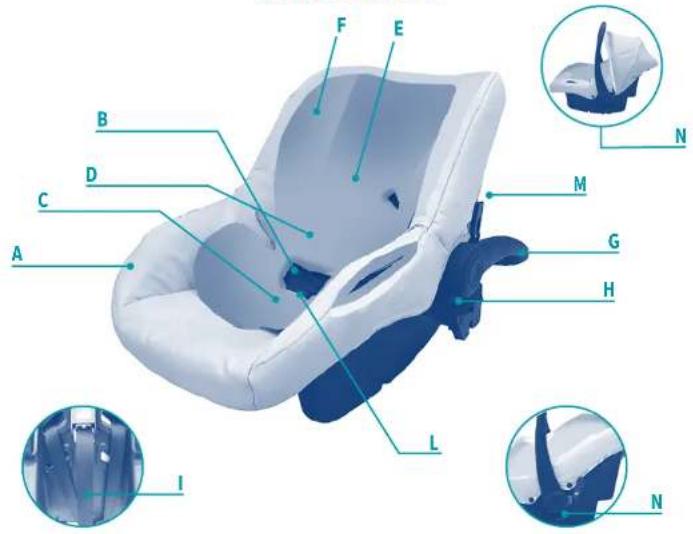
COMPONENTI
A Scocca
C Crotch strap with belt pad
D Three-point belt with belt pad
E Slots to adjust three-point belt
F Support pillow
G Carrying handle
H Carrying handle adjustment push button
1 3-point belts adjustment strap
L Quick adjustment control button
M Instructions and airbag warning sticker
N Sun canopy (builtin)
E COMPONENTES
A Estructura
natural_image
Interior view of a car seatbelt seat with visible leather bands and side brackets (no text or symbols)
natural_image
Close-up of a baby car seat with a blue and white strap (no text or symbols visible)
natural_image
Close-up of a car interior showing seatbelt, propeller, and seatbelt (no visible text or symbols)
natural_image
Interior view of a car seatbelt with white and blue panels, showing seatbelt and seatbelt (no text or symbols visible)
natural_image
Two circular images showing a mechanical component with crosshair overlay, no visible text or symbols
natural_image
Close-up of a white baby car seat with blue buttons and a green arrow indicating a specific seat (no text or symbols)
natural_image
Close-up of a mechanical component with visible brackets and mounting features (no text or symbols)
natural_image
3D illustration of a blue and white plastic bucket with a curved arrow indicating rotation (no text or symbols)
1 GIORDANI METROPOLITAN PRO SISTEMA MODULARE (DA 0 A 36 MESI CIRCA)
PASSEGGINO
APERTURA DEL PASSEGGINO
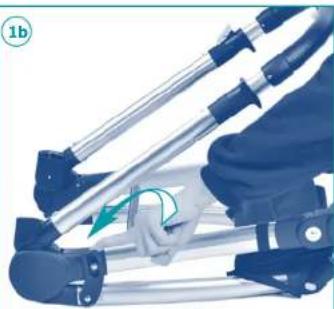
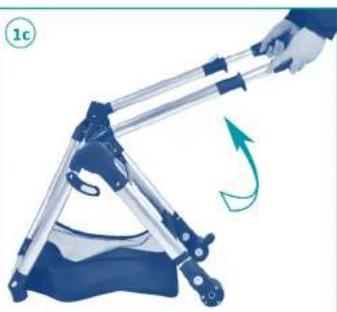
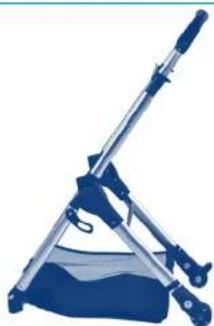
- According to Fig. 1a/1b/1c/1d, release the folding hook, which keeps the stroller closed. Then lift up the handle as shown by the arrow, the stroller will be opened fully when you hear a CLICK.
ASSEMBLING THE WHEELS
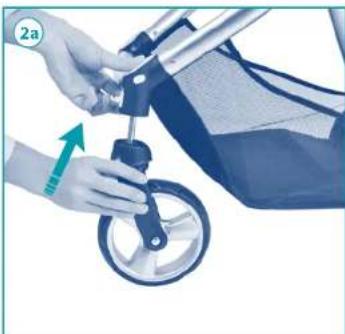
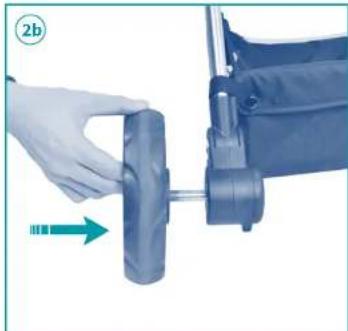
- Assembly of the front wheel: as shown in Fig. 2a insert the front wheel axles into the front housings and a CLICK indicates that they are correctly fixed. Assembly of the rear wheel: as shown in Fig. 2b insert the rear wheel axles into the rear housings, and a CLICK indicates that they are correctly fixed. ATTENTION: Try moving and rotating all the wheels manually to make sure all the wheels are firmly fixed in the housings before use.
SEAT UNIT ASSEMBLY
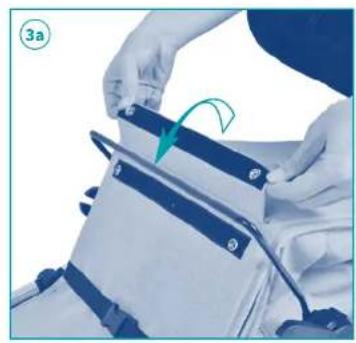
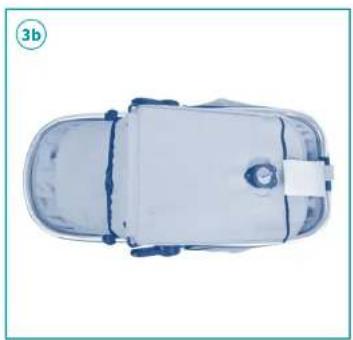
- Fasten the Velcro in the direction of the arrow as shown in Fig. 3a, and then attach the button to the bottom of the stroller mat. The seat unit is now completely assembled, as shown in Fig. 3b.
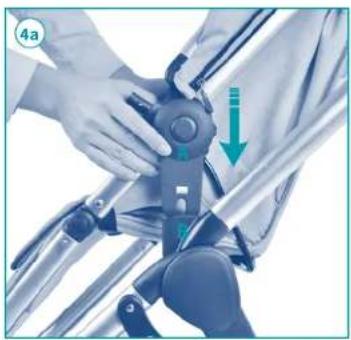
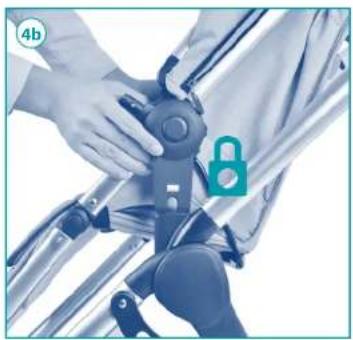
- Seat unit assembly: As shown in Fig. 4a, fix both adaptors A of the seat unit onto the seat supporting base B simultaneously; they are fixed together firmly when you hear a "CLICK".
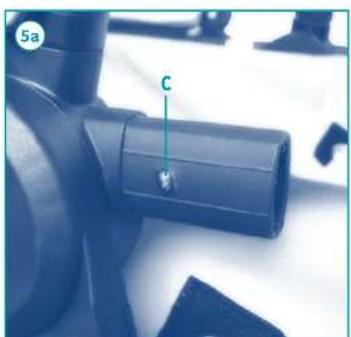
- Fixing the footrest leg: As shown in Fig. 5a, press both sides of clips C with your finger, then push the leg D into the plastic connecting parts. A "CLICK" confirms it is steadily fixed (see Fig. 5b).
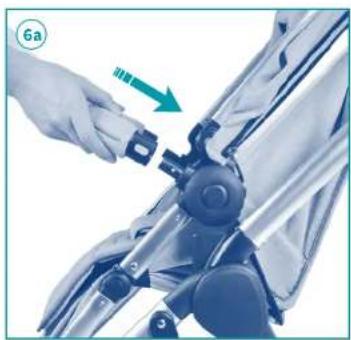
- Fixing the front bar: As shown in Fig. 6a, grasp the front bar and press down the white buttons on both sides simultaneously. Then fix the front bar onto both sides of the stroller until you hear a "CLICK".
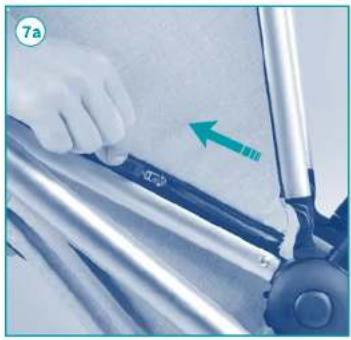
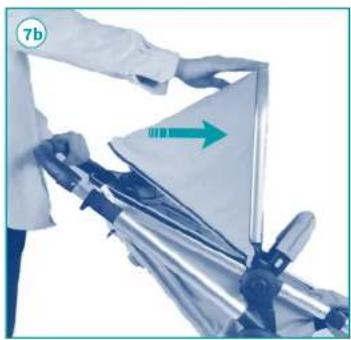
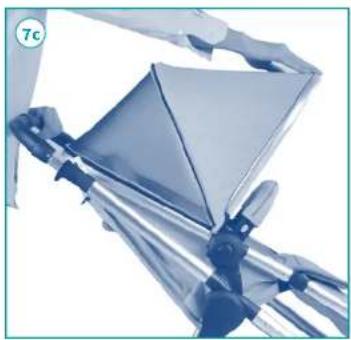
- As shown in Fig. 7a/7b/7c, unzip the canopy in the direction of the arrow, then push the canopy forward, the stroller is firmly and correctly opened.
ASSEMBLING AND DISASSEMBLING THE CANOPY
-
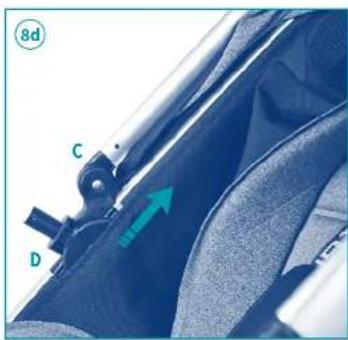
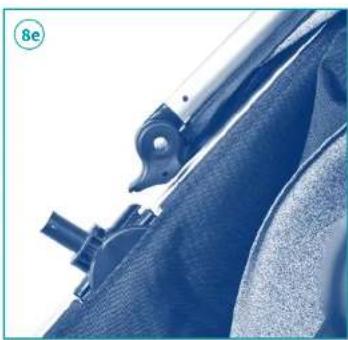
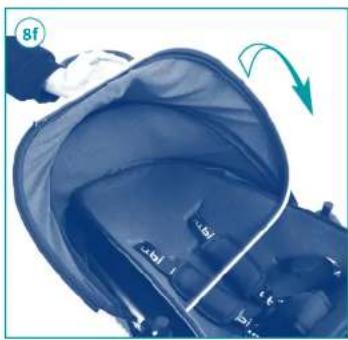
Canopy detachment: Hold the plastic part C and pull it out from the plastic holder slot D as shown by the arrow, see Fig. 8d/8e; See Fig. 8a, pull out the canopy fabric as shown by the arrow, (see Fig. 8f), pull out the iron bar E from the plastic holder slot as shown by the arrow, the canopy can be detached completely.
-
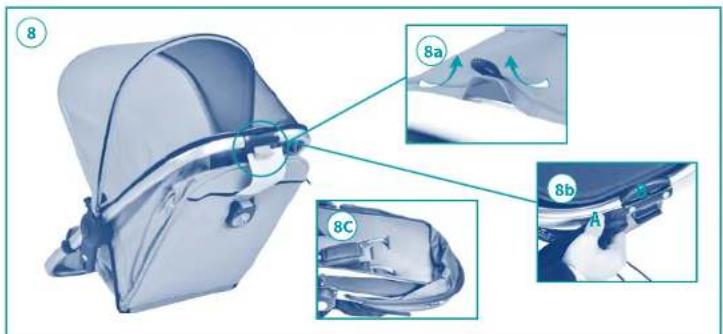
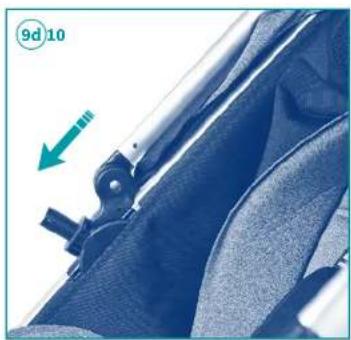
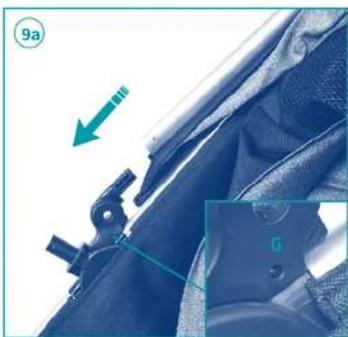
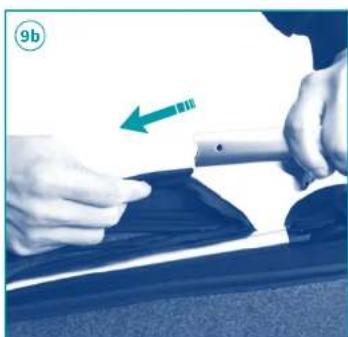
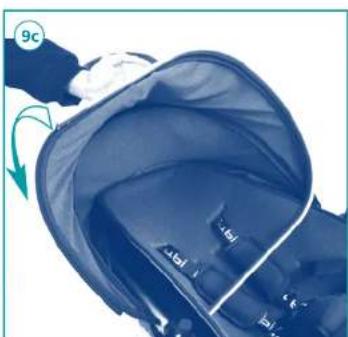
Canopy assembly: See Fig. 8a/8b Insert the rear-end A of the canopy fabric into the seat slot B, using one hand press and push the fabric into the slot and at the same time pull the front of fabric using the other hand as shown by the arrow, the canopy is fitted. See Fig. 9a, insert the canopy post into the canopy base as shown by the arrow, make sure dot G of the base is fixed in the hole of the post. See Fig. 9b/9c/9d, Insert the front-end B of the canopy fabric into the front of the canopy tube, then fix the tube in the canopy post slot as shown by the arrow. The canopy is now assembled completely (see Fig. 8).
HANDLE OPERATION
- Handle height adjustment: see Fig. 10, press the button down with one hand and the handle up or down. It is recommended to adjust the handle height.
REVERSIBLE SEAT
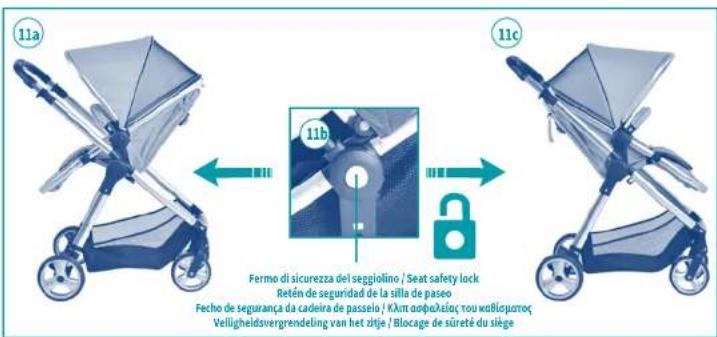
- Quickly release of the seat unit: ssee Fig. 11a/11b/11c, press down the safety lock on both sides of the seat at the same time and lift it up. The seat can be removed quickly or placed in the opposite direction.
ATTENTION: Keep your child away from the stroller when you release the seat unit.
SEAT ADJUSTMENT
- Press down the adjuster on the backrest or rotate the knob, the angle of the backrest is adjustable. The seat can be adjusted in 4 positions.
CONVERSION OF SEAT UNIT TO SOFT PRAM
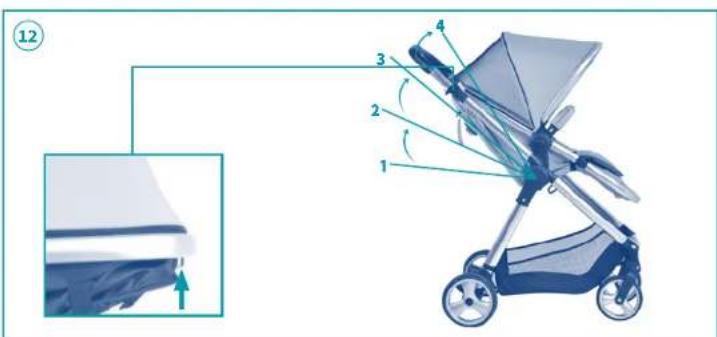
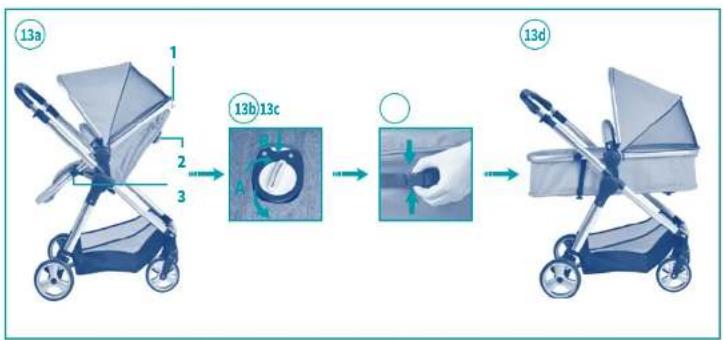
- Firstly, reverse the seat unit as shown in Fig. 13a. Press button 1 to adjust the seat unit to a horizontal position, then press button 2 in B mode as shown in Fig. 13b, and finally release the lock 3 as shown in Fig. 13c to change the seat unit into a cot as shown in Fig. 13d. To perform the opposite operation, rotate button 2 clockwise in A mode, and fasten lock 3 to change the cot into the seat unit.
Note: In order to ensure your baby's safety, always keep the cot facing you when using it (see Fig. 13d).
48 49
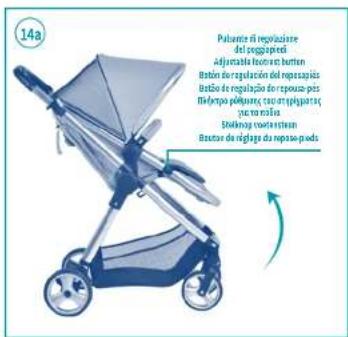
it up and down, the footrest can be adjusted in 3 positions (see Fig. 14a).
QUICK RELEASE OF THE FRONT BAR
- See Fig. 15a. Press down the button on both sides, then pull out the front which is quickly released.
WHEELS OPERATION
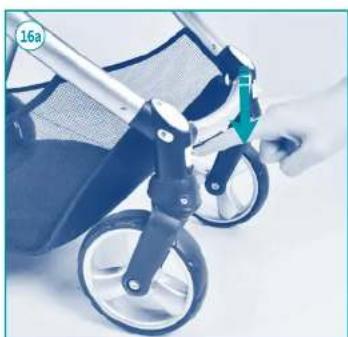
- Front wheel lock: push the front wheel locking lever in the direction of the arrow; when you hear a "CLICK" the wheel is locked in placed, as shown in Fig. 16a.
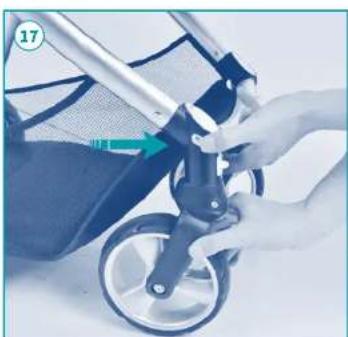
- Front wheel quick removal: press down the front wheel quick-release button, the front wheels will be released automatically.
- Rear wheels brake: to apply the brakes press the lock lever down as shown in Fig. 18a. Press the brake lever down in the same way to release the stroller. (Red means in brake condition, Green means in movement condition).
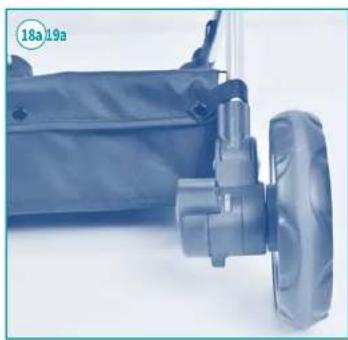
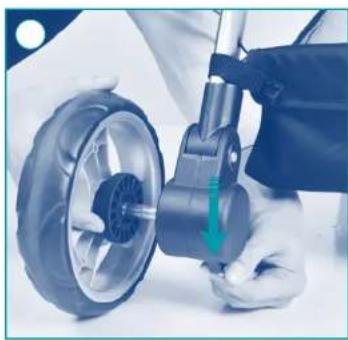
- Detachable rear wheels: As shown in Fig. 19a, press the quick release button in the direction of the arrow. Then the wheels can be pulled out quickly.
FITTING THE SAFETY BELT
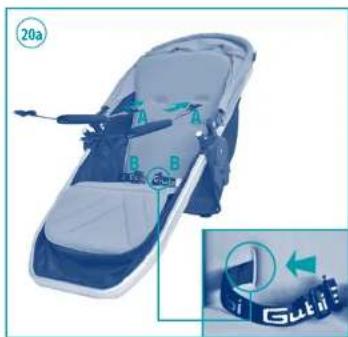
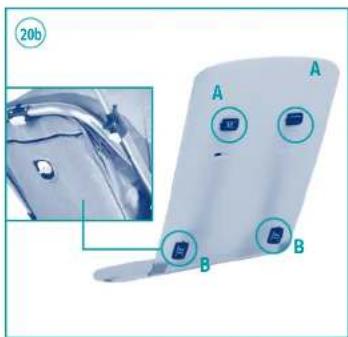
- Pass the buckles of the 3-point belt A and waist belt B through the eyelets located on the seat pad and the stiff board hidden in the side of the seat pad. Make sure they are attached firmly before use (see Fig. 20a/20b).
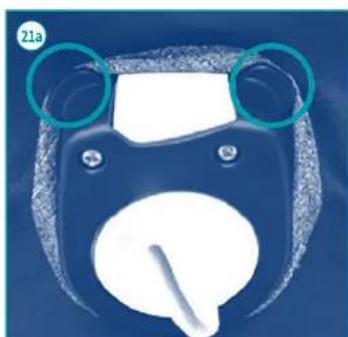
- Adjust the safety belt height, pull the fabric indicated in Fig. 21a and then use the same installation method as the first points, see Fig. 20a/20b.
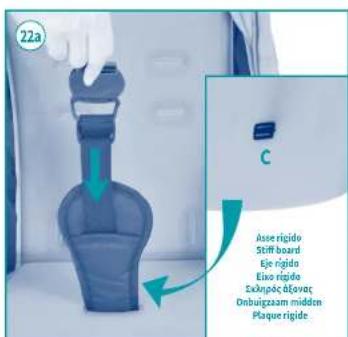
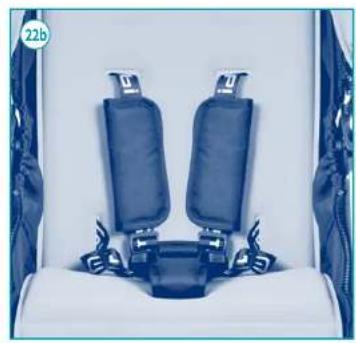
- Pass the crotch strap through the seat pad and the stiff board hidden in the side of the seat pad as shown by the arrow in Fig. 22a. Always make sure they are attached firmly before use. The safety belts are correctly fitted as in Fig. 22b.
SAFETY BELT REMOVAL
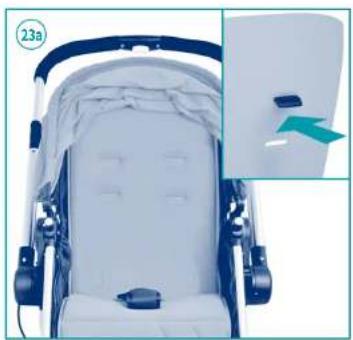
- Detach the 3-point belt H and waist belt I by pulling out the buckles from the seat pad (see Fig. 23a). ATTENTION:
- Please remove the seat belt from the stroller when using it as a cot.
- Please fix the stroller seat belt when using it as a seat.
ATTACHING THE BUCKLES
- Attaching the buckles: (see Fig. 24a), attach
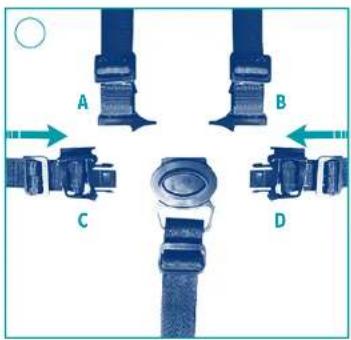
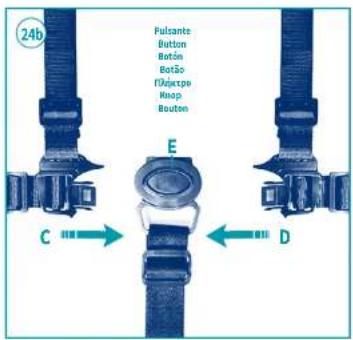
the buckles on the 3-point belt (C, D) on the buckles of the centre belt (A, B), and then attach the waist buckles on the central belt until you hear a CLICK (See Fig. 24b). Attaching the belt: (see Fig. 24a), press the central button to release the waist strap. Adjusting the seat belt: Adjust the 3-point belt and waist belt according to the size of the child so it is in a comfortable position (see Fig. 24c).
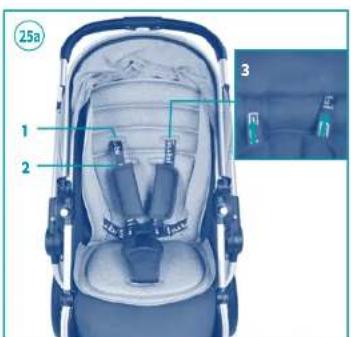
- The height of the 3-point belt is adjustable in 2 positions (see Fig. 25a), the lowest position (position 2) is only for babies under 6 months, and position 1 is for babies between 6 and 36 months. Adjust the height of seat belt by pulling the buckles out of the seat. Then attach them at the same level, always make sure the buckles are in the correct position. Note: always use the safety harness when the child is in the stroller.
OPTIONAL ACCESSORIES
HOW TO USE THE CAR SEAT
-
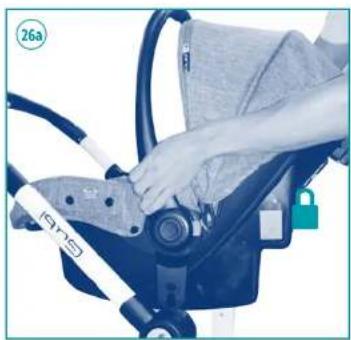
Fitting the car seat: as shown in Fig. 26a, put the car seat on the stroller support base, push it down until you hear a CLICK
-
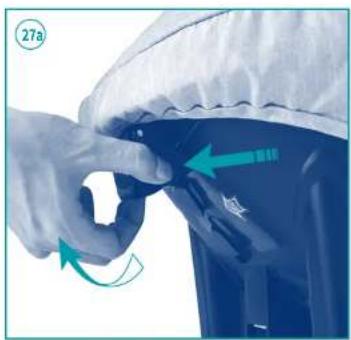
Disassembling the car seat: release the additional safety lock and raise the button with your hand as shown in the picture; lift the child seat upwards with the other hand at the same time using the handle to release the seat from the frame (see Fig. 27a).
Note: For security reasons, it is necessary to check again the pull clasp after fixing the car seat onto the stroller frame, if the pull clasp does not return completely push the plastic part to the end.
HOW TO USE THE CARRYCOT
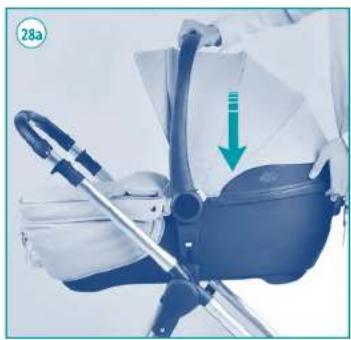
- Fitting the carrycot: put the carrycot on the stroller support base, then push down until you hear a "CLICK", as shown on Fig. 28a.
- Disassembly: push the button to the right in the direction of arrow A with your thumb, and pull up the pull-button in the direction of arrow A simultaneously, then lift the carrycot to release it from the stroller.
- Safety Belt: the carry cot is equipped with a safety belt inside. Press the red button as shown in Fig. 30a, the safety buckle will be released.
Note:
- please make sure you keep the baby facing you when using the components, it is important
for you to watch the baby's activity.
- please try to pull up the components after assembling stroller as shown in the picture, to ensure that both sides of the components are fixed completely and are not released.
PLACING THE BABY CHANGING BAG
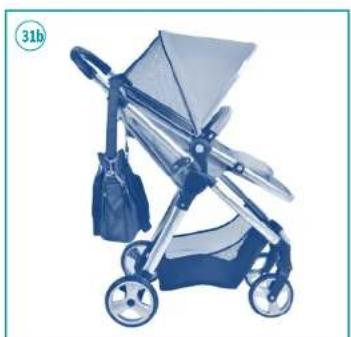
- As shown in Fig. 31a, put the straps of the baby changing bag on the handle of the stroller. The baby changing bag will then be hang on the stroller as shown in Fig. 31b.
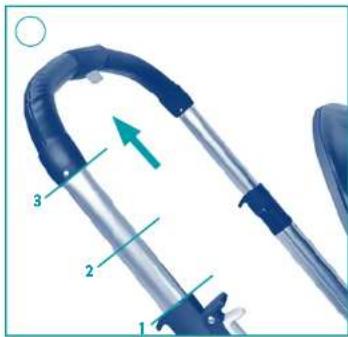
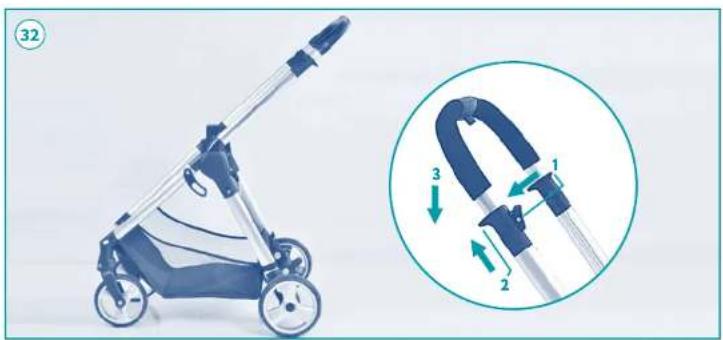
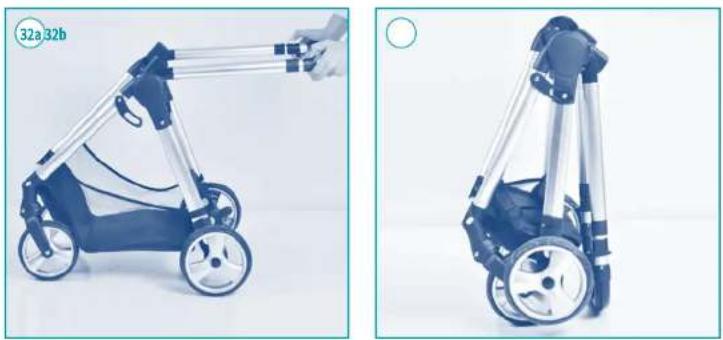
- Before closing the stroller, remove the seat. Then press the stroller-folding button 1, and pull up both sides of the handle simultaneously as shown by the direction of arrow 2, next fold the handle in the direction of arrow 3, the stroller will close automatically as shown in Fig. 32b. Important: the folding-hook on the left side should be locked manually. When the folding-hook is fixed in position, the stroller can be folded completely.
CARE AND MAINTENANCE
The stroller requires regular checking by the user to make sure the moving parts remain intact. All the locking devices and the second lock are engaged before use. This product can be cleaned with a damp cloth and common detergents. Do not use any abrasive detergents. The hood can be removed and washed, but should be dry before reuse. Every fixed device should be fastened firmly before fitting.


MATERIALS
Cover: 100% polyester
Frame: aluminium
SIZES
Open: L: 86 cm;
H: 60 cm;
D: 107 cm.
Close: L: 78.5 cm;
H: 60 cm;
D: 41 cm.
WARNINGS:
• WARNING: Never leave the child unattended.
• WARNING: Ensure that all the locking devices are
engaged before use.
- WARNING: To avoid injury ensure that the child is kept away when unfolding and folding this product.
• WARNING: Do not let the child play with this product.
- WARNING: Use a harness as soon as the child can sit unaided.
- WARNING: This seat unit is not suitable for children under 6 months.
- WARNING: Always use the restraint system
- WARNING: Check that the seat, carrycot or car seat attachment devices are correctly engaged before use.
- WARNING: This product is not suitable for running or skating.
- The stroller is intended for use with children aged between 6 and 36 months, up to 15 kg of weight.
- WARNING: For babies from birth to approximately 6 months, the stroller must be used with the METROPOLITAN PRO carrycot in pram configuration or with the METROPOLITAN PRO Car seat.
- Only the METROPOLITAN PRO Car Seat or METROPOLITAN PRO carrycot can be fastened to the stroller.
- WARNING: Do not use more than one mattress in the product. Only use the mattress that comes with the product.
• The braking device shall be engaged when placing and removing the child.
- Never leave the stroller on a sloped surface, with a child on board, even with the brakes engaged.
• Always apply the brakes whenever the stroller is stopped.
• Do not overload the storage basket. Maximum weight 3 kg.
- Any additional load placed on the handle and/or on the backrest and/or on the sides of the stroller will affect the stability of the stroller.
- During adjustment operations, ensure that the moving parts of the stroller do not come into contact with your child's body.
- Do not carry more than one child at a time.
- Do not use accessories, replacement parts, or any component not supplied or approved by the manufacturer.
- After removing the safety harnesses, make sure that the belts are re-assembled properly using the anchoring points. The belts must be re-adjusted. To make sure that the belts are fastened properly to the anchoring points, after placing your child inside the stroller, pull the end parts of the belts firmly.
- For car seats used in conjunction with a chassis, this vehicle does not replace a cot or a bed. Should your child need to sleep, then it should be placed in a suitable carrycot, cot or bed.
- Before assembly, check that the product and all of its components have not been damaged during transportation. Should any part be damaged, do not use it and keep it out of the reach of children.
- Do not use this product if some parts are broken, torn or missing.
- The lowest position of the footrest cannot be used when using the stroller.
• This product must only be used by an adult.
• Make sure that the person using the stroller knows how to do it in the safest way.
- Ensure that during adjustment operations the moveable parts of the stroller do not come into contact with your child's body.
- Never use the stroller on staircases or escalators: you could suddenly lose control of it.
• Always pay attention when going up and down steps or footpaths.
- To avoid all strangulation risks, never give the child objects with cords or strings attached, or leave it within proximity of such objects.
-
If the stroller has been exposed directly to sunlight for a long time, you must let it cool down before placing your child inside it.
-
Prolonged exposure to direct sunlight may cause the material and fabric to fade.
- Prevent the stroller from contact with salty water. It might cause the formation of rust.
- Do not use the stroller on the beach.
- When unused, the stroller should be kept out of the reach of children.
CARRYCOT
FITTING THE HOOD
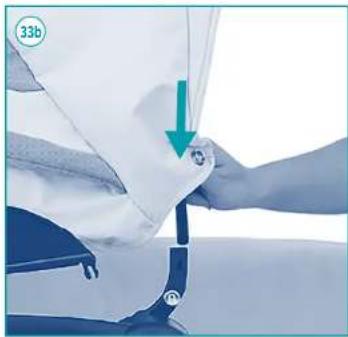
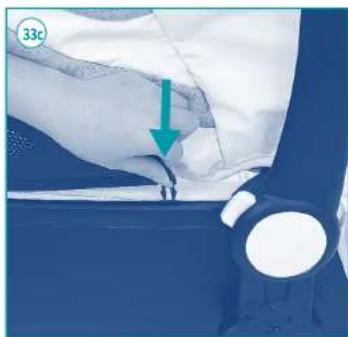
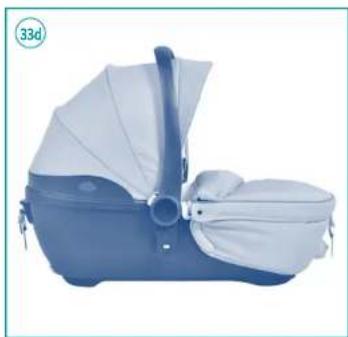
- Pull up the hood axis as shown in Fig. 33a and clip the 2 side metal plates onto it. The metal plate is installed completely when you hear a CLICK. Try to move it with your hands to make sure the hood is firmly assembled before use (see Fig. 33a/33b). Clip the decorative pieces into the clip base according to Fig. 33c. The decorative clips are installed completely when you hear a CLICK. Try to move them with your hands to make sure every clip is firmly assembled before use. The hood is completely assembled as in Fig. 33d.
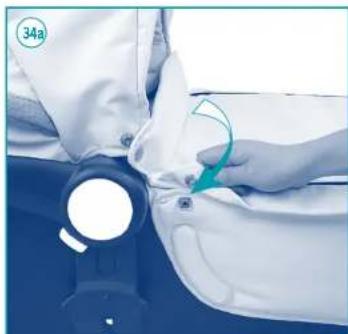
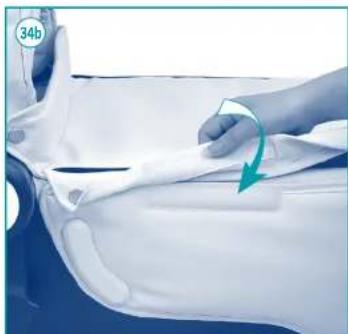
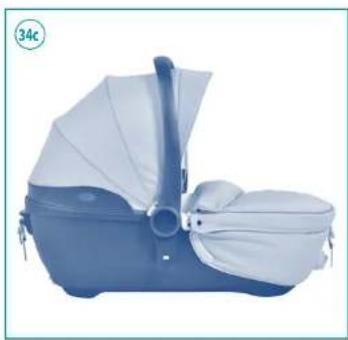
- As shown in Fig. 34a/34b/34c, put the footmuff on the kit first, and then snap the button on and fasten using the Velcros.
HOOD ADJUSTMENT
-
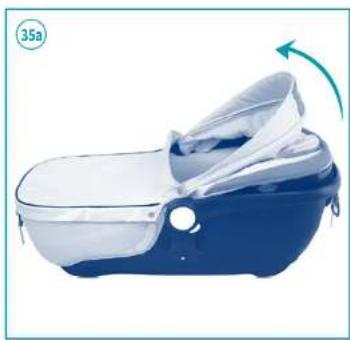
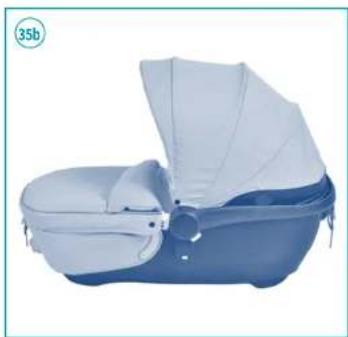
Opening the hood: open the hood by pushing it forward as shown in Fig. 35a.
-
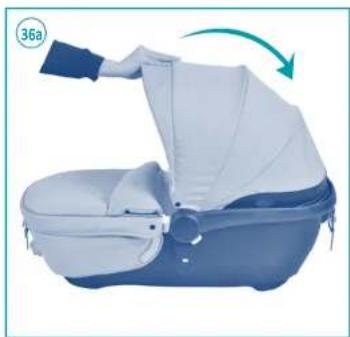
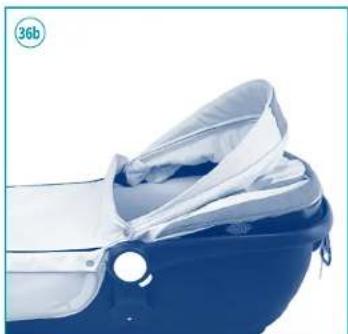
Closing the hood: when storing the carrycot, close the hood as shown by the arrow (see Fig. 36a/36b).
ADJUSTABLE HANDLE
-
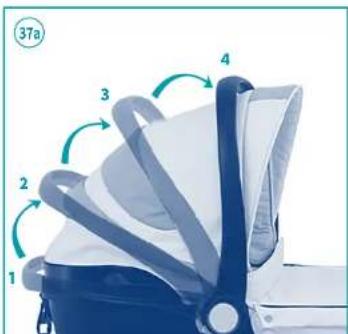
Releasing the handle: pull the handle up as shown by the arrow, it can be adjusted in three positions. The carrycot is firmly engaged when you hear a CLICK (see Fig. 37a).
-
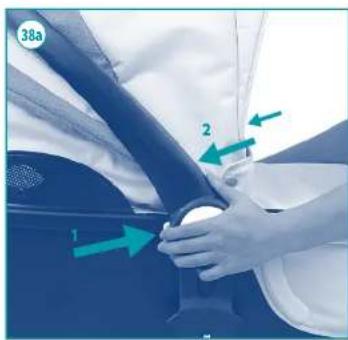
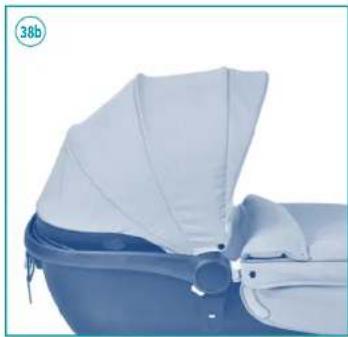
Locking the handle: press down the buttons on both sides of the handle simultaneously, and the adapter will lock, then push it as shown by the arrow 2. The handle is firmly locked when you hear A CLICK (see Fig. 38a/38b).
ADJUSTABLE BACKREST
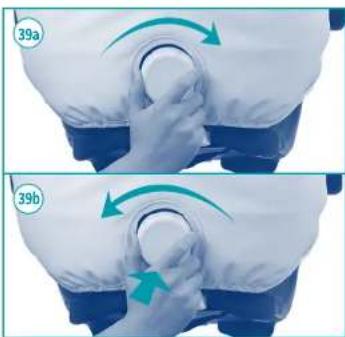
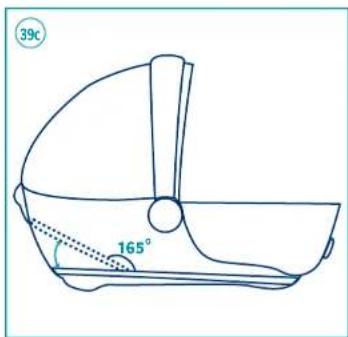
- Rotate the knob clock wise, the backrest can be raised up to the highest position at 165°. Rotate the knob counterclockwise and push
downwards lightly: this way the backrest can be lowered (see Fig. 39a/39b/39c).
ACCESSORIES
-
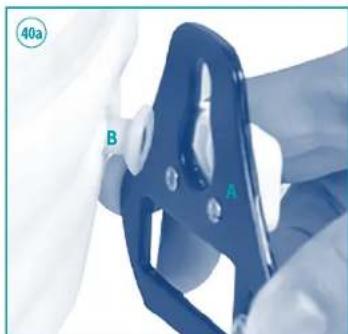
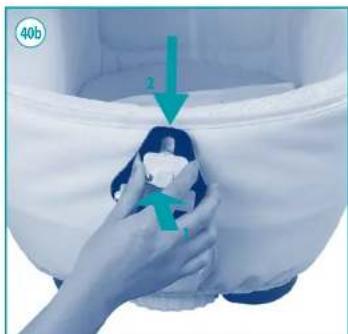
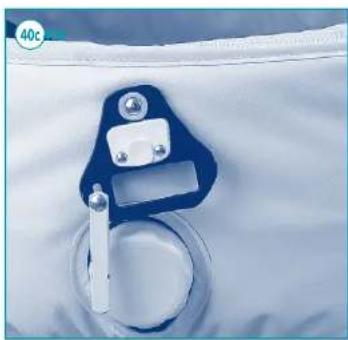
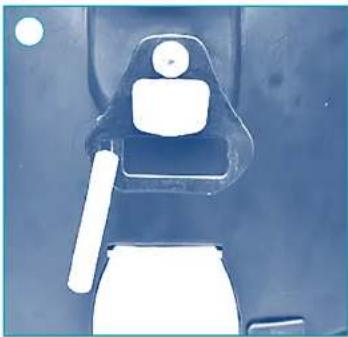
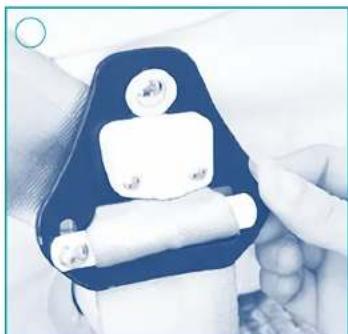
Preparation before use: Install the big buckle on the carrycot first. Fix "hole a" to the fixed plastic part b, insert and simultaneously pull the big buckle downwards as shown by arrow 2 (see Fig. 40a/40b). Repeat the operation also for the other buckle of the carrycot.
-
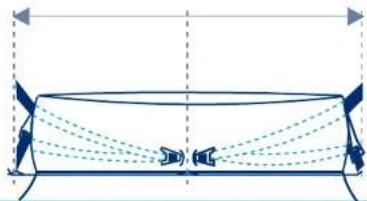
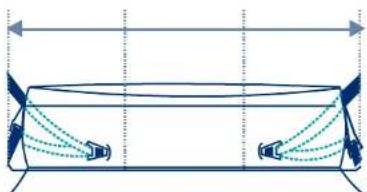
Pay attention to the different operation when the car seat is used in the car, see Fig. 41a/41b.
-
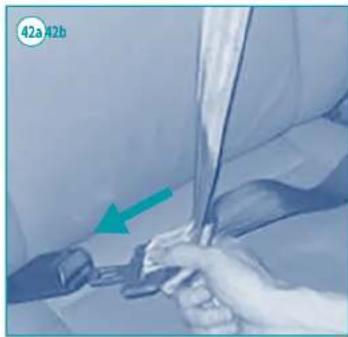
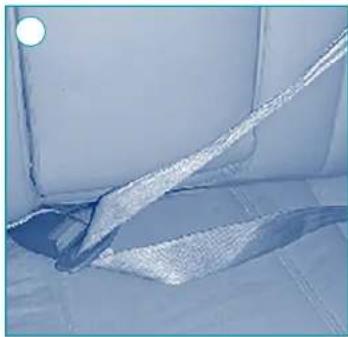
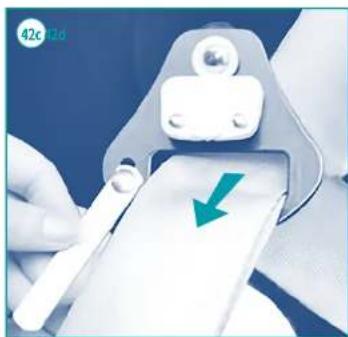
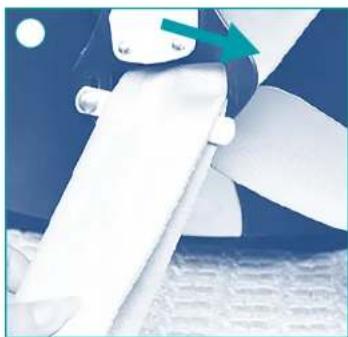
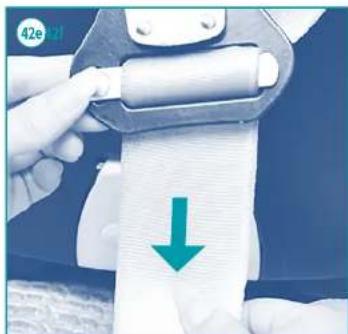
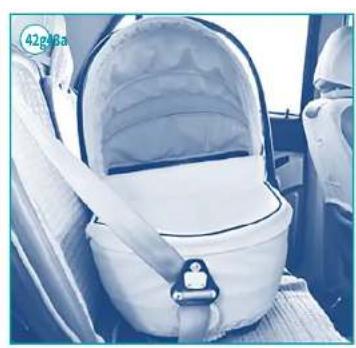
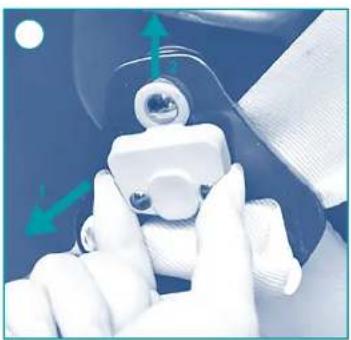
Fitting the carrycot in the car: fit the carrycot in the position shown in Fig. 41a/41b shown. Insert the car safety slot into the buckle on the seat and pull out of the safety belt, see Fig. 42a/42b; make a loop with the strap, pass the loop into the hole of the metal car connector and slide it over the tongue of the connector according to the arrow shown in Fig. 42c/42d; tighten the seat belt as shown by the arrow (see Fig. 42e). Repeat the operation also for the other buckle. This way the carrycot is firmly installed in the car as in Fig. 42f/42g.
-
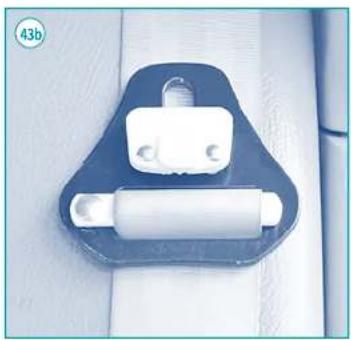
Disassembling the carrycot from the car: as shown in Fig. 43a, the carrycot can be removed from the car by releasing the "big buckle" (see arrow). The big buckles can be fixed on the safety belt after removing the carrycot from the car (see Fig. 43b)
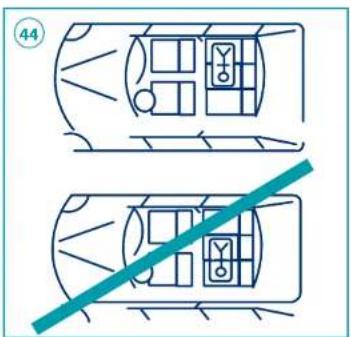
Note: The carrycot can only be installed on the rear seat, and always in the direction of travel. It can be installed in vehicles equipped with 3-point static belt in accordance with regulation R6 ECE/EEC.
WARNING
- For the sake of safety, never put the head of your child facing the door. When assembled in the back seat, make sure the restraint system in the carrycot for your child's safety is fixed firmly, especially if you travel. When assembled in the back seat, adjust the backrest to the lowest position and lower the carrying handle. When assembled in the back seat, the seat belts holding the restraint system of the carrycot to the vehicle should be tight. Adjust the seat belt to the maximum length to ensure the stability of the carrycot when used in the car. Adjust the seat safety belt in order to keep the carrycot steady in the car, the safety belt must be taut and never twisted.
USING THE SAFETY BELT
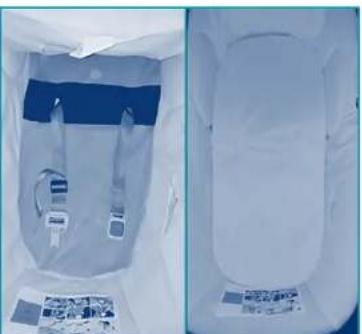
When the carrycot is used outside the vehicle, it will be necessary to conceal the safety harness. Remove the reducer cushion by taking out the belt from the holes (A).
Take out the two extremities of the belt from the mattress by passing the buckles into the corresponding holes (B).
Put the two extremities of the belt toward the foot area of the carrycot (C). Refit the mattress so that it covers the two extremities of the belt. For use inside a vehicle, repeat the operations in reverse order so as to make the belt usable again.
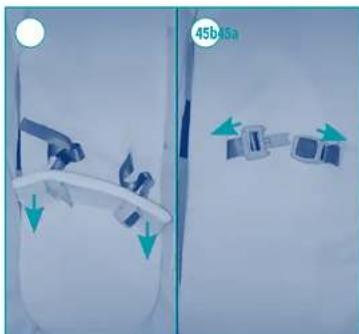
- When the carrycot is used as a car seat, press the middle button to open the buckle, see Fig. 45a. Connect the buckle on both sides, the buckle can be fastened, see Fig. 45b.
Note: always use the safety belt when your child is in the carrycot.
USING THE BREATHING HOLE
-
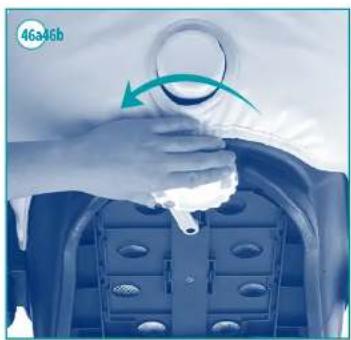
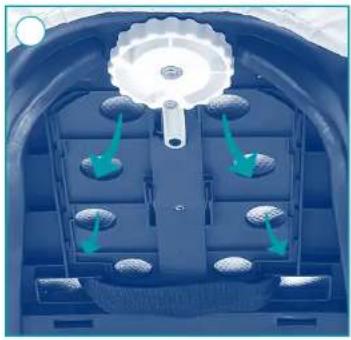
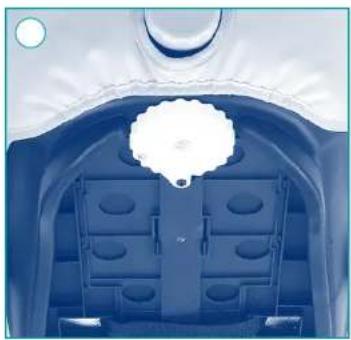
Open the air hole: rotate the knob under the basket counterclockwise, the breathing holes will open. The ventilation function is now enabled with all holes upwards.
-
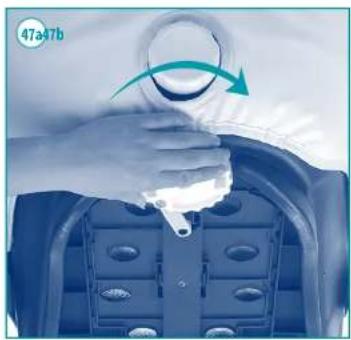
Close the air hole: rotate the knob under the basket clockwise, the breathing holes are closed (see Fig. 47a/47b). There will be no ventilation function with all holes downwards.
USE ON THE STROLLER
-
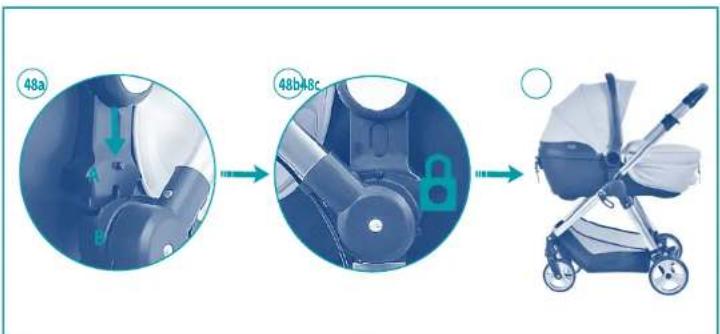
Assembling the carrycot: when using the carrycot on the frame, connect the adapter, push down the carrycot until you hear a "click" (see Fig. 48a/48b). The carrycot is assembled correctly on the frame as shown in Fig. 48c.
-
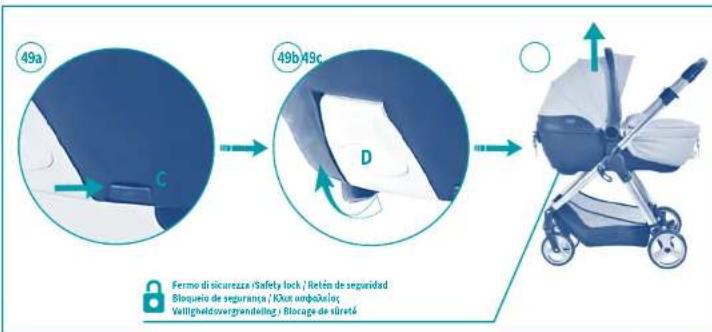
Push lock C as shown by the arrow in Fig. 49a, raise button D at the bottom of the carrycot as shown by the arrow and lift it up, you can then easily release the carrycot from the stroller (see Fig. 49b/49c).
CARE AND MAINTENANCE
For the sake of safety. This product requires a regular check and maintenance. Keep all parts clean. If they become stiff apply silicon based spray lubricant between components. Metal parts, the seat and fabric parts - Clean with a damp cloth soaked in warm water and mild detergent and wipe dry. Never clean with abrasive, ammonia based, bleach based or spirit cleaners. The footmuff and accessories are removable for cleaning. The canopy can be removed by simply pulling the frame out of the fixings. Do not use solvents, chemical cleaners or lubricants on any part of the seat and never attempt
52 53
to bleach or dye the fabric. Never store the carrycot if it is still damp. Always dry out first. If damp, leave fully open in a warm environment and dry off with a soft cloth. Storing a damp carrycot will encourage mould to form. Use near the sea will encourage salt to settle. Always keep regularly cleaned with a soft cloth soaked in warm water and mild detergent. Operate the carrycot according to the instructions to avoid any damage. Always service your carrycot before using for a second child.


MATERIALS
Cover: 100% polyester
Frame: aluminium
SIZES
L: 97.5 cm;
H: 60 cm;
D: 107 cm.
IMPORTANT NOTICE
-
This is a "Universal" child restraint. It is approved to Regulation No. 44.04 series of amendments, for general use in vehicles and it will fit most, but not all car seats.
-
A correct fit is likely if the vehicle manufacturer has declared that the vehicle is capable of accepting a "Universal" child restraint for this age group.
-
This child restraint has been classified as "Universal" under more stringent conditions than those applied to earlier designs, which do not carry this notice.
-
Only suitable for use in vehicles fitted with 3-point, static or retractor safety belts, approved to UN/ECE Regulation No. 16 or other equivalent standard.
-
If in doubt, consult either the child restraint manufacturer the retailer.
This product is fully certified to ECE R44/04 "0 Group" European Standard for the transportation of infants weighing from 0 to 10kg , and up to about 6 months of age.
CAR SEATING REQUIREMENTS
• In order to fit the carycot to the car seat, the car seat
must comply with the following requirements:
- it must be facing forward;
- it must be a rear seat fitted with at least two
3-point safety belts, approved to norm UNI/ECE 16, or equivalent.
WARNING: READ BEFORE LEAVING
ON A CAR TRIP
• These instructions must be carefully kept together with the product where they can be easily retrieved.
- The product must be fitted exactly as described in the instructions provided.
- Fit the product only to car seats that are properly secured to the car chassis facing forward.
- Any foldable, collapsible, or revolving car seats should be properly secured. Ensure also that there are no loose objects in the car - especially at the back: in case of an accident or sudden braking, they might otherwise hit the passengers injuring them.
- When installing the product to the vehicle ensure that movable seats or the car doors do not interfere with it. Make sure that no part of the product is caught in the car doors or rubs against cutting edges.
- Check that the car safety belt is always correctly tightened and not twisted or otherwise incorrectly positioned.
- Do not use the product if some of its parts are broken or missing.
- Do not interpose anything (pillows, blankets etc.) between the car seat and the carrycot, between the carrycot and the child.
- Do not place any heavy objects on the product.
• Always ensure that all passengers in the car wear safety belts for their own safety and because, while travelling, they could knock against the child.
- Regularly check the product for signs of wear or damage. In case of damage, do not use the product and keep it out of the reach of children.
- When the child is not in the car, the carrycot must remain fitted in place or it should be stored in the trunk.
- PRG declines all responsibility for the incorrect use of this product.
USE IN CAR - IMPORTANT NOTICE! READ CAREFULLY
- Please read these instructions carefully before using the product.
- KEEP THIS MANUAL FOR FUTURE REFERENCE.
- Carefully follow the instructions for the assembly and installation of this product. Do not let anyone use this product without having first read the instructions.
- Keep this manual together with the product.
- No safety car product can guarantee total safety to the baby in the event of an accident; however, the use of this product reduces the risk of injury and death.
- Incorrect use of the product increases the risk of serious injury to the baby, not only in case of an accident, but also in other situations as well.
- If the product is damaged, deformed or worn, it must be replaced: it might have lost its original safety characteristics.
- Do not make any modifications or additions to the product without the manufacturer's approval. Do not use accessories, spare parts or components not supplied by the manufacturer.
- Never leave your child unattended in the carycot in the car for any reason.
- Never leave the carycot on the car seat unfastened: it might knock other passengers injuring them.
- If the car has been left in the sun for a long time, check the carrycot before placing your child in it, as some parts could be very hot, and should be allowed to cool down to avoid burning the child.
- After an accident, even a slight one, the carrycot could be damaged, even if this is not visible to the naked eye.
It must in any case be replaced.
- Do not use second-hand car safety devices. They may have suffered structural damage, even if this is not visible to the naked eye.
• Each country has different safety laws and regulations for the transportation of children in cars. For this reason, it is recommended that you contact your local authority for further information.
- PRG declines any liability for improper use of the product.
IMPORTANT - READ THE INSTRUCTIONS CAREFULLY BEFORE USE AND KEEP FOR FUTURE REFERENCE.
- WARNING: KEEP PLASTIC BAGS AWAY FROM CHILDREN TO AVOID SUFFOCATION.
• WARNING: Never leave the child unattended.
- WARNING: This product is only suitable for a child who cannot sit up unaided. Maximum weight of the child: 9 kg.
- Indicative age of use: 0 - 5/6 months.
• WARNING: Only use on a firm, level and dry surface.
- WARNING: Do not let other children play unattended near the carrycot.
- WARNING: Do not use if any part is broken, torn or missing.
- WARNING: Never use this camycot on a stand.
- WARNING: This carycot can only be used on the PRG METROPOLITAN PRO Stroller.
- Only use spare parts supplied or approved by the manufacturer.
- Always be aware of the risk of open fire and other strong heat sources such as electric bar fires, gas fires, etc. Never leave the carrycot in the vicinity of these heat sources.
- Do not add another mattress on the upper part of the mattress supplied or recommended by the manufacturer.
- Check regularly the physical and structural integrity of the product. Specifically, check the carry handle and the bottom of the carrycot. Should any damage or signs of wear and tear be noticeable, do not use the product and keep out of the reach of children.
- Before assembly, ensure that the product and its components have not been damaged during transportation. In this case, do not use and keep out of the reach of children.
- Ensure that the handle is in the proper position for transport before lifting or transporting the carrycot.
- Do not attach accessories, spare parts or components not supplied by the manufacturer. Any unauthorised modifications made to the product will relieve the manufacturer of its responsibility.
- Do not leave anything inside the carrycot that might reduce its depth.
- Ensure that the carrycot is attached properly to the stroller before placing your child inside.
- Products exposed to direct sunlight will heat up; leave them to cool down before placing the child inside.
- The carrycot is not designed for children to sleep in for long periods of time: this product is not a substitute for a cot.
- It is recommended that the carrycot be aired out after prolonged use.
- Before lifting or transporting, the base needs to be adjusted to the lowest position.
- The child's head must never be lower than its body in the bag.
- WARNING: The restraint system must be used only when transporting your child in the car.
- WARNING: The restraint system must be removed when the product is used outside the car.
- Keep the carrycot out of the reach of children when it is not in use.
CAR SEAT GR 0+
INSTALLING THE SAFETY CHILD CAR SEAT IN YOUR CAR
-
This product is suitable for installation with three-point seat belts which will be divided into hip and shoulder belt, as shown in Fig. 50a.
-
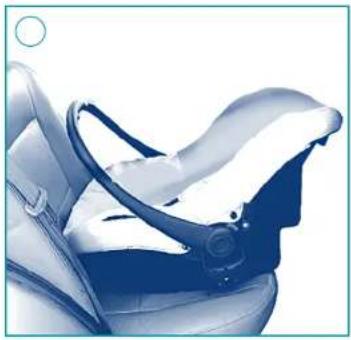
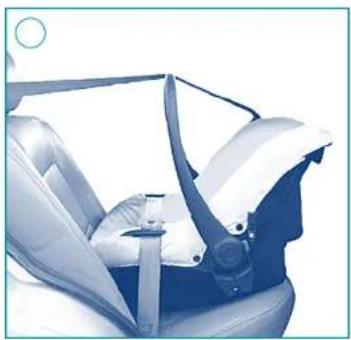
Place the child car seat in a rearward facing position on the seat or with the backrest forward facing. The carrying handle must be locked in an upright position, as shown in Fig. 51a.
-
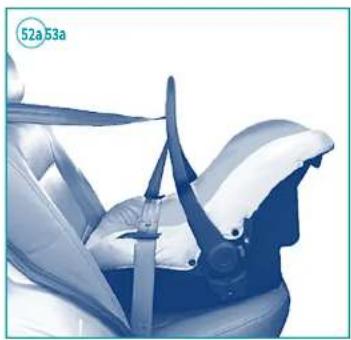
Thread the upper section of the safety belt across the front (foot end) between the shell and two belt hooks, as shown in Fig. 52a.
-
Place the upper section of the safety belt around the car seat and slide it into the belt hook on the back, as shown in Fig. 53a.
-
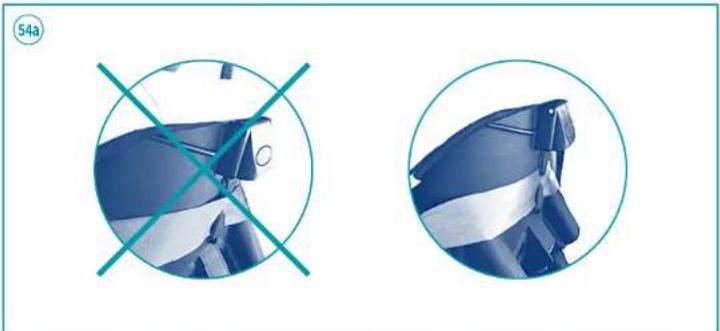
The retaining hook holds the safety belt in place, as shown in Fig. 54a.
-
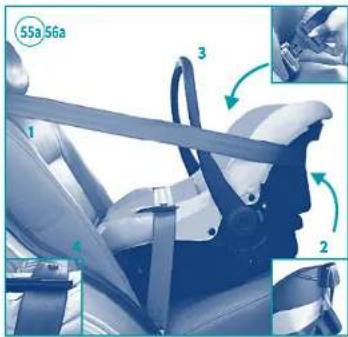
Insert the safety belt part into the buckle. Make sure the safety belt is not twisted. Tighten it as much as possible. Check again to make sure the belt is thread through all three blue belt hooks, as shown in Fig. 55a.
USING THE CAR SEAT
-
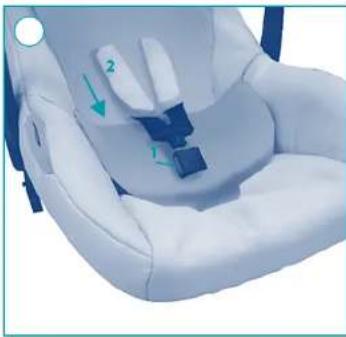
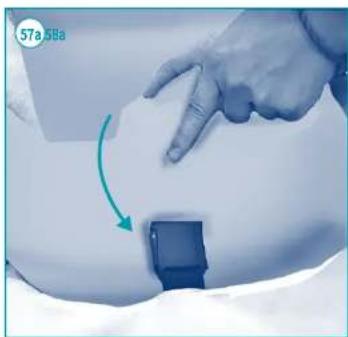
Loosen the shoulder belts by pressing the quick release button and pulling the shoulder belts towards you as shown in Fig. 56a, then put down the crotch strap as shown in Fig. 57a.
-
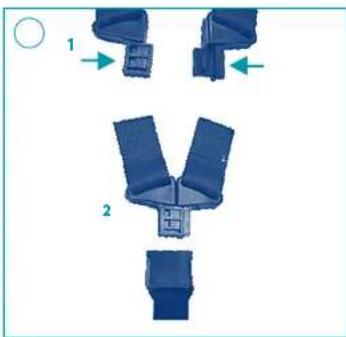
Join the hooking rings and insert them into the buckle as shown in Fig. 58a.
-
Pull the shoulder belts tight using the quick adjuster belt strap on the front. The loop can be secured under the cover rim.
-
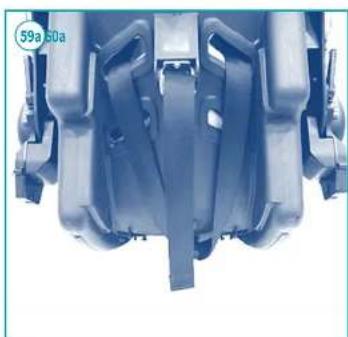
Adjust the height of the shoulder belts. The shoulder belts should run through the slots located directly above the baby's shoulders as shown in Fig. 59a. Pull the shoulder belts through the slots in the shell and cover. Place the shoulder belts back, at the required height and use the same slots in both shell and cover. Check to make sure the belts can be used properly and that they are not twisted
-
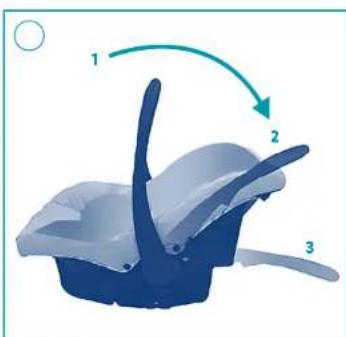
Press the buttons on both sides of the carrying handle at the same time and then adjust the carrying handle to the desired position. The buttons will pop up again once the handle is in position 1. carrying position/driving position 2. Sleeping position/rocking position 3. sitting position as shown in Fig. 60a.
REMOVING THE COVER
First remove the belt pads, open the rim of the sun canopy as far as possible. Then pull the hooking rings and adjustment strap through the openings. To refit the cover, carry out the above instructions in reverse order.
MAINTENANCE
The seat can be cleaned with soap and lukewarm water. Do not use any abrasive detergents. The cover must be washed by hand (maximum 30°C). Do not use a dryer. The belt buckle can be cleaned using warm water. Do not lubricate. To ensure optimum and safe use of car safety seats, they should not be used for longer than 5 years from the date of purchase. Ageing of the plastic, for instance, under the influence of sunlight (UV), may alter the product features. Therefore, once the child has grown out of the seat, we therefore advise you to no longer use the car seat and to dispose of it in a proper way.


MATERIALS
Cover: 100% polyester
Frame: aluminum
SIZES
L: 86 cm;
H: 60 cm;
D: 107 cm.
VERY IMPORTANT!
- Read these instructions carefully before assembling and installing the product. Prevent anybody from using the product without reading the instructions.
- Keep this instruction booklet for future use.
• Each country implements different laws and regulations in terms of safety to carry children inside vehicles. For this reason, contact local authorities for further information.
- WARNING! According to accident statistics, a vehicle's rear seat is generally safer than the front seat: therefore, we suggest to install the car seat on the rear seat of the vehicle. In particular, the safer seat is the rear central
one, if featuring a 3-point belt: in this case, we suggest positioning the Car seat on the rear central seat.
- WARNING! HAZARD! Never use this Car seat fitted on the front seat of a vehicle with a front airbag; use only if the front airbag is deactivated: check with the car manufacturer or see the owner's manual of your car for instructions on how to deactivate the airbag.
- If the child car seat is fitted on the front seat of the car (only if the front airbag is not present or has been deactivated), to ensure maximum safety the seat should be pushed as far back as possible while taking into account the comfort of passengers seated in the rear seat
- Never use this child car seat on side-facing or rear-facing car seats.
- Only fit the child Car seat onto seats which are fastened to the car chassis and facing forwards. Make sure that all folding or rotating car seats are always securely fastened in place; if not, they could be dangerous in the event of an accident.
- Pay attention when fitting the child Car seat into the car in order to avoid the car seat or car door interfering with it.
- No car seat can guarantee your child's total safety in the case of an accident but using this product reduces the risk of serious injuries or death.
- Serious risks for your child increase, not only in case of an accident but also in other circumstances (e.g. sudden braking, etc.) if the instructions contained in this manual are not followed carefully: always check that the child car seat is secured correctly to the vehicle's seat.
- If the child car seat is damaged, deformed or worn out, it must be replaced: it may no longer meet the original safety standards.
- Do not modify or add any components to the product without the manufacturer's approval.
-
Do not install accessories, spare parts, or any component not supplied by the manufacturer.
-
Never leave the child unattended in the child car seat for any reason.
• To avoid the risk of the child falling, fasten the child to the Car Seat also during transport by hand.
- When using the car seat out of the car, it is dangerous to use this product on an elevated surface.
- Never leave the child car seat unsecured in the car as it may hurt or harm the passengers.
- Never place anything except an approved accessory between the vehicle seat and the child car seat or between the child car seat and the child: in case of accident, the child car seat may not work properly.
- It is recommended to cover the child car seat if the vehicle is left exposed to direct sunlight.
- Even if not visible to the naked eye, after an accident (even minor one) the car seat may suffer damages: it must therefore be replaced.
- Before transporting the child seat by hand, make sure that the child is fastened with the belts and that the handle is correctly locked in the vertical position.
- This child car seat can ONLY be used on the PRG METROPOLITAN PRO stroller.
• Make sure that the child car seat is correctly attached to the stroller before placing your child inside.
- Do not use second-hand Car seats: they may have been structurally damaged and not visible to the naked eye but still liable to compromise the safety of the product.
- PRG declines all responsibility for any inappropriate use of the product.
- The seat fabric must only be replaced with another approved by the manufacturer as it forms an integral part of the child car seat. The child car seat must never be used without the fabric cover.
- Check that the safety harness strap is not twisted to avoid the strap or any parts of the child car seat getting trapped between the car doors, or rubbing against cutting edges. If the safety harness is cut or frayed, it must be replaced.
• Make sure that no objects or luggage is carried in particular on the rear shelf inside the vehicle, without previously having anchored or positioned them safely: they may injure the passengers in the case of an accident or sudden breaking.
- Make sure that all the vehicle's passengers use their safety belt for their own safety also because during the trip, they may injure the child in case of accident or sudden braking.
- On long distance journeys, make frequent stops. Children get tired easily. Do not remove the child from the child car seat while travelling. If your child needs attention, find a safe place and stop.
- Premature babies born before the 37th week of pregnancy can be at risk if placed in a child car seat. Newborn babies may have breathing difficulties when seated in the child car seat. We recommend consulting your doctor or the hospital's staff, for their medical advice on whether your child can be transported in the child car seat when leaving the hospital.
• Make sure that all passengers in the vehicle know how to release the child from the child car seat in case of an emergency.
PRODUCT FEATURES
- The child car seat is approved for "Group 0+", for the safe transportation of babies from birth up to 13 Kg in weight
IMPORTANT WARNING
- This is a "Universal" child restraint device. It is approved according to Regulation No. 44.04 series oamendments. Suitable for general use in vehicles and compatible with most but not all vehicle seats.
-
For perfect compatibility, check that the manufacturer of your vehicle has indicated in the manual whether your vehicle foresees the installation of Universal child retention devices for the age group in object.
-
This child restraint device has been classified as "Universal" under more stringent conditions than those that were applied to earlier designs that do not display this notice.
-
Suitable exclusively to be used in vehicles equipped with 3-point safety harnesses, whether static or withwinder, approved according to UN/ECE Regulation no. 16 or other equivalent standards.
-
In case of doubts, contact the manufacturer of the restraint device or your dealer.
LIMITATIONS ON USE WARNING!
Scrupulously observe the following limitations on the use of the product; safety will not be guaranteed otherwise.
• The weight of the child must not exceed 13 kg.
- Never use this car seat fitted on the front seat of a vehicle with front airbag; use only if the front airbag is deactivated; check with the car manufacturer or see the owner's manual of your car for instructions on how to deactivate the airbag.
WARNING! If it is used in a vehicle equipped with rear safety harnesses with integrated airbags (inflatable seat belts), the interplay between the inflatable portion of the seat belt and this child restraint system could cause serious injury or death. Do not install this child restraint equipment using an inflatable safety harness. The METROPOLITAN PRO Child Car Seat features a booster cushion:
- WARNING! To ensure maximum child safety, never use the booster cushion for children weighing more than 6 Kg.
- The Child Car Seat features a booster cushion to ensure good containment and greater comfort for children from birth to 6 kg in weight. Before fitting the booster cushion, check that the belts are inserted into the lowest slot: this is the only position allowed for use with this accessory.
NECESSARY REQUIREMENTS FOR THE CAR SEAT AND SAFETY BELT
The Child Car Seat can be installed on any front passenger or rear seat, but with the following limitations, the car seat must be:
-positioned forward-facing;
- equipped with 3-point safety belts, whether static or with inertia reel.
WARNING! Never install the child car seat on a car seat that is only equipped with a waist belt.
WARNINGS:
- WARNING! Age range intended for use: from birth to 10 kg (6 months).
• WARNING! Never leave the child unattended.
- WARNING! Do not use the product once your child cansit unaided, roll over or stand up pushing on its hands, knees and feet.
- WARNING! This product is not intended for prolonged periods of sleeping.
- WARNING! It is dangerous to use this product on an elevated surface, e. g. a table.
• WARNING! Always use the restraint system.
• Always use the restraint system when your child is in the product; adjust the length of the straps as necessary.
- WARNING! The product does not replace a bed or a cradle. Should it need sleep it should be placed in a suitable bed or cradle.
- WARNING! Do not use the product if any components are broken or missing.
- WARNING! Do not use accessories or replacement parts other than those approved by the manufacturer.
- Do not use the product with more than one child at time.
- Never leave the product on surfaces that are not perfectly horizontal.
• Always supervise children playing near the product.
- To prevent fire hazards, do not leave the product near sources of heat, electrical or gas devices etc.
• Make sure that the cover is properly secured to the structure of the product.
- WARNING! Before lifting and carrying the product, always bring back and lock the handle in the vertical position.
- Periodically check for any worn parts, loose screws, worn or unstitched materials and replace any damaged parts immediately.
- Do not place the product with your child in it near windows or walls where strings, curtains or other objects could be used by the child to climb or pose choking or strangling hazards.
- Do not place the product near windows or walls to avoid the risk of your child overbalancing and falling.
- Keep the product out of the reach of children when it is not being used.
FOR TECHNICAL OR COMMERCIAL REASONS, PRG RESERVES THE RIGHT, AT ANY TIME AND ALSO ONLY IN A SPECIFIC COUNTRY, TO MODIFY THE TECHNICAL CHARACTERISTICS OF THE MODELS DESCRIBED IN THIS LEAFLET, AND/OR THE SHAPE, TYPE AND NUMBER OF THE ACCESSORIES SUPPLIED.
E GIORDANI METROPOLITAN PRO SISTEMA MODULAR (DE 0 A 36 MESES APROX.)
SILLA DE PASEO
APERTURA DE LA SILLA DE PASEO
OPTIONELE ACCESSOIRES
HET AUTOSTOELTJE GEBRUIKEN
100% polyester aluminium
AFMETINGEN
Uitgeklapt:
Br: 86 cm;
H: 60 cm;
D: 107 cm.
Br: 78.5 cm
H: 60 cm;
D: 41 cm.
Ingeklapt:
Br: 78.5 cm;
H: 60 cm;
D: 41 cm.
WAARSCHUWINGEN
Bekleding: 100% polyester
Frame: aluminium
AFMETINGEN
Br: 97.5 cm;
H:60cm;
D: 107 cm.
BELANGRIJKE MEDEDELING
Bekleding: 100% polyester
Frame: aluminium
AFMETINGEN
Br: 86 cm;
H: 60 cm;
D:107cm.
ZEER BELANGRIJK! METEEN LEZEN
Structure: aluminium
DIMENSIONS
Ouvert: L:86 cm;
H:60cm;
P:107cm.
Fermé: L: 78,5 cm;
H:60cm:
P:41cm.
AVERTISSEMENT
Structure: aluminium
DIMENSIONS
L:97,5cm;
H:60cm;
P:107cm.
AVIS IMPORTANT
Structure: aluminium
DIMENSIONS
L:86cm;
H:60cm;
P:107cm.
TRÈS IMPORTANT! LIRE ATTENTIVEMENT
CARACTÉRISTIQUES DU PRODUIT