
FHMA 755 4G DC MB C - Cooker FRANKE - Free user manual and instructions
Find the device manual for free FHMA 755 4G DC MB C FRANKE in PDF.
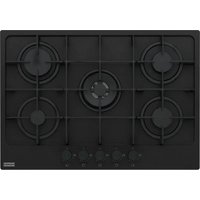


| Product type | Built-in gas hob |
| Brand | Franke |
| Model | FHMA 755 4G DC MB C |
| Number of burners | 5 (1 Double Crown, 2 Rapid, 1 Semi-rapid, 1 Auxiliary) |
| Overall dimensions (W x D) | 730 x 510 mm |
| Cutout dimensions (W x D) | 560 x 480 mm |
| Worktop thickness | 40 mm (minimum) |
| Net weight | 11.5 to 13 kg |
| Electrical supply | 220-240 V ~ 50/60 Hz, 0.6 W |
| Compatible gas types | Natural gas G20 (20 mbar) and LPG G30/G31 (28-30/37 mbar) |
| Total installed power (gas) | 10.8 kW (natural gas) / 10.5 kW (LPG) |
| Total nominal flow rate (G20) | 1.028 m³/h |
| Total nominal flow rate (G30/G31) | 764 g/h |
| Double Crown burner | 3.3 kW (nominal), 0.91 kW (reduced), injector 218 (G20/G30) |
| Rapid burner (x2) | 1.15 kW (nominal), 0.85 kW (reduced), injector 218 (G20) |
| Semi-rapid burner | 0.97 kW (nominal), 0.65 kW (reduced), injector 127 |
| Auxiliary burner | 0.72 kW (nominal), 0.50 kW (reduced), injector 73 |
| Ignition | Integrated electric ignition (rotary knob) |
| Safety | Thermocouple safety valve (automatic gas shut-off if flame goes out) |
| Surface material | Stainless steel |
| Grates | Grates with rubber feet, removable |
| Cleaning | Clean after each use with a soft cloth and water; do not use steam cleaners or abrasives |
| Spare parts | Use exclusively original Franke spare parts |
| Repairability | Any intervention must be carried out by a qualified technician; contact Franke after-sales service |
| Warranty | Manufacturer's warranty (see conditions) |
Frequently Asked Questions - FHMA 755 4G DC MB C FRANKE
User questions about FHMA 755 4G DC MB C FRANKE
0 question about this device. Answer the ones you know or ask your own.
Ask a new question about this device
Download the instructions for your Cooker in PDF format for free! Find your manual FHMA 755 4G DC MB C - FRANKE and take your electronic device back in hand. On this page are published all the documents necessary for the use of your device. FHMA 755 4G DC MB C by FRANKE.
USER MANUAL FHMA 755 4G DC MB C FRANKE
EN User manual Gas Hob
In this manual and on your appliance we have provided many important safety messages. Always read and obey all safety messages. Franke reserves the right to make modifications to the product without prior notice. All information correct at time of issuance.
This appliance can be used by children aged from 8 years and above and persons with reduced physical, sensory or mental capabilities or lack of experience and knowledge if they have been given supervision or instruction concerning use of the appliance in a safe way and understand the hazards involved. Children shall not play with the appliance. Cleaning and user maintenance shall not be made by children without supervision.

Risk of injury!
This device is not a toy. - Keep children and pets away from the device and the packaging material e.g. plastic film and polystyrene; it can be dangerous, dispose of it in a proper way.
Do not leave children near the device unattended. Do not let children play with the device.

Risk of burns!
During use the appliance becomes hot. Care should be taken to avoid touching the hob.
WARNING: Accessible parts may become hot during use. Young children should be kept away. Children less than 8 years of age shall be kept away unless continuously supervised.
Ensure the gas type and supply is compatible with appliance specifications. The hob was developed exclusively for nonprofessional, domestic use in the household only. The type of gas for which the appliance is arranged is specified on the dataplate on the bottom of the tray. Prior to installation, ensure that the local distribution conditions (nature of the gas and gas pressure) and the adjustment of the appliance are compatible. This appliance is not connected to a combustion products evacuation device.
It shall be installed and connected in accordance with current installation regulations. Particular attention shall be given to the relevant requirements regarding ventilation.
The adjustment conditions for this appliance are stated on the label (or data plate). Pay particular attention to the applicable regulations on ventilation. After use, switch off the hob by its controls. Make sure the burners are cold before closing the lid, if the appliance has one.

Risk of electric shock to entering liquid!
The device contains electrical components.
Make sure that no liquid enters the interior of the device. Do not use pressurised steam to clean the device. In the event of the burner flames accidentally extinguished, turn off the burner control and do not attempt to reignite the burner for at least 1 min. The device shall not be operated for more than 15 seconds if after 15 seconds the burner has not lit, stop operating the device and open the compartment door.
and/or wait at least 1 minute before attempting a further ignition of the burner.
Ensure that the device is installed in a way that allows to disconnect it from the power supply, with a contact opening distance (3 mm) that ensures complete disconnection in category III overvoltage conditions. Ensure that the appliance is connected to an earthing system in compliance with the current regulations.

CAUTION: The use
of a gas cooking appliance results in the production of heat, moisture and products of combustion in the room in which it is installed.
Ensure that the kitchen is well ventilated especially when the appliance is in use: keep natural ventilation holes open or install a mechanical ventilation device (mechanical extractor hood). Do not operate the appliance with an external time switch or a separate remote control system.
CAUTION: The cooking process has to be supervised. A short term cooking process has to be supervised continuously.
Do not use steam cleaners or direct jets of water. Never use scouring pads, steel wool, muriatic acid or other products which could scratch or mark the surface. - Never use sharp objects, as they could damage the seals between the trim and worktop. Ensure the gas outlet zones are perfectly clean. These instructions are only valid if the country symbol appears on the appliance. If the symbol does not appear on the appliance, it is necessary to refer to the
technical instructions which will provide the necessary instructions concerning modification of the appliance to the conditions of use of the country.

Risk of fire!
Do not store items on the cooking surfaces.

WARNING: Unattended aromatic cooking on a hob at or oil can be dangerous may result in fire. Hot oils readily.
TECHNICAL DATA
FHSM 604 4G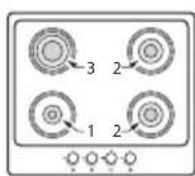
FHMA/FHSM 604 3G DC
THMA 755 4G DCL FHSM/FHM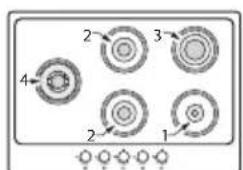
4G 755 DC FHMA/FHSM 905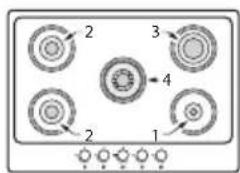
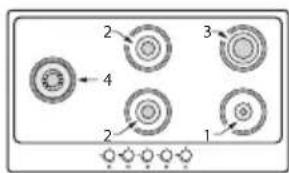
| Position Burner Rated | Capacity-G20 | InjectorsG20-20 mbar | RatedCapacity-G30 | RatedCapacity-G31 | Injectors G30/G31 28-30/37 mbar | RatedPower(Kw) | ReducedPower (Kw) | |
| 4 DC 0,315 1,35 | 240 240 0,91 3,3*218 *218 *0,85 | *3 | 2,10 | |||||
| 3 | R | 0,286 | 1,15 | 218 | 218 | 0,85 | 3 | 1,30 |
| 2 | SR | 0,166 | 0,97 | 127 | 127 | 0,65 | 1,75 | 0,70 |
| 1 AUX | 0,095 | 0,72 | 73 | 73 | 0,50 | 1 | 0,65 | |
| Pressure(mbar) | min | 17 | 20 | 25 | ||||
| nom | 20 | 28-30 | 37 | |||||
| max | 25 | 35 | 45 | |||||
| Type of Gas | G20 natural gas | LPGG30 ButaneG31 Propane | Cat. II2H3+ | |||||
*ALL FHMA MODELS
| MODELS'S CONFIGURATION | ||||||||||||
| MOD. nr | AUX | nr SR | nr R | nr DC | N burners | Heat Source | Total Rated Capacity G20 (m3/h) | Total Rated Capacity G30/G31 (g/h) | Air Necessary for combustion (m3/h) | Tot Installed Gas Rated Power (kW) | Tot Installed LPG Rated Power (kW) | Weight (net - gross) (kg) |
| FHSM 604 4G | 1 | 2 | 1 | 4 | GAS | 0,713 | 545 | 15 | 7,5 | 7,5 | 8-9,4 (C) 7,1-8,5 (E) | |
| FHSM 604 3G DC | 1 | 2 | 1 | 4 | GAS | 0,742 | 567 | 15,6 | 7,8 | 7,8 | 8-9,4 (C) 7,1-8,5 (E) | |
| FHSM 755 4G DC | 1 | 2 | 1 | 1 | 5 | GAS | 1,028 | 785 | 21,6 | 10,8 | 10,8 | 10,5-12(C) 8,9-10,4 (E) |
| FHSM 905 4G DCL | 1 | 2 | 1 | 1 | 5 | GAS | 1,028 | 785 | 21,6 | 10,8 | 10,8 | 14-15,7 (C) 12,5-14,2(E) |
| FHMA 604 3G DC | 1 | 2 | 1 | 4 | GAS | 0,742 | 545 | 15,6 | 7,8 | 7,5 | 8,8-10,2 (C) | |
| FHMA 755 4G DC | 1 | 2 | 1 | 1 | 5 | GAS | 1,028 | 764 | 21,6 | 10,8 | 10,5 | 11,5-13 (C) |
| FHMA 755 4G DCL | 1 | 2 | 1 | 1 | 5 | GAS | 1,028 | 764 | 21,6 | 10,8 | 10,5 | 11,5-13 (C) |
| FHMA 905 4G DCL | 1 | 2 | 1 | 1 | 5 | GAS | 1,028 | 764 | 21,6 | 10,8 | 10,5 | 14,5-16,2 (C) |
| DC = Double Crown SR-Semi-Rapid R = Rapid AUX=Auxiliary C = Cast Iron Grid E = Enameded Grid Power supply = 220-240 V; Frequency = 50-60 Hz; Power/current = 0,6 Watt | ||||||||||||
INSTALLATION

Installation and electrical/gas connection must only be carried out by specialized and licensed personnel.
The manufacturer declines any liability for injury to persons or damage to things due to failure to comply with these provisions. The gas connection must comply with the regulations in force in the country at the time of installation.
Ensure that the device is connected directly to the mains socket. Ensure that no adapters, multi-sockets, or extension cables are used to connect the device.
Cabinet requirements
This handbook refers to a class 3 built-in gas hob and type Y for electric part. The gas pipe must not come into contact with the sides of any oven under the hob. For fitted units, the components (plastic materials and veneered wood) must be assembled with heat-resistant adhesives (min. 100°C): Unsuitable materials and adhesives can result in warping and detachment.
The ventilation of rooms must be in compliance with local regulations. The kitchen element must allow sufficient room for the electrical connections of the appliance.
Important: These devices are "Y" type with respect to the degree of protection against the dangers of fire. The minimum distance from the edge of the appliance is 150 mm for the side wall, 50 mm for the rear, and 700 mm for any cabinets above it. The appliance is recommended to be built into 40 mm thick worktops. In case the dimensions are different, eventual modifications have to be managed by the technician.
Note: if a hood is installed above the hob, for the distance to be respected refer to the assembly instructions of the hood.
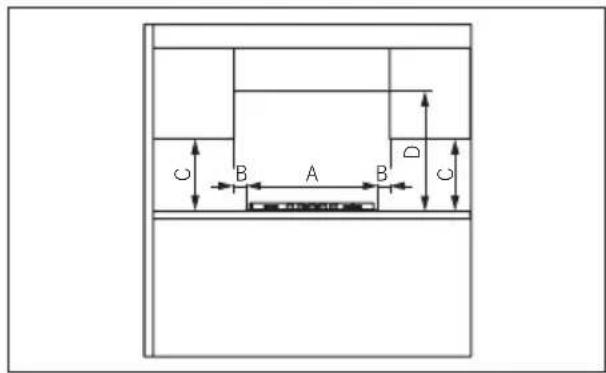
MINIMUM DIMENSIONS (MM)
A = 590 / 730 / 880, B = 50, C = 400, D = 700
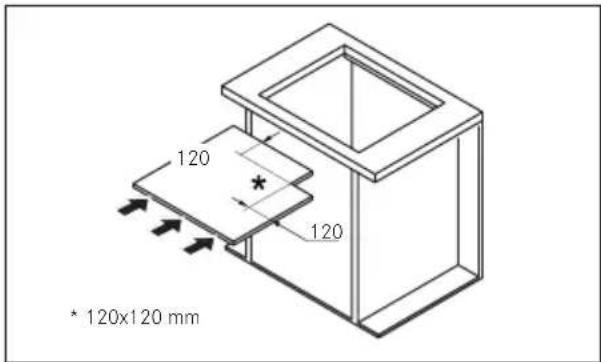
If the appliance is not installed above an oven: arrange a separator baffle.
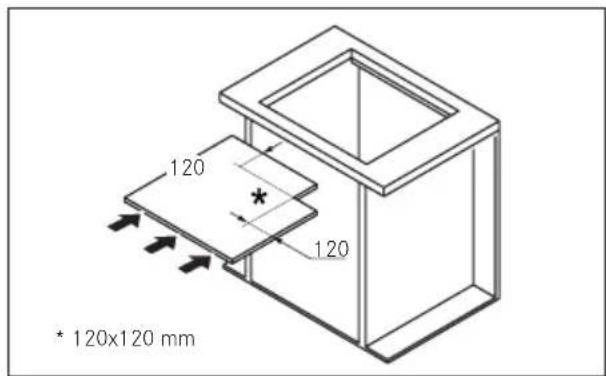
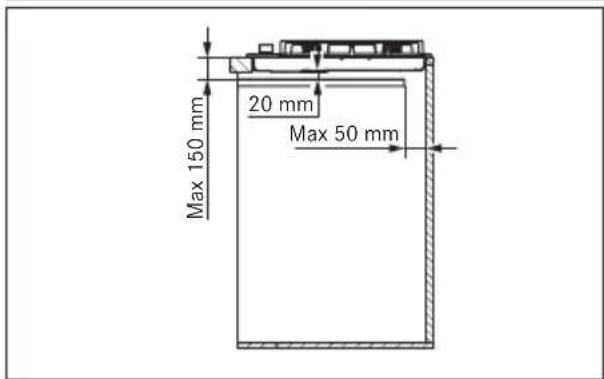
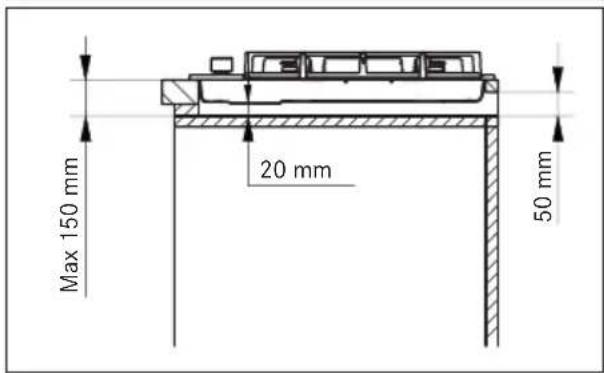
Installation procedure
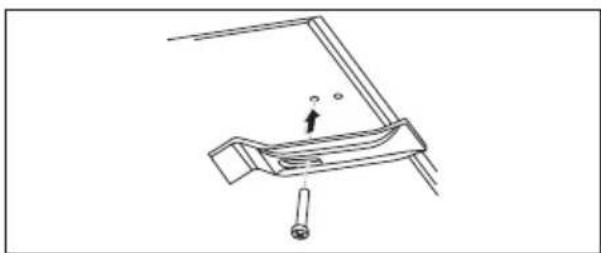
The appliance is fixed to the unit by means of the brackets and accessories provided.
Make sure that there is free access to the fixing elements in front and in the rear after the installation of the appliance. Prepare the hole in the worktop according to the dimensions indicated. Be sure to comply with the dimensions indicated.
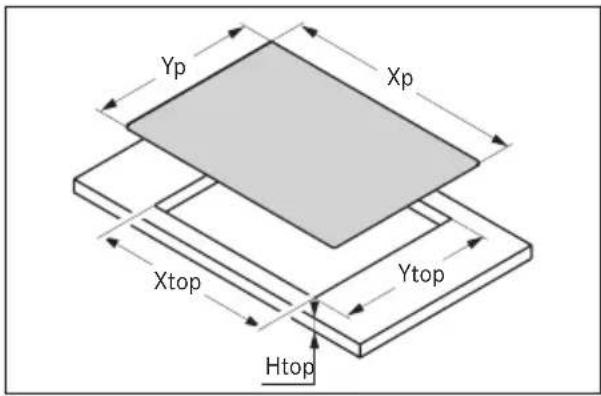
| Model Xp Yp X | top | Y top | H top | ||
| FHSM 604 3G DC | 590 | 510 | 560 | 480 | 40 |
| FHSM 604 4G | mm | mm | mm | mm | mm |
| FHMA 604 3G DC | |||||
| FHSM 755 4G DC | 730 | 510 | 560 | 480 | 40 |
| FHMA 755 4G DC/DCL | mm | mm | mm | mm | mm |
| FHSM 905 4G DCL | 880 | 510 | 840 | 480 | 40 |
| FHMA 905 4G DCL | mm | mm | mm | mm | mm |
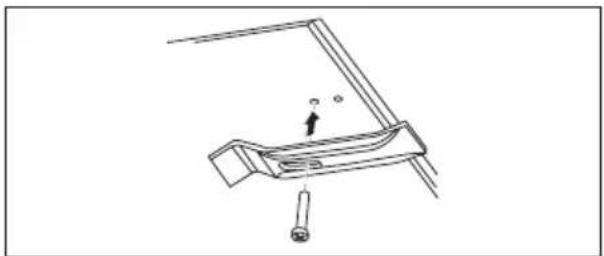
Apply the sealing strip around the hole and position the hob. Fix the appliance with the screws and brackets. Remove any excess sealing strip.
Connection to gas supply
Connect the appliance to the gas supply in compliance with the current regulations, only after making sure it is arranged for the type of gas to be used. Otherwise, carry out the operations described in the paragraph "Replacing injectors". For liquid gas use pressure regulators complying with the current regulations.
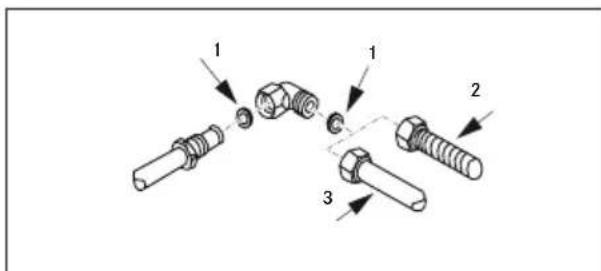
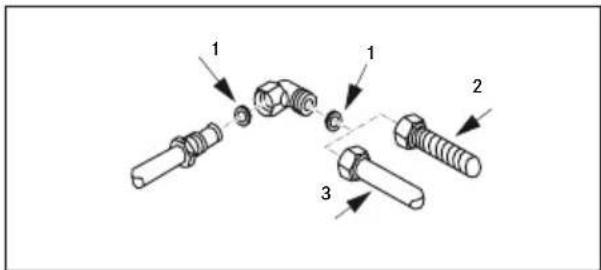
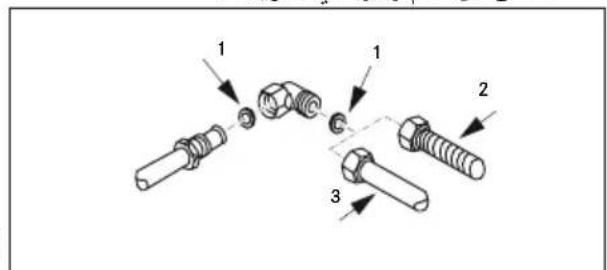
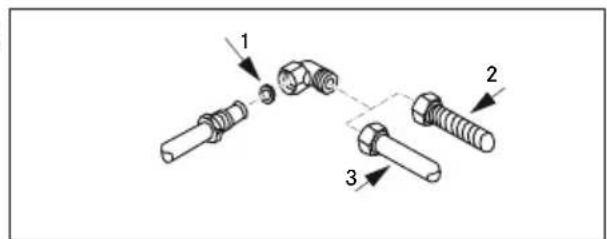
Connection to the gas supply can be made in two ways:
A. Connect the gas hob using a 12 mm diameter rigid copper pipe (3). To ensure a good seal, use the elastomer gasket supplied as an accessory (1). B. Connect the hob using a continuous-surface flexible steel tube (2). Also in this case, to ensure a good seal use the gasket supplied as an accessory (1). The maximum length of the hose is 2 linear metres.
Important: if a stainless steel hose is used, it must be installed so as not to touch any mobile part of the furniture. It must pass through an area where there are no obstructions and where it is possible to inspect it on all its length.
After connection to the gas supply light up the burners and turn the knobs from max position to minimum position to check flame stability. After carrying out the connection use soapy water to check for any leaks.
For United Kingdom, Northern Ireland and Republic of Ireland.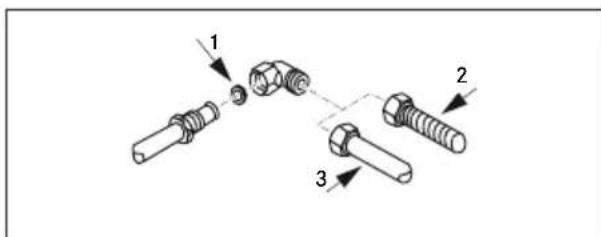
Electrical connection
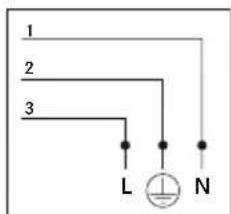
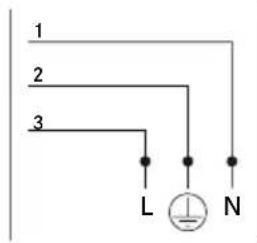
The FRANKE cooking hob comes with a 3-core power cable with free terminals.
Ensure the following:
- The characteristics of your household electrical power supply (voltage, maximum output and current) are compatible with those of your FRANKE hob.
- The plug and the socket can be easily reached and are positioned so that no live part is accessible when inserting or removing the plug.
- A 3 × 0.75 mm2 H05RR-F type cable for completely gas hobs is used when replacing the power cable.
- The terminals of two appliances are not connected to the same plug.
- The polarities of the free terminals (Blue = Neutral = (1) / Yellow and Green = Earth = (2) / Brown = Live = (3)) are respected.
Adjustment to different types of gas
WARNING: This operation must be performed by a qualified technician.
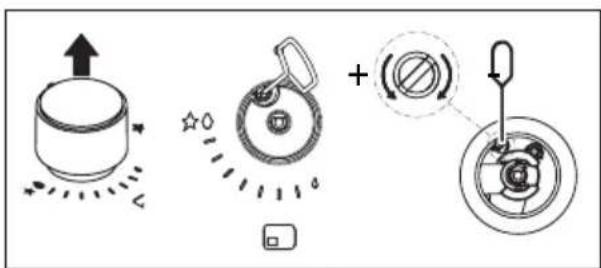
Minimum flame adjustment
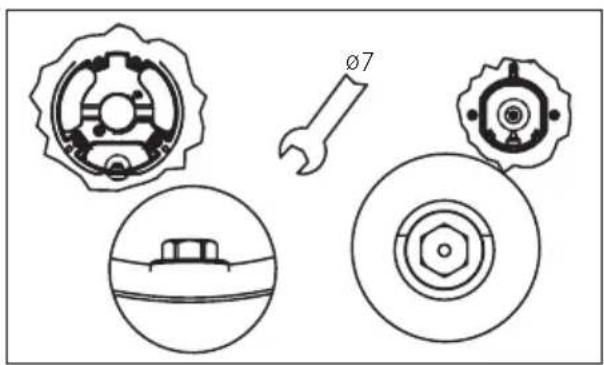
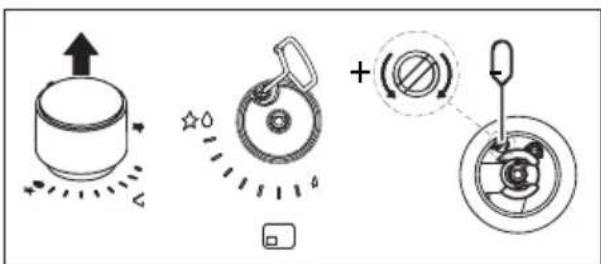
Remove the knob. Insert the screwdriver between the gasket and the cover until it reaches the adjustment screw. Adjust the minimum flame by turning the screw clockwise to decrease the flame and anticlockwise to increase it. The screwdriver for adjustment is supplied with the accessories.
Replacing injectors
Not supplied injectors must be requested to the customer service.
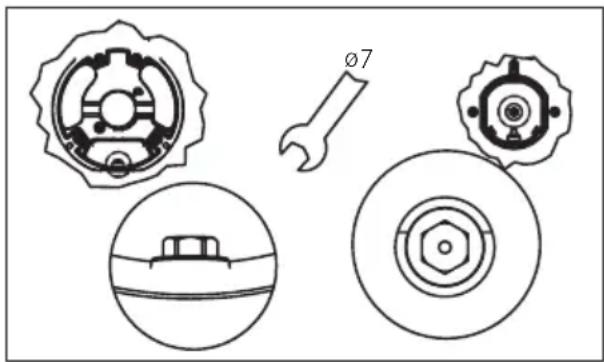
Important: All the appliances are factory-set for natural gas (G20). If a different type of gas is to be used, change the injectors as follows:
- Remove the grids, burner caps and flame-spreaders;
- Unscrew the injectors and replace them with those provided and suitable for the gas supply, making sure the marking matches that given in the table;
- Refit the flame-spreaders, burner caps and grids.
These burners do not require air adjustment.
Accessing the hob
To access the tray containing the functional parts, proceed as follows:
- Remove the grids, burner caps and flame-spreaders;
- Remove the knobs, sliding them off their pins;
- Remove the screws that fix the burners to the hob;
- Lift the hob.
Important: When converting the appliance to a different type of gas, place the corresponding sticker (supplied as an accessory) in the special space on the data plate. For operation with LPG (G30 or G31), the minimum flame adjustment screw must be fully screwed down.
These appliances are supplied in cat. II 2H3+.
INTENDED USE
CAUTION: This appliance is for cooking purposes only. It must not be used for other purposes, for example room heating.
Do not pull the appliance or the power cable to unplug it. Close the general gas supply cock when the hob is not in use.

Risk of burns!
Do not touch the pot grids during use. Do not touch the appliance with wet parts of the body.
Lighting the burners
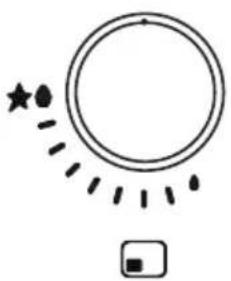
The hob is lit with the control knobs. To light the burners, proceed as follows:
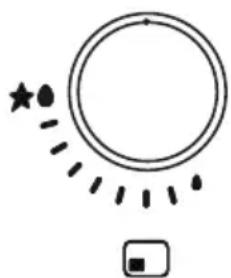
- Press and turn the required knob to the lighting and maximum delivery position.
- Keep the knob pressed down for 3-4 seconds to allow the sparks to ignite the gas coming out of the burner and to allow the thermocouple to heat up.
Then release the knob and, turning it anticlockwise, adjust the flame as required. If the flame does not stay lit, repeat the operation from step 1.
| Knob icon | Function |
| ● | Off |
| ● | Minimum flame |
| ★● | Lighting and maximum flame |
| ● | Cooking zone |
The hob is an item for daily use: signs of usage such as scratches or visible material abrasion from pots or cookware are normal. Intensive use leads to more distinctive signs of usage. In such cases, the appliance continues to function perfectly and a complaint is not justified. Safety is always guaranteed.
Do not use the appliance as a support top. To avoid damaging the appliance: In the case of thermal failure, switch the solid plate off and allow it to cool down completely. Do not put any dishes on it. Do not cool with cold water under any circumstances. Do not climb onto the appliance. The appliance is manufactured in compliance with the relevant effective safety standards and safety requirements of the Gas Directive.
Automatic Safety Valve
These hobs have a safety device that automatically closes the gas flow if the flame accidentally goes out due to draughts, pot spilling, or a temporary interruption of the gas supply. This device is activated approx. 30 seconds after the flame goes out.
Burner use
For lower gas consumption and better efficiency, use pots of widths suitable for the burners, making sure the flame does not go beyond the edges (comply with the following table):
| Burner | Pan bottom min-max. (recommended) |
| Double Crown 160 -240 mm | |
| Rapid 140 - 220 mm | |
| Semi-Rapid 140 - 200 mm | |
| Auxiliary 60 - 140 mm | |
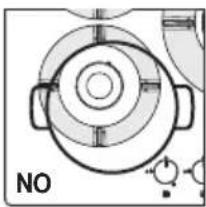
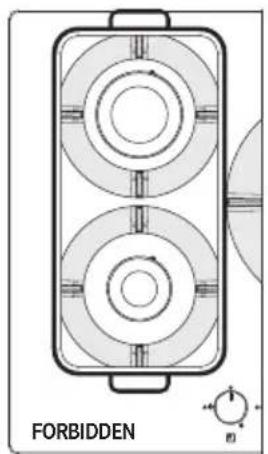
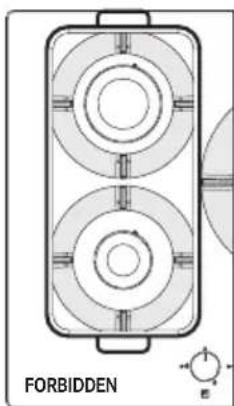
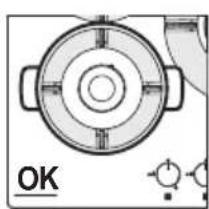
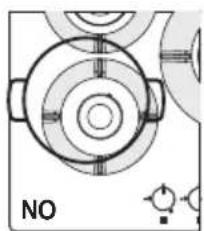
The use of larger pots than those specified can cause excessive overheating of the knobs and top and, in case of prolonged use, yellowing of the cover (if in stainless steel). FRANKE declines any liability for damage due to such use (Fig. 1).
Do not put the same pan on two burners (Fig. 1). Do not use two burners working at the same time with a single container, like a saucepan or a fish pan (Fig. 1). Improper use of the grids can damage the hob: do not position the grids upside down or slide them across the hob. In case of use of cast iron griddles, griddle stones, terracotta pots and pans, use them for no more than 20 minutes and, in case of prolonged cooking, adjust the burner to the minimum. Heat diffusers such as metal mesh, or any other types, are not recommended.
CAUTION: The use of particular pans or pots may cause a light temporary deformation of the steel cooking surface. This is normal and does not affect the operation of the appliance.
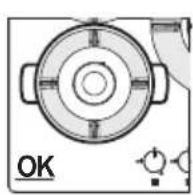
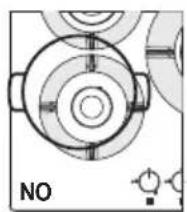
Fig. 1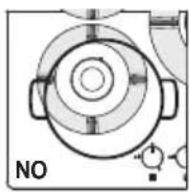
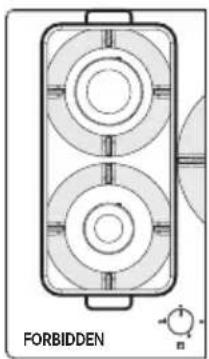
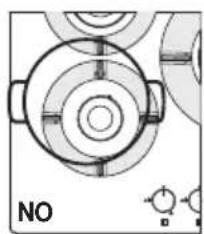
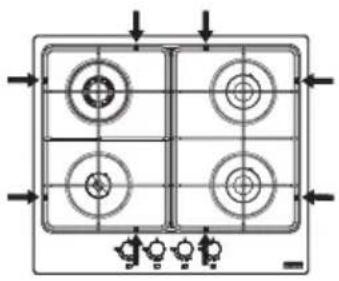
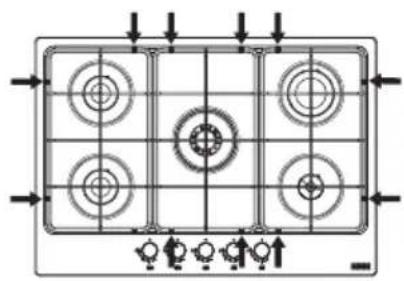
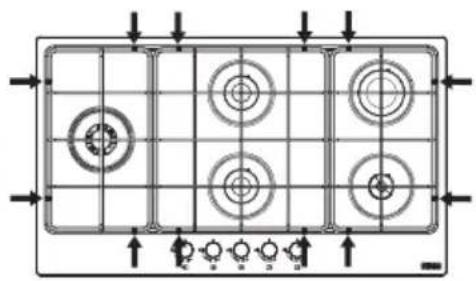
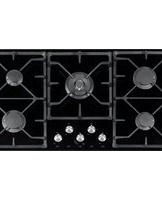
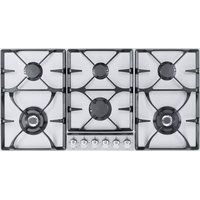
Correct position of the grids
Be sure to place the grids with the rubber feet in the right position as indicated by the arrows in the pictures below:
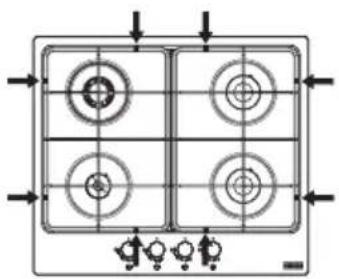
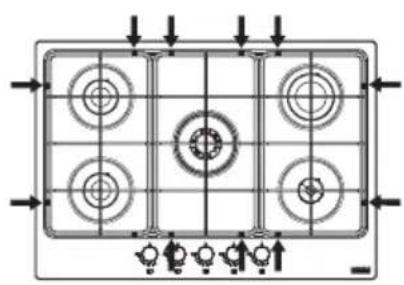
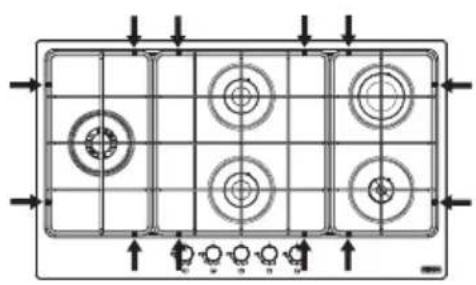
CLEANING AND CARE

Risk of burns!
Do not clean the appliance and its accessories until they are cold. Do not use flammable liquids near the appliance.
Before performing any cleaning and care: Turn the appliance off.
Foods that accidentally fall or settle on the surface, on the functional or aesthetic elements of the hob must not be eaten.
Cleaning the appliance
Clean the hob after every use in order to prevent food residues from burning on. To clean food residues, use a soft cloth or sponge with water. We recommend using protective cleaning agents. Immediately remove any foods with high sugar content that spill onto the hob. To prevent limescale stains from forming, always thoroughly dry the appliance after going over it with a damp cloth. Clean the grids, burner caps and flame-spreaders with hot soapy water, making sure to carefully dry them. Do not clean in a dishwasher. Make sure the gas outlet zones are perfectly clean. The natural colour of the pot grids in the pot placing section may alter over time due to the heat.
MAINTENANCE AND REPAIR
Before any maintenance operations disconnect the appliance from the mains power supply. In case of any operation problems, contact the Franke Technical Service Centre.
Make sure that maintenance on electrical components is carried out only by the manufacturer or the customer service. Use original spare parts only. Make sure that damaged cables are changed only by the manufacturer or the customer service.
When contacting the customer service, please provide the following information:
-type of fault - appliance model (Art. / Cod.) - serial number (S.N.)
This information is given on the data plate on the booklet or under the hob.
If the hob doesn't operate correctly, before calling the Franke Technical Service Centre, refer to the Troubleshooting Guide to determine the problem:
TROUBLESHOOTING GUIDE
Type of failure - Check if:
A
The burner fails to ignite, does not stay lit, or the flame is not steady.
1. The gas or electrical supplies are not shut off. 2. The gas supply tap is not open. 3. The refillable gas cylinder (liquid gas) is not empty. 4. The burner openings are not clogged. 5. The plug end is not dirty. 6. All the burner parts have not been positioned correctly. 7. There are no draughts near the hob. 8. When lighting the burner, the knob has not been pressed for enough time to activate the protection device (see page 9 "Intended use"). 9. The burner openings are not clogged near the thermocouple. 10. The minimum gas setting is not correct.
B
The containers (pots, pans, kettles) are not stable.
11. The bottom of the container is not perfectly flat. 12. The container is not centered on the burner. 13. The grids have not been exchanged or positioned incorrectly.
If after the above checks the fault still occurs, get in touch with the nearest Franke Technical Service Centre.
DISPOSAL
Packaging
All packaging materials (cardboard, plastic film (PE) and polystyrene (EPS)) are marked and should, if possible, be collected for recycling and disposed of in an environmentally friendly way.
Disconnection
Disconnect the appliance from the mains. With a fixed appliance, this must be carried out by a qualified electrician.
Disposal
The symbol on the product or on the packaging indicates that the device must not be disposed of in the domestic waste.
Dispose of the device, which is to be discarded, via a specialised waste collection point for electronic and electrical devices.
CUSTOMER SERVICE
Refer to the contact address for your country on the back page or on our website: www.franke.com
In accordance with the Directive 2012/19/EU, regarding the reduction of the hazardous substances used in electrical and electronic appliances, and waste disposal.
Proper separate waste collection of the scrapped appliance for subsequent recycling, treatment and environmentally-friendly disposal helps prevent a potentially negative impact on the environment and health and facilitates recycling of the materials used in appliance construction.
SAFETY INSTRUCTIONS
FHSM7554GDC 730mm 510mm 560mm 480mm 40mm
FHMA7554G
DC/DCL
FHSM 905 4G DCL 880 mm 510 mm 840 mm 480 mm 40 mm
FHMA 9054G DCL
Place the sealing tape around the opening and set the hob in place. Secure the appliance with screws and brackets. Remove any excess length of the sealing tape.
Connection to the gas supply
MAINTENANCE AND REPAIR
A = 590/730/880 B = 50 C = 400 D = 700
I P E D U N P E X K D E H N E! Bo B p e m r pa 60 t b I He k O T O p b I e DoctynbIe deta n np6opa CnblHo h a rpeBaOTcra. He DonyckaTKe K np60py dTei.
Y6eIITecb B TOM, yTO nCNoJIb3yEmbI N TnI rA3a I OCo6eHHOCTN eFO IOnaUn COOTBeTCTByIOT xapaKTePncTnKam np6opa.
Bapouhaj naneb 6bila pa3pa6oTaHa nckIIOuHTeIbHo IJI HeIpoOpeCCnOHaJIbHOrO IcNoJb3OBaHnT OJIbKO B IOMaUHnX yCIOBnX.
Подхоляшп ДлЯ np6opa TIN ra3a yka3aH Ha Ta6nueKe texHnuecknx DaHHbIX,pa3MeuEHHoB B HxKHeJ YacTn np6opa. Ipeed MoHTaXOM Heo6xOdHMo y6eIITbcra, YTO BbIOJHrOTcra IOKaJIbHbIe ycIOBnA cHa6XKeHnra (TIN ra3a n daBHeHne ra3a) IN BO3MOxHa peYIpOBKa 6bITOBOrO np6opa. Даньи рибор He coeHЯETcC yCTPOICTBOM ydaJIeHnI pOyKTOB rOpHnI. Pn yCTaHOBKe n npSoeHNHeHnI pr6bopa Heo6xOIMo COblOdaTb DeiCTByIOUne cTaHdApTbI n npaBnla.Oco6oe BnImaHne cJeNyET yJeJIaTb Tpe6OBaHnI M K BeHTnJIaUN. XapakTepeNTnKn peYnilpoBKn DaHHoro np60pa npNBOJTCa Ha nacnpTHo Ta6nUKe (HnHa 3TKeTke C TexHnueCKIMn DaHHbIM). O6paTnte ocO6oe BHNMaHne Ha cTaHdapTbI n IpaBnla B OTHOWeHn BeHTnJIaCn Ipn NCNoJb3OBaHn yCTpO'CTBa.
ПослпользованьВарочи NOBepxHOCTbIO63aTeJIbHO BbIKIQUaHTe eeC NOMOuCOOTBeTCTByUoX3JIeMeHTOB ynpabNeHn. Передзakpbibahnem KpbIshKN(prnHaJIuHIN) CLeIyET y6eIHTbcB B TOM, UTO KOHOOPKn IOCTaTOUHO OCTbIIN.

Pnck npopaxeHna
3JIeKTpOToKOM n3-3a ПОпадань XИДKOCTN BHyTpь прбopa!
Bapouhna NOBepxHocb YBnIeTc np6opom exKeHBeBHO nCNoIb3OBAHn.
COOTBETCTBEHHO, CJIeIb OT KAcTpIOJI N DpyrO KxOHHO NOcUdI (HaIpIMep, UapAnHHI HnCJIeIb IcTHaPAnMaTePnAna) ABJIOITc COBepWeHHO HopMaJIbHbIM AIBneHHeM. Pn INHTeHCINBOM IcNoJIb3OBaHIn CJIeIb 6yDyt 3aMeTHeE. B 3OM clyuae npnbOp n daJIbWe 6yDet pa6oTaB 6e3ynpeuHo, NoToMBy He CTOnT IpeKbBaTb. Mbl BcerJa rapaHTnpyeM 6e3ONaCHOCt HaWe npOdykUnn.
He pa3MeaIte cToPOHHne IpeIMeTbHa NOBepxHOCTn yCTpOcTBa. KaK n36eKaTb NOBpeKdEHH np6opa: BcnyaeOTka3aH3-3a HapyueneHnTeMnepaTyphoropeKImaHeo6xOIMOOTKIOHTB BApouHyIOOBepXHOCTbN DaTbeKAK CNeDyeT OCTbITb. He cTaBbTe KaKyIO-JnIbO NoCyU Ha Hee. Hn npKaknx 06cToaTeJIbCTBaX He npImeHnTe IOnxJaXdEHH XoJOnHyO BDOy. 3anpeaaetc onnpaTbca Ha np6op. YcTPOIcTOBnH3rOToBJeHO B COOTBETCTBnC DeNCTByIOUIM CTaHApTOM 6e3oNaCHOCTn N Tpe6oBaHnMn 6e3oNaCHOCTn Ra3oBOJ DnpeKTHBbl.
AByomatnueckn npedoxpahntbHbI Klaan
OncaHbI BapOHbI NOBepxHOCTn OchauHbI PpeOxpaHHTeHbHbIM YcTpoiCTBOM, ABTomatueckn NepeKpbBaIOUm NOTOK Ra3a npClyuahHom HCye3HOBeHHN PJIaMeHH, HApnpMep 3-3a CKB03HrKOB, PpOIbAHn JIKKOCTe N3 KAcTPOJb INN BPeMeHHbIX nepe6oEB Noaun r3a. OncaHHOe ycTpoiCTBO BKIIouaETcPn6bn3ntelbHo uepe3 30 cekyHn Iocne NCye3HOBeHHN PJIaMeHH.
IcnoNb3ObaHne KOHΦopok
IINHKeHHIOTpe6JIeHHra3aIIOBbIeHHN 3ΦΦeKTHBHOCTn Iprn6opaHCNoIb3yInTe NocUdy C NOxOJIM DnKOHΦOpOK dIaMaTePOM. Pn nTOM Heo6xOIMOcNeiNb, YTO6bl IIaMn He BbIPbIBaNOCb 3a KpaIocuMb (3HaueHHN DOJHKbI COOTBETCTBOBaTbYka3aHHbIM B cIeNyIoUe TabNiue):
Tinra3y,io npndaTHnI IJI npilaIy,3a3HaueHo Ha Ta6nuciTexHicHNx DaHnx B HxKHi yactnHiPiDOnHa.
Before installation, make sure that the local conditions for connection (natural gas and LPG) of the household appliance are ensured. This appliance is not connected to the flue gas exhaust devices; it must be installed and connected in accordance with the current installation regulations. Particular attention must be paid to the relevant requirements concerning ventilation. The connection conditions for this appliance are indicated on the rating plate (or data plate). Pay special attention to the ventilation norms in the room when using the appliance. After use, always contact the responsible service elements. Before lowering the lid (if present), make sure the appliance has cooled sufficiently.
Risk of electric shock due to water ingress into the appliance.
The gas pipe must not touch the side walls of any cabinet with its surface.
For furniture components containing plastic or veneered wood, use heat-resistant materials (min. 100°C).
The ventilation must comply with local regulations.
The furniture element must have sufficient space for the electrical connections of the appliance.
Important: The specified appliance belongs to class Y for continuous safety. The minimum distance from the edge of the appliance is 150 mm for the rear wall, 50 mm for the side walls, and 700 mm for any front panel. The appliance is recommended to be installed in walls with a thickness of 40 mm. If the dimensions of the existing furniture elements differ from those specified, the service technician must make the necessary changes to the furniture construction.
Note: An exhaust opening is installed on the rear surface. For proper installation, refer to the installation instructions for the exhaust.
MINIMUM DIMENSIONS (MM)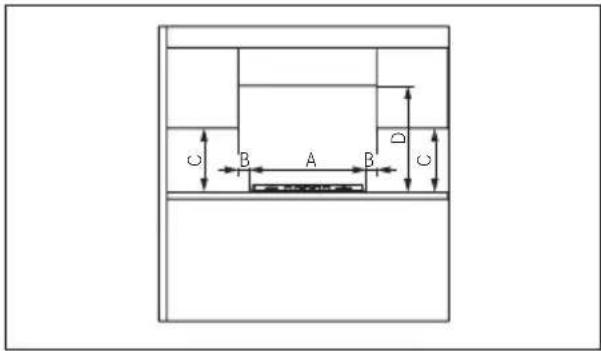
A=590/730/880 B=50
C=400 D=700
If the appliance is not installed near a wall: install a partition.
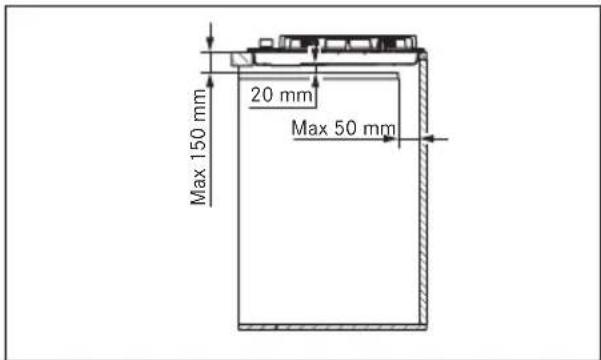
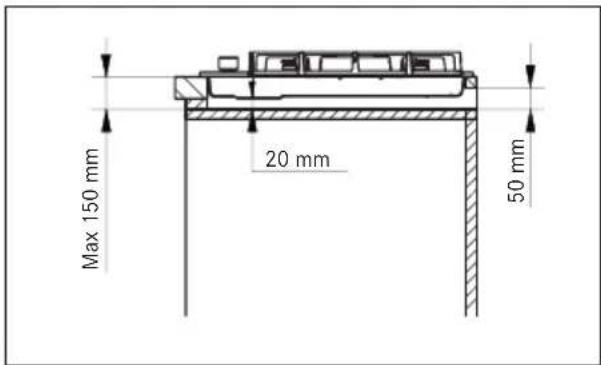
Installation procedure
The appliance is fixed to the furniture element using the brackets and accessories included in the kit.
Make sure there is free access to the fixing elements from the rear after installing the appliance. Drill a hole in the wall according to the specified dimensions. When doing this, follow the specified dimensions.
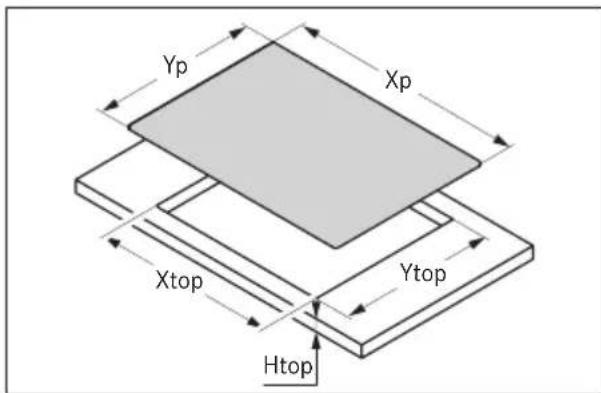
| Mодь Xp Yp X | Y | H | |||
| Bepx | Bepx | Bepx | |||
| FHSM 604 3G DC | 590 MM | 510 MM | 560 MM | 480 MM | 40 MM |
| FHSM 604 4G | |||||
| FHMA 604 3G DC | |||||
| FHSM 755 4G DC | 730 MM | 510 MM | 560 MM | 480 MM | 40 MM |
| FHMA 755 4G DC/DCL | |||||
| FHSM 905 4G DCL | 880 MM | 510 MM | 840 MM | 480 MM | 40 MM |
| FHMA 905 4G DCL | |||||
Attach the cylinder to the opening, install the valve surface in the opening. Close the device with screws and washers. Remove the cylinder so that it protrudes.
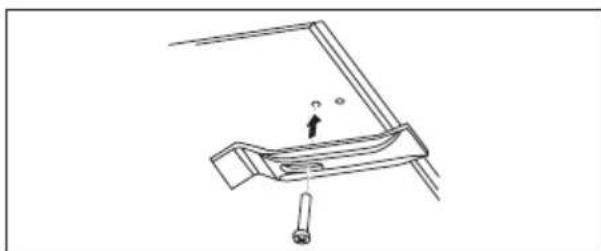
Connection to the gas supply source
Connect the device to the gas supply source in accordance with the regulatory standards. Beforehand, make sure that the device matches the type of gas used. In this case, perform the operations described in the section "Replacing the injectors". When using liquefied gas, use a pressure reducer that meets the regulatory standards.
Connection to the gas supply source can be done in the following ways:
A. Connect the gas valve surface using a flexible hose with a diameter of 12 mm (3). To ensure reliable sealing, use a spring clamp (included in the accessories kit) (1). B. Connect the valve surface using a flexible steel hose with a corrugated surface (2). To ensure reliable sealing, also use a spring clamp (included in the accessories kit) (1). The maximum length of the hose is 2 linear meters.
Important: If a corrugated hose is used, it must be installed so that it does not touch any moving parts of the furniture. It must pass through a zone without obstacles and be accessible for inspection along its entire length.
After connecting, check the tightness of the connections and turn the knobs from the maximum to the minimum position to check the stability of the flame. After assembly, check the connections using a soapy solution to verify the absence of leaks.
SURFACE: This device is intended only for cooking. It must not be used for other purposes, such as heating the room.
Do not pull the device by its cord, and do not pull the cord when disconnecting the device from the outlet.
Close the gas valve when not in use.

Danger of burns!
Do not touch the hot surfaces during operation of the device. Do not touch the device with wet parts of the body.
Setting the burners
The valve surface is adjusted using the control knobs. To set the burners, perform the following steps:
Press and turn the required knob to the ignition position and maximum supply. - Press the knob for 3-4 seconds to ignite the gas coming out of the burner and heat the thermocouple. - After this, release the knob, turning it counterclockwise, adjusting the flame. If the flame goes out, repeat the operation from step 1.

Function
Minimum

Minimum water level

Distribution and maximum water level

Zone of operation
The hotplate surface of the appliance is subject to normal wear during use. Accordingly, scratches from pans and other cookware (e.g., pots for cooking material) are considered normal wear. With intensive use, scratches may be more noticeable. At all times, the appliance must operate safely, so there is no cause for concern. We guarantee the safety of our product.
Do not place the appliance on its side. If the appliance is damaged due to improper temperature conditions, switch it off and let it cool down. Do not place cold cookware on it. Under no circumstances use cold water for cooling. Do not immerse the appliance.
Prepared in accordance with the relevant safety standard and safety requirements of the Gas Directive.
Automatic shut-off valve
The hotplate surfaces are equipped with a safety device that automatically cuts off the gas supply if the water level accidentally drops below the minimum due to boiling over from the pan or through the pressure relief of the gas. The device activates approximately 30 seconds after the water level drops.
Using the cooktop
To reduce gas consumption and increase efficiency, use cookware whose diameter matches the cooktop, following the table below so that the flame does not extend beyond the edge of the cookware (see table below):
| Конфоркa | Pan bottom min-max. Ø (recommended) |
| Дворяднa 160 - 240 MM | |
| «Експес» 140 - 220 MM | |
| «Нanzi�кспес» 140 - 200 MM | |
| Довоміжna 60 - 140 MM |
When using large cookware, their handles, the cooktop, and the appliance surface may become hot. As described above, during prolonged use, the appliance surface may discolor (in the case of stainless steel). The Franke company assumes no liability for damage to the appliance resulting from the above-described use. (Fig. 1)
Do not place a single pan on the cooktop (Fig. 1). Do not use the cooktop for a single large pot, such as a pan or wok (Fig. 1). Improper use of the grates may damage the hotplate surface: do not place the grates upside down and do not drag them across the hotplate surface. When using woks, the wok ring must be properly positioned; use it for no more than 20 minutes. For prolonged cooking, reduce the water level in the cooktop. It is not recommended to use heat diffusers such as metal mesh or any other type.
WARNING: When using the device, take measures to prevent deformation of the steel surface. It is normal pressure and does not affect the operation of the device.
Man.1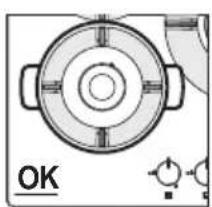
Correct placement of the rods
It is necessary to install the rods correctly
with the grooves and pins as shown by the arrows
on the indicated diagrams:
CLEANING AND CARE

Danger of burns!
Do not touch the device or its accessories until they have cooled down. Do not use abrasive cleaners for the device.
Cleaning with a damp cloth should be done as follows: unplug the device.
It is forbidden to use it if it has fallen or has been dropped on the surface, or if functional or aesthetic components of the steel surface are damaged.
Cleaning the device
To remove dirt and stains from the steel surface after each use, use a soft cloth or sponge dampened with water. We recommend using products with acidic properties. If liquid with high sugar content gets on the steel surface, do not leave it.
After cleaning the device, be sure to wipe it dry. Do not allow water to accumulate. Clean the grates, covers, and nozzles with a soft sponge and dry them. Do not wash the described parts in the dishwasher. Keep the gas outlet area clean. If the device is used for a long time, the parts located near the burner may become discolored due to heating.
SERVICE AND REPAIR
If the device is used for purposes other than those described in the operating instructions, it may be damaged. Connect the device to the power supply correctly.
If problems occur during operation of the device, contact the Franke service center.
Maintenance of electrical components must only be carried out by authorized dealers or the service center. Use only original spare parts. Replacement of damaged cables is allowed only by the dealer or service center.
When contacting the service center, be sure to provide the following information:
- Type of malfunction - device model (Art. / Cod.)
- Serial number (S. N.)
This information is provided on the data plate, which is located on the inner or outer surface.
If the outer surface is not accessible, before contacting the Franke service center, refer to the troubleshooting and fault repair instructions to identify the problem:
TROUBLESHOOTING AND FAULT REPAIR INSTRUCTIONS
| Tун несяпавноcti Песевір'tе настун've: | |
| A Конфорka He poэллюетс, He прочьк've ratii abo пolym'я He'e STIKNM | 1 He nepekrta noada ra3y abo enektprkn |
| 2 He bIDkpTo kpan noadai ra3y | |
| 3З苹равий ra3obni 6baon (ckpanleho r3ay) He e nopoхнim | |
| 4Отвори палнka He 3abnti. | |
| 5Заг lyшka He e 6bpydnoio | |
| 6Bci detani konфорkn po3miцeni He nprabinlbHo | |
| 7Поруч 3 рукchio hemae npotrayib | |
| 8При з苹аловни конфорkn ручka Hatnckalacry npotrayom He doctatnboro acy, zu6 akTbByBatn 3axncn npicstpi (duBtbcr cstopinky 152 "KopnstvbaHnra 3a npn3naueHnarn") | |
| 9Отвори konhфорkn He zacmiieleni npuyr 3termonapoiu | |
| 10HeprabinlbHe halaTuBaHHn Mihimalhoi noadai ra3y | |
| В Бмностi (kactpyli, ckOBoripdkn,чayнKKs) e HEcTiKNMn | 11Дно посу'dne He e idealbHo pIBHm |
| 12Посyd He bIDcentropoBaHo Ha konфорci | |
| 13Рewitkn He nomiHiMiCiMaN i po3miuTyOtsr NaprabInbHo | |
If the malfunction still occurs after the checks, contact the nearest Franke service center.
DISPOSAL
Packaging
All packaging materials (cardboard, plastic film (PE) and polystyrene (EPS)) are marked with the appropriate symbol. Where possible, they should be taken for recycling and disposed of in an environmentally friendly manner.
The device is designed for connection to the power supply. Once the connection is fixed, the specified operation must be performed by a qualified electrician.
Disposal

The symbol on the product or its packaging indicates that this product must not be disposed of with household waste.
Then dispose of the device at a special collection point for old electrical appliances.
Directive 2012/19/EU on waste electrical and electronic equipment (WEEE) and on the disposal of waste applies.
Proper sorting of the old device's components for further recycling, processing, and environmentally friendly disposal helps prevent potential negative effects on the environment and human health, and also promotes the recycling of materials used in the production of the device.
SERVICE CENTER
The contact address of the service center in your country is indicated on the last page of the manual, as well as on our website www.franke.com

Diagram


(.Cod./.Art) jj (N.S)
Lgduol jbcj1 ilissui jds
Aia jaiiall plalbll yj jial gai
C
xao jzao jia jia jia jia
(1)
()
y:jolil
jolilgill chwglc jzj gla
yall jao ac gaaal giall al
a
gabll 20 2
a j 1j 1e aiei iia
∴ a i = a 1 + 2Δai - 1
Jia jolaljg jglaiia
15
a
j 2 1
jie:all jièn jièng
∴ m = 3/11
jie 15i
( 0,π /4) ± 1
jglll jil glllall gll l
Lalal
plasily jieall y. 1y
a 1
∴ ja = 70 °
aiaaii aiaai iaiii jialad lao, jiaaii gaa
jiaai aol gai aolil aoxl llaio
jolol plao
Therefore D1(-2,0), D2(0,2)
1
- (x,y) = 1(0,1).
2a 1
1 1
a
\frac{1}{2}x - 1 > 3 - \frac{3}{2}x
j 120
(1) Cldoll 5 (gla) i y a bba a
JU 120000000000000000000000000000000000000000000
(1) k 1 = k 2 = ... + k n = n 故 a i = a i - 1 = a i - 1 得到 Δ /n = Δ /n + 1
- a
415 121 101 101 101 101 101 101 101 101 101 101 101 101 101 101 101 101 101 101 101 101 101 101 101 101 101 1
J 1 1 1 1 1 1 1 1 1 1 1 1 1 1 1 1 1 1 1 1 1 1 1 1 1 1
J 1
- 1ii 1ii 1ii 1ii 1ii 1ii 1ii
1
880/730/590 = A50 = B
400 = C700 = D
1
| H top | Y top | top | |||
| 40 | 480 | 560 | 510 | 590 | FHSM 604 3G DC |
| FHSM 604 4G | |||||
| FHMA 604 3G DC | |||||
| 40 | 480 | 560 | 510 | 730 | FHSM 755 4G DC |
| FHMA 755 4G DC/ DCL | |||||
| 40 | 480 | 840 | 510 | 880 | FHSM 905 4G DCL |
| FHMA 905 4G DCL |
J 1 J 2 J 3 J 4 J 5 J 6
y j 1
- RISK OF INJURY
- RISK OF BURNS
- RISK OF ELECTRIC SHOCK TO ENTERING LIQUID
- CAUTION: THE USE
- RISK OF FIRE
- TECHNICAL DATA
- INSTALLATION
- CABINET REQUIREMENTS
- MINIMUM DIMENSIONS (MM)
- INSTALLATION PROCEDURE
- CONNECTION TO GAS SUPPLY
- CONNECTION TO THE GAS SUPPLY CAN BE MADE IN TWO WAYS
- ELECTRICAL CONNECTION
- ADJUSTMENT TO DIFFERENT TYPES OF GAS
- MINIMUM FLAME ADJUSTMENT
- REPLACING INJECTORS
- ACCESSING THE HOB
- INTENDED USE
- LIGHTING THE BURNERS
- AUTOMATIC SAFETY VALVE
- BURNER USE
- CORRECT POSITION OF THE GRIDS
- CLEANING AND CARE
- CLEANING THE APPLIANCE
- MAINTENANCE AND REPAIR
- TROUBLESHOOTING GUIDE
- TYPE OF FAILURE - CHECK IF
- A
- B
- DISPOSAL
- PACKAGING
- DISCONNECTION
- CUSTOMER SERVICE
- SAFETY INSTRUCTIONS
- CONNECTION TO THE GAS SUPPLY
- I P E D U N P E X K D E H N E! BO B P E M R PA 60 T B I HE K O T O P B I E DOCTYNBIE DETA N NP6OPA CNBLHO H A RPEBAOTCRA. HE DONYCKATKE K NP60PY DTEI
- PNCK NPOPAXEHNA
- JIEKTPOTOKOM N3-3A ПОПАДАНЬ XИДKOCTN BHYTPЬ ПРБOPA
- ABYOMATNUECKN NPEDOXPAHNTBHBI KLAAN
- ICNONB3OBAHNE KOHΦOPOK
- RISK OF ELECTRIC SHOCK DUE TO WATER INGRESS INTO THE APPLIANCE
- CONNECTION TO THE GAS SUPPLY SOURCE
- CONNECTION TO THE GAS SUPPLY SOURCE CAN BE DONE IN THE FOLLOWING WAYS
- DANGER OF BURNS
- SETTING THE BURNERS
- FUNCTION
- AUTOMATIC SHUT-OFF VALVE
- USING THE COOKTOP
- CORRECT PLACEMENT OF THE RODS
- CLEANING THE DEVICE
- SERVICE AND REPAIR
- SERVICE CENTER
- LGDUOL JBCJ1 ILISSUI JDS
Brand : FRANKE
Model : FHMA 755 4G DC MB C
Category : Cooker