
HSW59F18DWPT - Fridge HAIER - Free user manual and instructions
Find the device manual for free HSW59F18DWPT HAIER in PDF.

User questions about HSW59F18DWPT HAIER
0 question about this device. Answer the ones you know or ask your own.
Ask a new question about this device
Download the instructions for your Fridge in PDF format for free! Find your manual HSW59F18DWPT - HAIER and take your electronic device back in hand. On this page are published all the documents necessary for the use of your device. HSW59F18DWPT by HAIER.
USER MANUAL HSW59F18DWPT HAIER
WARNING: Risk of fire/flammable material
EN
The symbol indicates there is a risk of fire since flammable materials are used. Take care to avoid causing a fire by ingiting flammable material.
ПРЕДУПРЕЖДЕНИЕ:
BG
Safety information ....5
Intended use 10
Product description 11
Control panel 13
Use 14
Equipment 24
Care and cleaning 26
Troubleshooting....29
Installation....33
Technical data 37
Customer service 39
Thank you for purchasing a Haier Product.
Please read these instructions carefully before using this appliance. The instructions contain important information which will help you get the best out of the appliance and ensure safe and proper installation, use and maintenance.
Keep this manual in a convenient place so you can always refer to it for the safe and proper use of the appliance.
If you sell the appliance, give it away, or leave it behind when you move house, make sure you also pass this manual so that the new owner can become familiar with the appliance and safety warnings.
Accessories
Check the accessories and literature in accordance with this list:
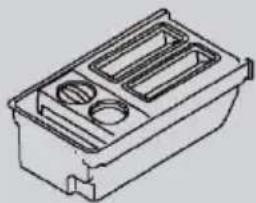
natural_image
Technical line drawing of a mechanical component with three circular cavities and a central housing (no text or symbols)Ice maker

Energy lable

Warranty card

Quick guide

General instructions
WARNING - Important Safety information

NOTICE - General information and tips

Environmental information
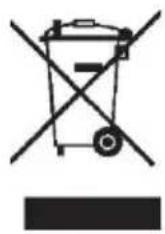
Disposal
Help protect the environment and human health. Put the packaging in applicable containers to recycle it. Help to recycle waste of electrical and electronic appliances. Do not dispose appliances marked with this symbol with the household waste. Return the product to your local recycling facility or contact your municipal office.
WARNING!
Risk of injury or suffocation!
Refrigerants and gases must be disposed of professionally. Ensure that the tubing of the refrigerant circuit is not damaged before being properly disposed of. Disconnect the appliance from the mains supply. Cut off the mains cable and dispose of it. Remove the trays and drawers as well as the door catch and seals, to prevent children and pets to get closed in the appliance.
Before switching on the appliance for the first time read the following safety hints!:

WARNING!
Before first use
▶ Make sure there is no transport damage.
▶ Remove all packaging and keep out of children's reach.
▶ Wait at least two hours before installing the appliance in order to ensure the refrigerant circuit is fully efficient.
▶ Handle the appliance always with at least two persons because it is heavy.
Installation
The appliance should be placed in a well-ventilated place. Ensure a space of at least 10 cm above and around the appliance.
▶ Never place the appliance in a damp area or location where it might be splashed with water. Clean and dry water splashes and stains with a soft clean cloth.
▶ Do not install the appliance in direct sunlight or in the near of heat sources (e.g. stoves, heaters).
▶ Install and level the appliance in an area suitable for its size and use.
▶ Keep ventilation openings in the appliance or in the in-built structure clear of obstruction.
▶ Make sure that the electrical information on the rating plate agrees with the power supply. If it does not, contact an electrician.
The appliance is operated by a 220-240 VAC/50 Hz power supply. Abnormal voltage fluctuation may cause the appliance to fail to start, or damage to the temperature control or compressor, or there may be an abnormal noise when operating. In such case, an automatic regulator shall be mounted.
▶ Do not use multi-plug adapters and extension cables.
▶ Do not locate multiple portable socket-outlets or portable power supplies at the rear of the appliance.
▶ Ensure that the power cable is not trapped by the refrigerator. Do not step on the power cable.

WARNING!
▶ Use a separate earthed socket for the power supply which is easy accessible. The appliance must be earthed.
Only for UK: The appliance's power cable is fitted with 3-cord (grounding) plug that fits a standard 3-cord (grounded) socket. Never cut off or dismount the third pin (grounding). After the appliance is installed, the plug should be accessible.
▶ Do not damage the refrigerant circuit.
Daily use
This appliance can be used by children aged from 8 years and above and persons with reduced physical, sensory or mental capabilities or lack of experience and knowledge if they have been given supervision or instruction concerning use of the appliance in a safe way and understand the hazards involved.
▶ Children aged from 3 to 8 years are allowed to load and unload, but not allowed to clean or install the refrigerating appliances.
▶ Keep away children under 3 years of age from the appliance unless they are constantly supervised.
▶ Children shall not play with the appliance.
If coal gas or other inflammable gas is leaking in the vicinity of the appliance, turn off the valve of the leaking gas, open the doors and windows and do not unplug a plug in the power cable of the refrigerator or any other appliance.
▶ Notice that the appliance is set for operation at a specific ambient range between 10 and 38°C. The appliance may not work properly if it is left for a long period at a temperature above or below the indicated range.
▶ Do not place unstable articles (heavy objects, containers filled with water) on top of the refrigerator, to ovoid personal injury caused by falling or electric shock caused by contact with water.
▶ Do not pull on the door shelves. The door may be pulled slant, the bottle rack, may be pulled away, or the appliance may topple.
▶ Open and close the doors only with the handles. The gap between the doors and between the doors and the cabinet is very narrow. Do not extend your hands in these areas to avoid pinching your fingers. Open or close the refrigerator doors only when there are no children standing within the range of door movement.

WARNING!
▶ Do not store or use inflammable, explosive or corrosive materials in the appliance or in the vicinity.
▶ Do not store medicines, bacteria or chemical agents in the appliance. This appliance is a household appliance. It is not recommended to store materials that require strict temperatures.
▶ Never store liquids in bottles or cans (besides high percentage spirits) especially carbonated beverages in the freezer, as these will burst during freezing.
▶ Check the condition of food if a warming in the freezer has taken place.
▶ Do not set unnecessarily low temperature in the refrigerator compartment. Minus temperatures may occur at high settings. Attention: Bottles can burst
Do not touch frozen goods with wet hands (wear gloves). Especially do not eat ice lollies immediately after removal from the freezer compartment. There is the risk to freeze or the formation of frost blisters. FIRST aid: keep immediately under running cold water. Do not pull away!
▶ Do not touch the inside surface of the freezer storage compartment when in operation, especially with wet hands, as your hands may freeze onto the surface.
▶ Unplug the appliance in the event of a power interruption or before cleaning. Allow at least 7 minutes before restarting the appliance, as frequent starting may damage the compressor.
▶ Do not use electrical devices inside the food storage compartments of the appliance, unless they are of the type recommended by the manufacturer. Maintenance / cleaning
▶ Make sure children are supervised if they carry out cleaning and maintenance.
▶ Disconnect the appliance from the electrical supply before undertaking any routine maintenance. Allow at least 5 minutes before restarting the appliance, as frequent starting may damage the compressor.

WARNING!
▶ Hold the plug, not the cable, when unplugging the appliance.
▶ Do not clean the appliance with hard brushes, wire brushes, detergent powder, petrol, amyl acetate, acetone and similar organic solutions, acid or alkaline solutions. Please clean with special refrigerator detergent to avoid damage.
▶ Do not scrape off frost and ice with sharp objects. Do not use sprays, electric heaters like heater, hair dryer, steam cleaners or other sources of heat in order to avoid damage to the plastic parts.
▶ Do not use mechanical devices or other means to accelerate the defrosting process, other than those recommended by the manufacturer.
If the supply cord is damaged, it must be replaced by the manufacturer, its service agent or similarly qualified persons in order to avoid a hazard.
▶ Do not try to repair, disassemble or modify the appliance by yourself. In case of repair please contact our customer service.
Eliminate the dust on the back of the unit at least once in the year to avoid hazard by fire, as well as increased energy consumption.
▶ Do not spray or flush the appliance during cleaning.
▶ Do not use water spray or steam to clean the appliance.
▶ Do not clean the cold glass shelves with hot water. Sudden temperature change may cause the glass to break.
Refrigerant gas information

WARNING!
The appliance contains the flammable refrigerant ISOBUTANE (R600a). Make sure the refrigerant circuit is not damaged during transportation or installation. Leaking refrigerant may cause eye injuries or ignite. If a damage has occurred, keep away open fire sources, thoroughly ventilate the room, do not plug or unplug the power cords of the appliance or any other appliance. Inform the customer service.
In case of eyes get into contact with the refrigerant, rinse immediately it under running water and call immediately the eye specialist.
Intended use
This appliance is intended for cooling and freezing food. It has been designed exclusively for use in household and similar applications such as staff kitchen areas in shops, offices and other working environments; farm houses and by clients in hotels, motels and other residential type environments as well as in bed-and-breakfast and catering business. It is not intended for commercial or industrial use. Changes or modifications to the device are not allowed. Unintended use may cause hazards and loss of warranty claims.
Standards and directives and UK CA
This product meets the requirements of all applicable EC directives with the corresponding harmonised standards and UK standards, which provide for CE and UKCA marking.

Notice
Due to technical changes and different models, some of the illustrations in this manual may differ from your model. (HSW59F18DW*)
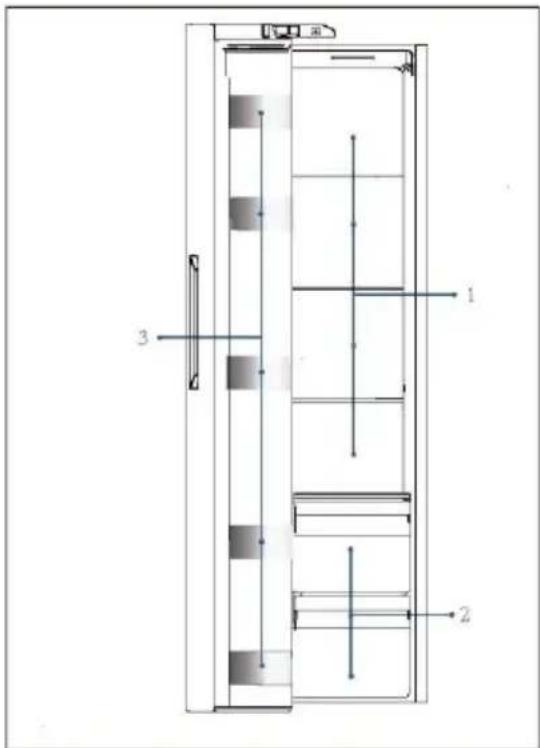
text_image
1 2 3 4 5 6 7 8 9 10 11A: Freezer compartment
1 Ceiling lamp
2 Bottle hold
3 Glass shelves
4 Drawers
B: Refrigerator compartment
5 Ceiling lamp
6 Wine rack
7 Water Tank
8 Bottle holder
9 Glass shelves
10 Wet zone cover plate
11 Drawers
12 Dispenser
natural_image
Simple line drawing of a refrigerator with a door and labeled component (no text or symbols beyond the number 12)
Notice
Due to technical changes and different models, some of the illustrations in this manual may differ from your model. (HSW59F18DN*)
text_image
1 2 3 4 5 6 7 8 9 10A: Freezer compartment
1 Ceiling lamp
2 Bottle hold
3 Glass shelves
4 Drawers
B: Refrigerator compartment
5 Ceiling lamp
6 Wine rack
7 Bottle holder
8 Glass shelves
9 Wet zone cover plate
10 Drawers
natural_image
Line drawing of a double-door refrigerator with a handle (no text or symbols)Control panel
Keys:
A Fridge selector
B Freezer selector
C Auto Set mode
D Holiday mode
E Super-Freeze mode
F Panel lock selector
Indicators:
a Super-Cool mode
b Fridge Temperature
c Freezer Temperature
d WiFi mode
e Auto Set mode
f Holiday mode
g Super-Freeze mode
h Panellock
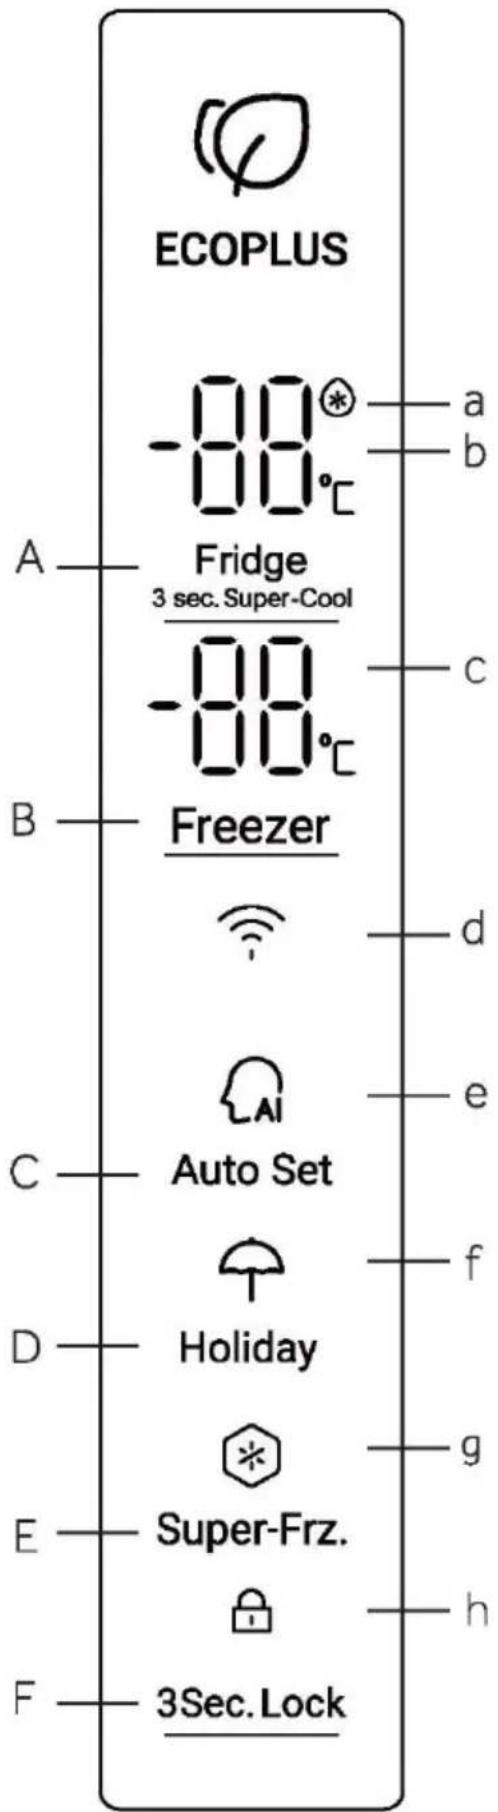
text_image
ECOPLUS -80°C a b A — Fridge 3 sec. Super-Cool -80°C c B — Freezer d C — Auto Set e f D — Holiday g E — Super-Frz. h F — 3Sec. LockBefore first use
Remove all packaging materials, keep them out of children's reach and dispose them in an environmentally friendly manner.
▶ Clean the inside and outside of the appliance with water and a mild detergent before putting any food in it.
▶ After the appliance has been levelled and cleaned, wait for at least 2-5 hours before connecting it to the power supply. See Section INSTALLATION.
▶ Precool the compartments at high settings before loading with food. The function Power- Freeze helps to cool down the compartments quickly.
The refrigerator temperature and freezer temperature are automatically set to 5^ C and -18^ C respectively. These are the recommended settings. If desired, you can change these temperatures manually. Please see ADJUST THE TEMPERATURE.
Sensor keys
The buttons on the control panel are sensor keys, which already respond when lightly touched with the finger
Switch on /of the appliance
The appliance is in operation as soon as it is connected to the power supply.
The temperatures displayed will show the setting temperatures in the compartment. Maybe the panel lock is active.

Notice
When the appliance is switched on after disconnection from the main power supply, it may take up to 12 hours for the correct temperatures to be reached.
Empty the appliance before switching off. To switch off the appliance, pull the power cord out off the power socket.

NOTICE
When the refrigerator is first powered on, the indicator illuminates. The fridge temperature and freezer temperature are automatically set to 5°C and -18°C respectively.
5.1. First Use
When the refrigerator first connects with power, the display is on. The default temperature for fridge compartment is 5^ C, and freezer is -18^ C. The intelligence function light is on.
5.2. Lock/ Unlock Panel
Automatic Lock:
When the fridge door and the freezer door are closed, and there is no operation on any button for 30s, the panel light will automatically turn off, and the panel is locked.
Manual Lock:
When the panel is unlocked, press the Lock button for 3 seconds, and the buzzer make a buzzing sound, the lock indicator is on, and then the display is locked.

Press for 3 sec.
indicator is on
Panel is locked
Unlock:
When the panel is off, open any door of the refrigerator or touch any button on the control panel, the panel will light up. At this time, the panel is locked. Press the lock function button for 3 seconds, the buzzer will sound, the lock indicator is off and the panel is unlocked.

flowchart
graph LR
    A["Lock"] --> B["3Sec. Lock"]
    B --> C["Lock"]
The Panel is on
Open the door or
Press any button
The indicator is off The Panel is unlocked
5.3. Adjust the temperature for fridge
- When the control panel is unlocked, press the "Fridge selector", and the buzzer sounds, Fridge temperature indicator flashes. Now the fridge temperature can be set.
- Then every press of the fridge selector, the buzzer sounds, and the setting downshifts by 1. The shift sequence is in a continuous loop as "4°C/ 3°C/ 2°C/ 1%/ 9°C/ 8°C/ 7°C/ 6°C/ 5°C/ 4°C"

flowchart
graph LR
    A["Fridge"] --> B["-0.0°C"]
    B --> C["Fridge"]
    C --> D["-0.0°C"]
Press once
flashing
Press once
Setting done
In setting condition

Notice
The appliance is preset to the recommended temperature of 5^ C (refrigerator) and -18^ C (freezer). Under normal ambient conditions you do not need set a temperature.
5.4. Adjust the temperature for freezer
- When the control panel is unlocked, press the "Freezer selector", and the buzzer sounds. Freezer temperature indicator flashes. Now the freezer temperature can be set.
- Then every press of the freezer selector, the buzzer sounds, and the temperature down shifts by 1. the shift sequence is in a continuous loop as "-18°C/ -19°C/ -20°C/ -21°C/ -22°C/ -23°C/ -24°C/ -14°C/ -15°C/ -16°C/ -17°C/ -18°C".

flowchart
graph LR
    A["Freezer"] --> B["-80℃"]
    B --> C["Freezer"]
    C --> D["-80℃"]
    style A fill:#f9f,stroke:#333
    style C fill:#f9f,stroke:#333
    note1["Press once"] --> A
    note2["flashing In setting condition"] --> C
    note3["Press once"] --> C
    note4["Setting done"] --> C

Notice
The temperature is set, if no button is pressed in 5 seconds, the temperature will be automatically confirmed and saved.
5.5. Auto set
- When the control panel is unlocked, press the "Auto set mode selector", and the buzzer sounds Auto set mode indicator is on. Auto set mode starts.
- When Auto set mode indicator is on, press the Auto set mode selector, and the buzzer sounds, the Auto set mode indicator is off, and Auto set mode closes.

flowchart
graph LR
    A["Auto Set"] --> B["Press once"]
    B --> C["on Auto set mode"]
    C --> D["Auto Set"]
    D --> E["Press once"]
    E --> F["off Auto set mode"]
    F --> G["AI Icon"]

Notice
When the Auto set mode is on, the fridge temperature and the freezer temperature can not be selected. When the fridge selector or the freezer selector is pressed, Auto set mode indicator flashes with sounds reminding that the operation is not allowed. With the Auto set mo, de if the fast cool, fast freeze or holiday function is selected, the Auto set mode is off, and Auto set mode automatically closes.
5.6. Holiday mode
Holiday mode is designed for the situation that the refrigerator will not be used for long time. When the holiday mode is on, the freezer temperature can be selected, while the fridge temperature is automatically set as 17^ C, which avoids any odor due to high temperature in fridge compartment, and also saves energy consumption.
- When the control panel is unlocked, press the "Holiday mode selector", and the buzzer sounds. Holiday Function indicator is on. Holiday mode starts.
- When Holiday mode indicator is on, press the Holiday Function selector, and the buzzer sounds, the Holiday mode indicator is off, and Holiday mode closes.
Holiday
press once

holiday mode

Holiday
press once


holiday mode

Notice
When the Holiday mode is on, the fridge temperature can not be selected. When the fridge selector is pressed, Holiday mode indicator flashes with sounds reminding that the operation is not allowed.
Before the holiday mode is selected, please empty the fridge compartment to avoid any food deterioration. With the holiday mode on, the intelligence function and fast cool can not be simultaneously selected. If intelligence mode or fast cool is selected, the holiday mode indicator is off and the function automatically closes.
5.7. Super-Cool mode
- When the control panel is unlocked, press the "Fridge selector" for 3 seconds, and the buzzer make a buzzing sound, super cool indicator illuminates. Super-cool starts.
- When super-cool indicator on, press the fridge selector for 3s, the buzzer make a sound, the super-cool indicator is off. Super cool mode closes
- When the super-cool mode is on, the refrigerator will automatically switch to the super-cool mode off state after the super-cool mode reaches the set condition. If you want to exit manually, you can press the fridge selector for 3s to turn off the super-cool mode.


Fridge


Fridge


indicator off
press 3s Super-Cool hold 3s
indicator on
Press 3s Super-Cool hold 3s
indicator off
hold 3s

Notice
With the super-cool function on, the Fuzzy mode and holiday mode can not be simultaneously selected. If Fuzzy mode or holiday mode is selected, the super-cool indicator is off and the super-cool automatically closes.
Automatically switch off: The super -cool function will be automatically disabled when the function has lasted for more than 6 Incurs.
5.8. Super-Freeze Mode
- When the control panel is unlocked, press the Super-freeze selector, and the buzzer sounds, the Super-freeze indicator illuminates. Super-freeze mode starts.
- With Super-freeze indicator on, press the Super-freeze selector, the buzzer sounds, the Super-freeze indicator is off. Super-freeze mode closes.
- When the Super-freeze mode is on, the refrigerator will automatically switch to the Super-freeze mode off state after the Super-freeze mode reaches the set condition. If you want to exit manually, you can press the Super-freeze selector to turn off the Super freeze mode.

flowchart
graph LR
    A["★"] --> B["Super-Frz."]
    B --> C["★"]
    C --> D["Super-Frz."]
    D --> E["★"]
indicator off
Press once
indicator on
Press once
indicator off

Notice
▶ Super-freeze mode is designed to sustain in the nutrients of the food in the freezer compartment, and the food is frozen within shortest time. If a large amount of food is to be frozen at one time, it is recommended to set the Super-freeze mode 24 hours in advance to reach to a lower temperature in the freezer compartment before the food is put in. Under this condition, the freezing speed in the freezer compartment is increased, and the food can be quickly frozen, thereby effectively locking the nutrition of the food and facilitating storage. In the Super freeze condition, if you want to choose the intelligence function, the Super freeze indicator is off, and the Super-freeze mode closes automatically. Automatically switch off: The super-freeze function will automatically switch off after 50 hours. The appliance is then operated at the previously set temperature.
5.9. WiFi mode
- when the refrigerator first connects with power, the WiFi icon flashing, automatically enter configuration mode.
- In the unlocked or locked state, press the Auto Set button for 3 seconds, and the buzzer will sound once to enter the configuration mode.
- Refer to the quick guide, download the app and follow the prompts to complete WiFi configuration.

text_image
Auto Set → press for 3 s flashingWhen the door opening time is too long or the door is not closed, the refrigerator will emit a drip alarm every time and then to remind you to close the door in time.
5.11. Energy-saving of control panel
No operation on the control panel for 30 seconds, the panel will be automatically off and enter into the locked state, which can save power. When the lock function button is pressed or any door is opened, the control panel will be illuminated.
5.12. Power failure memory function
When the refrigerator is powered off, the momentary working state of the power failure is memorized. After the power is connected again, the refrigerator continues to work according to the shift and functional status set before the power failure.
Attention: The lock function is not memorized. After the refrigerator is powered on again, the control panel starts self-checking, the lock function indicator is off, and the refrigerator is unlocked.
TIPS ON STORING FRESH FOOD
Storing into the fridge compartment
- Keep your fridge temperature below 5°C.
- Hot food must be cooled to room temperature before storing in the appliance.
- Foods stored in the fridge should be washed and dried before storing.
- Food to be stored should be properly sealed to avoid odour or taste alterations.
-
Do not store excessive quantities of food. Leave spaces between foods to allow cold air flowing around them, for a better and more homogeneous cooling.
-
Foods eaten daily should be stored at the front of the shelf.
-
Leave a gap between foods and the inner walls, allowing air flow. Especially don't store foods against the rear wall: foods could freeze against rear wall. Avoid direct contact of food (especially oily or acidic food) with the inner liner, as oil/acid can erode the inner liner. Clean away oily / acid dirt whenever it is found.
-
Defreeze frozen food in the fridge storage compartment. This way, you can use the frozen food to decrease the temperature in the compartment and save energy.
-
The ageing process of fruit and vegetables such as courgettes, melons, papaya, banana, pineapple, etc. can be accelerated in the fridge. Therefore, it is not advisable to store them in the fridge. However, the ripening of strongly green fruits can be promoted for a certain period. Onions, garlic, ginger and other root vegetables should also be stored at room temperature.
-
Unpleasant odours inside the fridge are a sign that something has spilled and cleaning is required. See CARE AND CLEANING.
-
Different kinds of food should be placed in different areas according to their properties:
1-Butter, cheese etc.
2-Eggs, canned food, spices etc.
3/4/5-Drinks and bottled foods.
6-Pickled foods, canned food, etc.
7/8-Meat products, fish, raw food.
9-Cans, dairy products etc.
10-Fruits, vegetables, lettuce, etc.
11-Cooked meat, sausages, etc.
text_image
1 2 3 4 5 6 7 8 9 10 11TIPS ON STORING FRESH FOOD
Storage into the freezer compartment
- Keep the freezer temperature at -18°C.
- 24 hours before freezing additional items switch on the Super - Freeze function; for small quantities of food 4-6 hours are sufficient.
- Hot food must be cooled to room temperature before storing in the freezer compartment.
- Food cut into small portions will freeze faster and is easier to defrost and cook. The recommended weight for each portion is less than 2.5 kg.
- It is better to pack food before putting it into the freezer. The outside of the packaging must be dry to avoid bags sticking together Packaging materials should be odour - free, airtight, non - poisonous and nontoxic.
- In order to avoid expiration of storage periods, please note the freezing date, time limit and name of the food on the packaging according to the storage periods of different foods.
- WARNING!: Acid, alkali and salt etc. could erode the internal surface of the freezer. Do not place the food having these substances (e.g. sea fish) directly on the internal surface. Salt water in the freezer should be cleaned up immediately.
- Do not exceed the food storage times recommended by the manufacturers. Only take the required amount of food out of the freezer.
- Different kinds of food should be placed in different areas according to their properties:
1-Less weighty items, such as ice cream, vegetables, bread etc.
2-Large / heavier portions of food, such as meat joints for roasting
3-Pizza etc.
text_image
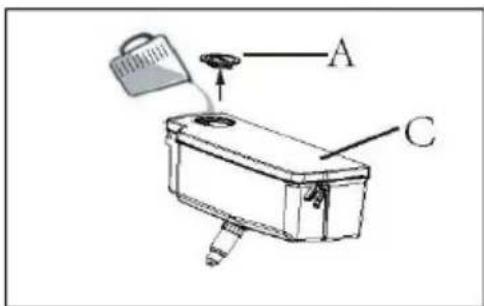
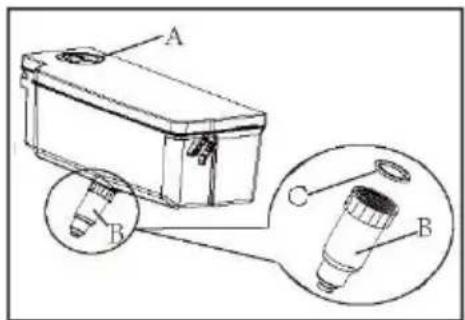
Technical diagram of a multi-level storage or ventilation system with labeled components 1, 2, and 3Water dispenser (HSW59F18DW\*)
With the water dispenser cool drinking water can be tapped.
The water tank should be cleaned before first use (see Care and cleaning).
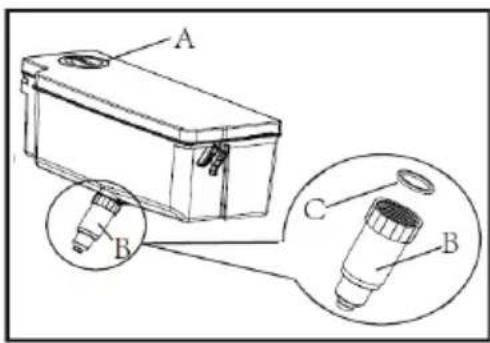
Putting water into the water tank

WARNING!
Use drinking water only.
- Ensure that the water tank is properly inserted (see Equipment).
- Open the cap (A) and pour fresh drinking water into the water tank.
-
Water poured into the water tank is not allowed to exceed the MAX water level, as it could overflow when the door opens and closes.
-
Close the cap (A) completely to shut the water tank
text_image
Diagram of a device with labeled parts A and C, showing a component being inserted into a box.
Notice
Before refilling dispose residual water and clean the water tank.
When you don't need water for a long time, please empty the water tank and insert the cleaned tank.
The cover (C) on the water tank is additionally used to save energy. If you do not want to get water from the water dispenser for a long period, please still install the cover because of better insulating and saving energy.
Getting water from the dispenser
- Place a glass underneath the water outlet the top edge of the glass at the push mark.
- Push it gently against the water dispenser lever with your glass.
Make sure the glass in line with the dispenser to prevent the water from splashing out.
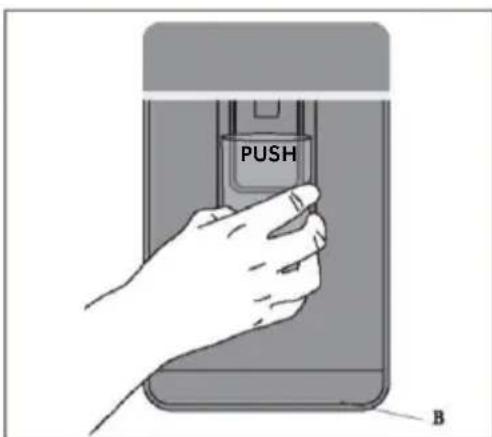
text_image
PUSH B
NOTICE: STORAGE
- Please keep a distance of more than 10 mm between the food and the sensor to ensure the cooling effect.
- Please leave the lowest drawer in the appliance when it is working in order to ensure the cooling effect.
- Food items that include ice (like ice cream etc.) should be stored inside the freezer compartment instead of in the bottle holders. The temperature changes the bottle holders are exposed to, caused by opening and closing the door, may thaw the food.
- Consume defrosted food quickly. Defrosted food cannot be re - frozen unless it is firstly cooked, otherwise it may become inedible.
- Do not load excessive quantities of fresh food in the freezer compartment. Refer to the freezing capacity of the freezer - See TECHNICAL DATA or data at the type plate.
- Food can be stored in the freezer at a temperature of at least -18°C for 2 to 12 months, depending on its properties (e.g., meat:3-12 months, vegetables:6-12 months)
- When freezing fresh food, avoid bringing it in contact with already frozen food. Risk of thawing!
- Defreeze frozen food in the fridge. This way, you can use the frozen food to decrease the temperature in the compartment and save energy.
When storing commercially frozen foods, please follow these guidelines:
- Always follow manufacturers' guidelines for the length of time you should store food for Do not exceed these guidelines!
- Try to keep the length of time between purchase and storage as short as possible to preserve food quality.
- Buy frozen foods, which have been stored at a temperature of -18°C or below.
- Avoid buying food which has ice or frost on the packaging - This indicates that the products might have been partially defrosted and refrozen at some point - temperature rises affect the quality of food.

Energy saving tips
▶ Make sure the appliance is properly ventilated (see INSTALLATION).
▶ Do not install the appliance in direct sunlight or in the near of heat sources (e.g. stoves, heaters).
▶ Avoid unnecessarily low temperature in the appliance. The energy consumption increases the lower the temperature in the appliance is set.
▶ Functions like POWER-FREEZE consume more energy.
▶ Allow warm food to cool down before placing it in the appliance.
▶ Open the appliance door as little and as briefly as possible.
▶ Do not overfill the appliance to avoid obstructing the air flow.
▶ Avoid air within the food packaging.
▶ Keep door seals clean so that the door always closes correctly.
▶ Defreeze frozen food in the fridge storage compartment.
The most energy-saving configuration requires the appliance keep drawers, food box and shelves on factory-fresh condition, and food should be places as far as possible without blocking the air outlet of the duct.
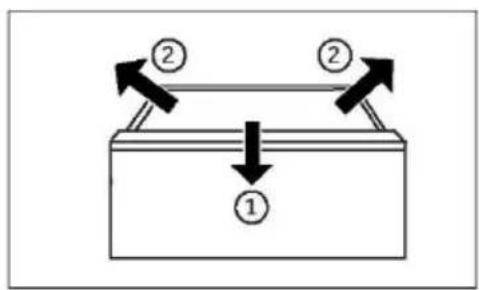
Adjustable shelves
-
The height of the shelves can be adjusted to fit your storage needs.
-
To relocate a shelf, remove it first by uplifting its hind edge ① and pulling it out ②.
-
To reinstall it, put it on the lugs on both sides and push it to the most rearward position until the rear of the shelf is fixed inside the slots in the sides
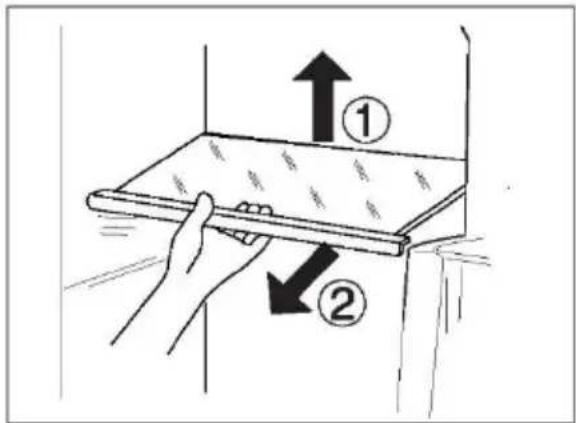
text_image
Diagram showing a hand holding a tray with two arrows labeled ① and ② indicating direction or movement, possibly illustrating a physics or engineering concept.
NOTICE
Ensure that all ends of a shelf are level.
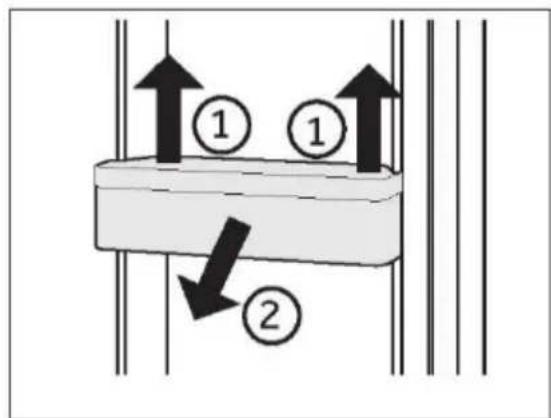
Removable door racks/bottle holder
- The door racks/bottle holder can be removed for cleaning:
- Place hands on each side of the racks/bottle holder, lift it upwards ① and pull it out ②.
- In order to insert the door racks/bottle holder, the above steps are carried out in reverse order.
text_image
Diagram showing two labeled arrows (① and ②) pointing upward and downward within a rectangular container, with directional arrows indicating flow or movement.Removable drawer
To remove the drawer out, pull out to the maximum extent ①, lift and remove ②.
In order to insert the drawer, the above steps are carried out in reverse order.
text_image
Diagram showing two labeled arrows (① and ②) pointing to a rectangular object with downward arrows, likely illustrating a physical or engineering concept.Removable water tank (HSW59F18DW\*)
Water tank can be removed for cleaning.
Install water tank (HSW59F18DW\*)
Make sure water tank lid is locked before installing the water tank!
Locate and insert water outlet section (B) into the hole on fridge door. Push fit water tank and align water tank location indicator to the reference marking on door side (as shown in graph).
text_image
Technical diagram of a mechanical device with labeled parts A, B, and C, showing internal components and assembly.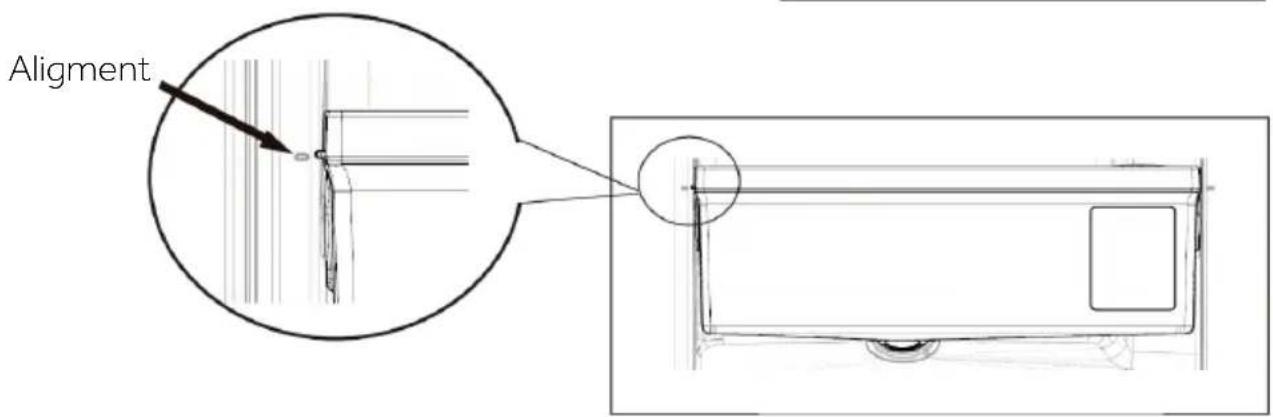
text_image
Alignment
Notice: Water tank
Make sure the spout is firmly screwed to the water tank and the white O-ring (C) is in position.
If the water tank is not properly inserted, water can drip from the connection. Do not use excessive force when removing or installing the water tank, to avoid damaging the tank.

WARNING!
Disconnect the appliance from the power supply before cleaning.
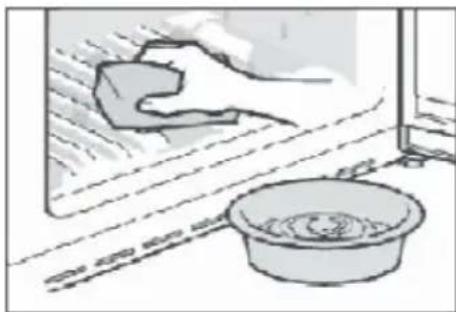
Cleaning
Clean the appliance when only little or no food is stored.
The appliance should be cleaned every four weeks for good maintenance and to prevent bad stored food odors.

WARNING!
▶ Do not clean the appliance with hard brushes, wire brushes, detergent powder, petrol, amyl acetate, acetone and similar organic solutions, acid or alkaline solutions. Please clean with special refrigerator detergent to avoid damage.
▶ Do not spray or flush the appliance during cleaning.
▶ Do not use water spray or steam to clean the appliance.
▶ Do not clean the cold glass shelves with hot water. Sudden temperature change may cause the glass to break.
▶ Do not touch the inside surface of the freezer storage compartment, especially with wet hands, as your hands may freeze onto the surface.
▶ In case of heating check the condition of frozen goods.
natural_image
Illustration of a hand cleaning a window with a soap block and a basin (no text or symbols)▶ Always keep the door gasket clean.
▶ Clean the inside and housing of the appliance with a sponge dampened in warm water and neutral detergent.
-
Please scrub the interior and exterior of the refrigerator, including door sealing, door rack, glass shelves, boxes and so on, with a soft towel or sponge dipped in warm water (you may add neutral detergent into the warm water).
-
If there is liquid spilled, remove all the contaminated parts, directly rinse with the flow water, dry and place it back into the fridge.
- If there is spilled cream (such as the cream, melting ice cream), please remove all the contaminated parts, put into the warm water with about 40^ C for some time, then rinse with the flow water, dry and place it back into the fridge.
- In case some small part or component gets stuck inside of the fridge (between shelves or drawers), use small soft brush to release it. If you could not reach the part, please contact Haier service
▶ Rinse and dry with soft cloth.
▶ Do not clean any of the parts of the appliance in a dishwasher.
▶ Allow at least 5 minutes before restarting the appliance as frequent starting may damage the compressor.
Defrosting
The defrosting of the refrigerator and the freezer compartment are done automatically; no manual operation is needed.
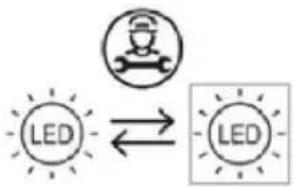
Replacing the LED-lamps

WARNING!
Do not replace the LED lamp yourself, it must only be replaced by either the manufacturer or the authorised service agent.
The lamps adopts LED as its light source, featuring low energy consumption and long service life. If there is any abnormality, please contact the customer service. See CUSTOMER SERVICE.
flowchart
graph LR
    A["LED"] <--> B["LED"]
Replaceable (LED only) light source by a professional.
This product contains a light source of energy efficiency class G.
| Compartment | Voltage | Energy efficiency class | Model |
| Refrigerator | 12V | G | HSW59F18DW* |
| Freezer | 12V | G | HSW59F18DN* |
Non-use for a longer period
If the appliance is not used for an extended period of time, and you will not use the Holiday-function for the refrigerator:
▶ Take out the food.
▶ Unplug the power cord.
▶ Clean the appliance as described above.
▶ Keep the doors open to prevent the creation of bad odours inside.

NOTICE
Turn the appliance off only if strictly necessary.
Moving the appliance
- Remove all food and unplug the appliance.
- Secure shelves and other moveable parts in the fridge and the freezer with adhesive tape.
- Do not tilt the refrigerator more than 45^ to avoid damaging the refrigerating system.

WARNING!
▶ Do not lift the appliance by its handles.
▶ Never place the appliance horizontally on the ground.
Water Tank (HSW59F18DW\*)
- Take off the water tank out of the appliance
- Remove the cover (A).
- Unscrew the dispenser spout (B).
- Clean the tank and dispenser spout with warm water and liquid dishwashing detergent. Make sure all soap is rinsed off.
- Mount the dispenser out (B) and take care that it is firmly screwed to the water tank and the white O-ring (C) is in position.
- Close the cover (A) and replace the tank inside the appliance.
text_image
Technical diagram of a mechanical device with labeled parts A, B, and C, showing internal components and connection points.
Notice: Water tank
If the water tank is not properly inserted, water can drip from the connection. Do not use excessive force when removing or installing the water tank, to avoid damaging.
Many occurring problems could be solved by yourself without specific expertise. In case of a problem please check all shown possibilities and follow below instructions before you contact an after sales service. See CUSTOMER SERVICE.
WARNING!
Before maintenance, deactivate the appliance and disconnect the mains plug from the mains socket.
Electrical equipment should be serviced only by qualified electrical experts, because improper repairs can cause considerable consequential damages.
▶ A damaged supply should only be replaced by the manufacturer, its service agent or similarly qualified persons in order to avoid a hazard.
| Problem | Possible Cause | Possible Solution |
| The compressor does not work. | Mains plug is not connected in the mains socket.The appliance is in the defrosting cycle | Connect the mains plug.This is normal for an automatic defrosting |
| The appliance runs frequently or runs for a too long period of time. | The indoor or outdoor temperature is too high.The appliance has been off power for a period of time.A door of the appliance is not tightly closed.The door has been opened too frequently or for too long.The temperature setting for the freezer compartment is too low.The door gasket is dirty, worn, cracked or mismatched.The required air circulation is not guaranteed. | In this case, it is normal for the appliance to run longerNormally, it takes 8 to 12 hours for the appliance to cool down completely.Close the door/drawer and ensure the appliance is located on a level ground and there is no food or container jarring the door.Do not open the door/drawer too frequently.Set the temperature higher until a satisfactory refrigerator temperature is obtained. It takes 24 hours for the refrigerator temperature to become stable.Clean the door/drawer gasket or replace them by the customer service.Ensure adequate ventilation. |
| The inside of the refrigerator is dirty and/ or smells. | The inside of the refrigerator needs cleaning.Food of strong odour is stored in the refrigerator. | Clean the inside of the refrigeratorWrap the food thoroughly.. |
| The appliance makes abnormal sounds. | · The appliance is not located on level ground. · The appliance touches some object around it. | · Adjust the feet to level the appliance. · Remove objects around the appliance. |
| It is not cold enough inside the appliance. | · The temperature is set too high. · Too warm goods has been stored. · Too much food has been stored at one time. · The goods are too close to each other. · A door/drawer of the appliance is not tightly closed. · The door/drawer has been opened too frequently or for too long. | · Reset the temperature. · Always cool down goods before storing them. · Always store small quantities of food. · Leave a gap between several foods allowing air flowing. · Close the door/drawer · Do not open the door/drawer too frequently. |
| It is too cold inside the appliance. | · The temperature is set too low. · The Super-Frz/ Super-Cool function is activated or is running too long. | · Reset the temperature. · Switch off the Super-Frz/ Super-Cool function |
| Moisture formation on the inside of the refrigerator compartment. | · The climate is too warm and too damp. · A door/drawer of the appliance is not tightly closed. · The door/drawer has been opened too frequently or for too long. · Food containers or liquids are left open. | · Increase the temperature. · Close the door/drawer · Do not open the door/drawer too frequently. · Let hot foods cool to room temperature and cover foods and liquids. |
| Moisture accumulates on the refrigerators outside surface or between the doors/door and drawer. | · The climate is too warm and too damp. · The door is not closed tightly. The cold air in the appliance and the warm air outside it condensates. | · This is normal in damp climate and will change when the humidity decreases. · Ensure that he door/drawer is tightly shut. |
| Strong ice and frost in the freezer compartment. | · The goods were not adequately packaged. · A door/drawer of the appliance is not tightly closed. · The door/drawer has been opened too frequently or for too long. · The door/drawer gasket is dirty, worn, cracked or mismatched.Something on the inside prevents the door/drawer to close properly. | · Always pack the goods well. · Close the door/drawer · Do not open the door/drawer too frequently. · Clean the door/drawer gasket or replace them by new ones.Reposition the shelves, door racks, or internal containers to allow the door/drawer to close |
| The sides of the cabinet and door strip get warm. | - | This is normal. |
| The appliance makes abnormal sounds. | The appliance is not located on level ground.The appliance touches some object around it. | Adjust the feet to level the appliance.Remove objects around the appliance. |
| A slight sound is to be heard similar to that of flowing water. | - | This is normal. |
| You will hear an alarm beep. | The fridge storage compartment door is open. | Close the door. |
| You will hear a faint hum. | The anti-condensation system is working | This prevents condensation and is normal |
| The interior lighting or cooling system does not work. | Mains plug is not connected in the mains socket.The power supply is not intact.The LED-lamp is out of order. | Connect the mains plug.Check the electrical supply to the room. Call the local electricity company!Please call the service for changing the lamp. |
| Water leaking or dripping from the water dispenser spout. | The water tank is not installed correctlyThe water dispenser spout is not screwed tight to the tank.The white silicon O ring is missing from the water spout. | Refit the water tank into the fridge door, ensure it is pushed fully into the door.The water spout is screwed in firmly to the water tank.Check the water spout has a white silicon O ring at the tank end before fitting the water spout to the water tank. |
To contact the technical assistance, visit our website: https://corporate.haier-europe.com/en/
Under the section "website", choose the brand of your product and your country. You will be redirected to the specific website where you can find the telephone number and form to contact the technical assistance.
Power interruption
In the event of a power cut, food should remain safely cold for about 5 hours. Follow these tips during a prolonged power interruption, especially in summer:
▶ Open the door/drawer as few times as possible.
▶ Do not put additional food into the appliance during a power interruption.
If prior notice of a power interruption is given and the interruption duration is longer than 5 hours, make some ice and put it in a container in the top of the refrigerator compartment.
▶ An inspection of the goods is required immediately after the interruption.
As temperature in the refrigerator will rise during a power interruption or other failure, the storage period and edible quality of food will be reduced. Any food that defrosts should be either consumed, or cooked and refrozen (where suitable) soon afterwards in order to prevent health risks.

NOTICE: Memory function during power interruption
After restoration of power the appliance continues with the settings that were set before the power failure.
Unpacking

WARNING!
The appliance is heavy. Always handle with at least two persons.
▶ Keep all packaging materials out of children's reach and dispose them in an environmentally friendly manner
▶ Take the appliance out of the packaging.
▶ Remove all packaging materials.
Environmental conditions
The room temperature should always be between 10^ C and 38^ C, since it can influence the temperature inside the appliance and its energy consumption. Do not install the appliance near other heat-emitting appliances (ovens, refrigerators) without isolation.
- Extended temperate (SN): this refrigerating appliance is intended to be used at ambient temperatures ranging from 10°C to 32°C;
- Temperate (N): this refrigerating appliance is intended to be used at ambient temperatures ranging from 16°C to 32°C;
- Subtropical (ST): this refrigerating appliance is intended to be used at ambient temperatures ranging from 16°C to 38°C;
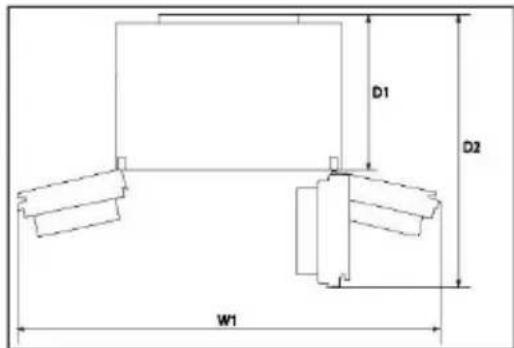
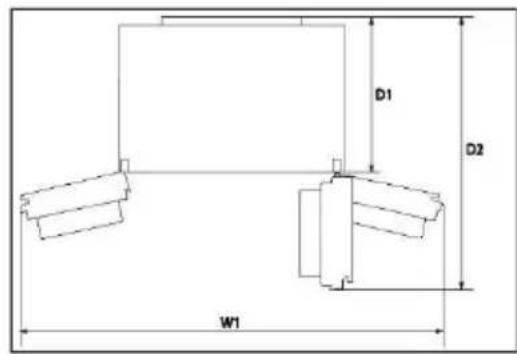
Recommended space
Recommended space when the door is opened:
$$ W 1 = 1 5 7. 8 \mathrm{cm} $$
$$ D 1 = 6 2. 9 \mathrm{cm} $$
$$ D 2 = 1 1 7. 3 \mathrm{cm} $$

text_image
D1 D2 W1Ventilaton cross-section
To achieve sufficient ventilation of the appliance for safety reasons, the information of the required ventilation cross sections must be observed.

text_image
10 cm 10 cm 10 cm
NOTICE
For a free standing appliance: this refrigerating appliance is not intended to be used as a built-in appliance.
Aligning the appliance
The appliance should be placed on a flat and solid surface.
- Tit the appliance slightly backwards (Fig.7).
- Set the feet to the desired level. Make sure the distance to the wall on the hinge sides is at least 10 cm.
- The stability can be checked by alternately bumping on the diagonals. The slightly swaying should be the same in both directions. Otherwise the frame can warp possible leaking door seals are the result. A low tendency to the rear facilitates the closing of the doors.

text_image
1. max 45° 2. 3. Fig.7Fine tuning of the doors
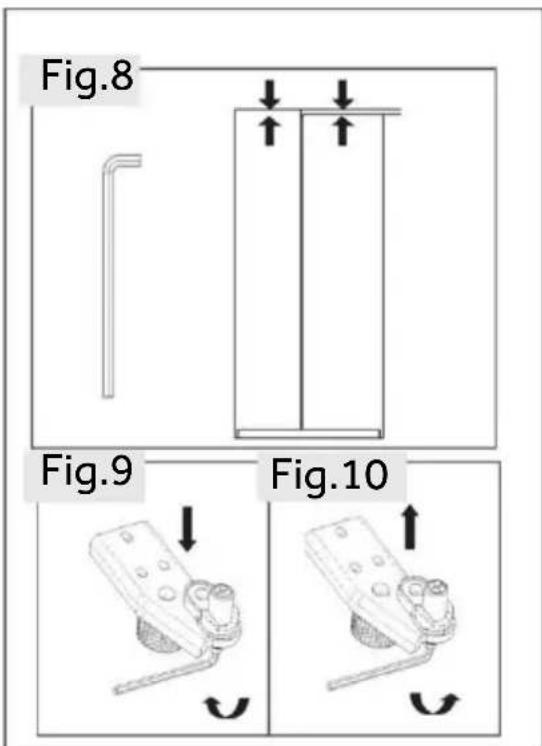
If the doors are still not in one level after levelling the doors by the feet, this mismatch can be remedied by turning the hinge lifting shaft at the right bottom corner of refrigerating door with a spanner (Fig.8)
Clockwise turn lifting shaft with spanner to lower door height (Fig.9).
Antic lock wise turn lifting shaft with spanner to llft door height (Fig.10).
text_image
Fig.8 Fig.9 Fig.10
WARNING!
Do not adjust the hinge lifting shaft excessively to a height which might cause the shaft to leave its original locked position. (Adjustable height range:3 mm)
text_image
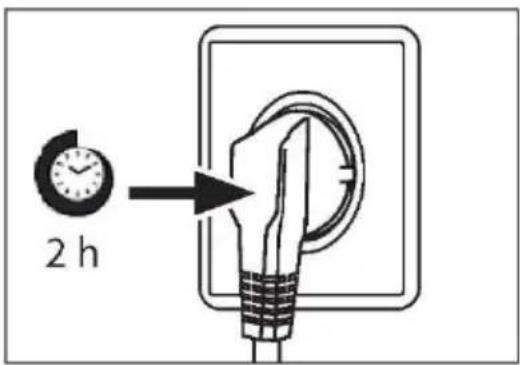
2 hWaiting time
To the maintenance-free lubrication oil is located in the capsule of the compressor This oil can get through the closed pipe system during slanting transport. Before connecting the appliance to the power supply you have to wait at least 2 hours so that the oil runs back into the capsule.
Electrical connection
Before each connection check if:
▶ power supply, socket and fusing are appropriate to the rating plate.
the power socket is earthed and no multi-plug or extension.
▶ the power plug and socket are strictly according.
Connect the plug to a properly installed household socket.
WARNING!
To avoid risks a damaged power cord must be replaced by the customer service (see warranty card).
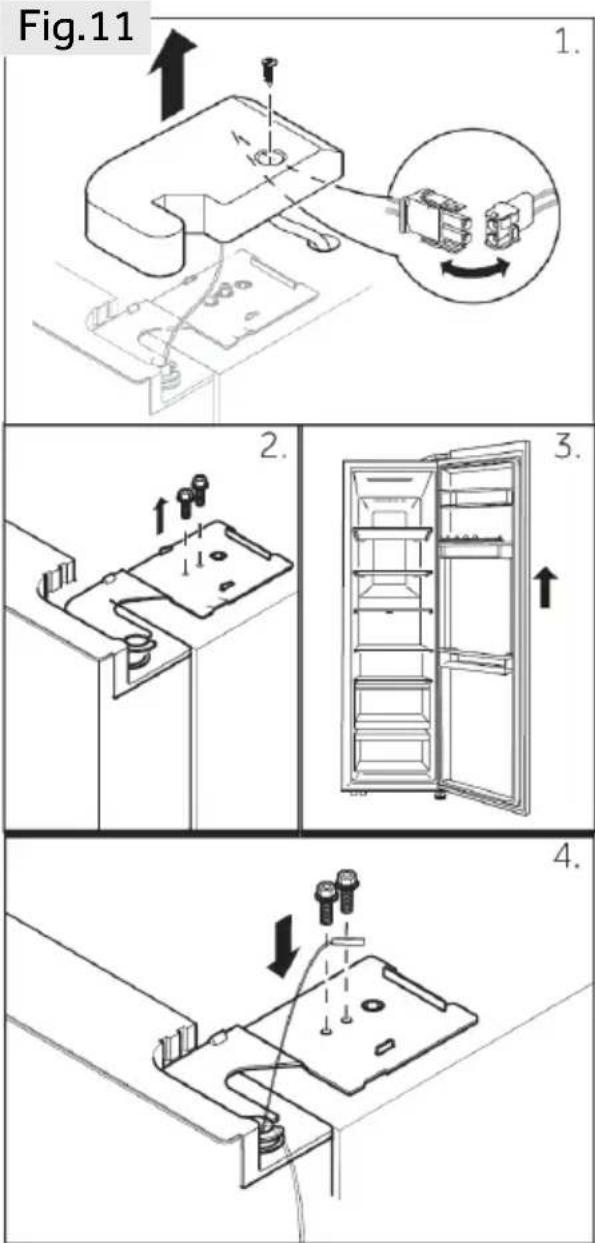
Removing and installing the doors
In the event that you need to remove the appliance doors, please follow the door removal and installation instructions below.

WARNING!
Before any operation, deactivate the appliance and disconnect the mains plug from the mains socket.
The appliance is heavy. Always handle with at least two persons.
▶ Do not tilt the appliance more than 45 or place it horizontally on the ground.
The door may fall over and hurt people, or get damaged during these steps, pleas pay more attention when removing and installing doors.
text_image
Fig.11 1. 2. 3. 4.-
Undo the hinge cover screw and remove the cover. Release the cable connector.
-
Undo the screws holding the upper hinge in position and then remove the hinge.
-
Lift the fridge compartment door to remove it.
-
Refit the door by reversing the removal steps. Ensure that the grounding cable will be fixed by the screw.

NOTICE: Fridge door
The pictures show the removing of the freezer compartment door. For the fridge doo please use the corresponding parts on the other side.
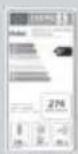
Product fiche according to regulation eu No. 2019/2016
| Brand | Haier |
| Model name / identifier | HSW59F18DW*/HSW59F18DN* |
| Category of the model | Refrigerator-freezer |
| Energy efficiency class | D |
| Annual energy consumption (kWh/year) (1) | 277 |
| Total volume (L) | 613/615 |
| Volume refrigerator (L) | 391/393 |
| Volume freezer (L) | 198 |
| Volume Storage bin (2-Star) (L) | 24 |
| Star rating |  |
| Temperature of other compartments >14°C | Non applicable |
| Frost-free system | Yes |
| Freezing capacity (kg/24h) | 10 |
| Climate rating (2) | SN-N-ST |
| Noise emission class and airborne acoustical noise emissions (db(A) re 1pW) | C(36) |
| Temperature rise time (h) | 5 |
| Type of appliance | freestanding |
Explanations:
- Yes, featured
(1) Based on the results of the standards conformance test over 24 hours. The actual consumption depends on the use and the location of the appliance.
(2) Climate rating SN: This appliance is intended for use in an ambient temperature of between +10°C and +32°C
Climate rating N: This appliance is intended for use in an ambient temperature of between +16°C and +32°C
Climate rating ST: This appliance is intended for use in an ambient temperature of between +16°C and +38°C
Additional technical data
| Voltage / Frequency | 220-240V ~ / 50Hz |
| Input current (A) | 1.8 |
| Defrosting input power (W) | 220 |
| Main fuse (A) | 15 |
| Coolant | R600a |
| Dimensions (H/W/D in mm) | 1775/ 905/ 726 |
We recommend our Haier Customer Service and the use of original spare parts. If you have a problem with your appliance, please first check section TROUBLESHOOTING.
If you cannot find a solution there, please contact
▶ your local dealer or
▶ our European Call Service-Center (see listed phone numbers below) or
▶ the Service & Support area at www.haier.com where you can activate the service
▶ claim and also find FAQs.
To contact our Service, ensure that you have the following data available. The information can be found on the rating plate.
Model ____ Serial No. ____
Also check the Warranty Card supplied with the product in case of warranty.
| European Call Service-Center | ||
| Country* | Phone number | Costs |
| Haier Italy (IT) | 199 100 912 | |
| Haier Spain (ES) | 902 509 123 | |
| Haier Germany (DE) | 0180 5 39 39 99 | • 14 Ct/Min Landline• max 42 Ct/Min Mobile |
| Haier Austria (AT) | 0820 001 205 | • 14,53 Ct/Min Landline• max 20 Ct/Min all others |
| Haier United Kingdom (UK) | 0333 003 8122 | |
| Haier France (FR) | 0980 406 409 | |
*For other countries please refer to www.haier.com Haier
Europe Trading S.r.l
Branch UK
Westgate House, Westgate, Ealing
London, W5 1YY
*Duration of the guarantee of the refrigerating appliance:
Minimum guarantee is: 2 years for EU Countries, 3 years for Turkey, 1 year for UK, 1 year for Russia, 3 years for Sweden, 2 years for Serbia, 5 years for Norway, 1 year for Morocco, 6 months for Algeria, Tunisia no legal warranty required.
*The period of spare parts for the repair of the appliance:
Thermostats, temperature sensors, printed circuit boards and light sources are available for a minimum period of seven years after placing the last unit of the model on the market.
Door handles, door hinges, trays and baskets for a minimum period of seven years and door gaskets for a minimum period of 10 year, after placing the last unit of the model on the market.
*For further information about the product, please consult https://eprel.ec.europe.eu/ or scan the QR on the energy label supplied with the appliance.
Haier
2023 Version A
text_image
Black and white barcode image with vertical lines and a central bar0060537944
Haier
natural_image
Interior view of a modern refrigerator with open storage shelves and bottles (no visible text or labels)Хладилник с фризер
HSW59F18DWMM HSW59F18DWPT HSW59F18DNMM HSW59F18DNPT
Информация за безопасност 45
natural_image
Technical line drawing of a mechanical component with three circular cutouts (no text or symbols)Машина за лед
Енергиен
етикет
Гаранционна
карта
natural_image
Line drawing of a refrigerator with a door and labeled component (no text or symbols beyond the number 12)
Предупреждение
natural_image
Line drawing of a double-door refrigerator with a handle (no text or symbols)Панел за управление
Ключове:
A Селектор за хладилник
В Селектор за фризер
С Режим „Auto Set“
D Режим „Holiday“
E Режим за супер замразяване „Super-Freeze"
F Селектор за функция „Panel lock“
Индикатори:
а Режим за супер охлаждане „Super-Cool“
b Температура на хладилника
с Температура на фризера
d WiFi режим
e Режим „Auto Set“
f Режим „Holiday"
g Режим за супер замразяване „Super-Freeze“
h Заключване на панела

text_image
ECOPLUS -80°C a b A — Fridge 3 sec. Super-Cool -80°C c B — Freezer d C — Auto Set e f D — Holiday g E — Super-Frz. h F — 3Sec. Locktext_image
Technical diagram of a multi-level storage or ventilation unit with labeled components and internal structuretext_image
Diagram of a device with labeled components A and C, showing a container with ports and a handle.
Предупреждение
text_image
Diagram showing two hands holding a tray with arrows labeled ① and ② indicating movement or force direction.
ЗАБЕЛЕЖКА
text_image
Diagram showing fluid flow with two directional arrows labeled ① and ②, indicating movement or force directions in a container-like structure.
text_image
Diagram showing two labeled arrows (① and ②) pointing to a rectangular container with downward arrows, likely illustrating a physical or engineering concept.Подвижен резервоар за вода (HSW59F18DW\*)
natural_image
Illustration of a hand cleaning a window with a soap block and a basin (no text or symbols)text_image
Technical diagram of a mechanical device with labeled parts A, B, and C, showing internal components and assembly.
Забележка: Резервоар за вода
Westgate House, Westgate, Ealing
London, W5 1YY
Chladnička-mraznička
HSW59F18DWMM HSW59F18DWPT HSW59F18DNMM HSW59F18DNPT
natural_image
Technical line drawing of a mechanical component with three circular cavities and a central housing (no text or symbols)Výrobník ledu
Energetický
štítek
Záruční list
Stručná
příručka
Obecné pokyny
natural_image
Line drawing of a double door with a labeled inset showing the number 12 (no text or symbols beyond the label)
Upozornění
natural_image
Line drawing of a double-door refrigerator with a handle (no text or symbols)Ovládací panel
Tlačítka:
flowchart
graph LR
    A["Lock"] --> B["3Sec.Lock"]
    B --> C["Lock"]
Panel je zapnutý
text_image
Technical diagram of a multi-level storage or ventilation unit with labeled components 1, 2, and 3Dávkovač vody (HSW59F18DW\*)
text_image
Diagram of a device with labeled parts A and C, showing a component being inserted into a box.
Upozornění
text_image
Diagram showing two hands holding a tray with labeled arrows and numbered sections, illustrating a physics or engineering concept.
UPOZORNĚNÍ
text_image
Diagram showing fluid flow with two directional arrows labeled ① and ②, indicating movement or force directions in a container-like structure.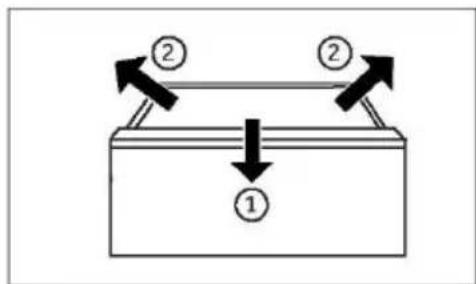
text_image
Diagram showing two labeled arrows (① and ②) pointing to a rectangular container with downward arrows, likely illustrating a physical or engineering concept.natural_image
Illustration of a hand cleaning a window with a soap block and a basin (no text or symbols)text_image
Technical diagram of a mechanical device with labeled parts A, B, and C, showing internal components and assembly.
$$ W 1 = 1 5 7, 8 \mathrm{cm} $$
$$ D 1 = 6 2, 9 \mathrm{cm} $$
$$ D 2 = 1 1 7, 3 \mathrm{cm} $$
Prostor pro větrání
text_image
Obr. 8 Obr. 9 Obr. 10
VAROVÁNÍ!
Westgate House, Westgate, Ealing
London, W5 1YY
text_image
Black and white barcode image with vertical lines and a central bar0060537944
Haier
Εγχειρίδιο χρήσης
Ψυγείο-καταψύκτης
HSW59F18DWMM HSW59F18DWPT HSW59F18DNMM HSW59F18DNPT
natural_image
Technical line drawing of a mechanical component with three circular cavities and a central housing (no text or symbols)Παγομηχανή
Ενεργειακή
ετικέτα
Κάρτα εγγύησης
Σύντομος
οδηγός
Γενικές οδηγίες
natural_image
Line drawing of a refrigerator with a door and labeled component (no text or symbols beyond the number 12)
Σημείωση
natural_image
Line drawing of a double-door refrigerator with a handle (no text or symbols)Πίνακας ελέγχου
Πλήκτρα:
flowchart
graph LR
    A["Lock"] --> B["3Sec. Lock"]
    B --> C["Lock"]
text_image
Technical diagram of a multi-level storage or ventilation system with labeled components 1, 2, and 3.text_image
Diagram of a device with labeled components A and C, showing a droplet being inserted into a container.
Σημείωση
text_image
Diagram showing a hand holding a tablet with two arrows labeled ① and ② indicating direction of movement or force.
ΣΗΜΕΙΩΣΗ
text_image
Diagram showing two labeled arrows (① and ②) pointing upward and downward within a layered structure, possibly illustrating fluid or mechanical flow.
text_image
Diagram showing two labeled arrows (① and ②) pointing to a rectangular object with downward arrows, likely illustrating a physical or engineering concept.natural_image
Illustration of a hand cleaning a window with a soap block and a basin (no text or symbols)text_image
Technical diagram of a mechanical device with labeled parts A, B, and C, showing internal components and assembly.
text_image
Diagram showing refrigerator interior with labeled parts and directional arrows indicating assembly or cleaning steps
natural_image
Technical line drawing of a mechanical assembly with a clamping device and bolted components (no text or symbols)Westgate House, Westgate, Ealing
Λονδίνο, W5 1YY
natural_image
Technical line drawing of a mechanical component with two internal chambers and a mounting base (no text or symbols)natural_image
Line drawing of a double door with a labeled inset showing the number 12 (no text or symbols beyond the label)
Aviso
natural_image
Line drawing of a double-door refrigerator with a handle (no text or symbols)Panel de control
Teclas:
text_image
Technical diagram of a multi-level storage or ventilation system with labeled components 1, 2, and 3Dispensador de agua (HSW59F18DW\*)
text_image
Diagram of a device with labeled components A and C, showing a container with ports and an arrow indicating direction.
Aviso
text_image
Diagram showing a hand holding a tray with two arrows labeled ① and ② indicating direction or movement, possibly illustrating a physics or engineering concept.
AVISO
text_image
Diagram showing fluid flow with two directional arrows labeled ① and ②, indicating movement or force directions in a container-like structure.
text_image
Diagram showing two labeled arrows (① and ②) pointing to a rectangular container with internal structure, likely illustrating a mechanical or physical process.natural_image
Illustration of a hand cleaning a window with a soap block and a basin (no text or symbols)text_image
Technical diagram of a vehicle with labeled parts A, B, and C, showing internal components and assembly.
$$ W 1 = 1 5 7, 8 \mathrm{cm} $$
$$ D 1 = 6 2, 9 \mathrm{cm} $$
$$ D 2 = 1 1 7, 3 \mathrm{cm} $$
text_image
Fig.8 Fig.9 Fig.10
¡ADVERTENCIA!
Westgate House, Westgate, Ealing
Londres, W5 1YY
text_image
Black and white barcode image with vertical lines and a central bar pattern0060537944
Haier
natural_image
Technical line drawing of a mechanical component with three circular cavities (no text or symbols)Machine à glaçons
Étiquette énergie

Carte de garantie
Guide rapide
natural_image
Line drawing of a double door with a labeled inset showing the number 12 (no text or symbols beyond the label)
Remarque
natural_image
Line drawing of a double-door refrigerator with a handle (no text or symbols)Panneau de commande
Touches :
flowchart
graph LR
    A["Lock"] --> B["3Sec.Lock"]
    B --> C["Lock"]
text_image
Technical diagram of a multi-level storage or ventilation unit with labeled components and measurement linestext_image
Diagram of a device with labeled components A and C, showing a handle, internal component, and a tool inserted into a housing.
Remarque
text_image
Diagram showing two hands holding a tray with labeled arrows and numbered sections, illustrating a physical or mathematical concept.
REMARQUE
text_image
Diagram showing fluid flow with two directional arrows labeled ① and ②, indicating movement or force directions in a container-like structure.
text_image
Diagram showing two labeled arrows (① and ②) pointing to a rectangular container with downward arrows, likely illustrating a physical or engineering concept.text_image
Alignment
natural_image
Illustration of a hand cleaning a window with a soap block and a basin (no text or symbols)text_image
Technical diagram of a mechanical device with labeled parts A, B, and C, showing internal components and connection points.
Westgate House, Westgate, Ealing
Londres, W5 1YY
text_image
Black and white barcode image with vertical lines and a central bar0060537944
Haier
natural_image
Technical line drawing of a mechanical component with three circular cavities and a central housing (no text or symbols)Jégkészítő
Energiacímke
Jótállási jegy
Gyors
útmutató
natural_image
Line drawing of a double door with a labeled inset showing the number 12 (no text or symbols beyond the label)
Megjegyzés
natural_image
Line drawing of a double-door refrigerator with a handle (no text or symbols)Vezérlöpult
Gombok:
flowchart
graph LR
    A["Lock"] --> B["3Sec. Lock"]
    B --> C["Lock"]
text_image
Technical diagram of a multi-level storage or ventilation unit with labeled components 1, 2, and 3Vízadagoló (HSW59F18DW\*)
text_image
Diagram of a device with labeled components A and C, showing a container with ports and an arrow indicating direction.
Megjegyzés
text_image
Diagram showing a hand holding a tray with labeled parts and directional arrows, likely illustrating a physics or engineering concept.
MEGJEGYZÉS
text_image
Diagram showing two labeled arrows (① and ②) pointing upward and downward to a rectangular object, with numbered circles indicating positions.Eltávolítható fiók
text_image
Diagram showing two labeled arrows (① and ②) pointing to a rectangular container with downward arrows, likely illustrating a physical or engineering concept.text_image
Technical diagram of a mechanical device with labeled parts A, B, and C, showing internal components and assembly.
natural_image
Illustration of a hand cleaning a window with a soap block and a basin (no text or symbols)text_image
Technical diagram of a mechanical device with labeled parts A, B, and C, showing internal components and connection points.
natural_image
Line drawing of an open refrigerator with shelves and doors, no text or symbols present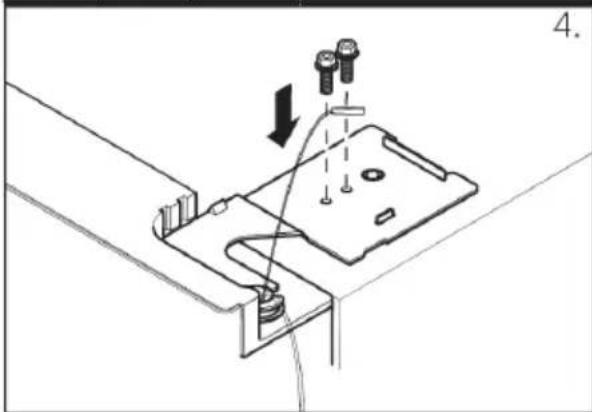
natural_image
Technical line drawing of a mechanical assembly with no visible text or symbolsWestgate House, Westgate, Ealing
London, W5 1YY
text_image
Black and white barcode image with vertical lines and a central bar0060537944
Haier
Manuale dell'utente
Frigorifero- Congelatore
HSW59F18DWMM HSW59F18DWPT HSW59F18DNMM HSW59F18DNPT
natural_image
Technical line drawing of a mechanical component with three circular cavities and a central housing (no text or symbols)natural_image
Line drawing of a refrigerator with a door and labeled component (no text or symbols beyond the number 12)
Avviso
natural_image
Simple line drawing of a two-decker refrigerator with a handle (no text or symbols)flowchart
graph LR
    A["Lock"] --> B["3Sec.Lock"]
    B --> C["Lock"]
text_image
Technical diagram of a multi-level storage or ventilation unit with labeled components 1, 2, and 3text_image
Diagram of a device with labeled components A and C, showing a handle, internal box, and tool.
Avviso
text_image
Diagram showing two hands holding a tray with labeled parts and directional arrows indicating movement or force
AVVISO
text_image
Diagram showing two labeled arrows (① and ②) pointing upward and downward to a rectangular object, with numbered circles indicating positions.Cassetto rimovibile
text_image
Diagram showing two labeled arrows (① and ②) pointing to a rectangular container with downward arrows, likely illustrating a physical or engineering concept.natural_image
Technical line drawing of a wall-mounted air conditioner unit with an inset magnified view showing internal structure (no text or symbols)
natural_image
Illustration of a hand cleaning a window with a soap block and a basin (no text or symbols)text_image
Technical diagram of a mechanical device with labeled parts A, B, and C, showing internal components and connection points.
$$ W 1 = 1 5 7, 8 \mathrm{cm} $$
$$ D 1 = 6 2, 9 \mathrm{cm} $$
$$ D 2 = 1 1 7, 3 \mathrm{cm} $$

text_image
D1 D2 W1Westgate House, Westgate, Ealing
London, W5 1YY
natural_image
Simple line drawing of a refrigerator with a door and labeled component (no text or symbols beyond the number 12)
Let op
natural_image
Line drawing of a double-door refrigerator with a handle (no text or symbols)Bedieningspaneel
Toetsen:
flowchart
graph LR
    A["Lock"] --> B["3Sec.Lock"]
    B --> C["Lock"]
flowchart
graph LR
    A["Hexagon with asterisk"] --> B["Super-Frz."]
    B --> C["Hexagon with asterisk"]
    C --> D["Super-Frz."]
    D --> E["Hexagon with asterisk"]
Indicator uit
Eenmaal drukken
Indicator aan
Eenmaal drukken
Indicator uit

Let op
text_image
Technical diagram of a multi-level storage or ventilation unit with labeled components 1, 2, and 3Waterdispenser (HSW59F18DW\*)
text_image
Diagram of a device with labeled components A and C, showing a handle and internal components.
Let op
text_image
Diagram showing a hand holding a tray with two arrows labeled ① and ② indicating direction or movement, possibly illustrating a physics or engineering concept.
LET OP
text_image
Diagram showing fluid flow with two directional arrows labeled ① and ②, indicating movement or force directions in a container-like structure.
text_image
Diagram showing two labeled arrows (① and ②) pointing to a rectangular container with internal structure, likely illustrating a physical or engineering concept.Let op: Waterreservoir
natural_image
Illustration of a hand cleaning a window with a soap block and a basin (no text or symbols)text_image
Technical diagram of a mechanical device with labeled parts A, B, and C, showing internal components and assembly.
Let op: Waterreservoir
https://corporate.haier-europe.com/en/.
$$ W 1 = 1 5 7, 8 \mathrm{cm} $$
$$ D 1 = 6 2 9 \mathrm{cm} $$
$$ D 2 = 1 1 7, 3 \mathrm{cm} $$
text_image
D1 D2 W1Westgate House, Westgate, Ealing
text_image
Black and white barcode image with vertical lines and a central bar0060537944
Haier
Instrukcja obsługi
natural_image
Technical line drawing of a mechanical component with two internal chambers and a side outlet (no text or symbols)Kostkarka do lodu
natural_image
Line drawing of a double door with a labeled inset showing the number 12 (no text or symbols beyond the label)
Uwaga
natural_image
Line drawing of a double-door refrigerator with a handle (no text or symbols)Panel sterowania
Przyciski:
flowchart
graph LR
    A["Lock"] --> B["3Sec. Lock"]
    B --> C["Lock"]
text_image
Technical diagram of a multi-level storage or ventilation unit with labeled components 1, 2, and 3text_image
Diagram of a device with labeled components A and C, showing a container with ports and an arrow indicating direction.
Uwaga
text_image
Diagram showing two labeled arrows (① and ②) pointing to a tray with patterned contents, likely illustrating a physics or engineering concept.
UWAGA
text_image
Diagram showing fluid flow with two directional arrows labeled ① and ②, indicating movement or force directions in a container-like structure.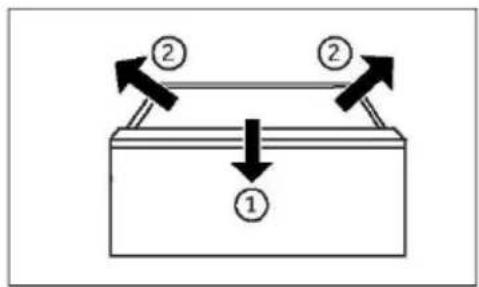
text_image
Diagram showing two labeled arrows (① and ②) pointing to a rectangular container with internal structure, likely illustrating a mechanical or physical process.natural_image
Illustration of a hand cleaning a window with a soap block and a basin (no text or symbols)text_image
Technical diagram of a mechanical device with labeled parts A, B, and C, showing internal components and connection points.
$$ W 1 = 1 5 7, 8 \mathrm{cm} $$
$$ D 1 = 6 2, 9 \mathrm{cm} $$
$$ D 2 = 1 1 7, 3 \mathrm{cm} $$
text_image
D1 D2 W1Westgate House, Westgate, Ealing
Londyn, W5 1YY
natural_image
Technical line drawing of a mechanical component with three circular cavities and a central housing (no text or symbols)natural_image
Line drawing of a refrigerator with a door and labeled component (no text or symbols beyond the number 12)
Aviso
natural_image
Line drawing of a double-door refrigerator with a handle (no text or symbols)Painel de controlo
Teclas:
A Seletor de frigorífico
B Seletor de congelador
C Modo Auto Set
D Modo Holiday
E Modo Super-Freeze
F Seletor de bloqueio do painel
Indicadores:
a Modo Super-Cool
d Modo WiFi
e Modo Auto Set
f Modo Holiday
g Modo Super-Freeze
h Bloqueio do painel
b Temperatura do frigorífico
c Temperatura do congelador

text_image
ECOPLUS -80°C a b A — Fridge 3 sec. Super-Cool -80°C c B — Freezer d C — Auto Set e f D — Holiday g E — Super-Frz. h F — 3Sec. Lockflowchart
graph LR
    A["Lock"] --> B["3Sec.Lock"]
    B --> C["Lock"]
flowchart
graph LR
    A["Hexagon with asterisk"] --> B["Super-Frz."]
    B --> C["Hexagon with asterisk"]
    C --> D["Super-Frz."]
    D --> E["Circle with asterisk"]
text_image
Technical diagram of a multi-level storage or ventilation unit with labeled components 1, 2, and 3text_image
Diagram of a device with labeled components A and C, showing a handle and internal components.
Aviso
text_image
Diagram showing two hands holding a tray with labeled arrows and numbered sections, illustrating a physics or engineering concept.
AVISO
text_image
Diagram showing two labeled arrows (① and ②) pointing upward and downward within a layered structure, possibly illustrating fluid or mechanical flow.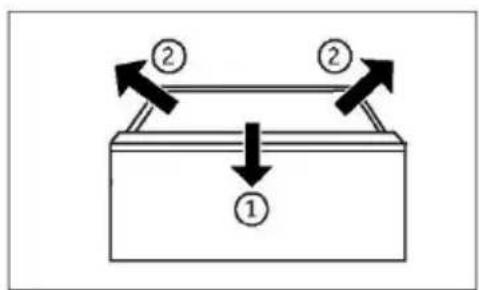
text_image
Diagram showing two labeled arrows (① and ②) pointing to a rectangular container with downward arrows, likely illustrating a physical or engineering concept.natural_image
Technical line drawing of a wall-mounted air conditioner unit with an inset showing the blade and mounting detail (no text or symbols)
natural_image
Illustration of a hand cleaning a window with a soap block and a basin (no text or symbols)Substituir as lâmpadas LED
AVISO!
text_image
Technical diagram of a mechanical device with labeled parts A, B, and C, showing internal components and connection points.
Westgate House, Westgate, Ealing
London, W5 1YY
text_image
Black and white barcode image with vertical lines and a central bar0060537944
Haier
Manualul de utilizare
Combină frigorifică
HSW59F18DWMM HSW59F18DWPT HSW59F18DNMM HSW59F18DNPT
natural_image
Technical line drawing of a mechanical component with two internal chambers and a side outlet (no text or symbols)A: Compartiment congelator
natural_image
Line drawing of a refrigerator with a door and labeled component (no text or symbols beyond the number 12)
Notificare
A: Compartiment congelator
natural_image
Line drawing of a double-door refrigerator with a handle (no text or symbols)Panou de comenzi
Taste:
A Selector frigider
B Selector congelator
C Modul Auto Set
D Modul Holiday
E Modul Super-Freeze
F Selector blocare panoul
Indicatori:
a Modul Super-Cool
b Temperatura frigiderului
c Temperatura congelatorului
d Modul Wi-Fi
e Modul Auto Set
f Modul Holiday
g Modul Super-Freeze
h Blocare panou

text_image
ECOPLUS -80°C a b A — Fridge 3 sec. Super-Cool -80°C c B — Freezer d C — Auto Set e f D — Holiday g E — Super-Frz. h F — 3Sec. Lockflowchart
graph LR
    A["Lock"] --> B["3Sec.Lock"]
    B --> C["Lock"]
text_image
Technical diagram of a multi-level storage or ventilation unit with labeled components 1, 2, and 3text_image
Diagram of a device with labeled components A and C, showing a handle and internal components.
Notificare
text_image
Diagram showing a hand holding a tray with two arrows labeled ① and ② indicating direction or movement, possibly illustrating a physics or engineering concept.
OBSERVATIE
text_image
Diagram showing fluid flow with two directional arrows labeled ① and ②, indicating movement or force directions in a container-like structure.
text_image
Diagram showing two labeled arrows (① and ②) pointing to a rectangular container with downward arrows, likely illustrating a physical or engineering concept.natural_image
Illustration of a hand cleaning a window with a soap block and a basin (no text or symbols)text_image
Diagram of a battery pack with labeled parts A, B, and C, showing internal components and connections.
text_image
Diagram showing a refrigerator interior with labeled parts and directional arrows indicating assembly or cleaning steps.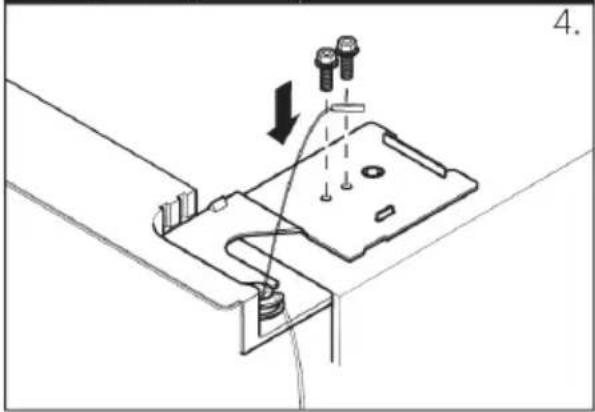
natural_image
Technical line drawing of a mechanical assembly with no visible text or symbolsWestgate House, Westgate, Ealing
Londra, W5 1YY
text_image
Black and white barcode image with vertical lines and a central bar0060537944


