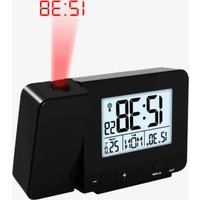
WT 546 - Alarm Clock Techno Line - Free user manual and instructions
Find the device manual for free WT 546 Techno Line in PDF.


| Product Type | Projection Alarm Clock Radio |
| Brand | Techno Line |
| Model | WT 546 |
| Main Power Supply | 4.5 V DC mains adapter (included) |
| Backup Power Supply | 2 AAA 1.5 V batteries (not included) |
| Radio-Controlled Time Reception | DCF-77 (77.5 kHz) |
| Time Display Formats | 12 h / 24 h |
| Adjustable Time Zone | From -12 to +12 hours |
| Date Display | Day, month, year (2000-2099) |
| Weekday Languages | German, English, French, Italian, Spanish, Dutch, Danish |
| Indoor Temperature Display | Range: -9.9 °C to 49.9 °C; accuracy ±1 °C (0-40 °C) |
| Indoor Humidity Display | Yes (value not specified) |
| Temperature Units | °C or °F |
| Time Projection | Distance: 1 to 2 meters |
| Backlight | Battery mode: 8 seconds; mains mode: high/low/off |
| Alarms | 2 independent alarms with snooze function |
| Alarm Volume | Crescendo (gradual increase) |
| Housing Material | Plastic |
| Care and Cleaning | Clean with a soft, dry cloth. Do not use solvents or abrasive products. |
| Safety | Do not immerse in water, do not expose to extreme temperatures, do not open the housing. Use only non-rechargeable alkaline batteries. |
| Spare Parts and Repairability | Mains adapter supplied. Batteries not included. No specific spare parts available; in case of malfunction, contact after-sales service. |
Frequently Asked Questions - WT 546 Techno Line
User questions about WT 546 Techno Line
0 question about this device. Answer the ones you know or ask your own.
Ask a new question about this device
Download the instructions for your Alarm Clock in PDF format for free! Find your manual WT 546 - Techno Line and take your electronic device back in hand. On this page are published all the documents necessary for the use of your device. WT 546 by Techno Line.
USER MANUAL WT 546 Techno Line
C1: Snooze/light-Taste
natural_image
Diagram of an electrical enclosure connected to a wall-mounted device via cable, showing wiring and lightning symbol (no text or labels present)Hinweis:
A1: Time
A2: Date
A3: Weekday
A4: "Time" button
A5: "Alarm" button
A6: “+” button
A7: “-”button
A8: Indoor temperature
EN2
A9: Indoor humidity
A10: Radio Controlled Icon
Part B – Back button and power
B1: Projection switch (ON/OFF)
B2: Projection rotation button
B3: "Wave" button
B4: Power connection
B5: Battery compartment
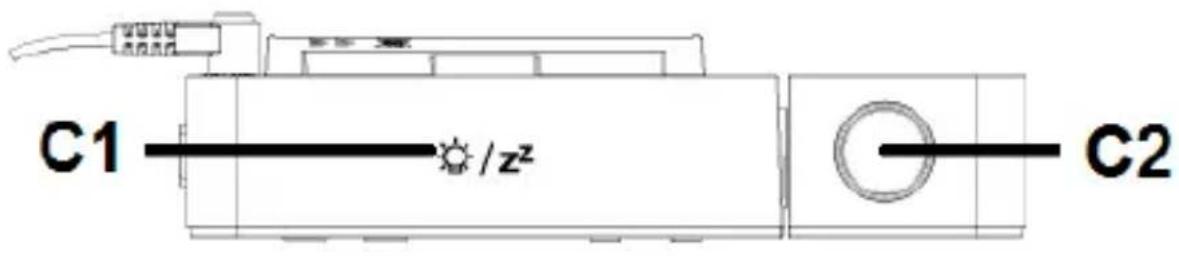
Part C – TOP Touch button
C1: Snooze/light touch button
C2: Projection window
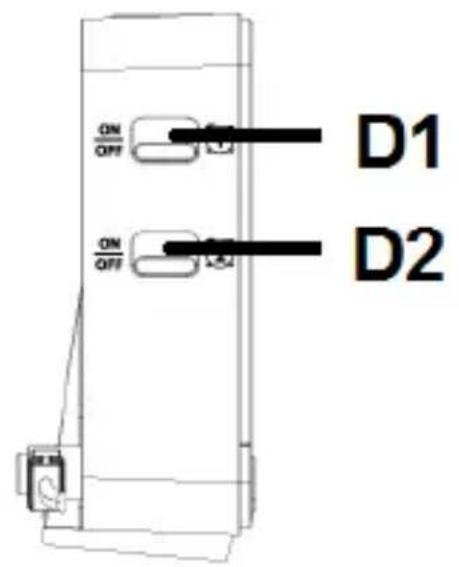
Part D – side buttons
D1: Alarm 1 on/off switch
D2: Alarm 2 on/off switch
Features:
▶ Radio controlled DCF-77 clock
▶ 12/24 hour time format
▶ Time zone setting (± 12h)
EN3
▶ Manual time setting
▶ Projection of the time
▶ Date and weekday display (7 languages)
▶ Temperature alternatively in °C or °F
▶ Alarm and automatic snooze function
▶ Indoor measurement range: -9.9°C \~ 49.9°C
▶ Power: DC-adapter (included), battery 1.5V “AAA” LR03 size x 2 pcs (not included)
Environmental reception effects
The clock obtains the accurate time with wireless technology. Same as all wireless devices, the reception is maybe affected by the following circumstances:
- long transmitting distance
- nearby mountains and valleys
- near freeway, railway, airports, high voltage cable etc.
- near construction site
-
among tall buildings
• inside concrete buildings -
near electrical appliances (computers, TV's, etc) and metallic structures
• inside moving vehicles
Place the clock at a location with optimal signal, i.e. close to a window and away from metal surfaces or electrical appliances.
Precautions
- This main unit is intended to be used only indoors.
- Do not subject the unit to excessive force or shock.
- Do not expose the unit to extreme temperatures, direct sunlight, dust or humidity.
- Do not immerse in water.
- Avoid contact with any corrosive materials.
- Do not dispose this unit in a fire as it may explode.
- Do not open the inner back case or tamper with any components of this unit.
Batteries safety warnings
- Use only alkaline batteries, not rechargeable batteries.
• Install batteries correctly by matching the polarities
$$ (+ / -). $$
• Always replace a complete set of batteries.
- Never mix used and new batteries.
- Remove exhausted batteries immediately.
- Remove batteries when not in use.
- Do not recharge and do not dispose of batteries in fire as the batteries may explode.
- Ensure batteries are stored away from metal objects as contact may cause a short circuit.
- Avoid exposing batteries to extreme temperature or humidity or direct sunlight.
- Keep all batteries out of reach from children. They are a choking hazard.
Use the product only for its intended purpose!
Consideration of duty according to the battery law
Old batteries do not belong to domestic waste because they could cause damages of health and environment. You can return used batteries free of charge to your dealer and collection points. As end-user you are committed
by law to bring back needed batteries to distributors and other collecting points!
Consideration of duty according to the law of electrical devices
natural_image
Simple line drawing of a trash bin with crossed lines indicating no waste or discharge (no text or symbols)This symbol means that you must dispose of electrical devices separated from the General household waste when it reaches the end of its useful life. Take your unit to your local waste collection point or recycling centre.
This applies to all countries of the European Union, and to other European countries with a separate waste collection system.
Initial operation
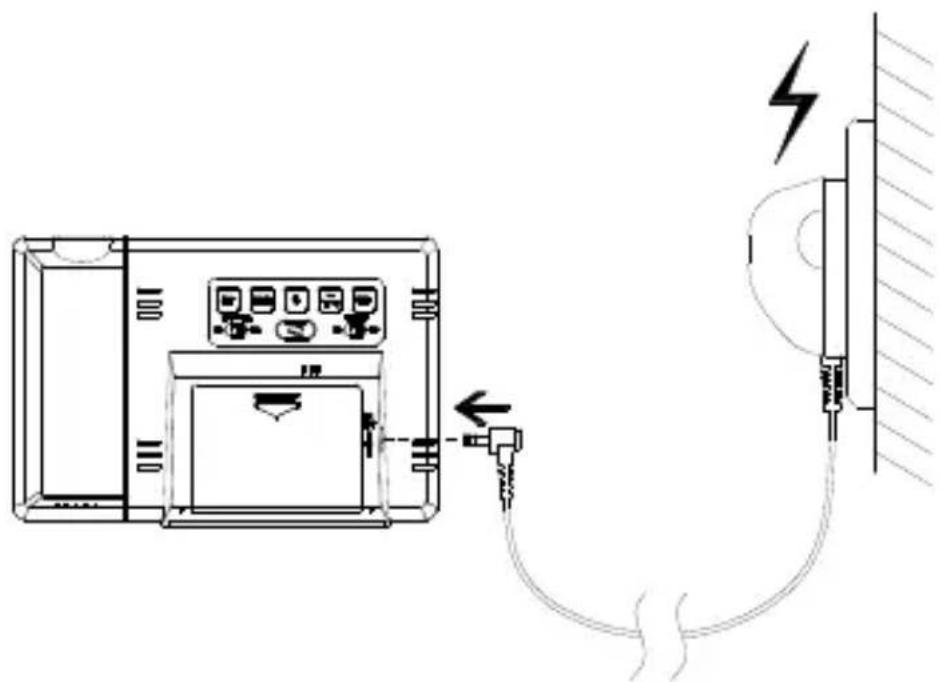
▶ Connect the included power supply with the socket on the backside
▶ Alternatively you can use batteries. Open the clocks battery compartment cover.
▶ Insert 2 x AAA batteries observing polarity [ “+” and “-” marks].
▶ When you insert the batteries, all icons on the LCD
display will light up for 3 seconds, you will hear a beep tone and the clock detects indoor temperature.
▶ Then the clock will enter the radio controlled time signal reception mode.
Projection function:
▶ Continuous projection is only possible by using the power adapter
When using the DC-adapter supply, touch the "SNOOZE/LIGHT" button can choose high brightness / low brightness / no backlight brightness. The projection will always work unless the projection switch is placed in the "OFF" position.
▶ Press the projection rotate button “” (on the back side) to turn the projection.
Backlight and Projection function Battery Mode
▶ Touch once “SNOOZE/LIGHT” button to activate backlight and projection for 8 seconds (the projection switch in “ON” position)
DC-adapter Mode
When using the DC-adapter supply, touch the "SNOOZE/LIGHT" button can choose high brightness / low brightness / no backlight brightness. The projection will always work unless the projection switch is placed in the "OFF" position.
natural_image
Diagram of an electrical device connected to a wall-mounted cable with a lightning bolt symbol (no text or labels present)Please note:
The projection distance is about 2 meters.
Reception of the Radio signal
The clock automatically starts the DCF signal search after any restart or changing of batteries. The radio
mast icon starts to flash.
▶ At 1:00 /2:00 / 3:00 am, the clock automatically carries out the synchronization procedure with the DCF signal to correct any deviations to the exact time. If this synchronization attempt is unsuccessful (the radio mast icon disappears from the display), the system will automatically attempt another synchronization at the next full hour. This procedure is repeated automatically up to total 5 times.
▶ To start manual DCF signal reception, press and hold down the “WAVE” button for two seconds. If no signals received within 7 minutes, then the DCF signal search stops (the radio mast icon disappears) and start again at the next full one hour.
▶ During RC reception, to stop searching radio signal, press the “WAVE” button once.
Please note:
▶ A flashing radio mast icon indicates that the DCF signal reception has started
▶ A continuously displayed radio mast icon indicates that the DCF signal was received successfully
▶ We recommend a minimum distance of 2.5 meters to all sources of interference, such as televisions or computer monitors
▶ Radio reception is weaker in rooms with concrete walls. In such circumstances, place the clock close to the window.
During the radio controlled clock signal receive mode, only the “SNOOZE” and “WAVE” button work, other buttons have no function. If you want to use other functions, please press “WAVE” button to stop the reception mode.
Manual time setting
▶ Press and hold down the “TIME” button for 2 seconds, the 12/24 hour mode display starts to flash. Now use “+” and “-” buttons to set the 12/24 hour mode.
▶ Press “TIME” button to confirm your setting, the time zone starts to flash. Use “+” and “-” buttons set the time zone (-12 to +12). For German time zone it is 0 and for UK it is -1.
▶ Press “TIME” to confirm your setting, the hour
display starts to flash. Use “+” and “-” buttons to set the hour.
▶ Press “TIME” to confirm your setting, the minute displays starts to flash. Now use “+” and “-” buttons to set the minute.
▶ Press “TIME” button to confirm your setting, the month and date icon display starts to flash. Now use “+” and “-” buttons to set the date display on Month/Date or Date/Month.
▶ Press “TIME” button to confirm your setting, the year display 2015 starts to flash. Now use “+” and “-” buttons to set the year.
▶ Press “TIME” button to confirm your setting, the month display starts to flash. Now use “+” and “-” buttons to set the month.
▶ Press “TIME” button to confirm your setting, the date display starts to flash. Now use “+” and “-” buttons to set the date.
▶ Press “TIME” button to confirm your setting, the language selection for the weekday displays starts to flash. Now use “+” and “-” buttons to select a language:
German, English, French, Italian, Spanish, Dutch, Danish
▶ Press “TIME” to confirm your setting and to end the setting procedures.
Please note:
▶ After 20 seconds without pressing any button, the clock switches automatically from Set Mode to Normal Time Mode.
Setting the daily alarms:
▶ Please toggle the alarm or switch to ON
position, LCD display the ① or icon accordingly,
the alarm function is ON. Toggle the an alarm switch to OFF position, the respective icon will disappear from the display, the alarm function is OFF.
▶ Press “ALARM” button once, to switch display to alarm time.
▶ Press and hold “ALARM” button for 2 seconds until hour of alarm ① starts to flash. Use the “+” and “-”
buttons to set the alarm hour.
▶ Press “ALARM” button to confirm your setting, the minute of alarm starts to flash. Use the “+” and “-” buttons to set the alarm minute.
▶ Press “ALARM” button to confirm your setting, the hour of alarm ② starts to flash. Use the “+” and “-” buttons to set the alarm hour.
▶ Press “ALARM” button to confirm your setting, the minute of alarm starts to flash. Use the “+” and “-” buttons to set the alarm minute.
▶ Press “ALARM” button to confirm your setting and to end the setting procedure.
Please note:
▶ After 20 seconds without pressing any button the clock switches automatically from setting mode to normal clock mode.
The alarm will sound for 2 minutes if you do not deactivate it by pressing any button. In this case the alarm will be repeated automatically after 24 hours.
▶ Rising alarm sound (crescendo, duration: 2 minutes) changes the volume 4 times whilst the alarm signal is heard.
Switching off the alarm signal
▶ Press any button except the “SNOOZE” button to stop the alarm signal. It is not necessary to reactivate the alarm. It switches itself automatically to the alarm time which has already been set.
Snooze function
▶ Touch the “SNOOZE” button the alarm signal sounds to get to snooze mode. Then Snooze
function is active and the ① or the ② icon is
flashing on the display. The alarm signal sounds again after the Snooze time that has been set.
Switching °C or °F
▶ Press once “-” button to switching the temperature unit in °C or °F.
SPECIFICATIONS
Supply voltage: 2.5\~3.3V
Battery: 2x 1,5V AAA LR03 (not incl.)
Adapter: DC 4.5V
Calendar range: 2000-1-1\~2099-12-31
Time zone: -12\~12Hr
Projection distance: 1.0\~2.0meter
IN Temperature measuring range:
-9°C\~50°C/14.2\~122°F (calibration time: 30sec.)
Temperature resolution: 0.1^ C/ ^ F
Temperature accuracy:
0^ 40^: ± 1^
-9.9^ -0^, 40^ 50^: ± 2^
FR1
natural_image
Simple line drawing of a trash bin with crossed lines indicating no waste or discharge (no text or symbols)natural_image
Diagram of an electrical enclosure connected to a wall-mounted device via cable, showing wiring and lightning symbol (no text or labels present)FR10
Remarque :
natural_image
Diagram of a device connected to a wall-mounted cable with lightning bolts (no text or symbols)natural_image
Simple line drawing of a trash bin with crossed lines indicating no waste or discharge (no text or symbols)natural_image
Diagram of an electrical device connected to a wall-mounted panel with a lightning bolt symbol (no text or labels present)Opgelet a.u.b.:
natural_image
Simple line drawing of a trash bin with crossed lines indicating no waste or discharge (no text or symbols)Nota:
natural_image
Diagram of a device connection showing cable routing and grounding (no text or symbols)Upozornění:
natural_image
Diagram of an electrical enclosure connected to a wall-mounted device via cable, showing wiring and lightning symbol (no text labels)Uwaga:
- Hinweis:
- Part B – Back button and power
- Part C – TOP Touch button
- Part D – side buttons
- Features:
- Environmental reception effects
- Precautions
- Batteries safety warnings
- Consideration of duty according to the battery law
- Initial operation
- Projection function:
- Backlight and Projection function Battery Mode
- DC-adapter Mode
- Please note:
- Reception of the Radio signal
- Manual time setting
- Setting the daily alarms:
- Switching off the alarm signal
- Snooze function
- Switching °C or °F
- SPECIFICATIONS
- Remarque :
- Opgelet a.u.b.:
- Nota:
- Upozornění:
- Uwaga:
Brand : Techno Line
Model : WT 546
Category : Alarm Clock