WT 745 - Alarm clock radio Techno Line - Free user manual and instructions
Find the device manual for free WT 745 Techno Line in PDF.


| Product Type | Alarm Clock Radio |
| Brand | Techno Line |
| Model | WT 745 |
| Dimensions (approx.) | 15.0 x 8.0 x 5.0 cm |
| Weight (approx.) | 250 g |
| Power Supply | AC adapter (included) or 2 x AAA batteries (backup) |
| Radio Bands | AM and FM |
| Alarm Functions | Dual alarm with radio or buzzer, snooze function (9 min) |
| Display | LED clock display with adjustable brightness |
| Other Features | Sleep timer, dimmer, battery backup for time & alarm |
| Buttons | Power, Snooze, Alarm Set, Time Set, Tuning, Volume +/- |
| Maintenance Instructions | Wipe with a dry soft cloth. Do not use liquids. |
| Safety Precautions | Do not expose to water or extreme temperatures. Keep away from children. |
| Spare Parts / Repairability | Spare battery compartment cover available. Unit is not user-serviceable; contact support. |
| General Information | 10-page user manual in English. Free download available. |
Frequently Asked Questions - WT 745 Techno Line
User questions about WT 745 Techno Line
0 question about this device. Answer the ones you know or ask your own.
Ask a new question about this device
Download the instructions for your Alarm clock radio in PDF format for free! Find your manual WT 745 - Techno Line and take your electronic device back in hand. On this page are published all the documents necessary for the use of your device. WT 745 by Techno Line.
USER MANUAL WT 745 Techno Line
Environmental recepon eects
The clock obtains the accurate me with wireless technology. Same as all wireless devices, the recepon is maybe acted by the following circumstances:
- long transming distance
• nearby mountains and valleys - near freeway, railway, airports, high voltage cable etc.
- near construcon site
• among tall buildings
• inside concrete buildings
• inside moving vehicles
• near electrical appliances (computers, TV's, etc) and metallic structures
Place the clock at a locaon with opmal signal, i.e. close to a window and away from metal surfaces or electrical appliances.
Precauons
- This main unit is intended to be used only indoors.
- Do not subject the unit to excessive force or shock.
- Do not expose the unit to extreme temperatures, direct sunlight, dust or humidity.
- Do not immerse in water.
- Avoid contact with any corrosive materials.
- Do not dispose this unit in a re as it may explode.
- Do not open the inner back case or tamper with any components of this unit.
Baeries safety warnings
- Use only alkaline baeries, not rechargeable baeries.
• Install batteries correctly by matching the polaries (+/-).
• Always replace a complete set of baeries. - Never mix used and new baeries.
- Remove exhausted baeries immediately.
- Remove baeries when not in use.
- Do not recharge and do not dispose of batteries in re as the baeries may explode.
- Ensure baeries are stored away from metal objects as contact may cause a short circuit.
- Avoid exposing baeries to extreme temperature or humidity or direct sunlight.
- Keep all baeries out of reach from children. They are a choking hazard.
Use the product only for its intended purpose!
Consideraon of duty according to the baery law

Old batteries do not belong to domesc waste because they could cause damages of health and environment. You can return used baeries free of charge to your dealer and collecon points. As end-user you are commied by law to bring back needed baeries to distributors and other collecng points!
Consideraon of duty according to the law of electrical devices
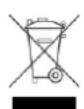
This symbol means that you must dispose of electrical devices separated from the General household waste when it reaches the end of its useful life. Take your unit to your local waste collecon point or recycling centre. This applies to all countries of the European Union, and to other European countries with a separate waste collecon system.
1. Features
1.1 Time - Radio Controlled Funcon Manual On/O funcon
- Dual Alarm funcon
- Perpetual Calendar Up to Year 2099
- Day of week in 8 languages user selectable
- P M -Indicator
1.2 Temperature - Indoor measurable range: -9.9^ +50^
- Measures °C / °F user selectable
2. Unit Appearance
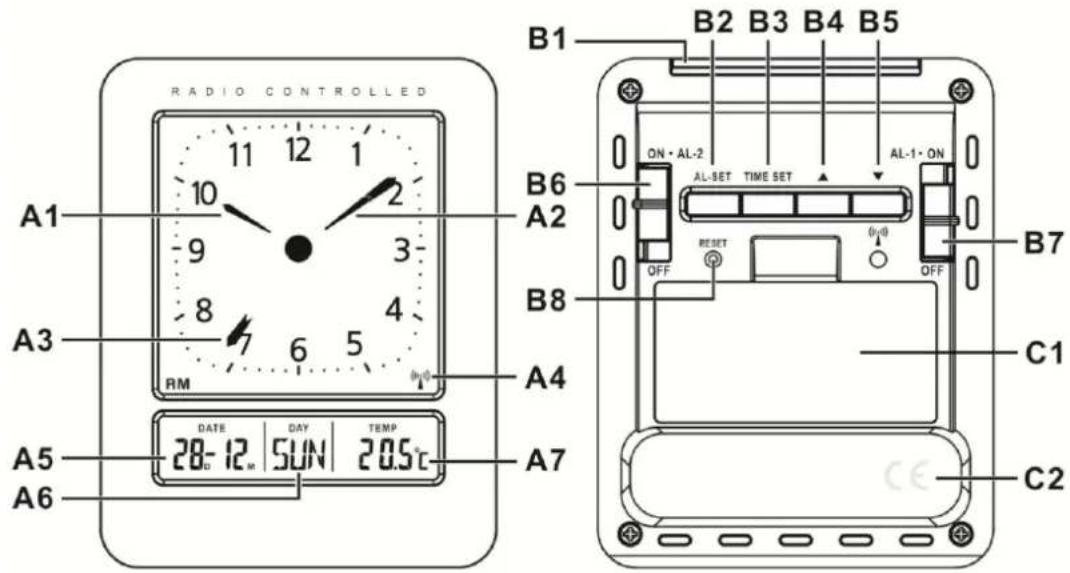
Part A-LCD
A1: Hour
A2: Minute
A3: Second
A4: Radio Control Icon
Part B-Buon
B1: "SNOOZE/LIGHT" Buon
B2: "AL SET" Buon
B3: "TIME SET" Buon
B4: "▲" Buon
Part C-Structure
C1: Baery Door
A5: Date
A6: Day of Week
A7: Temperature
B5: “▼” Buon
B6: "AL 2 ON/OFF" Slide key
B7: "AL 1 ON/OFF" Slide key
B8: "RESET" Buon
C2: Stand
3. Geng Started:
- Open baery Cover (C1)
- Insert 2 x AAA size baeries observing polarity [" +" and "- " marks]
- Replace baery compartment cover
- Place the unit onto at surface; the unit is ready for use now.
4. Time and Alarm Seng
4.1 Radio Controlled Time:
- Aer the start-up of the unit, the clock automacally starts to scan the DCF me signal. Radio Control Icon “(A4) ashes on LCD.
| (A4) ashes,Indicang now is receiving DCF signal | (A4) turns on,Indicang signal received successfully | (A4) disappear,Indicang signal recepon failed |
- The clock is automatically synchronized with the DCF radio signal every day at 2.00 am & 3.00 am to maintain accurate me keeping. If synchronizaon with the DCF radio signal fails, “” on LCD disappears and the clock then aempts to synchronize with the DCF radio signal at 4.00 am and 5am.
- The clock can be set to scan the radio signal manually by holding “ ^(1) ” buon (B5) for 3 seconds. Each reception takes around several minutes. If receptions fail, scanning stops. (“ ^(2) ” on LCD disappear) and repeats again on next full hour. E.g. scanning failed at 8:20a.m. It will scan again at 9:00a.m.
- Stop scanning DCF radio signal by holding “ ^(1) ” buon (B5) for 3 seconds.
- "DST" is shown on the LCD if it is in Daylight Saving Time Mode
4.2 Manual Time Seng:
- In me display, Press “TIME SET” buon (B3) to select to view :
Time & Date → Time & Year
- In me display, hold "TIME SET" buon (B3) for 3 seconds to enter Clock/Calendar seng Mode.
- Press “▲” (B4) or “▼” (B5) buon to adjust the seing and press “TIME SET” button (B3) to conrm each seng.
(By keeping the “▲” (B4) or “▼” (B5) buon pressed, could accelerate the process and reach the desired value more quickly)
- The seng sequence is shown as follow: RCC ON/OFF, 12/24 Time format for alarm me, Time Zone, Hour, Minutes, Year, Month, Date, Language of Weekday, C/F (unit of temperature seng)
- There are 8 languages, English, German, French, Spanish, Italian, Dutch, Polish and Czech, for day-of-week. The languages and their selected abbreviaons for each day of the week are shown in the following table.
| Language | Sunday | Monday | Tuesday | Wednesday | Thursday | Friday | Saturday |
| English, ENG | SUN | MON | TUE | WED | THU | FRI | SAT |
| German, GER | SON | MON | DIE | MIT | DON | FRE | SAM |
| French, FRE | DIM | LUN | MAR | MER | JEU | VEN | SAM |
| Spanish, SPA | DOM | LUN | MAR | MIE | JUE | VIE | SAB |
| Italian, ITA | DOM | LUN | MAR | MER | GIO | VEN | SAB |
| Dutch, DUT | ZON | MAA | DIN | WOE | DON | VRI | ZAT |
| Poland, POL | NIE | PON | WTO | SRO | CZW | PIA | SOB |
| Czech, CZE | NED | PON | UTE | STR | CTV | PAT | SOB |
Note:
(1) All Seng mode will automatically exit in around 15 seconds without any adjustment
(2) For Time Zone: If you receive no RC-DCF frequency signal, the time zone should be set to 00. Time Zone is used in countries which can received the DCF frequency signal but the me zone is dierent from German Time (i.e. GMT+1).
(3) If the temperature is out of the measurable range, LL.L (beyond the minimum temperature) or HH.H (beyond the maximum temperature) will be shown on the LCD.
(4) 12/24 me format is used for alarm me
4.3 Dual Alarm Seng:
- Press “AL SET” buon (B2), me of alarm 1 ashes, press “▲” (B4) or “▼” (B5) buon to adjust the alarm me. Press “AL SET” buon (B2) to conrm the seng and move to the setng of alarm 2, press “▲” (B4) or “▼” (B5) buon to adjust the me for alarm 2, press “AL SET” buon (B2) to conrm and exit the seng
4.4.1 Alarm funcon:
- Slide "AL 1" or "AL 2" switch to "ON" to acvate the ALARM 1 or ALARM 2 funcon, alarm me and alarm icon "((●))" appear on the display. Slide "AL 1" or "AL 2" switch to "OFF" to deacvate alarm funcon. Alarm icon " " disappears from the display.
4.4.2 Snooze Alarm Funcon:
- When alarm sounds, except "SNOOZE" buon, press any buons to stop the alarm. Otherwise, the alarm signal sounds for about 2 minutes, then stops automacally
- Press “SNOOZE/LIGHT” (B1) buon when alarm alerts. “flashes on the LCD. The alarm snoozes for around 4 minutes, then it alerts again. The snooze funcon can be enabled for maximum 8 mes.
6. Backlight
- Press "LIGHT" buon (B1), back light states for around 15 seconds.
- Environmental recepon eects
- Precauons
- Baeries safety warnings
- Consideraon of duty according to the baery law
- Consideraon of duty according to the law of electrical devices
- Features
- Unit Appearance
- Part A-LCD
- Part B-Buon
- Part C-Structure
- Geng Started:
- Time and Alarm Seng
- Radio Controlled Time:
- Manual Time Seng:
- Note:
- Dual Alarm Seng:
- Alarm funcon:
- Snooze Alarm Funcon:
- Backlight
Brand : Techno Line
Model : WT 745
Category : Alarm clock radio