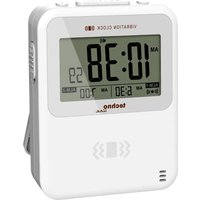
WT350 - Alarm clock radio Techno Line - Free user manual and instructions
Find the device manual for free WT350 Techno Line in PDF.


| Product Type | Clock Radio |
| Brand | Techno Line |
| Model | WT350 |
| Power Supply | 2 AA batteries (not included) |
| Display | LCD with backlight |
| Time Format | 12 or 24 hours |
| Time Zone | Adjustable from -12 to +12 |
| Day Languages | German, English, French, Italian, Dutch, Spanish, Danish, Russian |
| Alarms | 2 independent alarms |
| Alarm Mode | Sound or vibration |
| Alarm Volume | Low or high |
| Alarm Snooze | Yes, about 5 minutes, repeatable 7 times |
| Timer | Up to 39 hours 59 minutes |
| Stopwatch | Up to 39 hours 59 minutes 59 seconds |
| Backlight | Yes, key activation for 5 seconds |
| Reset | Reset button or battery removal |
| Intended Use | Domestic use |
| Maintenance and Cleaning | Dry cloth, avoid corrosive products |
| Precautions | Do not expose to water, extreme temperatures, shocks |
| Battery Safety | Use alkaline batteries, respect polarities, remove if not in use |
| Spare Parts | Not available, sealed device |
| Dimensions | Approximately 15 x 8 x 5 cm (estimated) |
| Weight | Approximately 200 g (estimated) |
Frequently Asked Questions - WT350 Techno Line
User questions about WT350 Techno Line
0 question about this device. Answer the ones you know or ask your own.
Ask a new question about this device
Download the instructions for your Alarm clock radio in PDF format for free! Find your manual WT350 - Techno Line and take your electronic device back in hand. On this page are published all the documents necessary for the use of your device. WT350 by Techno Line.
USER MANUAL WT350 Techno Line
Teil A - LCD
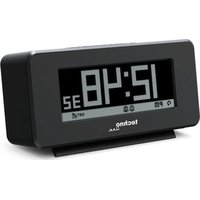
WT350 Vibration alarm clock - USER MANUAL
1. Feature
• Time from quartz clock
• Dual daily snooze alarm function
- Timer & stopwatch function
• Daily alarm alerts in vibration or alarm sounds.
2. Appearance
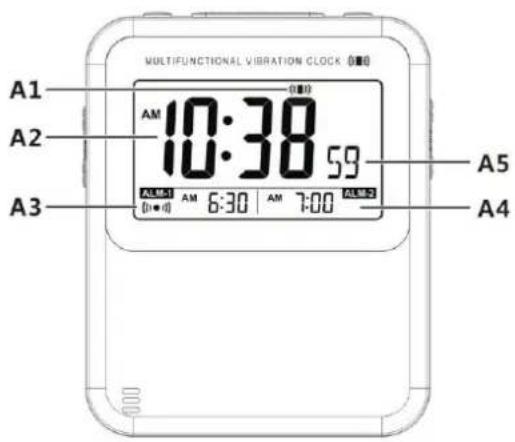
Part A - LCD
A1: Vibration icon
A2: Time
A3: Alarm time 1
A4: Alarm time 2
A5: Second/Day of week
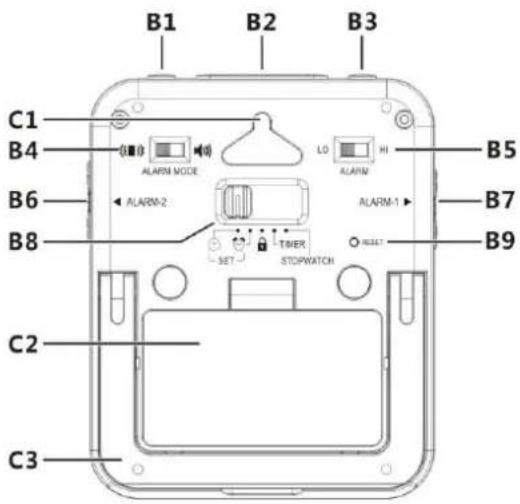
Part B - Button
B1: “+” button
B2: "SNOOZE/LIGHT" button
B3: "-" button
B4: Alarm mode slide switch
B5: Alarm volume slide switch
B6: Alarm 2 on/off slide switch
B7: Alarm 1 on/off slide switch
B8: Main switch: Function selection slide switch
B9: "RESET" button
Part C - Structure
C1: Hanging hole
C2: Battery door
C3: Stand
3. Getting started:
- Open battery compartment cover
- Insert 2 x AA batteries observing polarity [ “+” and “-” marks]
- Replace battery compartment cover.
4. Time and alarm setting
4.1 Time setting:
- In time display mode (main switch to 🔒), press “+” button (B1) to select to view the day of week or seconds. Press “-” button (B3) to select to view date and year.
- Slide main switch (B8) to “💡” to enter the setting of time and 24 Hr is blinking. Press the “+” or the “-” button (B1 / B3) to set 12-hour or 24-hour time display. Press the “SNOOZE/LIGHT” button to confirm and continue the setting.
- 00 TZ is blinking. Press the “+” or the “-” button (B1 / B3) to set a time zone from -12 to 12. Press the “SNOOZE/LIGHT” button to confirm and continue the setting.
- GER is blinking. Press the "+" or the "-" button (B1 / B3) to set weekday language. Press the "SNOOZE/LIGHT" button to confirm and continue the setting.
- The hour is blinking. Press the “+” or the “-” button (B1 / B3) to set the hour. Press the “SNOOZE/LIGHT” button to confirm and continue the setting.
- The minute is blinking. Press the "+" or the "-" button (B1 / B3) to set the minute. Press the "SNOOZE/LIGHT" button to confirm and continue the setting.
- The second is blinking. Press the “+” or the “-” button (B1 / B3) to set the second. Press the “SNOOZE/LIGHT” button to confirm and continue the setting.
- The 2018 Yr is blinking. Press the "+" or the "-" button (B1 / B3) to set the year. Press the "SNOOZE/LIGHT" button to confirm and continue the setting.
- The D and M are blinking. Press the “+” or the “-” button (B1 / B3) to set Date-Month or Month-Date display. Press the “SNOOZE/LIGHT” button to confirm and continue the setting.
- The month is blinking. Press the “+” or the “-” button (B1 / B3) to set the month. Press the “SNOOZE/LIGHT” button to confirm and continue the setting.
- The date is blinking. Press the "+" or the "-" button (B1 / B3) to set the date. Press the "SNOOZE/LIGHT" button to confirm and return to the beginning of this setting or slide the main switch (B8) to 🔒 to confirm the setting and return to normal time display.
Notes:
- At any time, slide main switch (B8) to 🔒 to confirm the setting and return to normal time display.
- Hold the “+” or the “-” button pressed to accelerate the setting process and reach the desired value more quickly.
- There are 8 languages for day of week: German, English, French, Italian, Dutch, Spanish, Danish and Russian. The languages and their selected abbreviations for each day of the week are shown in the following table.
| Language | Sunday | Monday | Tuesday | Wednesday | Thursday | Friday | Saturday |
| German, GER | SON | MON | DIE | MIT | DON | FRE | SAM |
| English, ENG | SUN | MON | TUE | WED | THU | FRI | SAT |
| Danish, DAN | SON | MAN | TIR | ONS | TOR | FRE | LOR |
| Dutch, NET | ZON | MAA | DIN | WOE | DON | VRI | ZAT |
| Italian, ITA | DOM | LUN | MAR | MER | GIO | VEN | SAB |
| Spanish, ESP | DOM | LUN | MAR | MIE | JUE | VIE | SAB |
| French, FRA | DIM | LUN | MAR | MER | JEU | VEN | SAM |
| Russian, RU | BC | NH | BT | CP | YT | NT | CE |
4.2 Alarm clock function:
4.2.1 Alarm setting
- Slide main switch (B8) to to enter the setting of alarm time.
- Alarm time of ALM-1 is blinking. Press the "+" or the "-" button (B1 / B3) to set the alarm time of Alarm 1. Press the "SNOOZE/LIGHT" button to confirm and continue the setting.
- Alarm time of ALM-2 is blinking. Press the “+” or the “-” button (B1 / B3) to set the alarm time of Alarm 2. Press the “SNOOZE/LIGHT” button to confirm and return to the beginning of this setting or slide the main switch (B8) to 🔒 to confirm the setting and return to normal time display.
Notes:
- At any time, slide main switch (B8) to 🔒 to confirm the setting and return to normal time display.
- Hold the “+” or the “-” button pressed to accelerate the setting process and reach the desired value more quickly.
4.3.2 Alarm alert modes
- Alarm could be set to alert in sound “◀◀◀” or vibration “◀◀◀◀” by alarm mode slide switch (B4).
- The alarm volume could be adjusted to lower volume or louder volume by slide switch (B5) on rear casing.
NOTE: When the alarm mode is set in vibration mode, we suggest to place the unit under the pillow. The unit might fall off while vibrating if it is placed on surfaces by stand.
4.3.3 Activate/Deactivate alarm and snooze alarm
- Slide alarm 1 or alarm 2 on/off slide switch (B6 / B7) to ON to activate alarm 1 or alarm 2 function, alarm icon “(10.0)” display.
- When alarm alerts or vibrates, icon “((●))” flashes, press “SNOOZE/LIGHT” button, alarm snoozes for around 5 minutes, then it alerts or vibrates again. Snooze Icon "Z" flashes on the LCD during the snooze time. This process can be repeated 7 times.
- Slide alarm on/off slide switch (B6 / B7) to OFF to deactivate alarm function. Otherwise, the alarm signal alerts or vibrates for about 3 minutes, then stops automatically.
5. Timer/stopwatch
5.1 Timer
Setting of timer
- Slide main switch (B8) to timer to enter to timer function.
- Press the “+” or the “-” button to adjust the timer value, and start countdown function by pressing “SNOOZE/LIGHT” button.
Press "SNOOZE/LIGHT" button again to stop it, and then press the "+" and the "-" button together to reset timer value to zero.
- When timer is counting down, hold the "+" or the "-" button to view the current time, and return to timer display by releasing "+" or "-" button
NOTE:
● Maximum countdown timer value is 39 hours 59 minutes
- Hold the "+" or the "-" button pressed to accelerate the setting process and reach the desired value more quickly.
Timer alarm
- When the timer counts to zero, the unit will sound or vibrate for around 3 minutes. Press any button to stop the alert sound or vibration, or slide main switch to exit timer function.
5.2 Stopwatch
- Slide main switch (B8) to stopwatch to enter to stopwatch function.
- Press "SNOOZE/LIGHT" button to start count up.
- When stopwatch is counting up, hold the "+" or the "-" button to view the current time, and return to stopwatch display by releasing "+" or "-" button
- Press "SNOOZE/LIGHT" button again to stop it and then press the "+" and the "-" button together to reset the stopwatch.
NOTE:
● Maximum stopwatch value is 39 hours 59 minutes 59 seconds
6. Backlight
- Press "LIGHT" button (B2), backlight will last for around 5 seconds.
7. Restart
- Use a pin to press the "RESET" (B9) button on the rear of the unit or reinstall the batteries in order to restart clock with default settings.
Precautions
- Do not subject the unit to excessive force or shock.
- Do not expose the unit to extreme temperatures, direct sunlight, dust or humidity.
- Do not immerse in water.
- Avoid contact with any corrosive materials.
- Do not dispose this unit in a fire as it may explode.
- Do not open the inner back case or tamper with any components of this unit.
Batteries safety warnings
- Use only alkaline batteries, not rechargeable batteries.
• Install batteries correctly by matching the polarities (+/-).
• Always replace a complete set of batteries. - Never mix used and new batteries.
- Remove exhausted batteries immediately.
- Remove batteries when not in use.
- Do not recharge and do not dispose of batteries in fire as the batteries may explode.
- Ensure batteries are stored away from metal objects as contact may cause a short circuit.
- Avoid exposing batteries to extreme temperature or humidity or direct sunlight.
- Keep all batteries out of reach from children. They are a choking hazard.
Use the product only for its intended purpose!
Consideration of duty according to the battery law

Old batteries do not belong to domestic waste because they could cause damages of health and
environment. You can return used batteries free of charge to your dealer and collection points. As end-user you are committed by law to bring back needed batteries to distributors and other collecting points!
Consideration of duty according to the law of electrical devices
This symbol means that you must dispose of electrical devices separated from the General household waste when it reaches the end of its useful life. Take your unit to your local waste collection point or recycling centre. This applies to all countries of the European Union, and to other European countries with a separate waste collection system.
Réveil vibreur WT350 – GUIDE D'UTILISATION
1. Caractéristiques
Partie A - LCD
Parte A - LCD
Deel A - LCD
Parte A - LCD
Część A - LCD
- Teil A - LCD
- WT350 Vibration alarm clock - USER MANUAL
- Feature
- Appearance
- Part A - LCD
- Part B - Button
- Part C - Structure
- Getting started:
- Time and alarm setting
- Time setting:
- Alarm clock function:
- Alarm setting
- Notes:
- Alarm alert modes
- Activate/Deactivate alarm and snooze alarm
- Timer/stopwatch
- Timer
- Setting of timer
- NOTE:
- Timer alarm
- Stopwatch
- Backlight
- Restart
- Precautions
- Batteries safety warnings
- Consideration of duty according to the battery law
- Réveil vibreur WT350 – GUIDE D'UTILISATION
- Caractéristiques
- Partie A - LCD
- Parte A - LCD
- Deel A - LCD
- Część A - LCD
Brand : Techno Line
Model : WT350
Category : Alarm clock radio