
SO 6-BS - Solar lighting EINHELL - Free user manual and instructions
Find the device manual for free SO 6-BS EINHELL in PDF.

| Product type | Solar lighting set with portable fluorescent lamp |
| Brand | Einhell |
| Model | SO 6-BS |
| Category | Solar lighting |
| Fluorescent lamp | 18 W |
| Mains power supply | 230 V / 50 Hz |
| Solar power supply | Solar module 12 V / 6 W |
| Rechargeable battery | 6 V / 4 Ah |
| Charge input | 9 - 18 V / max. 500 mA |
| Mains charging time | 12 hours |
| Solar charging time (full sun) | Approx. 10 hours |
| Run time per full charge | Approx. 4 hours |
| Connection cable length | 5 m |
| Battery protection | 1 A slow-blow fuse |
| Overcharge protection system | Integrated for the battery |
| Operating modes | Portable lamp, emergency lamp, fixed lighting, automatic activation in darkness |
| Brightness sensor | Solar module acting as sensor |
| Charge indicators | Green LED "CHARGE" and red LED "FULL" |
| Wall mounting possible | Yes, with the provided retaining bracket |
| Included accessories | Solar module, aluminium retaining bracket, 5 m cable, fluorescent lamp |
| Spare parts | Fluorescent lamp (18 W), fuse (1 A slow-blow) |
| Maintenance | Clean with a dry cloth, store in a dry frost-free place |
| Safety | Protect the lamp from rain; disconnect before any service; do not charge simultaneously from mains and solar |
| Warranty | 12 months from date of purchase |
Frequently Asked Questions - SO 6-BS EINHELL
1. Via mains: plug the power cable into a 230 V / 50 Hz socket. The green LED CHARGE lights up, and after 12 hours, the red LED FULL indicates a full charge.
2. Via the solar module: connect the solar module to the solar charge input. In full sun, a full charge takes about 10 hours.
User questions about SO 6-BS EINHELL
0 question about this device. Answer the ones you know or ask your own.
Ask a new question about this device
Download the instructions for your Solar lighting in PDF format for free! Find your manual SO 6-BS - EINHELL and take your electronic device back in hand. On this page are published all the documents necessary for the use of your device. SO 6-BS by EINHELL.
USER MANUAL SO 6-BS EINHELL
These instructions are designed to acquaint you the special features and mode of operation of the Solar Lighting Set SO 6-BS. Please read the contents carefully as we cannot accept any liability for damage caused by failure to observe the instructions.
You should read the instructions even if you have arranged for the equipment to be installed by someone else.
2. Items supplied
- Fluorescent lamp (1 unit)
Aluminium bracket (1 unit)
Power cable 5m
Solar module 12V / 6W (1 unit)
3. Technical data
Fluorescent lamp: 18W
Charging the fluorescent lamp: Mains: 230V 50Hz
or
Module: 12V / 6W
Storage battery: 6V / 4Ah
Charging input: 9 - 18V / max. 500mA
Caution! Protect the fluorescent lamp from the rain!
4. Choice of uses
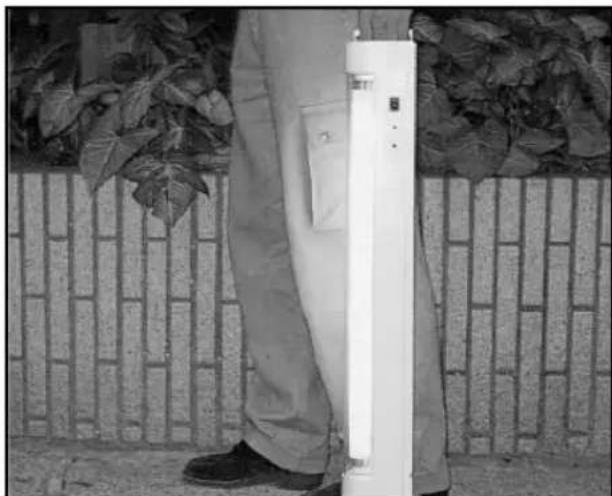
A. As a portable lamp for camping, workshops, professions, etc.
Pull out the handle. The appliance can be stood in upright or lying position on a level surface. Use the switch to turn the lamp on and off.
B. As an automatic emergency lamp in the event of a power failure
The mains charger has to be plugged in the socket-outlet and the switch turned to "ON". The lamp switches on automatically as soon as the mains voltage drops. When the mains voltage returns, the lamp goes out again and the storage battery is charged.
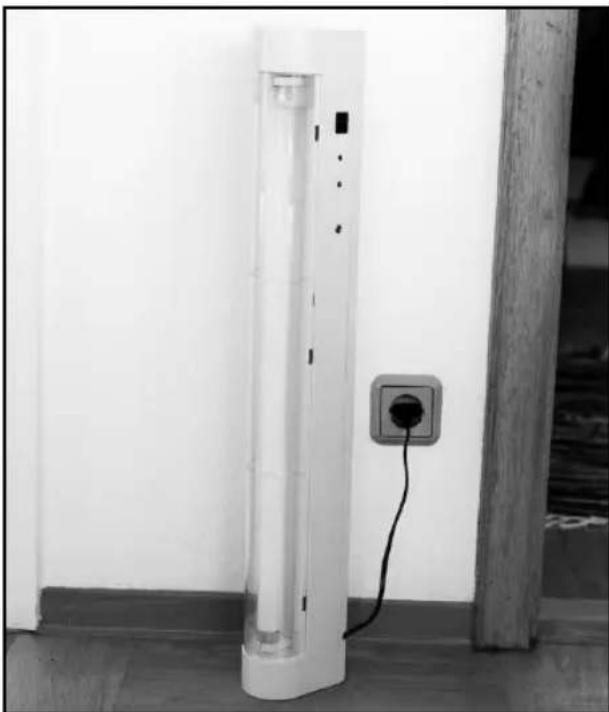
C. As lighting for the home, garage, summer house or camp-site
In this case the lamp is connected to neither the solar module nor the mains.
The lamp can be fitted to the ceiling or wall with two screws set 50~cm apart. Use the "ON/OFF" switch to turn the lamp on and off.
The lamp's battery must then be recharged as explained in section 6, "Charging options".
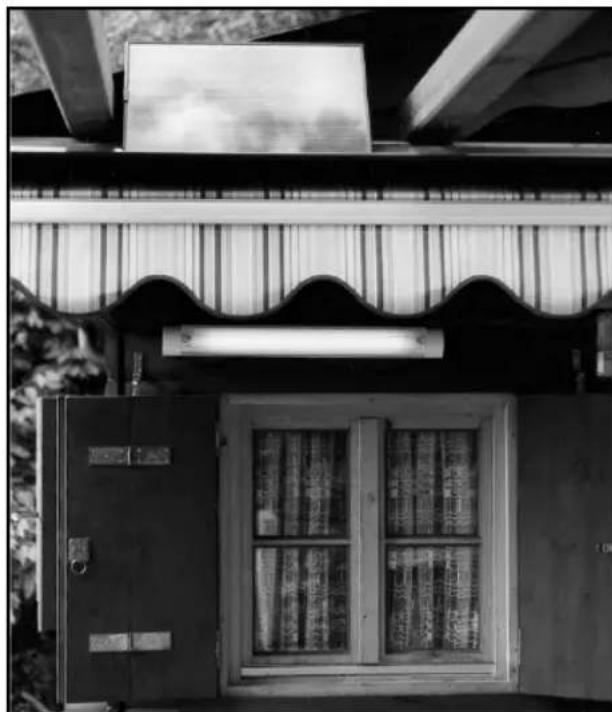
D. As a lamp which switches on automatically in the dark (only in conjunction with the solar module)
The solar module, which also performs the function of a light sensor, has to be connected in order for the lamp to switch on automatically in the dark. Make sure the ON/OFF switch is turned to ON. The lamp then comes on automatically when darkness falls and goes off again when the storage battery is empty. Next day the battery will be recharged by the solar module.
GB
6. Charging options
Charging the lamp via the built-in power supply unit
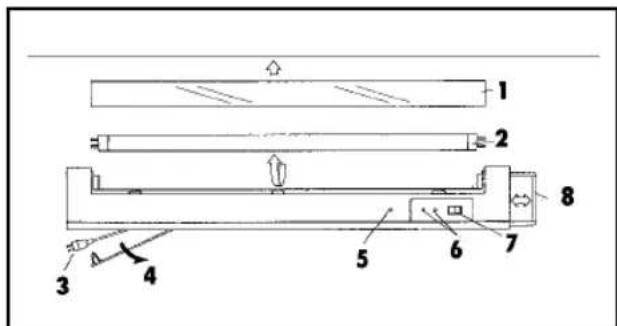
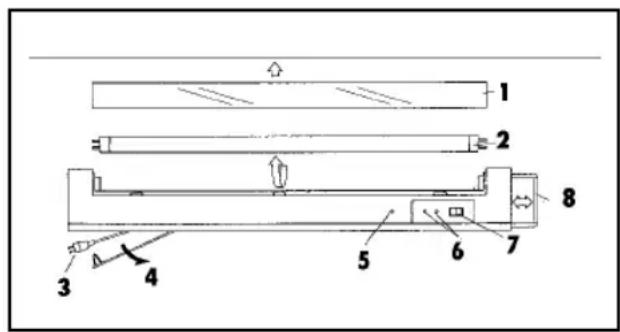
1 transparent guard hood
2 18W fluorescent tube
3 power cable
4 power cable lid
5 solar charging socket
6 charging monitor
7 ON/OFF switch
8 handle
- Open the lid for the power cable at the bottom of the lamp, pull out the power cable and plug it in a socket-outlet (230V 50Hz)
-
The green LED, "Charge" indicates that the storage battery is being charged.
-
When the red LED "Full" lights up, the battery is fully charged. It takes about 12 hours to charge the battery via the built-in power supply unit. An integrated overcharge cut-out makes sure that the battery is not overloaded, i.e. the battery can be left connected for longer than 12 hours without suffering any damage.
Charging via the solar module
Installing the solar module and making the connections
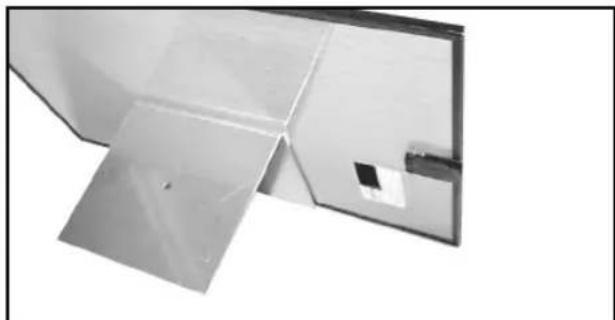
Choose a position for the solar module that lies within reach of the power cable and which ideally faces "south". A bracket is supplied to help you fix the module in position. Adhesive tape can be used to secure the module to the bracket. The solar module is a fragile component - install it with care and protect it from mechanical loads! A damaged solar module cannot be repaired but has to be disposed of in an environmentally responsible manner. The power cable plug is simply inserted in the socket on the back of the module.
Caution! The plug is non-reversible. Use no force when inserting!
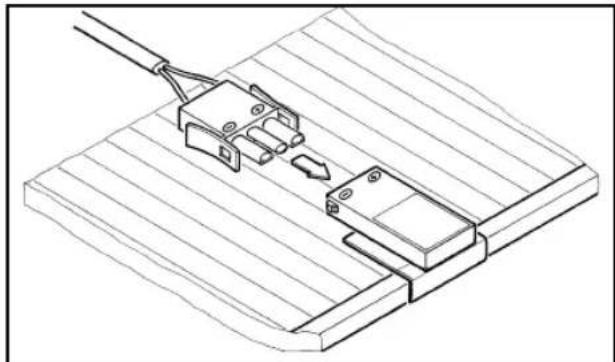
Connecting the lamp
Plug the lead from the solar module in the solar charging socket.
As soon as the solar module begins to supply enough current, the green LED "Charge" lights up and the storage battery is charged. Charging time depends on the amount of sunlight. In full sunlight the supplied solar module takes about 10 hours to fully charge the battery.
The red LED "Full" lights up when the battery is fully charged. A fully charged battery can produce about 4 hours of light.
Caution! Never charge the storage battery simultaneously from the mains and the solar module! The built-in electronics may be destroyed.
1 transparent guard hood
2 18W fluorescent tube
3 power cable
4 power cable lid
5 solar charging socket
6 charging monitor
7 ON/OFF switch
8 handle
7. Transport clip
To prevent the lamp from being switched on accidentally in transit, a clip is fitted over the ON/OFF switch. Remove this clip before using for the first time.
8. Replacing the fuse
Each time before changing a fuse, be sure to disconnect the lamp from the mains or the solar module.
A fuse is fitted to the bottom of the lamp in order to protect the battery from overloading. Always replace the fuse with one of identical rating (1A slow).
9. Replacing the fluorescent tube
To replace a defective fluorescent tube, switch off the lamp and then disconnect it from the mains or the solar module. Wait approx. 5 to 10 minutes for the tube to cool before replacing it. Undo the fixing screw in the transparent guard hood and remove the hood.
Twist the tube through 90^ and take it out. Install the new tube in reverse order. Then refit the guard hood and fasten it in position with the fixing screw.
10. Faults
If the lamp fails to work, check the following points: Is the battery fully charged?
Use the power cable to connect the lamp to a mains socket-outlet. The green LED "Charge" should light up. If it does not, check the fuse at the bottom of the lamp (see the section "Replacing the fuse").
11. Additional points to note
The lamp is designed for lighting jobs in the private sector.
Protect the lamp from moisture.
Do not expose the lamp to the rain.
When the lamp is not being used it should be stored in a frost-proof and dry room. Before opening the lamp, be sure to pull out the mains plug or disconnect the lamp from the solar module.
The solar module is weather-resistant and winterproof.
12. Ordering replacement parts
If you ever need a replacement part, please quote the following details:
-Type of unit
Article number of the unit
ID number of the unit
Replacement part number of the item required
F
1. Introduction
6. Possibilities de charge
The guarantee period begins on the sales date and is valid for 1 year.
Responsibility is assumed for faulty construction or material or functional defects.
Any necessary replacement parts an necessary repair work are free of charge.
We do not assume responsibility for consequential damage.
Your customer service partner
GARANTIE EINHELL
15 Warwick House Ind. Park, Banbury Road,
Sautham, Warwickshire CV 33 OPS
FAgence Commerciale Kettering
DK Danish Trading Co. Silkeborg ApS
Rodelundvej 11 - Rodelund
DK-8653 Them
Technical changes subject to change
O kataokevaotc diatnpel to ikaiwa TExvikw alayaw