USER MANUAL DOD209 LIVOO
natural_image
Glass water heater with digital display and control panel (no visible text or symbols)
Ô
Livoo
VürsiãÈô:ôí.â.0ôôôôô
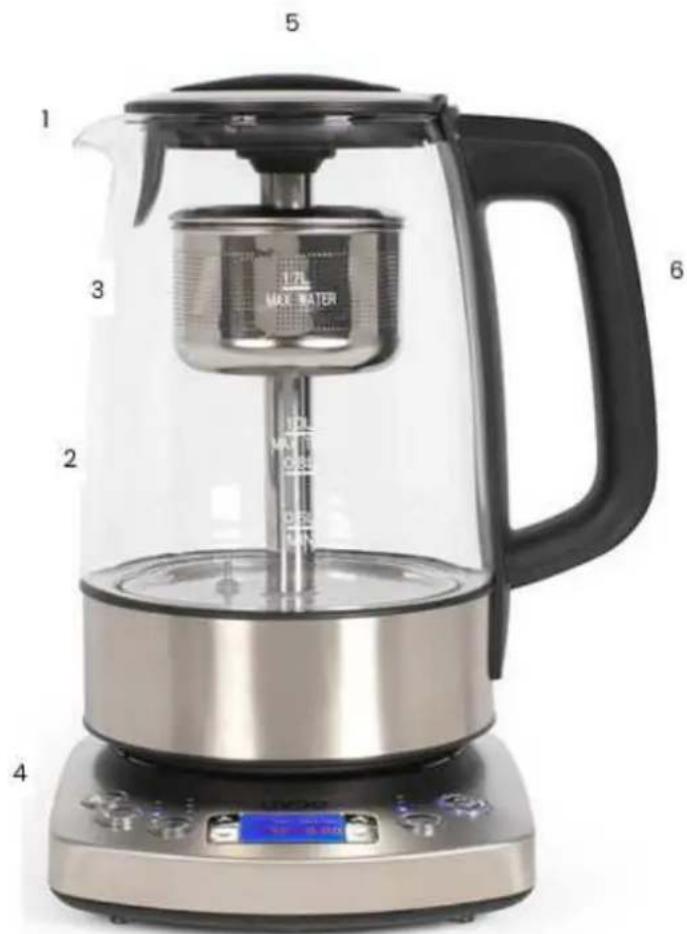
Figure 1
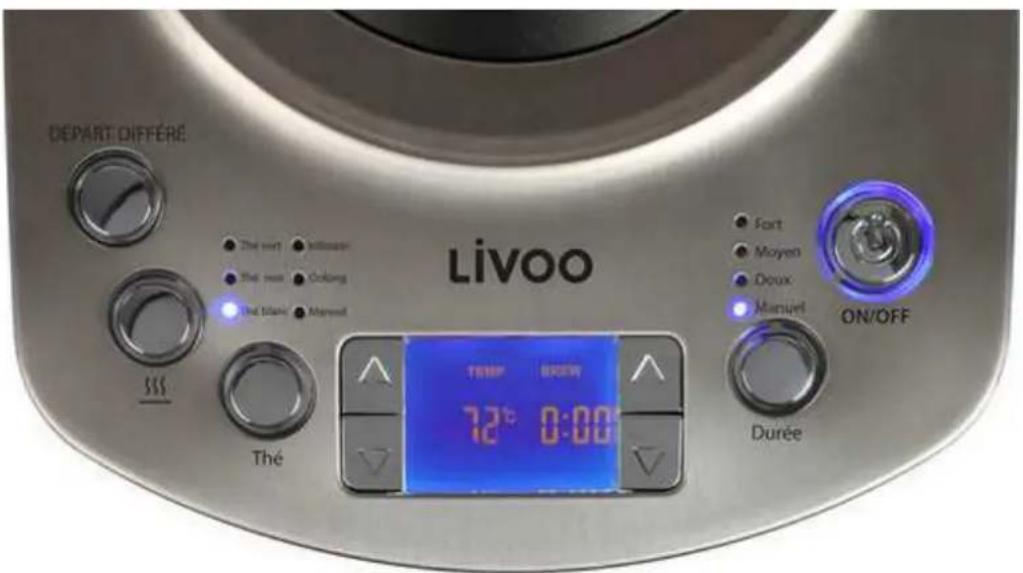
Figure 2
Protection anti-ébullition
natural_image
Symbol of a trash bin crossed with no text or labels, accompanied by a black rectangular block below (no readable text or symbols)
Thank you for choosing a Livoo product!
"our •lender, your •ar•ecue, and your „eadp„ones are not just o•jects, t„ey are extensions of yourself, allowing you to get closer to your friends and family, to •ring t„em toget„er, to laug„ and to s„are experiences. Livoo's aim is to „elp you live your life to t„e fullest, w„atever wis„es you „ave t„roug„out t„e year. Winter raclette, summer •ar•ecue. Or t„e ot„er way around. It's up to you. Take advantage of t„is freedom for feel good moments every day."
T„at's w„y we're constantly innovating and creating clever products full of zest, •ut most of all, accessible. Find our entire collection on our we•site www.livoo.en.
Livoo, your daily companion till social networks

@Lilāāo

@lilāāuāββiòiǔ

@Lilāā õ
çafety Ánstructions
Plüasü,ôÃaòüôÃiùüôÃãôrüaäöëüllôÃ,,üõiÈsÃrÂöÃiaÊôs,,üüÃô•üßârüôÃ,,üôßirsÃôAsüôaÉäöòüüÉôÃ,,üùôßârôaôßÃÃ.
AôûisÁsüôãßôÃ,„üôaÉÉliaÈöüôõaÈôäaùaÜüóiÃôârô,„ÁrÃôÃ,„üôÁsûr.ôAssÁrüôÃ,„aÃôyãÂôÁsüôÃ,„üôaÉÉliaÈöüôßârôÃ,ßârôë,„iö,°iîÃisôäüsiÜÈüä.ôWüôrüßÁsüôaÈyôrüsÉãÈsi•iliÂiüsôasôßârôÃ,„üôäaùaÜüsô•yôaÊóiÈöârrüöÃôÁsüôârôaçùaÈiÉÍAlaÃiâÈ.ô
â. èüßãrüôôÁsüôôö„üöòôôÄaÃôôÄüôôíãlÃaÜüôôãßôôãÁÃlüÃôöãrrüsÉãÈäôÃãôÄüôraÃüäôíãlÃaÜüôùaÈÈür
- ΑΕÉliaÈöüsôöaÈô•üôÁsüäô•yôÉürsãÈsôëiÄôrüäÁöüäô É„ysiöal,ôsüÈsãryôârôùüÊÃalôöaÉa•iliÃiüsôârôlaöòôc üxÉüriüÈöüôôaÈäôôòÈäëlüäÜüôóißôôÄüyôô„aÍüôô•ÜiÍüÈôôsÁÉüríisiãÈôôârôóiÈsÃrÁöÃiaÈôôõãÈöürÉiÈÜôô âßôôÄüôôaÉÉliaÈöüôóiÈôôaôôsaßüôôëayôôaÈäôóií ÁÈäürsÃaÈäôÄüô„azaräsóiÉíálíüä.ô
ê. T,,isô aÉÉliaÈöüô õaÈô •üô Ásüäô •yô ö,,ilärüÈô aβrãùô8ôyüarsôaÈäôa•ãlíüôißôÃ,,üyô,,alíüô•üüÈôÜílüÈâsÁÉüríisiãÈôãrõiÈsÃrÁöÃiãÈô öäÈöürÈiÈÜôÁsüôãßô Ã,,üaÉÉliaÈöüô iÈô aô saßüô ëayô aÈäôißô Ã,,üyô ÁÈäürsÃαÃ,,üô ,,azaräsô iÉÍãlíüä.ô ClüaÈiÈÜô aÈäô ÁsûrôùaiÈÃüÈaÈöüôôs,,allô ÈãÃôô•üôôùaäüôô•yôôö,,ilärüÊÁÈlüssôÃ,,üyôarüôãläürôÃ,,aÈô8ôaÈäôsÁÉüríisüä.ôKüüÃ,,üô aÉÉliaÈöüô aÈäô iÃsô öârääô âÃÂô âßô rüaö,,çö,,ilärüÈôaÜüäölüssôÃ,,aÈô8ôyüars.ô
- C,,ilärüÈôs,,allôÈãÃôÉlayôëiÃ,,ôÃ,,üôaÉÉliaÈöü.ôô
- T„üôôaÉÉliaÈöüôôùÁsÃôôÈãÃôô•üôôiùùürsüä.ôô»ülüré ÉlaöüôiÃóiÈÃõ„üôäis„ëas„ür.ô
- »ülírôlüÃôÃ,„üôùaö,,iÈüôãÉüraÃüôë,,ilüôÁÈaÃÃüÈäüä.ô
- IßôÄüôsÁÉÉlyôöãrãôisôäaùaÜüä,õiÃôùÁsÃô•üô rüÉlaöüäô•yôÄüôùaÈÁßaöÃÁrür,õiÃsôsûríöüôaÜüÈà arôsiùilarlyôôÁalißiüäôÉürsãÈsõiÈôãräúrôÃãôalãiaõc „azarãô(*).ôô
- »ülürôÁsüôÃ,„üôaÉÉliaÈöüôãÁÃäããrsôaÈäôalëaysô ÉlaöüõiÃõiÈôaôäryôüÈírãÈùüÈÃ.ô
- AlëaysôrüùãlíüôÃ,,üôÉlÁÜôßrãùôÃ,,üôsãöòüÃîÈôõasü
ãßôaÈyôùalßÁÈöÃiãÈ,ô•üßãrüôßilliÈÜôãrôaßÃürôÁsü
•üßãrüôölüaÈiÈÜ.ô
â0. DãôÈãÃôallãëôÄüôaÉÉliaÈöüôãrõiÃsôsÁÉÉlyôöãrãôÃãÁö„ô„ãÃôsÁrßaöüsôãrôÃãôõãùüõiÊããôõãÉãaoÃôaÈyô„üaÃôsãÁröüs.ô
ââ. TãôrüäÁöüôÄüôrisòôãßôülüöÃriöôs„ãöò,ôÈülûrôãÉiÄisôÉrãäÁöÃöëiÄôëüÃô„aÈäs.ô
â2. »ülürôÃãÁö„ôÄüô„ãÃôsÁrßaöüôãßôÉrãäÃöÃ.ôUsüô„„aÈälüôãÈlyôãrôÄüô•ÁÃÃãÈ.ô
âê. »ülürôÂÈÉIÁÜôãrôùãlíüôÃ,„üôaÉÉliaÈöüô•yôÉÁlliÈÜô
Ã,,üô õãrä.ô Dãoô ÈãÃô ëiÈäô Â,,üô õãräô arãÂÈäô í
aÉÉliaÈöüôãrôÃëisÃõiÃô
â4. SÃaÈäôÃ,,üôaÉÉliaÈöüôãÈôaôsÃa•lü,ôßlaÃôsÁrßaöü.
â5. »ülürô lüÃô Ã,,üô öäräô âßô Ã,,üô òüÃÃlüô ßrãùô
pending.
-
Never use your kettle wit,,out water in it. Only use fres,, and cold water.
-
Please o-serve t,,e minimum and maximum water levels indicated on t,,e kettle. Do not use your kettle in case of overflowing.
-
Never put t,,e jug in an oven (including microwave oven) to warm up water.
-
Do not forget t„at t„e temperature of water prepared is „ig„„ andle wit„ care t„e jug to avoid scalding.
-
T,,e appliance is only to •e used wit,, t,,e stand provided.
-
Always set any control to "off" •efore unplugging from t,,e socket.
-
Make sure t,,e am·ient temperature is a·ove 0°C, ot,,erwise t,,e appliance does not function properly.
-
Always descale t,,e appliance regularly to ensure optimum performance and prevent malfunction.
-
Make sure t,,at t,,e appliance completely cooled down •efore cleaning.
-
T,,is kind of appliance cannot worked continuously, it is not a professional type of appliance. It is necessary to make temporary
stops.
-
It is a•solutely necessary to keep t_,, is appliance clean at all times as it comes into direct contact wit, food.
-
Regarding t,,e instruction for cleaning surfaces in contact wit,, food t,,anks to refer to t,,e •elow paragrap,, "cleaning" in manual.
-
T,,e appliance is not intended to •e operated •y means of external timer or separate remote control system.
-
Never used t,,e appliance :
-
If t,,e power cord is damaged
- In case of •ad operation
- It „as • een damaged in any manner
- It „as • een su•merged in water
-
If you dropped it
-
Unwind t,,e cord of its flat to avoid t,,e super,,eating of t,,e appliance.
-
T„e guarantee can only cover t„e manufacturing defect and „ouse„old use. All deterioration resulting of failure to respect t„e safety instruction are not cover •y t„e guarantee.
-
Never try to open t,,e casing yourself.
-
Warning: Potential risk of injuries from misuse.
-
Heating element surface is subject to residual
„üαÃôαßÃürôÁsüô
ê5. °ÈlyôÃ,,üôaÉÉrãÉriaÃüôõãÈÙöÃärôùÁsÃô•üôÁsüä.ô
ê6. D°ô»°TôrüùãlíüôÄüôliäôë„ilüôÄüôëaÃûrôisô•ãiliÊÜ.ô
ê7. ÎßôôÄüôôòüÃÃlüôôisôôãírßillüä,ô •ãiliÈÜôôëaÃûrô üÖüöÃüä.ô
ê8. WarÈiÈÜ:ôAíãiaãôsÉillaÜüôãÈôÃ,,üôöãÈÈüöÃâr.ô
ê9. IÈsÁrüôÄαÃôÄüôaÉÍliaÈöüôisôsëiÃö„üäôãßßô•üßãí rüùãlíÈÜîiÃôßrãùôiÃsôsÃaÈä.ô
40. WAR»I»û:ôDãôÈãÃôÁsüôÄüôaÉÉliaÈöüõißôÄüôsÁrßc isôöraöòüä.ô
4â. T,,isôôaÉÉliaÈöüôôisôôiÈÃüÈäüäöôÃãôô•üôôÁsüäôôi
„ãÁsü„ãlääôaÈäôsiùilarôaÉÉliöaÃiãÈsôsÁö„ôas:ô
• sÃαßßôòiÃö„üÊôarüasôiÈôs„ãÉs,ôãßßiöüsôaÈäôãÃ
ëâròiÈÜûüÉlírãÈùüÈÃsô
- Barùô,,ãÁsüsô
• yôöliüÈÃsôiÈô,,ãÃüls,ôùãÃülsôaÈäôãÃ,,ürôô rüsiäüÈÃialôÃyÉüôüÉlírãÈùüÈÃsô
• •üäôaÈäô•rüaòßasÃôÃyÉüôüÈlírãÈùüÈÃsô
Technical Specifications
220-240V\~ 50-60Hz 1850-2200W
Before using for the first time
Prior to initial use, clean it •y going t,,roug,, several •oiling cycles, using clean water wit,, eac,, cycle and filling t,,e kettle to its upper marking.
Note: t,,e maximum capacity for •oiling water is 1.7L, and t,,e maximum capacity and minimum capacity for •rewing tea is 1L and 0.5L respectively. Ensure t,,at t,,e lid is firmly in place •efore plugging t,,e power outlet
Press t,,is •utton to start or stop working mode.
During working, t„e "DEPART DIFFERE" • utton, tea • utton and t„e "Durée • utton" are invalid.
Press t,,e " " button, t,,e appliance will enter into keep warm mode. Press it again to exit.
To select t„e •rewing time, press t„e Durée •utton.
Type of tea and t,e corresponding temperatures:
Green: t,,e temperature of water s,,all · e 80°C +/- 5°C.
Black: t,,e temperature of water s,,all ·e > 96°C.
White: t, e temperature of water s, all • e 85°C +/- 5°C.
Herbal: t,e temperature of water s,all •e > 96°C.
Oolong: t,e temperature of water s,all • e 90°C +/- 5°C.
Custom: t, e temperature of water s, all ·e > 96°C, ot, ers are +/- 5°C.
It's used for selecting t„e strengt„ of tea, and t„e corresponding •rewing time for eac„ tea strengt„ is as following.
| Type of tea | Strong | ,,edium | ,,ild Custom |
| Green 4 mins | 3 mins | 2 mins 0-10 mins | |
| Black 3 mins | 2 mins | 2 mins 0-10 mins | |
| W,,ite 4 mins | 3 mins | 2 mins 0-10 mins | |
| Her•al 5 mins | 4 mins | 3 mins | |
| Oolong 4 mins | 3 mins | 2 mins 0-10 mins | |
Press t„e "Départ différé" •utton, its corresponding indicator illuminates in •lue, t„e LCD display turns on and indicates t„e "Current time" and "Auto-start time", t„en press t„e "ON/OFF •utton to activate t„e "Départ différé" function. To exit from t„e "Départ différé" working mode, press any •utton except t„e "ON/OFF" •utton or " " button.
üote: Do not fill t„e water over t„e maximum level, as water may spill out of t„e spout w„en • oiling.
üote: t„e appliance is equipped wit„, a power •ase w„ic„ can •e rotated 360 °.
Óunction
BßÁL WAõzà
Open t,,e kettle lid and fill t,,e kettle wit,, appropriate amount of water, t,,en close t,,e lid.
Put t„e kettle •ody on t„e power •ase, connect wit,, t„e power source, t„e “Brewing temperature” s„own in t„e LCD display is 100°C, and t„e “Brewing time” is 0:00. Set t„e temperature using t„e arrows on t„e left of t„e LCD screen. After finis„ing setting, press “ON/OFF” •utton, t„e appliance starts to work, t„e indicator of “ON/OFF” •utton illuminates in •lue.
W, en t, e temperature reac, es t, e selected temperature, a •eep could •e ,eard, t, e appliance will stop working, t, e indicator of "ON/OFF" •utton will turn off and t, e LCD display will extinguis, after 15 seconds, t, en t, e appliance enters into stand•y mode. (•efore t, e water •oiled, if you press on/off •utton again, t, e electric kettle stops working)
BàzW õzA
Open t,,e kettle lid and add some tea leaves into t,,e •rewing and fill kettle wit,, appropriate amount of water, t,,en close t,,e lid.
Put t„e kettle •ody on t„e power •ase, connect wit„t„e power source.
- Press t„e "Tea" •utton to select your desired type of tea. If you are not using t„e predefined setting press t„e "Temperature setting •uttons" to set t„e •rewing temperature, and t„e LCD display will indicate t„e set •rewing temperature.
- Press t„e "Durée" •utton to select your desired tea strengt„, w„en setting t„e strengt„ of tea, t„e LCD display will indicate t„e set •rewing time.
- Finally, press "ON/OFF" •utton, t„e appliance starts to •oil water and t„e indicator of "ON/OFF" •utton illuminates in •lue. W„en t„e temperature reac„es t„e set temperature, t„e •rewing •asket will go down into t„e water for •rewing t„e tea, and t„e •rewing time will start to count down. W„en t„e •rewing time is "0:00", t„e •rewing •asket will go up automatically, t„ree long •eeps can •e „eard, t„e appliance will stop working, t„e indicator of "ON/OFF" •utton will turn off and t„e LCD display will extinguis,, after 15 seconds, t„en t„e appliance will enter into stand•y mode. (During working, if you press On/off •utton again, t„e electric kettle stop working)
AUß-çõAàõ ÓUüóõÁßü
After c„oosing your •rew type (water or tea according to t„e explanation a•ove), „old and press t„e “Départ différé” •utton for 3 seconds: its corresponding indicator illuminates in •lue, and t„e LCD display indicates t„e “Current time” and “Auto-start time”.
Press t„e “arrow •uttons” on t„e left side of t„e LCD screen to set current time, and press t„e “arrow •uttons” on t„e rig„t side of t„e LCD screen to set t„e auto-start time. A.M. are t„e „ours from midnig„t to noon, P.M. are t„e „ours from noon to midnig„t. T„e time cycle is 12H, not 24H
T, en press t, e "ON/OFF" •utton to enter into t, e auto-start working mode. At t, at time, t, e indicator of t, e "ON/OFF" •utton illuminates in •lue; t, e LCD display lig, ts solidly. T, e current time starts to count up until it reac, es t, e auto-start time, t, en t, e tea-•rewing function is activated and t, e appliance will enter into stand·y mode after finis, •rewing.
äzzÜ WAà,, \\\\
Press “” button before finishing brewing, the appliance enters into the keep-warm mode after finishing brewing, at that time, it’s corresponding indicator illuminates in blue; the keep-warm temperature is ≥ 60°C, and the keep-warm time is 30 minutes.
BßÁL-DàY Üàßőzóő
Should you accidentally let the kettle operate without water, the boil-dry protection will automatically switch off the power. If this occurs, allow the kettle to cool before filling with cold water before re-boiling.
óleaning and maintenance
Make sure the appliance is unplugged from the supply socket and fully cooled down before cleaning. To clean the exterior surfaces, slightly wipe over with a soft damp cloth and dry thoroughly.
To clean the inner walls of the kettle, use a soft damp cloth or a soft brush to remove the residues. Note: Never use abrasive product. Never immerse the jug kettle or its base in water. Dish washer forbidden.
The appliance has to be descaled regularly to ensure optimum performance. The frequency depends on the water hardness and the boiling frequency.
If you begin to notice the increase of the noise during boiling, or if the kettle switches off before water boils, this indicates that descaling is necessary.
Generally, the descaling should be done in the following periodicity:
If you use soft water, at least once every 3 months.
If you use hard water, at least once every 2 weeks
You can use descaling agent (In this case read carefully the instructions supplied with the product) or with vinegar mixed with water (1/3 vinegar+ 2/3 water), while respecting the maximum level marked on the product.
natural_image
Symbol of a trash bin with crossed lines indicating no waste, and a solid black rectangle below (no text or labels)
ócorrect disposal of the unit (zelectrical and electronic zquipment).
(Applicable in the European Union and the rest of Europe that have adopted separate collection systems countries). The European +irective 2012/19/EU on Waste Electrical and Electronic Equipment (WEEE), requires that old household electrical appliances must not be disposed of in the normal household waste stream. >Id appliances must be collected separately in order to optimize the recovery and recycling of the materials they contain and reduce the impact on human health and the environment. The symbol of the crossed out dustbin is marked on all products to remind the obligations of separate collection. Consumers should contact their local authority or retailer for information concerning the correct disposal of their product.
• Non contractual illustration
- Product information is subject to change without prior notice.
natural_image
Symbol of a trash bin crossed with two crossed arms, no text or labels present
natural_image
Symbol of a trash bin crossed with no text or labels, accompanied by a black rectangular block below (no readable text or symbols)
natural_image
Symbol of a trash bin crossed with no text or labels, accompanied by a black rectangular block below (no readable text or symbols)
natural_image
Symbol of a trash bin crossed with a diagonal line and a horizontal bar below (no text or labels)

