302145 - Battery charger Aplic - Free user manual and instructions
Find the device manual for free 302145 Aplic in PDF.


| Product type | 4-bay battery charger |
| Brand | Aplic |
| Model | 302145 |
| Power supply | 100-240 V, 50 Hz power adapter; charger: 12 V DC |
| USB output | 5 V DC, 1000 mA |
| Compatible battery types | NiCd, NiMH, Li-ion |
| Compatible battery models | AA, AAA, A, SC, C; 26650, 22650, 18650, 17670, 18490, 17500, 17335, 16340 (123A), 14500, 10440 |
| Charging current per bay | 300 mA, 500 mA, 700 mA, 1000 mA (adjustable) |
| Discharge current per bay | 250 mA, 250 mA, 500 mA, 500 mA (depending on charging current) |
| Operating modes | Charge, Test (discharge then charge) |
| Display | LCD screen with backlight |
| Functions | Display current, voltage, capacity, internal resistance, charging time; capacity test; reverse polarity protection |
| Number of independent bays | 4, independent management |
| Maintenance and cleaning | Unplug, wipe with dry soft cloth, do not use harsh cleaners |
| Safety instructions | Do not open, avoid contact with mains voltage, do not short-circuit, use indoors dry, keep away from children |
| Recycling | Do not dispose of with household waste, drop off at WEEE collection point |
| Approximate weight | 200 g (estimated) |
| Approximate dimensions | 150 x 100 x 50 mm (estimated) |
Frequently Asked Questions - 302145 Aplic
User questions about 302145 Aplic
0 question about this device. Answer the ones you know or ask your own.
Ask a new question about this device
Download the instructions for your Battery charger in PDF format for free! Find your manual 302145 - Aplic and take your electronic device back in hand. On this page are published all the documents necessary for the use of your device. 302145 by Aplic.
USER MANUAL 302145 Aplic
natural_image
Abstract geometric logo design with a stylized letter 'O' inside a partial white circle on dark background (no text or symbols)BEDIENUNGSANLEITUNG
USER MANUAL
INTELLIGENT 4-BAY BATTERY CHARGER
Mod.-Nr. 302145
| Umgebungstemperatur + 0 | -3°C bis 35-40°C |
| Ambient temperature | + 0-3°C until 35-40°C |
| Température ambiante + 0 | -3°C à 35-40°C |
| Température ambiante + 0 | -3°C fino 35-40°C |
| Temperatura ambiente + 0 | -3°C a 35-40°C |
GER
Read the operating instructions carefully and especially observe the safety information. If you do not follow the safety instructions and information on proper handling in this manual, we assume no liability for any resulting personal injury or damage to property. Such cases will invalidate the warranty/guarantee.
Never operate the product unattended. Despite the extensive and varied protective circuits, malfunctions or problems when charging a battery cannot be ruled out.
FRA
ENG: Current drivers, user manuals and other relevant documents for this product can be found on our homepage.
Thank you for choosing an aplic product. Please read the following user manual carefully to have an enjoyable experience with your purchased product. Before using the delivered product, check that they are complete, faultless and undamaged.
1. Scope of supply
• 4-Bay battery charger
- Power adapter
- User manual
2. Technical data
| Operating voltage • Power supply: 100-240V, 50HzBattery charger: 12V DC | |||
| Output • 4 charging bays | • 1 USB port 5V DC / 1000mA | ||
| Battery types NiCd, NiMH, Li-ion | |||
| Compatible battery types • AA, AAA, A, SC, C• 26650, 22650, 18650, 17670, 18490, 17500, 17335, 16340 (123A), 14500, 10440 | |||
| Charging current per bay (adjustable) | 300mA 500mA 700mA | 1000mA | |
| Discharging current per bay (half of the configured charging current) | 250mA 250mA 500mA | 500mA | |
| Modes • Charge | • Test / discharge | ||
| Features • LCD display | • Backlight• Test function (check battery capacity and internal resistance)• Battery discharging function• Internal resistance display• Battery reverse polarity protection | ||
3. Function
When the device is put into operation for the first time, check the intactness of the product or components and their function again. The aplic charger is intended for charging and testing microprocessor-controlled NiCD, NiMH or Lithium-ion batteries. The four independent charging bays can accommodate and control batteries of different type, size and capacity at the same time. The large, easy-to-read display shows information that can be optionally selected such as charging current, charged capacity, internal resistance or the current charging time per charging bay. Batteries are not subject to any capacity limits and can be charged using a charging current of 300mA, 500mA, 700mA, or 1000mA, whereby this can be selected independently for each bay. In addition, the charger also has a USB socket using which an external device having a maximum current consumption of 1000mA can be loaded or operated.
4. Product details
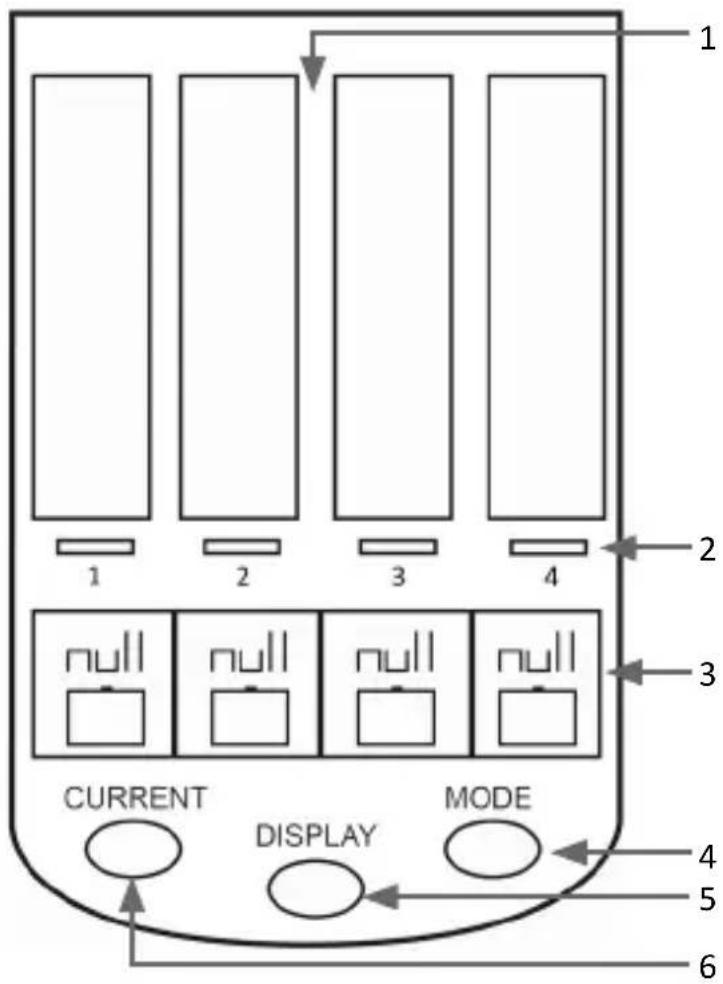
| 1 Battery charging bays |
| 2 Selection buttons |
| 3 Display (1 for each charging bay) |
| 4 "Mode" button |
| 5 "Display" button |
| 6 "Current" button |
4.1 Button functions
| Selection buttons | With this button, you can select the desired charging bay to configure the mode or the charging current. |
| "Mode" button | Using the "mode" button, you can select between the two modes of "Charging" and "Test". To configure all the charging bays at the same time, press and hold the button for about 4 seconds till the display starts to flash. You can configure the charging current using the "current" button. If you want to individually configure the charging bays, then you need to select the desired charging bay (1-4) before-hand using the selection button. |
| "Display" button | By pressing the "Display" button, you can select the information about current, voltage, capacity, internal resistance and the previous charging time, on the respective display. |
| "Current" button | The charging and discharging current can be configured using this button. This button has only one function if you select one charging bay using one of the selection buttons, or all the charging bays by pressing the "Mode" button for 4 seconds. |

5. Power supply
Use only the power adapter supplied or recommended by the manufacturer for this charger. All the LCD segments will be illuminated briefly as soon as the charger is switched on. A 'null' is displayed till all the batteries are inserted.
6. Initial use
Take the device out of the package and remove all the packaging material. Plug the supplied power adapter to a properly connected 230 v AC power socket and to the rechargeable battery charger. You can then insert the desired type of battery into the charger.
Please note! Charge only rechargeable batteries. Please do not use non-rechargeable batteries!
When a battery is inserted, the actual voltage is displayed for about 4 seconds. Then the actually configured charging current is displayed for 4 seconds. If you do not make changes using the "MODE" or the "Current" button, the charging process starts automatically with the default charging current of 300mA.
The mode can be changed at any time subsequently by selecting the desired charging bay using the selection buttons (1-4) and then pressing the "mode" button. You can choose between "Charge" and "Test". It may be that discharged or defective batteries cannot be recharged. In such cases, the display shows "null".
If you want to charge completely discharged batteries, it may be that the charging process is more effective if you load using a lower charging current. The device can display the internal resistance of the battery (mR). The internal resistance tells you something about the condition of the battery, and should be checked when fully charged. The higher the internal resistance, the worse the condition of the battery. Please note that the contacts of the charger as well as those of the battery also form a contact resistance, which can falsify the measurement result negatively. To do this, clean the contacts of the charger and the batteries with a cotton swab and some isopropanol.
6.1 Charging current
Within the first 8 seconds of inserting the battery, you can press the "Current" button to select between the various charging currents of 300mA, 500mA, 700mA or 1000mA. If you want to change the charging current or the mode subsequently, you can select the desired charging bay using the selection buttons "1-4".
As soon as the display starts to flash, you can change the mode using the "MODE" button, or configure the desired charging current using the "Current" button.
7. Operating modes
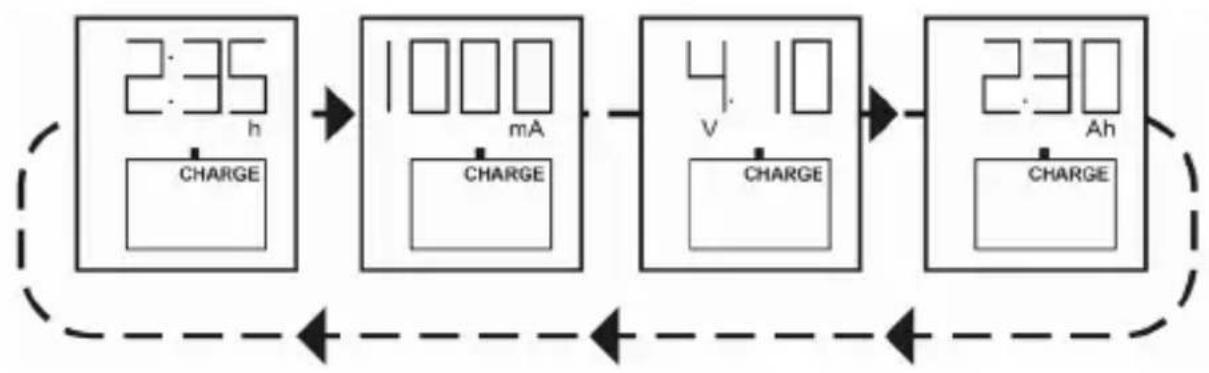
"Charge" mode: The battery is charged to the maximum capacity.
Start:
flowchart
graph LR
    A["2:35 h\nCHARGE"] --> B["1000 mA\nCHARGE"]
    B --> C["4:10 V\nCHARGE"]
    C --> D["230 Ah\nCHARGE"]
    D -.-> E["←"]
    E --> F["←"]
    F --> G["←"]
    G --> H["←"]
    H --> I["←"]
    I --> J["←"]
    J --> K["←"]
    K --> L["←"]
    L --> M["←"]
    M --> N["←"]
    N --> O["←"]
    O --> P["←"]
    P --> Q["←"]
    Q --> R["←"]
    R --> S["←"]
    S --> T["←"]
    T --> U["←"]
    U --> V["←"]
    V --> W["←"]
    W --> X["←"]
    X --> Y["←"]
    Y --> Z["←"]
    Z --> AA["←"]
    AA --> AB["←"]
    AB --> AC["←"]
    AC --> AD["←"]
    AD --> AE["←"]
    AE --> AF["←"]
    AF --> AG["←"]
    AG --> AH["←"]
    AH --> AI["←"]
    AI --> AJ["←"]
    AJ --> AK["←"]
    AK --> AL["←"]
    AL --> AM["←"]
    AM --> AN["←"]
    AN --> AO["←"]
    AO --> AP["←"]
    AP --> AQ["←"]
    AQ --> AR["←"]
    AR --> AS["←"]
    AS --> AT["←"]
    AT --> AU["←"]
    AU --> AV["←"]
    AV --> AW["←"]
    AW --> AX["←"]
    AX --> AY["←"]
    AY --> AZ["←"]
    AZ --> BA["←"]
    BA --> BB["←"]
    BB --> BC["←"]
    BC --> BD["←"]
    BD --> BE["←"]
    BE --> BF["←"]
    BF --> BG["←"]
    BG --> BH["←"]
    BH --> BI["←"]
    BI --> BJ["←"]
    BJ --> BK["←"]
    BK --> BL["←"]
    BL --> BM["←"]
    BM --> BN["←"]
    BN --> BO["←"]
    BO --> BP["←"]
    BP --> BQ["←"]
    BQ --> BR["←"]
    BR --> BS["←"]
    BS --> BT["←"]
    BT --> BU["←"]
    BU --> BV["←"]
    BV --> BW["←"]
    BW --> BX["←"]
    BX --> BY["←"]
    BY --> BZ["←"]
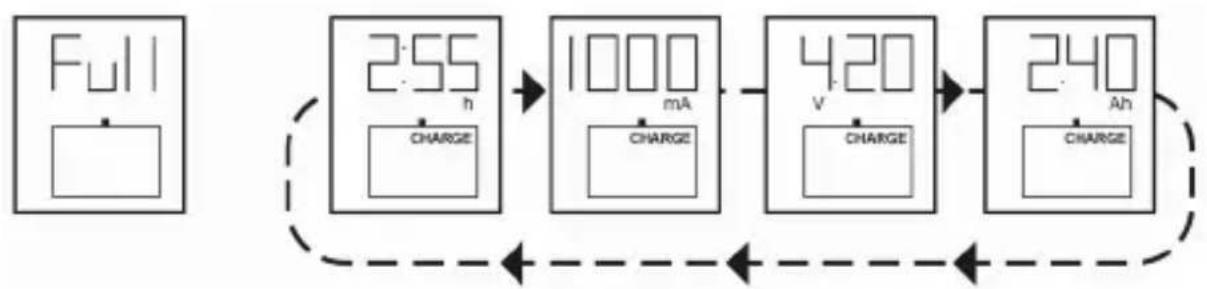
End:
flowchart
graph LR
    A["Full"] --> B["2.55 h CHARGE"]
    B --> C["1000 mA CHARGE"]
    C --> D["4.20 V CHARGE"]
    D --> E["240 Ah CHARGE"]
    E -.-> B
"Test" mode: This mode checks the actual capacity of a battery. The maximum capacity is determined by discharging the battery after charging it fully. If the maximum capacity is much lower than the rated capacity, then it may be that the battery has reached the end of its life.
In such cases, it might sometimes be useful to run the test mode again so that the battery reaches its full capacity again.

Charging:
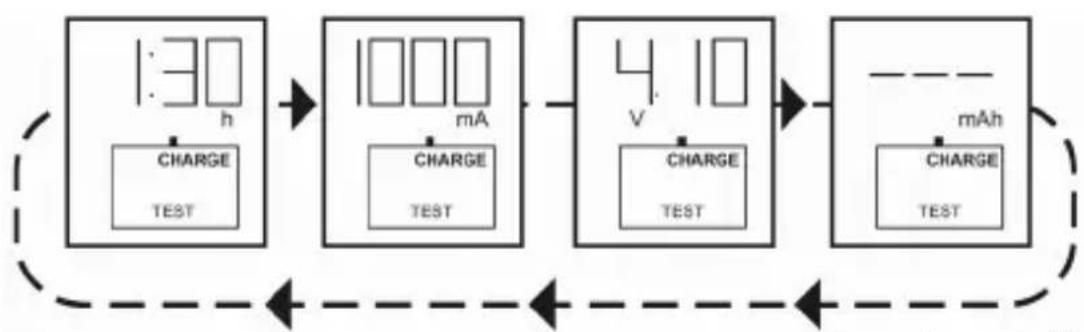
flowchart
graph LR
    A["1:30 h\nCHARGE\nTEST"] --> B["1000 mA\nCHARGE\nTEST"]
    B --> C["4.10 V\nCHARGE\nTEST"]
    C --> D["--- mAh\nCHARGE\nTEST"]
    D -.-> E["End"]
Actual capacityVoltageCurrentTime
Discharging:

flowchart
graph LR
    A["1:30 h\nTEST"] --> B["500 mA\nTEST"]
    B --> C["3.75 V\nTEST"]
    C --> D["800 mAh\nTEST"]
    D -.-> A
Actual capacityVoltageDischarging
Discharging completed, recharge again:
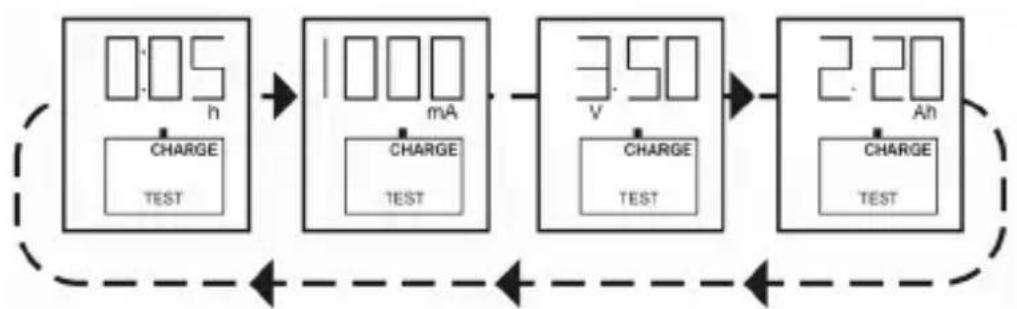
flowchart
graph LR
    A["0:05 h\nCHARGE\nTEST"] --> B["1000 mA\nCHARGE\nTEST"]
    B --> C["3.50 V\nCHARGE\nTEST"]
    C --> D["2.20 Ah\nCHARGE\nTEST"]
    D -.-> A
Actual capacityVoltageCurrentTime
The testing process is completed:
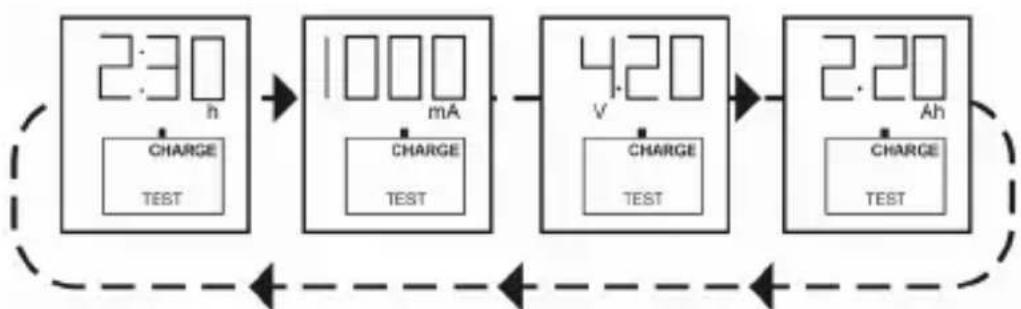
flowchart
graph LR
    A["2:30 h\nCHARGE\nTEST"] --> B["1000 mA\nCHARGE\nTEST"]
    B --> C["4:20 V\nCHARGE\nTEST"]
    C --> D["2:20 Ah\nCHARGE\nTEST"]
    D -.-> E["End"]
Actual capacityVoltageCurrentT
8. Cleaning and Maintenance
Disconnect the device from the mains and make sure that it is not carrying any current. Wipe it using a dry and soft cloth. Please do not use aggressive cleaning agents.

9. Safety instructions and liability disclaimer
Never try to open the device to carry out repairs or conversions. Avoid contact with mains voltages. Do not short-circuit the product. The device is not certified for use in the open air; only use it in dry conditions. Protect it from high humidity, water and snow. Keep it away from high temperatures. Do not subject the device to sudden changes in temperature or heavy vibration as this might damage electronic components. Examine the device for damage before using it. The unit should not be used if it has received an impact or has been damaged in any other way. Please observe national regulations and restrictions. Do not use the device for purposes other than those described in the instructions. This product is not a toy. Keep it out of the reach of children or mentally impaired persons. Any repair or alteration to the device not carried out by the original supplier, will invalidate the warranty or guarantee. The product may only be used by persons who have read and understood these instructions. The device specifications may change without any separate prior notice to this effect.
10. Disposal instructions
Electrical and electronic devices may only be disposed of in accordance with the European WEEE Directive and not with household rubbish. Components must be disposed of or recycled separately as dangerous, toxic elements can inflict sustained damage on the environment if they are disposed of incorrectly. As a consumer, you are bound by the Electrical and Electronic Devices Act (ElektroG) to return electrical and electronic goods free of charge at the end of their useful life to the manufacturer, the place of purchase or to specially set up, public collection points. The details in each case are governed by national law. The symbol on the product, the operating instructions and/or the packaging refers to these regulations. By separating materials in this way, recycling and disposing of old devices, you are making an important contribution towards protecting our environment. For information on authorised collection points in your area, please contact your local city or municipal administration.

WEEE guideline: 2012/19/EU WEEE register number: DE 67896761
WD Plus GmbH, herewith declares that this product 302145 conforms to the principle requirements and other relevant stipulations. The complete Declaration of Conformity can be obtained from: WD Plus GmbH, Wohlenbergstraße 16, 30719 Hanover
MO-FR 9:30am - 18pm CET

- BEDIENUNGSANLEITUNG
- USER MANUAL
- INTELLIGENT 4-BAY BATTERY CHARGER
- GER
- FRA
- Scope of supply
- Technical data
- Function
- Product details
- Button functions
- Power supply
- Initial use
- Charging current
- Operating modes
- Start:
- End:
- Cleaning and Maintenance
- Safety instructions and liability disclaimer
- Disposal instructions
Brand : Aplic
Model : 302145
Category : Battery charger