Küchen-Chef 14.1504 - Thermometer TFA - Free user manual and instructions
Find the device manual for free Küchen-Chef 14.1504 TFA in PDF.


| Brand | TFA |
| Model | Küchen-Chef 14.1504 |
| Product type | Radio-controlled cooking thermometer |
| Receiver dimensions | 60 x 21 (28) x 105 mm |
| Receiver weight | 67 g (unit only) |
| Transmitter dimensions | 63 x 23 x 85 mm |
| Transmitter weight | 60 g (unit only) |
| Receiver power supply | 2 x 1.5 V AAA batteries (included) |
| Transmitter power supply | 2 x 1.5 V AAA batteries (included) |
| Measuring range | 0 °C to +300 °C (32 °F to 572 °F) |
| Resolution | 1 °C / 1 °F |
| Radio range | Approx. 40 meters (open field) |
| Transmission frequency | 433 MHz |
| Probe | Stainless steel with approx. 80 cm cable, resistant to 300 °C |
| Main functions | Internal temperature monitoring, meat presets, alarm, timer, stopwatch |
| Display | LCD |
| Usage | Oven, grill, low-temperature cooking |
| Safety | Do not use in microwave, do not immerse the probe, wear gloves |
| Maintenance and cleaning | Clean with a soft damp cloth, no solvents |
| Package contents | Receiver, transmitter, probe, 4 AAA batteries, instruction manual |
| Spare parts | Probe (Cat. No. 30.3517), Transmitter (Cat. No. 30.3201) |
| Certification | CE compliant with Directive 2014/53/EU |
| Manufacturer | TFA Dostmann |
Frequently Asked Questions - Küchen-Chef 14.1504 TFA
User questions about Küchen-Chef 14.1504 TFA
0 question about this device. Answer the ones you know or ask your own.
Ask a new question about this device
Download the instructions for your Thermometer in PDF format for free! Find your manual Küchen-Chef 14.1504 - TFA and take your electronic device back in hand. On this page are published all the documents necessary for the use of your device. Küchen-Chef 14.1504 by TFA.
USER MANUAL Küchen-Chef 14.1504 TFA
°C Temperaturen Temperatures Températures Temperatura Temperaturas
| Display BEEF PORK CHICK TURKY VEAL LAMB FISH HAM- | BURGER |
| Well done 75 77 80 80 75 75 60 75 | |
| Medium 70 71 70 70 | |
| Medium rare 60 | |
| Rare 55 |
Je nach Fleischsorte stehen unterschiedliche Garstufen zur Verfügung.
Different degrees of doneness are available depending on type of meat.
Vous disposez de différents niveaux de cuisson en fonction du type de viande.
Sono disponibili diversi livelli di cottura a seconda del tipo di carne.
Al naar gelang het soort vlees staan u verschillende gaarniveaus ter beschikking.
Según el tipo de carne, hay diferentes niveles de cocción disponibles.


Instruction manuals
Kat. Nr. 14.1504
www.tfa-dostmann.de/en/service/downloads/instruction-manuals

Fig. 1
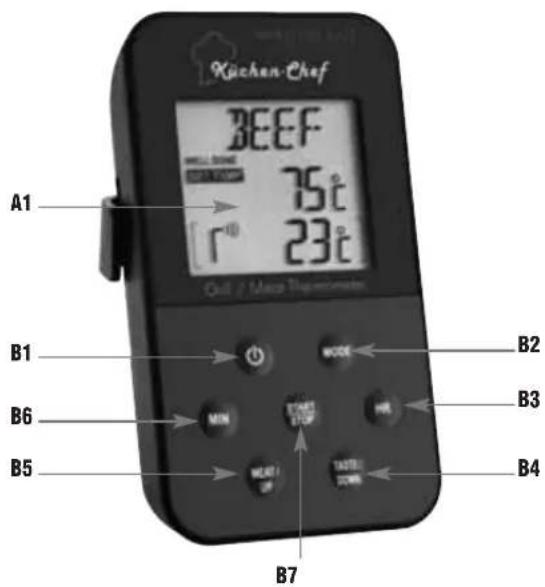
Fig. 2
Funk-Grill-Bratenthermometer

Radio-controlled grill and meat thermometer

Thank you for choosing this instrument from TFA.
1. Before you use this product
- Please make sure you read the instruction manual carefully.
- Following and respecting the instructions in your manual will prevent damage to your instrument and loss of your statutory rights arising from defects due to incorrect use.
- We shall not be liable for any damage occurring as a result of non-following of these instructions. Likewise, we take no responsibility for any incorrect readings or for any consequences resulting from them.
- Please pay particular attention to the safety notices!
- Please keep this instruction manual safe for future reference.
2. Delivery contents
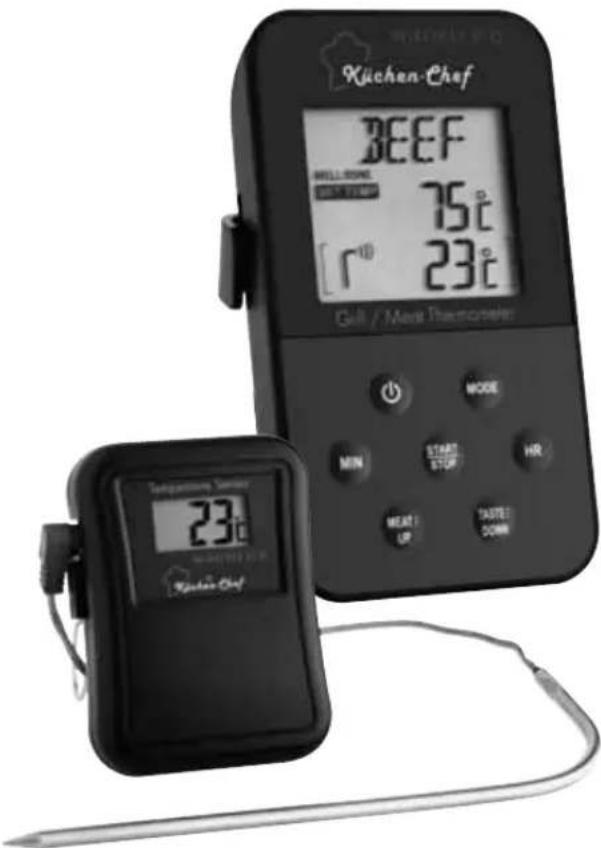
• Radio-controlled grill and meat thermometer (receiver)
• Transmitter (Cat.-No. 30.3201)
- Stainless steel probe with 80 cm cable (Cat.-No. 30.3517)
• Batteries 4 x 1.5 V AAA
- Instruction manual
3. Field of operation and all the benefits of your new instrument at a glance
• Monitoring of the core temperature (range up to 40 m) for the optimal preparation of meat
- Can be used for the oven or grill, also ideal for cooking at low temperatures
- Different types of meat and doneness pre-programmed
- Individual temperature requirements can be programmed
- Alarm warning when the target temperature is reached
- Timer and stop watch function
- Stainless steel probe with approx. 80 cm cable
4. For your safety
- This product is exclusively intended for the field of application described above. It should only be used as described within these instructions.
- Unauthorized repairs, modifications, calibrations or changes to the product are prohibited.

Caution! Risk of injury:
- Wear heat-resistant protective gloves when you touch the sensor during or after cooking.
- Do not use the instrument in the microwave.
- Be careful when handling the probe.
Radio-controlled grill and meat thermometer

- Keep these devices and the batteries out of reach of children.
- Small parts can be swallowed by children (under three years old).
- Batteries contain harmful acids and may be hazardous if swallowed. If a battery is swallowed, this can lead to serious internal burns and death within two hours. If you suspect a battery could have been swallowed or otherwise caught in the body, seek medical help immediately.
- Batteries must not be thrown into a fire, short-circuited, taken apart or recharged. Risk of explosion!
- Low batteries should be changed as soon as possible to prevent damage caused by leaking.
- Never use a combination of old and new batteries together, nor batteries of different types.
- Avoid contact with skin, eyes and mucous membranes when handling leaking batteries. In case of contact, immediately rinse the affected areas with water and consult a doctor.

Important information on product safety!
- Do not expose the receiver and the transmitter to extreme temperatures, vibrations or shocks. Only the probe and cable are heat resistant up to 300 °C. Never hold the probe directly over a fire.
- Do not immerse the cable and the probe in water. Water can penetrate the precision sensor and cause malfunction. Not suitable for dishwasher.
- The receiver is not splash-proof. Do not use it in rain.
- The transmitter is splash-proof, but not watertight. Do not immerse the transmitter in water.
5. Elements
5.1 Radio-controlled grill and meat thermometer (receiver) (Fig. 1)
A1: Display
Type of meat Target temperature
Radio-controlled reception symbol and current measured temperature
Buttons
B1: ON/OFF button
B2: MODE button
B3: HR button
B4: TASTE/DOWN button
B5: MEAT/UP button
B6: MIN button
B7: START/STOP button
Radio-controlled grill and meat thermometer

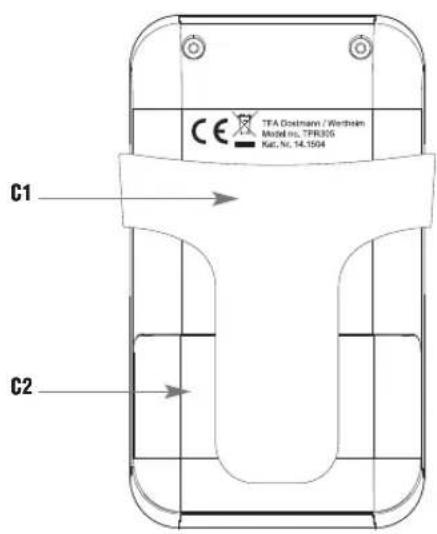
Housing
C1: Support
C2: Battery compartment
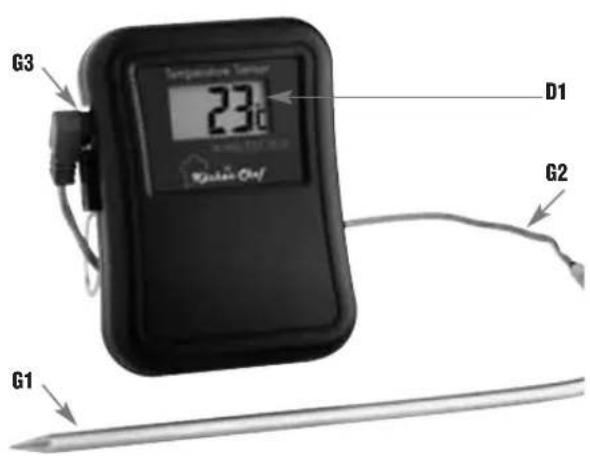
5.2 Transmitter (Fig. 2)
D1: Display
Current measured temperature
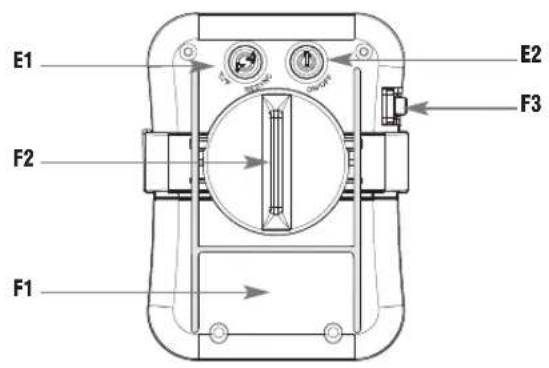
Buttons (back)
E1: °C/°F button
E2: ON/OFF button
Housing
F1: Battery compartment (screwed on)
F2: Bracket for metal support
F3: Opening for the connecting plug with rubber protection cap
Sensor
G1: Metal probe
G2: Cable
G3: Connecting plug
6. Getting started
- Remove the supports at the back of the receiver and the transmitter.
- Pull off the rubber protection cap carefully from the opening for the connecting plug on the left side of the transmitter. Plug the connector for the sensor cable into the socket.
- Open the battery compartment at the back of the transmitter with a suitable screwdriver and the battery compartment at the back of the receiver.
- Lay the instruments on a table. Avoid getting close to possible interference sources. (Electronic devices and radio installations)
- To guarantee a quicker and better transmission of the measured temperature, insert two batteries AAA 1.5 V in the compartment of the receiver and make sure that the polarities are correct. The device will alert you with a beep and all LCD segments will light up for a short moment.
- The device is now ready for use.
- The temperature display is flashing and the defaults appear on the display.
- Afterwards insert two new batteries 1,5 V AAA in the compartment of the transmitter. Make sure the polarities are correct. All LCD segments will be displayed briefly.
- The latest measured temperature will appear on the display of the transmitter and the information will be transmitted automatically to the receiver.
Radio-controlled grill and meat thermometer

- As soon as the transmission is successful the device will alert you with a beep, the radio signal symbol will blink and the latest measured temperature will appear on the display of the receiver.
- Every 5 seconds the transmitter will transmit the last measured temperature
- Close the battery compartment of the transmitter and the receiver again.
6.1 Manual transmitter search
- If the transmission fails or if the contact between the transmitter and the receiver gets lost (maximum range 40 m free field, within ferro-concrete rooms like basements and superstructures, the received signal is naturally weakened), a beep tone will be heard at regular intervals, the radio-controlled reception symbol disappears and --- °C appears on the display of the receiver.
- You can now start the search for the transmitter manually.
- Press and hold the MIN button on the receiver in the temperature setting mode.
- --- °C is flashing on the display of the receiver.
- Press and hold the ° C / °F at the back of the transmitter.
- As soon as the transmission is successful a beep tone will be heard, the radio-controlled reception symbol is flashing and the last measured temperature appears on the display of the receiver.
6.2 Receiver
- Press and hold the HR button in the temperature setting mode to select between °C (Celsius) or °F (Fahrenheit) as the temperature unit.
- Press and hold the button.
• The instrument is turned off - Press and hold the button to turn on the instrument.
• The temperature display is flashing. - Wait until the flashing is finished (90 seconds) and the last measured temperature appears or start the search for the transmitter manually.
6.3 Transmitter
- Press the °C/°F button at the backside to change between °C (Celsius) or °F (Fahrenheit) as temperature unit.
- Press and hold the button at the back of the transmitter.
• The instrument is turned off. - Press and hold the button to turn on the instrument
- If the probe is still connected, the display will show the last measured temperature.
Radio-controlled grill and meat thermometer

For your information:
- To guarantee a better and quicker transmission of the last measured temperature, turn on at first the receiver and then the transmitter.
6.4 Measuring of the core temperature
- Press and hold eventually the MODE button in temperature setting mode.
- WELL DONE (default) appears on the display.
- Press the MEAT/UP button to choose the type of meat (see table).
- Press the TASTE/DOWN button to choose the doneness (see table).
- Press and hold the MODE button in temperature setting mode to insert an individual temperature.
- WELL DONE (default) disappears.
- Press the MEAT/UP or TASTE/DOWN button to adjust the core temperature. Press and hold the button for fast running.
- Push the probe at least 2.5 cm into the middle of the thickest part of the meat, for poultry between the torso and the thigh; it should touch neither bones nor cartilage and should not protrude from the meat. Put the meat into the oven and set the relevant oven temperature.
- If you only want to measure the oven temperature, place the probe in the oven.
6.5 Measuring procedure
- Simply run the cable to the outside. The cable adapts to the oven seal. Take care of sharp-edged frames and hinges.
- Use the flexible support to fasten the transmitter in position near the oven (cable length approx. 80 cm) or remove the holder and the instrument can be placed onto flat surfaces.
• The receiver can now be used in a range of up to 40 m. - As soon as the core temperature is reached three beep tones will be heard every second.
- The temperature display and the warning symbol ⚠ are flashing on the display of the receiver.
- Press any button to stop the alarm sound.
- The temperature display and the warning symbol ⚠ continue flashing on the display of the receiver.
- The temperature display will continue flashing until the measured temperature is below the desired temperature.
- The warning symbol ⚠ disappears.
6.6 Setting of the timer and the stop watch
Stop watch
- Press the MODE button to enter the timer-stop watch mode.
- The stop watch symbol (in the top left corner) and 0:00 appear.
Radio-controlled grill and meat thermometer

- Press the START/STOP button to start the count up process.
- is #ashing.
- With the START/STOP button you can stop and restart the counting.
• stays/is flashing. - Press and hold the START/STOP button to clear the display.
- disappears.
Count Down Timer
- Press the HR button to adjust the hours.
- Press the MIN button to adjust the minutes.
- appears on the display.
- Press the START/STOP button.
- is washing and the count up process starts.
- When setting more than one hour, only the hours / minutes are displayed, otherwise minutes / seconds.
- With the START/STOP button you can stop the counting ( ≧ stays) and start it again ( ≧ flashing).
- When the timer count down is finished, the display will be flashing and two short beep tones will be heard every seconds (30 seconds).
- and will be flashing simultaneously and the seconds will be counted up.
- Press any button to stop the alarm sound.
7. Table stand and attachment
Receiver:
- To use the bracket as a clamp (for example on a belt), insert the double-sided mounting aids into the upper slots of the receiver.
- To use the bracket as a stand, put the double-sided mounting aids into the lower, gently sloping slots. The installation is successful if you hear a click.
Transmitter:
- Place the bracket for the flexible metal support into the double-sided mounting aids on the transmitter. The installation is successful if you hear a click. Take the metal support and attach the two ends into the holes provided on the turntable of the bracket. With the turntable, you can now choose whether you want to use the metal support to stand or to be mounted. The turntable is properly adjusted when you hear a click.
8. Care and maintenance
- Clean the instruments and the probe with a soft damp cloth. Do not use solvents or scouring agents. Protect it from moisture.
Radio-controlled grill and meat thermometer

- Should water or steam enter the socket, it could affect the contact with the probe. Dry the plug connector with a cloth before you connect it to your transmitter.
- Turn off the instruments after use.
- Remove the batteries if you do not use your instruments for a long period of time.
- Keep the instruments in a dry place.
8.1 Battery replacement
- Change the batteries of the transmitter (REMOTE) or the receiver (MAIN) when the battery symbol appears on the display of the receiver.
- Please note: When the batteries are changed, the contact between transmitter and receiver must be restored – so always insert new batteries into both units or start a manual transmitter search.
9. Troubleshootings
Problems Solutions
| No display → Turn on the instruments(at first the receiver and afterwards the transmitter)→ Ensure correct polarity of the batteries→ Change the batteries | |
| Incorrect display → Change the batteries→ Check the contact of the plug to the socket, wipe dry if necessary | |
| Display is flashing and a beep tone is heard between → no contact between transmitter and receiver | → Reduce the distance transmitter and receiver (max. 40 m)→ Check if there is any source of interference→ Manual transmitter search→ Restart according to the manual |
| Temperature displayed is too high | → Check the position of the probe in the meat |
10. Waste disposal
This product and its packaging have been manufactured using high-grade materials and components which can be recycled and reused. This reduces waste and protects the environment.
Radio-controlled grill and meat thermometer

Dispose of the packaging in an environmentally friendly manner using the collection systems that have been set up.

Disposal of the electrical device
Remove non-permanently installed batteries and rechargeable batteries from the device and dispose of them separately.
This product is labelled in accordance with the EU Waste Electrical and Electronic Equipment Directive (WEEE).
Please do not dispose of this product in ordinary household waste. As a consumer, you are required to take end-of-life devices to a designated collection point for the disposal of electrical and electronic equipment, in order to ensure environmentally-compatible disposal. Observe the current regulations in place!

Disposal of the batteries
Never dispose of empty batteries and rechargeable batteries with ordinary household waste. They contain pollutants which, if improperly disposed of, can harm the environment and human health. As a consumer, you are required by law to take them to your retail store or to an appropriate collection site depending on national or local regulations in order to protect the environment.
The symbols for the contained heavy metals are: Cd=cadmium, Hg=mercury, Pb=lead.

WARNING!
Environmental and health damage caused by incorrect disposal of batteries!
11. Specifications
Receiver
| Measuring range Meat: 0 °C...+300°C(+32 °F... +572 °F)°C/°F-reversible |
Resolution: 1°C/1°F
HHH/LLL: Temperature is outside measuring range
Count-up and max. 23 hours
count-down timer: and 59 minutes
Radio-controlled grill and meat thermometer

| Power consumption: 2 x 1.5 V AAA |
| Batteries (included) |
| Housing dimension: 60 x 21 (28) x 105 mm |
| Weight: 67 g (instrument only) |
Transmitter
| Cable: appr. 80 cm,heat resistant up to 300 °C |
| Range: max. 40 m (free field) |
| Transmission frequency: 433 MHz |
| Maximumradio-frequency power: < 10mW |
| Power consumption: 2 x 1.5 V AAABatteries (included) |
| Housing dimension: 63 x 23 x 85 mm |
| Weight: 60 g (instrument only) |
No part of this manual may be reproduced without written consent of TFA Dostmann. The technical data are correct at the time of going to print and may change without prior notice.
The latest technical data and information about this product can be found in our homepage by simply entering the product number in the search box.
EU Declaration of conformity
Hereby, TFA Dostmann declares that the radio equipment type 14.1504 is in compliance with Directive 2014/53/EU. The full text of the EU declaration of conformity is available at the following Internet address: www.tfa-dostmann.de/service/downloads/ce
www.tfa-dostmann.de


- FUNK-GRILL-BRATENTHERMOMETER
- RADIO-CONTROLLED GRILL AND MEAT THERMOMETER
- BEFORE YOU USE THIS PRODUCT
- DELIVERY CONTENTS
- FIELD OF OPERATION AND ALL THE BENEFITS OF YOUR NEW INSTRUMENT AT A GLANCE
- FOR YOUR SAFETY
- CAUTION! RISK OF INJURY
- IMPORTANT INFORMATION ON PRODUCT SAFETY
- ELEMENTS
- 5.1 RADIO-CONTROLLED GRILL AND MEAT THERMOMETER (RECEIVER) (FIG. 1)
- A1: DISPLAY
- BUTTONS
- HOUSING
- 5.2 TRANSMITTER (FIG. 2)
- D1: DISPLAY
- BUTTONS (BACK)
- SENSOR
- GETTING STARTED
- 6.1 MANUAL TRANSMITTER SEARCH
- 6.2 RECEIVER
- 6.3 TRANSMITTER
- FOR YOUR INFORMATION
- 6.4 MEASURING OF THE CORE TEMPERATURE
- 6.5 MEASURING PROCEDURE
- 6.6 SETTING OF THE TIMER AND THE STOP WATCH
- STOP WATCH
- COUNT DOWN TIMER
- TABLE STAND AND ATTACHMENT
- RECEIVER
- TRANSMITTER
- CARE AND MAINTENANCE
- 8.1 BATTERY REPLACEMENT
- TROUBLESHOOTINGS
- WASTE DISPOSAL
- DISPOSAL OF THE ELECTRICAL DEVICE
- DISPOSAL OF THE BATTERIES
- WARNING
- ENVIRONMENTAL AND HEALTH DAMAGE CAUSED BY INCORRECT DISPOSAL OF BATTERIES
- SPECIFICATIONS
- EU DECLARATION OF CONFORMITY
- WWW.TFA-DOSTMANN.DE
Brand : TFA
Model : Küchen-Chef 14.1504
Category : Thermometer