Stay & Play PIF00-12917 - Pets PETSAFE - Free user manual and instructions
Find the device manual for free Stay & Play PIF00-12917 PETSAFE in PDF.


User questions about Stay & Play PIF00-12917 PETSAFE
0 question about this device. Answer the ones you know or ask your own.
Ask a new question about this device
Download the instructions for your Pets in PDF format for free! Find your manual Stay & Play PIF00-12917 - PETSAFE and take your electronic device back in hand. On this page are published all the documents necessary for the use of your device. Stay & Play PIF00-12917 by PETSAFE.
USER MANUAL Stay & Play PIF00-12917 PETSAFE
protect. teach. love:
Operating and Training Guide
text_image
Sence™ s fil systeem able o wireless stem PetSafe PetSafe Please read this entire guide before beginningPlease read this entire guide before beginning
Hereinafter Radio Systems Corporation, Radio Systems PetSafe Europe Ltd., Radio Systems Australia Pty Ltd. and any other affiliate or Brand of Radio Systems Corporation may be referred to collectively as "We" or "Us".
IMPORTANT SAFETY INFORMATION
Explanation of Attention Words and Symbols used in this guide


This is the safety alert symbol. It is used to alert you to potential personal injury hazards. Obey all safety messages that follow this symbol to avoid possible injury or death.

WARNING indicates a hazardous situation which, if not avoided, could result in death or serious injury.

CAUTION, used without the safety alert symbol, indicates a hazardous situation which, if not avoided, could result in harm to your pet.
NOTICE is used to address safe use practices not related to personal injury.


- Not for use with aggressive dogs. Do not use this product if your dog is prone to aggressive behaviour. Aggressive dogs can cause severe injury or death to their owners and others. If you are not sure that this product is right for your dog, please talk to your veterinarian or a certified trainer.
- Risk of electric shock. Use the Fence Transmitter indoors in dry location only.
- This PetSafe® Stay + Play Wireless Fence™ system is NOT a solid barrier. The system is designed to act as a deterrent to remind pets by Static Stimulation to remain in the boundary established. It is important that you reinforce training with your pet on a regular basis. Since the tolerance level to Static Stimulation varies from pet to pet, Radio Systems Corporation CANNOT guarantee that the system will, in all cases, keep a pet within the established boundary. Not all pets can be trained to avoid crossing the boundary! Therefore, if you have reason to believe that your pet may pose a danger to others or harm himself if he is not kept from crossing the boundaries, you should NOT rely solely upon the PetSafe® Stay + Play Wireless Fence™ system to confine your pet. Radio Systems Corporation shall NOT be liable for any property damage, economic loss or any consequential damages, sustained as a result of any animal crossing the boundary.
- Proper fit of the collar is important. A collar worn for too long or made too tight on the pet's neck may cause skin damage. Ranging from redness to pressure ulcers; this condition is commonly known as bed sores.
- Avoid leaving the collar on the dog for more than 12 hours per day.
- When possible reposition the collar on the pet's neck every 1 to 2 hours.
- Check the fit to prevent excessive pressure; follow the instructions in this manual.
- Never connect a lead to the electronic collar; it will cause excessive pressure on the contacts.
- When using a separate collar for a lead, don't put pressure on the electronic collar.
- Wash the dog's neck area and the contacts of the collar weekly with a damp cloth.
- Examine the contact area daily for signs of a rash or a sore.
- If a rash or sore is found, discontinue use of the collar until the skin has healed.
- If the condition persists beyond 48 hours, see your veterinarian.
- For additional information on bed sores and pressure necrosis, please visit our website.
CAUTION
These steps will help keep your pet secure and comfortable. Millions of pets are comfortable while they wear stainless steel contacts. Some pets are sensitive to contact pressure. You may find after some time that your pet is very tolerant of the collar. If so, you may relax some of these precautions. It is important to continue daily checks of the contact area. If redness or sores are found, discontinue use until the skin has fully healed.
- You may need to trim the hair in the area of the Contact Points. Never shave the dog's neck; this may lead to a rash or infection.
- Always remove your dog's Receiver Collar before performing any Transmitter testing.
- The Receiver Collar should not be on your dog when the system is tested. Your pet may receive an unintended stimulation.
- The Boundary Width of the system must be tested whenever an adjustment is made to the containment field to prevent unintended stimulations to your pet.
- If you use a collar and lead for training, be sure the extra collar does not put pressure on the contact points.
- Never remove power from the system when the collar is on the pet. This may activate the Receiver Collar.
- Radio Systems Corporation recommends the use of an Uninterruptible Power Supply (UPS) for use with your wireless fence. Should the power go out at your home, your pet will be unprotected. Power outages can be unpredictable, and the use of a UPS will provide you with some time to properly restrain your pet.
In rare instances, if your pet is near the boundary at the time when the power fails, it is possible that your pet will receive a stimulation. This stimulation will stop after a 15 second timeout period has been reached. This is due to the operation of the collar: the collar is activated by the absence of the containment signal.
While results will vary depending on the UPS manufacturer's specifications the following are typical examples to guide your choice of UPS:
• Using a 400 VA UPS a consumer should expect 1 hours of backup time.
• Using a 900 VA UPS a consumer could expect 4 hours of backup time.
If settings below maximum fence size are used, additional backup time will result. At minimum fence size settings backup time may be more than two times the backup time estimated at maximum fence size.
- To prevent an unintended stimulation, after the Boundary Flags have been placed, be sure to set the Static Stimulation on the Receiver Collar back to level 1 tone only.
- Do not charge your Receiver Collar every night. Charging too often can reduce battery life. Charge your Receiver Collar when the Receiver Indicator Light blinks yellow; or when the light blinks red.
- Do not place anything on the top of the Transmitter or cover any ventilation holes. This may overheat the Transmitter and cause early transmit failure.
- Do not place Transmitter in a closet or any other confined, unventilated area.
- Do not place Transmitter on or near a metal surface.
NOTICE
Thank you for choosing the PetSafe® Brand. You and your pet deserve a companionship that includes memorable moments and a shared understanding together. Our products provide you with tools and technologies to successfully train your pet. If you have any questions about our products or training your pet, please visit our website at www.petsafe.net or contact our Customer Care Centre. For a listing of Customer Care Centre telephone numbers, visit our website at www.petsafe.net.
To get the most protection out of your warranty, please register your product within 30 days at www.petsafe.net. By registering and keeping your receipt, you will enjoy the product's full warranty and should you ever need to call the Customer Care Centre, we will be able to help you faster. Most importantly, your valuable information will never be given or sold to anyone. Complete warranty information is available online at www.petsafe.net.
Table of Contents
Components 5
Other Items You May Need 5
How the System Works 6
Key Definitions 6
Operating Guide
Set Up the Transmitter 7
Charge the Receiver Collar....8
Prepare the Receiver Collar....9
Adjust the Pet Area to Desired Size. 12
Transmitter Range Chart.... 13
Record Your Settings 13
Place the Boundary Flags 13
Fit the Receiver Collar 14
Training Guide
Be Patient With Your Pet. 16
Day 1 - Boundary Awareness.... 17
Days 2 thru 4 - Continue Boundary Awareness 18
Days 5 thru 8 - Distraction Phase 18
Days 9 thru 14 - Supervision Off the Lead 19
Days 15 thru 30 - Pet Monitoring 20
Taking Your Pet Out of the Pet Area 20
Wireless-To-Go 20
Accessories....20
Frequently Asked Questions 21
Troubleshooting 23
Important Recycling Advice....26
Compliance 26
Terms of Use and Limitation of Liability 27
Warranty....28
Mounting Template 172
Components
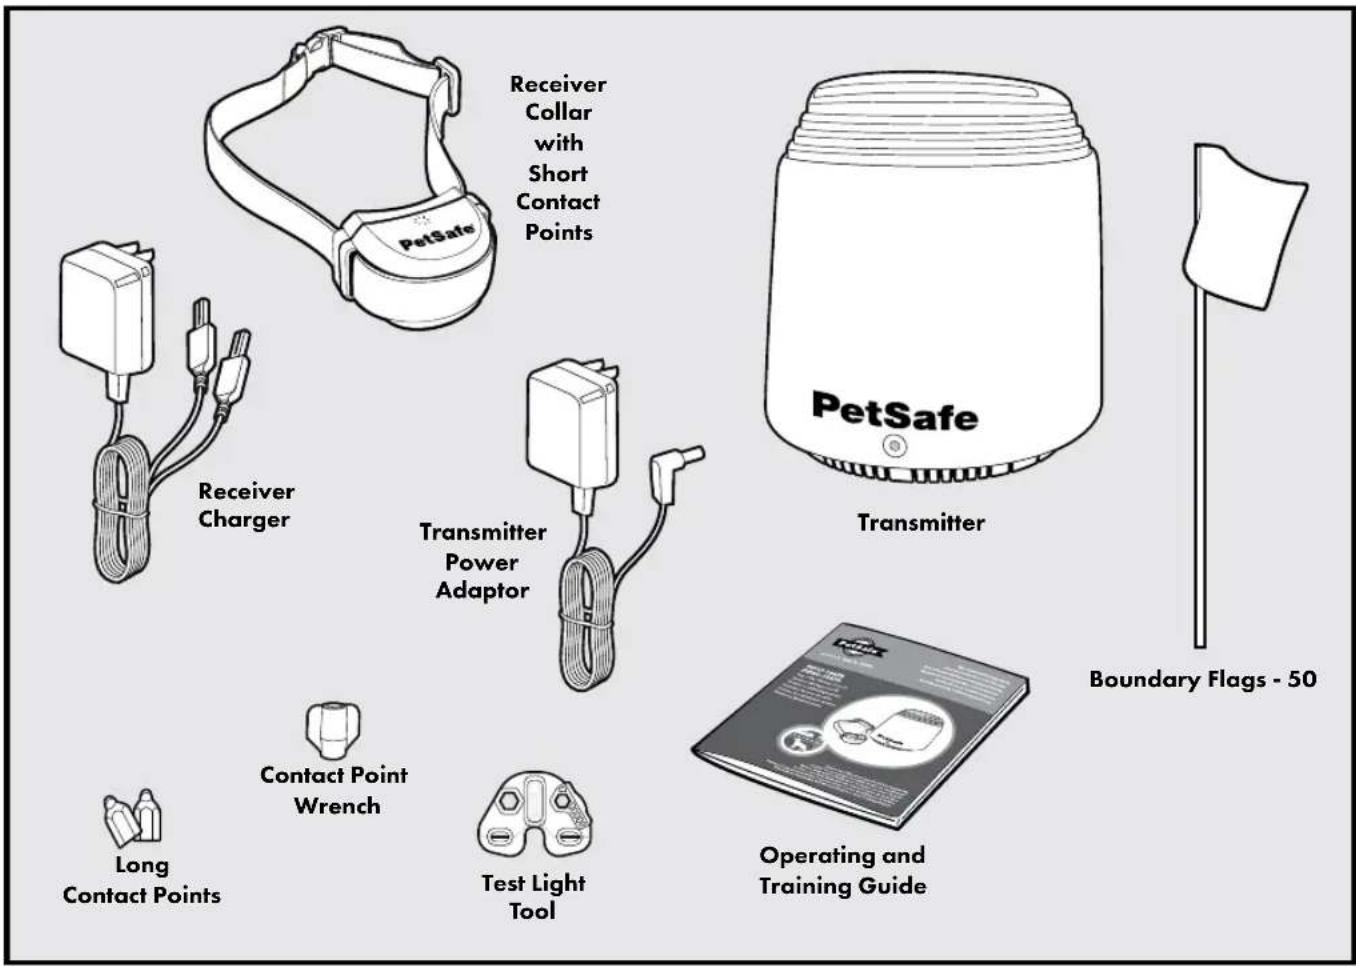
text_image
Receiver Collar with Short Contact Points PetSafe Receiver Charger Transmitter Power Adaptor Long Contact Points Contact Point Wrench Test Light Tool Transmitter PetSafe Transmitter Boundary Flags - 50 Operating and Training GuideOther Items You May Need
- Screwdriver
- Scissors
- Lighter
- Drill & mounting hardware
- Tape measure
• Non-metallic collar and lead
Set up and training help: www.petsafe.net
How the System Works
The PetSafe® Stay + Play Wireless Fence™ system has been proven safe, comfortable, and effective for all pets over 2.3 kg. The system works by transmitting a radio signal up to 32 m in all directions. You temporarily define the Pet Area with Boundary Flags for a visual aid in training your pet. Your pet wears a Receiver Collar with Contact Points that touch his neck, and, once trained, is allowed to roam freely within the Pet Area. When your pet reaches the Boundary Zone, the Receiver Collar gives a warning beep before delivering a safe Static Stimulation through the Contact Points to get his attention until he returns to the Pet Area.
Key Definitions
Pet Area: The area around the Transmitter where your pet can roam freely.
Boundary Zone: A 0.6 m to 1 m wide ring outside the Pet Area where your pet's Receiver Collar will begin to beep and then begin to deliver a Static Stimulation. The stimulation will start in the Boundary Zone and continue anywhere beyond the Pet Area. Note: The Receiver Collar is equipped with a safety time-out feature that will stop correcting after 15 seconds if your pet remains outside the Pet Area.
Receiver Collar: Receives the radio signal from the Transmitter.
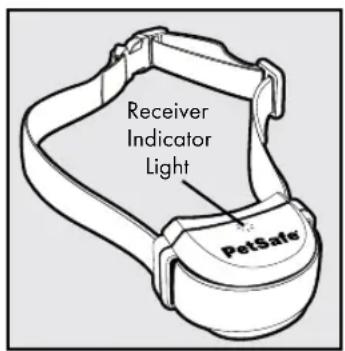
Receiver Indicator Light: Indicates the level of stimulation at which the Receiver Collar is set. This light also indicates battery status.
Contact Points: Deliver the safe Static Stimulation when your pet moves into the Boundary Zone.
Mode Button: Turns Receiver on/off and adjusts the level of Static Stimulation your pet received outside of Pet Area.
Receiver Charger: Charges the batteries inside the Receiver Collar.
Receiver Charge Jack: Connection point for charging Receiver battery.
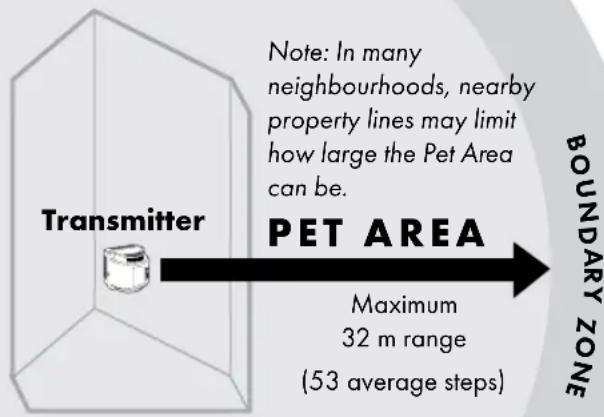
text_image
Transmitter Note: In many neighbourhoods, nearby property lines may limit how large the Pet Area can be. PET AREA Maximum 32 m range (53 average steps) BOUNDARY ZONEReceiver Collar
text_image
Receiver Indicator Light PetSafe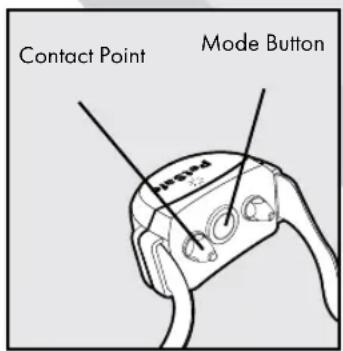
text_image
Contact Point Mode Button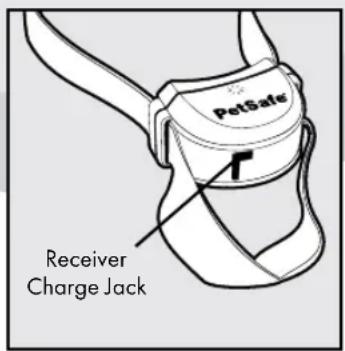
text_image
PetSafe Receiver Charge JackTransmitter: Transmits the radio signal and is the centre of the Pet Area.
Power Light: Indicates when the Transmitter is on.
Power Jack: Where the Power Adaptor plugs into the Transmitter. The Transmitter is powered by a standard AC outlet.
Boundary Switch: Adjusts the size according to the size of the Pet Area desired. Note: Adjusting the switch does not change the level of Static Stimulation on the Receiver Collar.
Boundary Control Dial: Adjusts the distance from the Transmitter to the Boundary Zone. Note: Adjusting the dial does not change the level of Static Stimulation on the Receiver Collar.
Alarm Disable Button: Silences Power Loss Alarm and re-initiates the Transmitter radio signal after Metal Interference Alarm activates.
Power Loss Alarm: Sounds an intermittent single tone alarm which indicates power has been removed from the Transmitter.
Metal Interference Alarm: Disables the Transmitter radio signal to protect the Transmitter from damage if placed too close to metal objects.
Transmission Failure Alarm: Continuous tone which indicates a Transmitter problem.
Transmitter
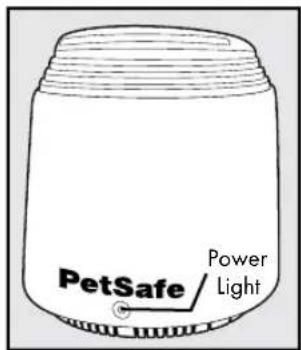
text_image
PetSafe Power Light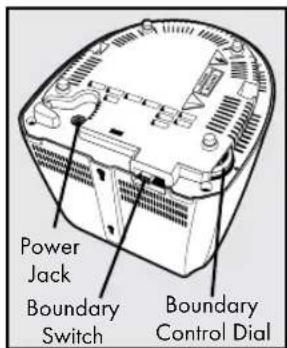
text_image
Power Jack Boundary Switch Boundary Control Dial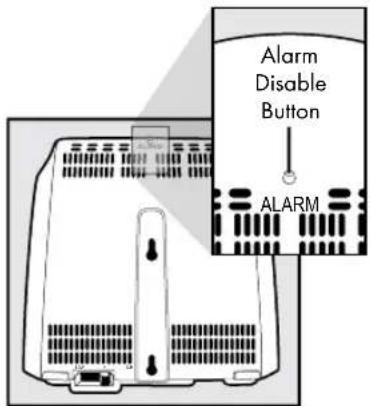
text_image
Alarm Disable Button ALARMOPERATING GUIDE
STEP 1
Set Up the Transmitter
Important: You may need to move the Transmitter several times before determining the final location.
The Transmitter is located at the exact centre of the desired Pet Area. Place the Transmitter:
- On the ground floor of your home and at least 60 cm above the floor.
• In a dry, well ventilated, protected area. - In an area where temperatures do not fall below -12 °C (e.g., garage, basement, shed, cupboard).
- On a non-metal table or other hard surface to ensure proper ventilation (1A).
NOTICE
- Do not place anything on top of Transmitter or cover any ventilation holes. This may overheat the Transmitter and cause early Transmitter failure.
- Do not place Transmitter in a closet or any other confined, unventilated area.
- Do not place Transmitter on or near a metal surface.
- At least 1 m from large metal objects, as these items may reduce the size and shape of your Pet Area (1B). Placing the Transmitter inside a metal building or shed can reduce the maximum range of the Stay + Play Wireless Fence™ system.
The Transmitter has three built in warning alarms: a Power Loss Alarm, a Metal Interference Alarm, and a Transmission Failure Alarm.
- The Transmitter Power Loss Alarm sounds an intermittent single tone alarm indicating power has been removed from the Transmitter. The Power Loss Alarm will last up to 30 minutes. In the event of a power loss, your pet is no longer contained.
There are three ways to turn off the Power Loss Alarm:
- Plug Power Adaptor into a functional standard AC outlet.
-
Unplug Transmitter Power Adaptor from the Power Jack located on the bottom of the Transmitter.
-
Press the Alarm Disable button for 5 seconds then release. Three short tones will sound to signify the alarm has been turned off.
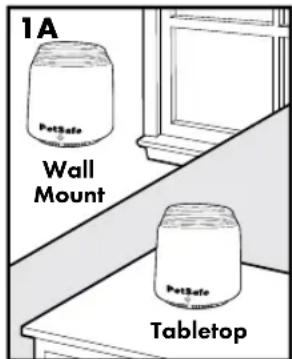
text_image
1A PetSafe Wall Mount PetSafe Tabletop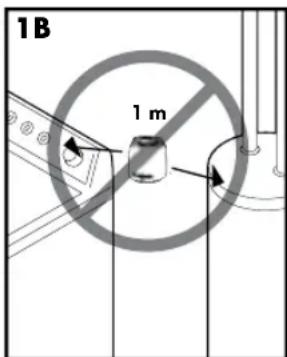
text_image
1B 1 m- The Metal Interference Alarm sounds an intermittent double tone alarm indicating that the Transmitter has been set towards the maximum range and placed on or close to a metal surface. If the Metal Interference Alarm sounds, your pet is no longer contained. You must relocate the Transmitter away from metal or the alarm will continue to sound and the transmission from the Transmitter will remain disabled.
There are two ways to turn off the Metal Interference Alarm and re-initiate the Transmitter radio signal.
- Unplug Transmitter Power Adaptor from the Power Jack located on the bottom of the Transmitter.
- Press the Alarm Disable Button for 5 seconds then release.
- The Transmission Failure Alarm makes a continuous tone indicating a Transmitter problem. In this situation, your pet can no longer be contained. Contact the Customer Care Centre or visit our website at www.petsafe.net for a replacement Transmitter.
STEP 2
Charge the Receiver Collar
The Receiver Collar Charger is designed to plug into a standard AC wall outlet. The Receiver Collar light will glow red when the Receiver Charger is properly seated into the Receiver Charge Jack. The light will turn green when charging is complete. A built in safety circuit prevents the Receiver Collar from overcharging.
The Receiver Collar will achieve a full charge in 2 to 3 hours. Each charge can last up to 3 weeks depending upon frequency of use.
text_image
2A PetSafeNOTICE
- Do not charge your Receiver Collar every night. Frequent charging can have a negative effect on the battery. We recommend that the Receiver Collar be used until the Receiver Indicator Light blinks yellow or red.
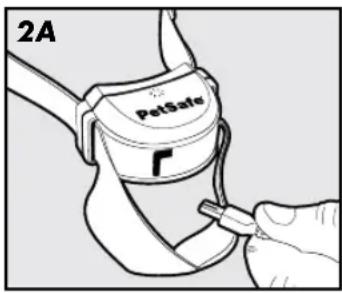
To charge the Receiver Collar, lift and slide the Receiver Collar strap away from the front of the unit (2A). Lift the rubber plug to allow access to the Receiver Charge Jack. The rubber plug needs to remain attached to the Receiver Collar. Plug the Receiver Charger into the Receiver Charge Jack on the Receiver Collar. The Receiver Charge Jack and Receiver Charger are keyed to fit one way. Do not force it in backwards.
STEP 3
Prepare the Receiver Collar
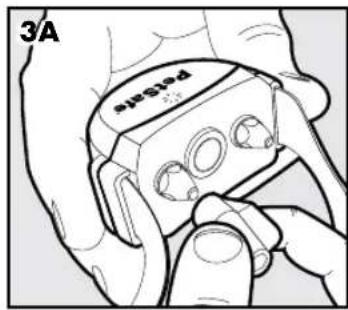
Your Receiver Collar comes with short Contact Points installed. Use the long Contact Points for pets with long or thick hair. Tighten the Contact Points using the Contact Point Wrench (3A). Check the tightness weekly.
Turning the Receiver Collar On
Press and hold the Mode Button continuously for 5 seconds (3B). The green or yellow or red Receiver Indicator Light will turn on for 5 seconds (3C) to indicate battery status, followed by the red Receiver Indicator Light flashing the Static Stimulation Level Settings.
Turning the Receiver Collar Off
Press and hold the Mode Button continuously for 5 seconds.
The red Receiver Indicator Light will be on during this time.
The red Receiver Indicator Light will then turn off and all Receiver Indicator Lights will stay off indicating that the unit is turned off.
To extend the time between charging the Receiver Collar, consider turning off the Receiver Collar when it is not in use.
text_image
3A PESER
text_image
3B POTATE Mode Button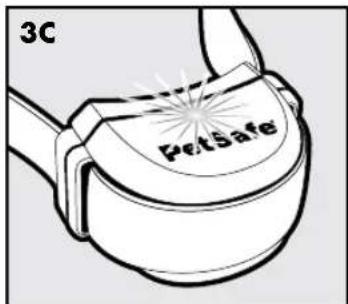
text_image
3C PetsafeReceiver Collar Status Indicators
The Receiver Indicator Light along with the Receiver Collar Alarm Tone are used to determine the battery status, and the stimulation type. Refer to the Receiver Collar Status Indicator Table below to understand the status lights and tones for the Receiver Collar.
During normal operation, the Receiver Indicator Light will flash every 4 to 5 seconds to indicate the battery status as shown in the table below.
| Receiver Collar Status Indicator Table | ||
| Status Light Alarm Tone Condition | ||
| While Plugged into Receiver Charger | ||
| Solid red No tone Charge in progress | ||
| Solid green No tone Charge complete | ||
| No light | Charge failure, contactCustomer Care Centre | |
| After Removing from Receiver Charger | ||
| Continuous green or yellow or red(5 seconds duration) | No tone | Battery Charge Indication.Occurs immediately after unplugging the charger from the Receiver Collar |
| Operating Battery Status | ||
| Slow blinking green(every 4-5 seconds) | No tone | Collar battery charge 100% to 60% |
| Slow blinking yellow(every 4-5 seconds) | No tone | Collar battery charge 60% to 20% |
| Slow blinking red(every 4-5 seconds) | No tone | Collar battery charge 20% or less,charge immediately |
| Receiver Activation Status | ||
| Fast pulsating green(3 flashes per second) | Warning tone Warning tone | |
| Fast pulsating red(3 flashes per second) | Tone for duration ofStatic Stimulation | Static Stimulation being delivered up to 15 seconds |
| Continuous green(10 seconds) | No tone | Over Stimulation Protection;collar locked for 10 seconds |
To Set the Static Stimulation Level
Read all the steps below before attempting to set the Static Stimulation Level. Refer to the Function and Response Table below for advice on setting the Static Stimulation Level that best suits your pet.
- Press the Mode Button and release (3B) when the Receiver Indicator Light illuminates Red (3C).
- The Receiver Indicator Light will emit a series of Red flashes representing the Static Stimulation Level.
- Increase the Static Stimulation Level by pressing and releasing the Mode Button within 5 seconds of the previous series of flashes.
The Static Stimulation levels increase in strength from 1 to 6. Pushing the Stimulation Level Button while the Receiver Collar is on level 6 will cause the Receiver Collar to revert to level 1.
| Function and Response Table | |||
| Indicator Light Response | Static Stimulation Level | Receiver Collar Function Temperament of Pet | |
| 1 Red Flash | 1 | No Static Stimulation, Tone Only | Initial Training Mode |
| 2 Red Flashes | 2 Low Static Stimulation | Timid | |
| 3 Red Flashes | 3 Medium-Low Static Stimulation | Timid or Average | |
| 4 Red Flashes | 4 Medium Static Stimulation | Average Energy | |
| 5 Red Flashes | 5 | Medium-High Static Stimulation | Average or High Energy |
| 6 Red Flashes | 6 High Static Stimulation | High Energy | |
Over Stimulation Protection
If your pet enters the Boundary Zone or continues anywhere beyond the Pet Area, this feature limits the Static Stimulation duration to 15 seconds. While the system locks out further Static Simulation, the green light will remain on for 10 seconds.
In the unlikely event that your pet leaves the Pet Area, he will not receive a Static Stimulation upon return to the Pet Area.
STEP 4
Adjust the Pet Area to Desired Size
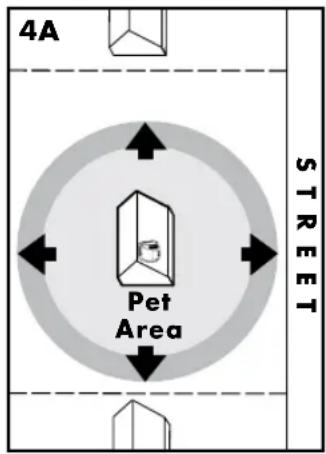
Make sure the entire Pet Area lies within your property boundaries (4A). Always start determining the Boundary Zone at the shortest distance from Transmitter. Place the Boundary Switch on "High" for Boundary Zones more than 13.5 m from the Transmitter. For Boundary Zones below this distance place the Boundary Switch on "Low."
Test Light Instructions
- Make sure the Receiver Collar Battery is properly charged. Set the Stimulation Level to 2 or above.
- Hold the Test Light Contacts to the Contact Points (4B).
- Walk toward the Boundary Zone holding the Receiver collar at your pet's neck level (4E) until the Test Light flashes (4F).
Save Test Light for future testing.
Note: If your next-door neighbour has an In-Ground Containment system, see Troubleshooting section page 23.
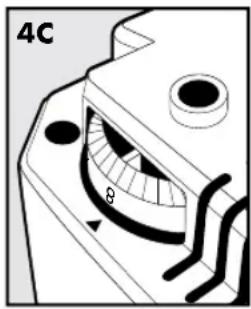
To maximize your Pet Area, make sure the Boundary Switch is on "High" and the Boundary Control Dial is set to "8" (4C & 4D). Plug Power Adaptor into Power Jack and standard AC outlet.
text_image
4A Pet Area STREET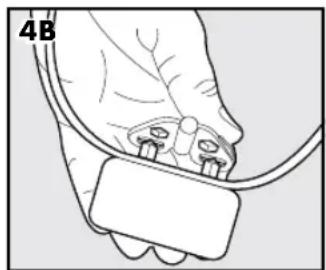
natural_image
Illustration of a hand holding a medical device with a label '4B' (no text or symbols on the device itself)Two-Person Method
Hold the Receiver Collar at your pet's neck height (4E) with the Petsafe® logo facing away from the Transmitter. Walk to the edge of the desired Pet Area. Facing away from the Transmitter, hold the Receiver Collar at the edge of the desired Pet Area (4F).
Starting with the Boundary Control Dial set to "8", have a second person turn the dial down SLOWLY. When the Receiver Collar starts to beep, tell the person to stop turning the Boundary Control Dial. Record your settings below for future reference.
One-Person Method
Measure the shortest distance from the desired Boundary Zone to the Transmitter. Find the distance on the Transmitter Range Chart on page 13 and set the Boundary Switch and Boundary Control Dial. Hold the Test Light Contacts to the Contact Points (4B). Take the Receiver Collar to the Boundary Zone with the logo side facing away from the
text_image
4C θ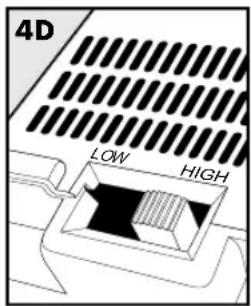
text_image
4D LOW HIGH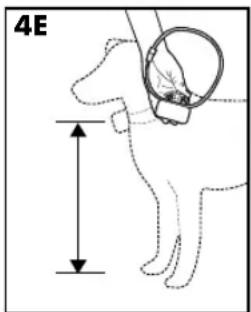
text_image
4E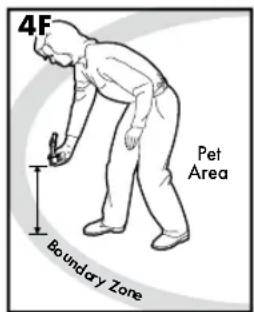
text_image
4F Pet Area Boundary ZoneTransmitter and Contact Points facing upwards (4E). Hold the Receiver Collar at your pet's neck level (4F) until the Receiver Collar beeps and the Test Light flashes. If the Receiver Collar beeps before or after the desired Boundary Zone, return to the Transmitter and adjust the Boundary Control Dial. Repeat this process until the Receiver Collar is beeping at the desired location. Record your settings on page 13 for future reference.
Transmitter Range Chart
(Note: These distances are approximate.)
| Boundary Control Dial Position | Boundary Switch LOW | Boundary Switch HIGH |
| 1 6.7 m 1 | 4.0 m | |
| 2 7.3 m 1 | 5.2 m | |
| 3 8.0 m 1 | 7.0 m | |
| 4 8.8 m 1 | 8.9 m | |
| 5 9.4 m 2 | 1.0 m | |
| 6 | 11.3 m | 25.9 m |
| 7 | 13.7 m | 29.0 m |
| 8 | 15.2m | 32.0 m |
Record Your Settings
| Final Boundary Switch Setting (HIGH or LOW) | Final Boundary Control Dial Position (1-8) | Receiver Static Stimulation Level (1-6) | |
| Home | |||
| Camping | |||
| Holiday | |||
| Other | |||
STEP 5
Place the Boundary Flags
The Boundary Flags are visual reminders for your pet of where the Boundary Zone is located. The Receiver Collar will activate within 0.6 m to 1 m of the Boundary Flags.
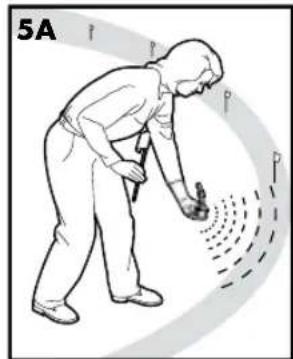
- Using the Test Light, with the Static Stimulation Level set at 2 or greater, hold the Receiver Collar at your pet's neck height with the PetSafe® logo facing away from the Transmitter.
- Walk towards the Boundary Zone until the Receiver Collar beeps and the Test Light flashes (5A).
- Place a Boundary Flag in the ground (5B).
- Walk back into the Pet Area until the beeping stops.
- Repeat this process around the Boundary Zone until it is marked with Boundary Flags every 3 m.
text_image
5A P P P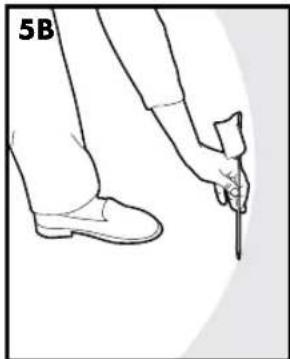
natural_image
Line drawing of a person's legs and foot with one hand holding a pen, no text or symbols presentThe Boundary Flags may be in different parts of the Boundary Zone and may not be in a line. The Boundary Zone is 0.6 m to 1 m wide.
STEP 6
Fit the Receiver Collar
Important: The proper fit and placement of your Receiver Collar is important for effective training and the Safety of your pet. The Contact Points must have direct contact with your pet's skin on the underside of his neck.
CAUTION
Please read and follow the instructions in this manual. Proper fit of the collar is important. A collar worn for too long or made too tight on the pet's neck may cause skin damage. Ranging from redness to pressure ulcers; this condition is commonly known as bed sores.
- Avoid leaving the collar on the dog for more than 12 hours per day.
- When possible reposition the collar on the pet's neck every 1 to 2 hours.
- Check the fit to prevent excessive pressure; follow the instructions in this manual.
- Never connect a lead to the electronic collar; it will cause excessive pressure on the contacts.
- When using a separate collar for a lead, don't put pressure on the electronic collar.
- Wash the dog's neck area and the contacts of the collar weekly with a damp cloth.
- Examine the contact area daily for signs of a rash or a sore.
- If a rash or sore is found, discontinue use of the collar until the skin has healed.
- If the condition persists beyond 48 hours, see your veterinarian.
- For additional information on bed sores and pressure necrosis, please visit our website.
These steps will help keep your pet secure and comfortable. Millions of pets are comfortable while they wear stainless steel contacts. Some pets are sensitive to contact pressure. You may find after some time that your pet is very tolerant of the collar. If so, you may relax some of these precautions. It is important to continue daily checks of the contact area. If redness or sores are found, discontinue use until the skin has fully healed.
You may need to trim the hair in the area of the Contact Points. Never shave the dog's neck; this may lead to a rash or infection.
To assure a proper fit, please follow these steps:
- Make sure Transmitter is not plugged in, and the receiver is turned off.
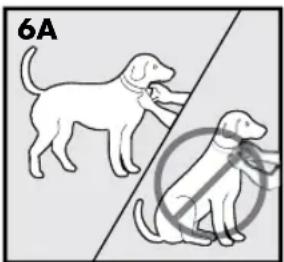
- Start with your pet standing comfortably (6A).
- To make it easier to hear the warning beep, place the Receiver Collar on your pet with the PetSafe® logo side of the Receiver facing your pet's chin.
- Centre the Contact Points underneath your pet's neck, touching the skin. If your pet has a long or thick coat, use the enclosed long Contact Points to reach through the hair.
text_image
6ACAUTION
You may need to trim the hair in the area of the Contact Points. Never shave the dog's neck; this may lead to a rash or infection.
-
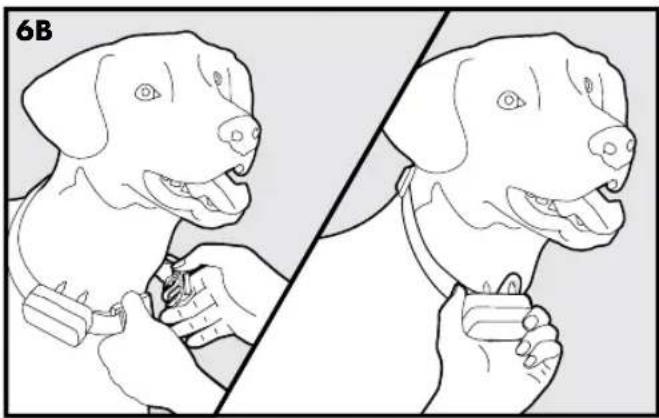
Check the tightness of the Receiver Collar by inserting one finger between the end of a Contact Point and your pet's neck. The fit should be snug but not constricting (6B).
-
Allow your pet to wear the collar for several minutes then recheck the fit. Check the fit again as your pet becomes more comfortable with the Receiver Collar.
-
Trim the collar as follows (6C):
a. Mark the desired length of the Receiver Collar with a pen. Allow for growth if your pet is young or grows a thick winter coat.
b. Remove the Receiver Collar from your pet and cut off the excess.
c. Before placing the Receiver Collar back onto your pet, seal the edge of the cut collar by applying a flame along the frayed edge.
natural_image
Illustration of a dog being held by hands, showing two different positions (no text or symbols)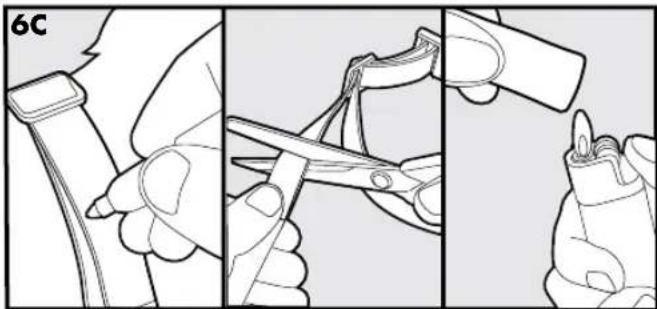
natural_image
Three-step illustration showing a hand holding a tool, cutting a piece into a clip, and adjusting the tip of a clip (no text or symbols present)To Re-Thread the Collar
text_image
Slide Buckle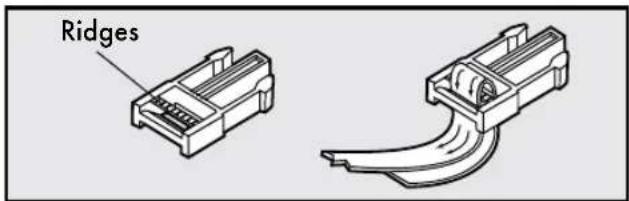
text_image
Ridges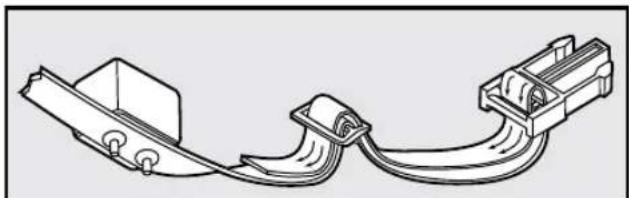
natural_image
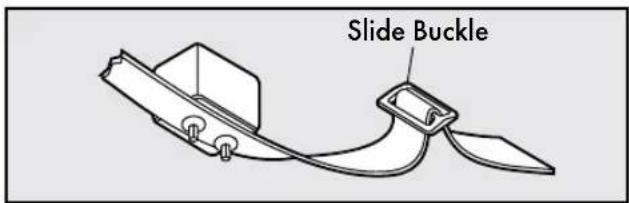
Technical line drawing of a mechanical clamp or connector assembly (no text or symbols)The slide buckle prevents the collar from becoming loose around your pet's neck.
The ridges must be facing up; the collar will slip if it is not properly threaded.
TRAINING GUIDE
Be Patient With Your Pet
Important: Proper training of your pet is essential to the success of the PetSafe® Stay + Play Wireless Fence™ system. Read this section completely before beginning to train your pet. Remember that the PetSafe® Stay + Play Wireless Fence™ system is not a solid barrier.
- Have fun with your pet throughout the training process. Training should be fun, fair, firm and consistent.
- Train for 10 to 15 minutes at a time. Don't try to do too much too quickly. More-frequent short sessions are better than less-frequent longer sessions.
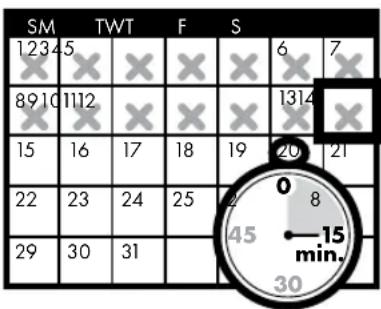
- We suggest a minimum of 14 days of training. Depending on your pet and how he learns, the training could take more or less time.
-
If your pet shows signs of stress, slow down the training schedule, add additional days of training, or increase the amount of play time with your pet in the Pet Area. Common stress signals include:
-
Pet pulling on lead toward the house
- Ears tucked
- Tail down
- Body lowered
- Nervous / frantic movement or stiffening of pet's body
- Your pet must be completely comfortable near the Boundary Flags at the end of every training session. Spend at least 5 minutes of "play time" at the completion of each session within 3 m of the Boundary Flags.
- Finish each training session on a positive note with lots of praise and play.
- Remove the Receiver Collar after each training session.
- Be sure to contain your pet by another means during the training period.
- During training, if you need to take your pet out of the Pet Area, remove the Receiver Collar and either pick your pet up or put him in the car to pass out of the Pet Area.
- Even if you think your pet is responding well to the training, complete the entire training. Reinforcement is important!
PHASE 1
Day 1 - Boundary Awareness
Tone Only Training Mode
Perform three sessions on day 1, each training session lasting 10 to 15 minutes.
Goal:
To have your pet learn that the Boundary Flags and warning beep from the Receiver Collar define the new Pet Area.
Setup:
- Program the Static Stimulation level on the Receiver Collar to level 1, tone only training mode.
- Put a separate non-metallic collar on your pet's neck ABOVE the Receiver Collar and attach a lead.
CAUTION
Be sure the extra collar does not put pressure on the Contact Points.
• Have tiny pieces of treats that your pet will find desirable available.
- Have your pet's favourite play toy available.
Steps:
- Begin by walking your pet on a lead in the Pet Area. Calmly praise and talk to your pet.
- Move toward the Boundary Flags (1A). Keep your mood happy.
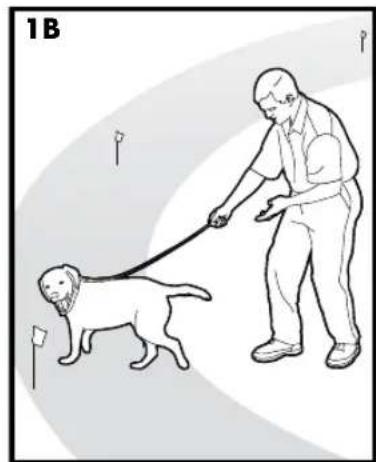
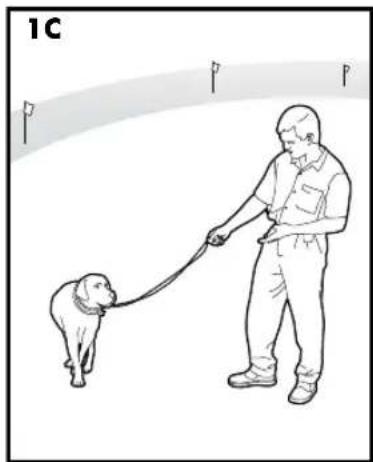
- With full control of your pet on a lead, walk to the Boundary Flags. As your pet enters the Boundary Zone, the Receiver Collar will begin to tone (1B). Allow your pet to stay in the Boundary Zone for up to 2 seconds then gently help him back into the Pet Area (1C). Immediately praise and offer your pet a treat as he enters the Pet Area, even if you have helped with the lead.
- Repeat this process at the same Boundary Flag until your pet resists going into the Boundary Zone.
- Aim to master 3 to 4 Boundary Flags per session. Make this FUN! Praise if your pet quickly retreats or resists going into the Boundary Zone.

text_image
1A 1B 1C P P P P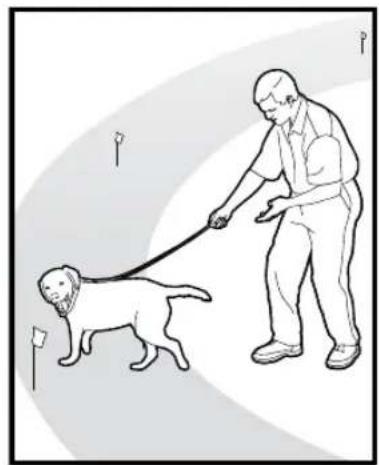
natural_image
Illustration of a person walking with a dog, no text or symbols present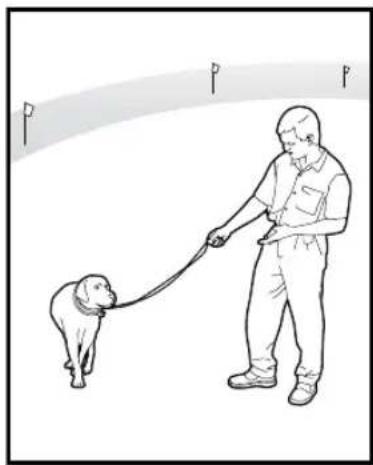
natural_image
Illustration of a man walking a dog on a leash, with no text or symbols presentPHASE 2
Days 2 thru 4 - Continue Boundary Awareness Introduction to Static Stimulation
Perform three sessions per day, each lasting 10 to 15 minutes.
Goal:
To train your pet to stay in the Pet Area and respect the boundary.
Setup:
- Program the Static Stimulation level on the Receiver Collar to level 2.
- Put a separate non-metallic collar on your pet's neck ABOVE the Receiver Collar and attach a lead.
CAUTION
Be sure the extra collar does not put pressure on the Contact Points.
- Have tiny pieces of treats available.
- Have your pet's favourite play toy available.
Steps:
- Repeat steps 1 through 5 in Phase One.
- If your pet does not respond to the Static Stimulation, confirm that the Receiver Collar is fitting properly according to Step 6 on page 14.
- If the Receiver Collar is fitted properly and your pet does not respond to the Static Stimulation, increase the Static Stimulation Level by 1. Watch for slight reactions at first such as ears up, head turned, looking at the ground.
- Stay at the same Boundary Flags until your pet resists going into the Boundary Zone.
PHASE 3
Days 5 thru 8 - Distraction Phase
Perform three training sessions per day, each lasting 10 to 15 minutes.
Goal:
To train your pet to stay within the Pet Area with distractions outside of the Pet Area.
Setup:
- Program the Static Stimulation level on the Receiver Collar to level 2 or higher depending on your pet's response to days 2 through 4.
- Put a separate non-metallic collar on your pet's neck ABOVE the Receiver Collar and attach a lead.
CAUTION
Be sure the extra collar does not put pressure on the Contact Points.
- Have tiny pieces of treats available.
- Have your pet's favourite play toy available.
- Create distractions to tempt your pet to enter the Boundary Zone, such as:
- Have a family member cross from inside the Pet Area to outside of it.
- Throw a ball outside of the Pet Area.
- Have a neighbour walk their pet outside of the Pet Area.
- Gradually increase distraction level. Never coax or call your pet out of the Pet Area.
Steps:
- With full control of your pet on a lead, have the distraction presented.
- If your pet does not move toward the distraction, praise and offer a treat.
- If your pet does react to the distraction, allow him to go into the Boundary Zone.
- Help your pet back into the Pet Area if he does not turn back after 2 seconds.
- Treat and praise your pet anytime he comes back into the Pet Area with or without help.
- Repeat this process with other distractions. Use other family members during this process.
- If your pet does not respond to the Static Stimulation, confirm that the Receiver Collar is fitting properly according to Step 6 on page 14.
- If the Receiver Collar is fitted properly and if your pet does not respond to the Static Stimulation, increase the Static Stimulation Level by 1.
PHASE 4
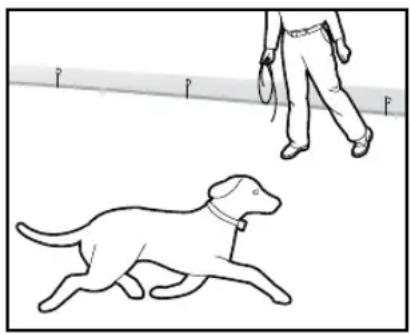
Days 9 thru 14 - Supervision Off the Lead
Training sessions should start at 10 to 15 minutes, gradually increasing to over an hour.
Your pet is ready for this step only when he clearly avoids the entire Boundary Zone, regardless of any distractions or temptations. During this step, do not leave your pet unattended.
Goal:
To give your pet free run of the Pet Area off the lead.
Setup:
Adjust the Receiver Collar to the permanent setting appropriate for your pet depending on his size and temperament.
natural_image
Line drawing of a dog running alongside a person walking, with no text or symbols present.Steps:
- Enter the Pet Area with your pet wearing the Receiver Collar.
- Walk around the garden and play with your pet, staying within the Pet Area at all times.
- Preoccupy yourself with another task in the garden while watching your pet.
PHASE 5
Days 15 thru 30 - Pet Monitoring
Your pet is ready to run! Check in on your pet at regular intervals.
Note: After you are satisfied your pet's training is complete, remove every other Boundary Flag every 4 days until all flags are removed. Save Boundary Flags for future use.
Taking Your Pet Out of the Pet Area
Important: Remove the Receiver Collar and leave it in the Pet Area.
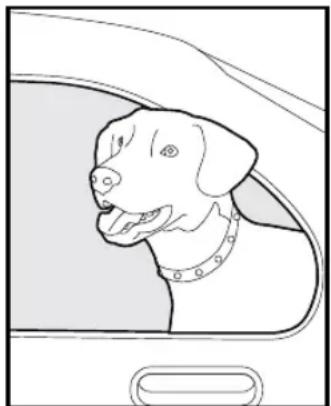
Once your pet learns the Boundary Zone, he will be reluctant to cross it for walks or car rides.
Option 1: Replace the Receiver Collar with a regular collar. Put your pet in a car that is within the Pet Area and drive him out of the Pet Area.
Option 2: Replace the Receiver Collar with a regular collar and lead. Walk your pet out of the Pet Area while giving a command such as "OK" at a specific place of the Boundary Zone (the end of your driveway, sidewalk, etc.). Always leave the Pet Area with a lead at this place and your pet will associate leaving the Pet Area only on a lead, only at this place, and only with a person. You may initially need to convince your pet to leave the Pet Area with a food treat and lots of praise.
Note: You may also carry your pet out of the Pet Area.
natural_image
Line drawing of a dog's head and collar inside a vehicle (no text or symbols)Wireless-To-Go
Your PetSafe ^® Stay + Play Wireless Fence ^™ system is completely portable. Follow the set-up procedures (Steps 1 through 4) wherever you wish to have containment of your pet. Reestablish the Pet Area and mark it with Boundary Flags so your pet knows his Boundary Zone.
Note: If setting up in a metal building or vehicle, the maximum size of the Pet Area may be reduced. Be sure to remove the Receiver Collar battery before turning off the Transmitter. If you want to power the Transmitter from a car or other DC source, use an inverter rated for 50 watts or more.
Accessories
To purchase additional accessories for your PetSafe ^® Stay + Play Wireless Fence ^™ system, visit our website at www.petsafe.net to locate a retailer near you and for a listing of Customer Care Centre telephone numbers in your area.
Frequently Asked Questions
| How old does my pet have to be before starting training on the PetSafe® Stay + Play Wireless FenceTM system? | ·Because all pets are different, training on this system can be started once your pet can learn basic obedience commands like "sit" and "stay". The system should only be used with pets who are over 6 months of age. If your pet is injured or its mobility is otherwise impaired, contact your veterinarian or professional trainer before use. |
| Is the Receiver Collar waterproof? · | Yes. |
| Will the PetSafe® Wireless Pet Containment SystemTM cover a larger circle than 64 m across? | ·You can use another wireless Transmitter with overlapping boundaries of at least 2 m to 3 m to get a larger Pet Area. |
| Will a sloping garden affect the Pet Area? | ·The Transmitter signal extends 32 m in all directions. A sloping garden can cause the Pet Area to appear less or more than expected. Consider repositioning the Transmitter to maximize your Pet Area. |
| Can I use more than one Receiver Collar with the Stay + Play Wireless FenceTM? | ·Yes. There is no limit to the number of pets you can contain with the Stay + Play Wireless FenceTM. You must purchase an additional Receiver Collar for each pet. Contact the Customer Care Centre or visit our website at www.petsafe.net to locate a retailer near you. |
| Will the Stay + Play Wireless FenceTM keep other pets out of my garden? | ·No. The Wireless system is only effective on pets who wear the Receiver Collar. |
| Is there a hand-held remote Transmitter that will work with the Stay + Play Wireless FenceTM Receiver Collar? | ·No. You would need to purchase a separate Remote Training system. Contact the Customer Care Centre or visit our website at www.petsafe.net to locate a retailer near you. |
| Is there a smaller Receiver Collar or another compatible Receiver Collar that I can use with the wireless Transmitter? | ·No. Contact the Customer Care Centre or visit our website at www.petsafe.net for additional ideas or solutions. |
| If I have a question about my Stay + Play Wireless FenceTM or need replacement parts, where can I get answers or service? | ·Contact the Customer Care Centre or visit our web site at www.petsafe.net. |
| Can I use the Stay + Play Wireless FenceTM on an aggressive pet? | ·This product is not for use with aggressive pets. If you are unsure if your dog is aggressive, please consult your veterinarian or a certified trainer. |
| Can I use the Stay + Play Wireless FenceTM on a cat? | ·The Stay + Play Wireless FenceTM can be used as long as the cat can comfortably wear the Receiver Collar. |
| What happens if the power is cut? | The Stay + Play Wireless FenceTM is designed to recognize power loss and shuts down without activating the Receiver Collar. However, if your pet is near the Boundary Zone during the power failure, he may receive a Static Stimulation. The Transmitter will sound an intermittent alarm for up to 30 minutes to alert you to the power failure. |
| If my pet leaves the Pet Area, for how long will he be corrected? | Your pet will receive Static Stimulation for up to 15 seconds as long as he is out of the Pet Area. |
| How often do I need to charge the Receiver Collar battery? | Battery life depends on how frequently your pet tests the Boundary Zone. The Receiver Indicator Light acts as a low battery indicator, flashing every 4 to 5 seconds when replacement is required. |
| Can I place the Receiver on another collar? | Yes. You may use any 1.9 cm, non-metallic collar. |
| Do I need to perform maintenance on my Stay + Play Wireless FenceTM? | Check your pet's neck daily for irritation from the Contact Points.Check the Contact Points on the Receiver Collar weekly to make sure they are tight and clean.Check the fit of the Receiver Collar weekly.The Receiver Indicator Light acts as a low battery indicator, flashing every 4 to 5 seconds when replacement is required. |
| How do I know the battery in the Receiver Collar is still working? | Check Receiver Indicator Light. |
| Will vehicles, buildings, and landscape features (trees, shrubs, etc.) affect the performance of the Stay + Play Wireless FenceTM? | Yes. Placing the Transmitter inside a metal building can reduce the maximum range of the wireless system.Parking a vehicle within the Pet Area, can reduce the range of the system and cause your pet to receive a Static Stimulation where it otherwise would not if the vehicle was not there.Fixed large metal objects such as metal sheds can affect the signal by reducing the maximum range of the system at the location of the object. As a result, your pet may receive a Static Stimulation. |
| What do I do if my pet's neck becomes red and irritated? | This condition is due to the Contact Points irritating the skin. Discontinue use of the Receiver Collar for a few days. If the condition persists beyond 48 hours, see your veterinarian. Once the skin returns to normal, replace the Receiver Collar and monitor the skin condition closely. |
| Can I attach a lead to the Receiver Collar? | No. This can result in pulling the Contact Points too tightly against your pet's neck. Attach a lead to a separate, non-metallic collar positioned above the Receiver Collar. |
| Why does my Receiver Collar have a beep only mode? | The beep only mode can be used in training your pet to his boundary or for well-trained pets that no longer require Static Stimulation. |
Troubleshooting
| The Transmitter is sounding an intermittent double tone alarm. | ·The intermittent double tone is the Metal Interference Alarm. This alarm sounds if the Transmitter is placed too close to a metal surface. When this alarm sounds, the transmission output is disabled and your pet is no longer being contained. Relocate the Transmitter and either unplug the Power Adaptor from the Power Jack or press the Alarm Disable Button for 5 seconds then release. |
| The Transmitter is sounding an intermittent single tone when I unplug the Power Adaptor from the wall outlet. | ·The Power Loss Alarm in the Transmitter is activated to alert you that power has been removed from the Transmitter and your pet is no longer being contained. To turn off the Power Loss Alarm, unplug the Power Adaptor from the Power Jack located on the bottom of the Transmitter or press the Alarm Disable Button for 5 seconds then release. |
| The Transmitter is generating a loud continuous tone. | ·The Transmitter has a built in Transmission Failure Alarm that continuously monitors the Transmitter output. If a transmission failure ever occurs the alarm warns you that your pet is no longer being contained. Contact the Customer Care Centre for a replacement Transmitter. |
| The Receiver Collar is not beeping when setting up the Boundary Zone. | ·Make sure Receiver Collar is turned on and Battery Status Lights are flashing every 4 to 5 seconds.·Charge Receiver Collar.·The beep may be difficult to hear in a noisy environment.·Install the Test Light as explained in the “Test Light Instructions” section, and use it to determine the location of Boundary Zone.·Check that the Transmitter is set up according to directions. |
| The Receiver Collar is not beeping or administering a Static Stimulation. | ·Make sure Receiver Collar is turned on and Battery Status Lights are flashing every 4 to 5 seconds.·Charge Receiver Collar.·Check that the Transmitter is plugged into a working standard AC outlet, the Power Light is on, and the Transmitter controls are set at your desired settings. |
| The Receiver Collar is beeping everywhere. | ·Check that the Transmitter is plugged into a working standard AC outlet, the Power Light is on, and the Transmitter controls are set at your desired settings.·Bring Receiver Collar within 3 m of the Transmitter to reset.·Make sure no continuous alarm is sounding on the Transmitter. |
| The Receiver Collar is beeping inside the house. | It is recommended to remove the Receiver Collar fram your pet when indoors to avoid activation of the Receiver Collar.Make sure the Transmitter is plugged in and set up according to the directions.Ensure the entire house is within the Pet Area. The Transmitter may need to be moved to adjust the Pet Area to include the entire house.If relocating the Transmitter, remove the Receiver Collar from your pet before removing power from the Transmitter. |
| My pet is receiving a Static Stimulation in his metal crate. | The Receiver Collar activates when it loses the Transmitter signal. The metal crate may block the Transmitter signal which causes the Receiver Collar to activate.Remove the Receiver Collar from your pet when placing him in his metal crate. |
| The Boundary Zone seems to fluctuate. | This is normal for the electro magnetic field of the Stay + Play Wireless FenceTM. The field may be affected by surrounding “electronic noise,” which can cause it to fluctuate up to 5%.Where the Receiver Collar activates is influenced by the speed and orientation of the Receiver Collar as your pet enters the Boundary Zone. |
| The Receiver Collar activates in the middle of the garden. | The Receiver Collar activates when it loses the Transmitter signal. This sometimes occurs if a large metal object is between the Receiver Collar and Transmitter, if the orientation of the Receiver Collar changes near the Boundary Zone, or if the surrounding “electronic noise” interferes with the signal. If this continues to occur, consider relocating the Transmitter and resetting the Pet Area. |
| The Receiver Collar is beeping but my pet is not responding to the Static Stimulation. | Make sure the Static Stimulation Level is set at 2 or above.Test the Receiver Collar with the Test Light.If the Test Light flashes, check the fit of the Receiver Collar.Trim your pet’s fur where the Contact Points touch the neck and/or switch to the longer Contact Points.Increase the Static Stimulation Level.Repeat training steps to reinforce training. |
| My pet reacts strongly to the Static Stimulation and has become fearful. | Lower the Static Stimulation Level.Make sure you are in control of the situation when your pet receives his first Static Stimulations (have him on a lead attached to a separate, non-metallic collar) and lead him into the Pet Area and praise him. If your pet remains fearful, suspend training and start again the next day. Make sure to end all training sessions on a positive note with lots of praise and play. |
| The Transmitter Power Light is not on. | Make sure the Power Light on the Power Adaptor is on when plugged into a working standard AC wall outlet.If Power Adaptor Light is not on, contact the Customer Care Centre for a replacement Power Adaptor. |
| I was setting up the Pet Area and after I turned down the Boundary Control Dial, the Receiver Collar would no longer beep or correct. | You may have turned the Boundary Control Dial down too quickly, causing the Receiver Collar to go into power-fail mode. This is a safety feature designed to protect your pet when power to the Transmitter goes out. With the Receiver Collar within 3 m of the Transmitter, readjust the Boundary Control Dial as shown in Step 4 and reset the Boundary Zone, making sure to turn the dial down slowly. |
| My next-door neighbour has an in-ground containment system and the Receiver Collar does not activate near their property. | Your neighbour's In-Ground Fence signal may interfere with the operation of the Receiver Collar preventing activation close to their fence. To minimize the interference, reduce the size of the Pet Area or move the Transmitter away from the in-ground containment system.Adjust the Pet Area so that the Receiver Collar activates for at least 1.5 m beyond the reduced Boundary setting when walking towards the in-ground containment system. |
| The Receiver Collar has injured my pet's neck. | Failing to follow the important safety information at the front of the Operating and Training Guide has caused pressure ulcers. Some descriptions of advanced pressure ulcers describe the sores as looking like burns on the dog's neck. Be assured that electronic collars do not use enough energy to create electrical burns. The energy in an output pulse is only a few thousandths of a Joule; it is similar in nature to the static pulse that you may feel when getting out of your car. In some cases, pressure ulcers are described as chemical burns. The battery in your Receiver Collar is sealed, in addition, your collar's housing is also sealed. This sealing makes it virtually impossible, without misuse or abuse, for your Receiver Collar battery to leak onto your pet's neck. Please review and follow the important safety information on page 2, and the instructions in Step 6 under the heading "Fit the Receiver Collar". |
Terms of Use and Limitation of Liability
1. Terms of Use
Use of this Product is subject to your acceptance without modification of the terms, conditions and notices contained herein. Use of this Product implies acceptance of all such terms, conditions and notices. If you do not wish to accept these terms, conditions, and notices, please return the Product, unused, in its original packaging and at your own cost and risk to the relevant Customer Care Centre together with proof of purchase for a full refund.
2. Proper Use
This Product is designed for use with pets where training is desired. The specific temperament or size/weight of your pet may not be suitable for this Product. Radio Systems Corporation recommends that this Product is not used if your pet is aggressive and accepts no liability for determining suitability in individual cases. If you are unsure whether this Product is appropriate for your pet, please consult your veterinarian or certified trainer prior to use. Proper use includes, without limitation, reviewing the entire Operating Guide and any important safety statements.
3. No Unlawful or Prohibited Use
This Product is designed for use with pets only. This pet training device is not intended to harm, injure or provoke. Using this Product in a way that is not intended could result in violation of Federal, State or local laws.
4. Limitation of Liability
In no event shall Radio Systems Corporation or any of its associated companies be liable for (i) any indirect, punitive, incidental, special or consequential damage and/or (ii) any loss or damages whatsoever arising out of or connected with the misuse of this Product. The Purchaser assumes all risks and liability from the use of this Product to the fullest extent permissible by law.
5. Modification of Terms and Conditions
Radio Systems Corporation reserves the right to change the terms, conditions and notices governing this Product from time to time. If such changes have been notified to you prior to your use of this Product, they shall be binding on you as if incorporated herein.
Covered by US Patent 6,879,300; 7,142,167.
Compliance
CE
This equipment has been tested and found to comply with the EU R&TTE Directive. Before using this equipment outside the EU countries, check with the relevant local R&TTE authority. Unauthorised changes or modifications to the equipment that are not approved by Radio Systems Corporation may violate EU R&TTE regulations, could void the user's authority to operate the equipment, and will void the warranty.
Hereby, Radio Systems Corporation, declares that this Stay + Play Wireless Fence ^™ is in compliance with the essential requirements and other relevant provisions of Directive 1999/5/EC. The Declaration of Conformity can be found at: http://www.petsafe.net/customercare/eu_docs.php.
IC
This device complies with Industry Canada licence-exempt RSS standard(s). Operation is subject to the following two conditions: (1) this device may not cause interference, and (2) this device must accept any interference, including interference that may cause undesired operation of the device.
ACMA
This device complies with the applicable EMC requirements specified by the ACMA (Australian Communications and Media Authority).
Important Recycling Advice
Please respect the Waste Electrical and Electronic Equipment regulations in your country. This equipment must be recycled. At the end of the product life, do not place it in the normal municipal waste system. Please check the regulations in your area or return it to where it was purchased so that it can be placed in our recycling system. If these options are not possible, please contact the Customer Care Centre for further information.
The Receiver Collar for this unit operates on one 3.7 Volt Rechargeable Lithium-Ion battery.
Warranty
Three Year Non-Transferrable Limited Warranty
This Product has the benefit of a limited manufacturer's warranty. Complete details of the warranty applicable to this Product and its terms can be found at www.petsafe.net and/or are available by contacting your local Customer Care Centre.
Europe – Radio Systems PetSafe Europe Ltd., 2nd Floor, Elgee Building, Market Square, Dundalk, Co. Louth, Ireland
Canada – Radio Systems Corporation, 10427 PetSafe Way, Knoxville, TN 37932 USA
Australia/New Zealand – In compliance with the Australian Consumer Law, Warranties Against Defects, effective January 1, 2012, warranty details of this Product are as follows: Radio Systems Australia Pty Ltd. (hereinafter referred to as "Radio Systems") warrants to the original retail purchaser, and not any other purchaser or subsequent owner, that its Product, when subject to normal and proper residential use, will be free from defects in material or workmanship for a period of three (3) years from the purchase date. An "original retail consumer purchaser" is a person or entity who originally purchases the Product, or a gift recipient of a new Product that is unopened and in its original packaging. When serviced by Radio Systems Customer Service, Radio Systems covers labour and parts for the first three years of ownership; after the first three years, a service or upgrade charge will apply relative to replacement of the Product with new or refurbished items at Radio Systems' sole discretion.
The limited warranty is non-transferrable and shall automatically terminate if the original retail consumer purchaser resells the Radio Systems Product or transfers the property on which the Radio Systems Product is installed. This Limited Warranty excludes accidental damage due to dog chews; lightning damage; or neglect, alteration, and misuse. Consumers who purchase products outside of Australia, New Zealand, or from an unauthorised dealer will need to return the Product to the original place of purchase for any warranty issues.
Please note that Radio Systems does not provide refunds, replacements, or upgrades for change of mind, or for any other reason outside of these Warranty terms.
Claims Procedure: Any claim made under this Warranty should be made directly to Radio Systems Australia Pty Ltd. Customer Care Centre at:
Radio Systems Australia Pty Ltd.
PO Box 7266, Gold Coast Mail Centre QLD 9726, Australia
Australia Residents: 1800 786 608
New Zealand Residents: 0800 543 054
Email: info@petsafeaustralia.com.au
To file a claim, a proof of purchase must be provided. Without a proof of purchase, Radio Systems will not repair or replace faulty components. Radio Systems requests the Consumer to contact the Radio Systems Customer Care Centre to obtain a Warranty Return number, prior to sending the Product. Failure to do so may delay in the repair or replacement of the Product.
If the Product is deemed to be faulty within 30 days from date of original purchase, Radio Systems will organise for a replacement to be sent in advance of returning the faulty Product. A Post Bag will be included with the replacement Product for the return of the faulty Product. The Product must be returned within 7 days of receiving the replacement. If the Product is deemed to be faulty after 30 days from the date of original purchase, the consumer will be required to return the Product to Radio Systems at the consumer's own expense. Radio Systems will test and replace the faulty unit or its components and return to the consumer free of charge, provided the Product is within its said warranty period. This warranty is in addition to other rights and remedies available to you under the law. Radio Systems goods come with guarantees that cannot be excluded under the Australia Consumer Law. You are entitled to a replacement or refund for a major failure and for compensation for any other reasonably foreseeable loss or damage. You are also entitled to have the goods repaired or replaced if the goods fail to be of acceptable quality and the failure does not amount to a major failure.
Should you have any queries or require any further information, please contact our Customer Care Centre on 1800 786 608 (Australia) or 0800 543 054 (New Zealand).
text_image
2A PetsafeAVIS
text_image
3A stated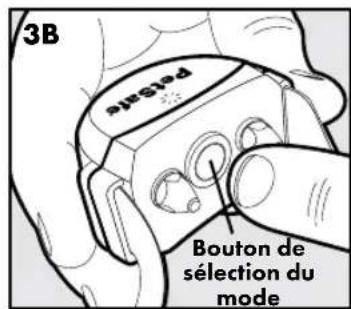
text_image
3C Petsafenatural_image
Medical illustration showing a hand holding a device with a catheter and tubing (no text or symbols)text_image
5A P P P P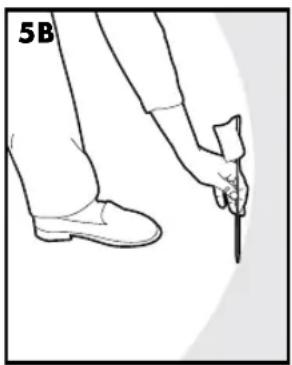
natural_image
Line drawing of a person's legs and foot holding a pen, no text or symbols presentÉTAPE 6
natural_image
Illustration of a dog being held in a dog's mouth, showing front and side views (no text or symbols)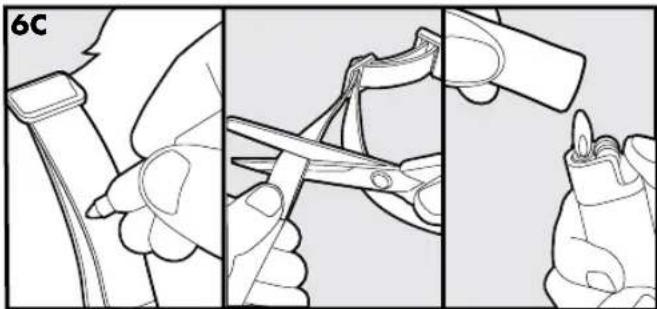
natural_image
Three-step illustration showing a hand holding a tool, being cut with scissors, and finally adjusting the grip (no text or symbols present)natural_image
Technical line drawing of a mechanical component with two curved connectors and a housing (no text or symbols)text_image
1A 1B 1C P P P P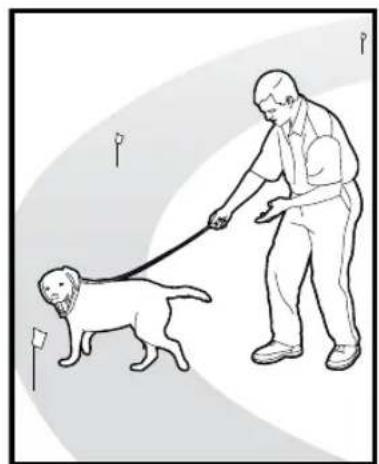
natural_image
Illustration of a man walking with a dog, no text or symbols present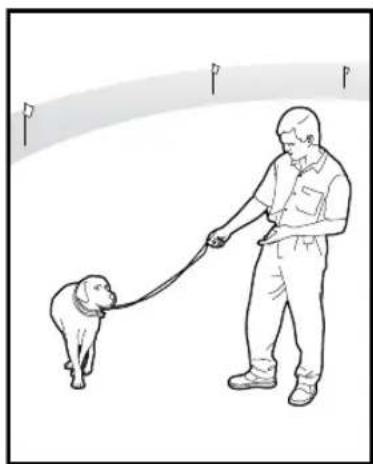
natural_image
Line drawing of a person walking with a dog, no text or symbols presentPHASE 2
natural_image
Line drawing of a dog running alongside a person walking on a path (no text or symbols)Étapes :
natural_image
Line drawing of a dog's head and collar inside a vehicle (no text or symbols)Europe - Radio Systems PetSafe Europe Ltd., 2nd Floor, Elgee Building, Market Square, Dundalk Co. Louth, Ireland
Canada – Radio Systems Corporation, 10427 PetSafe Way, Knoxville, TN 37932 USA
text_image
3C PetsafeStatusindicators van de ontvangerhalsband
natural_image
Illustration of a hand holding a medical device with a labeled section '4B' (no text or symbols on the device itself)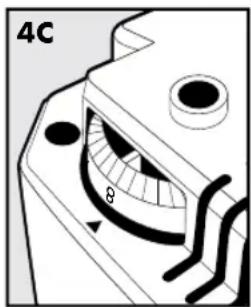
text_image
4C θ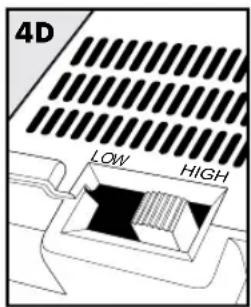
text_image
4D LOW HIGH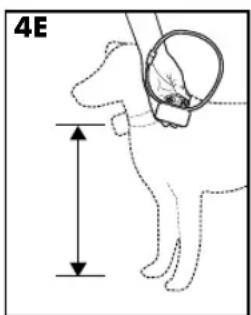
text_image
4E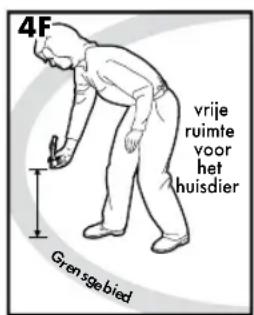
text_image
5A P P P P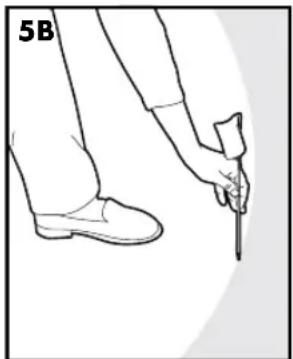
natural_image
Line drawing of a person's legs and foot with a hand holding a tool, labeled '5B' (no text or symbols on the diagram itself)natural_image
Illustration of two dogs: one standing and one sitting, separated by a diagonal line (no text or symbols)VOORZICHTIG
natural_image
Illustration of a dog being held in a dog's mouth, showing the side profile and side view (no text or symbols)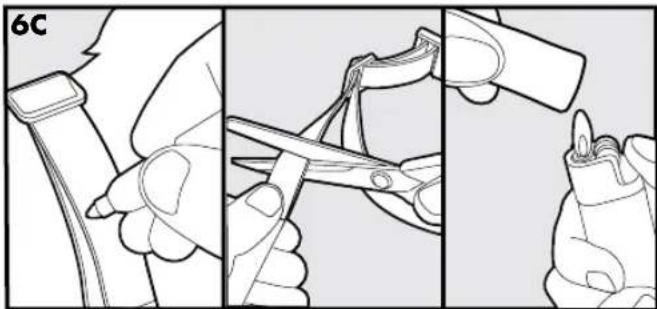
natural_image
Three-step illustration showing a hand holding a tool, cutting a piece into a clip, and adjusting the tip of a clip (no text or symbols present)natural_image
Technical line drawing of a mechanical component with two curved connectors and a housing (no text or symbols)text_image
1A 1B P P P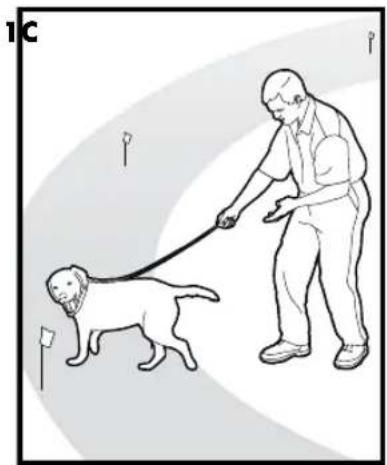
natural_image
Illustration of a man walking a dog on a leash, no text or symbols present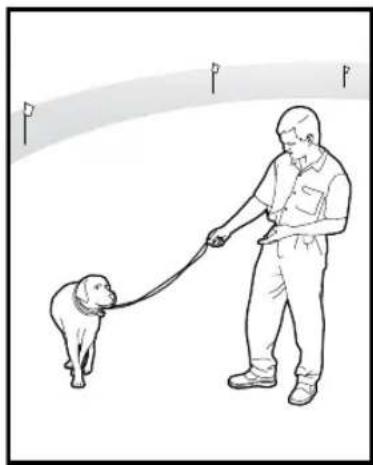
natural_image
Line drawing of a person walking with a dog, no text or symbols presentFASE 2
natural_image
Line drawing of a dog's head and collar inside a vehicle (no text or symbols)• Radio Systems PetSafe Europe Ltd., 2nd Floor, Elgee Building, Market Square, Dundalk, Co. Louth, Ireland

natural_image
Six gray rounded rectangular shapes with a black central shape, no text or symbols presenttext_image
3C Petsafenatural_image
Illustration of a hand holding a medical device with a labeled section '4B' (no text or symbols on the device itself)text_image
5A P P P P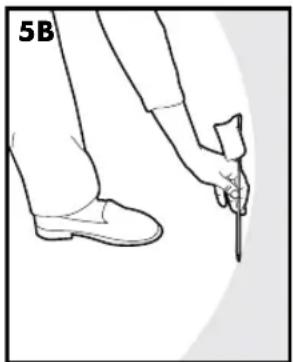
natural_image
Line drawing of a person's legs and foot holding a tool, no text or symbols presentPASO 6
Ajuste del collar receptor
natural_image
Illustration of a dog being held in a glove, showing two sequential stages (no text or symbols)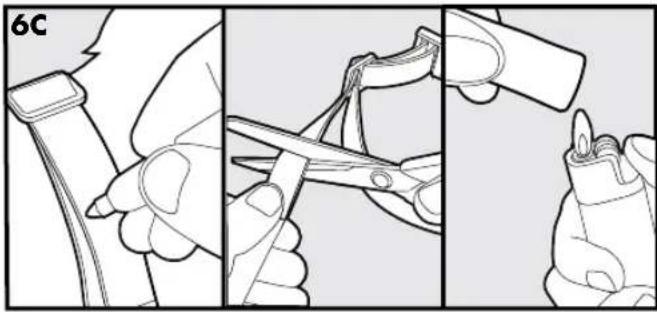
natural_image
Three-step illustration showing a person using a tool to cut a cable, then adjusting the cable with scissors (no text or symbols present)natural_image
Technical line drawing of a mechanical clamp or connector assembly (no text or symbols)MANUAL DE ADIESTRAMIENTO
text_image
1A P P P P P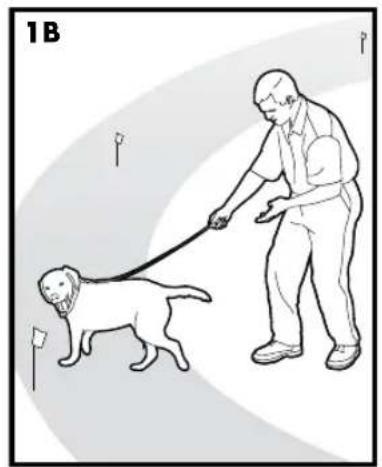
natural_image
Illustration of a man walking with a dog on a leash, no text or symbols present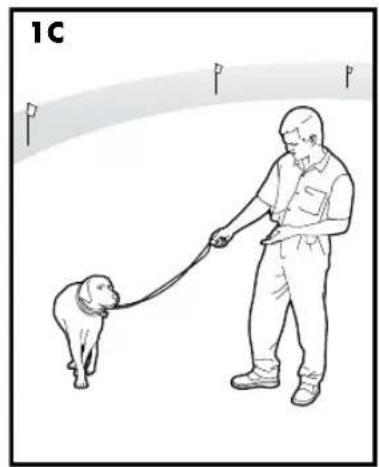
natural_image
Illustration of a person walking with a dog, no text or symbols presentFASE 2
natural_image
Line drawing of a dog running alongside a person walking on a path (no text or symbols)Pasos:
natural_image
Line drawing of a dog's head and collar inside a vehicle (no text or symbols)• Radio Systems PetSafe Europe Ltd., 2nd Floor, Elgee Building, Market Square, Dundalk, Co. Louth, Ireland

natural_image
Six gray rounded rectangular shapes arranged horizontally, one black and one white (no text or symbols)text_image
3C Petsafenatural_image
Medical illustration showing a hand holding a device with a labeled section '4B' (no text or symbols on the diagram itself)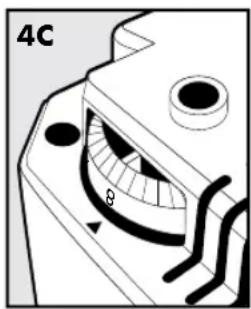
text_image
4C θ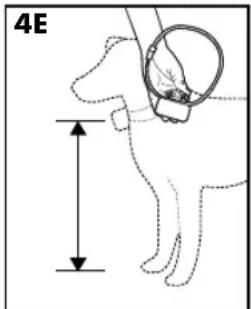
text_image
4E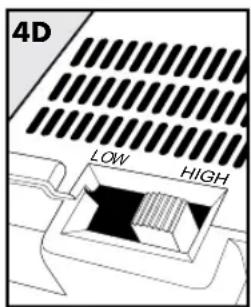
text_image
4D LOW HIGH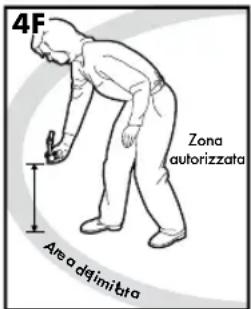
text_image
4F Zona autorizzata Are o definitatatext_image
5A P P P P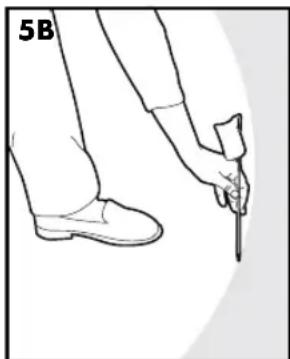
natural_image
Line drawing of a person's legs and foot with a hand holding a tool, labeled '5B' (no text or symbols on the diagram itself)PUNTO 6
natural_image
Illustration of a dog being held in a dog's mouth, showing front and side views (no text or symbols)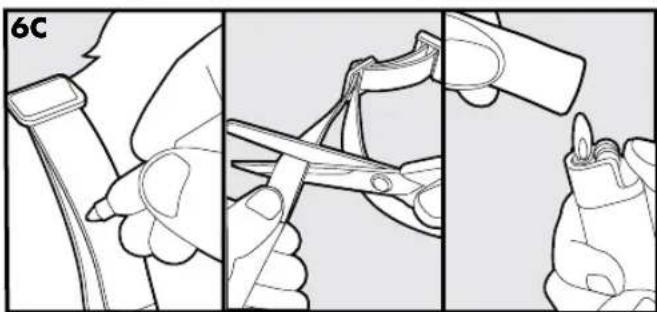
natural_image
Three-step illustration showing a hand holding a tool, being cut with scissors, and finally adjusting a clip (no text or symbols present)natural_image
Technical line drawing of a mechanical component with two curved connectors and a housing (no text or symbols)natural_image
Illustration of a man walking a dog on a leash, with no text or symbols present130
natural_image
Illustration of a man pulling a dog on a leash, no text or symbols presentwww.petsafe.net
natural_image
Line drawing of a person walking with a dog, no text or symbols presentFASE 2
natural_image
Line drawing of a dog running alongside a person walking, with no text or symbols present.Procedura:
natural_image
Line drawing of a dog's head and collar inside a vehicle (no text or symbols)• Radio Systems PetSafe Europe Ltd. 2nd Floor, Elgee Building, Market Square, Dundalk, Co. Louth, Ireland
text_image
3C Petsafenatural_image
Medical illustration showing a hand holding a medical device with a catheter, labeled '4B' (no text or symbols on the diagram itself)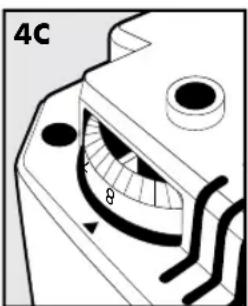
text_image
4C θ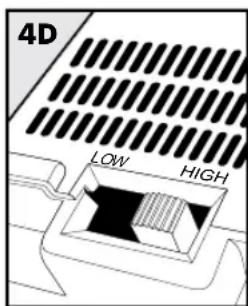
text_image
4D LOW HIGH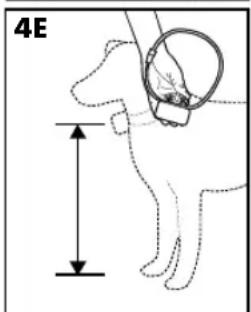
text_image
4E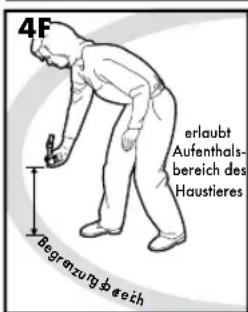
text_image
5A P P P P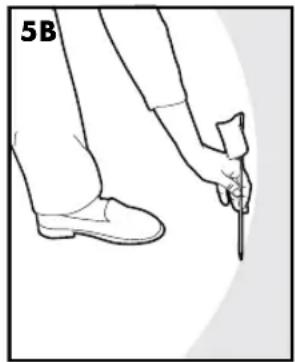
natural_image
Line drawing of a person's legs and foot holding a tool, labeled '5B' (no text or symbols on the diagram itself)natural_image
Illustration of a dog being held by hands, showing two sequential stages (no text or symbols)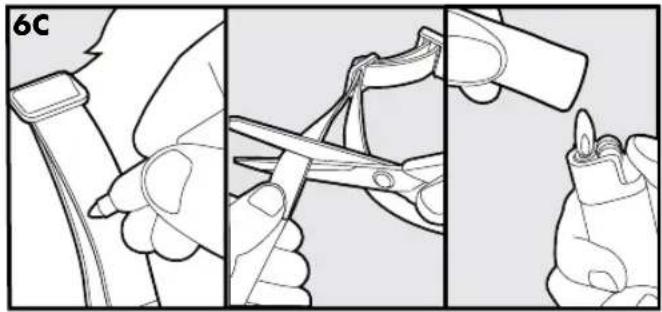
natural_image
Three-step illustration showing a hand holding a tool, being cut with scissors, and finally adjusting a clip (no text or symbols present)natural_image
Technical line drawing of a mechanical clamp or connector assembly (no text or symbols)text_image
1A 1B 1C P P P P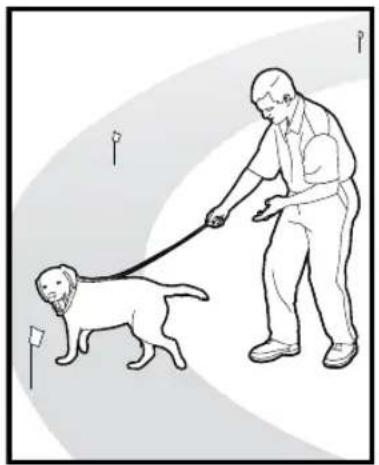
natural_image
Illustration of an elderly man walking a dog on a leash (no text or symbols present)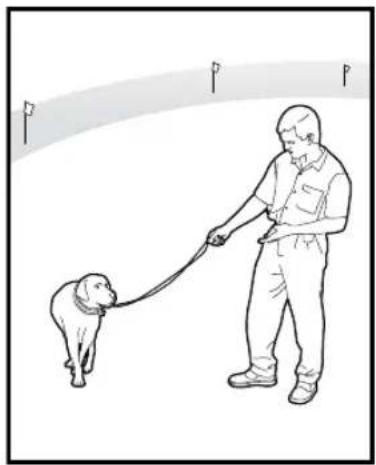
natural_image
Line drawing of a person walking with a dog, no text or symbols presentPHASE 2
natural_image
Line drawing of a dog running with a stick and a person walking, no text or symbols presentSchritte:
natural_image
Line drawing of a dog's head and collar inside a vehicle (no text or symbols)Drahtloses To Go
• Radio Systems PetSafe Europe Ltd., 2nd Floor, Elgee Building, Market Square, Dundalk, Co. Louth, Ireland
Mounting Template Gabarit de montage Mal voor montage Plantilla de montage Dima di montaggio Montageschablone
PetSafe® products are designed to enhance the relationship between you and your pet. To learn more about our extensive product range which includes Containment Systems, Training Systems, Bark Control, Pet Doors, Health & Wellness, Waste Management and Play & Challenge products, please visit www.petsafe.net.
Radio Systems Corporation
10427 PetSafe Way
Knoxville, TN 37932
(865) 777-5404
Radio Systems PetSafe Europe Ltd.
2nd Floor, Elgee Building, Market Square Dundalk
Co. Louth, Ireland
+353 (0) 76 892 0427
www.petsafe.net
400-1632-19/2
©2015 Radio Systems Corporation

DO NOT PRINT THIS PAGE
| Radio Systems®CORPORATIONThe world leader in pet training products | RSC Part #: 400-1632-19 | |
| Description: MANUAL PIF17-13478 & PIF45-13479 | ||
| Created by: TL Updated by: RCInitial Creation Date: 9/21/12 | ||
| Material: 80g woodfree paperColor: WhitePrinting: 1C x 1CFinishing: Die cut, fold, perfect binding and bulk pack | Approved by: LBDate Approved: 10/14/15 | |
| Program used: INDESIGN CC | ||
| Revision: 002 ECO: RSC12917 | ||
| Revision Description: Metal interference Alarm Updates | ||
| Revision Date: 9/15/2015 | ||