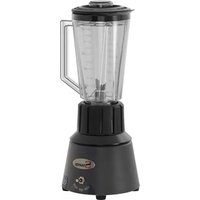
N° 33 - Mixer Santos - Free user manual and instructions
Find the device manual for free N° 33 Santos in PDF.


User questions about N° 33 Santos
0 question about this device. Answer the ones you know or ask your own.
Ask a new question about this device
Download the instructions for your Mixer in PDF format for free! Find your manual N° 33 - Santos and take your electronic device back in hand. On this page are published all the documents necessary for the use of your device. N° 33 by Santos.
USER MANUAL N° 33 Santos
natural_image
Green and black SANTOS blender with a clear glass handle and control knob (no visible text or symbols on the device body)*408.060 - *408.061
Model no 33
INHOUDSOPGAVE
"CE"-CONFORMITEITSVERKLARING 3
BELANGRIJKE VOORZORGSMAATREGELEN 4
WAARSCHUWINGEN 4
TYPEPLAATJE VAN HET APPARAAT....18
"CE"-CONFORMITEITSVERKLARING
DE FABRIKANT :
SANTOS SAS - 140-150, Av. Roger SALENGRO 69120 VAULX-EN-VELIN (LYON) FRANKRIJK
text_image
5 8 7 6 Fig CRECYCLAGE VAN HET PRODUCT AAN HET EINDE VAN DE LEVENSDUUR
text_image
11 12 Fig D 19text_image
14 D Fig Gnatural_image
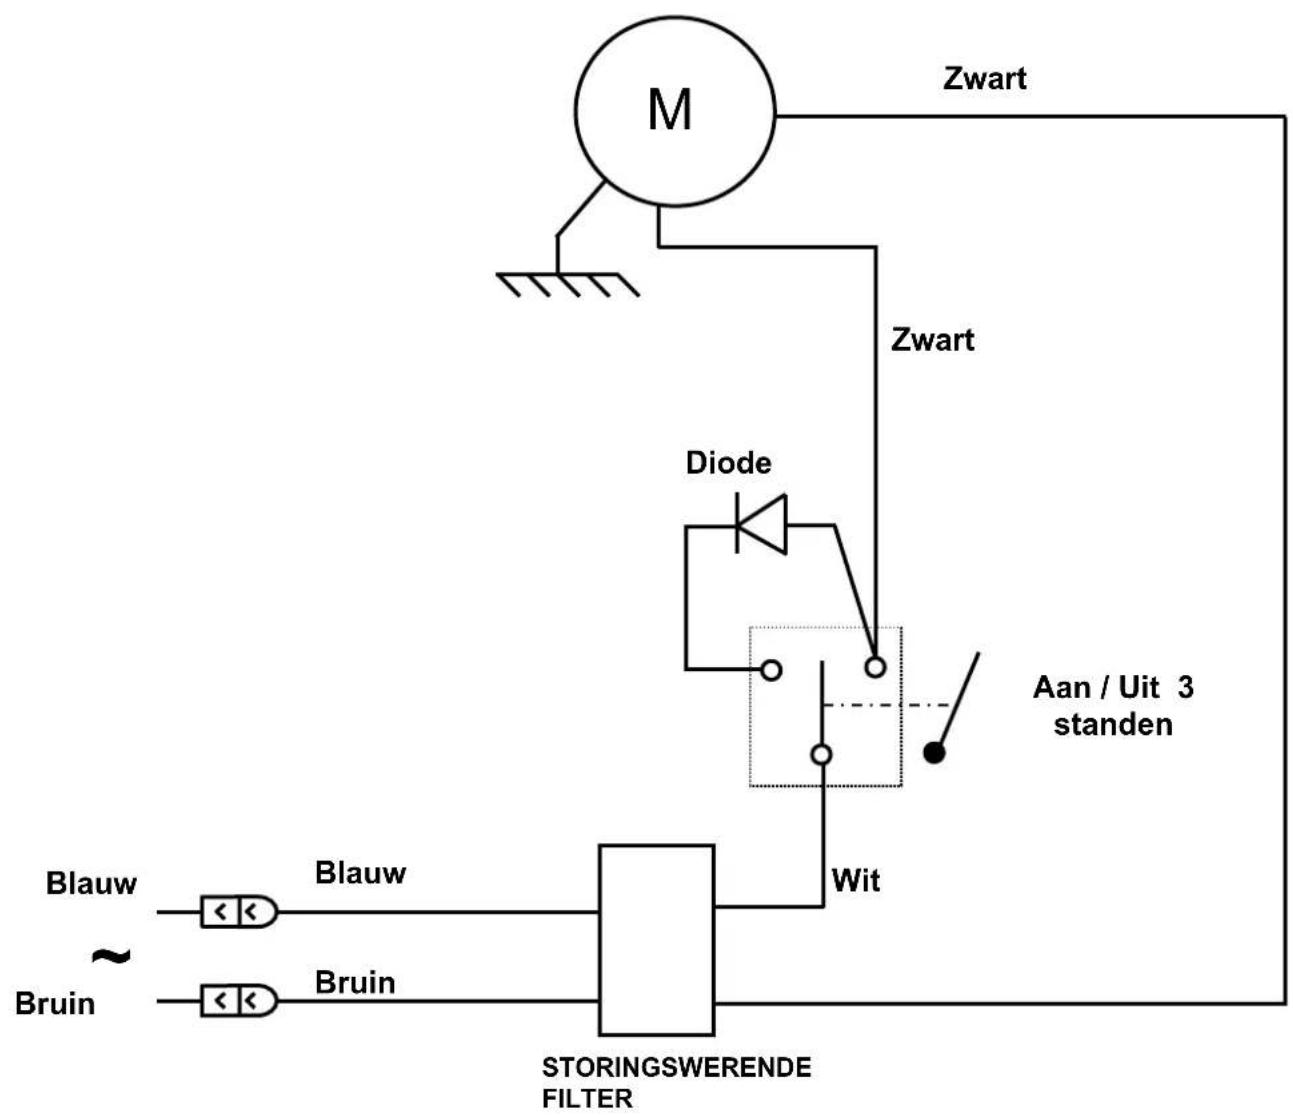
Pure electrical circuit lines without any symbolsElektrisch schema 220-240V 50/60Hz
flowchart
graph TD
    M["Motor M"] --> Zwart1["Zwart"]
    Zwart1 --> Diode["Diode"]
    Diode --> Aan["Uit 3 standen"]
    Aan --> Wit["Wit"]
    Wit --> StoringswerendeFilter["Storingswerende Filter"]
    StoringswerendeFilter --> Blauw1["Blauw"]
    StoringswerendeFilter --> Bruin1["Bruin"]
    Blauw1 --> Blauw2["<<"]
    Bruin1 --> Bruin2["<<"]
    Blauw2 --> Blauw3["Blauw"]
    Bruin2 --> Bruin3["Bruin"]
    Zwart1 --> Zwart2["Zwart"]

text_image
Groen / geel 7Since the 01.01.95, all our appliances comply with CE and possess the CE label. Our guarantee is of 12 months from the manufacturing date mentioned on the descriptive plate. Warranty is strictly limited to the free replacement of any part of origin recognized by us as defective due to a defect or building default and identified as belonging to the concerned appliance. Warranty does not apply to damages resulting from installation or use non-complying with our appliance data sheet (user's manual) or in case of an evident lack of maintenance or disrespect of elementary security electric rules. It does not apply in case of regular wear and tear. Any replacement of parts under warranty will be realized after return of the defective part in our workshops, postage paid, supported by a copy of a conformity statement on which appears the serial number of the appliance. Every appliance is equipped with a descriptive plate conforming to the EC recommendations and of which a duplicate exists in the conformity statement (serial number, manufacturing date, electrical characteristics ...). In case of serious damage judged repairable only in our workshops, and after prior consent from our departments, any appliance under guarantee is sent by the Distributor, carriage paid. In case of repairs or reconditioning of appliances not under guarantee, the round trip transport is payable by the distributor. The parts and workforce are invoiced at the current rate. A preliminary estimate can be supplied.
Coffee grinder not using SANTOS original burrs are not taken under guarantee. The warranty conditions, repairs, reconditioning, of the espresso coffee grinder are the object of a specific note. Our guarantee does not extend to the payment of penalties, the repair of direct or indirect damages and notably to any loss of income resulting from the nonconformity or the defectiveness of products, SANTOS's global responsibility being limited to the sale price of the delivered product and to the possible repair of the defective products.
In case of revelation of an imperfection during the warranty period, the Distributor has to, unless a different written agreement of SANTOS, indicate to his customer to stop any use of the defective product. Such a use would release SANTOS of any responsibility.
TYPEPLAATJE VAN HET APPARAAT
SPECIMEN
IMPORTANT: documents included in this manual to be kept:
- “CE” COMPLIANCE DECLARATION
• WARRANTY CERTIFICATE
natural_image
Green SANTOS blender with black handle and green base, no visible text or symbols on the device itself.*408.060 - *408.061
Model no 33
CONTENTS
"CE" COMPLIANCE DECLARATION ....3
IMPORTANT SAFEGUARDS....4
DO NOT: 4
ELECTRICAL CONNECTION: 4
USING FOR THE 1 ^st TIME....5
RECYCLING THE PRODUCT AT THE END OF ITS SERVICE LIFE 6
Changing the coupling system:....9
Assembling the drive part (motor) (Fig. F):....10
Dismantling the receiver part (knives):....11
TROUBLESHOOTING....12
The appliance does not start:....12
The appliance stops following an overload: 13
The motor runs but the knives do not rotate:....13
TECHNICAL SPECIFICATIONS ....14
Wiring diagram 110-120V 50/60Hz 15
Wiring diagram 220-240V 50/60Hz 16
WARRANTY CERTIFICATE....18
APPLIANCE IDENTIFICATION PLATE 18
"CE" COMPLIANCE DECLARATION
THE MANUFACTURER:
SANTOS SAS - 140-150, Av. Roger SALENGRO 69120 VAULX-EN-VELIN (LYON) FRANCE
declares that the appliance intended for the professional market described below:
Description: BAR BLENDER
Type number: 33, 33C
complies with:
- the statutory provisions defined in appendix 1 of the European "machines" directive n°2006/42/CE and the national legislation transposing it
- the statutory provisions of the following European directives and regulations:
○ N° 2006/95/CE (low voltage directive)
○ N° 2004/108/CE (EMC directive)
○ No. 2002/95/CE (RoHS directive)
○ No. 2002/96/CE (WEEE directive)
○ N° 1935/2004/CE (regulation) relating to materials and articles intended to come into contact with foodstuffs
Harmonised European standards used to give presumption of conformity with the essential requirements of the above-mentioned directives:
- NF EN 12852+A1: 2010, Food processing machinery – Food preparation equipment and blenders - Safety and hygiene requirements.
This European standard is a type-C standard as defined in EN ISO 12100. When the provisions of this type-C standard differ from those stated in the type-A or B standards, the provisions of the type-C standard override the provisions of the other standards. This standard provides the means to comply with the requirements of the "machines" directive n°2006/42/CE, (see appendix ZA)
- NF EN ISO 12100 -1 and 2:2004: Safety of machinery - General principles for design
- NF EN 60204-1: 2006 : Safety of machinery - Electrical equipment of machines-General requirements
- NF EN 1672-2: 2005, Food processing machinery – Basic concepts – Hygiene requirements
• NF EN 60335-1: 2003 : Household and similar electrical appliances. Safety. - NF EN 60335-2-64 :2004 : Particular requirements for commercial electric kitchen machines
Drawn up in VAULX-EN-VELIN on: 01/01/2010
Signatory's position: CHIEF EXECUTIVE OFFICER
Signatory's name: Aurélien FOUQUET
Signature:
IMPORTANT SAFEGUARDS
When using, cleaning or maintaining the machine, always follow these instructions:
Read all instructions
Note: You will find it easier to understand the next few paragraphs if you refer to the diagrams at the end of this manual.
DO NOT:

- Never operate the appliance when it is empty.
- Do not use this appliance to crush big ice cubes or frozen foods. The knives are not meant for this.
- Do not insert dry ingredients into the mixer before switching it on.
- Do not remove the lid before the appliance has stopped completely.
- Never remove the bowl assembly (1) from the motor unit before the motor has stopped COMPLETELY.
- Never fit the bowl assembly (1) onto the motor unit (2) when it is in operation.
ELECTRICAL CONNECTION:
- The appliance's power supply is available in two single phase voltages:
- 110-120 V, 50/60 Hz
- 220-240 V, 50/60 Hz
Line protection: the appliance must be connected to a standard 2 pole + earth socket. The set-up must be fitted with a differential circuit breaker and a 16A fuse. The appliance must be earthed.
TAKE CARE:

- Before connecting the machine, check that the mains electrical voltage is the same as the voltage for your appliance. Its value is shown:
- either on the identification plate under the machine.
➢ or on the identification plate on the last page of this manual.
- If the power cable is damaged, it should be replaced with a special unit available from SANTOS or a SANTOS-approved dealer.
TAKE CARE: Check that the On / Off switch (6) is in the 0 position before connecting the power cable plug to your mains electric power socket.

USING FOR THE 1 ^st TIME
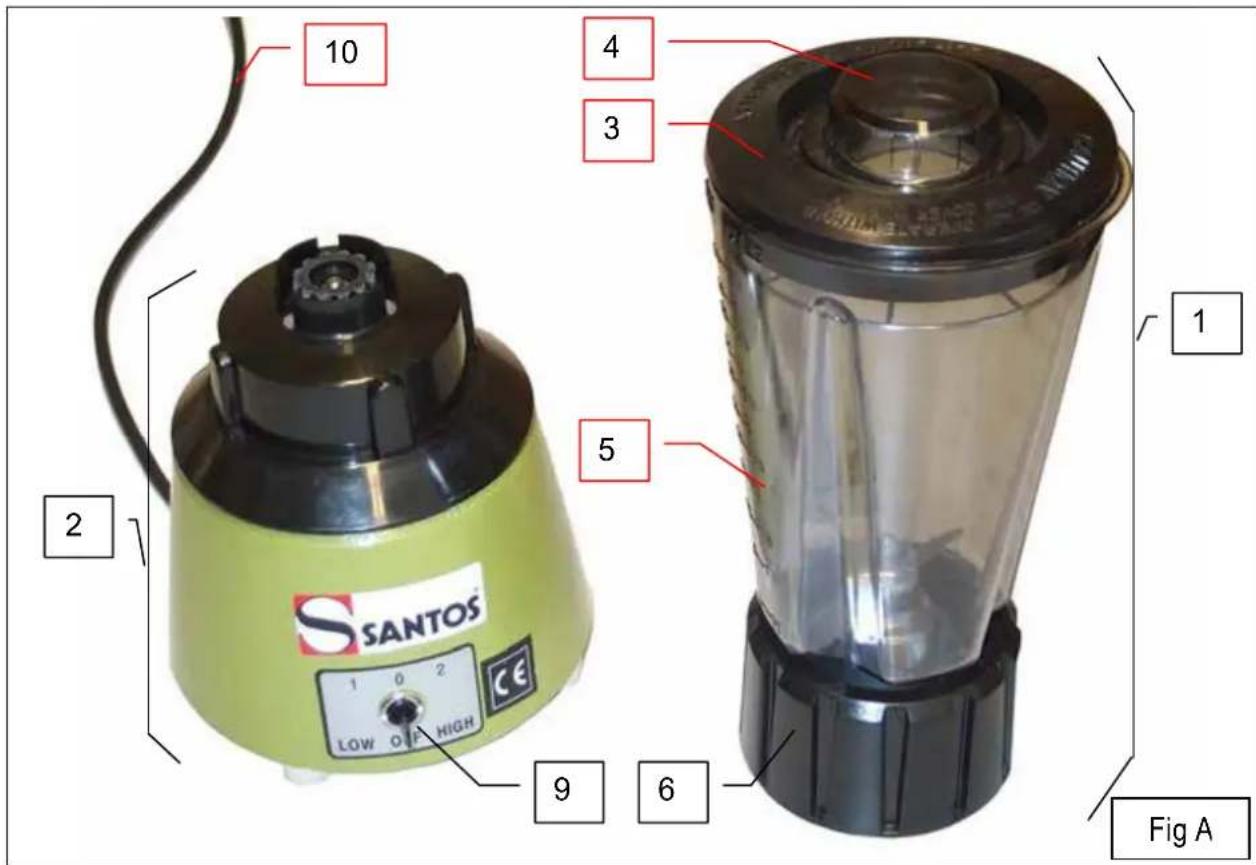
Thoroughly clean all parts in contact with the food (Fig. A).
text_image
10 4 3 2 SANTOS 1 0 2 CE LOW HIGH 5 9 6 Fig A 1- Remove the bowl (1) from the motor unit (2).
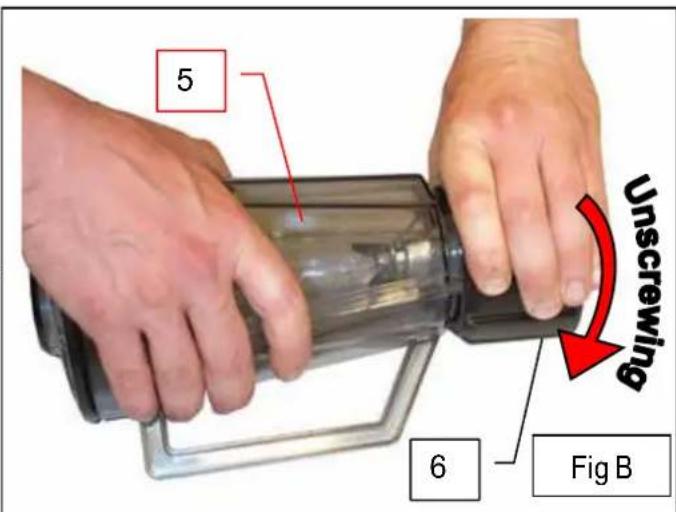
• Take off the lid (3) and the cap (4) and wash them with a standard dish washing product. - Unscrew the bowl (5) from the nut (6) turning it counter-clockwise (right-hand thread) (Fig. B).
- Being careful not to injure yourself with the sharp knives, remove the knife hub (7) and the bowl seal (8) (Fig. C).
- Wash with a standard dish washing product or in the dish-washer: the lid (3), the cap (4), the knife hub (7), the bowl seal (8) and the bowl (5).
text_image
5 6 Fig B Unscrewing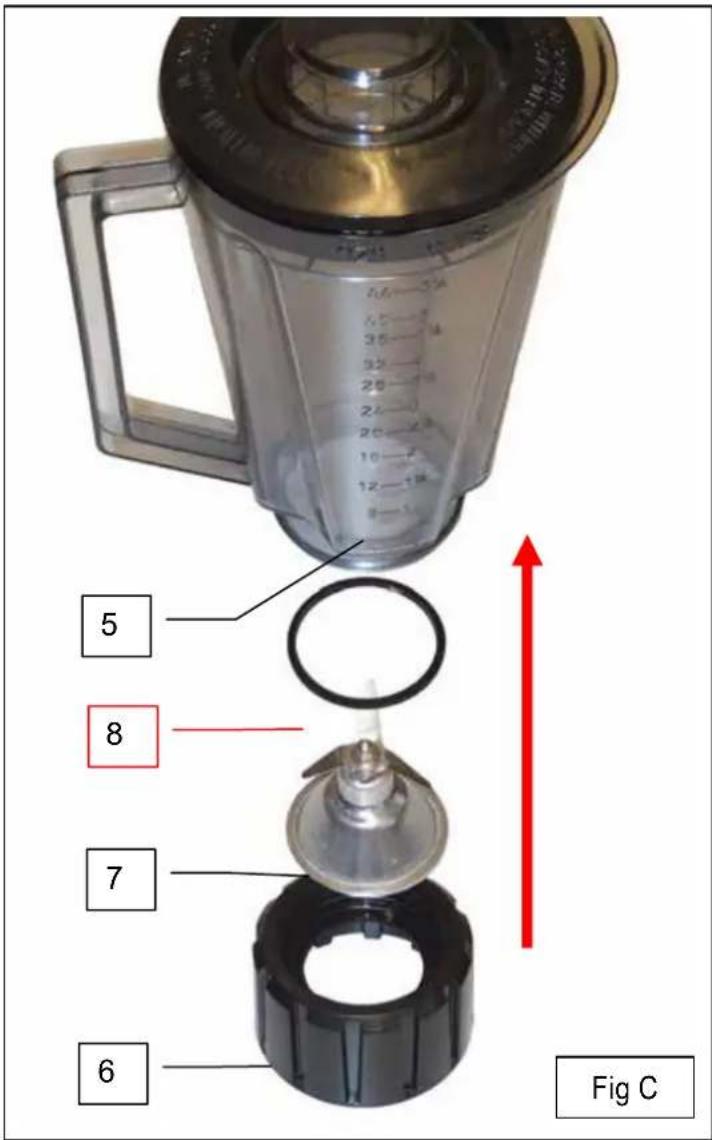
text_image
Fig C 5 8 7 6RECYCLING THE PRODUCT AT THE END OF ITS SERVICE LIFE
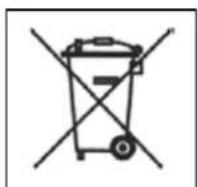
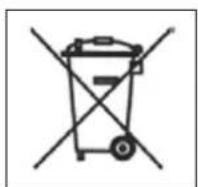
This appliance has the recycling symbol marking relating to waste electrical and electronic equipment. This means that this product must be processed by a waste sorting system in accordance with Directive 2002/96/CE (WEEE) – Professional Equipment section – so that it can be either recycled or disassembled in order to reduce any impact on the environment.
For further information, please contact your dealer or SANTOS..
For the disposal or recycling of the appliance components, please refer to a specialist company or contact SANTOS.
Electronic products which have not been out-sorted are potentially dangerous for the environment.
The packaging material should be disposed of or recycled in accordance with regulations in force.
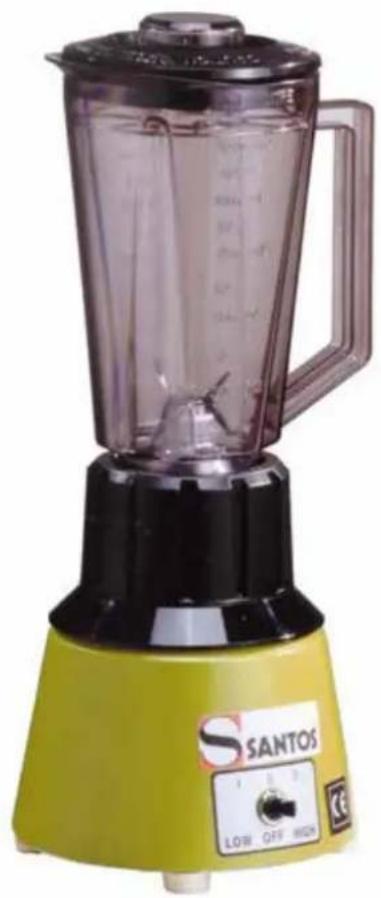
YOUR BAR MIXER N°33
- The bar mixer N° 33 is designed especially for bars, cafés, hotels, restaurants, cocktail bars, canteens, stores selling fruit juices, cake stores, ice cream parlors....
- The appliance comprises a cast aluminum motor unit and a removable mixing bowl. This is made up of a transparent plastic graduated bowl, a plastic lid, a measuring cap, a set of stainless steel knives and a coupling system.
-
The mixer N° 33 is designed to mix different foodstuffs in the form of liquids, doughs or solids.
• It is ideal for making: -
drinks (fruit, vegetable cocktails, punches, syrups, sangria...)
o small quantities of soup, sauces, soufflés, puréed vegetables, meat and fish pâtés, creams, stewed fruit.
o Ice creams, milk shakes
Using the MIXER

START-UP:
ATTENTION : a mixer must always be used with a minimum of liquid in the bowl.
Assembly and preparation:
- Place the knife hub (7) into the bowl nut (6).
- Fit the bowl seal (8) onto the knife hub (7), making sure that the seal is seated properly on the knife hub.
ATTENTION: It is important to duly adhere to the assembly order of the elements to prevent serious malfunctioning of the appliance (adhere to: (6) (7))
(8) (5)) (fig C).
- Screw and tighten the bowl (5) onto the bowl nut (6) until it is sealed by compressing the bowl's seal.
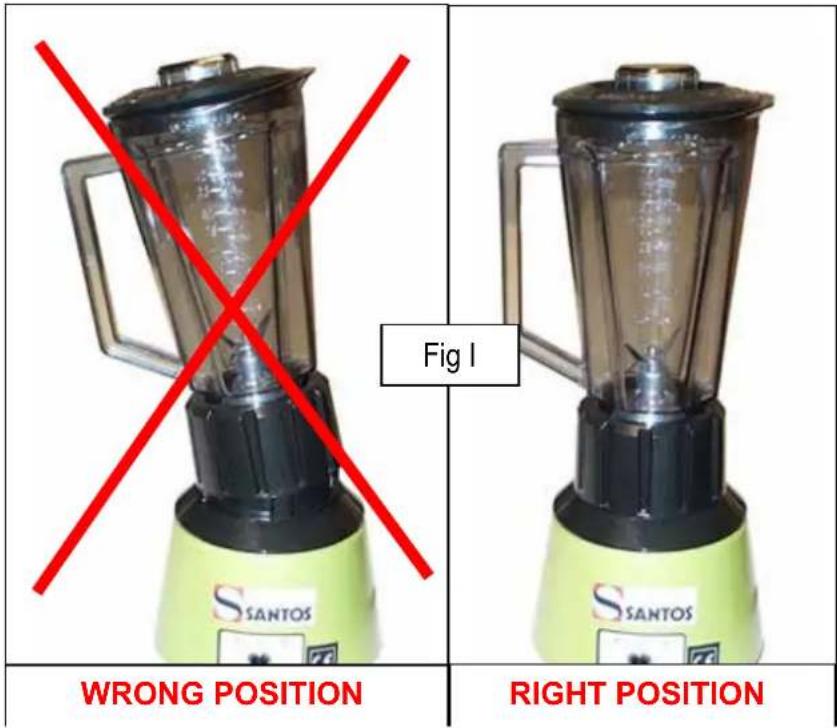
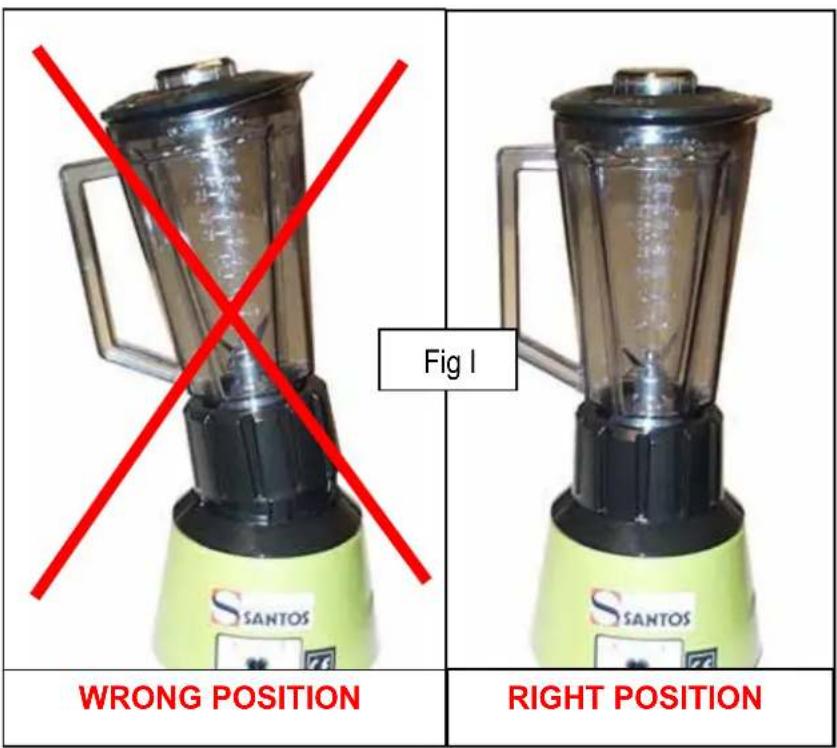
- Fit the bowl assembly (1) onto the motor unit (2) with the motor stopped (switch (9) in position 0) checking the bowl assembly is seated as per the diagram opposite
- Fit the lid (3) with its cap (4) onto the bowl (5).
- Check that the on / off switch (9) is in position 0 before plugging in the power cable (10) to the mains power socket.
text_image
Fig I WRONG POSITION RIGHT POSITION-
Add a minimum of liquid or purée (until the knives are completely covered) before adding the solid ingredients to be mixed. For best results, dice up the solid ingredients and insert them through the hole in the lid when the knives are rotating.
-
Select the knife rotation speed depending on the work desired:
- switch to position 1 for low speed (12,000 rpm)
- switch to position 2 for high speed (16,000 rpm).
- Switch off the appliance by setting the on / off switch to position 0.

ATTENTION: It is important not to remove the bowl assembly (1) or to fit it before the motor is stopped COMPLETELY to prevent premature wearing of the coupling system.
CLEANING:
IMPORTANT:

• In all cases, stop the appliance and unplug the power cable (10).
- To avoid injuring yourself when cleaning, handle the knife hub and the knives carefully.
- The appliance should neither be cleaned in a jet of water nor with a high pressure spray
- The motor unit (2) must not be immersed in water.
You are advised to clean the appliance as soon as it has finished being used.
It will be easier to clean if you do not allow the remaining scraps of food to dry in the bowl, lid or on the knives.
Although the bowl assembly (1) can be washed in a dish-washer without being dismantled, for optimum hygiene, you are advised to dismantle the bowl assembly (1) and wash all the components separately: bowl nut (6), bowl seal (8), knife hub (7), bowl (5), lid (3) and cap (4).
The base and outside of the motor unit should be cleaned with a soft, damp sponge, then dried.
STORAGE:
- To prevent cuts, you are advised to replace the knife hub (7) back into the bowl (5) and the bowl nut (6)
- Do not fit the lid of the bowl airtight when the appliance is stored away.
This machine requires no particular maintenance because the bearings are lubricated for life.
If any intervention is necessary to replace parts subject to wear, such as the knives, the electrical or other components, please refer to the parts lists (see the exploded view at the end of this manual).
MAINTENANCE

Prior to carrying out any intervention on the appliance, it must be disconnected from the mains without fail (10).
Spare parts:
This machine requires no particular maintenance because the bearings are lubricated for life.
If any intervention is necessary to replace parts subject to wear, such as the knives, the electrical or other components, please refer to the parts lists (see the exploded view at the end of this manual)..
For all spare part orders state:
the type,
the machine serial number and
the electrical specifications
recorded under the machine.
Changing the coupling system:

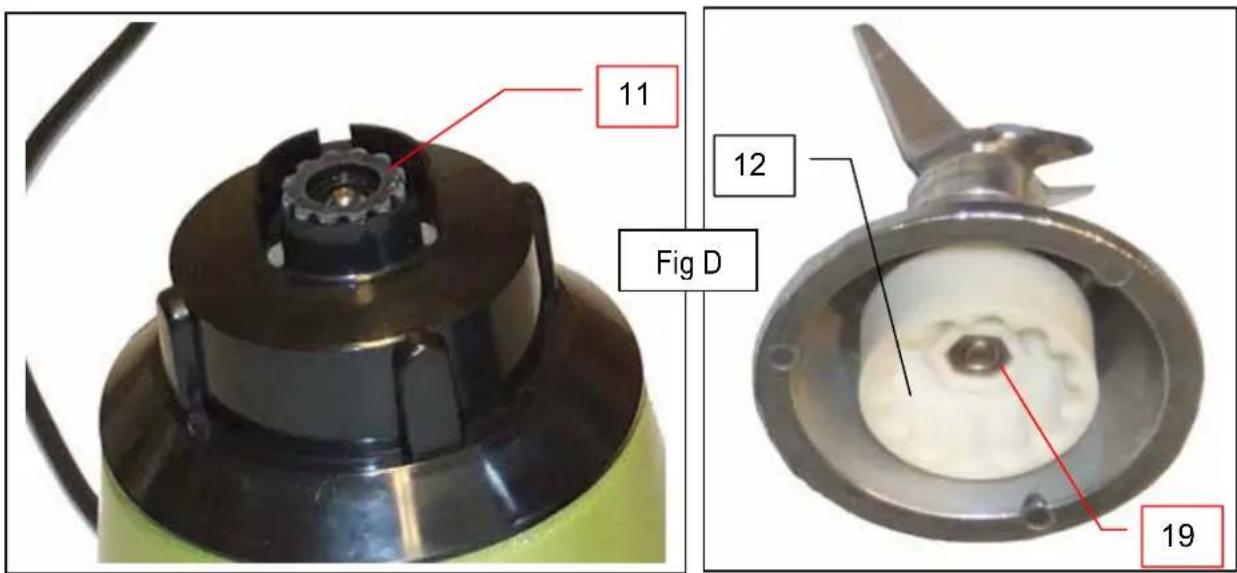
IMPORTANT: (Fig. D).
- The drive part (motor) (11) is made of flexible rubber.
- The receiver part (knives) (12) is made of hard plastic.
text_image
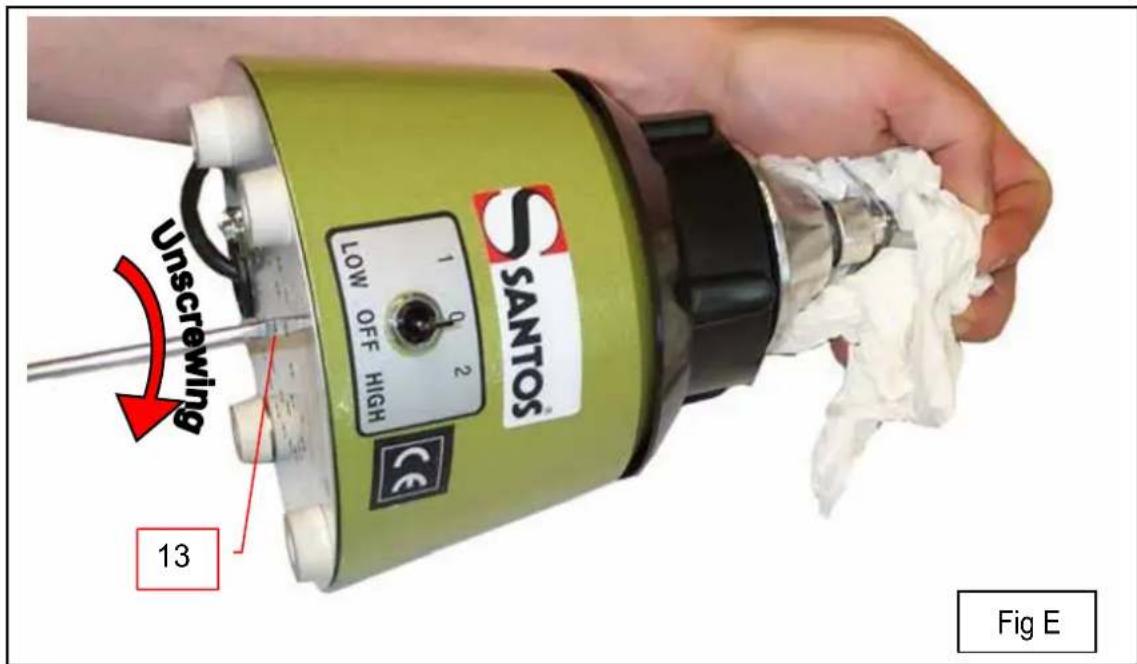
11 Fig D 12 19Dismantling the drive part (motor): (Fig. E)
- Lay the motor unit down on its side.
- Stop the rotation of the rubber drive part. You can use the knife hub (7) fitted with the rigid coupling (12). Use a thick cloth to hold the knives to prevent you from getting cut.
- Via the central hole of the base plate, put a flat-ended screwdriver into the groove of the motor shaft (13).
- Turn the screwdriver clockwise to unscrew the motor coupling (left-hand thread).
text_image
SANTOS LOW OFF HIGH 1 0 2 Unscrewing 13 Fig EAssembling the drive part (motor) (Fig. F):
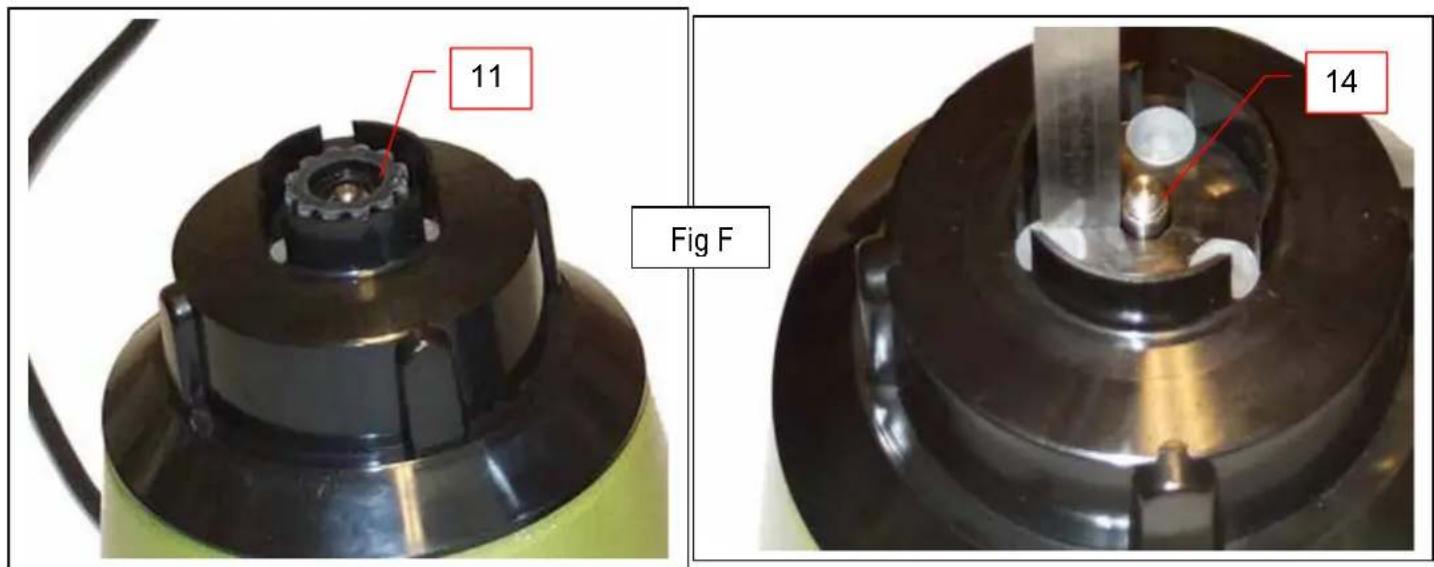
- Fit the motor unit (2) onto its legs.
- By hand, screw the flexible coupling onto the motor shaft (14) anti-clockwise (left-hand thread).
text_image
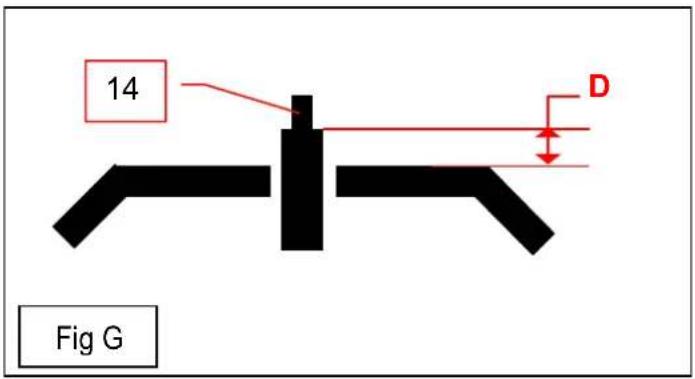
11 Fig F 14Depending on the model of the motor shaft, you may sometimes have to screw a low nut onto the motor shaft before screwing on the flexible coupling. (Fig. G)
- If "D" is greater than 3 mm, do not screw on a low nut.
- If "D" is less than 3 mm screw a low nut (left-hand thread) onto the motor shaft then screw on the flexible coupling (11).
text_image
14 D Fig GDismantling the receiver part (knives):

- With a thick cloth, hold the knives (BE CAREFUL there is a risk of cutting yourself).
- With pliers, catch the rigid coupling and unscrew it clockwise (left-hand thread).
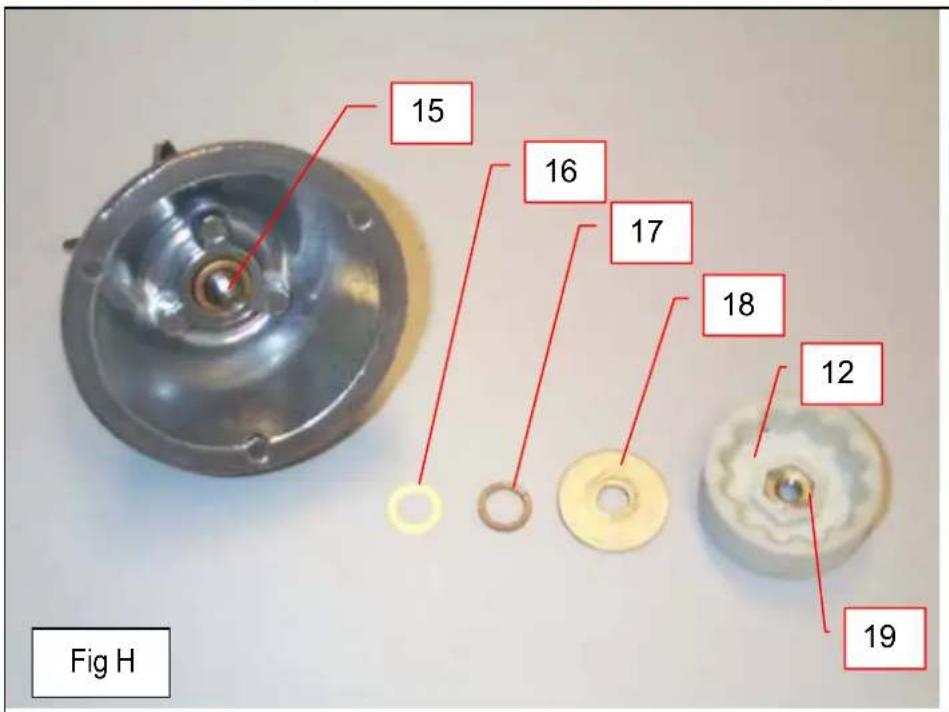
Assembling the receiver part (knives) (Fig. H):

- With a thick cloth, hold the knives (BE CAREFUL there is a risk of cutting yourself).
- Fit the low nut (19) (left-hand thread) into the hexagonal housing of the hard plastic coupling (12).
- Adhering to this order, put the knives (15) back on the shaft, the thin, stainless steel washer (16) then the fiber washer (17) and finally the wide stainless steel washer (18).
- Screw up the coupling (12) counter-clockwise (left hand thread).
text_image
15 16 17 18 12 19 Fig HTROUBLESHOOTING
Identifying the cause of appliance stoppage with precision.
The appliance does not start:
- Check: the mains supply, the condition of the supply cord (10).
The appliance stops after the motor has overheated: (the motor unit is hot)
The motor is protected by a built-in cut-out system. If it overheats the motor stops.
- Turn the On Off switch (9) to position 0, take out the plug.
- Wait for the motor to cool down (20 to 45 minutes), then turn the On / Off switch (9) on (position 1).
If the problem persists, switch off the power supply to the machine (unplug the power supply cord (10)) and call in the maintenance service or contact a SANTOS-approved dealer.
The appliance stops following an overload:
If the motor jams (foreign body, matter or food too hard jamming the knives), it may heat up very quickly and cut out due to overheating.
- Switch off the appliance (unplug the power supply cord (10))
- Switch the on / off switch (9) to position 0.
- Remove the bowl assembly (1) from the motor unit (2) and place it on a work top.
- Remove the lid (3) from the bowl and with a long, thin object, shift the hard bits jamming the knives.
- Put back the bowl assembly (1) onto the motor unit and switch back on.
- If the knives get jammed again, empty the bowl and cut the food up into small pieces.
If the problem persists, switch off the power supply to the machine (unplug the power supply cord (10)) and call in the maintenance service or contact a SANTOS-approved dealer.
The motor runs but the knives do not rotate:
- Check: the seating of the bowl assembly (1) on the motor unit (2), (Fig. I).
- Check: the condition of the coupling system (11 and 12).
- Check: the bowl seal (5) is positioned correctly (see "assembly and preparation" part).
text_image
Fig 1 WRONG POSITION RIGHT POSITIONTECHNICAL SPECIFICATIONS
| ELECTRICAL SPECIFICATIONS (1) | |||
| Model 33 Single phase | |||
| Supply voltage .(V) 220-240 110-120 Frequency | (Hz) | 50/60 | 50/60 |
| Motor: Power rating | |||
| Power input (W) 600 650 Speed: Position 2 | (rpm) | 16000 | 18000 |
| Position 1 | (rpm) | 12000 | 14000 |
| Bowl capacity (L) 1.2 | |||
| Dimensions: Height (mm) 420 Width (mm) 180 Depth (mm) 180 Weight: Net weight Packaged weight Noise: (2) | (kg) | 2.5 | |
| (dBA) | 73 | ||
(1) These ratings are given for your guidance. The exact electrical specifications of your appliance can be found on the rating plate.
(2) Noise level measured with sound pressure appliance in operation 1 m from its centerline in accordance with standard EN 31201.
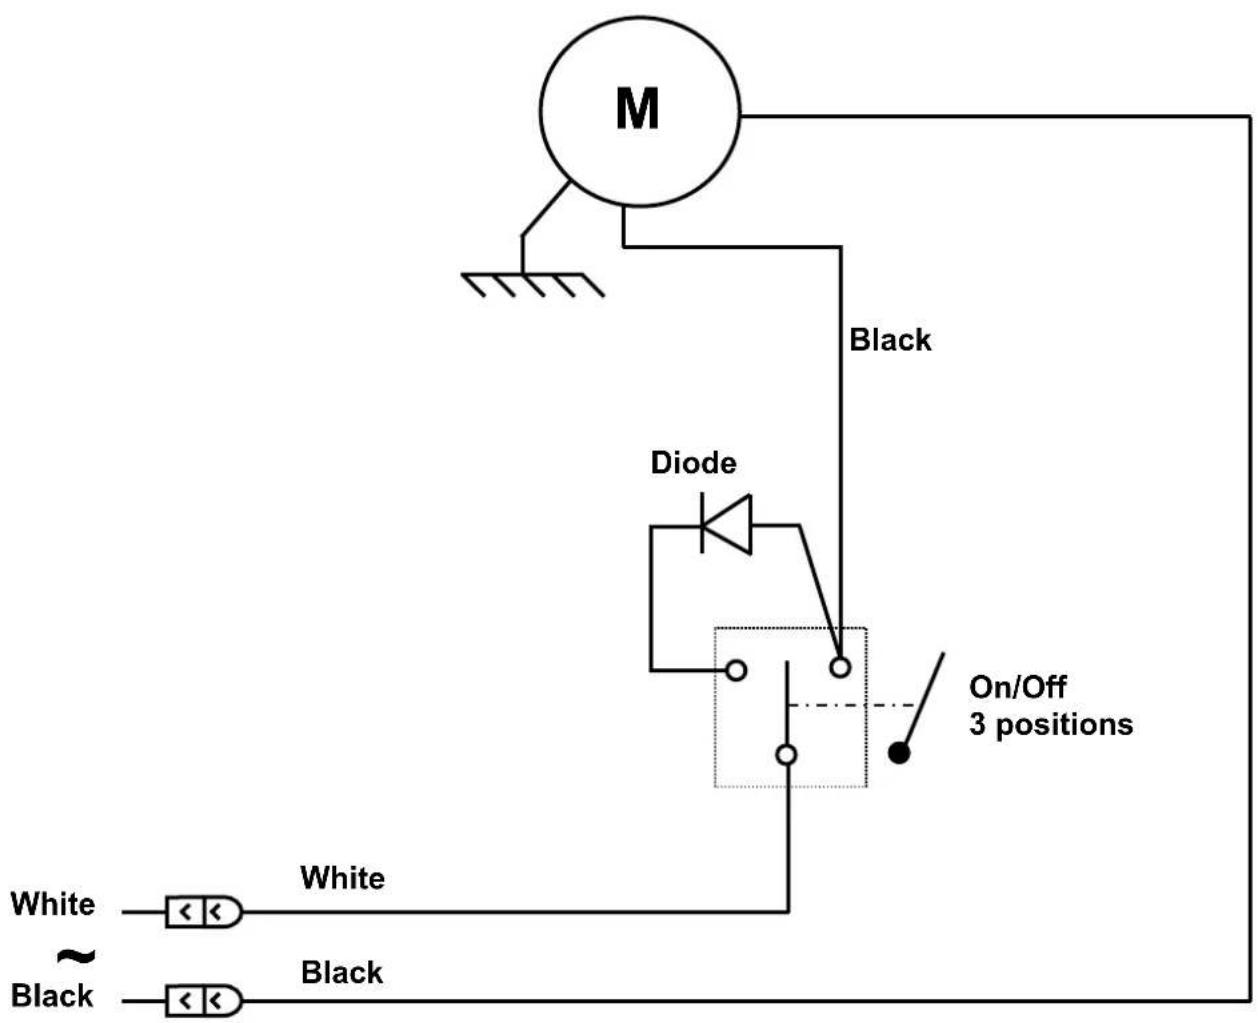
Wiring diagram 110-120V 50/60Hz
flowchart
graph TD
    M["Motor M"] --> Black["Black"]
    Black --> Diode["Diode"]
    Diode --> On/off["On/Off 3 positions"]
    Diode --> White["White"]
    Diode --> Black["Black"]
    White --> Black1["Black"]
    Black1 --> Black2["Black"]
    Diode -.-> On/off
    Diode -.-> Black

text_image
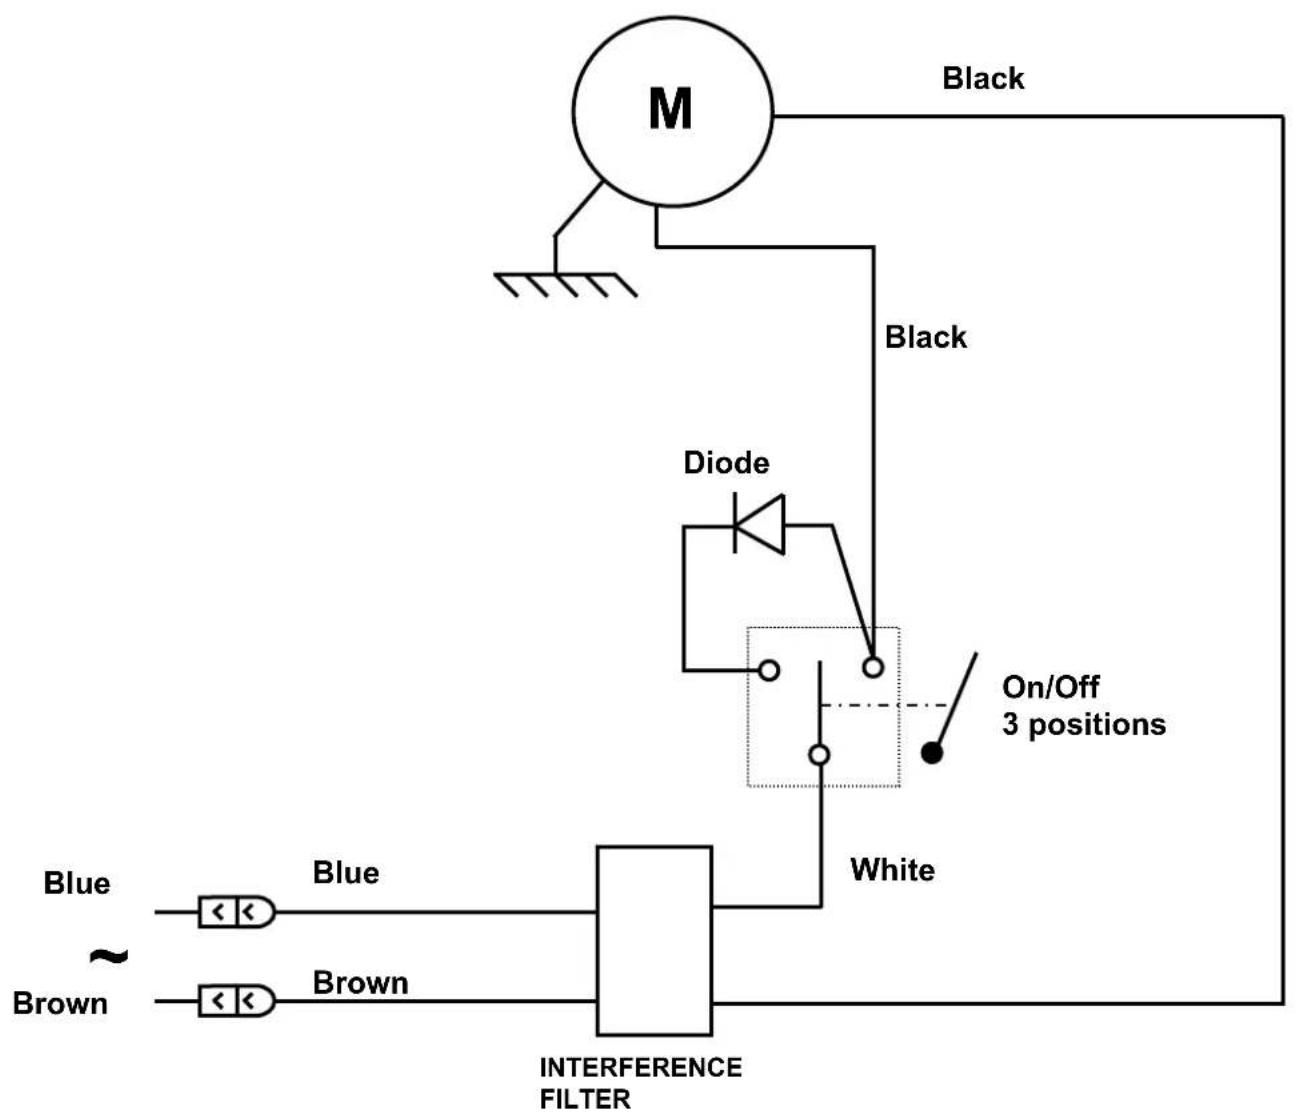
Green/Yellow 7Wiring diagram 220-240V 50/60Hz
flowchart
graph TD
    A["Black"] --> B["M"]
    B --> C["Diode"]
    C --> D["On/Off 3 positions"]
    D --> E["White"]
    E --> F["INTERFERENCE FILTER"]
    F --> G["Blue"]
    F --> H["Brown"]
    I["Blue"] --> J["<<"]
    K["Brown"] --> L["<<"]
    M["Black"] --> N["Diode"]
    O["On/Off 3 positions"] --> P["Diode"]

text_image
Green/Yellow 7| ITEM Description | |
| 1 Bowl assembly | |
| 2 Motor unit | |
| 3 Lid | |
| 4 Cap | |
| 5 Bowl | |
| 6 Bowl nut | |
| 7 Knife hub | |
| 8 Bowl seal | |
| 9 On / Off switch | |
| 10 Power supply cord | |
| 11 Flexible coupling | |
| 12 Hard coupling | |
| 13 Groove of motor shaft | |
| 14 Motor shaft | |
| 15 Knife shaft | |
| 16 Thin, stainless steel washer | |
| 17 Fiber washer | |
| 18 Wide, stainless steel washer | |
| 19 Low nut | |
WARRANTY CERTIFICATE
WARRANTY
Since the 01.01.95, all our appliances comply with CE and possess the CE label. Our guarantee is of 12 months from the manufacturing date mentioned on the descriptive plate. Warranty is strictly limited to the free replacement of any part of origin recognized by us as defective due to a defect or building default and identified as belonging to the concerned appliance. Warranty does not apply to damages resulting from installation or use non-complying with our appliance data sheet (user's manual) or in case of an evident lack of maintenance or disrespect of elementary security electric rules. It does not apply in case of regular wear and tear. Any replacement of parts under warranty will be realized after return of the defective part in our workshops, postage paid, supported by a copy of a conformity statement on which appears the serial number of the appliance. Every appliance is equipped with a descriptive plate conforming to the EC recommendations and of which a duplicate exists in the conformity statement (serial number, manufacturing date, electrical characteristics ...). In case of serious damage judged repairable only in our workshops, and after prior consent from our departments, any appliance under guarantee is sent by the Distributor, carriage paid. In case of repairs or reconditioning of appliances not under guarantee, the round trip transport is payable by the distributor. The parts and workforce are invoiced at the current rate. A preliminary estimate can be supplied.
Coffee grinder not using SANTOS original burrs are not taken under guarantee. The warranty conditions, repairs, reconditioning, of the espresso coffee grinder are the object of a specific note. Our guarantee does not extend to the payment of penalties, the repair of direct or indirect damages and notably to any loss of income resulting from the nonconformity or the defectiveness of products, SANTOS's global responsibility being limited to the sale price of the delivered product and to the possible repair of the defective products.
In case of revelation of an imperfection during the warranty period, the Distributor has to, unless a different written agreement of SANTOS, indicate to his customer to stop any use of the defective product. Such a use would release SANTOS of any responsibility.
APPLIANCE IDENTIFICATION PLATE
SPECIMEN
For all the documents not delivered with the appliance.
Printed, Faxed, Downloaded
MANUEL D'UTILISATION ET D'ENTRETIEN

natural_image
Green SANTOS blender with black handle and plastic lid, no visible text or symbols on body*408.060 - *408.061
Modèle n° 33
SOMMAIRE
DECLARATION "CE" DE CONFORMITE....3
REGLES DE SECURITES .... 4
CONTRE INDICATIONS....4
BRANCHEMENT ELECTRIQUE ; 4
1ere MISE EN ROUTE 5
RECYCLAGE DU PRODUIT EN FIN DE VIE 6
VOTRE MIXER DE BAR N°33 7
UTILISATION DE L'APPAREIL 7
MISE EN ROUTE : 7
AIDE AU DEPANNAGE....13
natural_image
Green SANTOS blender with red prohibition symbol crossed (no text or symbols on device)MAUVAISE POSITION
Fig 1
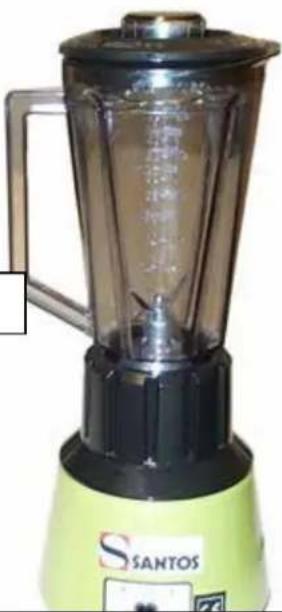
natural_image
Green SANTOS blender with black handle and plastic lid (no visible text or symbols on body)BONNE POSITION
text_image
11 Fig D 12 19text_image
14 D Fig Gnatural_image
Green SANTOS blender with black handle and clear glass interior (no visible text or symbols on body)*408.060 - *408.061
Modelle Nr. 33
INHALT
RECYCLING DES ALTGERÄTS
Since the 01.01.95, all our appliances comply with CE and possess the CE label. Our guarantee is of 12 months from the manufacturing date mentioned on the descriptive plate. Warranty is strictly limited to the free replacement of any part of origin recognized by us as defective due to a defect or building default and identified as belonging to the concerned appliance. Warranty does not apply to damages resulting from installation or use non-complying with our appliance data sheet (user's manual) or in case of an evident lack of maintenance or disrespect of elementary security electric rules. It does not apply in case of regular wear and tear. Any replacement of parts under warranty will be realized after return of the defective part in our workshops, postage paid, supported by a copy of a conformity statement on which appears the serial number of the appliance. Every appliance is equipped with a descriptive plate conforming to the EC recommendations and of which a duplicate exists in the conformity statement (serial number, manufacturing date, electrical characteristics ...). In case of serious damage judged repairable only in our workshops, and after prior consent from our departments, any appliance under guarantee is sent by the Distributor, carriage paid. In case of repairs or reconditioning of appliances not under guarantee, the round trip transport is payable by the distributor. The parts and workforce are invoiced at the current rate. A preliminary estimate can be supplied.
Coffee grinder not using SANTOS original burrs are not taken under guarantee. The warranty conditions, repairs, reconditioning, of the espresso coffee grinder are the object of a specific note. Our guarantee does not extend to the payment of penalties, the repair of direct or indirect damages and notably to any loss of income resulting from the nonconformity or the defectiveness of products, SANTOS's global responsibility being limited to the sale price of the delivered product and to the possible repair of the defective products.
In case of revelation of an imperfection during the warranty period, the Distributor has to, unless a different written agreement of SANTOS, indicate to his customer to stop any use of the defective product. Such a use would release SANTOS of any responsibility.