
LD135-152 - Monitor VIEWSONIC - Free user manual and instructions
Find the device manual for free LD135-152 VIEWSONIC in PDF.

| Product Type | Direct View LED Monitor |
| Brand | Viewsonic |
| Model | LD135-152 |
| Screen Size | 135" (diagonal) |
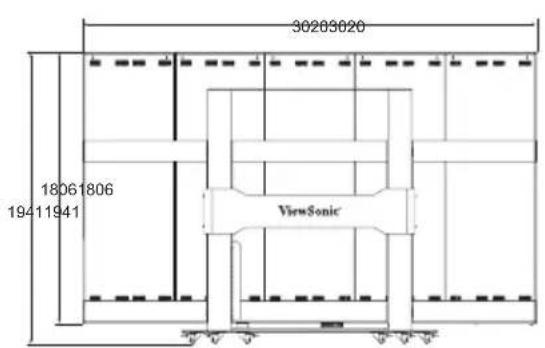
| Display Area | 118.11" x 66.44" (3000 x 1687.5 mm) |
| Pixel Pitch | 1.56 mm |
| Native Resolution | FHD 1920 x 1080 |
| Refresh Rate | Up to 4440 Hz |
| Contrast Ratio | 6000:1 (typical) |
| Brightness | 100 – 600 cd/m² (8 adjustment levels) |
| LED Lifespan | 100,000 hours |
| Video Inputs | 2 x HDMI (1080p@60Hz, HDCP 1.4), 1 x LAN (RJ45) |
| USB Ports | 1 x USB 3.0 Type A, 2 x USB 2.0 Type A (input); 3 x USB Type A (power output 5V/1A x1, 5V/0.5A x2), 1 x USB Type B (maintenance) |
| Audio Output | 1 x 3.5 mm jack, built-in speakers 5W x 2 stereo |
| Serial Control | RS-232 |
| Power Supply | 100-120 V~ / 30 A, 50/60 Hz or 220-240 V~ / 15 A, 50 Hz (depending on country) |
| Power Consumption (normal/max) | 2030 W / 2900 W |
| Power Consumption Standby / Off | < 0.5 W / < 0 W |
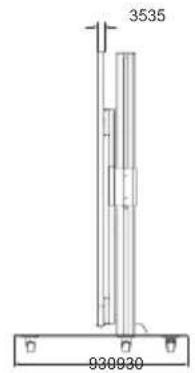
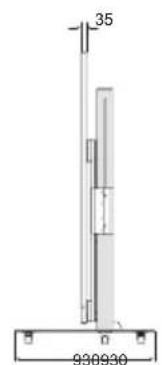
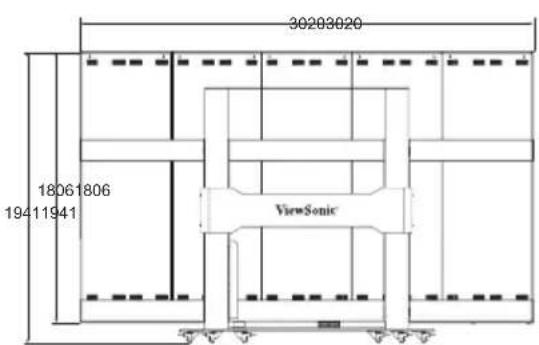
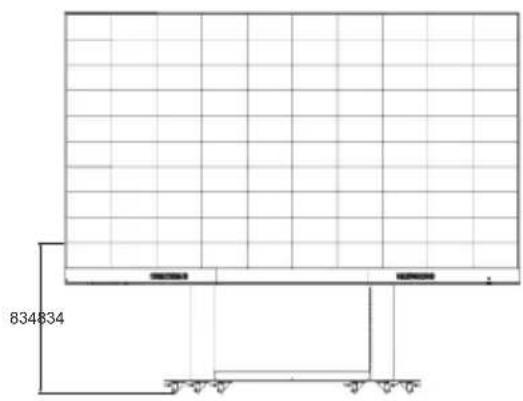
| Dimensions (W x H x D) | 3020 x 1941-2531 x 930 mm (height adjustable with cart) |
| Net Weight | 240 kg |
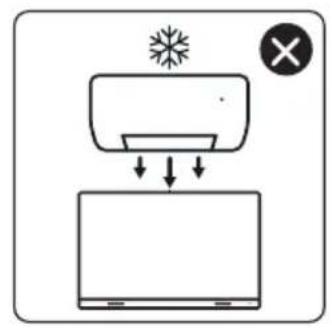
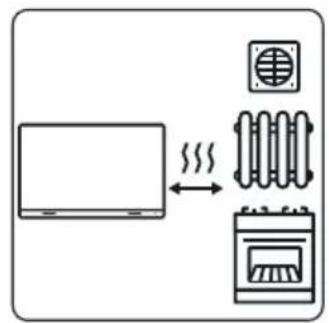
| Operating Conditions | Temperature: 0°C to 40°C; Humidity: 20% to 80% non-condensing; Altitude: ≤ 2000 m |
| Storage Conditions | Temperature: -20°C to 60°C; Humidity: 10% to 90% non-condensing |
| Main Functions | Motorized cart with height adjustment, remote control, ambient light sensor, multiple inputs, automatic standby |
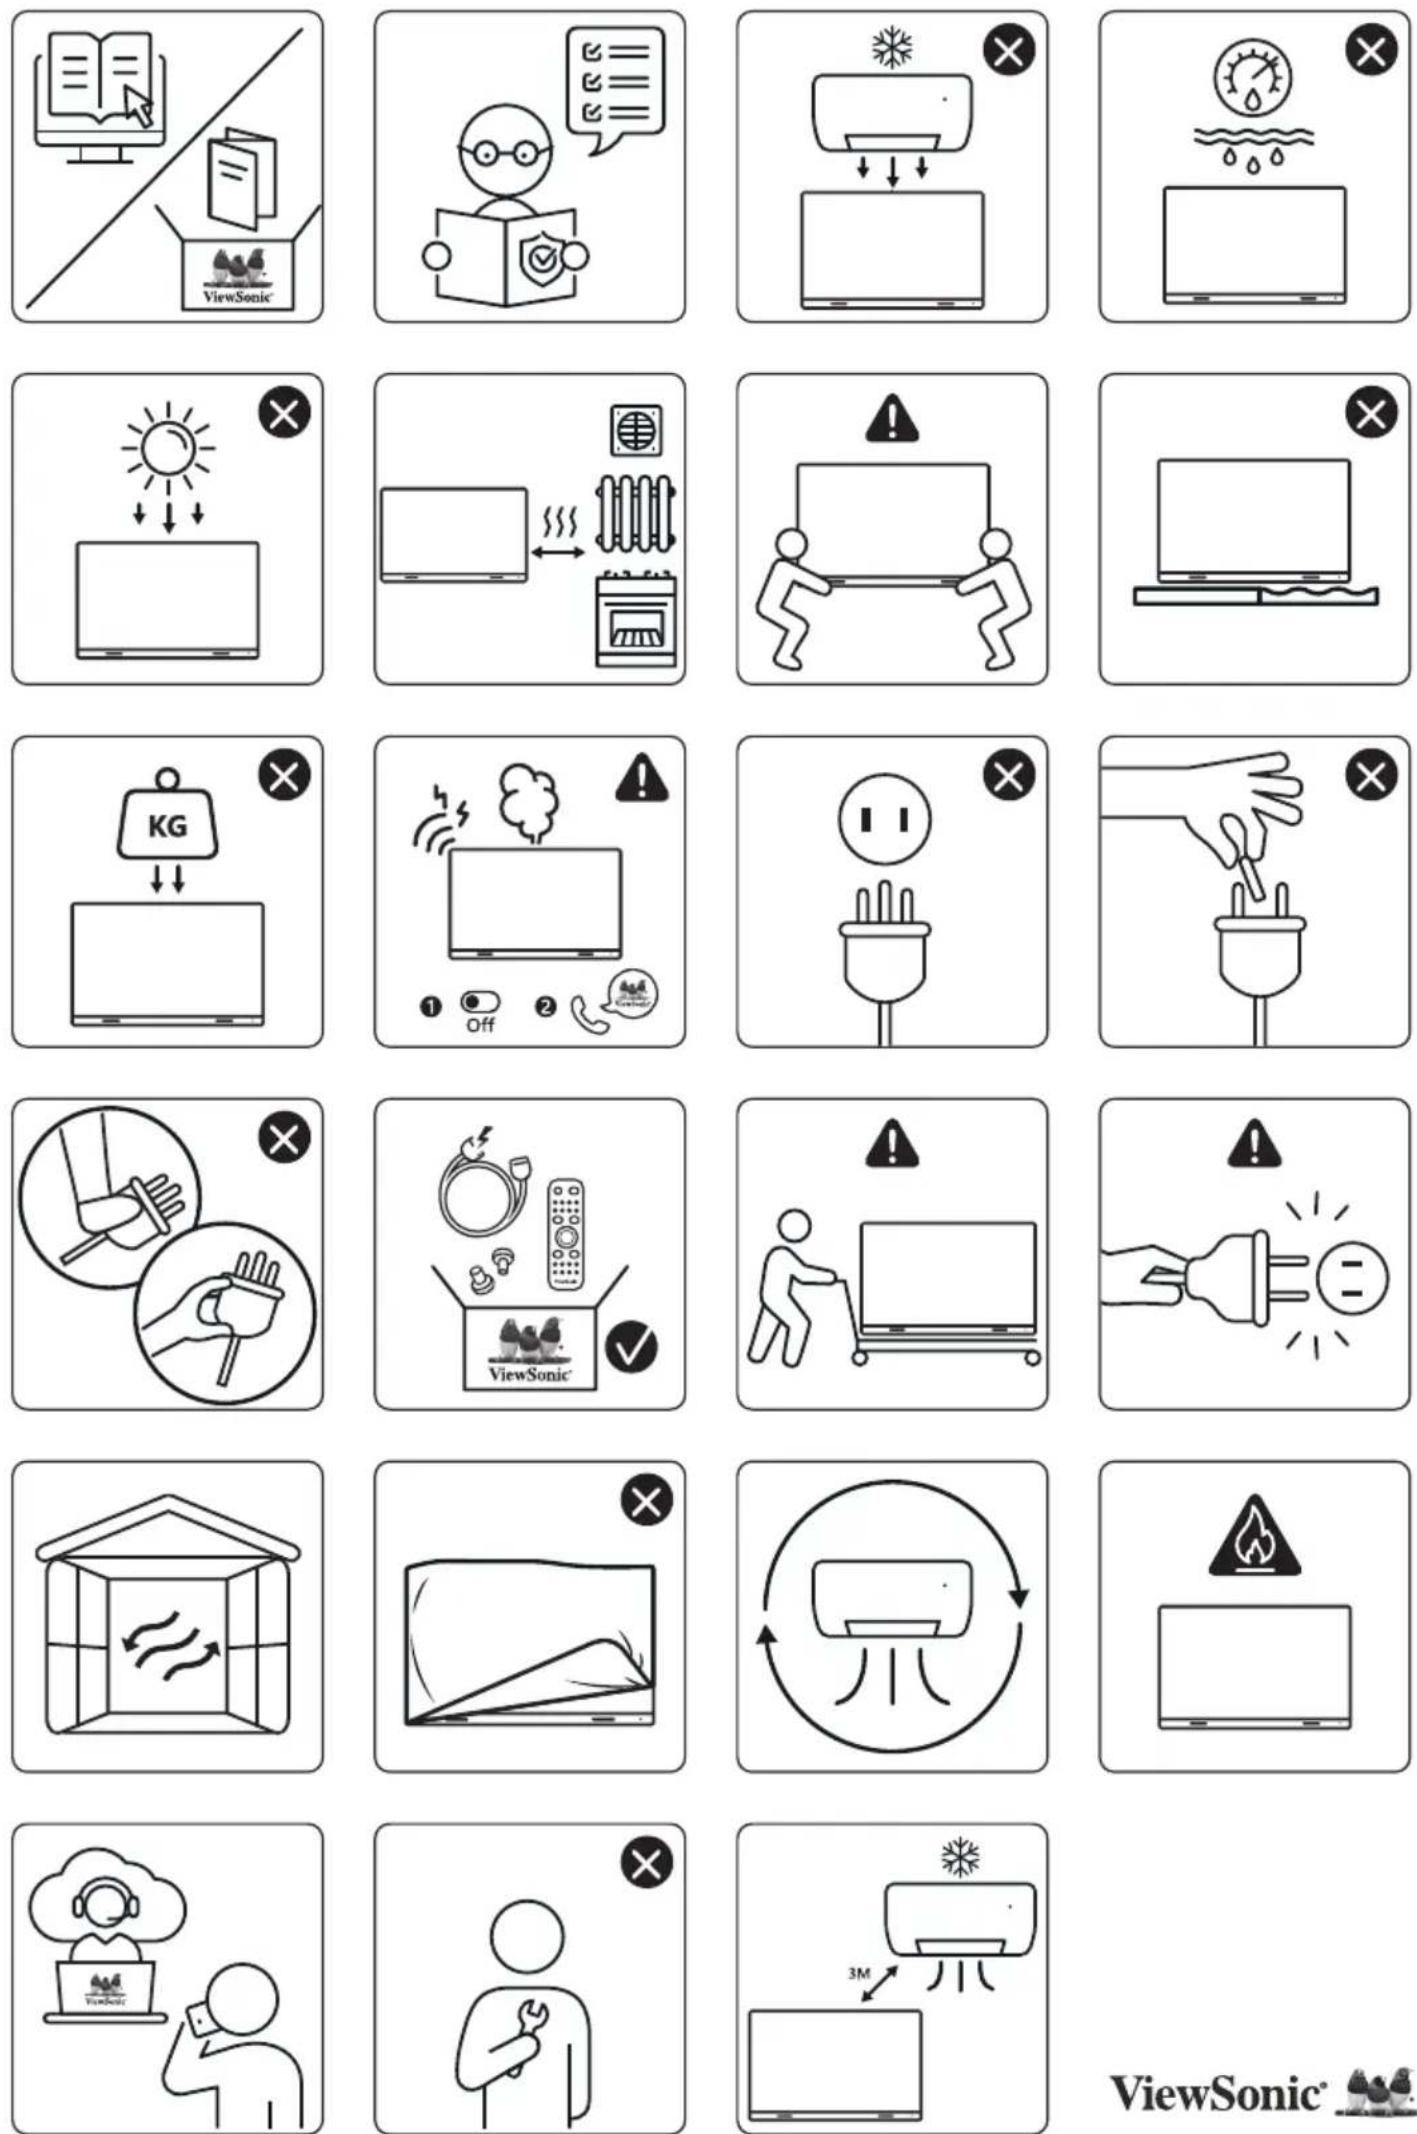
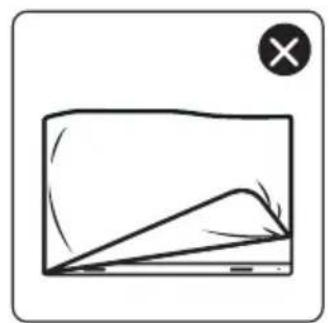
| Care and Cleaning | Clean with a soft, dry cloth. Do not use liquids or abrasive products. Unplug before cleaning. |
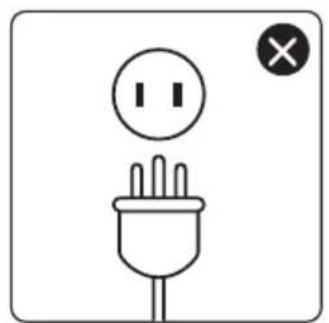
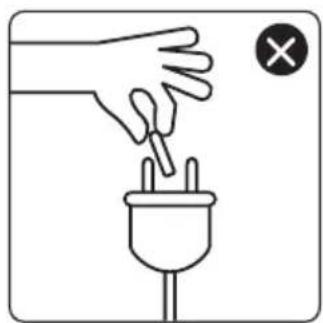
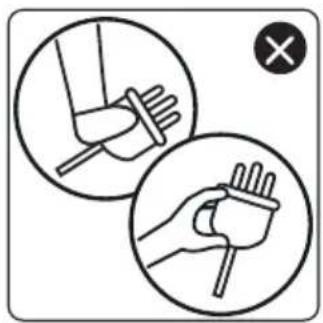
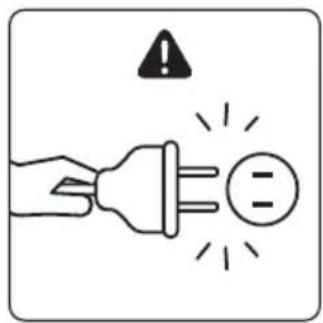
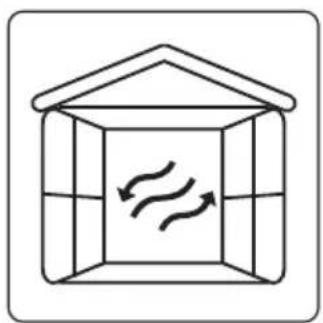
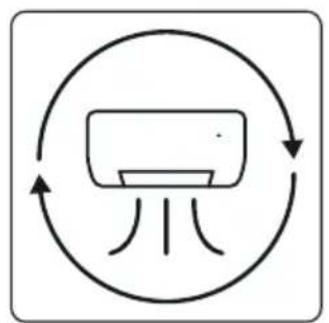
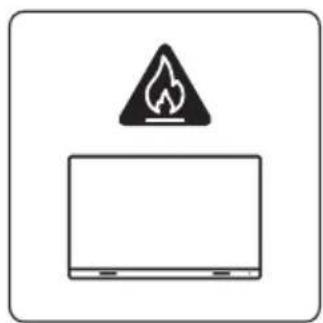
| Safety | Do not obstruct ventilation openings. Avoid any contact with water. Use only the supplied power cord. Be careful when moving the motorized cart. |
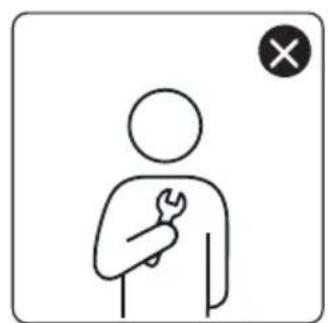
| Spare Parts and Repairability | Spare LED modules included depending on country. Vacuum suction tool provided. For repairs, contact Viewsonic support. |
Frequently Asked Questions - LD135-152 VIEWSONIC
User questions about LD135-152 VIEWSONIC
0 question about this device. Answer the ones you know or ask your own.
Ask a new question about this device
Download the instructions for your Monitor in PDF format for free! Find your manual LD135-152 - VIEWSONIC and take your electronic device back in hand. On this page are published all the documents necessary for the use of your device. LD135-152 by VIEWSONIC.
USER MANUAL LD135-152 VIEWSONIC
All-in-one Direct View LED Display Solution kit
Quick Start Guide
快速安装说明
快速入門指南
FCC Compliance Statement
This device complies with part 15 of FCC Rules. Operation is subject to the following two conditions: (1) this device may not cause harmful interference, and (2) this device must accept any interference received, including interference that may cause undesired operation.
Industry Canada ICES-003 Compliance: CAN ICES-003(B) / NMB-003(B)
CE Conformity for European Countries
The device complies with the EMC Directive 2014/30/EU and Low Voltage Directive 2014/35/EU and Radio Equipment Directive 2014/53/EU. The full Declaration of Conformity can be found at the following website:
https://www.viewsonicglobal.com/public/products download/safety compliance/LED Display/LD108-122 CE_DOC.pdf
https://www.viewsonicglobal.com/public/products download/safety compliance/LED Display/LD135-152 CE_DOC.pdf
Declaration of RoHS2 Compliance
This product has been designed and manufactured in compliance with Directive 2011/65/EU of the European Parliament and the Council on restriction of the use of certain hazardous substances in electrical and electronic equipment (RoHS2 Directive) and is deemed to comply with the maximum concentration values issued by the European Technical Adaptation Committee (TAC).
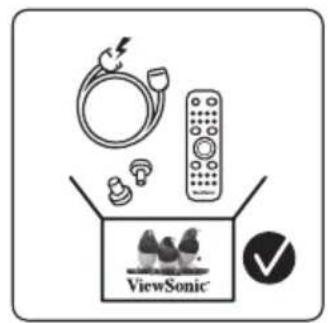
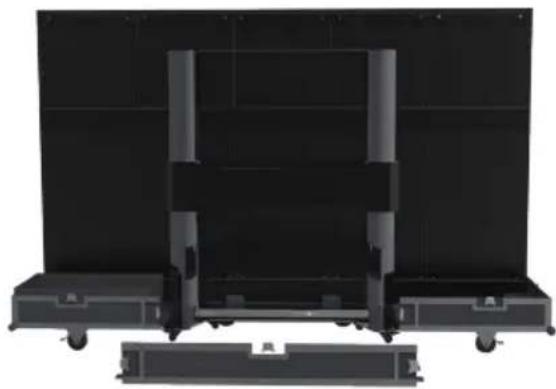
Package Contents

| Item Quantity Note | |||
| LED Display with Motorized Trolley Cart | 1 | ||
| Quick Start Guide | Wardrobe No. L0108-321 MOTORISED LED Module D40000000000000000000000000000000000000000000000000000000000000000000000000000000000000000000000000000 | 1 | |
| Remote Control | 1 | ||
| Power Cable | |||
| LED Modules | 2 modules | The quantity of spare LED modules will vary by country. | |
| Vacuum Suction Tool | 1 | ||
| USB-A to USB-B Cable (5m) | 1 | ||
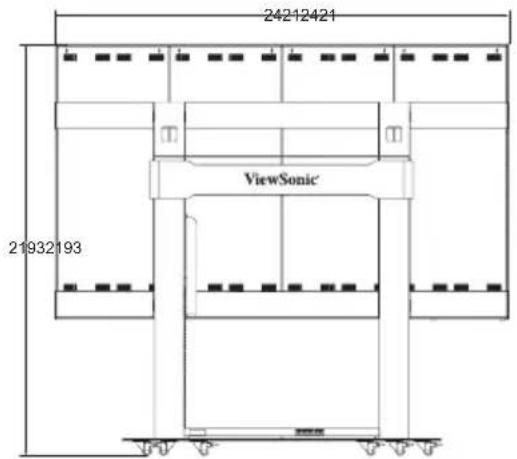
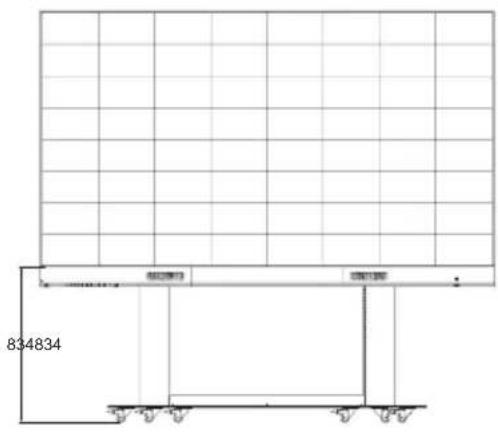
Physical Dimensions for LD108-122

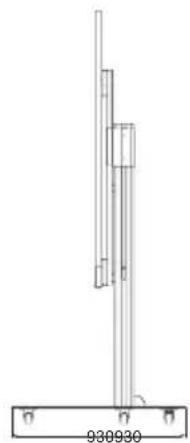
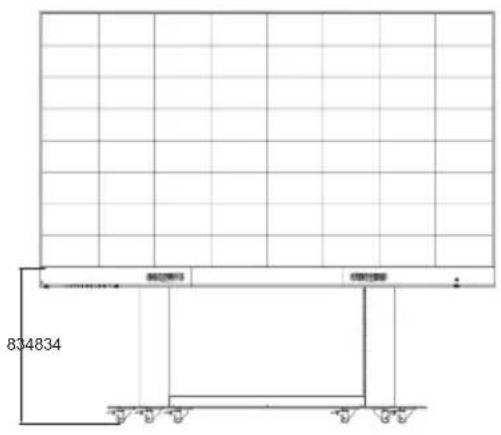
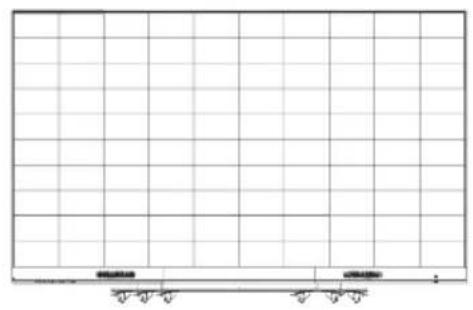
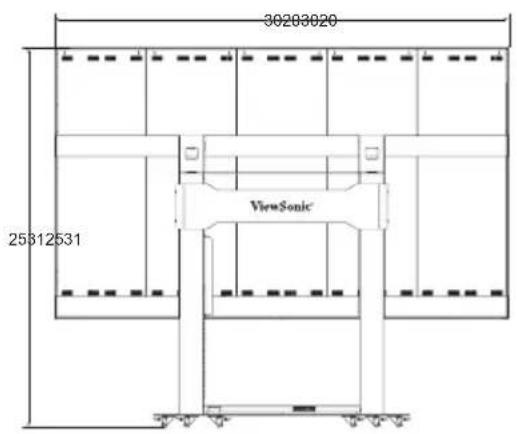
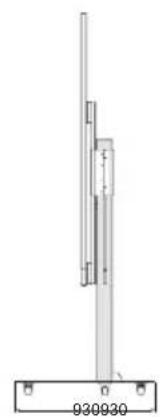
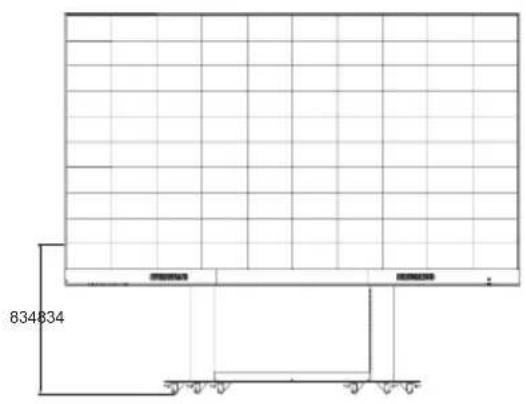
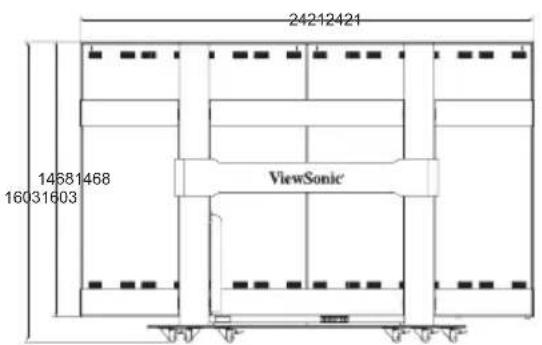
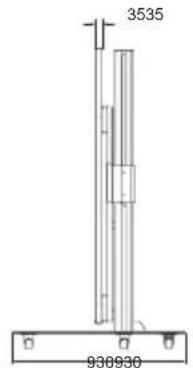
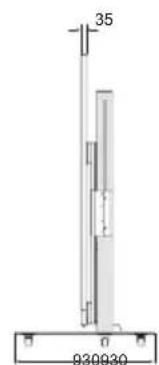
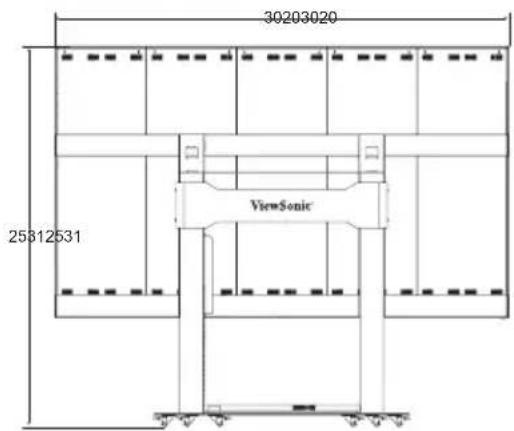
Physical Dimensions for LD135-152
Product Overview
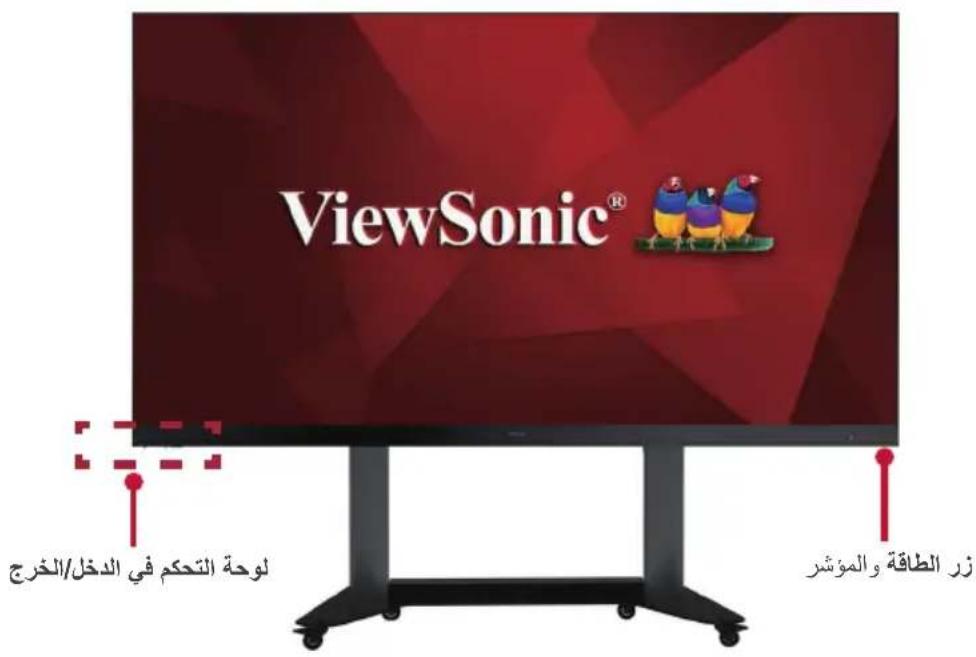
Front Panel
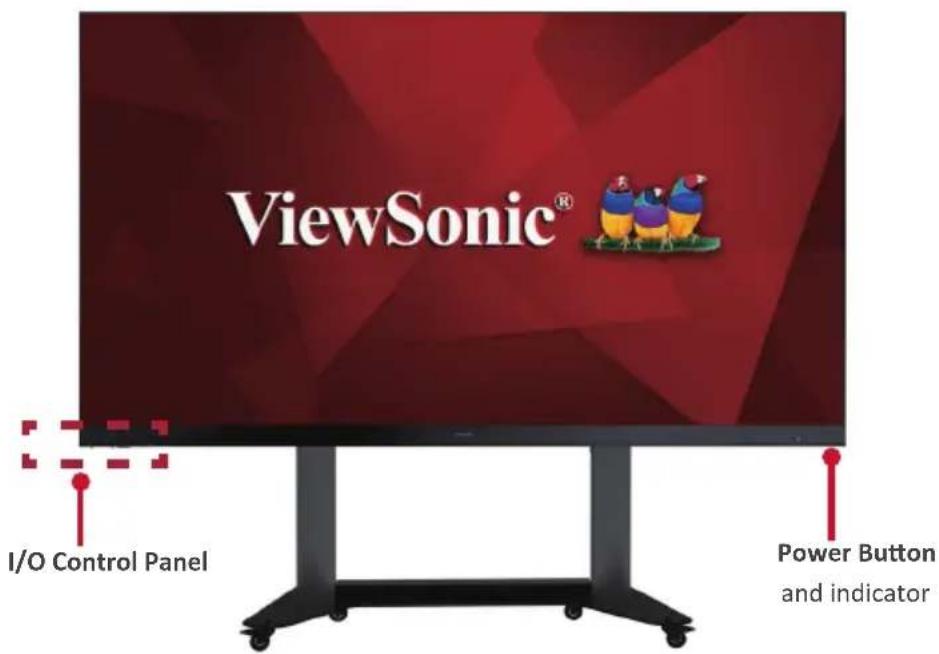
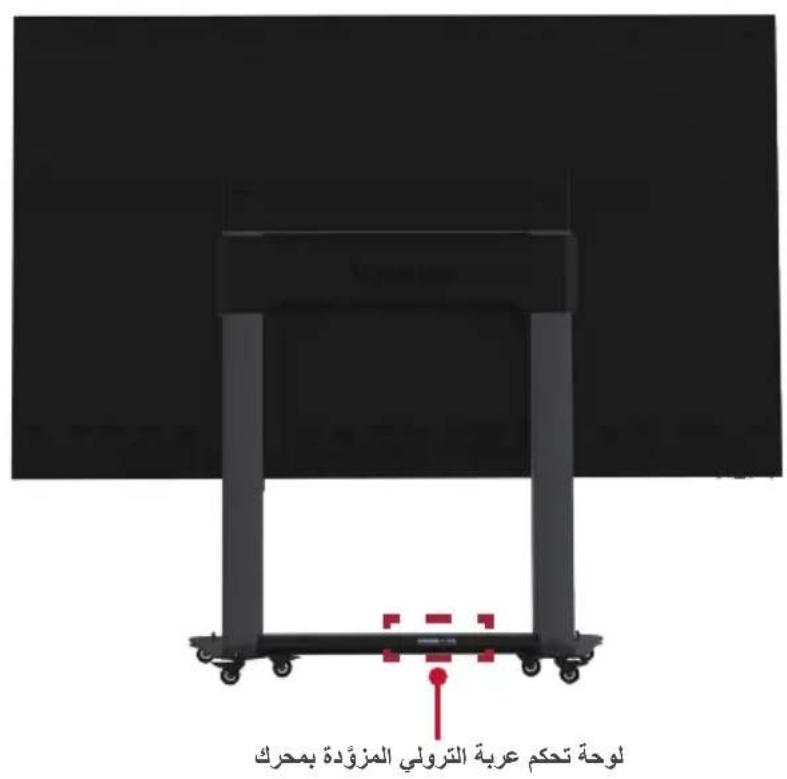
Rear Panel
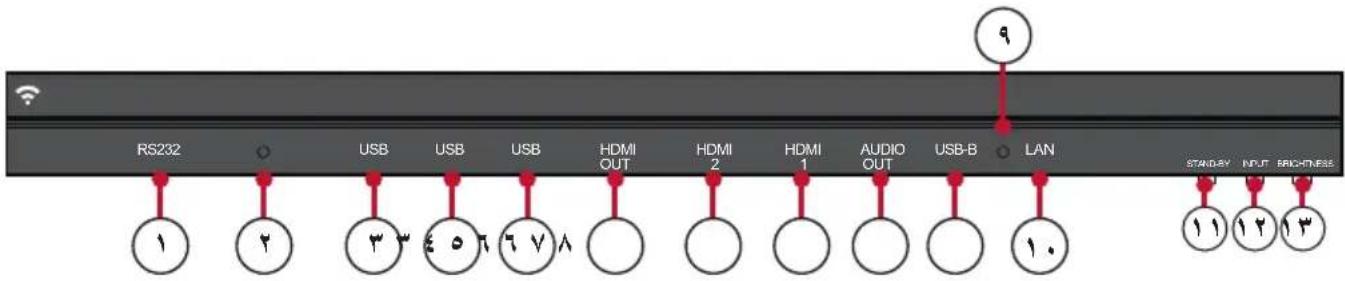
I/O Control Panel

| Number Item Port | Description | ||
| 1 | RS-232 | Serial control port. | |
| 2 | ○ | Ambient Light Sensor | Detects ambient light and adjusts brightness levels automatically. |
| 3 | USB | USB 2.0 | USB Reader (5V/0.5A) |
| 4 | USB | USB 3.0 | USB Reader (5V/1A) |
| 5 | HDMI Out | Extend content out to another display device. | |
| 6 | HDMI In | High definition input; connect to PC with HDMI output, set-top box, or other video device. | |
| 7 | Audio Out | Audio output to an external speaker. | |
| 8 | USB-B | Maintenance port for external PC connection. | |
| 9 | ○ | IR Receiver | Receiver for the Remote Control. |
| 10 | LAN | Standard RJ45 (10M/100M/1000M) Internet connection interface. | |
| 11 | Stand-by | Press to enter Stand-by mode. | |
| 12 | Input Select | Press to cycle through available input sources. | |
| 13 | Brightness | Press to cycle through brightness levels. | |
Remote Control
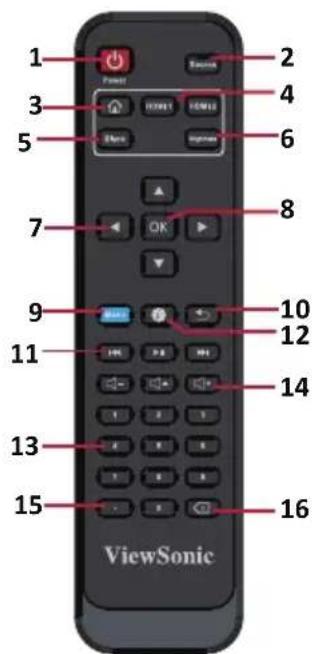
| Number Item Description | ||
| 1 Power On/Off | ||
| 2 Input sourcelection | ||
| 3 Back to Home screen | ||
| 4 Change to HDMI/HDMI 2 input source | ||
| 5 Switch to Black, black screen | ||
| 6 Adjust the brightness level | ||
| 7 | ▲/▼/▲/▼ | Directional buttons |
| 8 Confirm the OK election | ||
| 9 Enter the settings menu | ||
| 10 Return to previous | ||
| 11 | ←→→ | Move content forwards and backwards;Play/Pause content |
| 12 Enter the information page | ||
| 13 Numeric input buttons | ||
| 14 | + - → | Increase/decrease the volume level;Mute/Unmute |
| 15 Input key for dot | ||
| 16 Delete key text input | ||
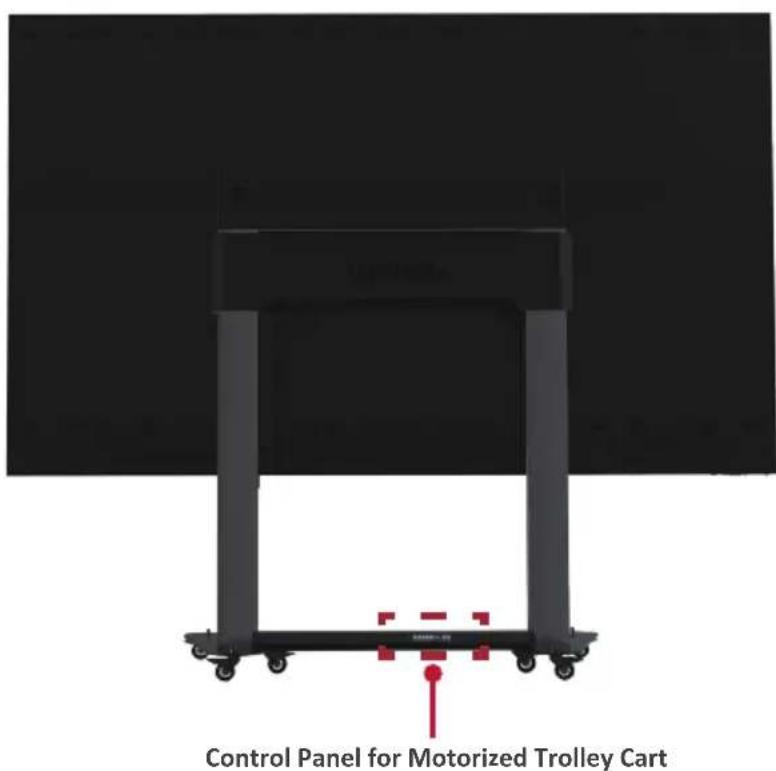
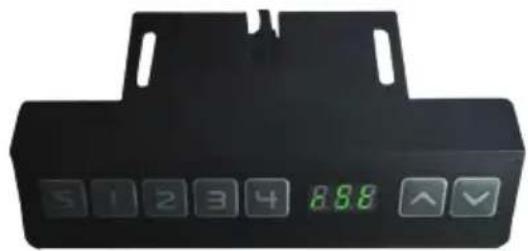
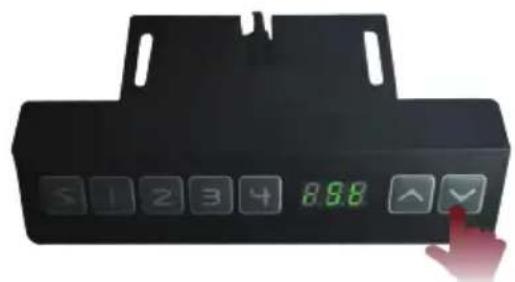
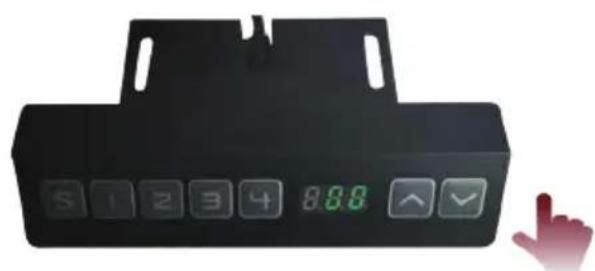
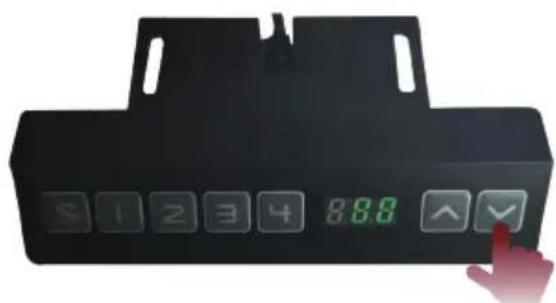
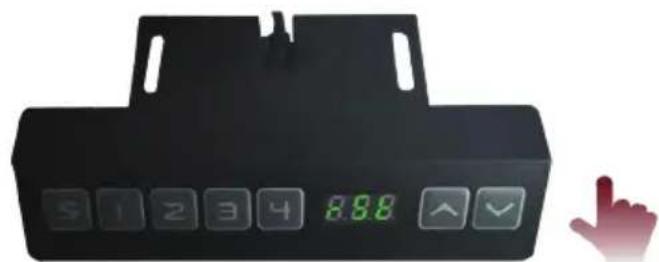
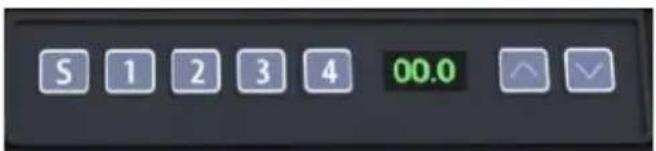
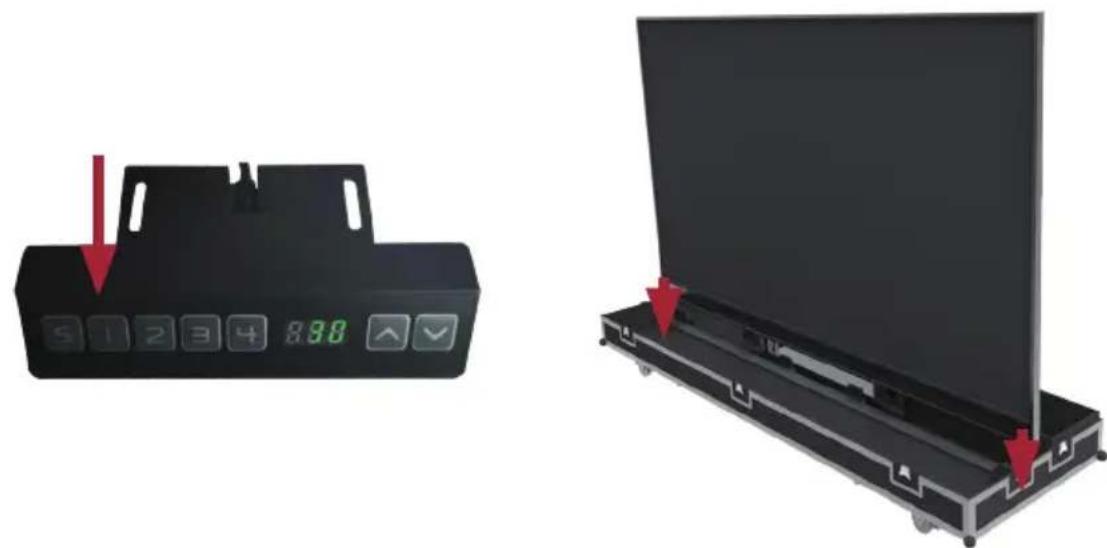
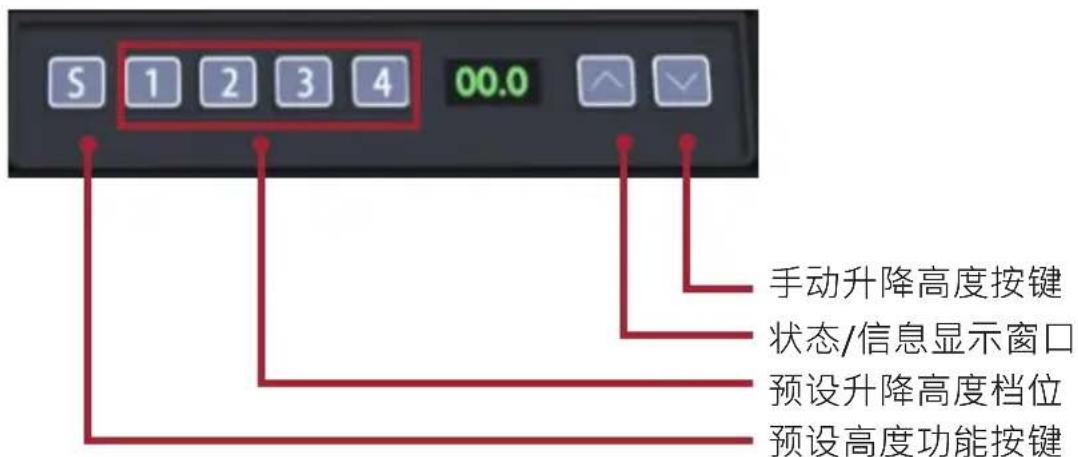
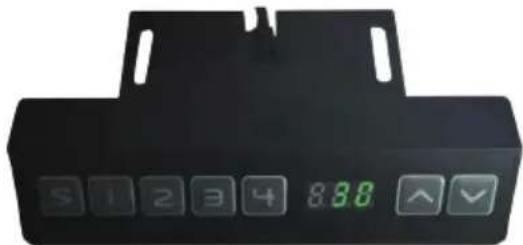
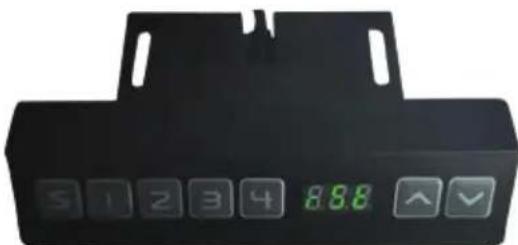
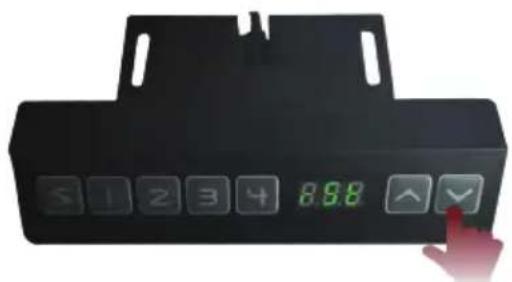
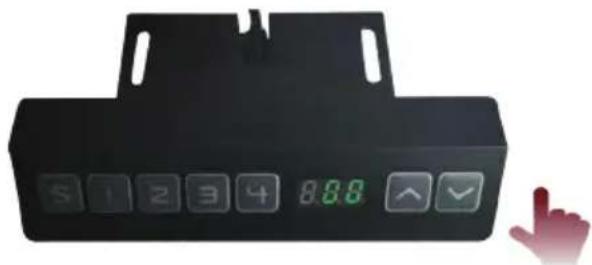
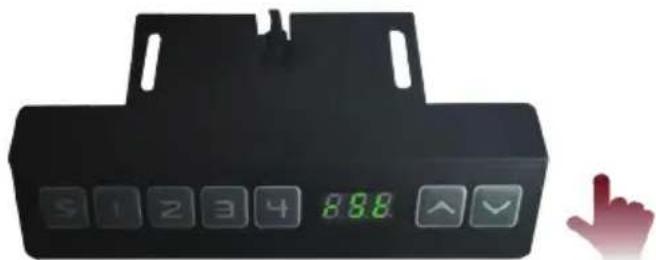
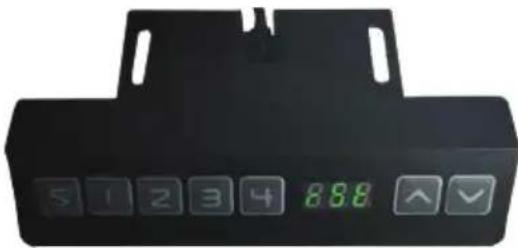
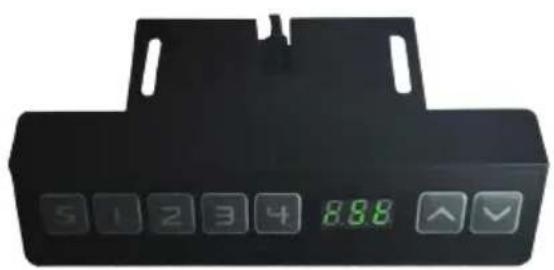
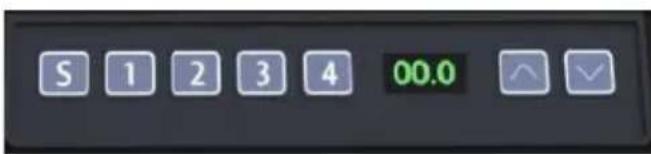
Control Panel for Motorized Trolley Cart

Manual lifting height key
Status/information display window
Preset lifting height level
Preset height function key

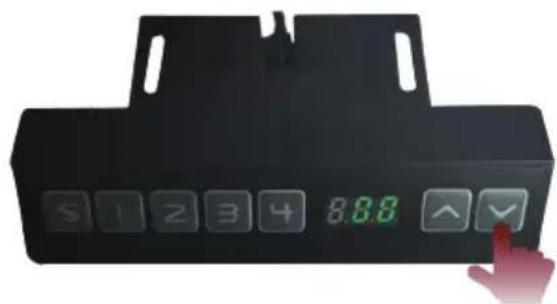
1. Instructions on Preset Lifting Height
- Initial preset lifting height: 4 groups of preset data, i.e. 1/2/3/4 correspond to 0% / 50% / 75% / 100% height respectively.
- Erasing of preset height data: data to be stored for more than 10 years. When new parameters are set, old parameters will be automatically erased.
- How to preset height: at any height (unavailable under the reset and error status), the current height parameters can be preset into keys 1-4.
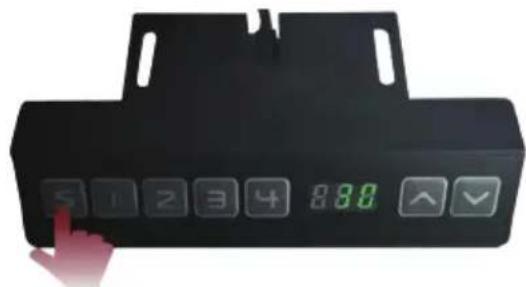
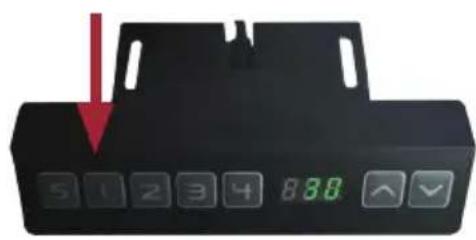
For example: set 30 into key 2:
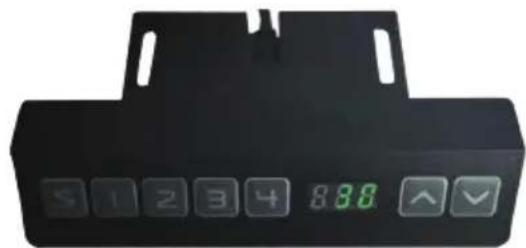
Press the "S" key to display "SET".

Within 2 seconds, before "SET" disappears, press "2".
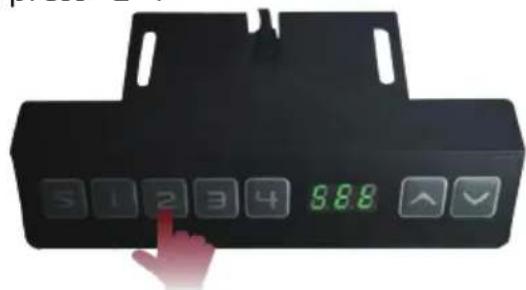
When "S-2" is displayed, the setting is over and will return to the previous display.
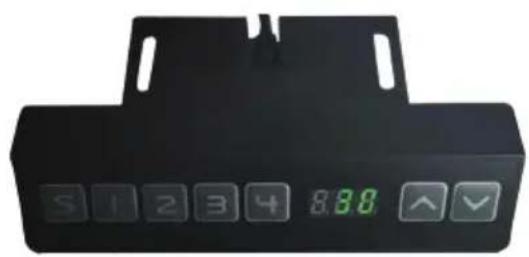
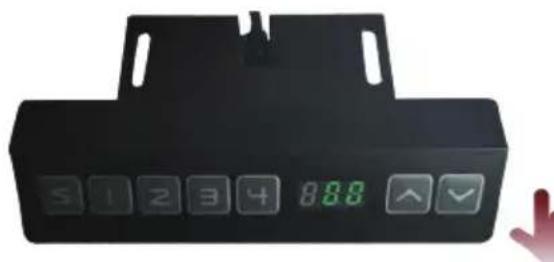
2. How to Use Preset Height
At any height (unavailable under the reset and error status), keys 1-4 may be used to quickly reach the preset height. If the current height has reached such preset height, no actions will be performed.
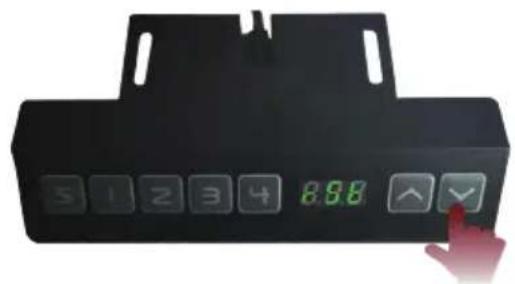
3. How to Change the Height
- Use the "Up" key to lift the display. The lift will automatically stop upon reaching the height limit. Please note, the "Up" key is a "click to act" key, i.e., upon releasing the key the lift will not immediately stop. Instead, it will slow down for a short distance then stop.
- Use the "Down" key to lower the display. The lift will automatically stop upon reaching the height limit. Please note, the "Down" key is a "click to act" key, i.e., upon releasing the key the lift will not immediately stop. Instead, it will slow down for a short distance then stop.
4. System Resetting
Resetting Reminding: when the information window displays "RST" or other error codes, causing the pillar to not be lifted up to the maximum height, it needs to be manually operated to reset the entire system:
How to Reset:
- When the information window displays "RST," hold the "Down" key, and the pillar will start to lower. After the "RST" displaying in the window disappears, the displayed height is at its minimum value.
- When the height displayed in the information window is at its minimum value, hold the "Down" key for at least 5 seconds.

Note: During resetting and lifting operations, please be aware of any person or object that may be nearby or under the display to avoid harm or damage.
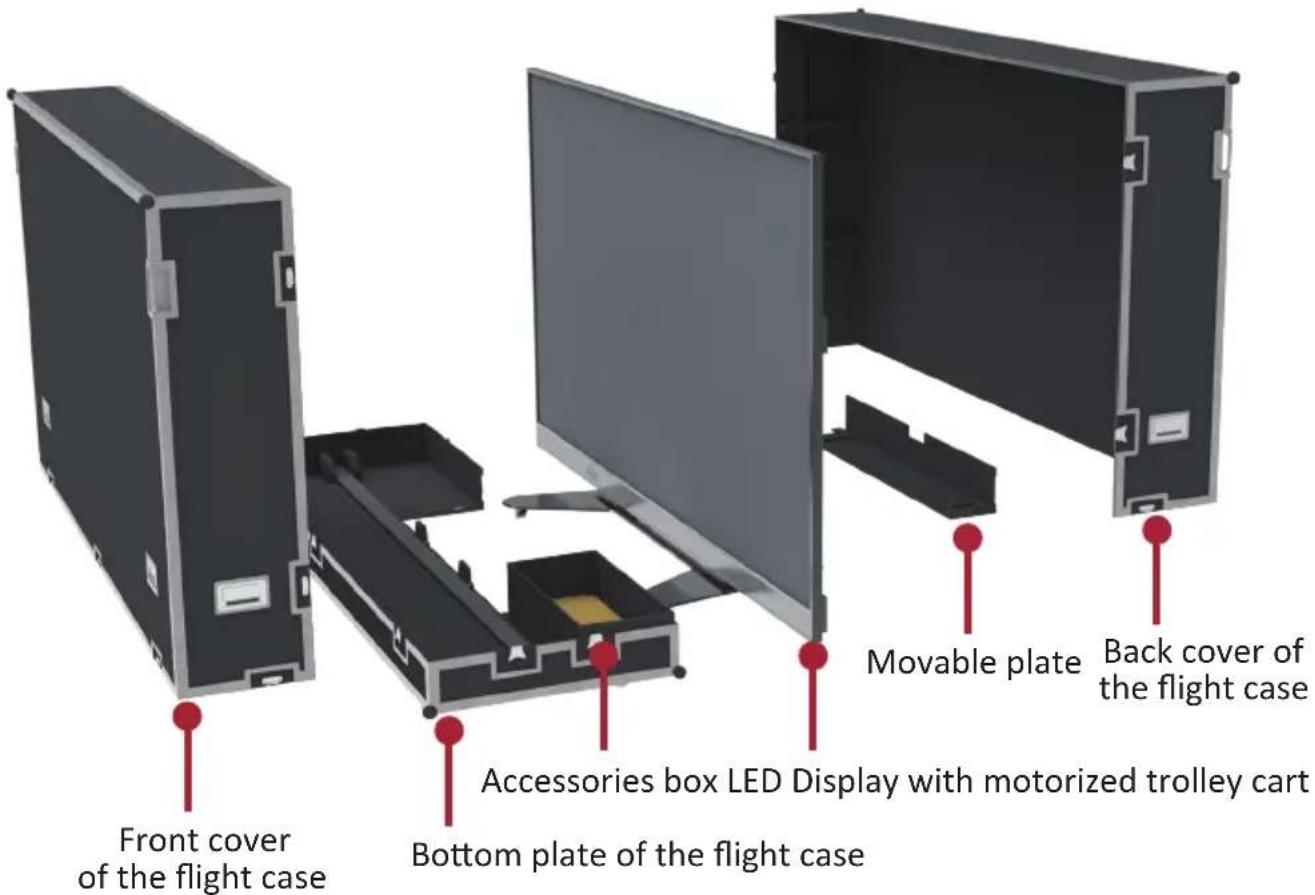
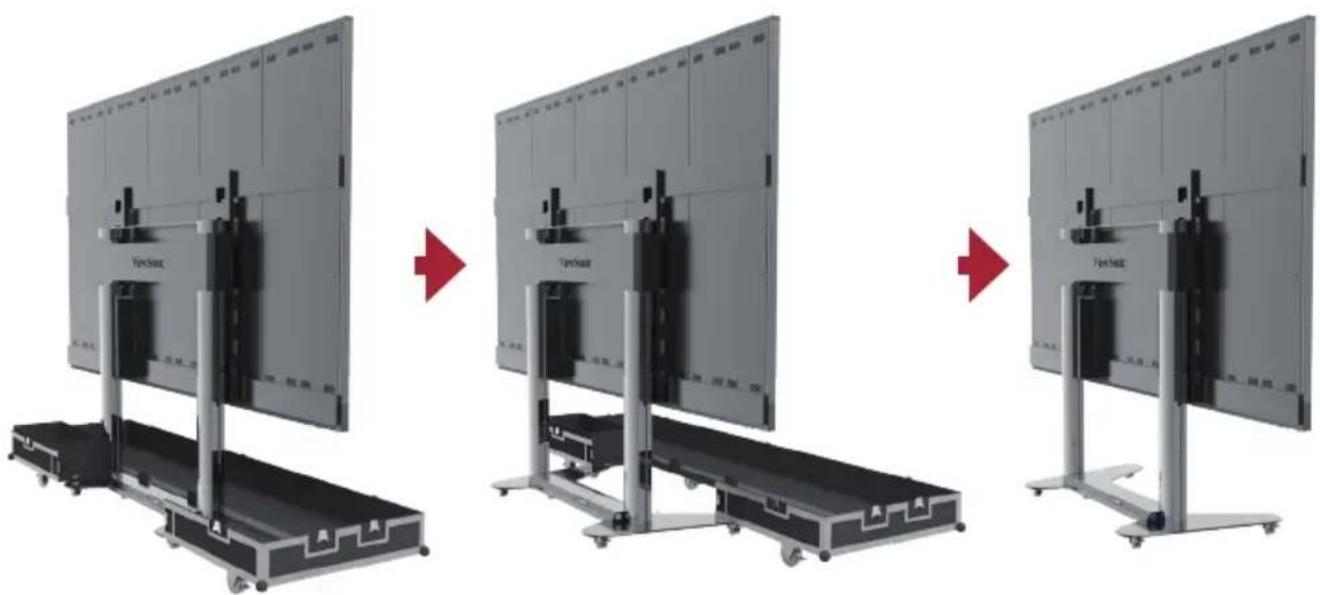
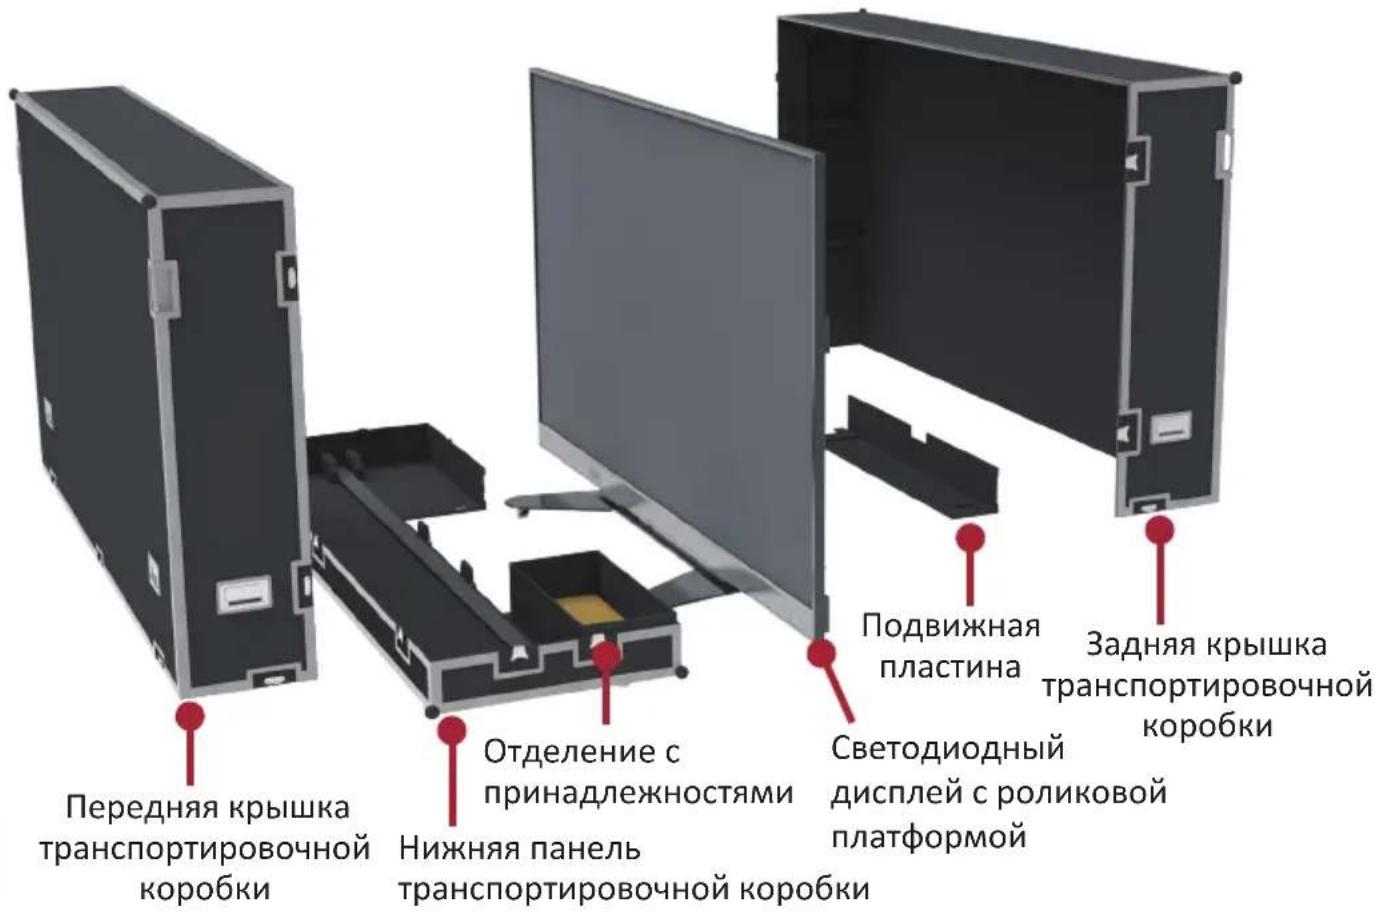
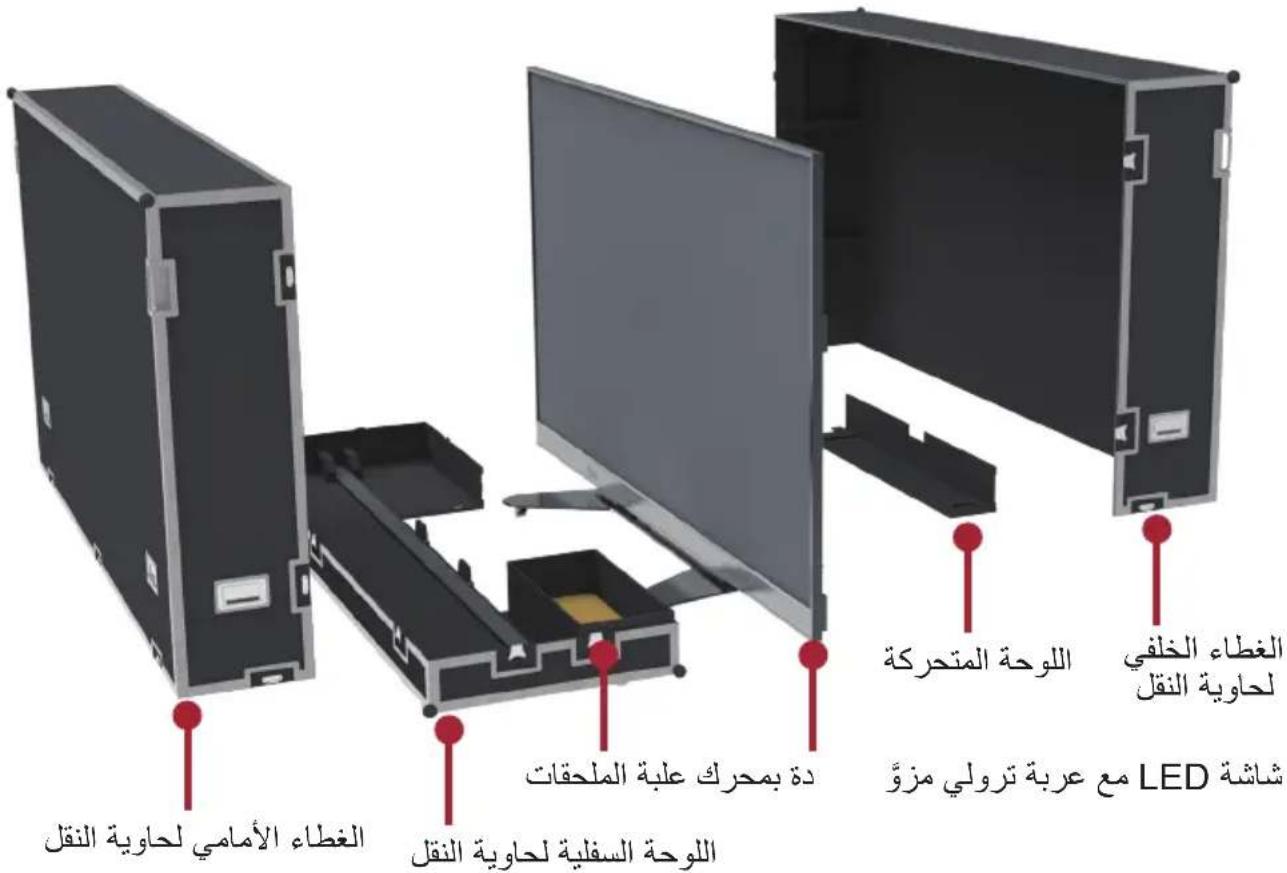
Schematic Diagram of Components

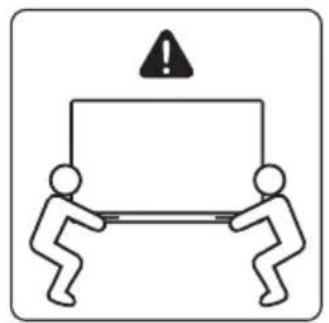
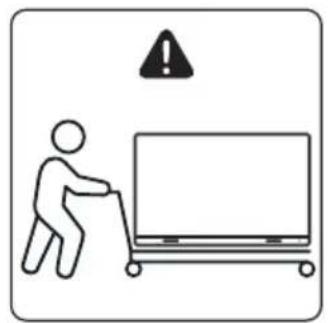
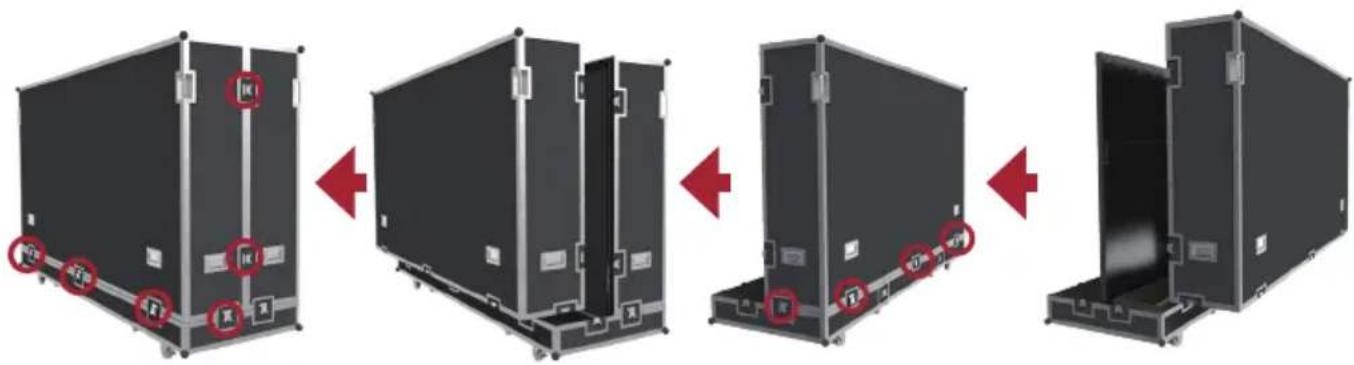
I. Handling and Moving Flight Cases
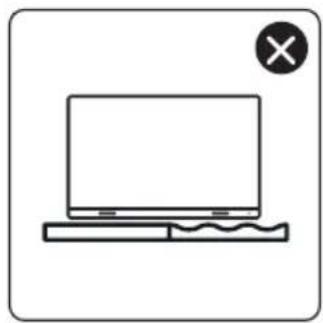
! Note: During moving, handling, placing and transporting of flight cases, always keep the specified position up, no reversing, in order to prevent bumping and damage to the structure of the equipment and the display components.
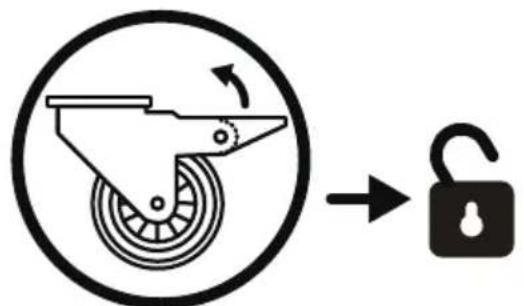
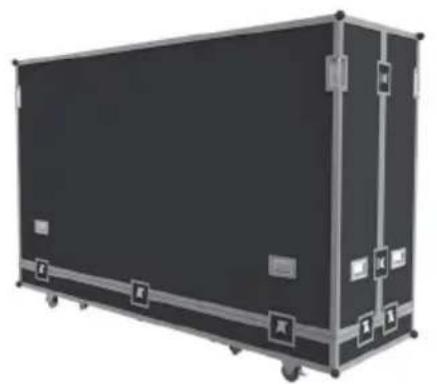
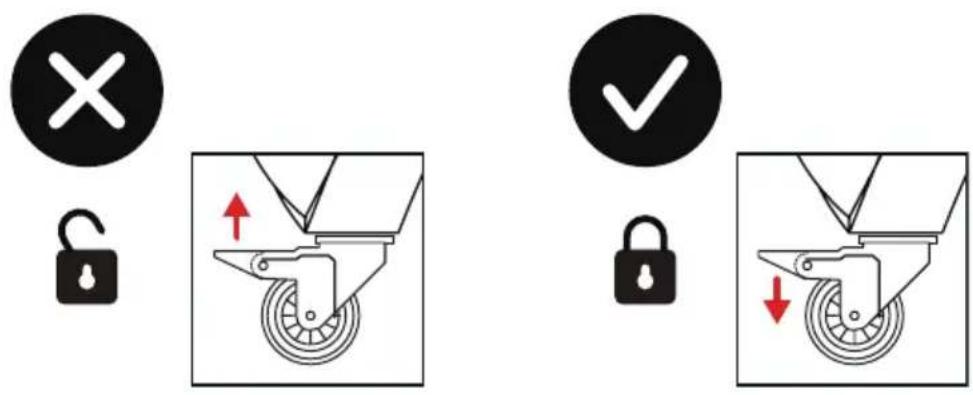
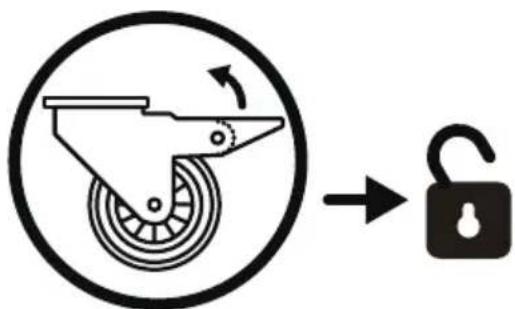
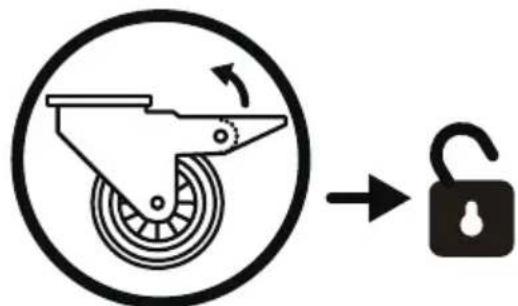
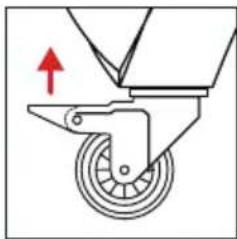
- Before moving any flight case, pull up the braking locks of those six rollers at the bottom, guaranteeing the release of the braking status.
- Ensure that the group is level, with the height difference less than 1.5cm , and the ground can comfortably hold more than the weight of the entire equipment.
- During moving, at least two adults are needed.
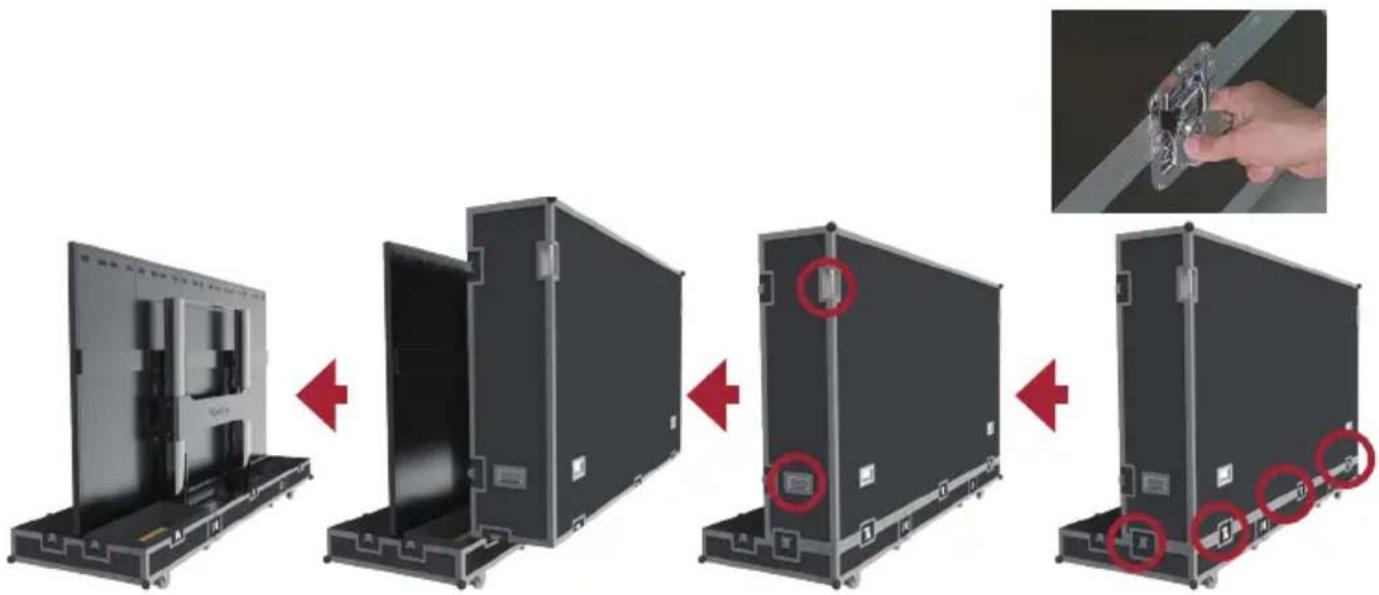
II. Unboxing Operation
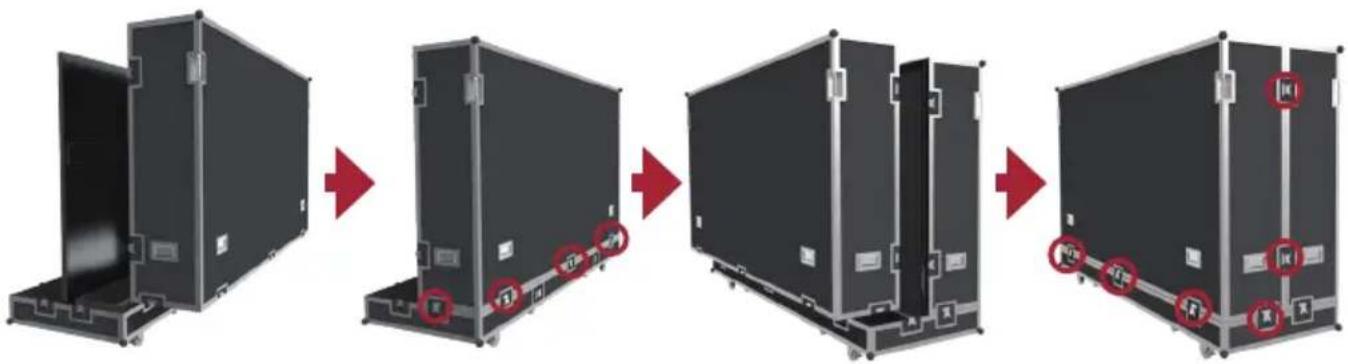
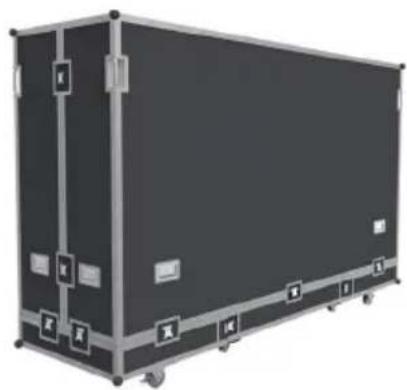
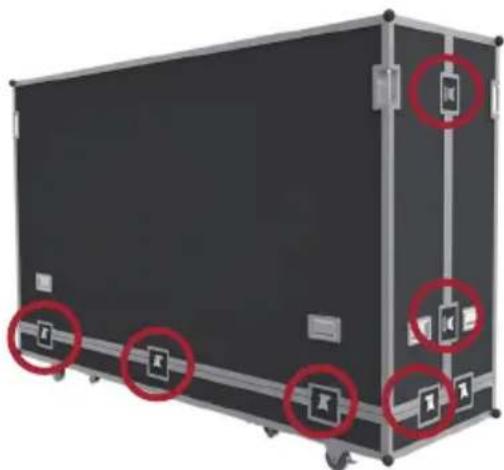
- After the flight case is moved to the designated location, open the flight case according to the sequence of Front cover, Back cover, Movable plate and Bottom plate in turn. To distinguish the Front cover and Back cover, refer to the following diagram.
(FCrnt cover) (Back cover)

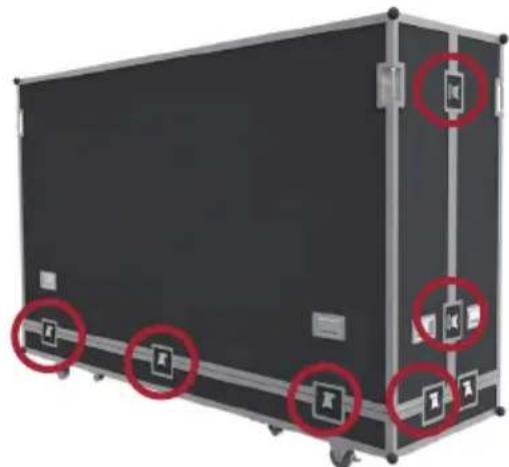
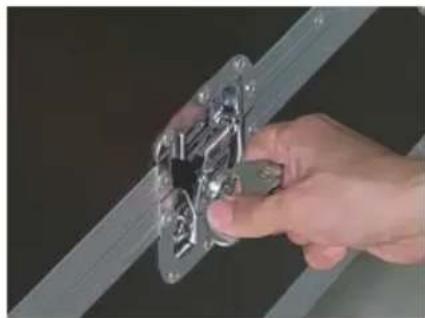
- As shown below, pull the handle of the lock-ups, and rotate the handle counterclockwise to unlock those 9 lock-ups connecting the Front cover with the Bottom plate and the Back cover, ensuring that each lock-up will not be interlocked.

- Two people will need to grip the handles, as indicated by the red circles below, and pull. While lifting, keep the the Front cover level as it is moved to another location.
- As shown below, pull the handle of the lock-ups, and rotate the handle counterclockwise to unlock those 5 lock-ups connecting the Back cover with the Bottom plate, ensuring that each lock-up will not be interlocked. Two people will need to grip the handles, as indicated by the red circles below, and pull. While lifting, lift off the Back cover to another location, ensuring to keep the cover level.
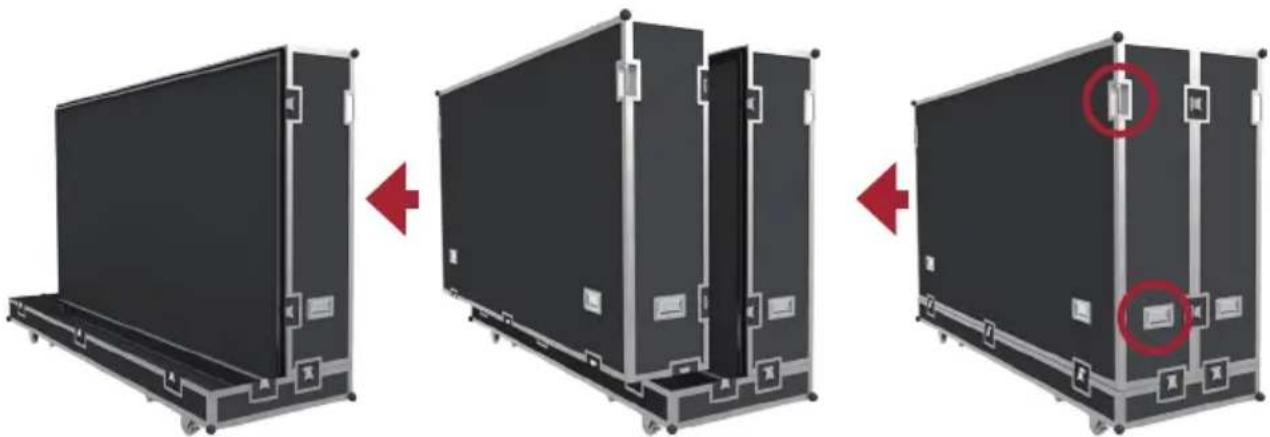
- As shown in the red circles below, open the 4 lock-ups of the Movable plate at the bottom of the flight case, and lift the Movable plate while holding up the bottom of it. Pull out the Movable plate from behind to separate.
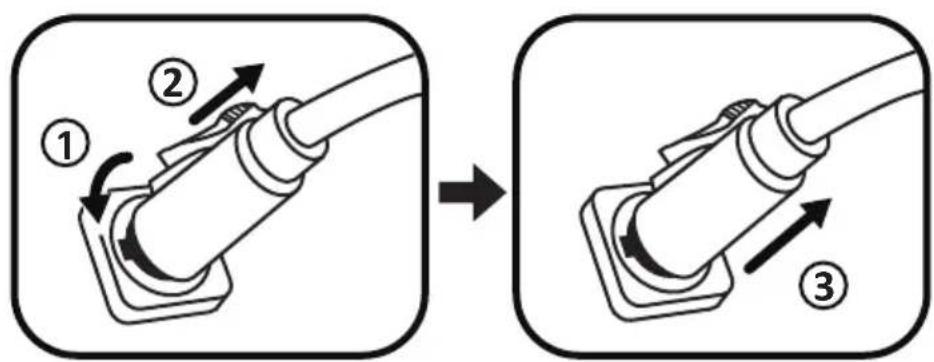
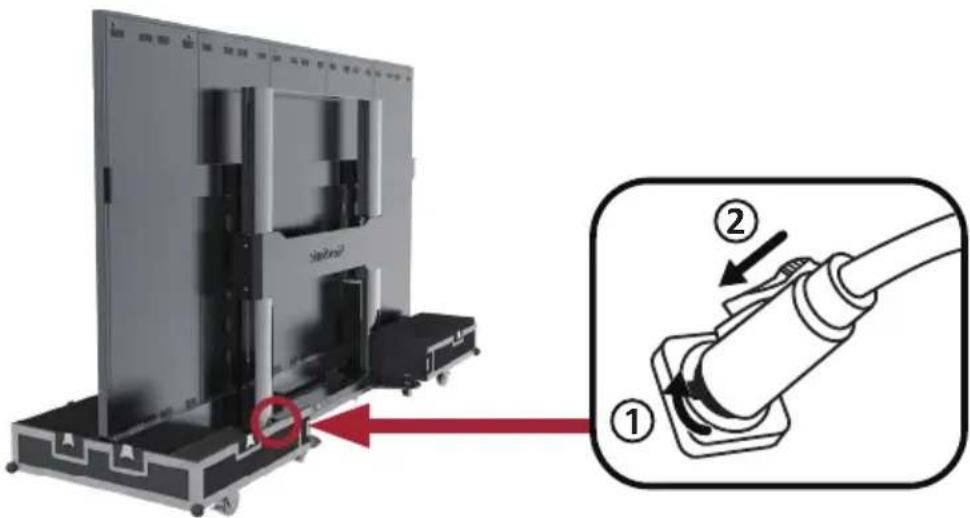
- Take the power cord out of the accessory box. Insert the flight plug into the female socket at the right of the base control box of the screen and rotate the plug 90^ clockwise (as shown below). Ensure the plug is connected securely (a click should be heard). Insert the other end of the plug into a power socket. Ensure that the power socket meets the specifications and standards of the LED display screen (30A socket for 110V area, and 16A socket for 220V area).
- After the power cord is properly connected, the green light and digits on the control lifting plate of the base of the screen will be ON. Keys are used to control the lifting operations of the screen.
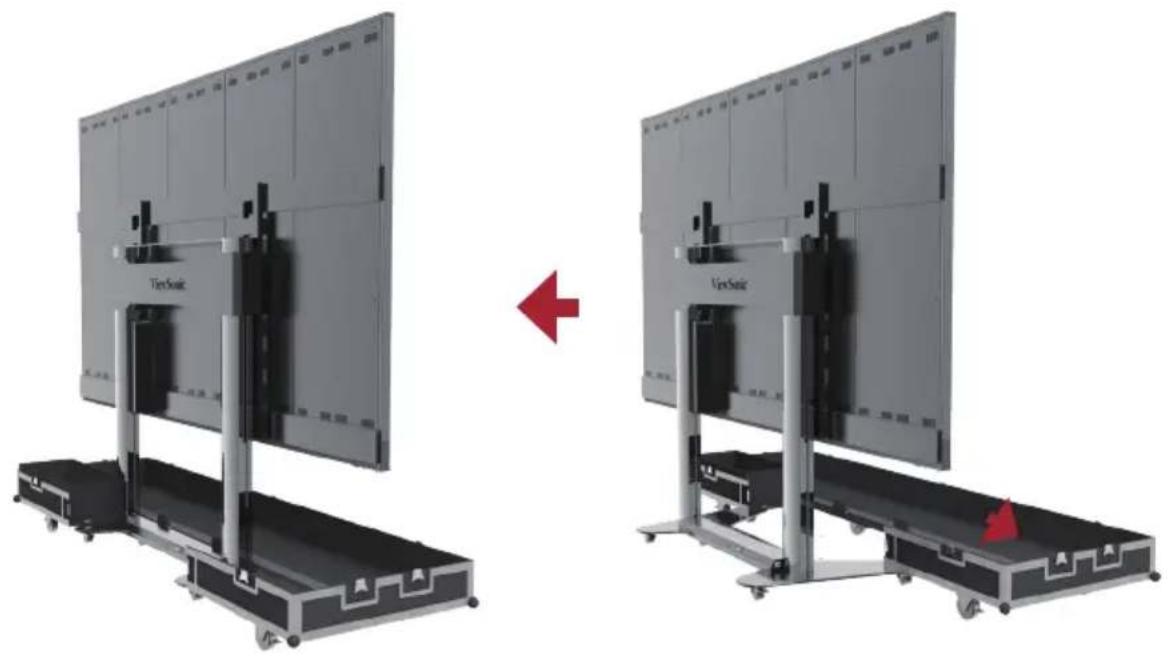
- After the screen is lifted to a certain height, pull out the Bottom plate of the flight case from the front.
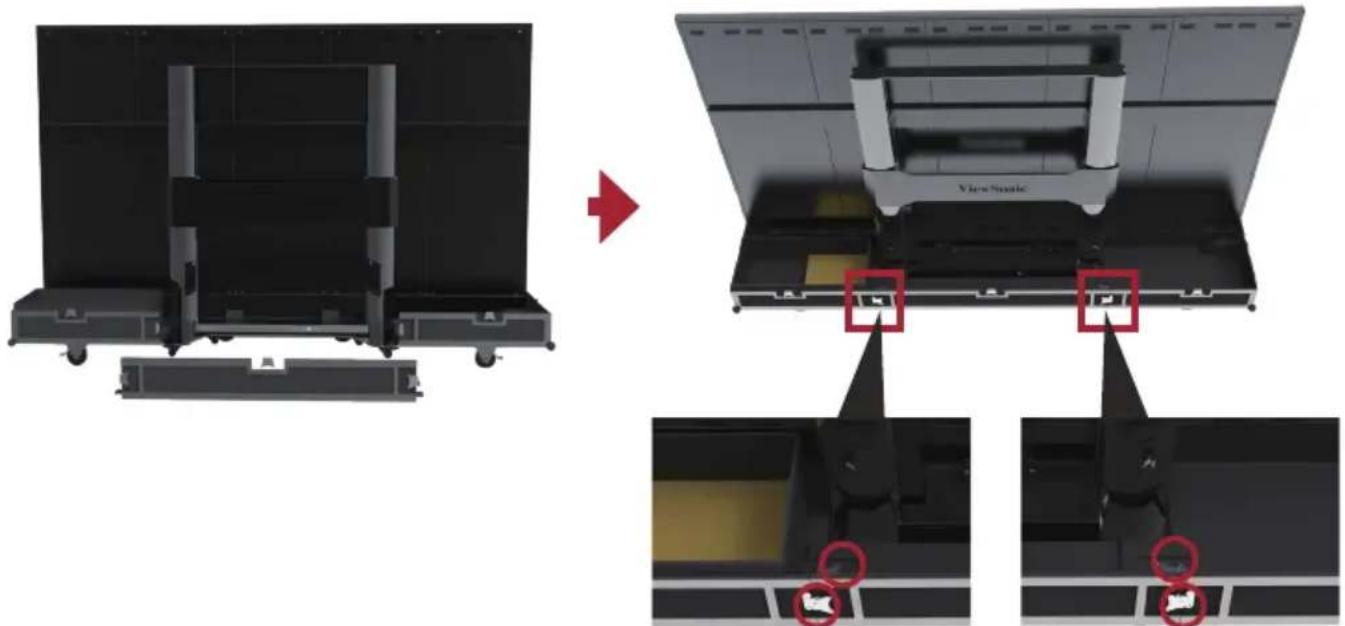
III. Packing and Handling Operation
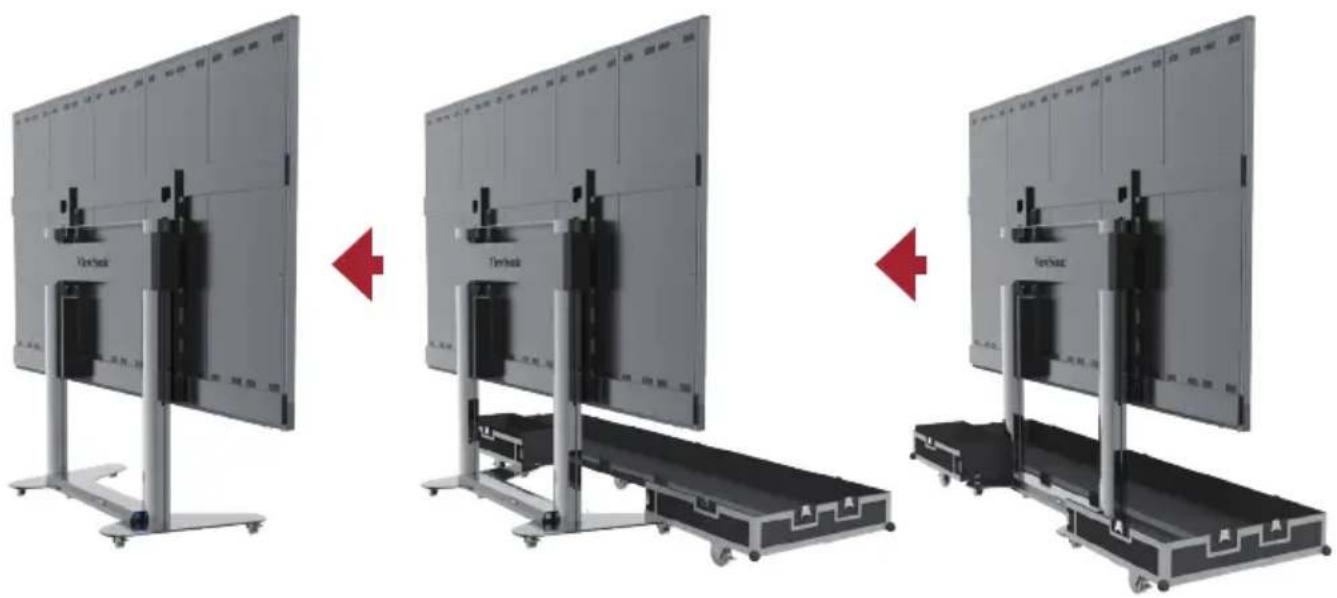
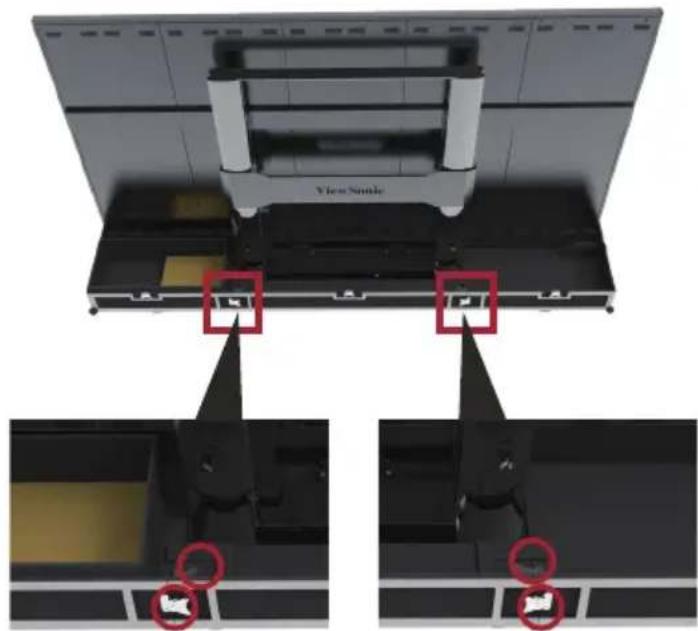
- Ensure that the LED display is OFF, and the Accessories box is placed in the grid corresponding to the Bottom plate of the flight case. The Bottom plate of the flight case, which shall be close to the ground, is clipped into the base of the screen from the position of the front as shown below.
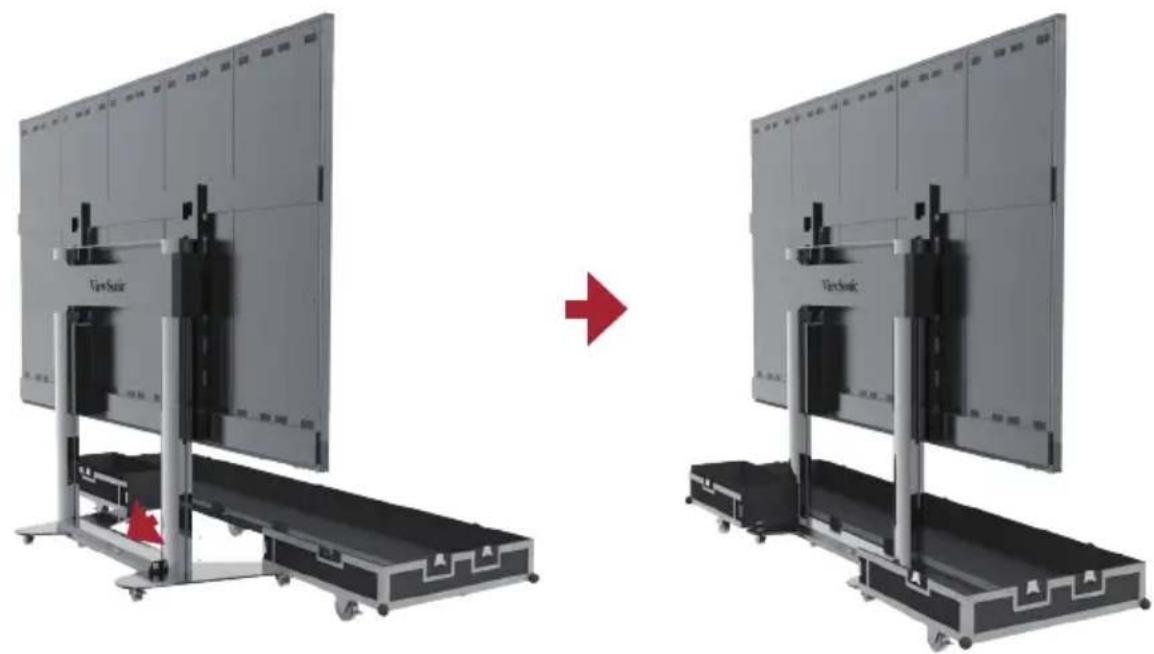
- Power On the display and press the 1 key on the control box at the base, or continuously hold the "Down" key, to lower the screen to the lowest position until it is inside the cart slot, as shown below:
- Insert the Moveable plate from behind, as shown below, and tighten the 4 lock-ups connecting with the Bottom plate. Ensure that the clips are engaged.
- Ensure the display is Powered Off, then unplug the power cord from the power socket. Next, remove the flight plug by rotating it 90^ counterclockwise. Finally, place the power cord into the Backup Box on the Bottom plate.
- Two people will need to lift the Back cover of the flight case, aligning the Back cover with the position of the lock-ups of the Bottom plate. When aligned, rotate the 5 lock-ups clockwise to secure the connection with the Bottom plate. Next, lift the Front cover of the flight case onto the Bottom plate, aligning the Front cover with the position of the lock-ups. When aligned, rotate the 9 lock-ups clockwise to secure the connection between the Front cover, the Bottom plate, and Back cover. Ensure that the lock-ups are engaged in place, and there are no obvious gaps.
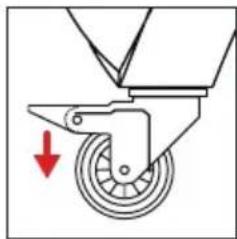
- After the flight case is closed, at least two people will be needed to move the case to its storage or transport location. Ensure the braking locks are engaged on all six rollers upon reaching the case's storage or transport location.
Note: When storing the flight case, ensure the ground is level and that all six rollers are locked.
Note: For the detailed instructions on the equipment, please see the user manual, which can be found at the following links: https://www.viewsonic.com/us/ld108-121.html#downloads https://www.viewsonic.com/us/ld135-151.html#downloads
Specifications
| Item Category Specifications | ||
| Model LD108-122 | ||
| LED Screen Type | Direct View LED Display | |
| Size 108" | ||
| Display Area 94.49" (H) x 53.15" (V) 2400 mm (H) x 1350 mm(V) | ||
| Pixel Pitch 1.25 mm | ||
| Resolution FHD, 1920 x 1080 | ||
| Refresh Rate up to 4440Hz | ||
| Contrast Ratio 600:1 (Typical) | ||
| Brightness 100-500 cd/m2 (8 levels of adjustments) | ||
| LED Lifespan 100,000 hours | ||
| Input Signal 2 x H | DMI (1920 x 1080 @ 60Hz, HDCP 1.4) 1 x LAN (RJ45) 1 x USB Type A (3.0) 2 x USB Type A (2.0) | |
| Output Signal 1 x | HDMI (1080p @ 60Hz) 1 x Audio Out (3.5 mm) 1 x USB Type B (for debug) 3 x USB Type A (Power) [5V/1A x 1; 5V/0.5A x 2] | |
| Speaker Output | 5W x 2 Stereo | |
| RS-232 | RS-232 Serial Control | |
| Power | Voltage | 100-120V/30A ~ 50/60Hz 220-240V/15A ~ 50Hz (vary by country) |
| Operating Conditions | Temperature | 32° F to 104° F (0°C to 40°C) |
| Humidity | 20%~80% non-condensing | |
| Altitude | ≤ 6,562 ft (2,000 m) | |
| Storage Conditions | Temperature | -4° F to 140° F (-20°C to 60°C) |
| Humidity | 10%~90% non-condensing | |
| Altitude | ≤ 6,562 ft (2,000 m) | |
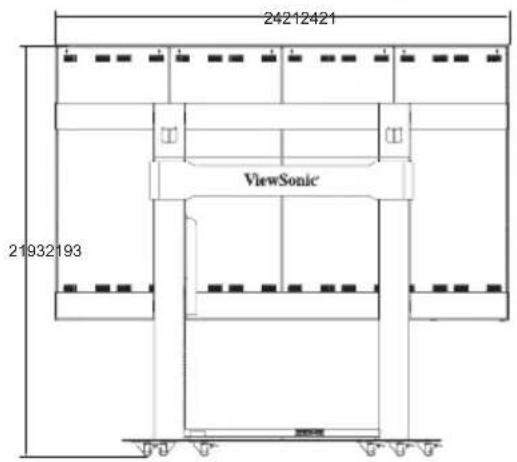
| Physical Dimensions (W x H x D) | 2,421 x 1,603-2,193 x 930 mm (95.3" x 63.1-86.3" x 36.6") | |
| Weight Physical | 180 kg (397 lb) | |
| Power Consumption | On | 1,330W (Normal) 1,900W (Max) |
| Sleep <0.5W | ||
| Off <0W | ||
NOTE: Product specifications are subject to change without notice.
Specifications
| Item Category Specifications | ||
| Model LD135-152 | ||
| LED Screen Type | Direct View LED Display | |
| Size 135" | ||
| Display Area 118.11" | (H) x 66.44" (V) 3,000 mm (H) x 1,687.5 mm(V) | |
| Pixel Pitch 1.56 mm | ||
| Resolution FHD, 1920 x 1080 | x 1080 | |
| Refresh Rate up to 4440Hz | 40Hz | |
| Contrast Ratio 6000:1 (Typical) | (Typical) | |
| Brightness 100-600 cd/m2 (8 levels of adjustments) | d/m2 (8 levels of adjustments) | |
| LED Lifespan 100,000 hours | hours | |
| Input Signal 2 x HDMI (1920 x 1080 @ 60Hz, HDCP 1.4) 1 x LAN (RJ45) 1 x USB Type A (3.0) 2 x USB Type A (2.0) | ||
| Output Signal 1 x HDMI (1080p @ 60Hz) | ||
| 1 x Audio Out (3.5 mm) 1 x USB Type B (for debug) 3 x USB Type A (Power) [5V/1A x 1; 5V/0.5A x 2] | ||
| Speaker Output | 5W x 2 Stereo | |
| RS-232 | RS-232 Serial Control | |
| Power | Voltage | 100-120V/30A ~ 50/60Hz 220-240V/15A ~ 50Hz (var by country) |
| Operating Conditions | Temperature | 32° F to 104° F (0°C to 40°C) |
| Humidity | 20%~80% non-condensing | |
| Altitude | ≤ 6,562 ft (2,000 m) | |
| Storage Conditions | Temperature | -4° F to 140° F (-20°C to 60°C) |
| Humidity | 10%~90% non-condensing | |
| Altitude | ≤ 6,562 ft (2,000 m) | |
| Physical Dimensions (W x H x D) | 3,020 x 1,941-2,531 x 930 mm (118.9" x 76.4" x 99.6") | |
| Weight Physical | 240 kg (529 lb) | |
| Power Consumption | On | 2,030W (Normal) 2,900W (Max) |
| Sleep <0.5W | ||
| Off <0W | ||
NOTE: Product specifications are subject to change without notice.
FCC符合性聲明
https://www.viewsonicglobal.com/public/products_download/safety_compliance/LED Display/LD108-122_CE_DOC.pdf
https://www.viewsonicglobal.com/public/products_download/safety_compliance/LED Display/LD135-152_CE_DOC.pdf
RoHS2符合性聲明
https://www.viewsonicglobal.com/public/products download/safety_compliance/LED Display/LD108-122 CE_DOC.pdf
https://www.viewsonicglobal.com/public/products download/safety compliance/LED Display/LD135-152 CE DOC.pdf
RoHS2符合性声明
Control Panel for Motorized Trolley Cart
1. 预设升降高度说明
https://www.viewsonicglobal.com/public/products download/safety compliance/LED Display/LD108-122 CE DOC.pdf
https://www.viewsonicglobal.com/public/products download/safety compliance/LED Display/LD135-152 CE DOC.pdf
https://www.viewsonic.com/us/ld108-121.html#downloads
https://www.viewsonic.com/us/ld135-151.html#downloads
Specifications
https://www.viewsonicglobal.com/public/products download/safety_compliance/LED Display/LD108-122 CE_DOC.pdf
https://www.viewsonicglobal.com/public/products download/safety compliance/LED
Display/LD135-152 CE DOC.pdf
https://www.viewsonic.com/us/ld108-121.html#downloads
https://www.viewsonic.com/us/ld135-151.html#downloads
Especificaiones
https://www.viewsonicglobal.com/public/products download/safety compliance/LED Display/LD108-122 CE DOC.pdf
https://www.viewsonicglobal.com/public/products download/safety compliance/LED Display/LD135-152 CE DOC.pdf
https://www.viewsonic.com/us/ld108-121.html#downloads
https://www.viewsonic.com/us/ld135-151.html#downloads
Specifications
| Item Categorie Specificaties | ||
| Model LD108-122 | ||
| LED beeldscherm Type | Direct View LED beeldscherm | |
| Formaat 108" | ||
| Weergavegebied 94,49" (H) x 53,15" (V) 2400 mm (H) x 1350 mm(V) | ||
| Pixelpitch 1,25 mm | ||
| Resolutie FHD, 1920 x 1080 | ||
| Vernieuwings-frequentie | up to 4.440Hz | |
| Contrast Ratio 6000:1 (Typisch) | ||
| Helderheid 100-500 dd/m 2 (8 aanpassingsniveau's) | ||
| LED Levenduur 100.000 uur | ||
| Ingangssignaal 2 x HDMI (1920 x 1080 @ 60Hz, HDCP 1.4) 1 x LAN (RJ45) 1 x USB Type A (3.0) 2 x USB Type A (2.0) | ||
| Uitgangssignaal 1 x HDMI (1080p @ 60Hz) | 1 x Geluid Uitvoer (3,5 mm) 1 x USB Type B (voor debug) 3 x USB Type A (Stroom) [5V/1A x 1; 5V/0,5A x 2] | |
| Luidsprekeruitgang 5W x 2 Stereo | ||
| RS-232 | RS-232 Seriele Controle | |
| Stroom | Voltage | 100-120V/30A ~ 50/60Hz 220-240V/15A ~ 50Hz (verschilt per land) |
| Werkingsom-standigheden | Temperatuur | 32° F tot 104° F (0° C tot 40° C) |
| Vochtigkeit | 20%~80% nicht-condenserend | |
| Hoogte | ≤ 6.562 ft (2.000 m) | |
| Opslagom-standigheden | Temperatuur | -4° F tot 140° F (-20° C tot 60° C) |
| Vochtigkeit | 10%~90% nicht-condenserend | |
| Hoogte | ≤ 6.562 ft (2.000 m) | |
| Fysieke afmetingen (B x D x H) | 2.421 x 1.603-2.193 x 930 mm (95,3" x 63,1-86,3" x 36,6") | |
| Gewicht Fysiek 180 kg | ||
| Energieverbruik | Aan | 1.330W (Normaal) 1.900W (Max) |
| Slaapstand <0,5W | ||
| Uit <0W | ||
3aBHeHne O COOTBeTCTBn n CtaHdapTaM RoHS2
KhoNka MHHMaJIbHOB BbICOTbl NOIbeMa
OKHO 3KpaHa COCTOaHn/HHOpMaun YpoBeHb npedBapntelbHo 3aDaHHoB BICOTbl NODbema
Hanpimep, yCTaHOBnTb 30 KhoNkoN 2:
Hakmte KhoNky «S»ДЯ OTO6paXeHnA «SET» (YcTaHOBtB).
B TeueHne 2 cekyHd, npexde yem noaBntc SET (YctaHOBtB), HaxMnTe 2).
Korda noaBntc «S-2» peKIM HacTpoiKn 3aBepuNTcN I npOn3oJET BO3BpaT K npEdbIyUeMy ekpaHy.
2. YctaHObKa npedBapnteIbHo 3aHaHHO BBICOTbl
Дялобов ВьICOTы (HeDCyHOB COCTOHN C6pOca n OwN6K) KhoNkn 1-4 MoJHo NcPONb3OBaTдЯ 6bICTpoYCTaHOBKN BvICOTbВпpeDvapNTeJbHO 3aDaHHoe 3HaueHne. Ecn TeKyuzaB VbICOTA DOCTnIa 3TOrO ppeDvapNTeJbHO 3aDaHHoro 3HaueHny, DOnOpHNTeJbHbIe DeiCTBnB BblONHЯrTb He HxHNo.
3.ИЗмеHeHne BBICOTbl
- Дя подьема диспег ИспьзуITE Кногку «Вверх». Повьем abTomатиескипpeкразгс no Doctижени рpeдьhoe BBICOTbl.Орразе Вниманe,чTo Kногka «Вверх» —эTO кногka «Дeйстbra», T. e. пи ee OTnyckани подьем He пекразгсЯ HemeДленHo. BmecTo 3TOrO OH 3aMeДлNTcЯ Ha HeKOTOpom KOPOTKOMpacCTOЯнu, a 3aTeM OCTaHOBITcя.
Дя onyckaHnДиCnIe nCNoJb3yIte KhoNkY «Bn3».ПoDbem ABTOMaTnueckn npekpaTntcno doCTnxKeHHIO npedeJIbHO BbICOTbl.ObpaTnte BHNMaHne,уTO KhoNka «Bn3» — 3TO KhoNka «DeiCTBnA», T. e. npu ee OTnyckaHn NpOBeM He npekpaTntc HemeJeHNO. BmecTo 3tOrO OH 3aMeJInTCra Ha HeKOTOpom KOPOTKOM pacCTOAHn, a 3aTeM OCTaHOBNTcR.
4. C6poc cnCTembl
HaonmnaHne c6poca: ecn B nHopMaunOHom okHe oTo6paKaetcra (RST) nn dpyrne KOnbOoN6OK, n3-3a KOtOpbIX cTOnKa He NOdHMaeTcra Ha MaKcImaIbHyIO BbcOTy, Heo6xOdmo BpyuHyIO BblONHITb c6poc cnCTembl B ceIOM:
BbInoJIHeHne c6poca:
- EcIn BnHΦopMaunOHHom OKHe OTo6paXaETcY «RST», ydepxHBaIe KHOJky «BHN3», cToiKa NaHT OnyckatbCra. IocJIncue3HOBeHnY «RST» OTo6paXaEma YbICota npIMet MmHmAlbHoE 3HaueHne.
- EcIn BbICota, OTo6paKaemar B HOpMaunOHm OKHe, DOCTnHET MHHMaJIbHOrO 3HaueHn, ydepKINBaIe KONKy «Bn3» He MeHee 5 ceKynd.


IprimeaHne. To6bI n36eKaT bpAM nn NOBpeKdEHN mMyuEcTba, npn BblOJIHeHH c6pOca n noDbema CJeDyET NOMHTb, yTO no6JIn3OCTn nn IOD dNcPJIeEM MOryTH hXoDnTbcr IIOH nn PpeDMtbl.
Cxema kOMnoHeHToB
I. Norpuy3ka/pa3rpy3ka n nepemeueHne TpaHcnpTnpoBOuHNo Kopo6Kn
!Ппрмeeане.прперemeшени,нору3ke/pa3rpy3keи pa3meшени Верхяя пань ТраHCnOpTnpOBOHybIX Kopo6OKdoJXHa obЯЗоTeьно 6byTb Oбpaцehа BBERx, He nepeBopauHBAite Kopo6Ky,эTO npeДOTВpaTNT ydapbl I nobpeждене KOHCTpykCIN O6OpYIDOBAHN I KOMNoHEHTOB DIncPJIeR.
- Ipepe nepemeeHem TpaHcnpTupOBoHOn Kopo6Kn NotaHnTe TOpMo3HbIe 0KcaTopbI 3TNX WeCTn POJIKOB B HNXHe Yactn DnA CHrTn C TopMo3a.
- YbEInTeCb, yTo rpynnpa pacnoIooKeHa Ha oDHom ypOBHe c nepenadom no BbICote He BbIwe 1,5 cm, a onOpHn anobepxHOCTb MoKeT rapaHTnpOBaHHo BbldePKNBaTb Maccy, npeBbIshaOnuMaccy Bcero obopydoBaan.
3.ДЯТранспoptировиnotpe6yeTcHMeHeeDbyxYeNoBek.
https://www.viewsonicglobal.com/public/products_download/safety_compliance/
LED Display/LD108-122_CE_DOC.pdf
https://www.viewsonicglobal.com/public/products_download/safety_compliance/
LED Display/LD135-152 CE DOC.pdf
(RoHS2) 83
2011/65/EU 4g j g 4g 4g 4g 4g 4g 4g 4g 4g 4g 4g 4g 4g 4g 4g 4g 4g 4g 4g 4g 4g 4g 4g 4g 4g 4g 4g 4g 4g 4g 4g 4g 4g 4g 4g
.(TAC)


| LED LED LED LED LED LED LED LED LED LED LED LED LED LED LED LED LED LED LED LED LED LED LED LED LED LED LED LED LED LED LED LED LED LED LED LED LED LED LED LED LED LED LED LED LED LED LED LED LED LED LED | |||


LD135-152

eall jc aaleo
aolalaggl
aai 1
J 1
a a a a a a a a a a a a a a a a a a a
()
4-1
Jalali g jll Alae caggaaa aai lgl "g" pssllcdo .dall
jy Jn jy y 111111111111111111111111111111111111111111
Jolal jy f y 111111111111111111111111111111111111
bn + 1 = bn + c
"J" 10000000000000000000000000000000000000000000000000
.
e 150

F
1
ggl
aal gall cl! 1e laol jelai g lai gil glia g illl cglg acll:abla
1
J 1 J 1 1 1 1 1 1 1 1 1 1 1 1 1 1 1 1 1 1 1 1
- [3]21 _____C
aagaae aee
aill lallll 111 111 111 111 111 111 111 111 111 1

(sol)()(
Jaa Jia aai i jao oaii ssc jaoaai jao aai coai jao gao laS-4
1 1
a 1 a 1 1 1 1 1 1 1 1 1 1 1 1 1 1 1 1 1 1 1 1 1 1 1 1 1 1 1 1 1 1 1 1 1
aal aal aal aal aal aal aal aal aal aal aal aal aal aal aal aal aal aal aal aal aal aal aal aal aal aal aal aal aal aal aal aal aal aal aal aal aal aal aal aal aal aal aal aal aal aal aal aal aal aal aal

a. 1000
J 10000000000000000000000000000000000000000000000000000000000000
y
A
1 1
1 1 1 1 1 1 1 1 1 1 1 1 1 1 1 1 1 1 1 1 1 1 1 1 1 1 1

aJai aagll bji y jy Jaa yj 100g 0al gao gao Ls cilln no as jaiall a gill J-

9.
A


J 10000000000000000000000000000000000000000000000000000000000
1


1
https://www.viewsonic.com/us/ld108-121.html#downloads
https://www.viewsonic.com/us/ld135-151.html#downloads
- All-in-one Direct View LED Display Solution kit
- FCC Compliance Statement
- CE Conformity for European Countries
- Declaration of RoHS2 Compliance
- Package Contents
- Physical Dimensions for LD108-122
- Physical Dimensions for LD135-152
- Product Overview
- I/O Control Panel
- Remote Control
- Control Panel for Motorized Trolley Cart
- Instructions on Preset Lifting Height
- How to Use Preset Height
- How to Change the Height
- System Resetting
- Schematic Diagram of Components
- Handling and Moving Flight Cases
- Unboxing Operation
- Packing and Handling Operation
- FCC符合性聲明
- RoHS2符合性聲明
- RoHS2符合性声明
- 预设升降高度说明
- 3aBHeHne O COOTBeTCTBn n CtaHdapTaM RoHS2
- YctaHObKa npedBapnteIbHo 3aHaHHO BBICOTbl
- 3.ИЗмеHeHne BBICOTbl
- C6poc cnCTembl
- BbInoJIHeHne c6poca:
- Cxema kOMnoHeHToB
- Norpuy3ka/pa3rpy3ka n nepemeueHne TpaHcnpTnpoBOuHNo Kopo6Kn
- (RoHS2) 83
- a a a a a a a a a a a a a a a a a a a
Brand : VIEWSONIC
Model : LD135-152
Category : Monitor