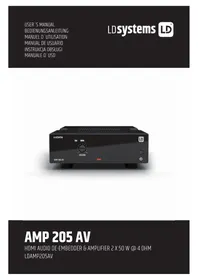
AMP 205 AV - Receiver LD Systems - Free user manual and instructions
Find the device manual for free AMP 205 AV LD Systems in PDF.


| Product type | Power amplifier for fixed installation with HDMI audio de-embedder |
| Dimensions (W x H x D) | 142 x 53 x 222 mm (height including rubber feet) |
| Weight | 1.0 kg |
| Power supply | External, 24 V DC, 3.5 A, 100-240 V AC power adapter |
| Power consumption | 115 W max (1 kHz sine wave into 2 x 4 ohms), 6 W idle, < 1 W standby |
| Output power | 2 x 50 W RMS into 4 ohms (stereo) / 1 x 100 W RMS into 2 ohms (HPM mode) |
| Amplifier class | Class D |
| HDMI inputs | 1 HDMI type A input, 1 HDMI output with ARC function |
| Speaker outputs | 2 channels on 4-pin Euroblock connector (pitch 5.08 mm) |
| Line outputs | 2 balanced outputs on 3-pin Euroblock connectors |
| Control connectors | VCA (10 kΩ potentiometer), source select, standby (momentary contact) |
| LED indicators | SIG (signal), HPM (high power), PROT (protection) |
| Built-in protections | Overvoltage, undervoltage, overtemperature, short circuit, DC detection |
| Cooling | Passive convection |
| Operating temperature | 0°C to 40°C, humidity < 85% non-condensing |
| Safety class | Class 3 |
| Included accessories | Power adapter, mounting plates, Euroblock connectors, mounting kit, rubber feet |
| Maintenance | Clean with damp cloth; dust off ventilation grilles |
| Repairability | No user-serviceable parts; repair by qualified personnel only |
Frequently Asked Questions - AMP 205 AV LD Systems
User questions about AMP 205 AV LD Systems
0 question about this device. Answer the ones you know or ask your own.
Ask a new question about this device
Download the instructions for your Receiver in PDF format for free! Find your manual AMP 205 AV - LD Systems and take your electronic device back in hand. On this page are published all the documents necessary for the use of your device. AMP 205 AV by LD Systems.
USER MANUAL AMP 205 AV LD Systems
SAFETY INSTRUCTIONS 5
NOTES FOR INDOOR INSTALLATION UNITS 7
PACKAGING CONTENT 8
INTRODUCTION 8
CONNECTIONS, OPERATING
AND DISPLAY ELEMENTS 9
TERMINAL BLOCK CONNECTIONS 12
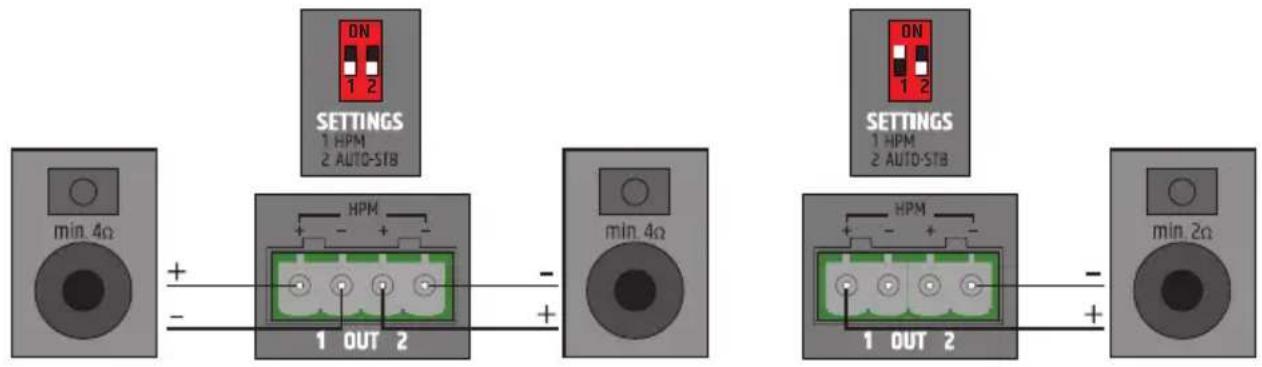
CONNECTION EXAMPLE 13
UNDER / ON-TABLE MOUNTING 14
CARE, MAINTENANCE AND REPAIR 14
DIMENSIONS 15
TECHNICAL DATA 16
DISPOSAL 18
MANUFACTURER'S DECLARATIONS 18
DEUTSCH
INFORMATIONEN ZU DIESER
We have designed this product to work reliably for many years. This is what LD Systems stands for with its name and its many years of experience as a manufacturer of high-quality audio products. Please read these operating instructions carefully, so that you can quickly get the most out of your LD SYSTEMS product. For more information about LD SYSTEMS, please visit our internet page WWW.LD-SYSTEMS.COM
ABOUT THIS MANUAL
- Read the safety instructions and the entire manual carefully before commissioning.
- Observe the warnings on the unit and in the operating instructions.
• Always keep the operating instructions within reach. - If you sell or pass on the appliance, be sure to hand over these operating instructions as well, as they are an essential part of the product.
INTENDED USE
The product is a device for professional audio installation!
The product was developed for professional use in the field of audio installation and is not intended for use in households! Furthermore, this product is intended for installation by qualified persons with expertise and for operation by instructed persons!
Use of the product outside the specified technical data and operating conditions is considered improper use! Liability for damage and third-party damage to persons and property due to inappropriate use is excluded!
The product is not suitable for:
- Persons (including children) with limited physical, sensory or mental abilities or lack of experience and knowledge.
- Children (children must be instructed not to play with the device).
DEFINITIONS AND SYMBOL EXPLANATIONS
- DANGER: The word DANGER, possibly in combination with a symbol, indicates immediately dangerous situations or conditions for life and limb.
- WARNING: The word WARNING, possibly in combination with a symbol, indicates potentially dangerous situations or conditions for life and limb.
- CAUTION: The word CAUTION, possibly in combination with a symbol, is used to indicate situations or conditions that may lead to injury.
- ATTENTION: The word ATTENTION, possibly in combination with a symbol, refers to situations or states that can lead to damage to property and/or the environment.
This symbol identifies hazards that can cause electric shock.

This symbol identifies hazardous areas or hazardous situations.
This symbol indicates hazards caused by hot surfaces.
This symbol indicates dangers due to high volume levels.

This symbol indicates additional information on the operation of the product.

This symbol denotes a device that does not contain any user-serviceable parts.
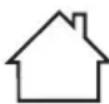
This symbol indicates electrical equipment designed primarily for indoor use.
SAFETY INSTRUCTIONS
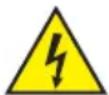
HAZARD:
- Do not open the device and do not perform any modifications.
- If your device no longer functions properly, if liquids or objects get inside it or if it has been damaged in any other way, switch it off immediately and disconnect it from the mains. The device may be repaired only by authorised repair technicians.
- For devices of protection class 1, the protective conductor must be connected correctly. Never disconnect the protective conductor. Devices of protection class 2 do not have a protective conductor.
- Ensure that live cables are not kinked or otherwise mechanically damaged.
- Never bypass the device fuse.
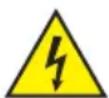
WARNING:
- The device may not be operated if it shows obvious signs of damage.
- The device may only be installed in a voltage-free state.
- If the mains cable of the device is damaged, do not operate the device.
- Permanently connected power cables may only be replaced by a qualified person.
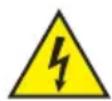
ATTENTION:
- Do not operate the unit if it has been exposed to large temperature fluctuations (for example, after transport). Moisture and condensation can damage the device. Switch on the device only when it has reached room temperature.
- Make sure that the voltage and frequency of the mains supply correspond to the values indicated on the unit. If the device has a voltage selector switch, do not connect the device until it has been set correctly. Use only suitable power cables.
- To disconnect the unit from the mains at all poles, it is not sufficient to press the on/off switch on the unit.
- Make sure that the fuse used corresponds to the type printed on the unit.
- Make sure that appropriate measures have been taken against overvoltage (e.g. lightning strike).
- Observe the specified maximum output current on units with Power Out connection. Ensure that the total current consumption of all connected devices does not exceed the specified value.
- Replace pluggable mains cables only with original cables.

HAZARD:
- Danger of suffocation! Plastic bags and small parts must be kept out of reach of persons (including children) with reduced physical, sensory or mental capabilities.
- Danger from falling down! Make sure that the device is securely installed and will not fall down. Only use suitable stands or mounts (particularly for fixed installations). Ensure that accessories are properly installed and secured. Ensure that applicable safety regulations are observed.

WARNING:
- Use the device only in the manner intended.
- Operate the device only with the accessories recommended and intended by the manufacturer.
- During installation, observe the safety regulations applicable in your country.
- After connecting the unit, check all cable routes to avoid damage or accidents, e.g. due to tripping hazards.
- Always observe the specified minimum distance to normally flammable materials! Unless explicitly stated, the minimum distance is 0.3 m.

CAUTION:
- In the case of moving components such as mounting brackets or other moving components, there is a possibility of jamming.
- In the case of units with motor-driven components, there is a risk of injury from the movement of the unit. Sudden device movement can cause shock reactions.

ATTENTION:
- Do not install or operate the appliance near any radiators, heat registers, stoves or other heat sources. Ensure that the device is always installed in such a way that it is sufficiently cooled and cannot overheat.
- Do not place ignition sources such as burning candles near the appliance.
- Ventilation openings must not be covered and fans must not be blocked.
- Use the original packaging or packaging provided by the manufacturer for transport.
- Avoid shock or impact to the unit.
- Observe the IP protection class as well as the ambient conditions such as temperature and humidity according to the specification.
- Devices can be constantly further developed. In the event of deviating information on operating conditions, performance or other device properties between the user manual and the device labelling, the information on the device always takes priority.
- The unit is not suitable for tropical climates and for operation above 2000 m above sea level.

CAUTION:
Connecting signal cables can cause a lot of noise. Make sure that devices connected to the output are muted when plugged in. Otherwise, noise levels may cause damage.
CAUTION: HIGH VOLUME AUDIO PRODUCTS!
This device is designed for professional use.
The commercial operation of this device is subject to the applicable national regulations and guidelines for accident prevention.
Hearing damage due to high volume and continuous exposure: Use of this product may produce high sound pressure levels (SPL) which may cause hearing damage. Avoid exposure to high volumes.

NOTES FOR INDOOR INSTALLATION UNITS
- Units for installation applications are designed for continuous operation.
- Equipment for indoor installation is not weather-resistant.
- Surfaces and plastic parts of installation equipment can also age, e.g. due to UV radiation and temperature fluctuations. As a rule, this does not lead to functional restrictions.
- With permanently installed devices, the accumulation of impurities, e.g. dust, is to be expected. Always observe the care instructions.
- Unless expressly stated on the unit, the units are intended for installation heights of less than 5 m.
PACKAGING CONTENT
Remove the product from the packaging and remove all packaging material. Please check the completeness and integrity of the delivery and notify your distribution partner immediately after purchase if the delivery is not complete or if it is damaged.
The packaging includes:
- 1 x AMP 205 AV installation amplifier
- 1 x power supply device
- 1 set of terminal blocks
- 1 set of rubber feet (pre-assembled)
- 1 x mounting set for under- or on-table mounting
- User manual
INTRODUCTION
The LD Systems AMP 205 AV is the perfect compliment to deliver sound from an AV system. Just connect your video source and it extracts the audio and delivers stereo audio to your loudspeakers. An HDMI pass though connection makes connection to your display device easy.
Powered by a highly efficient 2 x 50 W Class-D amplifier, it features 4 Ohm outputs and a user-friendly front panel, equipped with signal, clip, and protection LEDs.
Its tiny form factor (142 x 44 x 222) and included mounting plates allow it to be installed discreetly almost anywhere; behind screens, under tables or even in air-handling spaces and above plenum ceilings. Alternatively, it fits into 1/3 19 inch rack. Use the optional rack tray to slot up to four TICA ^® series products alongside each other and build a system to your exact requirements, using minimal rack space.
The AMP 205 AV uses an external 24 V power supply. Terminal block connections for the analogue outputs and GPIO connections make wiring easy.
With remote control connectivity for third-party devices, you can adjust volume on either channel or put the power amplifier into standby mode at any time, even when it's hidden. Optional auto-standby saves power when no audio is running.
The perfect solution for professional installers and users looking to deliver higher performance audio for the video systems.
FEATURES
• Professional mini amplifier with HDMI Audio de-embedder
• HDMI In- and Out and stereo line outputs
- 2 x 50 W Class-D amplifier with low impedance outputs
- Compact form factor and passive cooling
- Remote source select, standby and volume control
- External 100 - 240 V power supply
- Mounting plates for flexible inconspicuous installation, even above suspended ceilings
• Auto standby to save power
• Balanced line output and loudspeaker output on terminal blocks
- User-friendly front panel with signal, clip and protection LEDs
- Optional rack tray for combining with other TICA® series products
CONNECTIONS, OPERATING AND DISPLAY ELEMENTS
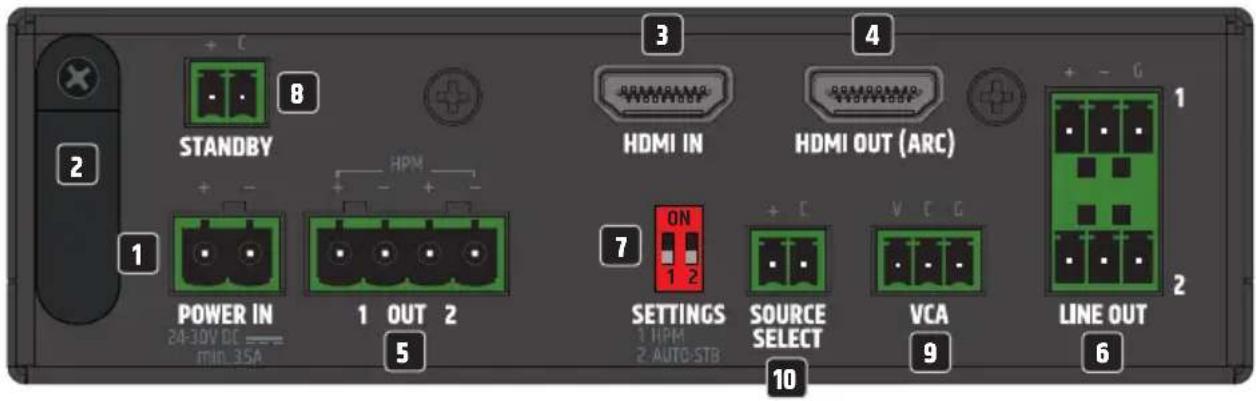
1 POWER IN
Terminal block connection for the device's power supply. To avoid damage to the device, please use only the original power supply (power supply device included).
2 STRAIN RELIEF
Use the strain relief for the flexible cable of the external power supply to protect the device's power terminal block connector and the power supply terminal block from damage and to prevent the terminal block from being pulled out unintentionally.
3 HDMI IN
Digital audio / video input with a type A HDMI socket.
4 HDMI OUT (ARC)
Digital audio / video output with a type A HDMI socket and ARC function (Audio Return Channel).
HDMI IN AND HDMI OUT FUNCTIONALITY OVERVIEW
| HDMI sources connected | CEC source detection status | Default source selected on power up | Action after triggering SOURCE SELECT GPI | Plug in HDMI IN | Plug in HDMI OUT (ARC) | Unplug HDMI IN | Unplug HDMI OUT (ARC) |
| HDMI IN only connected | Enabled HDMI IN | X | X | AMP205AV doesn't switch to HDMI OUT (ARC). Users must use SOURCE SELECT GPI to toggle between sources | X | X | |
| HDMI OUT (ARC) only connected | Enabled HDMI OUT (ARC) | X | AMP205AV doesn't switch to HDMI IN. Users must use SOURCE SELECT GPI to toggle between sources | X X X | |||
| Both HDMI IN and HDMI OUT (ARC) connected | Disabled | Last selected HDMI source (Factorydefault setting is HDMI IN for the first power up) | Toggle between the HDMI sources | X | X | AMP205AV toggles to HDMI OUT (ARC) | AMP205AV toggles to HDMI IN |
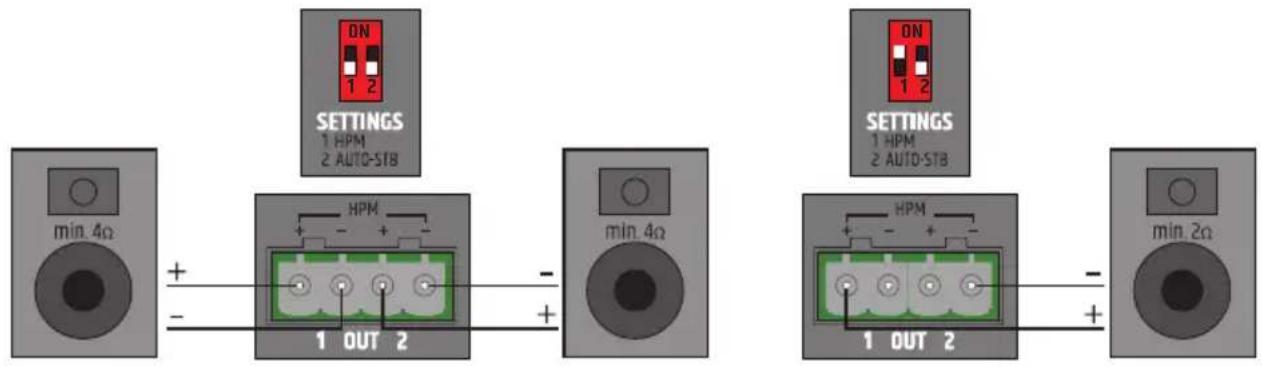
5 OUT 1 / 2
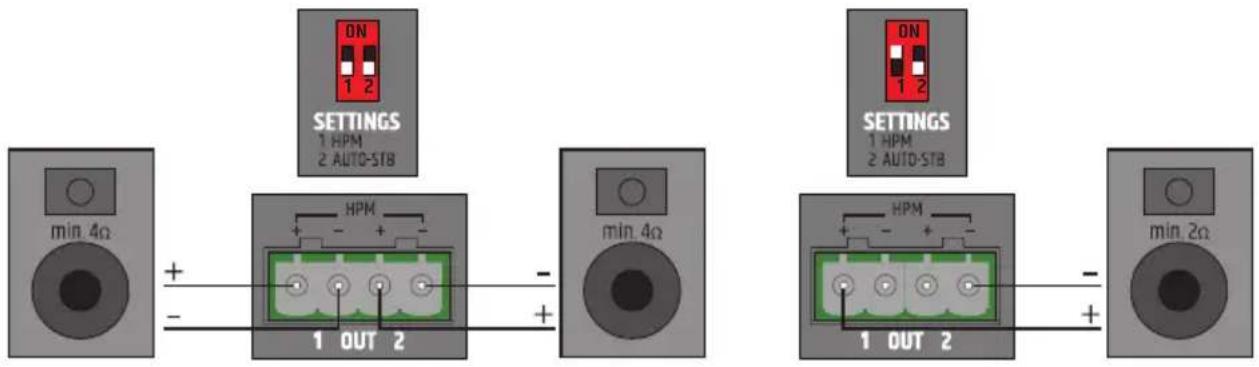
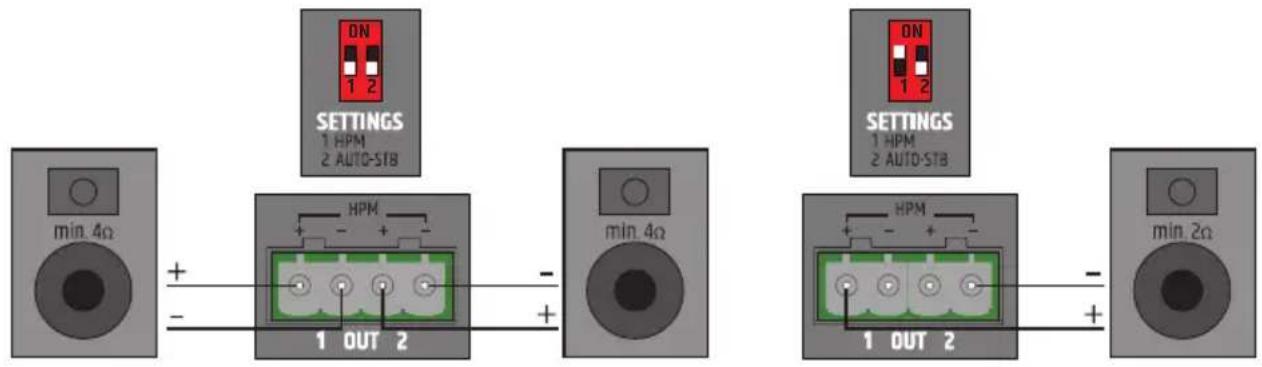
Loudspeaker outputs 1 and 2 for connecting low impedance loudspeakers (standard mode: min. 4 Ohm each; HPM mode min. 2 Ohm). Please observe the correct assignment of the terminal block poles (see TERMINAL BLOCK CONNECTIONS in this manual). The total power handling of the connected loudspeakers should be approximately equal to the amplifier power.
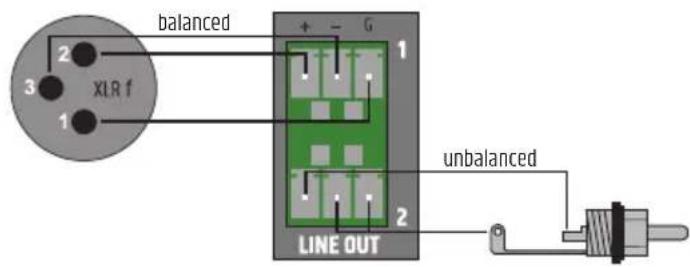
6 LINE OUT 1 / 2
Analogue audio outputs with balanced terminal block connections. The poles +, - and G are intended for the balanced output signal (suitable for unbalanced cabling). Terminal blocks are included in the packaging content.
7 SETTINGS
DIP switch 1 HPM: Move the switch to the ON position to activate the high power mode. This mode allows users to connect speakers or speaker lines with an impedance of 2 ohms to the amplifier (amplifier power: 100 W @ 2 Ohm). Switch in position down: HPM deactivated. CAUTION! Before using the device, make sure that the switch is in the correct position!
DIP switch 2 AUTO-STB: Move the switch to the ON position to activate the device's automatic standby function.
If the standby function is activated, the amplifier is automatically set to standby mode when the HDMI source selected via SOURCE SELECT is switched off. This reduces energy consumption in a sensible way. As soon as an HDMI signal is present again and selected via SOURCE SELECT, the amplifier is automatically booted up from standby mode and is fully operational again within approx. 7 seconds.
The power symbol on the front panel lights up red in standby mode. If the power-symbol lights up white, the device is operational.
Switch in position down: Auto standby deactivated.
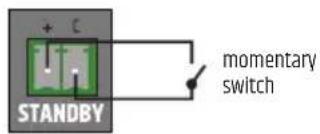
8 STANDBY
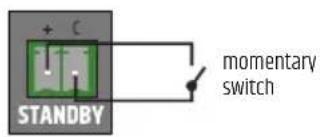
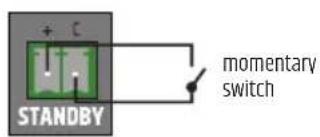
Standby mode can be activated manually with the help of an external button (momentary switch). Press the button to activate standby mode and to mute the loudspeaker outputs OUT 1 / 2 and the line outputs LINE OUT 1 / 2. Press the button again to end standby mode. The standby function via external button has priority over the automatic standby function (see point 7 SETTINGS).
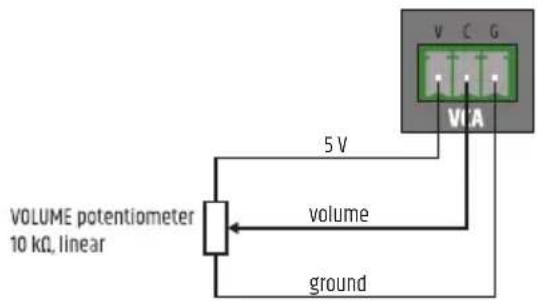
9 VCA
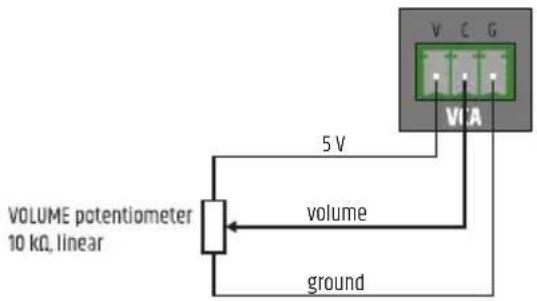
Terminal block connections for the use of an external volume control. The maximum volume is set on the VOLUME control on the front panel.
Once you have set the maximum volume, you can use the external volume control to adjust the volume of the device from the minimum value to the preset value as desired.
Please observe the correct assignment of the terminal block poles (see TERMINAL BLOCK CONNECTIONS in this manual).
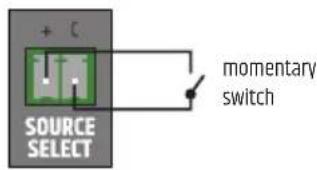
10 SOURCE SELECT
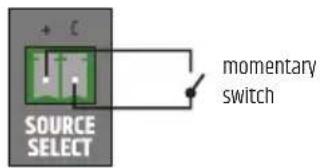
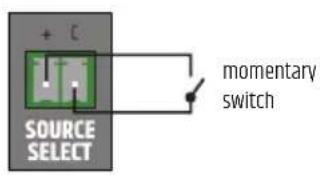
The audio source can be selected with the help of an external button (momentary switch). Press the button to switch the audio source from HDMI IN to ARC and vice versa.
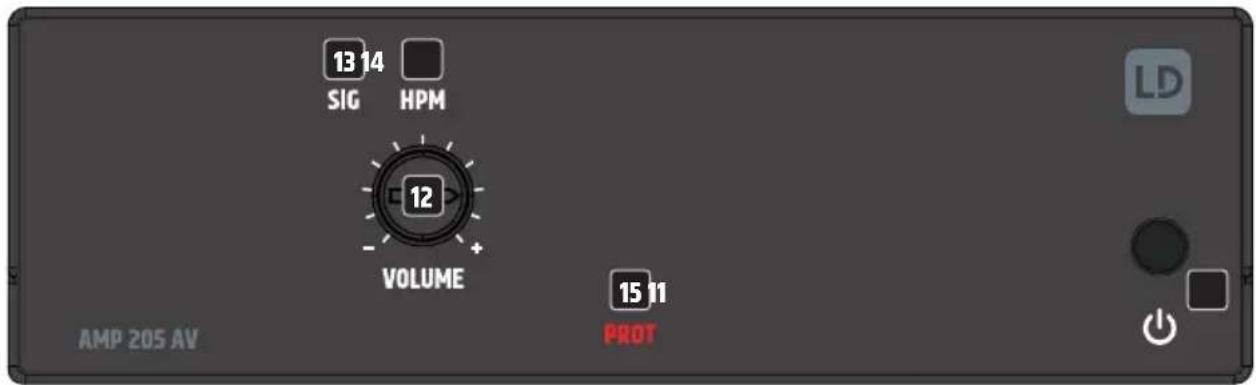
11 STANDBY BUTTON AND POWER SYMBOL
Press the button to activate standby mode and again to end standby mode. The power symbol lights up red when standby mode is activated. As soon as the standby mode is ended and the device is operational, the symbol lights up white.
12 VOLUME
Level control for adjusting the volume. Turning to the right increases the volume, turning to the left decreases it.
13 SIG (SIGNAL)
As soon as an audio signal is present at the device, the signal indicator lights up white.
14 HPM
As a visual indication that the high power mode is activated, the HPM indicator lights up white (see point 7 SETTINGS).
15 PROT (PROTECT)
The Protect indicator lights up permanently if the system is overloaded or overheats, in case of a short circuit in the loudspeaker path and in case of a defect. The amplifier is automatically muted. Disconnect the amplifier from the power supply and let it cool down for some time. Eliminate a possible short circuit in the loudspeaker path. Reconnect the amplifier to the power supply. If the Protect indicator still lights up, there is a defect in the amplifier electronics. Contact an authorised service workshop.
AIR VENTS
To prevent damage to the device, do not cover the ventilation openings on the left and right sides and on the top and bottom of the device and ensure that air can circulate freely. Covering the ventilation openings on the top or bottom of the enclosure when mounting it underneath or on top of a table is not critical, as the cooling provided by the ventilation openings on the remaining sides is sufficient.
TERMINAL BLOCK CONNECTIONS
Connections LINE OUT 1 / 2 Connections STANDBY
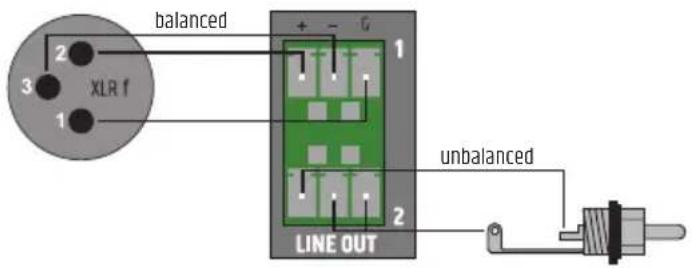
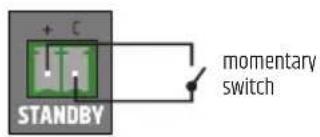
Connections VCA Connections SOURCE SELECT
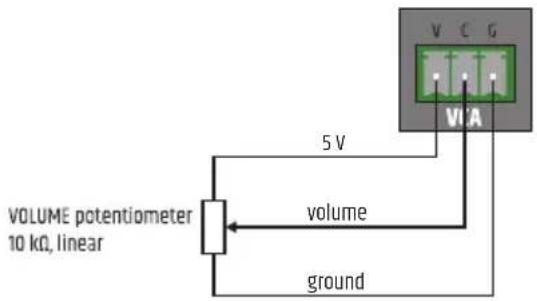
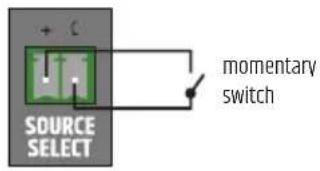
Connections OUT 1 / 2 / HPM
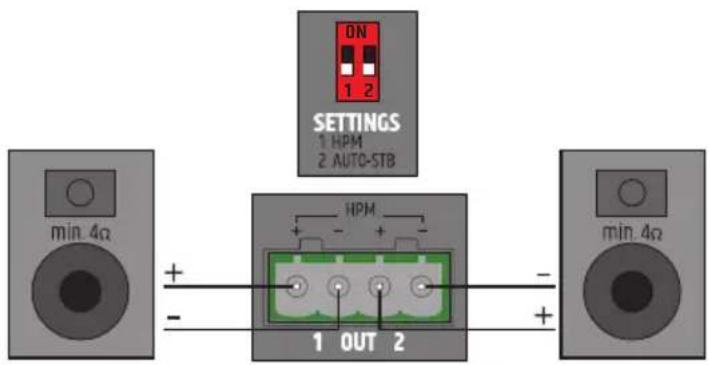
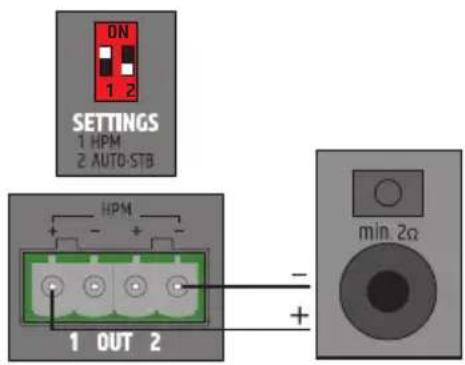

ATTENTION: When wiring terminal blocks, please note the correct assignment of the poles/terminals. The manufacturer accepts no liability for damage caused by faulty wiring!

Tip: Preferably use balanced audio cables for wiring analogue line inputs and outputs.
CONNECTION EXAMPLE
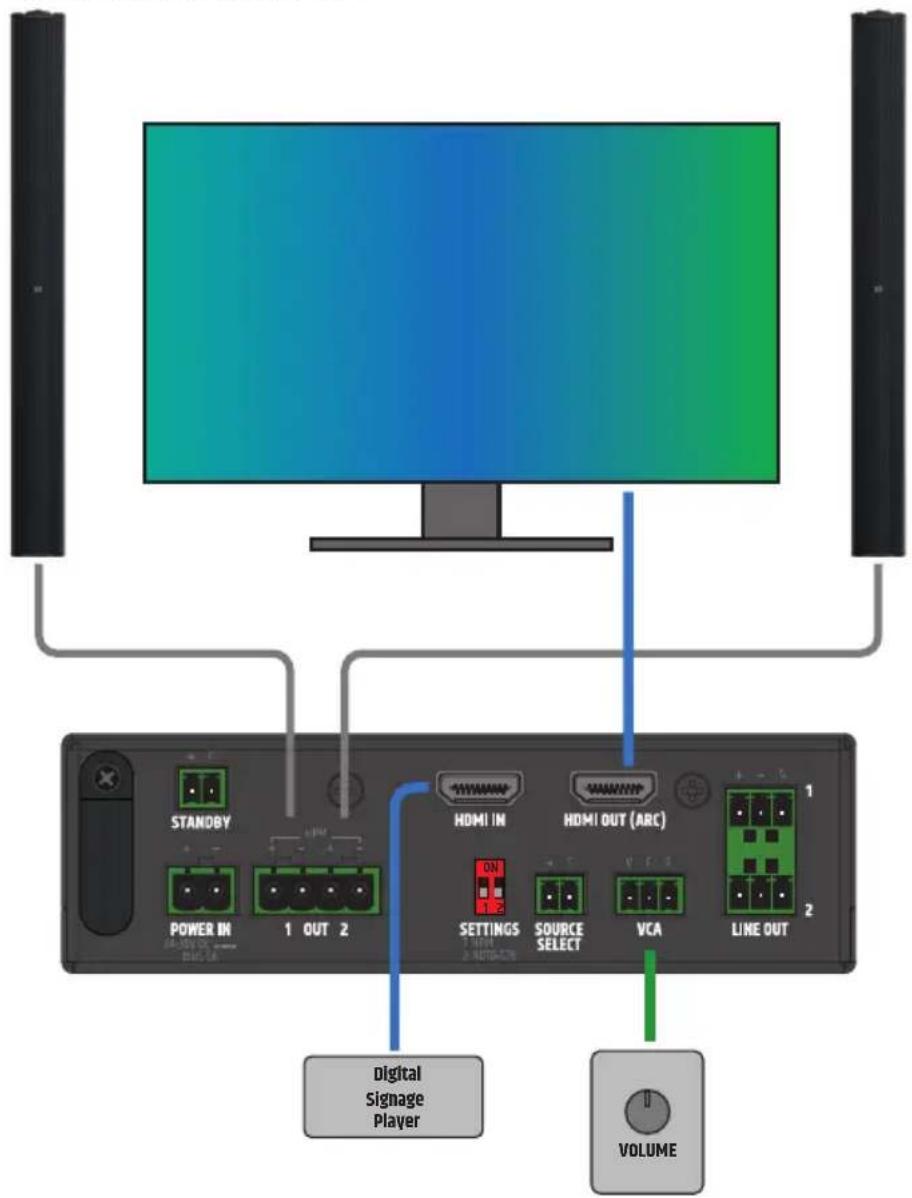
UNDER / ON-TABLE MOUNTING
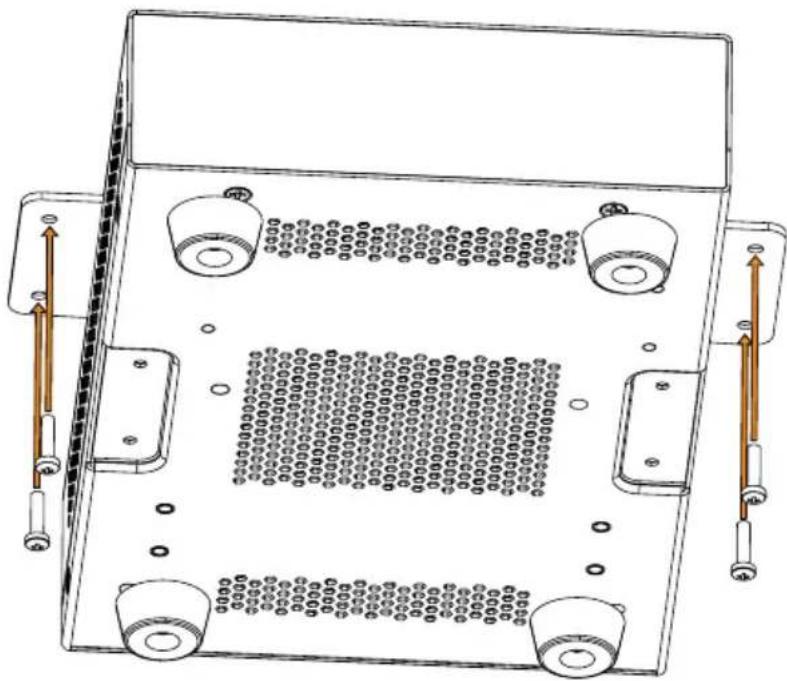
There are two recesses on the top and bottom of the enclosure, each with two M3 threaded holes, for mounting underneath or on top of the table. Screw the two enclosed mounting plates to the top or bottom using the enclosed M3 countersunk screws. Now the amplifier can be fixed in the desired position (see illustration, fixing screws not included). For tabletop mounting, the four rubber feet must be removed beforehand.
natural_image
Technical line drawing of a mechanical or electronic component with four mounting holes and a central grid pattern (no text or symbols)CARE, MAINTENANCE AND REPAIR
In order to ensure the long-term, proper functioning of the device, it must be regularly cleaned and, if necessary, maintained. The maintenance requirement depends on the intensity of use and the environment in which it is used.
We generally recommend a visual inspection before each operation. Furthermore, we recommend carrying out all the applicable maintenance measures specified below once every 500 operating hours or, in the case of a lower intensity of use, at the latest after one year. Warranty claims may be limited in the event of defects resulting from inadequate maintenance.
CARE (CARRIED OUT BY USER)

WARNING! Before carrying out any maintenance work, the power supply and, if possible, all device connections must be unplugged.

NOTE! Improper care can lead to impairment of the unit up to and including destruction.
- Housing surfaces must be cleaned with a clean, damp cloth.
Make sure that no moisture can penetrate the device. -
Air inlets and outlets must be regularly cleaned of dust and dirt. If compressed air is used, make sure that damage to the device is prevented (e.g. fans must be blocked in this case).
-
Lines and plug contacts must be cleaned regularly and dust and dirt must be removed.
- In general, no cleaning agents or abrasive agents may be used, otherwise the surface finish may be damaged. Especially solvents, such as alcohol, can impair the function of housing seals.
- Devices must generally be stored dry and protected from dust and dirt.
MAINTENANCE AND REPAIR (BY QUALIFIED PERSONNEL ONLY)
DANGER! There are live components in the unit. Even after disconnecting the mains connection, there may still be residual voltage in the device, for example, due to charged capacitors.

PLEASE NOTE! There are no user-serviceable assemblies in the device.

NOTE! Maintenance and repair work may only be carried out by specialist personnel authorised by the manufacturer. If in doubt, consult the manufacturer.

PLEASE NOTE! Improperly performed maintenance work may affect warranty claims.

PLEASE NOTE! For conversion or retrofit sets provided by the manufacturer, it is essential to observe the installation instructions included.
DIMENSIONS
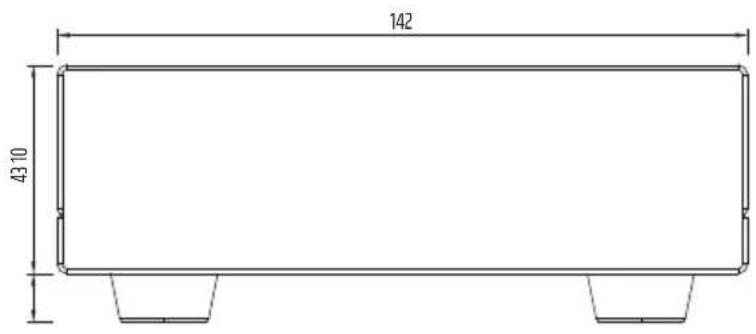
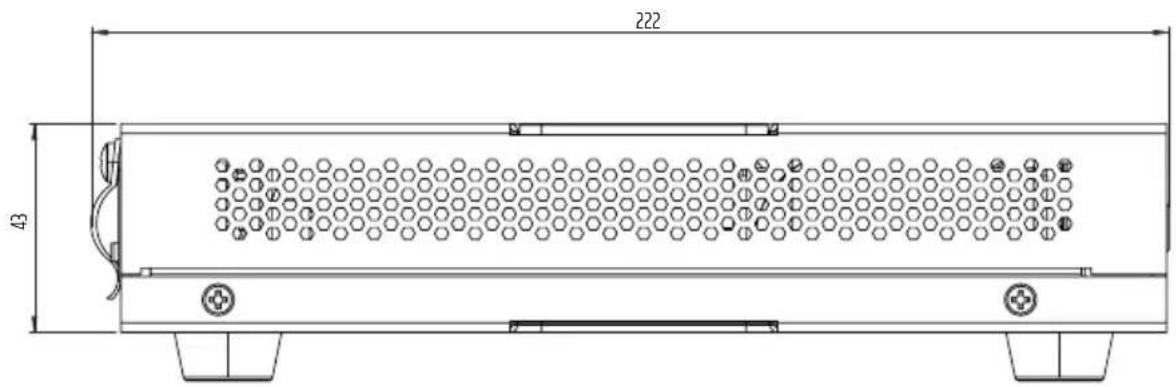
TECHNICAL DATA
Item number LDAMP205AV
Product type Installation power amplifier and HDMI Audio-Deembedder
Line inputs 0
Line outputs 2
Line output connectors Balanced line outputs, pitch 3.81 mm terminal block (3-pin)
Powered outputs 2 with output mode selector (Stereo / High Power Mode)
Cooling system Convection cooling
HDMI Specifications
Supported Color Format RGB, YUV444, YUV422, YUV420
Max. Data Rate 48 Gbit/s
Resolution range Up to 4K2K 60 Hz
Color bit depth 8 bits per color
Chroma Sampling 4:4:4
Standards HDMI 2.1, HDCP 1.4 - 2.3
Number of HDMI Inputs 1
HDMI Input Connector 1 female HDMI type A
Number of HDMI Outputs 1
HDMI Output Connector 1 female HDMI type A
Standby wake up time 7 seconds
Line Out Specifications
THD+N > 0.006%
SNR (A) < 100 dB
Frequency response 20 Hz - 20 kHz (-1 dB)
Output Level +15 dBu (0 dBFS / 1 kHz)
3rd Party Control
Main Volume (VCA) 10k (Linear Taper) External Potentiometer, pitch 3.5mm terminal block (3-pin)
Source Select Pitch 3.5 mm terminal block (3-pin)
Power Standby External momentary button, pitch 3.5 mm terminal block (2-pin)
Amplifier Output
Type Class D
Output Modes Stereo, Parallel, High Power Mode (ST / HPM)
Amplifier Outputs 2-channel (STEREO) / 1-Channel (HPM)
Connector 4-pin Terminal block (pitch 5.08 mm)
Item number LDAMP205AV
| THD+N (-20dBFS) > 0.005% |
| SNR (A) < 100 dB |
| RMS output power 2x 50 W @ 4ohm (ST, PAR) / 1x 100 W @ 2 ohm(Continuous sine wave 1 kHz 10 sec) |
| Minimum Load Impedance 4 ohms (Stereo and Parallel Modes) / 2 ohms (HPM Mode) |
| Frequency response 15 Hz - 20 kHz (-0.5 dB) |
| Protection Over/Undervoltage, Overtemperature, Short-Circuit, DC-Detection |
Power Supply
| Type External SMPS | |
| Voltage Range 100 VAC - 240 VAC (+-10%), 50-60 Hz | |
| Mains fuse none | |
| Secondary Voltage 24 V DC | |
| Secondary Current 3.5 A | |
| Secondary Connector Terminal Block 5.08 mm 2-pole | |
| Primary Connector IEC Jack | |
| Safety Class Class 3 | |
| Max power consumption 115 W (sine 1 kHz with 2x 4 ohm load) | |
| Idle power consumption 6 W (no signal input) | |
| Standby power consumption < 1 W | |
| Mains Inrush Current 1.5 A @ 230 V AC | |
| Operating Temperature 0°C - 40°C; < 85% humidity, non condensing |
General
| Material | Steel chassis, Plastic Front panel |
| Dimensions (W x H x D) | 142 x 53 x 222 mm (height with rubber feet) |
| Weight | 1.0 kg |
| Included Accessories | External power supply, Mounting plates for surface mount applications, Terminal blocks for Electrical Connections. |
DISPOSAL

Packaging:
- Packaging can be fed into the reusable material cycle using the usual disposal methods.
- Please separate the packaging in accordance with the disposal laws and recycling regulations in your country.
Device:
- This device is subject to the European Directive on Waste Electrical and Electronic Equipment, as amended. WEEE Directive Waste Electrical and Electronic Equipment. Old devices and batteries do not belong in household waste. The old device or batteries must be disposed of via an authorised waste disposal company or a municipal waste disposal facility. Please observe the applicable regulations in your country!
- Observe all disposal laws applicable in your country.
- As a private customer, you can obtain information on environmentally-friendly disposal options from the seller of the product or the appropriate regional authorities.
MANUFACTURER'S DECLARATIONS
MANUFACTURER'S WARRANTY & LIMITATION OF LIABILITY
Adam Hall GmbH, Adam-Hall-Str. 1, D-61267 Neu Anspach / E-Mail Info@adamhall.com / +49 (0)6081 / 9419-0.
Our current warranty conditions and limitation of liability can be found at:
https://cdn-shop.adamhall.com/media/pdf/MANUFACTURERS-DECLARATIONS_LD_SYSTEMS.pdf.
In case of service, please contact your sales partner.
UKCA-CONFORMITY
Hereby, Adam Hall Ltd. declares that this product meets the following guidelines (where applicable)
Electrical Equipment (Safety) Regulations 2016
Electromagnetic Compatibility Regulations 2016 (SI 2016/1091)
The Restriction of the Use of Certain Hazardous Substances in Electrical and Electronic Equipment Regulation 2012 (SI 2012/3032)
Radio Equipment Regulations 2017(SI 2016/2015)
UKCA-DECLARATION OF CONFORMITY
Products that are subject to Electrical Equipment(Safety)Regulation 2016, EMC Regulation 2016 or RoHS Regulation can be requested at info@adamhall.com. Products that are subject to the Radio Equipments Regulations 2017 (SI2017/1206) can be downloaded from
www.adamhall.com/compliance/
CE CONFORMITY
Adam Hall GmbH hereby confirm that this product meets the following guidelines (where applicable):
R&TTE (1999/5/EC) or RED (2014/53/EU) as of June 2017.
Low Voltage Directive (2014/35/EU)
EMC Directive (2014/30/EU)
RoHS (2011/65/EU)
The complete Declaration of Conformity can be found at www.adamhall.com.
Furthermore, you can also request it at info@adamhall.com.
CE DECLARATION OF CONFORMITY
Declarations of conformity for products subject to the LVD, EMC, RoHS Directive can be requested from info@adamhall.com.
Declarations of conformity for products subject to RED Directive can be downloaded from www.adamhall.com/compliance/.
DEUTSCH
Anschlüsse LINE OUT 1 / 2 Anschlüsse STANDBY
Anschlüsse VCA Anschlüsse SOURCE SELECT
Anschlüsse OUT1 / 2 / HPM

natural_image
Technical line drawing of a mechanical or electronic component with four ports and a central grid pattern (no text or symbols)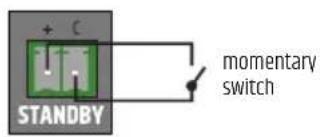
Connexions OUT 1 / 2 / HPM

natural_image
Technical line drawing of a mechanical or electronic component with four ports and a central grid pattern (no text or symbols)ENTRETIEN, MAINTENANCE ET RÉPARATIONS
DÉCLARATION DE CONFORMITÉ EU
Conector VCA Conector SOURCE SELECT
Conectores OUT 1/2/HPM

natural_image
Technical line drawing of a mechanical or electronic component with four ports and a central grid pattern (no text or symbols)MONTAŻ POD / NA BLACIE
natural_image
Technical line drawing of a mechanical or electronic component with four ports and a central grid pattern (no text or symbols)PIELEGNACJA, KONSERWACJA I NAPRAWA
Connessioni OUT 1 / 2 / HPM

natural_image
Technical line drawing of a mechanical or electronic component with four mounting holes and a central grid pattern (no text or symbols)

- DEUTSCH
- ABOUT THIS MANUAL
- INTENDED USE
- DEFINITIONS AND SYMBOL EXPLANATIONS
- SAFETY INSTRUCTIONS
- HAZARD:
- WARNING:
- ATTENTION:
- CAUTION:
- CAUTION: HIGH VOLUME AUDIO PRODUCTS!
- NOTES FOR INDOOR INSTALLATION UNITS
- PACKAGING CONTENT
- INTRODUCTION
- FEATURES
- POWER IN
- STRAIN RELIEF
- HDMI IN
- HDMI OUT (ARC)
- OUT 1 / 2
- LINE OUT 1 / 2
- SETTINGS
- STANDBY
- VCA
- SOURCE SELECT
- STANDBY BUTTON AND POWER SYMBOL
- VOLUME
- SIG (SIGNAL)
- HPM
- PROT (PROTECT)
- AIR VENTS
- TERMINAL BLOCK CONNECTIONS
- UNDER / ON-TABLE MOUNTING
- CARE, MAINTENANCE AND REPAIR
- CARE (CARRIED OUT BY USER)
- MAINTENANCE AND REPAIR (BY QUALIFIED PERSONNEL ONLY)
- DIMENSIONS
- TECHNICAL DATA
- Item number LDAMP205AV
- HDMI Specifications
- Line Out Specifications
- 3rd Party Control
- Amplifier Output
- DISPOSAL
- Packaging:
- Device:
- MANUFACTURER'S DECLARATIONS
- MANUFACTURER'S WARRANTY & LIMITATION OF LIABILITY
- UKCA-CONFORMITY
- UKCA-DECLARATION OF CONFORMITY
- CE CONFORMITY
- CE DECLARATION OF CONFORMITY
- ENTRETIEN, MAINTENANCE ET RÉPARATIONS
- DÉCLARATION DE CONFORMITÉ EU
- MONTAŻ POD / NA BLACIE
- PIELEGNACJA, KONSERWACJA I NAPRAWA
Brand : LD Systems
Model : AMP 205 AV
Category : Receiver