
RM 10.5T - Fridge DOMETIC - Free user manual and instructions
Find the device manual for free RM 10.5T DOMETIC in PDF.

| Product type | Absorption refrigerator |
| Brand | Dometic |
| Model | RM 10.5T |
| Intended use | Installation in caravan or motorhome, cooling and freezing food |
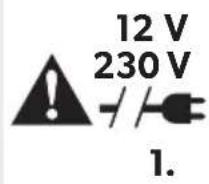
| Power supply | 230 V~ (50 Hz) / 12 V= |
| Gas supply | Liquid gas (propane or butane) – 270 g/24 h |
| Power consumption | 2.8 kWh/24 h (230 V~) |
| Total gross capacity | 88 litres |
| Refrigerator compartment capacity | 78.7 litres |
| Freezer compartment capacity | 9.2 litres |
| Dimensions (H × W × D) | 821 × 523 × 548 mm |
| Weight | 28 kg |
| Climate class | SN (ambient temperatures +10 °C to +32 °C) |
| Control display | TFT display with brightness reduction |
| Automatic operating mode | Yes, selects the most economical energy source |
| Refuelling shutdown mode | Yes, blocks gas for 15 minutes during refuelling |
| Fan function (optional) | Available with REF-FANKIT kit |
| Optional battery packs | Up to 12 AA batteries for independent gas operation |
| Included accessories | Winter covers WA 130 for grille LS 200 |
| Defrosting | Manual, recommended when frost layer reaches 3 mm |
| Winter position of doors | Yes, to prevent mould formation during periods of non-use |
| Gas burner maintenance | Cleaning recommended once a year or every 6 months |
| Repairs | Only by qualified personnel |
| Warranty | Legal, contact dealer or Dometic |
Frequently Asked Questions - RM 10.5T DOMETIC
User questions about RM 10.5T DOMETIC
0 question about this device. Answer the ones you know or ask your own.
Ask a new question about this device
Download the instructions for your Fridge in PDF format for free! Find your manual RM 10.5T - DOMETIC and take your electronic device back in hand. On this page are published all the documents necessary for the use of your device. RM 10.5T by DOMETIC.
USER MANUAL RM 10.5T DOMETIC
natural_image
Technical line drawing of two identical rectangular metal enclosure units with vertical framing (no text or symbols)RM 10.5(S)(T), RMS 10.5(X)(S)(T)
EN Absorber refrigerator Operating manual.... 11
© 2023 Dometic Group. The visual appearance of the contents of this manual is protected by copyright and design law. The underlying technical design and the products contained herein may be protected by design, patent or be patent pending. The trademarks mentioned in this manual belong to Dometic Sweden AB. All rights are reserved.
NOTICE
natural_image
Technical line drawing of a refrigerator interior with labeled compartments and door holders (no text or symbols)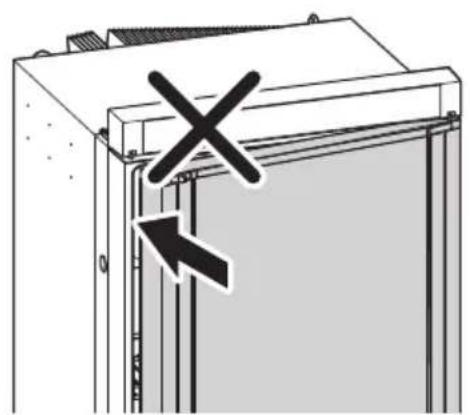
natural_image
Diagram of a server rack with a black X mark and arrow indicating a location or movement (no text or symbols present)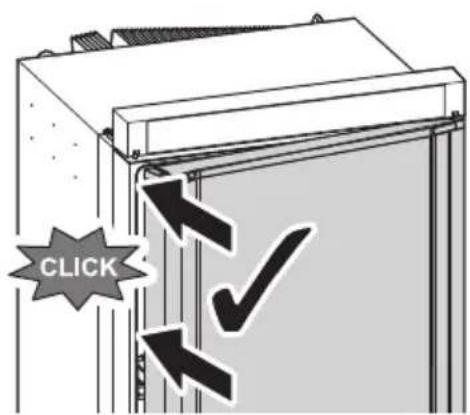
3
4
RM 10.5T, RMS 10.5T, RMS 10.5XT
flowchart
graph TD
    A["Sensor"] --> B["Auto"]
    B --> C["Sensor"]
    C --> D["Auto"]
    D --> E["Sensor"]
    E --> F["Output"]
    B --> G["Signal Light"]
    C --> H["Signal Light"]
    D --> I["Signal Light"]
    E --> J["Signal Light"]
    B --> K["Signal Light"]
    C --> L["Signal Light"]
    D --> M["Signal Light"]
    E --> N["Signal Light"]
    B --> O["Signal Light"]
    C --> P["Signal Light"]
    D --> Q["Signal Light"]
    E --> R["Signal Light"]
    B --> S["Signal Light"]
    C --> T["Signal Light"]
    D --> U["Signal Light"]
    E --> V["Signal Light"]
    B --> W["Signal Light"]
    C --> X["Signal Light"]
    D --> Y["Signal Light"]
    E --> Z["Signal Light"]
    B --> AA["Output"]
    C --> AB["Output"]
    D --> AC["Output"]
    E --> AD["Output"]
    F --> AE["Feedback to Sensor"]
    G --> AF["Feedback to Sensor"]
    H --> AG["Feedback to Sensor"]
    I --> AH["Feedback to Sensor"]
    J --> AI["Feedback to Sensor"]
    K --> AJ["Feedback to Sensor"]
    L --> AK["Feedback to Sensor"]
    M --> AL["Feedback to Sensor"]
    N --> AM["Feedback to Sensor"]
    O --> AN["Feedback to Sensor"]
    P --> AO["Feedback to Sensor"]
    Q --> AP["Feedback to Sensor"]
    R --> AQ["Feedback to Sensor"]
    S --> AR["Feedback to Sensor"]
    T --> AS["Feedback to Sensor"]
    U --> AT["Feedback to Sensor"]
    V --> AU["Feedback to Sensor"]
    W --> AV["Feedback to Sensor"]
    X --> AW["Feedback to Sensor"]
    Y --> AX["Feedback to Sensor"]
    Z --> AY["Feedback to Sensor"]
7
8
9
natural_image
Technical line drawing of a structural frame with diagonal braces and a triangular support (no text or symbols)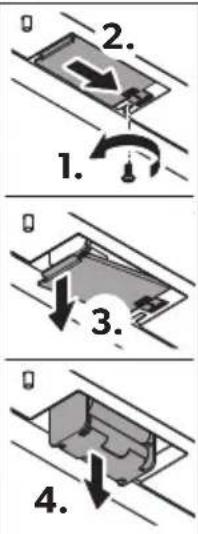
natural_image
Diagram showing a hand holding a device above a wall-mounted device, with arrows indicating movement or force (no text or symbols present)10
11
12

natural_image
Mechanical assembly diagram showing a lever mechanism with no visible text or symbols
Please read these instructions carefully and follow all instructions, guidelines, and warnings included in this product manual in order to ensure that you install, use, and maintain the product properly at all times. These instructions MUST stay with this product.
By using the product, you hereby confirm that you have read all instructions, guidelines, and warnings carefully and that you understand and agree to abide by the terms and conditions as set forth herein. You agree to use this product only for the intended purpose and application and in accordance with the instructions, guidelines, and warnings as set forth in this product manual as well as in accordance with all applicable laws and regulations. A failure to read and follow the instructions and warnings set forth herein may result in an injury to yourself and others, damage to your product or damage to other property in the vicinity. This product manual, including the instructions, guidelines, and warnings, and related documentation, may be subject to changes and updates. For up-to-date product information, please visit documents.dometic.com.
Contents
1 Explanation of symbols.... 11
2 Safety instructions....12
3 Accessories....16
4 Intended use....17
5 Technical description .....17
6 Using the refrigerator .....19
7 Troubleshooting 26
8 Cleaning and maintenance....31
9 Warranty 33
10 Disposal.... 33
11 Technical data 34
1 Explanation of symbols

WARNING!
Safety instruction: Indicates a hazardous situation that, if not avoided, could result in death or serious injury.

CAUTION!
Safety instruction: Indicates a hazardous situation that, if not avoided, could result in minor or moderate injury.

NOTICE!
Indicates a situation that, if not avoided, can result in property damage.

NOTE
Supplementary information for operating the product.
2 Safety instructions
This product is only suitable for the intended purpose and application in accordance with these instructions.
This manual provides information that is necessary for proper installation and/or operation of the product. Poor installation and/or improper operating or maintenance will result in unsatisfactory performance and a possible failure.
The manufacturer accepts no liability for any injury or damage to the product resulting from:
- Incorrect assembly or connection, including excess voltage
- Incorrect maintenance or use of spare parts other than original spare parts provided by the manufacturer
• Alterations to the product without express permission from the manufacturer - Use for purposes other than those described in this manual
Dometic reserves the right to change product appearance and product specifications.
2.1 General safety

WARNING! Failure to obey these warnings could result in death or serious injury.
Electrocution hazard
- Installation and removal of the device may only be carried out by qualified personnel.
- Do not operate the device if it is visibly damaged.
- If this device's power cable is damaged, it must be replaced by the manufacturer, customer service or a similarly qualified person in order to prevent safety hazards.
- This device may only be repaired by qualified personnel. Improper repairs can result in considerable danger or damage to the device.
Fire hazard
- The refrigerant in the refrigerant circuit is highly flammable. In the event of any damage to the refrigerant circuit (smell of ammonia):
- Switch off the device.
- Avoid naked flames and sparks.
- Air the room well.
Explosion hazard
- Do not store any explosive substances, such as spray cans with propellants, in the device.
Health hazard
- Never open the absorber unit. It is under high pressure and can cause injury if it is opened.
- This device can be used by children aged from 8 years and above and persons with reduced physical, sensory or mental capabilities or lack of experience and knowledge if they have been given supervision or instruction concerning use of the device in a safe way and understand the hazards involved.
• Children shall not play with the device. - Cleaning and user maintenance shall not be made by children without supervision.
- Children aged from 3 to 8 years are allowed to load and unload refrigerating devices.

CAUTION! Failure to obey these cautions could result in minor or moderate injury.
Risk of crushing
- Do not put your fingers into the hinge.

NOTICE! Damage hazard
- Keep the condensation drain clean at all times.
- The device lighting may only be replaced by customer service.
- Do not use a high-pressure cleaner near the ventilation grill when cleaning the vehicle.
- Attach the winter covers (accessories) of the ventilation grille when the vehicle is cleaned from the outside or not used for a prolonged period of time.
-
Do not open the refrigerant circuit under any circumstances.
-
The refrigerator is not suitable for storing substances which are caustic or contain solvents.
- The refrigerator may not be exposed to rain.
2.2 Safe operation

CAUTION! Failure to obey these cautions could result in minor or moderate injury.
Risk of injury
- Close and lock the device door before beginning a journey.
- The cooling aggregate at the back of the device becomes very hot during operation. Protect yourself from coming into contact with hot parts when removing ventilation grills.

NOTICE! Damage hazard
- Do not use electrical devices inside the device unless they are recommended by the manufacturer for that purpose.
- Ensure that the ventilation openings are not covered.
• Danger of overheating!
Always ensure sufficient ventilation so that the heat generated during operation can dissipate. Make sure that the refrigerator is sufficiently far away from walls and other objects so that the air can circulate.
- Do not fill the inner container with ice or fluid.
- Protect the refrigerator and the cable against heat and moisture.
- Make sure that foodstuffs do not touch the walls of the cooling area.
2.3 Safety when operating with gas

WARNING! Failure to obey these warnings could result in death or serious injury.
Explosion hazard
- Only operate the device at the pressure shown on the type plate. Only use pressure controllers with a fixed setting which comply with the national regulations.
- While driving only operate the device with gas if the vehicle manufacturer allows the operation of the gas system while driving (see vehicle's manual).
- Check the national requirements for operating the device with gas during driving.
- Never operate the device with gas:
- At petrol stations
- In parking garages
- On ferries
- While transporting the caravan or mobile home with a transport vehicle or tow truck
- Never use a naked flame to check the device for leaks.
• In case of gas odor:
- Close the gas supply cock and the valve on the cylinder.
- Open all windows and leave the room.
- Do not press an electric switch.
- Put out any naked flames.
- Have the gas system checked by a specialist.
- Never store liquid gas cylinders in unventilated areas or below ground level (funnel shaped holes in the ground).
- Keep liquid gas cylinders away from direct sunlight. The temperature may not exceed 50 °C.

NOTICE! Damage hazard
- Only use propane or butane gas, not natural gas (see rating plate).
NOTE
- Ignition problems may occur at altitudes above 1000 m. Switch to a different energy source.
2.4 Safety when operating

CAUTION! Failure to obey these cautions could result in minor or moderate injury.
Health hazard
- Make sure that you only put items in the device which may be chilled at the selected temperature.
- Food may only be stored in its original packaging or in suitable containers.
- Opening the door for long periods can cause significant increase of the temperature in the compartments of the device.
- Clean regularly surfaces that can come in contact with food and accessible drainage systems.
- Store raw meat and fish in suitable containers in the device, so that it is not in contact with or can drip onto other food.
- If the device is left empty for long periods:
- Switch off the device.
- Defrost the device.
– Clean and dry the device. - Leave the door open to prevent mold developing within the device.
Risk of injury
- The device door or the freezer door can completely detach from the device if used incorrectly. Push the doors closed until you hear a clear click at the top and bottom.
- Do not lean on the open device door.

NOTICE! Damage hazard
- If the door is not locked correctly on the opposite side, push on that side at the top and the bottom until it locks in place.
- Only store heavy objects such as bottles or cans in the device door, in the vegetable compartment or on the bottom shelf.

NOTE
- Ask your vehicle manufacturer if the battery management of your vehicle shuts down the devices to protect the battery.
- Put the device door and the freezer door into the winter position if you are not going to use the device for a longer period of time. This prevents mold from forming.
- For ambient temperatures of +15 °C to +25 °C, select the average temperature setting.
3 A c c e s s o r i
Description
Winter cover WA 130 for the ventilation grill LS 200
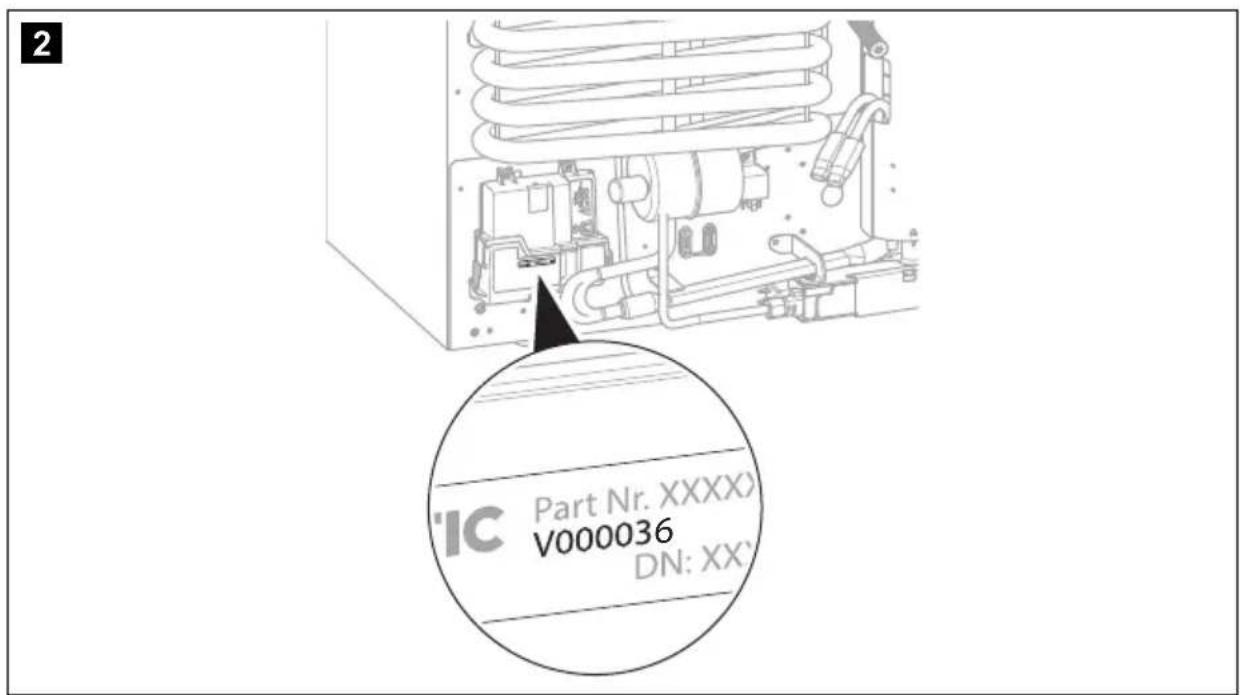
Optional Fan Kit REF-FANKIT
Note: The Fan Kit can only be installed in refrigerators with software version 36 or higher (fig. 2, page 4).
Optional Battery pack Pack R10-BP for stand-alone gas operation
Optional storage kit
4 Intended use
The device is suitable for:
• Installation in caravans and motor homes
• Cooling, deep-freezing and storing food
The device is not suitable for:
- Storing medications
- Storing corrosive substances or substances that contain solvents
- Quick-freezing food
5 Technical description
The refrigerator is an absorber refrigerator and is designed for operation
• on a DC power supply (12 V)
• on an AC power supply
• with liquefied gas (propane or butane)
The refrigerator has an automatic operating mode that selects the most economical type of energy connected. The refrigerator unit operates silently.
5.1 Operating and display elements
RM10.5T, RMS10.5T, RMS10.5XT
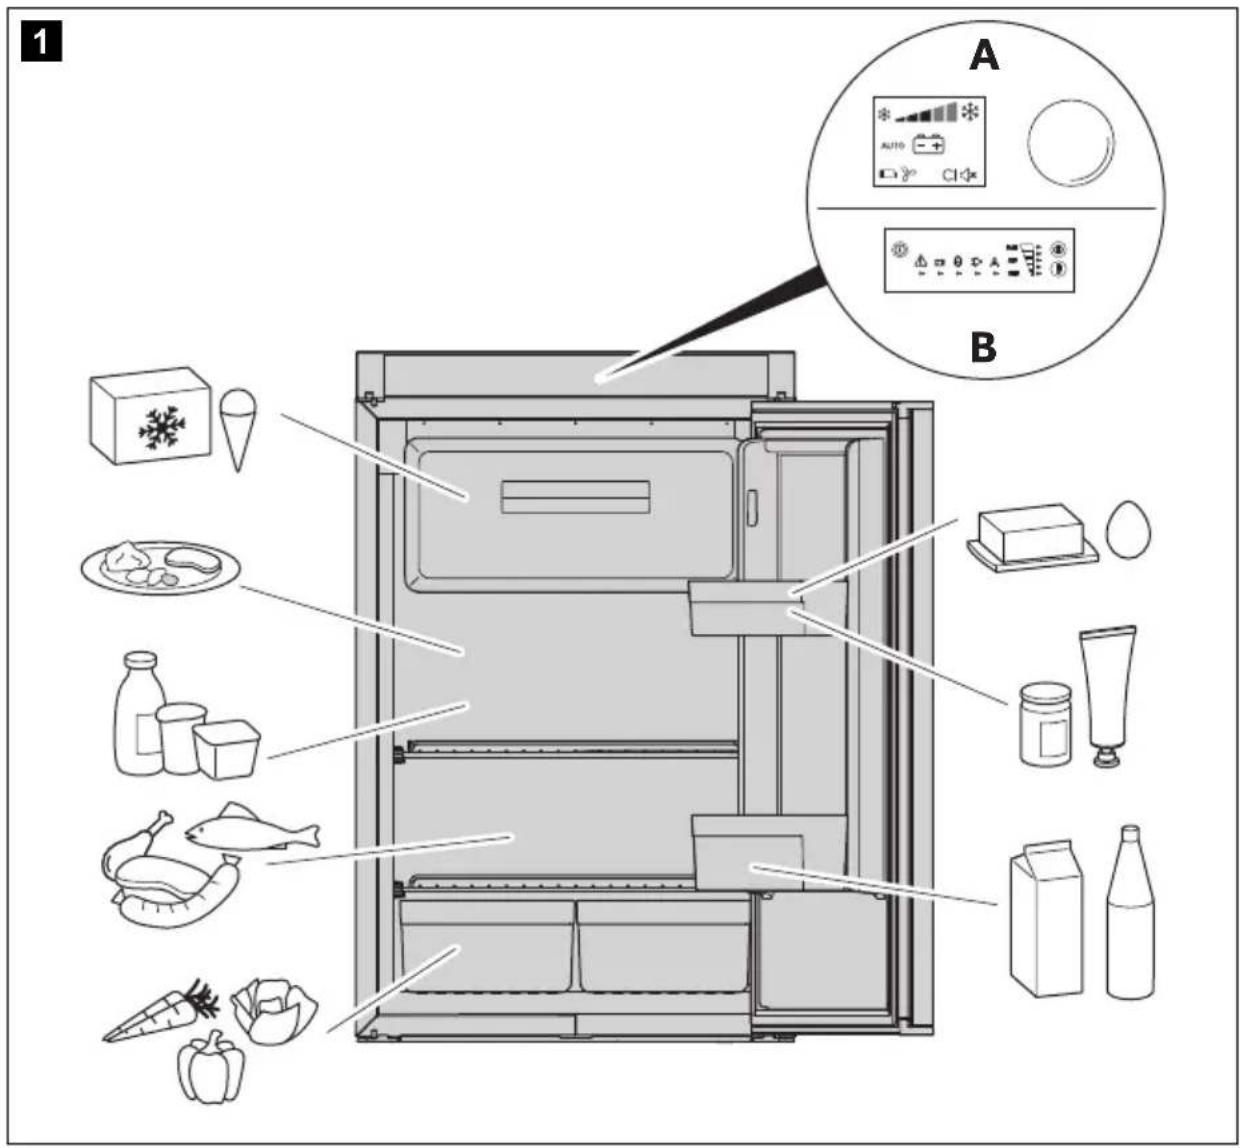
The TFT display features the following operating and display elements (fig. 1 A, page 4):
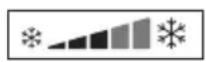
| Symbol Description | |
| * - ▲ * | Cooling capacity indicator |
| Operation with AC power | |
| Operation with DC power | |
| Operation with gas | |
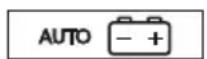
| AUTO | Automatic mode:In automatic mode, the refrigerator automatically selects the most economical operating mode in the following order of priority:Battery:Symbol lights up when the battery packs (optional) are fitted and the device is in stand-alone gas mode. |
| Fan (optional):Symbol lights up when die fan function is activated. | |
| CI | Symbol lights up when the refrigerator is connected to the CI bus. |
| Dim TFT displayAfter 30 seconds, the brightness of the display is reduced to the set level. | |
| Beep off:Error messages and warnings are not signaled acoustically.Door left open for an extended period is signaled acoustically. | |
| Beep on:Error messages, warning messages and door left open for an extended period are signaled acoustically. | |
| Confirm selection and return to the main menu | |
RM10.5S, RMS10.5S, RMS10.5XS
The LED display features the following operating and display elements (fig. 1 B, page 4):
| Symbol Description | |
| 1 | ON/OFF button |
| Δ | Fault indicator |
| Operation with DC power | |
| Operation with gas | |
| Operation with AC power | |
| A | Automatic mode |
| Temperature indicator | |
Symbol Description

Energy selection button

Temperature selection button
6 Using the refrigerator

NOTE
- Before starting your new refrigerator for the first time, clean it inside and outside with a damp cloth for hygienic reasons.
- When using the refrigerator for the first time, there may be a mild odor which will disappear after a few hours. Air out the living space well.
- Park the vehicle so that it is level, especially when starting up and filling the refrigerator before setting off on a journey.
- The cooling capacity can be affected by:
– the ambient temperature (e.g. when the vehicle is exposed to direct sunlight)
– the amount of food to be refrigerated - how often you open the door
6.1 Tips for optimal refrigerator operation
- Do not store goods in the refrigerator for the first 12 hours after start-up.
- Protect the interior of the vehicle from warming up excessively (e.g. sunshades in the windows, air conditioner).
- Protect the refrigerator from direct sunlight (e.g. sunshades in the windows).
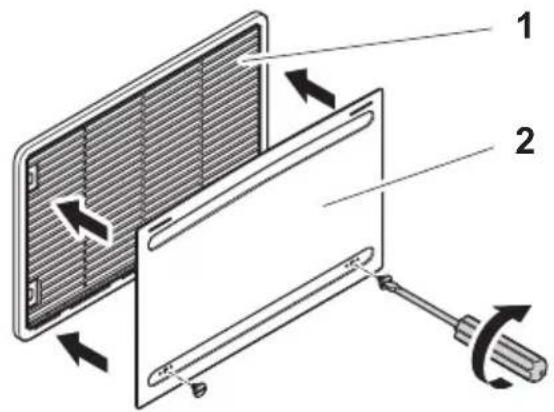
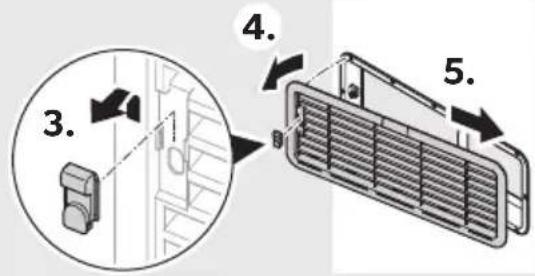
6.2 Operation at low outdoor temperatures

NOTICE!
In AC power mode and DC power mode, install both winter covers. In gas mode or automatic mode, install the lower winter cover only. This prevents heat from building up and ensures the fumes from the refrigerator can dissipate properly.

NOTE
Cold air can impact the performance of the cooling unit. Install the winter covers if you determine a loss of cooling capacity at low ambient temperatures.
▶ Install the winter covers (accessory) as shown in fig. 3, page 5.
6.3 Switching on the refrigerator
▶ Press for 2 seconds
- RM10.5T, RMS10.5T, RMS10.5XT: the control knob
- RM10.5S, RMS10.5S, RMS10.5XS: the button
√ The refrigerator starts with the most recent settings.
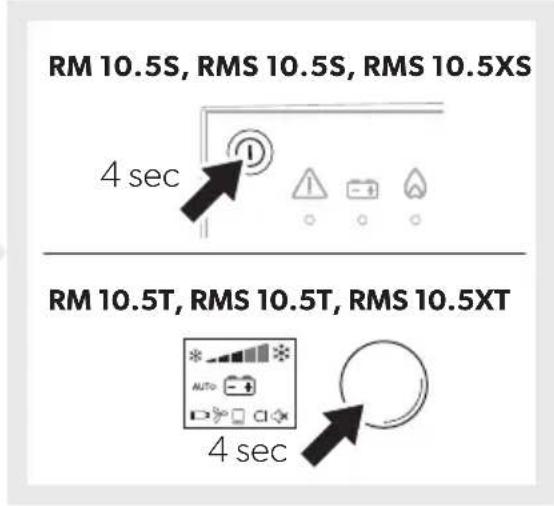
6.4 Switching off the refrigerator
▶ Press for 4 seconds
- RM10.5T, RMS10.5T, RMS10.5XT: the control knob
- RM10.5S, RMS10.5S, RMS10.5XS: the button
√ A beep sounds and the refrigerator switches off.
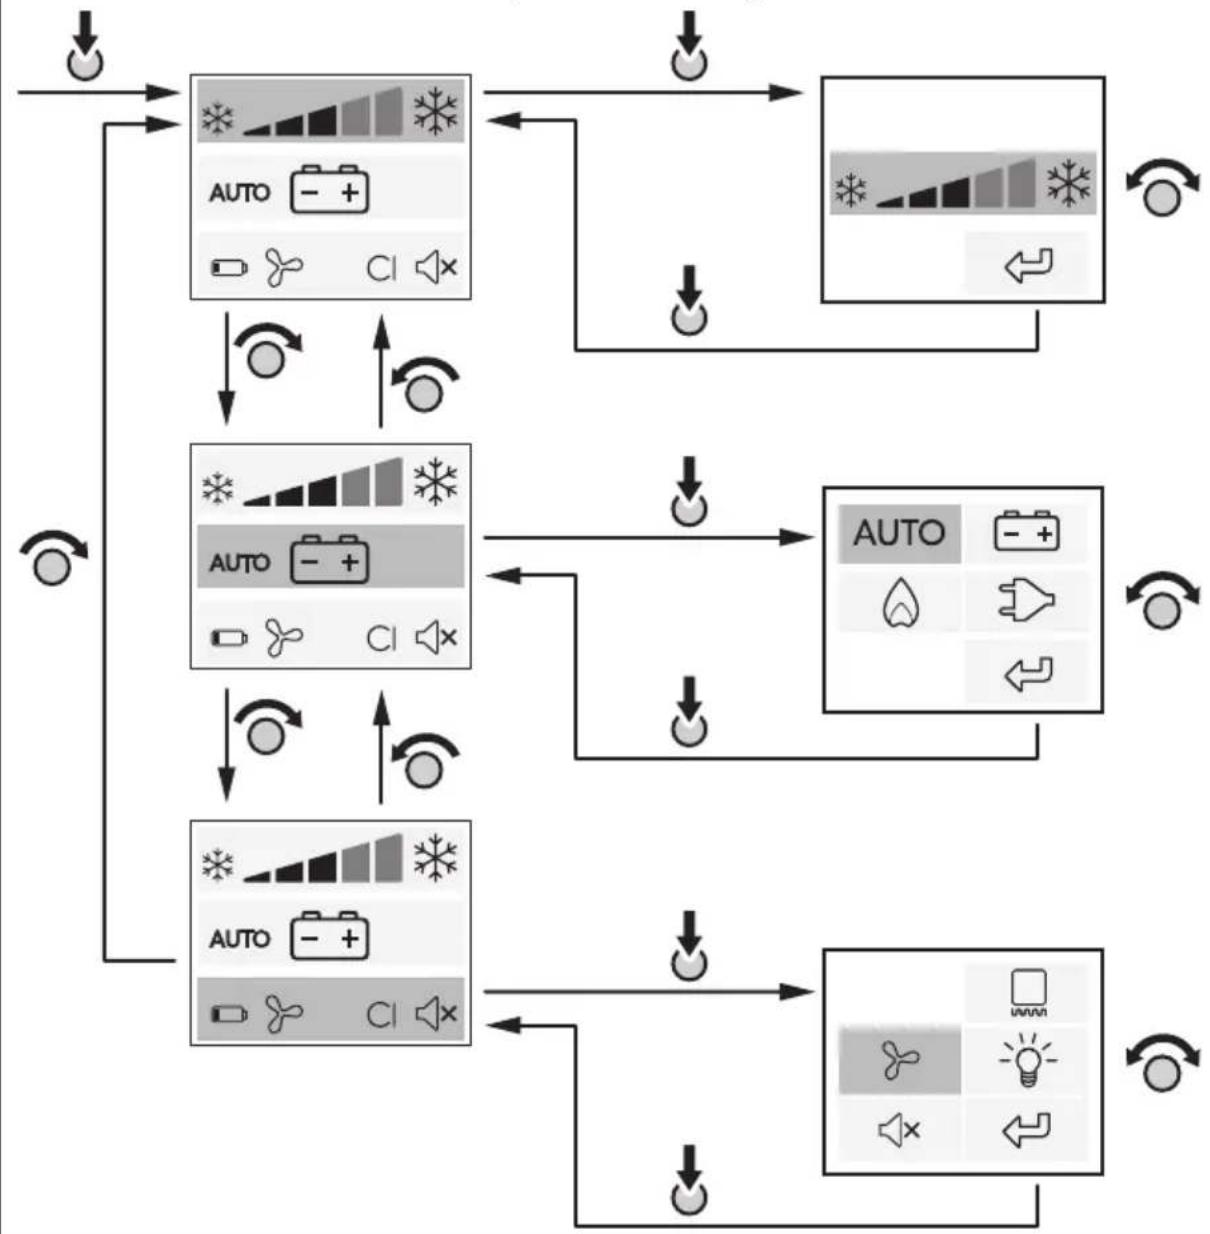
6.5 Operating the refrigerator (RM 10.5T, RMS 10.5T, RMS 10.5XT)
Menu navigation: fig. 4, page 5
▶ Press the control knob to activate the TFT display.
The main menu is divided into three lines:
Main menu Detail menu
Cooling capacity menu
Operating mode menu

Settings menu
▶ Turn the control knob to select the desired detail menu.
▶ Press the control knob to open the selected detail menu.
▶ Turn the control knob to navigate through the detail menu.
√ Selected settings are displayed in blue.
▶ Press the control knob to choose the selected setting.
▶ Confirm the selection using
6.6 Operating the refrigerator (RM 10.5S, RMS 10.5S, RMS 10.5XS)
Controls
▶ Repeatedly press ^MODE , until the LED indicates the desired operating mode.
▶ Repeatedly press ⚠, until the desired temperature level is set.
6.7 Tank stop mode

WARNING!
Turn off the refrigerator or select a different operating mode if refueling takes longer than 15 minutes.
If the vehicle's ignition is switched off, the refrigerator will switch to tank stop mode for safety reasons. This blocks gas operation for 15 minutes. The refrigerator then automatically switches back to the standard automatic mode.
In tank stop mode
- RM10.5T, RMS10.5T, RMS10.5XT: the symbol 📋 is displayed
- RM10.5S, RMS10.5S, RMS10.5XS: the LED flashes
6.8 Stand-alone gas mode (accessory)

WARNING!
In stand-alone gas mode, the refrigerator must be switched off manually during refueling.

NOTE
- When no AC or DC power is connected, there is a load on the batteries even when the refrigerator is off.
- Remove the batteries when the refrigerator is not in use (risk of leakage).
For stand-alone gas mode, the optional battery packs must be installed. This makes connecting to AC or DC power unnecessary.
When using 12 batteries (type AA), the refrigerator can be operated in stand-alone gas mode for 2 to 3 days.
Please note the following special features when using stand-alone gas mode:
- The light inside the refrigerator remains switched off.
- The display turns off 2 seconds after the last activity.
- The display briefly switches on every 15 seconds. This indicates that the refrigerator is switched on.
- If there are error messages, the display stays switched on.
Stand-alone gas mode is indicated
- RM10.5T, RMS10.5T, RMS10.5XT: by the symbols 🏠 and 📄
- RM10.5S, RMS10.5S, RMS10.5XS: by the flashing of LED every 15 seconds
The batteries in the battery packs must be replaced
- RM10.5T, RMS10.5T, RMS10.5XT: when the error "E 14" is displayed
- RM10.5S, RMS10.5S, RMS10.5XS: when the error 🔒 / 🔒 is displayed
6.9 Setting the cooling capacity

NOTE
For ambient temperatures of +15 °C to +25 °C, select the average cooling capacity.
▶ Set the cooling capacity:
- RM10.5T, RMS10.5T, RMS10.5XT: Select the desired temperature level in the cooling capacity menu.
- RM10.5S, RMS10.5S, RMS10.5XS: Repeatedly press until the desired temperature level is selected.
6.10 Fan operation (optional)
For fan operation the optional fan must be installed.
When switching on the device, the fan is switched on for a short time (function test). During the device's operation the fan only switches on:
- When the ambient temperature is above 32^ .
- When the set cooling temperature is not reached within 2 hours.
• RM10.5T, RMS10.5T, RMS10.5XT: When the fan function is activated.

NOTE
RM10.5T, RMS10.5T, RMS10.5XT: In delivery state, the fan function is activated.
RM10.5S, RMS10.5S, RMS10.5XS: The fan function is always activated and can not be deactivated.
RM10.5T, RMS10.5T, RMS10.5XT
The fan operation is indicated by the symbol ✿
6.11 Using the refrigerator door

CAUTION! – Risk of injury
- The refrigerator door or freezer compartment door can completely detach from the device if used incorrectly.
- Do not lean on the open refrigerator door.

NOTE
If the door is not secured correctly on the opposite side, carefully push on the top and bottom of the door on that side until it is secured in place.
Closing and securing the refrigerator door
▶ Press the door shut until you clearly hear it click at the top and bottom.
√ The door is now closed and secured.
6.12 Notes on storing food

CAUTION! – Health hazard!
- Please check whether the cooling capacity of the refrigerator is suitable for the food you wish to cool.
- Opening the door for long periods can cause significant increase of the temperature in the compartments of the refrigerator.
- Store raw meat and fish in suitable containers in the refrigerator, so that raw meat and fish is not in contact with or drip onto other food.
- Food may only be stored in its original packaging or in suitable containers.
- The freezer compartment is suitable for making ice cubes and for keeping frozen food. It is not suitable for freezing previously unfrozen food.
- If the refrigerator is exposed to a room temperature of below +10 °C for an extended period of time, a uniform temperature cannot be guaranteed in the freezer compartment. This can lead to an increase of the freezer compartment temperature and the goods stored in it may defrost.

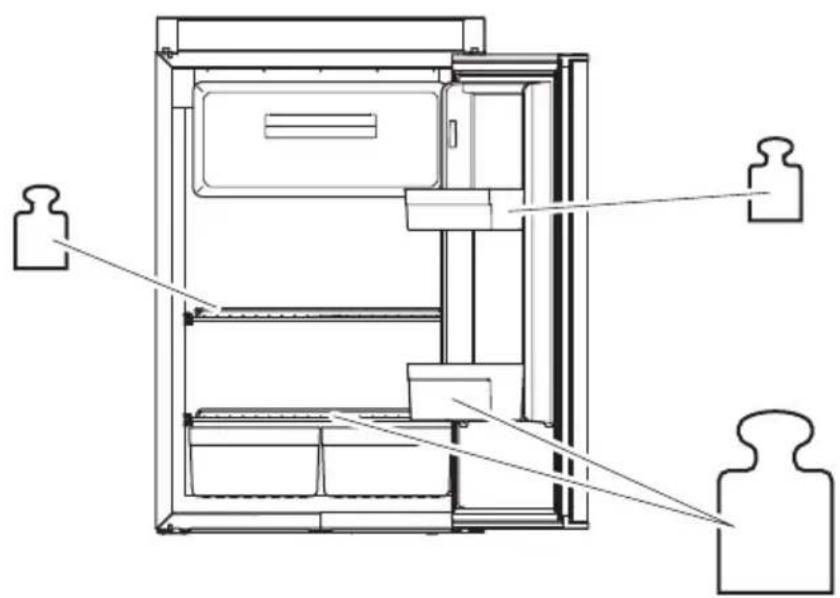
NOTICE!
- The maximum weight per door shelf is 6 kg. The maximum weight for the entire door is 7.5 kg.
- Store heavy objects such as bottles or cans in the refrigerator door, in the lower storage compartment or on the bottom shelf only.
- Do not keep carbonated drinks in the freezer compartment.
▶ Store food as shown (fig. 1, page 4).
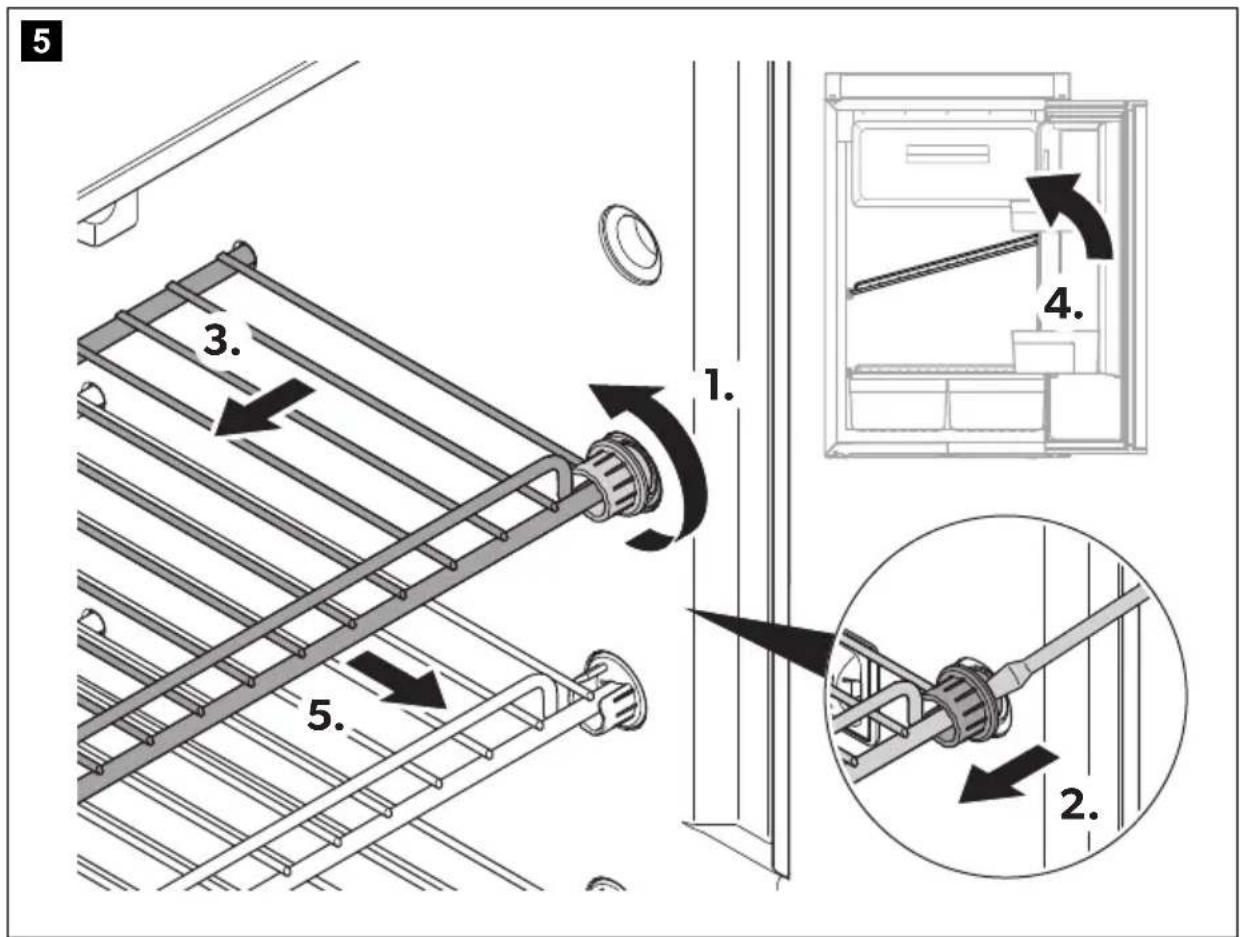
6.13 Positioning the shelves

WARNING! Children beware!
All shelves are fixed in place to prevent children from climbing into the refrigerator.
- Only remove the shelves for cleaning purposes.
- Refit the shelves and secure them in place.
▶ Remove the shelf as shown (fig. 5, page 6).
▶ Refit the shelf in the reverse order.
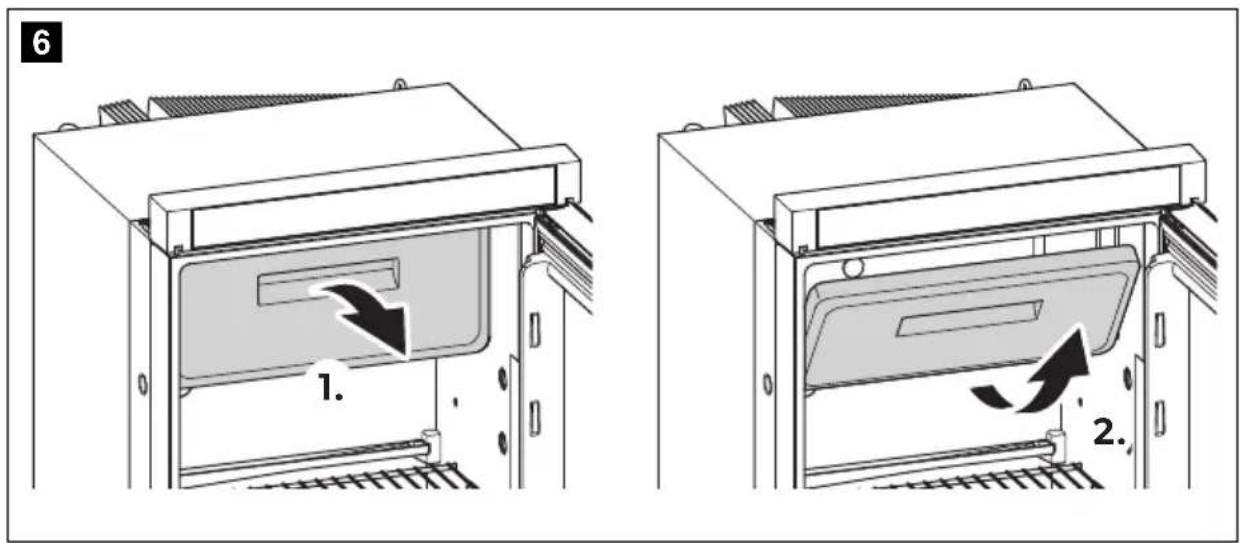
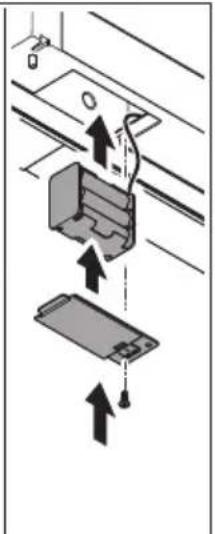
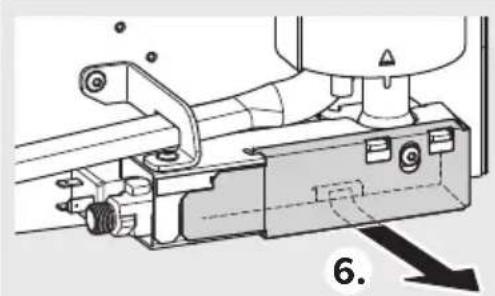
6.14 Removing the freezer compartment
You can take out the freezer compartment to make more space in the refrigerator compartment.

NOTE
- Keep the freezer compartment door and the base in a safe place to prevent any damage.
- When installing, replace the parts in the reverse order.
▶ Proceed as shown (fig. 6, page 6).
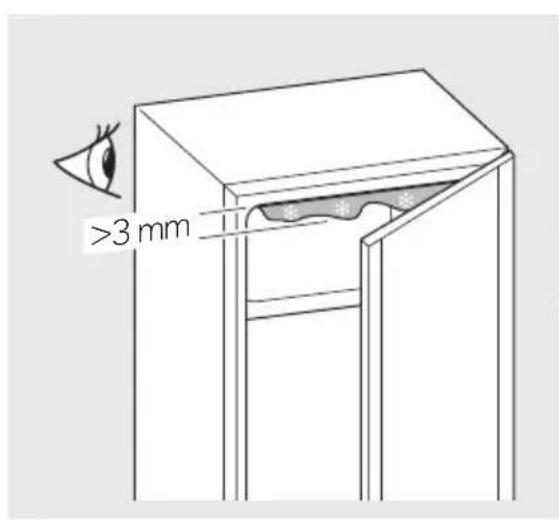
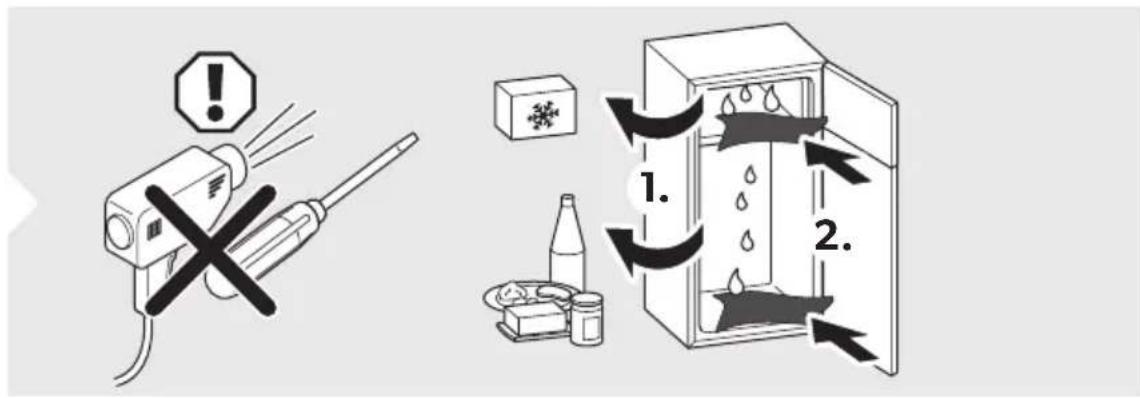
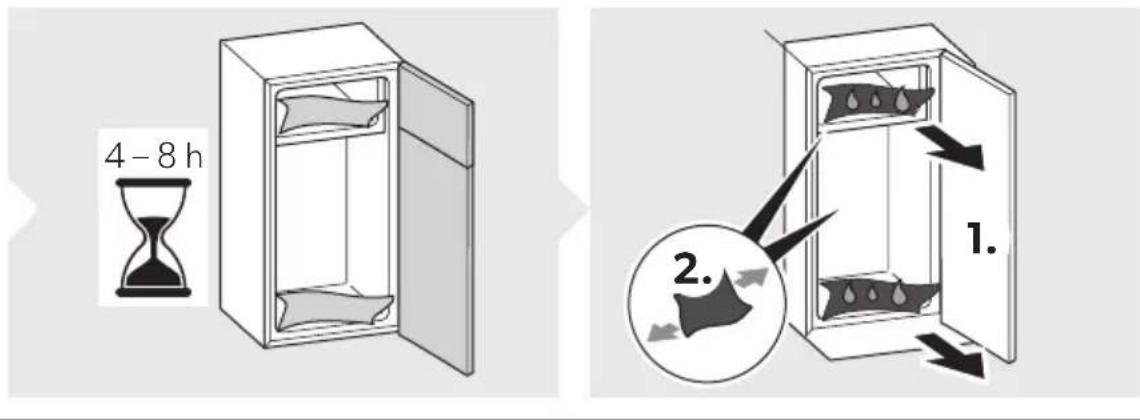
6.15 Defrosting the refrigerator

NOTICE!
Do not use mechanical tools or a hair dryer to remove ice or to loosen frozen items.

NOTE
Over time, frost builds up on the cooling fins inside the refrigerator. If this layer of frost is about 3 mm thick, you should defrost the refrigerator.
▶ Proceed as shown (fig. 7, page 7).
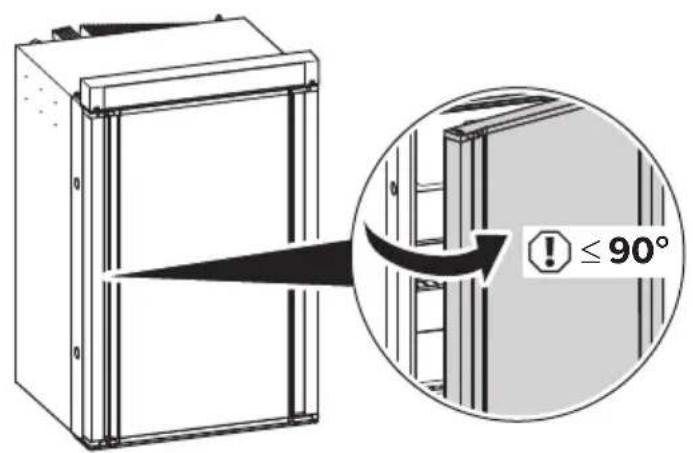
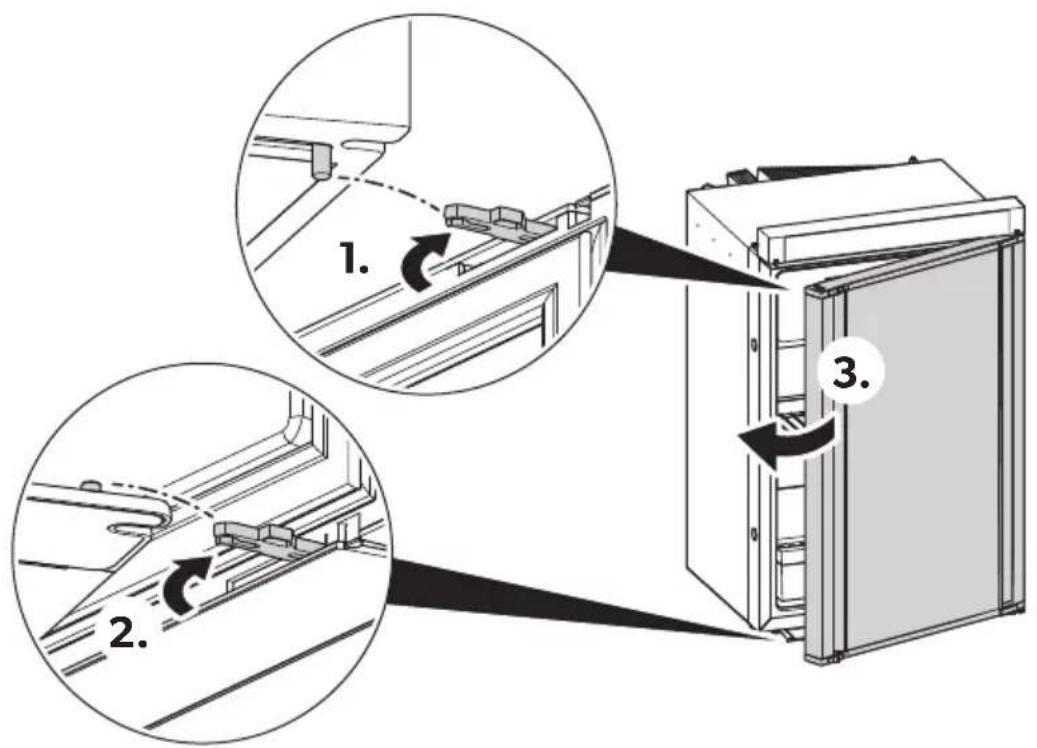
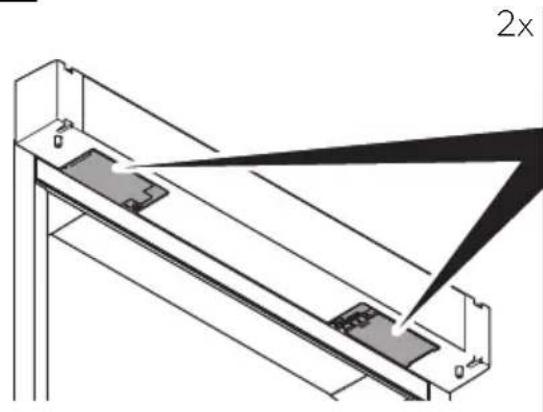
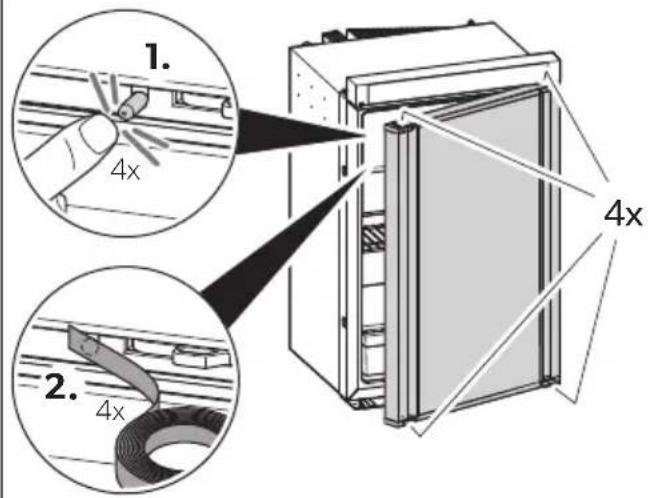
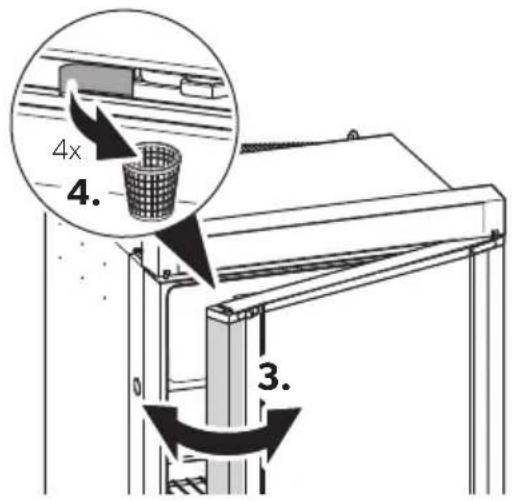
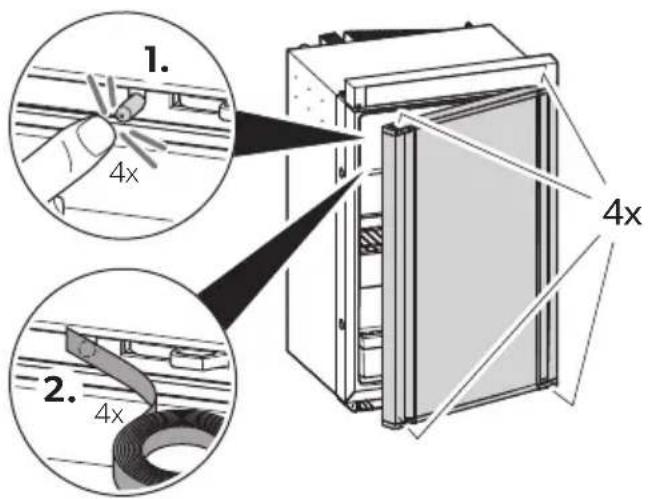
6.16 Positioning the refrigerator door in the winter position

CAUTION!
The winter position may not be used while driving.
Place the refrigerator door and the freezer compartment door into the winter position if you are not going to use the refrigerator for an extended period of time. This prevents mold from forming.
▶ Defrost the refrigerator (chapter "Defrosting the refrigerator" on page 25).
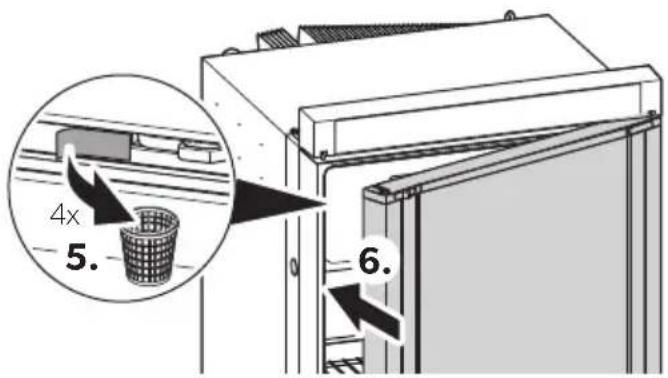
▶ Unscrew the hook near the securing mechanism all the way at the top and bottom of one side of the door (fig. 8, page 8).
▶ Press against the refrigerator door.
√ The protruding pin snaps into the hook.
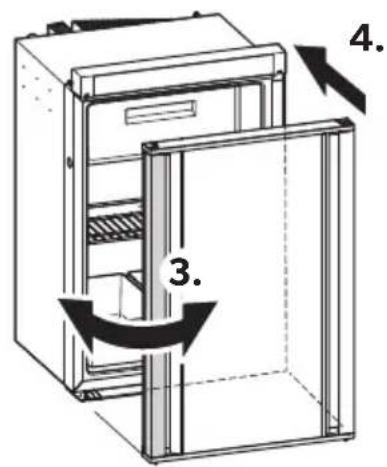
Open the door in winter mode as follows:
▶ Pull the door toward you.
▶ Push the protruding hooks at the top and bottom of the door back in.
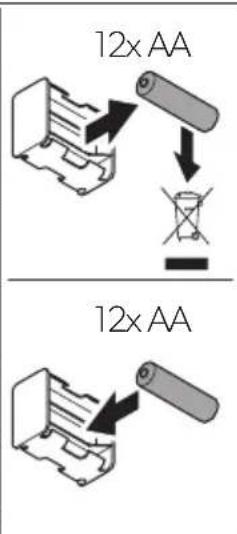
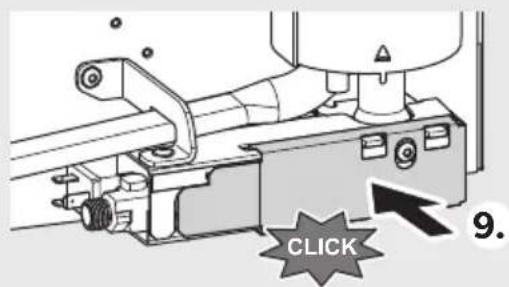
6.17 Optional battery packs
If the vehicle's own 12 V DC battery power supply is unavailable or if the power supply is cut off while the appliance is in operation, the electronic control unit automatically switches over to the internal battery power (if batteries are inserted).
The compartments for the battery packs (accessories) are located on the right and left under the operating element. A total of 12 AA batteries are needed.
▶ Proceed as shown in fig. 9, page 8 to insert the batteries.
7 Troubleshooting

NOTE
To safely operate 12 V consumer units in the caravan while driving, it must be ensured that the towing vehicle provides sufficient voltage. On some vehicles, the battery management system may automatically switch off the consumer units to protect the battery. Ask your vehicle manufacturer for more information.
Fault Possible cause Suggested remedy
| In AC power mode: The refrigerator does not work. | The fuse in the AC power supply is defective. | Replace the fuse. |
| The vehicle is not connected to the AC power supply. | Connect the vehicle to the AC power supply. | |
| The AC heating element is defective. | Contact an authorized customer service point. |
Fault Possible cause Suggested remedy
| In DC power mode: The refrigerator does not work. | The fuse in the DC cable is defective. | The fuse on the relay must be replaced.Contact an authorized customer service point. |
| The vehicle fuse has blown. Replace the vehicle fuse. (Please refer to the operating manual of your vehicle.) | ||
| The vehicle battery is discharged. Test the battery and charge it. | ||
| The ignition is not switched on. Switch on the ignition. | ||
| The DC heating element is defective. | Contact an authorized customer service point. | |
| In gas mode: The refrigerator does not work. | The gas cylinder is empty. Replace the gas cylinder. | |
| The gas valve is closed. Turn the valve to open. | ||
| Air is in the gas line. Switch the refrigerator off and on again. Repeat the procedure three or four times if necessary.If installed, switch on the stove and repeat the process on the refrigerator if necessary. | ||
| In automatic mode: The refrigerator is being operated with gas although it is connected to the AC power supply. | The grid voltage is too low. The refrigerator automatically switches back to AC power supply as soon as the grid voltage is sufficient again. | |
Fault Possible cause Suggested remedy
| The refrigerator is not cooling adequately. | The ventilation around the cooling unit is not sufficient. | Check that the ventilation grille is not obstructed. |
| The evaporator is iced up. Check whether the refrigerator door closes properly. Make sure that the refrigerator seal fits correctly and is not damaged. Defrost the refrigerator. | ||
| The temperature is set too high. Set a lower temperature. | ||
| The ambient temperature is too high. | Remove the ventilation grille for a while so that warm air can escape quicker. | |
| Too much food was placed in the refrigerator at the same time. | Remove some of the food. | |
| Too much warm food was placed in the refrigerator at the same time. | Remove the warm food and leave it to cool down before putting it in again. | |
| The refrigerator has not been operating for very long. | Check the temperature again after four or five hours. | |
7.1 Fault messages and signal tones
All faults are indicated by a warning symbol, a fault ID and a beep. The beeping lasts for 2 minutes and is repeated every 30 minutes until the error has been rectified.
If multiple faults occur, the display shows the most recent fault. The underlying faults are displayed after the last fault has been confirmed.
RM10.5T, RMS10.5T, RMS10.5XT: Faults are indicated by a fault code with a warning symbol ( ) in the middle of the TFT display.
RM10.5S, RMS10.5S, RMS10.5XS: In the event of a fault, the LED warning symbol ( ) in the display lights up continuously and the LEDs flash according to the fault.
WARNING type fault messages
All faults of the WARNING type are reset automatically once the fault has been rectified.
| RM10.5T, RMS10.5T, RMS10.5XT | RM10.5S, RMS10.5S, RMS10.5XS | Fault Solution | |
| W01 |  | Defective temperature sensor in the refrigerator compartment | Contact an authorized customer service point. |
| W05 |  | AC power not connected or AC voltage <190 V | Connect the refrigerator to AC power or select a different energy type, e.g. gas or DC power. |
| W06 |  | DC power not connected | Connect the refrigerator to DC power or select a different energy type, e.g. gas or AC power. |
| W11 |  | DC over voltage (>16 V). Reduce the DC supply voltage. | |
 | |||
 |  | Tank stop mode: Gas operation is blocked for 15 minutes. | Wait 15 minutes or switch to another operating mode. |
 | Beep | The door has been open for more than 2 minutes. | Close the door. |
| W10 + beep | |||
ERROR type fault messages
All faults of the ERROR type must be reset manually:
▶ RM10.5T, RMS10.5T, RMS10.5XT: Press the control knob for 2 seconds.
▶ RM10.5S, RMS10.5S, RMS10.5XS: Press ① for 2 seconds.
√ A beep sounds.
√ The error has been reset.
| RM10.5T, RMS10.5T, RMS10.5XT | RM10.5S, RMS10.5S, RMS10.5XS | Fault Solution | |
| E03 No connection between power module and display | Contact an authorized customer service point. | ||
E07 No cooling capacity in gas mode  | Check if the device is at an angle and adjust it so it is level, if necessary. Reset the error. Contact customer service if this error occurs again. | ||
E08 No cooling capacity in AC power mode  | Check if the device is at an angle and adjust it so it is level, if necessary. Reset the error. Contact customer service if this error occurs again. | ||
| E09 No cooling capacity in DC power mode [GC67] | Check if the device is at an angle and adjust it so it is level, if necessary. Reset the error. Contact customer service if this error occurs again. | ||
E12 Gas valve test error Gas operation is not possible.  | Reset the error. Contact customer service if this error occurs again. | ||
E13 Internal communication error Gas operation not possible.  | Reset the error. Contact customer service if this error occurs again. | ||
E14 In stand-alone gas mode: The battery charge of the battery packs is too low  | Insert new batteries and then reset the error. | ||
| E50 Gas lock after 3 ignition attempts | Ignition not possible. The gas cylinder is empty. Replace the gas cylinder. Reset the error. | ||
| RM10.5T, RM10.5S,RMS10.5T, RMS10.5S, Fault SolutionRMS10.5XT RMS10.5XS | ||
E51 Gas lock, inte' error in the power module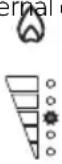 | Reset the error.Contact customer service if this error occurs again. | |
E52 Ground contact, gas valve Reset the error. | Contact customer service if this error occurs again. | |
E53 Ground contact, ignition electrode | Reset the error.Contact customer service if this error occurs again. | |
Refrigerator door does not close

NOTE
If the door no longer closes, then the door handle is blocked on the opened side.
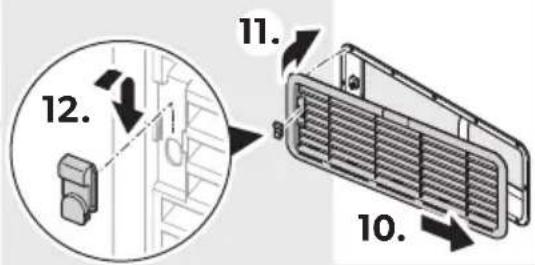
▶ Remove the door handle blockage as shown (fig. 10, page 9).
Refrigerator door has completely detached from the device

CAUTION! Risk of injury
The door can completely detach from the device if the locking pins have been tampered with or are twisted.
▶ Insert the door as shown (fig. 11, page 9).
8 Cleaning and maintenance

WARNING!
Always disconnect the refrigerator from the energy supply before cleaning and servicing it.

NOTICE!
When cleaning, never use sharp cleaning agents or hard or pointed tools to remove layers of ice or to loosen objects which have frozen in place.
▶ Clean the refrigerator regularly and when it gets dirty using a damp cloth.
▶ Make sure that no water drips into the seals. This can damage the electronics.
▶ Wipe the refrigerator dry with a cloth after cleaning.
▶ Check the condensate drain regularly.
Clean the condensate drain when necessary. If it is blocked, the condensate collects on the bottom of the refrigerator.
▶ Make sure that the ventilation grilles in the outer wall of the mobile home or caravan and the refrigerator roof ventilator are free from dust and pollutants. This ensures that the heat generated during operation can dissipate, the refrigerator is not damaged and the cooling capacity is not reduced.
8.1 Cleaning the gas burner

WARNING!
- Allow the burner to cool down before cleaning it.
- Do not modify the gas equipment.

NOTE
- Dirt in the gas burner is indicated by poor ignition or deflagrations.
- The manufacturer also recommends cleaning the burner after it has not been used for an extended period, and at least once a year.
- When using liquefied petroleum gas, the cleaning interval is reduced to half yearly or quarterly, depending on the level of dirt.
▶ Proceed as shown (fig. 12, page 10).
8.2 Maintenance

WARNING!
Work on gas and electrical installations may only be performed by qualified technicians.
Have the gas system and connected flues inspected before starting up the device for the first time, and by an authorized professional every two years to ensure they comply with the national safety requirements.
▶ Keep a record of any maintenance performed.
9 W a r r a n t y
The statutory warranty period applies. If the product is defective, please contact your retailer or the manufacturer's branch in your country (see dometic.com/dealer).
For repair and warranty processing, please include the following documents when you send in the product:
• A copy of the receipt with purchasing date
• A reason for the claim or description of the fault
Note that self-repair or non-professional repair can have safety consequences and might void the warranty.
10 Disposal

NOTE
This device contains flammable insulation blowing gas. Only have the device removed and disposed of by a specialist.
Recycling products with non-replaceable batteries, rechargeable batteries or light sources
If the product contains any non-replaceable batteries, rechargeable batteries or light sources, you don't have to remove them before disposal.
If you wish to finally dispose of the product, ask your local recycling center or specialist dealer for details about how to do this in accordance with the applicable disposal regulations.
The product can be disposed free of charge.
Recycling packaging material

Place the packaging material in the appropriate recycling waste bins wherever possible.
11 Technical data
| RM10.5(S)(T) | RMS10.5(S)(T) | RMS10.5X(S)(T) | |
| Connection voltage: | 230 V~/50 Hz12 V= | ||
| Capacity | |||
| Gross capacity: | 88 l | 78 l | 92 l |
| Refrigerator compartment: | 78.7 l | 69.1 l | 80.3 l |
| Freezer compartment: | 9.2 l | 9.2 l | 12.1 l |
| Total net capacity: | 86 l | 76 l | 90 l |
| Excluding freezer compartment | |||
| Gross capacity: | 93 l | 83 l | 98 l |
| Net capacity: | 91 l | 81 l | 96 l |
| Power input: | 135 W (230 V~)130 W (12 V= | ||
| Energy consumption: 2.8 kWh/24 h(230 V~) | 2.5 kWh / 24 h(230 V~) | 3.2 kWh / 24 h(230 V~) | |
| Gas consumption: 270 g/24 h | |||
| Climate class: SN | |||
| Dimensions H x W x D: | 821 x 523 x 548 mm | 821 x 523 x 603 mm | |
| Weight: | 28 kg | 27.4 kg | 29 kg |
| Inspection/certification: |  | ||
For the current EU Declaration of Conformity for your device, please refer to the respective product page on dometic.com or contact the manufacturer directly (see back page).
Detailed information

dometic.com
RM10.5S, RMS10.5S, RMS10.5XS
5 Description technique 68
5 Description technique
RM10.5S, RMS10.5S, RMS10.5XS
RM10.5S, RMS10.5S, RMS10.5XS
RM10.5S, RMS10.5S, RMS10.5XS
- RM10.5T, RMS10.5T, RMS10.5XT: o botão de controlo
- RM10.5S, RMS10.5S, RMS10.5XS: o botão
- RM10.5T, RMS10.5T, RMS10.5XT: o botão de controlo
- RM10.5S, RMS10.5S, RMS10.5XS: o botão ①
6.13 Posicionar as prateleiras

RM10.5S, RMS10.5S, RMS10.5XS
RM10.5S, RMS10.5S, RMS10.5XS
WAARSCHUWING-type foutmeldingen
2.2 Sikkerhed under driften

RM10.5S, RMS10.5S, RMS10.5XS
LED-displayet har følgende betjenings- og displayelementer (fig. 1 B, side 4):
RM10.5S, RMS10.5S, RMS10.5XS
PASS PÅ! Fare for skade
PASS PÅ! Fare for skade
PASS PÅ! Fare for skade
- Bruk kun flytende gass, ingen naturgass (se merkeskiltet).
MERK
PASS PÅ! Fare for skade
RM10.5S, RMS10.5S, RMS10.5XS
LED-displayet har følgende betjenings- og displayelementer (fig. 1 B, side 4):
ADVARSEL! Farlig for barn!
▶ RM10.5S, RMS10.5S, RMS10.5XS: Trykk⑪2 sekunder.
√ Et lydsignal lyder.
√ Feilen har blitt nullstilt.
RM10.5S, RMS10.5S, RMS10.5XS
RM10.5S, RMS10.5S, RMS10.5XS
RM10.5S, RMS10.5S, RMS10.5XS
RM10.5S, RMS10.5S, RMS10.5XS
RM10.5S, RMS10.5S, RMS10.5XS
RM10.5S, RMS10.5S, RMS10.5XS
RM10.5S, RMS10.5S, RMS10.5XS
RM10.5S, RMS10.5S, RMS10.5XS
RM10.5S, RMS10.5S, RMS10.5XS
RM10.5S, RMS10.5S, RMS10.5XS
RM10.5S, RMS10.5S, RMS10.5XS
RM10.5S, RMS10.5S, RMS10.5XS
6.17 Valikulised patareipakid
RM10.5S, RMS10.5S, RMS10.5XS
RM10.5S, RMS10.5S, RMS10.5XS
RM10.5S, RMS10.5S, RMS10.5XS
dometic.com/sales-offices