
Glee - Stroller CHICCO - Free user manual and instructions
Find the device manual for free Glee CHICCO in PDF.

| Product type | Baby lounger (rocking cradle) |
| Brand | Chicco |
| Model | Glee |
| Recommended age of use | From birth to 9 kg (approx. 6 months) |
| Power supply | 4 AA 1.5V batteries or USB cable (5-6V, adapter not included) |
| Main functions | Motorized lateral sliding, music console, timer (10 or 30 minutes) |
| Restraint system | Adjustable 5-point harness |
| Backrest adjustment | Multiple recline positions via button |
| Folding | Yes, for transport and storage |
| Removable cover | Yes, removable cover for washing |
| Cover care | Hand wash cold, do not bleach, do not tumble dry, do not iron, hang to dry |
| Cleaning plastic and metal parts | Damp cloth, dry metal to prevent rust, no solvents or abrasives |
| Safety of use | Adult supervision required, always use harness, do not use on elevated surfaces |
| Accessories and spare parts | Use only those approved by the manufacturer |
| Warranty | Against conformity defects according to national conditions, excludes improper use or normal wear |
| Compliance | Directive 2012/19/EU (WEEE), adapter compliant with EN 61558-2-7 or EN 61558-2-16 |
Frequently Asked Questions - Glee CHICCO
User questions about Glee CHICCO
0 question about this device. Answer the ones you know or ask your own.
Ask a new question about this device
Download the instructions for your Stroller in PDF format for free! Find your manual Glee - CHICCO and take your electronic device back in hand. On this page are published all the documents necessary for the use of your device. Glee by CHICCO.
USER MANUAL Glee CHICCO
natural_image
Line drawing of a mobile phone seat with visible mechanical components and a handle (no text or symbols)


natural_image
Illustration of a coiled cable with connectors and a red circular label containing the letter 'K' (no text or symbols on the cable itself)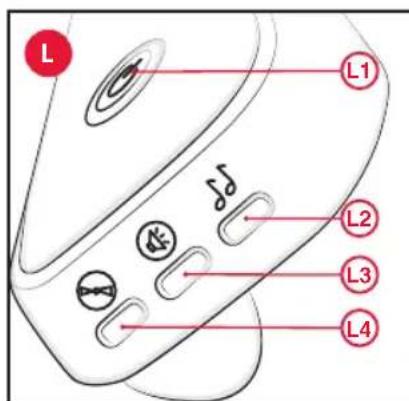
natural_image
Diagram of a mechanical device with two arms and a central hub, showing directional arrows (no text or symbols)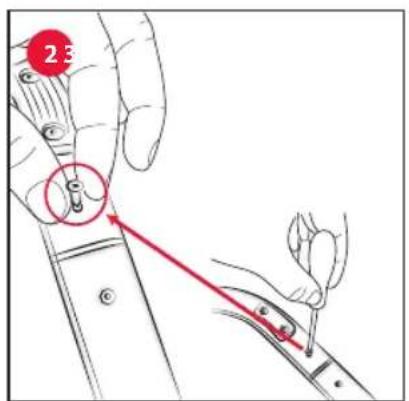
natural_image
Diagram of a mechanical device with a red circular indicator and curved arrow, no text or symbols present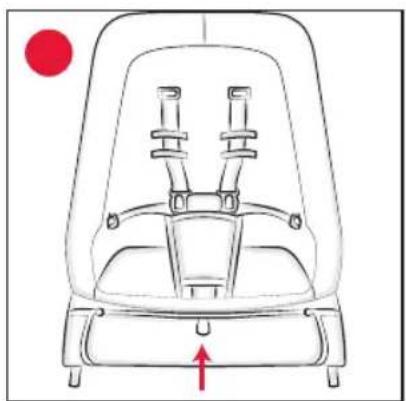
natural_image
Line drawing of a car seat with two seats and a red circular indicator (no text or symbols)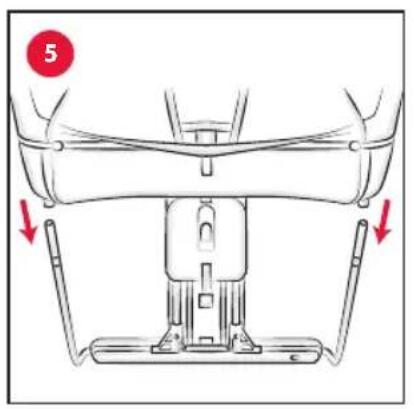
natural_image
Diagram of a car seatbelt with red arrows indicating downward movement (no text or symbols)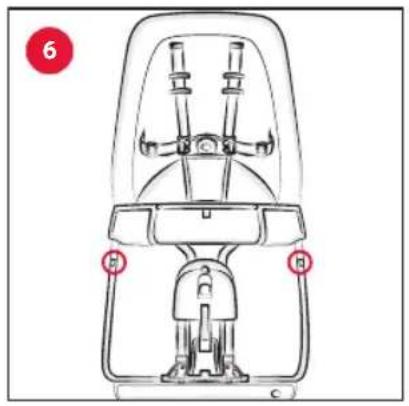
natural_image
Line drawing of a device with a handle and control panel, no text or symbols present
natural_image
Line drawing of a bicycle steering wheel with a red circular indicator (11) and rotation arrow, no text or symbols present.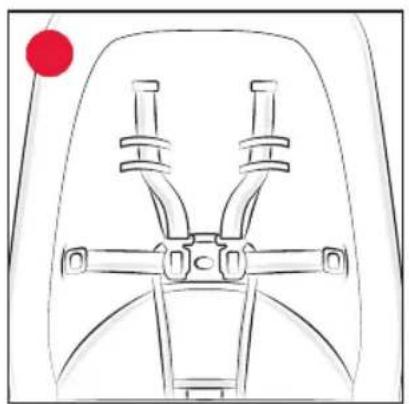
natural_image
Diagram of a car seatbelt with two vertical bars and a red dot on the side (no text or symbols)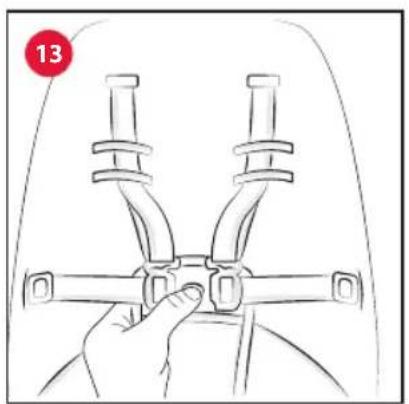
natural_image
Illustration of a hand adjusting a car seatbelt with two metal brackets (no text or symbols)
natural_image
Diagram of a bicycle seatbelt mechanism with red arrows indicating movement or force direction (no text or symbols)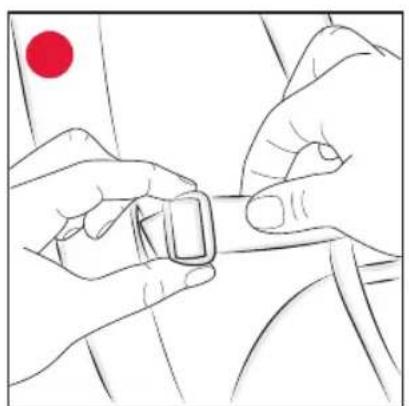
natural_image
Line drawing of two hands adjusting a small rectangular object, with a red circular marker in the top-left corner (no text or symbols)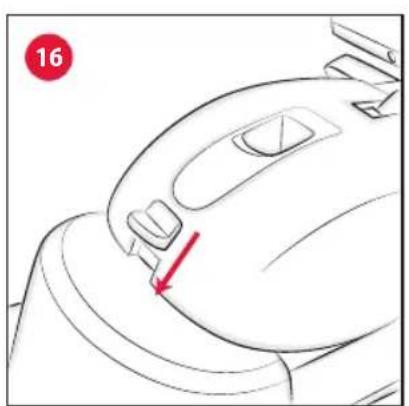
natural_image
Line drawing of a hand holding a device with a red arrow pointing to the handle (no text or symbols)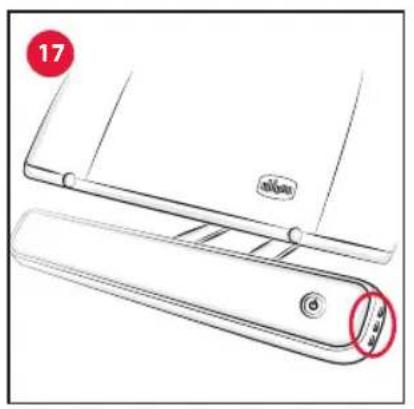
natural_image
Diagram of a computer mouse with red arrows indicating motion or force direction (no text or symbols)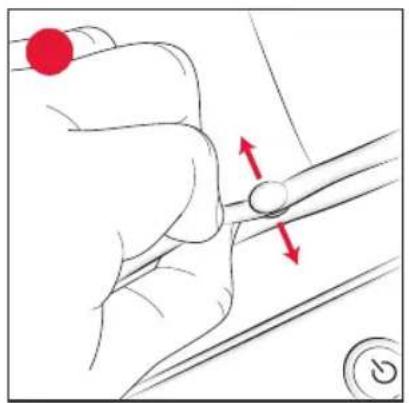
natural_image
Hand holding a tool with red arrows indicating movement or force direction (no text or symbols)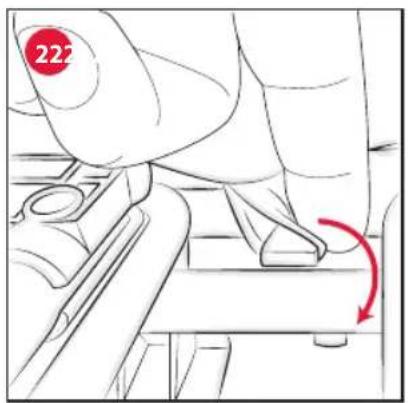

natural_image
Line drawing of a hand holding a tool near a mechanical component (no text or symbols)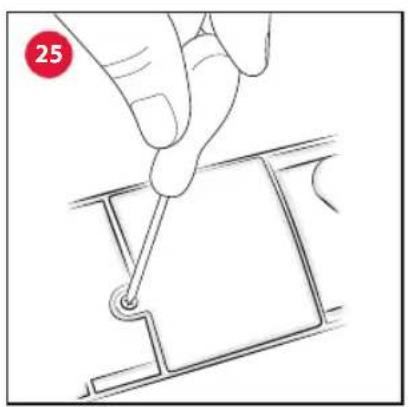
natural_image
Hand holding a screwdriver to cut a component (no text or symbols visible)IT ISTRUZIONI D'USO
RHYTHM'N'SOUND is a reclined cradle that can be used from birth to when your child starts to sit up unaided (about 5/6 months, max. 9 kg).
IMPORTANT! KEEP FOR FUTURE REFERENCE.
WARNING: BEFORE USE, REMOVE AND DISPOSE OF ALL PLASTIC BAGS AND PACKAGING MATERIALS AND KEEP THEM OUT OF REACH OF CHILDREN.
WARNINGS
- WARNING: Age range intended for use: from birth to 9 kg (6 months).
- WARNING: Never leave the child unattended.
- WARNING: Do not use the reclined cradle once your child can sit unaided, roll over or stand up pushing on their hands, knees and feet.
- WARNING: This reclined cradle is not intended to be used for prolonged periods of sleeping.
- WARNING: It is dangerous to use this baby bouncer on an elevated surface, e.g., a table, etc.
- WARNING: Always use the restraint systems.
• Always use the restraint system when your child is in the reclined cradle; adjust the length of the straps as necessary.
- WARNING: This reclined cradle does not replace a cot or a bed. Should your child need to sleep, then it should be placed in a suitable cot or bed.
- WARNING: Do not use the reclined cradle if any components are broken or missing.
- WARNING: Do not use accessories or replacement parts other than those approved by the manufacturer.
- WARNING: This product must only be assembled by an adult.
- The product and all of its components must always be assembled by an adult.
- Do not use the reclined cradle with more than one child at time.
- Never leave the reclined cradle on surfaces that are not perfectly horizontal.
• Always supervise children playing near the reclined cradle and the USB power cable.
• To prevent fire hazards, do not leave the reclined cradle near sources of heat, electrical or gas devices etc.
• Make sure that the cover is properly secured to the structure of the chair.
- Never use it to carry your child in motor vehicles.
• Make sure that all parts are correctly hooked to the mounts.
• Periodically check for any worn parts, loose screws, worn or unstitched materials and replace any damaged parts immediately.
- Do not place the reclined cradle with your child in it near windows or walls where strings, curtains or other objects could be used by the child to climb or pose choking or strangling hazards.
• To avoid the risk of your child over-balancing and falling do not place the reclined cradle near windows
or walls.
- If the reclined cradle is left exposed to direct sunlight for an extended period of time, allow it to cool down before placing your child inside.
- Prolonged exposure to direct sunlight can cause the fabric to fade.
- Keep the product out of reach of children when it is not being used.
CARE AND MAINTENANCE
The fabric on the reclined cradle can be removed, see the chapter on "REMOVING THE FABRIC". Periodically wipe the plastic parts clean with a soft damp cloth. After possible contact with water, dry the metal parts in order to avoid the formation of rust. Do not use solvents or abrasive products.
• This product requires periodical maintenance.
- Cleaning and maintenance operations must only be carried out by an adult.
- Check that the fabric, stitching and buttons are in good condition each time you wash it.
- Please refer to the care label for instructions on washing the product:

Hand wash

Do not bleach

Do not tumble dry

Do not iron

Do not dry clean

Do not twist or wring

line drying
LIST OF COMPONENTS
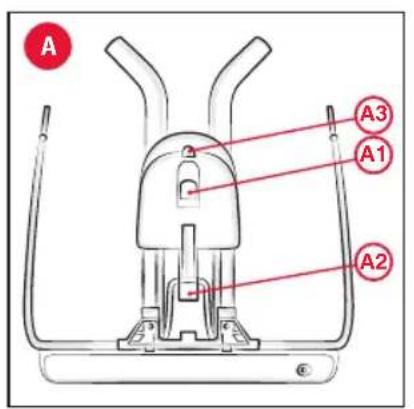
A - Base
A1 - Recline button
A2 - Close button
A3 - Button to lock/unlock side to side movement
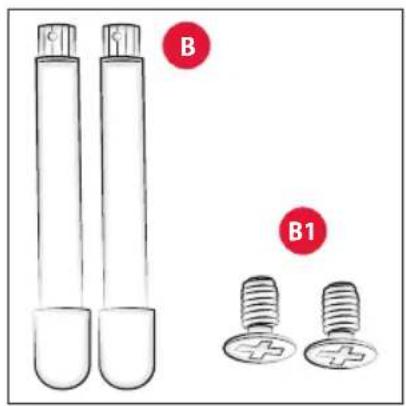
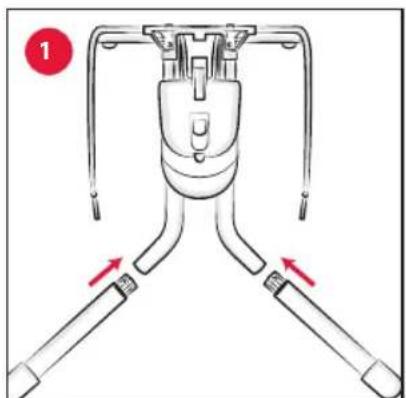
B - Feet (x2)
B1 - Screws for fastening feet (x2)
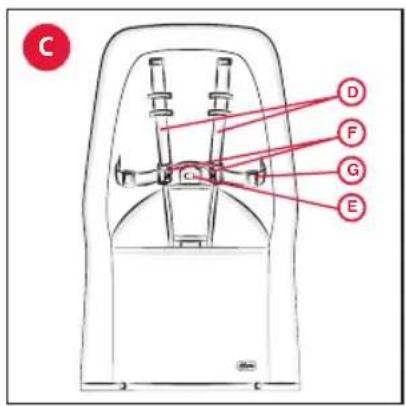
C - Seat fabric with backrest frame
D - Safety harness
E - Buckle
F - Prongs
G - Ring for adjusting the safety harness
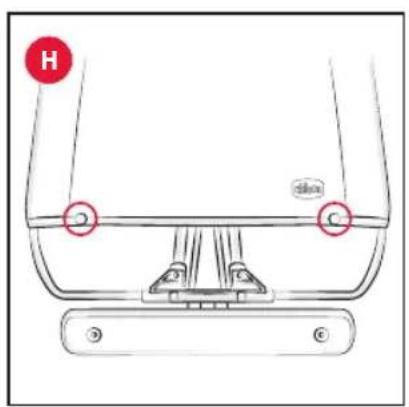
H - Snap buttons
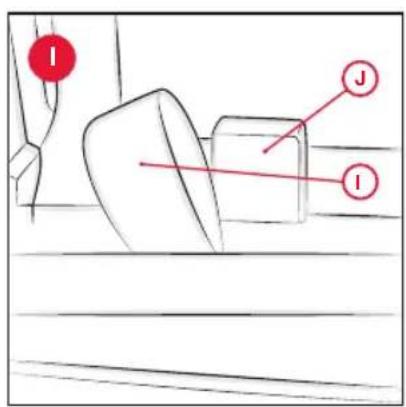
I - Seat fabric buttonhole
J - Hook tab for fabric buttonhole
K - USB power cable
L - Control panel for side to side movement / music
L1 - On/off button for side to side movement
L2 - On/off button for music
L3 - Button for adjusting volume and changing tunes
L4 - Timer button
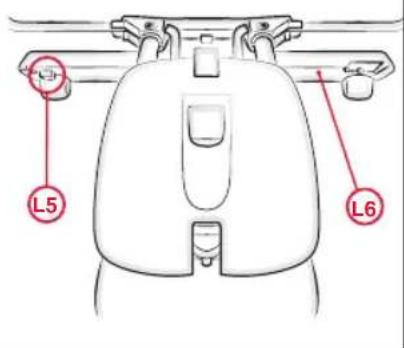
L5 - Power supply connector
L6 - Battery compartment cover
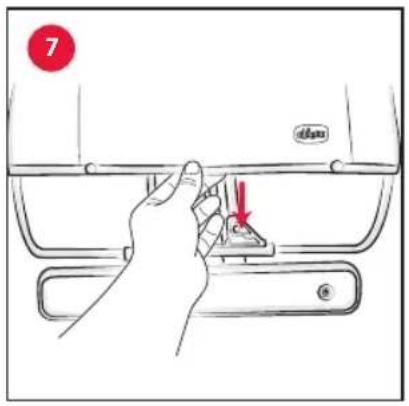
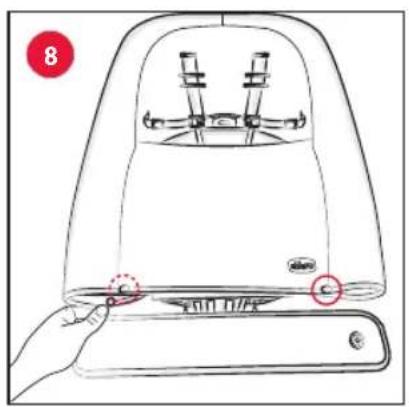
FIRST ASSEMBLY OF THE RECLINED CRADLE
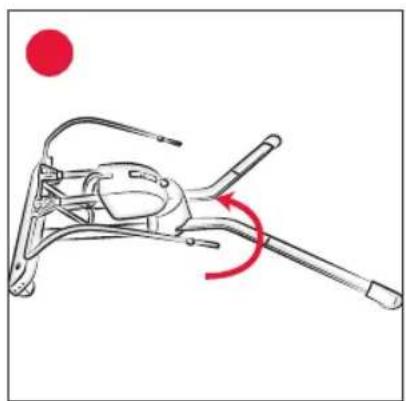
- Insert the feet "B" in the base "A" (Fig. 1), tighten the screws "B1" in their holes (Fig. 2) and open the base "A" of the reclined cradle by pulling up on the rods until you hear a click (Fig. 3).
- Lift the fabric component of the backrest frame "C" to uncover the tubes (Fig. 4), insert the two tubes in the rods located on the base "A" (Fig. 5) making sure they go all the way down (Fig. 6).
- Then, lower the fabric (Fig. 7). Wrap the fabric around the frame, fasten the 2 snap buttons "H" (Fig. 8), finish assembling the fabric by wrapping fabric buttonhole "I" around the hook tab "J" (Fig. 9).
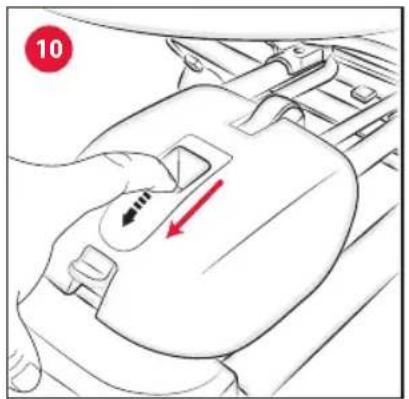
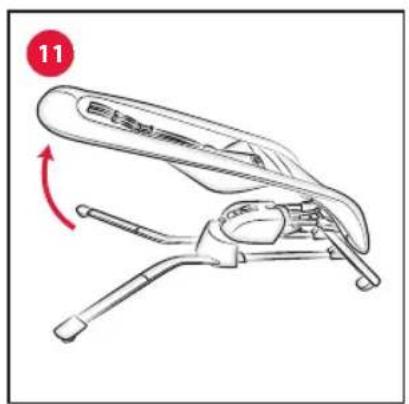
- To adjust the inclination of the backrest from a higher to a less inclined position, pull out on the recline button "A1" (Fig. 10). To switch from a less inclined position to a higher position, simply pull up on the backrest (Fig. 11). This operation may also be carried out with the child sitting in the reclined cradle. In this case it can be more difficult.
WARNING: Always guide the backrest with the fingers when adjusting the reclining.
WARNING: Always check that the backrest is properly locked before use.
USING THE SAFETY HARNESS
- The safety harness should already be fitted when it comes to using the reclined cradle for the first time. (Fig. 12). To release them, press the central button on the buckle "E" (Fig. 13) and extract the two prongs "F" (Fig. 14). The reclined cradle is ready for the child.
WARNING: When using the product, always fasten the 5-point safety harness and check that it is tight enough and properly fastened.
- To adjust the length and tension of the safety harness, keep one end of the buckle blocked while pulling on the belt and sliding it into the ring "G" (Fig. 15).
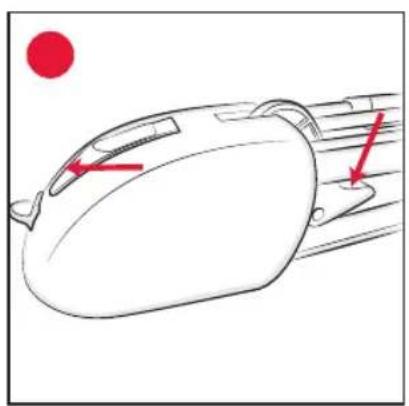
FIXED POSITION OR SIDE TO SIDE MOVEMENT
The reclined cradle is equipped with a motorised mechanism that allows it to move from side to side.
- The reclined cradle can be used in fixed or motorised side to side movement mode:
- Fixed mode: push down on the side to side movement lock button "A3" (Fig. 16);
- Side to side movement function: release the side to side lock button "A3" by pulling up and use the side to side movement on/off button "L1" to activate the movement. The side to side movement function can be set to either of 2 different modes using the timer button "L4", activating the function for a maximum of 30 minutes ("L1" power light fixed) or 10 minutes ("L1" power light blinking).
SOUND PANEL
The reclined cradle includes a MUSIC PANEL that can be activated using the buttons located on the side (Fig. 17).
-
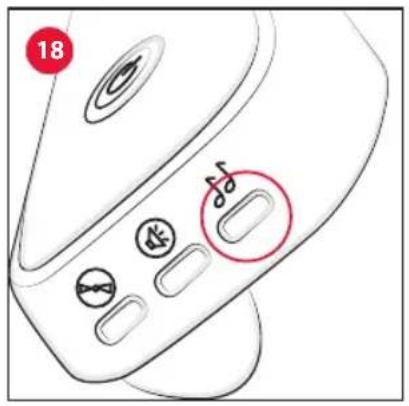
To play music simply press the music on button "L2" (Fig. 18)
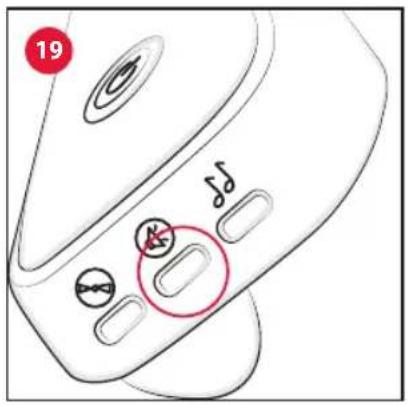
-
To switch between tunes press the "L3" button once (Fig.
19) until you reach the desired tune.
- To adjust the volume press and hold the "L3" button (Fig. 19).
When the timer is active (power button light "L1" blinking), both the music and the side to side movement will stop after 10 minutes. Parents can reactivate the side to side movement ONLY by simply touching the backrest.
CLOSURE
- The reclined cradle can be closed for transport or storage.
WARNING: The reclined cradle must never be closed with a child sitting in it. Remove the child from the reclined cradle before closing the frame!
- To close the reclined cradle you will need to follow the two steps simultaneously (Fig. 20): To close the reclined cradle you will need to act on 2 buttons simultaneously (Fig. 20):
- Move the incline button "A1" outwards
- Lower the closure button "A2"
- To open the reclined cradle again, just pull the seat upward (Fig. 11) until you hear a click, which indicates that the cradle has been opened completely and correctly.
REMOVING THE COVER
The fabric of the reclined cradle can be removed and washed.
Follow these steps to complete the operation:
-
Release the 2 snap buttons "H" located on the side under the metal tube (Fig. 21), free the fabric buttonhole of the seat "I" from the hook tab "J" (Fig. 22).
-
Tug lightly on the fabric to pull it upwards; free the shoulder straps and the waist belts from the button-holes on the fabric; carefully and completely remove the fabric from the frame of the backrest.
-
To reposition the fabric on the frame of the backrest, after washing, execute these same steps in reverse order, being sure to insert the safety harnesses in the appropriate buttonholes. Be sure to execute the operation described in Point 3 of the manual.
The harnesses and shoulder straps may need to be adjusted to fit the child, see Point 6 of the manual.
WARNINGS ELECTRICAL PARTS
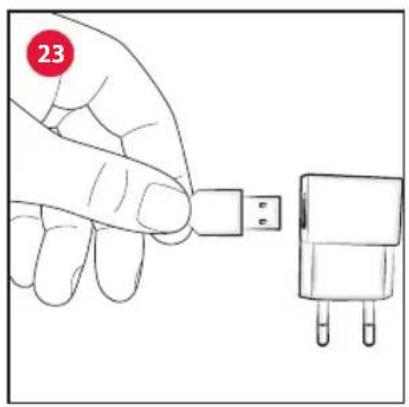
The motorised mechanism that allows the reclined cradle to move from side to side and the operation of the sound panel are powered by batteries or by the USB power cable "K".
The reclined cradle can be powered with a USB power cable using an external power supply (not included) with a range of 5 to 6 Volts (the transformer for a mobile phone charger, for example) (Fig. 23).
To operate with the USB power cable, insert the power cable jack in the power supply connector "L5" (Fig. 24).
WARNING: Transformers used with the product are to be regularly examined for damage to the cord, plug, enclosure and other parts, and in the event of such damage, they shall not be used.
WARNING: The product shall only be used with the recommended transformer.
- To replace the batteries: loosen the screw on the battery compartment cover "L6" (Fig. 25) with a screwdriver and open the cover. Next, remove the finished batteries and fit new ones, ensuring that they have been fitted with
correct polarity (as shown on the product), close the battery cover, and tighten the screw. You will need 4 AA 1.5 V batteries.
- Batteries must only be replaced by an adult.
- Only use alkaline batteries of the same type or equivalent to the type recommended for this product (4 x 1.5 V AA batteries).
• Make sure the battery polarity is correct. - Never mix new and old or different types of batteries.
• Always keep batteries and tools out of reach of children. - Do not short-circuit the power terminals.
• Always remove flat batteries from the product to prevent any possible liquid leaks from damaging it.
• Always remove the batteries if the product will not be used for a long period of time. - Remove the batteries from the control panel before disposing of the product.
- Do not throw dead batteries into a fire; they must be disposed of through waste sorting.
- If the batteries are leaking liquid, replace them immediately, making sure to clean the battery compartment; thoroughly wash your hands if they have come into contact with the liquid.
• Always dispose of leaking batteries immediately: they can cause burns or other types of injuries. - Do not try to recharge non-rechargeable batteries: they might explode.
• The use of rechargeable batteries is not advised. - Do not leave the product outside in the rain; water will damage the electronic circuit.
- WARNING: Only use power transformers that conform to EN 61558-2-7 or EN 61558-2-16.
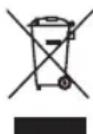
THIS PRODUCT COMPLIES WITH THE DIRECTIVE 2012/19/EU.
The crossed bin symbol on the appliance indicates that the product, at the end of its life, must be disposed of separately from domestic waste,
either by taking it to a separate waste disposal site for electric and electronic appliances or by returning it to your dealer when you buy another similar appliance. The user is responsible for taking the appliance to a special waste disposal site at the end of its life. If the unwanted appliance is collected correctly as separate waste, it can be recycled, treated and disposed of ecologically; this avoids a negative impact on both the environment and health, and contributes towards the recycling of the product's materials. For further information regarding the waste disposal services available, contact your local waste disposal agency or the shop where you bought the appliance.
WARRANTY
The product is guaranteed against any conformity defect in normal conditions of use as provided for by the instructions. The warranty shall not therefore apply in the case of damage caused by improper use, wear or accidental events. For the duration of the warranty on conformity defects please refer to the specific provisions of national laws applicable in the country of purchase, where provided

NOTICE D'UTILISATION
FÄLLA IHOP PRODUKTEN
INDSTILLING AF RYGLÆN
- ل SXBPT MSTOYI ALSOCT, A#SHT O#BT ##HCT OLE L3* (L3* (L3* (L3* (L3* (L3* (L3* (L3* (L3* (L3* (L3* (L3* (L3* (L3* (L3* (L3* (L3* (L3* (L3* (L3* (L3* (L3* (L3* (L3* (L3* (L3* (19
ARTSANA GERMANY GMBH
Borsigstrasse 1-3
28923 Alcorcon (Madrid)-Spain
902 117 093
www.CHICCO.es

ARTSANA PORTUGAL S.A.
ARTSANA POLAND Sp.zo.o.
Aquarius, Ul. Połczyńska 31 A
01-377 Warszawa
+48 22 290 59 90
www.CHICCO.com

ООО "Артсана Рус"
ARTSANA BRASIL LTDA.
Dec V. Ruben Dario 1015
Colonia Lomas De Providencia 44647
Guadalajara, Jalisco-Mexico
01800 702 8983
www.CHICCO.com.mx

ARTSANA ARGENTINA S.A.
Av. Santa Rita 2731 Piso 1 Of 5,
1609 Boulogne, Buenos Aires.
Argentina.
Phone: (011) 5254-3030
www.CHICCO.com.ar

ARTSANA INDIA PRIVATE LIMITED,
7Th Floor, Tower B, Paras Twin Towers,
Golf Course Road, Sector 54
Gurgaon - 122002 - Haryana, India
(+91)(124)(4964500)
www.CHICCO.in

ARTSANA S.p.A.
22070 Grandate (CO) - Italy
Tel. (+39) 031 382 111
Fax (+39) 031 382 400
www.CHICCO.com
NOTE


