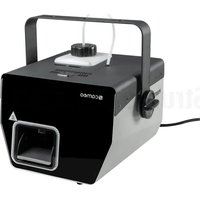
Phantom H2 - Effect machine Cameo - Free user manual and instructions
Find the device manual for free Phantom H2 Cameo in PDF.


| Product type | Compact evaporative fog machine |
| Brand | Cameo |
| Model | Phantom H2 |
| Reference | CLPHANTOMH2 |
| Dimensions (W x H x D) | 242 x 187 x 275 mm |
| Weight (without tank) | 6.8 kg |
| Operating voltage | 230 V AC / 50-60 Hz |
| Power consumption | 620 W |
| Heating element power | 600 W |
| Fuse | F5AL 250 V (5x20 mm) |
| Preheat time | Approx. 2 minutes |
| Output volume | Approx. 226 m³/min |
| Fluid consumption | Approx. 3.5 ml/min |
| Tank volume | 0.8 L |
| Control | DMX512, wired remote control |
| DMX mode | 2 channels (fog output, fan speed) |
| DMX connectors | 3-pin XLR male input, 3-pin XLR female output |
| Remote control connector | 5-pin DIN female |
| Wired remote control functions | Manual, continuous (CONT), timed (TIMER) with OUTPUT, WIND SET, INTERVAL settings |
| Display | 4-character LED display, tank illumination |
| Dark mode | Yes (disables tank illumination and backlight) |
| Operating ambient temperature | 5 °C to 40 °C |
| Relative humidity | < 85%, non-condensing |
| Housing material | Metal, two-tone black/grey |
| Included accessories | 4 rubber feet, tank, wired remote control |
| Recommended fluid | Cameo water-based fog fluid |
| Maintenance | Clean evaporator every 60 h with Cameo specific cleaning fluid |
| Manufacturer warranty | Refer to https://cdn-shop.adamhall.com/media/pdf/MANUFACTURERS-DECLARATIONS_CAMEO.pdf |
Frequently Asked Questions - Phantom H2 Cameo
User questions about Phantom H2 Cameo
0 question about this device. Answer the ones you know or ask your own.
Ask a new question about this device
Download the instructions for your Effect machine in PDF format for free! Find your manual Phantom H2 - Cameo and take your electronic device back in hand. On this page are published all the documents necessary for the use of your device. Phantom H2 by Cameo.
USER MANUAL Phantom H2 Cameo
natural_image
Black and white photo of a Cameroon Airshow (no visible text or symbols on the device body)PHANTOM H2
COMPACT HAZER
CLPHANTOMH2
CONTENTS / INHALTSVERZEICHNIS / CONTENU / CONTENIDO / TREŚĆ / CONTENUTO
ENGLISH
SAFETY INFORMATION 3
INTRODUCTION 5
CONNECTIONS, CONTROL, AND DISPLAY ELEMENTS 5
OPERATION 7
SETUP AND INSTALLATION 9
TECHNICAL SPECIFICATIONS 9
MANUFACTURER'S DECLARATIONS 10
DMX CONTROL 51
DEUTSCH
This device was developed and produced under the highest standards of quality in order to ensure smooth operation for many years. Please read these operating instructions carefully so that you can use your new Cameo Light product quickly and optimally. You can find more information on Cameo Light on our website WWW.CAMEOLIGHT.COM.
SAFETY INFORMATION
- Please read through these instructions carefully.
- Store all information and instructions in a secure location.
- Follow the instructions.
- Heed all warnings. Do not remove any safety warnings or other information from the device.
- Use the device only in the intended manner.
- Use only stable and suitable stands and/or mounts (for fixed installations). Make sure that wall mounts are properly installed and secured. Make sure that the device is securely installed and will not fall.
- During installation, heed all safety provisions that apply in your country.
- Do not install and operate the device in the vicinity of heaters, heat reservoirs, ovens, or other heat sources. Make sure that the device is installed in such a way that it is sufficiently cooled and will not overheat.
- Do not place any ignition sources, e.g. candles, on the device.
- Do not block the ventilation slits.
- The device was designed to be used only in interior spaces, do not operate the device in the direct vicinity of water (this does not apply to specialty outdoor devices - in this case, please note the special instructions given in the following). Do not bring the device into contact with combustible materials, fluids, or gases.
- Make sure that no water can drop or splash into the device. Do not place any containers filled with fluids, such as vases or drinking vessels, onto the device.
- Ensure that no objects can fall into the device.
- Operative the device using only those accessories recommended and specified by the manufacturer.
- Do not open the device, and do not modify it.
- After connecting the device, inspect all cable paths in order to avoid damage or accidents, such as those caused by tripping over said cables.
- During transport, ensure that the device will not fall and potentially cause material damage and personal harm.
- If your device no longer functions properly, fluids or objects have made their way into the device interior, or the device is otherwise damaged, switch it off immediately and remove it from the power outlet (provided the device is active).
This device is to be repaired only by authorized specialists. - Use a dry towel to clean the device.
- Follow all laws on disposal applicable in your country. Please separate plastic and paper or cardboard when disposing of the packaging.
- Plastic bags must be kept out of reach of children.
FOR DEVICES CONNECTED TO A POWER SUPPLY:
-
ATTENTION: If the device power cable is equipped with a ground pin, it must be inserted into an outlet with a grounding conductor. Never disable the grounding conductor of a power cable.
-
Do not immediately switch on the device when it has been exposed to stark temperature deviations (for example after transport). Humidity and condensation could damage the device. Switch on the device only when it has reached room temperature.
-
Before you connect the device to the outlet, first ensure that voltage and frequency of the power supply complies with the values given on the device. If the device has a voltage selector switch, connect the device to the outlet only if the device values comply with the values of the power supply. If the provided power cable or power adapter does not fit your power outlet, contact an electrician.
-
Do not step on the power cable. Make sure that live cables, in particular those at the power socket or at the power adapter and the device socket, are not bent.
-
With regard to the device cables, always make sure that the power cable or power adapter is always freely accessible. Always separate the device from the power supply when the device is not in use or when you would like to clean the device. Always unplug the power cable and power adapter from the power outlet using the plug or adapter, not the cord. Never touch the power cable and power adapter with wet hands.
-
If possible, do not switch the device on and off quickly because this may impair the service life of the device.
-
IMPORTANT INFO: Replace fuses only with fuses of the same type and value. If a fuse trips repeatedly, please contact an authorized service center.
-
In order to completely separate the device from the power supply, remove the power cable or power adapter from the outlet.
-
If your device is equipped with a Volex power cord, release the correct Volex device connector before removing the cord. However, this also means that the device may slide and fall when removing the power cord, which may cause personal harm and/or material damage. Therefore, always lay cables carefully.
-
Remove the power cable and power adapter from the outlet when there is a risk of lighting or when you no longer want to use the device.
-
The device may only be installed when it carries no voltage (separate the power plug from the power supply).
-
Dust and other debris within the device may damage it. The device should be serviced or cleaned regularly by qualified specialists depending on the environmental conditions (dust, nicotine, smoke, etc.) in order to avoid overheating.
-
The distance to combustible materials must be at least 0.5 m.
-
Power cables for powering multiple devices must have a core cross-section of at least 1.5 mm². In the EU, lines must be H05VV-F or similar. Adam Hall provides suitable cables. Using these cables, you can connect multiple devices via the Power Out connection with the Power In connection of another device. Ensure that the total power consumption of all connected devices does not exceed the specified value (printed on the device). Be sure to keep power lines as short as possible.
-
The appliance is not to be used by persons (including children) with reduced physical, sensory or mental capabilities, or lack of experience and knowledge.
- Children must be instructed not to play with the device.
- If the power cord of the device is damaged, do not use the device. The power cord must be replaced by an adequate cable or assembly from an authorized service center.

CAUTION:
To reduce the risk of electric shock, do not remove cover (or back). There are no user serviceable parts inside. Maintenance and repairs should be exclusively carried out by qualified service personnel.
The warning triangle with lightning symbol indicates dangerous uninsulated voltage inside the unit, which may cause an electrical shock.

The warning triangle with exclamation mark indicates important operating and maintenance instructions.

Warning! This symbol indicates a hot surface. Certain parts of the housing can become hot during operation. After use, wait for a cool-down period of at least 10 minutes before handling or transporting the device.

Warning! This device is designed for use below 2000 metres in altitude.

Warning! This product is not intended for use in tropical climates.

CAUTION! IMPORTANT INFORMATION ON FOG MACHINES!
- The device is specially developed for professional use in the area of event technology and is not suitable for household use!
- Use only Cameo fog fluid (water-based) and never fill the canister with combustible fluids! Risk of explosion!
- Disconnect the fog machine from the power supply before changing or filling the canister with fog fluid!
- Only use the fog machine in well-ventilated spaces!
- Never operate the fog machine unattended!
- Separate the fog machine from the power supply before setup and installation, and make sure that the fog machine has cooled completely.
- The fog output nozzle becomes very hot during use. Do not touch the output nozzle during use and keep a minimum distance of 20 inches! Before cleaning and transport, make sure that the device has cooled completely!
- The discharged fog is very hot! Never aim the output nozzle at people or animals! BURN HAZARD!
- Ensure that no people or animals are located directly below the fog machines! BURN HAZARD!
- Never aim the fog outlet nozzle at open flames or combustible materials!
- Ensure that other electrical devices and outlets are never directly exposed to the fog jet.
- Fluid may collect via condensation in front of the fog outlet nozzle during use. Caution, slipping hazard!
- Occasionally, small amounts of fog may escape during use even when not triggered, as well as a short time after switching off the fog machine.
- Never expose persons with respiratory diseases (such as allergies, asthma) to artificial fog.
- When using fog machines, ensure that visibility within the room does not sink below approx. 6.5 feet so that people can still safely orient themselves within the space.
- Empty the fluid canister before transport.
- The fog released can trigger smoke alarms.
- Keep away from children!
INTRODUCTION
COMPACT HAZER
CLPHANTOMH2
CONTROL FUNCTIONS
2-channel DMX control
Cable remote
PROPERTIES
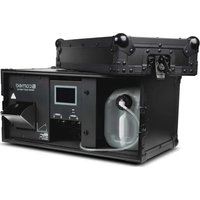
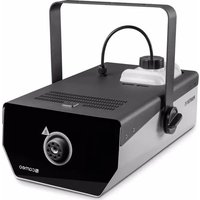
Compact haze machine for water-based haze fluid. DMX control. Cable remote included. Operating voltage 230 V AC/50–60 Hz. 620 W power consumption.
CONNECTIONS, CONTROL, AND DISPLAY ELEMENTS
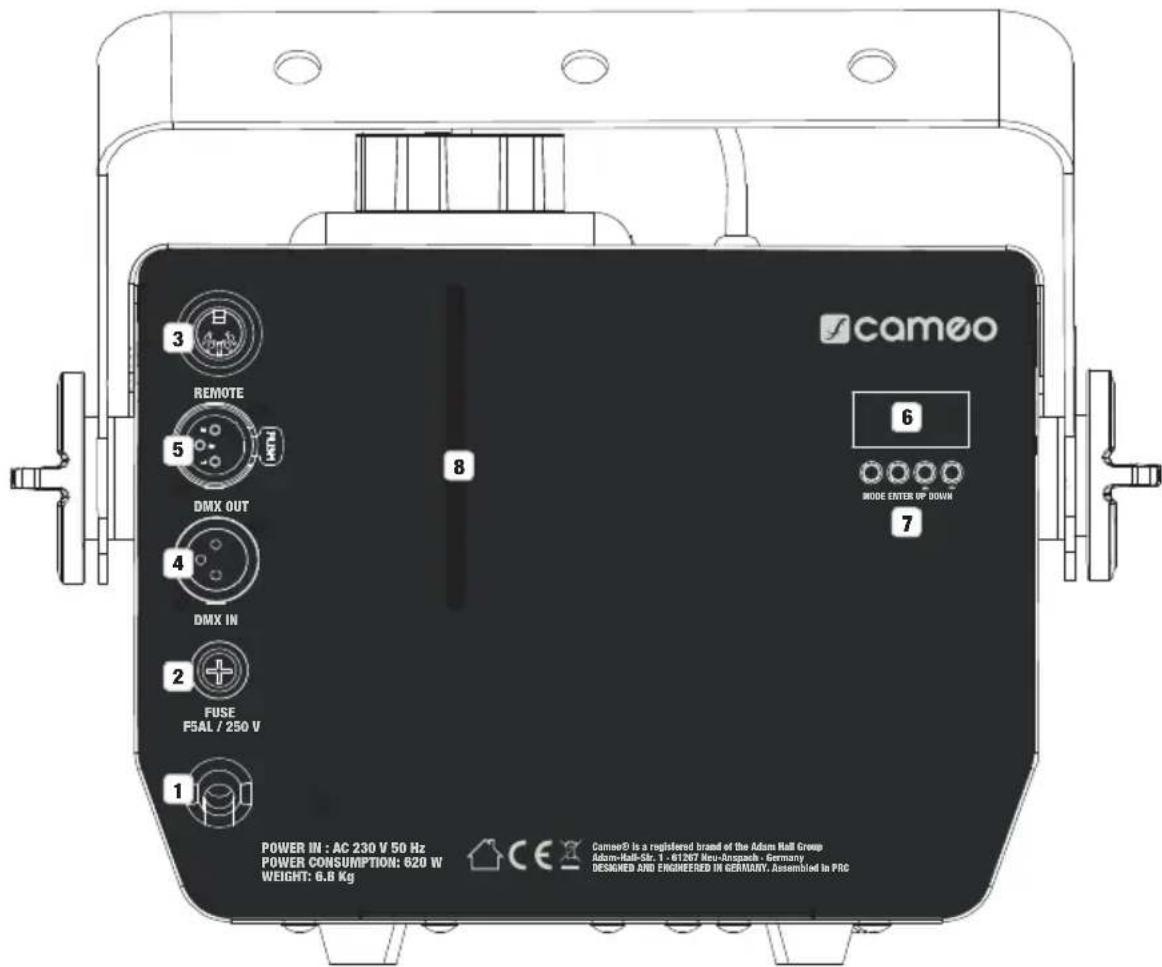
1 POWER IN
Permanently connected power cable with CEE 7/7 power plug.
2 FUSE
Fuse holder for 5 x 20 mm micro fuses. IMPORTANT NOTE: Replace the fuse only with a fuse of the same type and values (see inscription on housing). If a fuse trips repeatedly, please contact an authorized service center.
3 REMOTE
Female 5-pin DIN jack for connection of the cable remote (included).

DMX IN
Male 3-pin XLR jack for connection of a DMX controller.

DMX OUT
Female 3-pin XLR connector to transmit the DMX control signal.

LED DISPLAY
4-digit LED display for display of the DMX start address and other information.

CONTROL KEYS
MODE – press MODE to enter the Edit menu to exit the menu, press MODE again. The display will now show rEAd.
ENTER – press ENTER to go one level deeper in the editing menu and to confirm value or status changes.
UP / DOWN – use the UP and DOWN buttons to change a value, such as the DMX start address or the status of a menu item.

WINDOW
Window to monitor the canister fill level. The canister is illuminated to make fill level monitoring easier. In the heating phase, red LEDs are permanently on. Once the heating phase is over and sufficient haze fluid is available, blue LEDs light up. If insufficient haze fluid is available for operation, the red LEDs and 2 segments in the displays will begin blinking as a warning signal and the fluid pump will deactivate to protect the system. Immediately disconnect the hazer from the power supply and top up the haze fluid level. The warning signal for insufficient haze fluid will also activate even when Dark Mode is activated.
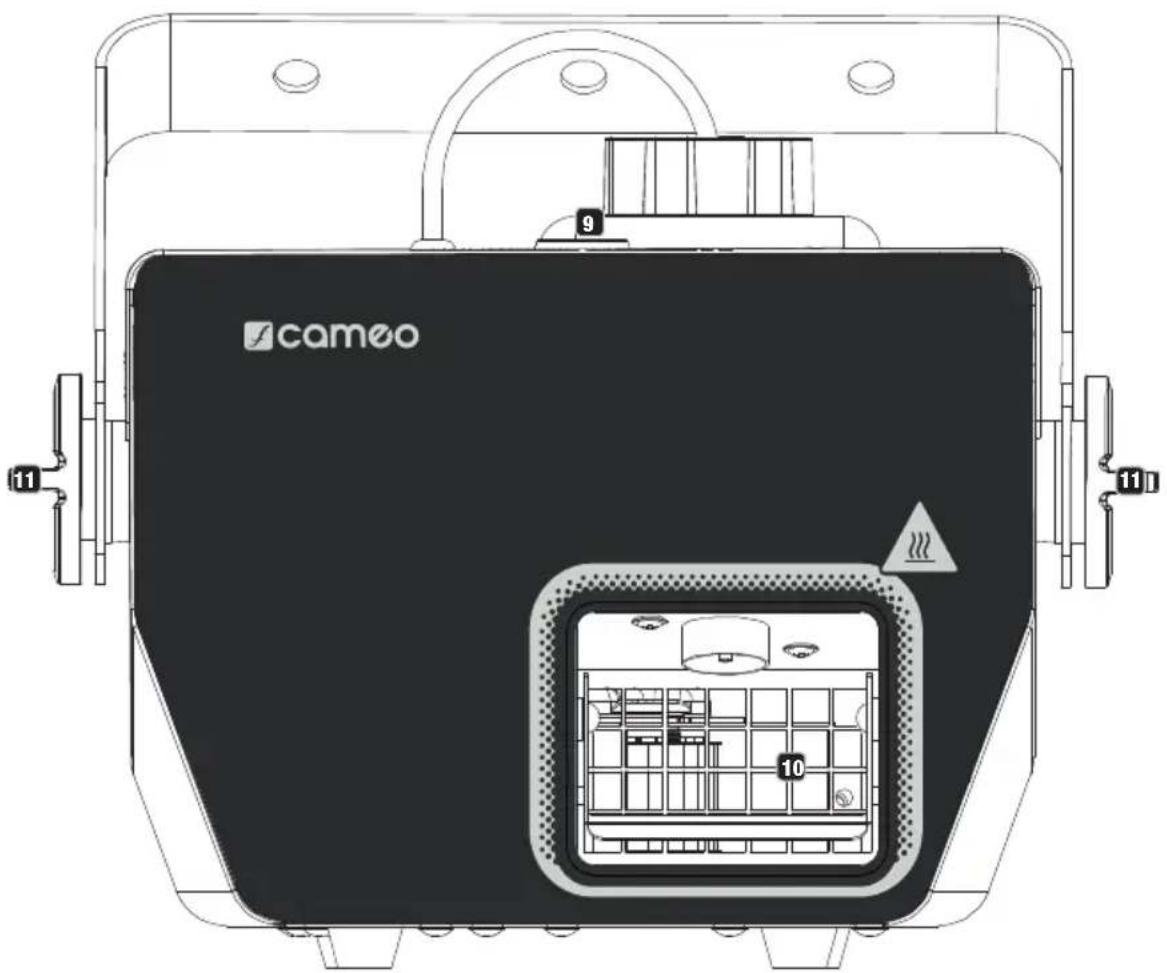
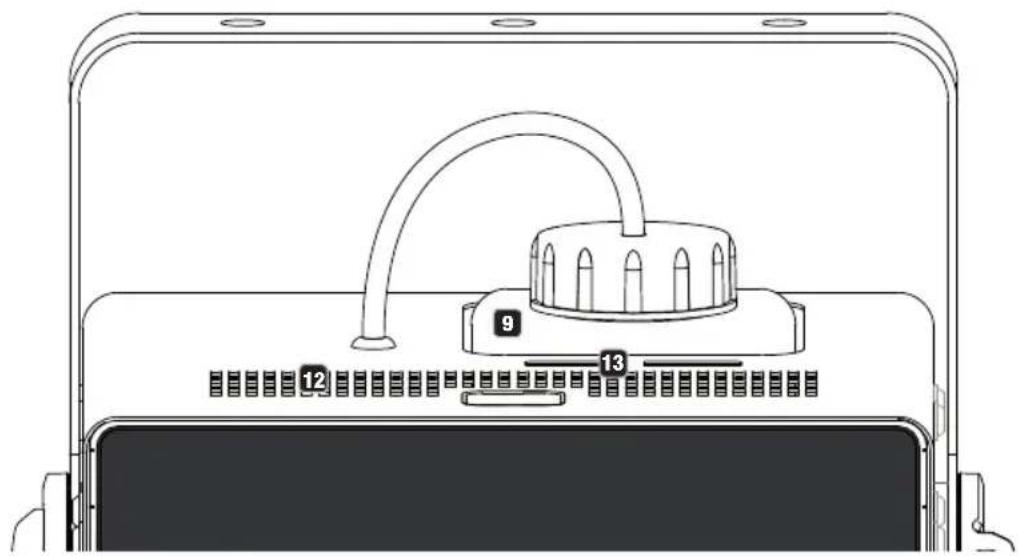
9 CANISTER
Fluid canister with screw cap and intake hose. The sinter filter on the end of the intake hose ensures that contaminant particles do not get into the system and that the hose end is always at the lowest point of the canister. Completely disconnect the fog machine from the power supply (remove the power plug) before filling the canister. Let the fog machine cool down sufficiently to prevent burn injuries. Unscrew the lid of the canister and fill it with suitable fog fluid. Make sure that no fog fluid enters the device (take canister out of the fog machine). Put the intake hose back into the canister and carefully close it with the lid. Never operate the fog machine without fog fluid.
10 HAZE OUTPUT OPENING
The haze output opening is located on the front side of the fog machine. Adjust the angle of the air guide as required. Ensure that the air intake grille on the bottom of the device is not covered and that air intake in unimpeded. Ensure that no dust, sand, etc. can be drawn in. Warning! The output nozzle is extremely hot. Do not touch! When setting up the haze machine, please refer to the points under "CAUTION! IMPORTANT INFORMATION ON FOG MACHINES!" in the safety instructions.
11 HANDLE SCREWS
Handle screws for adjustment of the mounting bracket.
12 VENTILATION SLOTS
Ventilation slots are located on the top of the device. Ensure that the ventilation slots are not covered and that air can circulate freely.
13 SECURING POINT
Securing point for attaching the device on crossbeam installations.
OPERATION
NOTES
- Remove the protective film from the front of the hazer before first use.
-
After connection to the power supply, the fog machine's heating phase will start (approx. 2 minutes). During this time, the display will show "UP" and the fog output cannot be started. After the heating phase is completed, it shows rEAd on the display.. In standalone operation, "rEAd" (ready) is displayed to signal that it is ready for operation. When operated with the cable remote, the green LED will light up on the remote control. Operation via a DMX controller has priority over both other modes of operation. Operation via the cable remote has priority over standalone operation.
-
The fluid canister has a canister illumination to make fill level monitoring easier. In the heating phase, red LEDs are permanently on. Once the heating phase is over and sufficient haze fluid is available, blue LEDs light up. If insufficient haze fluid is available for operation, the red LEDs and 2 segments in the displays will begin blinking as a warning signal and the fluid pump will deactivate to protect the system. Immediately disconnect the hazer from the power supply and top up the haze fluid level. The warning signal for insufficient haze fluid will also activate even when Dark Mode is activated.
- Do not operate the hazer without haze fluid.
In order to remove fluid residue in the vaporizer system of your fog machine and thus ensure a long service life, clean the vaporizer system regularly (approx. every 60 operating hours). To do so, use the special Cameo cleaning fluid for fog machines and follow the instructions on the bottle label.
CONFIGURING DMX MODE
Press MODE to access the editing menu and press UP or DOWN until the display shows the menu item "Addr". Confirm with ENTER and then select the desired DMX start address by using the UP or DOWN buttons (hold down for fast value change) and confirm the selection with ENTER.
ACTIVATE/DEACTIVATE DARK MODE
In some situations, the canister illumination and illuminated display can be disruptive. That's why you have the option of activating dark mode, which deactivates canister illumination and the display. Press MODE to access the editing menu and press UP or DOWN until the display shows the menu item "dArK" (Dark Mode). Confirm with ENTER and use UP or DOWN to select "on" (activate dark mode) or "off" (deactivate dark mode). Confirm your selection with ENTER. When dark mode is activated, the canister illumination will turn off immediately, the display after approx. 15 seconds. Press one of the control keys to reactivate the display. The warning signal for insufficient haze fluid will also activate even when Dark Mode is activated.
Standalone operation is only possible when neither a DMX controller nor the cable remote are connected to the device. If "Addr" is displayed on the menu display, press MODE once to display "rEAd" (ready) and to be able to access the menu for standalone operation. Confirm with ENTER. "P" (pump) is now displayed and you are able to set the haze output to a value between 1 and 100 with the UP and DOWN buttons (hold down to change values quickly). Now press MODE to switch to menu item "F" (Fan) and to set the fan speed to a value between 1 and 100 with the UP and DOWN buttons. End haze output and reduce fan speed to the minimum speed by pressing ENTER.
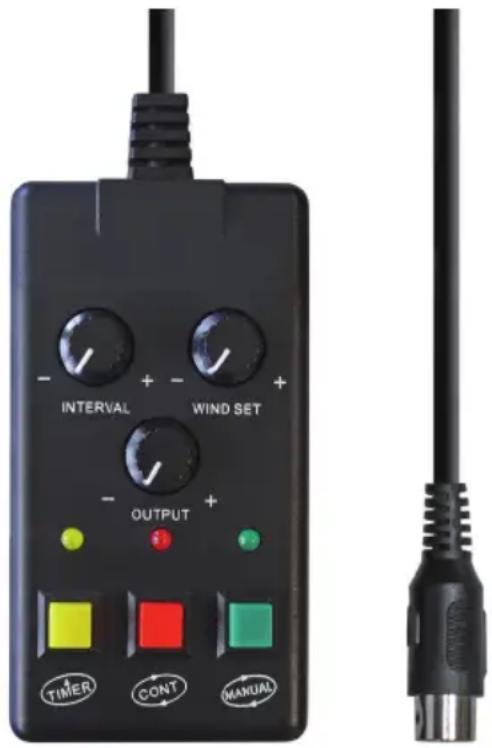
Operation by cable remote is only possible if no active DMX controller is connected to the device. After connection of the cable remote to the appropriate REMOTE jack, the display will show "con" (Controller). The green LED lights up on the remote control to signal that the heating phase is complete and that the hazer is ready for operation.
MANUAL – Press and hold the button for the duration you wish to output haze. The fluid pump will operate at maximum performance and the fan's rotation speed can be set with the WIND SET controller.
CONT – switch for continuous haze output. The volume of haze is preset with the OUTPUT controller and the fan speed with WIND SET. The red display LED is lit up when this operating mode is activated.
TIMER – switch for timed haze output. The duration of the haze output and paused haze output increases in equal amounts the further the INTERVAL controller is turned in a clockwise direction. The volume of haze is preset with the OUTPUT controller and the fan speed with WIND SET. The yellow display LED is lit up when this operating mode is activated.
This CONT continuous haze output feature has priority over the TIMER timed feature. The MANUAL control feature has priority over both other features.
SETUP AND INSTALLATION
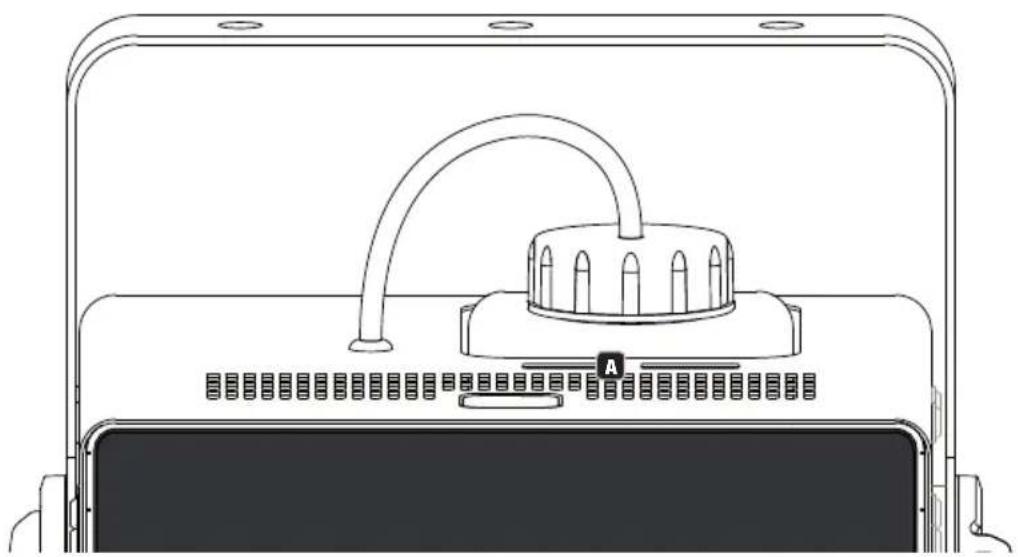
Place the fog machine in a suitable location on its preinstalled rubber feet. Install on a crossbeam using an optionally available transverse clamp that is attached to the fog machine mounting bracket. Make sure that the device is firmly attached and secure it using a suitable safety cable on the designated point (A). The maximum permitted incline of the fog machine is 30°. During setup and installation, follow the information under "CAUTION! IMPORTANT INFORMATION ON FOG MACHINES!" in the safety instructions.

Important safety information: Overhead installation requires extensive experience, including the calculation of workload limits and installed equipment, and periodic safety checks of all installation materials and devices. If you do not have these qualifications, do not attempt to carry out the installation yourself; contact a professional company.
natural_image
Technical line drawing of a device with a central connector and mounting base (no text or symbols)TECHNICAL SPECIFICATIONS
Article number: CLPHANTOMH2
| Product type: Hazer | |
| Type: Hazer per vaporization principle | |
| Heat-up time: Approx. 2 minutes | |
| Heating element power: 600 W | |
| Output volume: Approx. 226 m3/min | |
| Fluid consumption: Approx. 3,5 ml/min | |
| Canister volume: 0,8 l | |
| Controller: DMX512, cable remote with 10 m cable | |
| DMX input: 3-pin XLR, male | |
| DMX output: 3-pin XLR, female | |
| DMX mode: | 2-channel |
| DMX functions: Haze output, fan rotation speed | |
| System settings: | Dark mode on/off (display and canister illumination on/off) |
| Connection for cable remote: | 5-pin DIN, female |
| Functions for cable remote: | Timer (interval, wind set, output), continuous haze output, manual haze output |
| Cable remote display elements: | Hazer ready for operation (green LED), continuous haze output (red LED), timer (yellow LED) |
| Display elements: | 4-digit LED display |
| Power supply connection: | Permanently connected power cable with CEE 7/7 power plug |
| Operating voltage: | 230 V AC / 50–60 Hz |
| Fuse: F5AL 250 V 5x20 mm | |
| Power consumption: | 620 W |
Ambient temperature (running): 5 °C - 40 °C
Relative humidity: < 85%, non-condensing
Housing material: Metal
Housing color: Bi-color black/gray
Dimensions (W x H x D): 242 x 187 x 275 mm
Weight (without canister): 6.8 kg
Accessories (included): 4 rubber feet Canister and cable remote included
MANUFACTURER'S DECLARATIONS
MANUFACTURER'S WARRANTY & LIMITATIONS OF LIABILITY
You can find our current warranty conditions and limitations of liability at: https://cdn-shop.adamhall.com/media/pdf/MANUFACTURERS-DECLARATIONS_CAMEO.pdf. To request warranty service for a product, please contact Adam Hall GmbH, Adam-Hall-Str. 1, 61267 Neu Anspach / Email: Info@adamhall.com / +49 (0)6081 / 9419-0.

CORRECT DISPOSAL OF THIS PRODUCT
(valid in the European Union and other European countries with a differentiated waste collection system)
This symbol on the product, or on its documents indicates that the device may not be treated as household waste. This is to avoid environmental damage or personal injury due to uncontrolled waste disposal. Please dispose of this product separately from other waste and have it recycled to promote sustainable economic activity. Household users should contact either the retailer where they purchased this product, or their local government office, for details on where and how they can recycle this item in an environmentally friendly manner. Business users should contact their supplier and check the terms and conditions of the purchase contract. This product should not be mixed with other commercial waste for disposal.
FCC STATEMENT
This device complies with Part 15 of the FCC Rules. Operation is subject to the following two conditions:
(1) This device may not cause harmful interference, and
(2) This device must accept any interference received, including interference that may cause undesired operation
CE Compliance
Adam Hall GmbH states that this product meets the following guidelines (where applicable):
R&TTE (1999/5/EC) or RED (2014/53/EU) from June 2017
Low voltage directive (2014/35/EU)
EMV directive (2014/30/EU)
RoHS (2011/65/EU)
The complete declaration of conformity can be found at www.adamhall.com.
Furthermore, you may also direct your enquiry to info@adamhall.com.
DEUTSCH
9 KANISTER
BEDIENUNG
ANMERKUNGEN
natural_image
Technical line drawing of a device with a central connector and mounting base (no text or symbols)TECHNISCHE DATEN
Artikelnummer: CLPHANTOMH2
9 BIDON
MODE D'EMPLOI
REMARQUES
natural_image
Technical line drawing of a device with a central connector and mounting base (no text or symbols)CARACTÉRISTIQUES TECHNIQUES
(Valid in the European Union and other European countries with waste separation)
9 BIDÓN
FUNCIONAMIENTO
OBSERVACIONES
natural_image
Technical line drawing of a device with a central connector and mounting base (no text or symbols)DATOS TÉCNICOS
9 KANISTER
OBSŁUGA
UWAGI
natural_image
Technical line drawing of a device rear panel with internal components and mounting holes (no text or symbols)DANE TECHNICZNE
9 FUSTO
UTILIZZO
OSSERVAZIONI
natural_image
Technical line drawing of a device with a central connector and mounting base (no text or symbols)DATI TECNICI
- PHANTOM H2
- CONTENTS / INHALTSVERZEICHNIS / CONTENU / CONTENIDO / TREŚĆ / CONTENUTO
- ENGLISH
- DEUTSCH
- SAFETY INFORMATION
- FOR DEVICES CONNECTED TO A POWER SUPPLY:
- CAUTION:
- CAUTION! IMPORTANT INFORMATION ON FOG MACHINES!
- INTRODUCTION
- COMPACT HAZER
- CONTROL FUNCTIONS
- PROPERTIES
- POWER IN
- FUSE
- REMOTE
- DMX IN
- DMX OUT
- LED DISPLAY
- CONTROL KEYS
- WINDOW
- CANISTER
- HAZE OUTPUT OPENING
- HANDLE SCREWS
- VENTILATION SLOTS
- SECURING POINT
- OPERATION
- NOTES
- CONFIGURING DMX MODE
- ACTIVATE/DEACTIVATE DARK MODE
- SETUP AND INSTALLATION
- TECHNICAL SPECIFICATIONS
- MANUFACTURER'S DECLARATIONS
- MANUFACTURER'S WARRANTY & LIMITATIONS OF LIABILITY
- CORRECT DISPOSAL OF THIS PRODUCT
- FCC STATEMENT
- CE Compliance
- KANISTER
- BEDIENUNG
- ANMERKUNGEN
- TECHNISCHE DATEN
- BIDON
- MODE D'EMPLOI
- REMARQUES
- CARACTÉRISTIQUES TECHNIQUES
- BIDÓN
- FUNCIONAMIENTO
- OBSERVACIONES
- DATOS TÉCNICOS
- OBSŁUGA
- UWAGI
- DANE TECHNICZNE
- FUSTO
- UTILIZZO
- OSSERVAZIONI
- DATI TECNICI
Brand : Cameo
Model : Phantom H2
Category : Effect machine