
Futura - Air purifier OLIMPIA SPLENDID - Free user manual and instructions
Find the device manual for free Futura OLIMPIA SPLENDID in PDF.

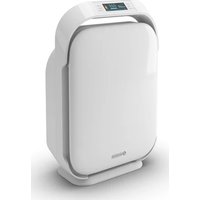
| Product type | Air purifier, fan and supplementary heater |
| Brand | Olimpia Splendid |
| Model | Futura |
| Dimensions (L x W x H) | 700 x 255 x 255 mm |
| Power supply | 220-240 V ~ 50-60 Hz |
| Rated power | 35 W (ventilation), 2000 W (heating) |
| Main functions | Ventilation (9 speeds), heating (4 speeds), purification, horizontal oscillation, timer (1-8 h), night mode, turbo mode, Wi-Fi, infrared remote control, touch screen |
| Control | Electronic via touch screen and remote control |
| Maintenance and cleaning | Clean with a dry or slightly damp cloth; vacuum the inlet/outlet grilles; replace the filter after 700 hours of operation |
| Safety | ON/OFF switch, anti-tip protection, overheat protection, automatic shut-off after 9 hours in heating mode |
| Spare parts and repairability | Replaceable air filter; repairs only by an authorized service center |
| General information | Indoor household use only; do not cover; do not use without filter |
Frequently Asked Questions - Futura OLIMPIA SPLENDID
User questions about Futura OLIMPIA SPLENDID
0 question about this device. Answer the ones you know or ask your own.
Ask a new question about this device
Download the instructions for your Air purifier in PDF format for free! Find your manual Futura - OLIMPIA SPLENDID and take your electronic device back in hand. On this page are published all the documents necessary for the use of your device. Futura by OLIMPIA SPLENDID.
USER MANUAL Futura OLIMPIA SPLENDID
natural_image
Line drawing of a portable air purifier with a central vent and side-mounted base (no text or symbols)natural_image
Technical line drawing of a mechanical component with labeled parts (no text or symbols beyond the number 8)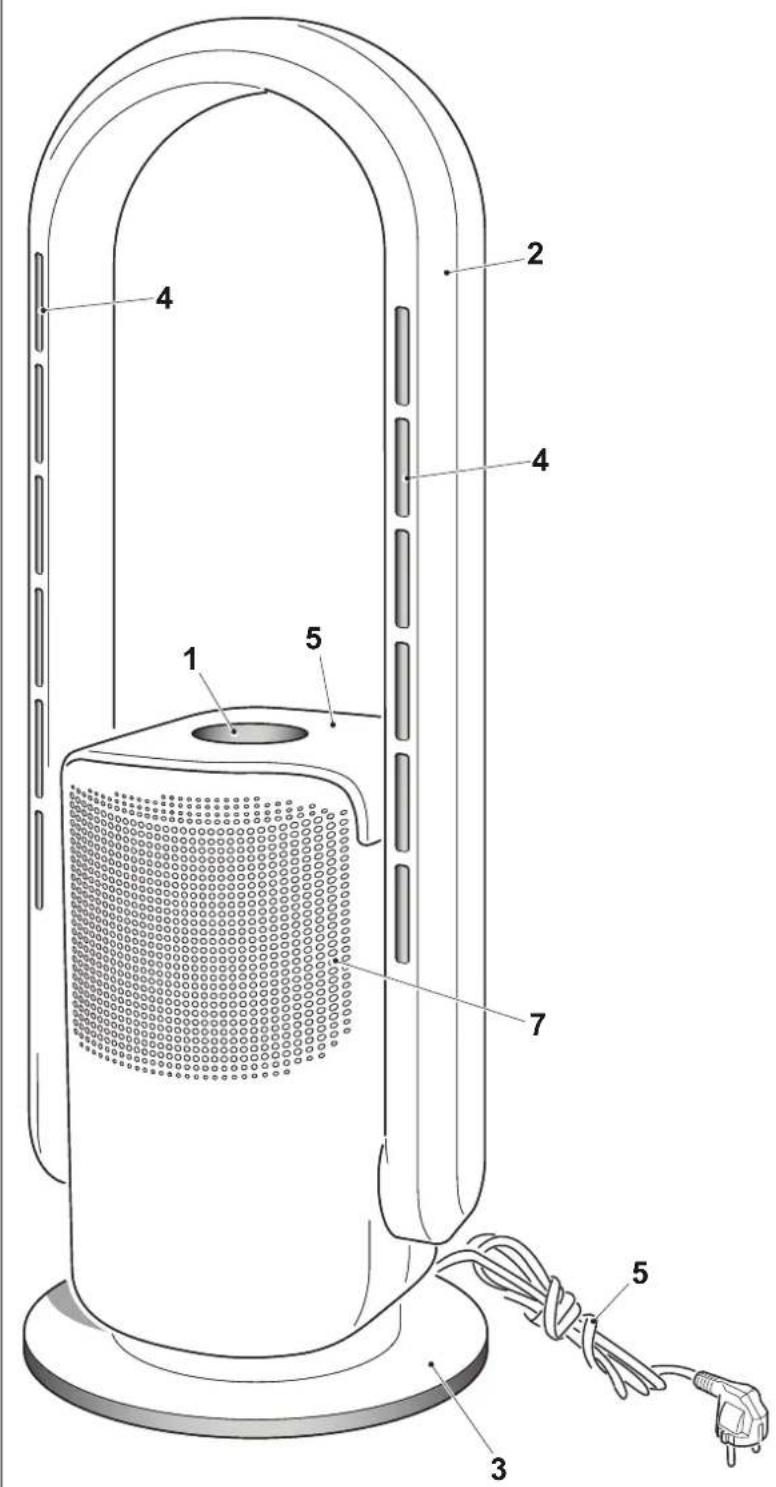
natural_image
Black remote control with multiple function buttons and a labeled button '10' (no text or symbols on the device itself)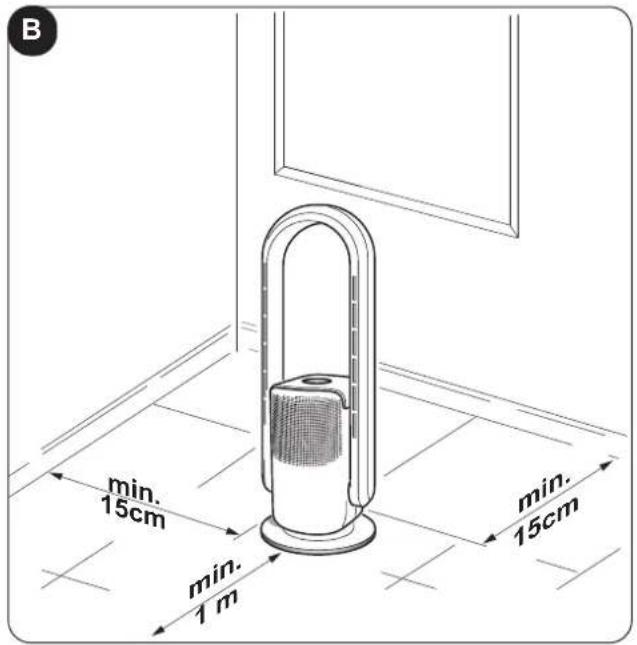
natural_image
Diagram showing two views of a window with a door and a speaker, marked with 'B1' (no text or symbols on the diagram itself)
ILLUSTRAZIONI
natural_image
Illustration of a hand using a power plug to insert an electrical socket (no text or symbols present)natural_image
Illustration of a hand using a power plug to plug an electrical outlet (no text or symbols present)IT - 9
3 - USO DELL'APPARECCHIO
natural_image
Illustration of a black remote control with hand gesture, no text or symbols visible
natural_image
Illustration of a hand using a power plug to insert an electrical outlet (no text or symbols present)4.1 - PULIZIA
SMALTIMENTO
The illustrations are grouped on the initial pages of the manual
MAIN INDEX
The main index of this manual is given on page "EN-3"
0 - WARNINGS
0.1 - GENERAL INFORMATION
First of all, we would like to thank you for choosing our appliance.
This document is confidential pursuant to the law and may not be reproduced or transferred to third parties without the explicit authorisation of the manufacturer.
The appliance may undergo updates and therefore have details different from those represented, without prejudice to the texts contained in this manual.
0.2 - SYMBOLS
The pictograms in the next chapter provide the necessary information for correct, safe use of the machine in a rapid, unmistakable way.
0.2.1 - Editorial pictograms

Service
Refers to situations in which you should inform the SERVICE department in the company:
CUSTOMER TECHNICAL SERVICE.
Index
Paragraphs marked with this symbol contain very important information and recommendations, particularly as regards safety.
Failure to comply with them may result in:
- danger of injury to the operators
- loss of the warranty
- refusal of liability by the manufacturer.

Raised hand
Refers to actions that absolutely must not be performed.
nals to the personnel that the operation described could cause electrocution if not performed according to the safety rules.

GENERIC DANGER
It informs the personnel concerned that if the operation is not carried out in compliance with the safety regulations, it presents the risk of suffering physical damage.

DANGER DUE TO HEAT
It informs the personnel concerned that if the operation is not carried out in compliance with the safety regulations, it presents the risk of burns due to contact with components at very high temperatures.

DO NOT COVER
ates to the personnel concerned, that it is prohibited to cover the appliance, to prevent over-heating.

WARNING
Indicates that this document must be read carefully before installing and/or using the appliance.
- Indicates that this document must be read carefully before any maintenance and/or cleaning operation.

ATTENTION
Indicates that there may be additional information in attached manuals.
Indicates that information is available in the user manual or in the installation manual.

ENTION
rates that the assistance personnel must handle the appliance respecting the installation manual.
EN - 2
0 - WARNINGS....1
0.1 - GENERAL INFORMATION....1
0.2 - SYMBOLS....1
0.2.1 - Editorial pictograms....1
0.3 - GENERAL WARNINGS....4
0.4 - PROPER USE 8
0.5 - HAZARDOUS ZONES 8
1 - MAIN FEATURES AND FUNCTIONING....9
1.1 - IDENTIFICATION OF MAIN PARTS 9
2 - INSTALLATION....9
2.1 - WARNINGS....9
2.2 - ELECTRICAL CONNECTION 9
3 - USE OF THE APPLIANCE....10
3.1 - AIR DUCT ADJUSTMENT 10
3.2 - CONTROL PANEL AND REMOTE CONTROL 10
3.3 - USE OF THE REMOTE CONTROL....11
3.3.a - Inserting the batteries....11
3.3.b - Replacing the batteries.... 11
3.3.c - Location of the remote control....12
3.4 - USE OF THE APPLIANCE....12
3.4.a - Preliminary operations....12
3.5 - OPERATING INSTRUCTIONS 12
3.5.a - ON/OFF key 12
3.5.b - Ventilation air speed....13
3.5.c - Ventilation air speed (heating mode)....13
3.5.d - Appliance oscillation....13
3.5.e - Mode key (only activable from remote control) 13
3.5.e.1 - Fan mode 13
3.5.e.2 - Heating mode 13
3.5.e.3 - Purifier mode 14
3.5.e.4 - Sleep mode 14
3.5.e.5 - Wi-Fi function (can only be activated from the Display) 14
3.5.f - Timer key (can only be activated from the remote control)....14
4 - MAINTENANCE AND CLEANING ....15
4.1 - CLEANING....15
4.1.a - Cleaning the appliance and the remote control....15
4.1.b - Air inlets and outlets cleaning....15
4.1.c - Filter replacement....15
5 - BEFORE STORING THE APPLIANCE AT THE END OF THE SEASON ....16
6 - TECHNICAL DATA 16
EN - 3
0.3 - GENERAL WARNINGS
WHEN USING ELECTRICAL EQUIPMENT, BASIC SAFETY PRECAUTIONS MUST ALWAYS BE FOLLOWED IN ORDER TO REDUCE RISKS OF FIRE, ELECTRIC SHOCKS AND INJURY, INCLUDING THE FOLLOWING:

- This document is restricted in use to the terms of the law and may not be copied or transferred to third parties without the express authorization of the manufacturer, OLIMPIA SPLENDID.
Our appliances are subject to change and some parts may appear different from the ones shown here, without this affecting the text of the manual in any way.

- Read this manual carefully before performing any operation (installation, maintenance, use) and follow the instructions contained in each chapter.

Keep the manual carefully for future reference.
- After removing the packaging, check that the appliance is in perfect condition. The packaging materials must not be left within reach of children as they can be dangerous.
- THE MANUFACTURER IS NOT RESPONSIBLE FOR DAMAGES TO PERSONS OR PROPERTY CAUSED BY FAILURE TO FOLLOW THE INSTRUCTIONS IN THIS MANUAL.
- The manufacturer reserves the right to make any changes it deems advisable to its models, although the essential features described in this manual remain the same.
- The appliance is equipped with a power cord with plug (Y-type connection). If the power cord is damaged, it must be replaced by the manufacturer, his technical service or a similarly qualified person in order to eliminate all possible risks.
- Ordinary maintenance of the air outlet/inlet grilles, general external cleaning can also be performed by the user, as they do not involve difficult or dangerous operations.
- At each maintenance operation, it is necessary to respect the precautions indicated in this manual and on the labels located inside or on the appliance, as well as to take all the precautions suggested by common sense and by the Safety Regulations in force in the country of installation.
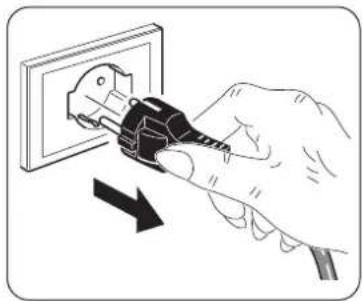
- During cleaning, remove the plug from the socket.

- In case of replacement of parts, use only original OLIMPIA SPLENDID parts.

- Do not use liquid or corrosive detergents to clean the unit, do not spray water or other liquids onto the unit, since they could damage the plastic components or even cause electric shocks.
EN - 4

- In case of functioning anomalies (for example: abnormal noise, bad smell, smoke, abnormal increase in temperature, electrical dispersions, etc.), immediately switch off the appliance and disconnect the plug from the power socket.
For repair work contact solely the technical service centres authorised by the manufacturer and ask for original spare parts to be used. Failure to do this can affect the safety of the appliance.

14.Do not disconnect the power plug during functioning.
e or electrical shocks hazard.
14a. Always unreel the cable completely during use.
- This product is suitable for indoor use only and should not be used outdoors.
15a. Do not use the appliance to dry clothes.

-
Before connecting, make sure that the plate data corresponds with the mains electrical supply. The data plate is located on the appliance.
-
DO NOT pull or disconnect the plug before turning off the appliance using the ON/OFF switch.
-
If the appliance's plug is incompatible with the socket, have the socket replaced with a suitable one by a qualified technician, who must ascertain that the section of the socket cables is compatible with the power absorbed by the appliance. We do not recommend using adaptors and/or extension cables. If they cannot be avoided, however, they must comply with current safety regulations and their ampacity (A) must not be below the maximum ampacity of the appliance.

- DO NOT use the appliance near flammable objects, explosives and heat sources. DO NOT use the appliance in places with a strong presence of dust.

19a. It is recommended not to use the appliance in the immediate vicinity of the bathtub, shower or of a pool.
- Always and only use the appliance in a vertical position.
- Do not obstruct the air inlet and outlet grids in any manner.
- Do not insert extraneous items in the air inlet and outlet grids as this will create the risk of electrical shocks, fire or damages to the appliance.
-
For correct use of the appliance NEVER:
-
Place it immediately underneath a mains wall socket.
- Pull the power cable or the appliance itself to remove the plug from the mains socket.
- Leave it expose to atmospheric agents (rain, sun, etc.).
- Leave it plugged in when not in use.
-
Touch it with wet or damp hands.
-
Use this appliance only as described in this manual. Any other use is not recommended by the manufacturer and may cause fire, electric shock or injury.
EN - 5

- Do not let the appliance work in enclosed areas such as a cabinet since it could cause a fire.

-
Do not operate the unit near flammable liquids or in explosive atmospheres.
-
Do not spray insecticide or flammable gasses near the appliance.
- Always place the appliance on a stable, plane and levelled surface.
- Leave at least 1 m of free space in front of the appliance. Do not place the device near curtains to avoid obstructing the air outlet (Fig.B-B1).
-
Do not use the appliance if it has been dropped or shows signs of damage.
-
The socket must be easily accessible so that the plug can be removed easily in an emergency. Do not place the power cable in the front of the appliance, risk of overheating or damage.
-
Do not handle the plug with wet hands.
-
Do not excessively bend, twist, pull or damage the power cord.
33a. Do not allow cord to come in contact with heated surfaces during operation.
- Do not run the cord under carpeting, throw rugs or runners etc. Arrange cord away from traffic areas so that it will not be tripped over.
34a. Do not twist, kink or wrap the cord around the appliance, as this may cause the insulation to weaken and split.
-
Unplug the cord when unit is not in use for an extended period of time and/or when no one is home.
-
Do not use the appliance outdoors or on wet surfaces. Avoid dropping liquids on the appliance. Do not use the appliance near sinks and taps.
-
Do not immerse the appliance in water or in other liquids.
-
If this product is covered or placed incorrectly, it may cause a fire hazard. DO NOT use a programmable auto switch, timer, or any other device with this product.
-
This unit shall not be exposed to dripping or splashing water.
-
This product is NOT suitable for use in hot and humid areas (kitchen, bathroom, etc).
-
The unit should not be adjusted or repaired by anyone except specialized technicians.

- To reduce the risk of fire or electric shock, do not use this product near any other electronic device.
EN - 6
- Avoid positioning the product outdoors. Do not blow air directly towards people, especially children and elderly.

-
Make sure the plug is always completely inserted in the power socket.
-
It is severely prohibited to remove or install the air filter (9) during operation of the appliance.
-
Clean the appliance with a damp cloth; do not use abrasive products or materials. See the appropriate paragraph for the filters cleaning.
-
The most common cause of overheating is dust or lint deposit in the appliance. Regularly remove these accumulations by disconnecting the appliance from the power socket and vacuuming the grids.
-
Do not use the appliance if insecticide gas has just been sprayed in the room or in the presence of burning incenses, chemical vapours or oily residues.
-
Do not use the appliance if the filter is not positioned correctly.
-
Disassembly, repair or reconversion performed by an unauthorized person could cause heavy damages and will cancel the manufacturer warranty.
-
Do not use the appliance in case of malfunctioning or faults, if the cord or plug are damaged, or if it has been dropped or damaged in any manner. Turn the appliance off, disconnect the plug from the socket and let it be checked by professionally qualified personnel.
-
Neither disassemble nor modify the appliance.
-
Repairing the appliance by yourself is extremely dangerous.
-
If you no longer wish to use this appliance, it must be made inoperative by cutting the power supply cable after removing the plug from the power socket. Hazardous parts of the appliance must be rendered harmless, especially as there is a risk of children playing with it.
-
This heater is intended for floor use only. Do not mount on ceiling or walls.

- It is forbidden to dispose of or leave in the reach of children the packaging materials which could become a source of danger.

- Children of less than 3 years should be kept away unless continuously supervised.

- Children aged from 3 years and less than 8 years shall not plug in, regulate and clean the appliance or perform user maintenance.

59.WARNING - Some parts of this product may become very hot and could cause burns. Be very careful when children or vulnerable adults are nearby.

60.WARNING: in order to avoid overheating, do not cover the heater (Fig.B1).

-
In the presence of gas leaks from other equipment, ventilate the room well before activating the appliance.
-
After removing the packing, make sure that the appliance is complete, without visible damage that could have been caused during transport. In case of doubt, do not use the appliance and contact the authorised Technical Assistance centres.
- At first use and after a long period of inactivity of the appliance, a slight noise may be heard and a slight odour may be smelled. It is a normal phenomenon which will disappear after a few minutes of operation.
- This appliance contains an UV emitter. Do not stare at the light source.
0.4 - PROPER USE
- The appliance must be used exclusively for cooling, heating or purifying the air with the sole purpose of making the environment where you stay comfortable.
- This appliance is only designed for domestic use or similar, not for commercial or industrial use.
- An improper use of the appliance with possible damages caused to people, things or animals releases OLIMPIA SPLENDID from any responsibility.
0.5 - HAZARDOUS ZONES
- The appliance must not be installed in places with inflammable gases, explosive gases or excess humidity (laundries, greenhouses, etc.), or in places with other machines that generate a strong heat source, in proximity of a sources of salt water or sulphurous water.

• DO NOT use gas, gasoline or other inflammable liquids near the appliance.
- Only use supplied components. The use of non-standard parts may cause water leaks, electric shocks, fires and injuries or damages to things.

This product must be used exclusively according to the specifications indicated in this manual. Use different to that specified, could cause serious injuries.
THE MANUFACTURER IS NOT LIABLE FOR INJURY/DAMAGE TO PERSONS/OBJECTS DERIVING FROM FAILURE TO COMPLY WITH THE REGULATIONS CONTAINED IN THIS MANUAL.
EN - 8
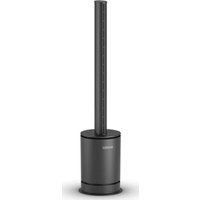
1 - MAIN FEATURES AND FUNCTIONING
• Functions: fan, heater and purifier;
• Timer function: from 1 to 8h;
• Infrared remote control;
- Touch display;
• Nine fan speed levels;
• Four levels of fan speed in heating mode;
• Horizontal oscillation of the appliance;
• Keys press acoustic warning;
- Connection via Wi-Fi.
1.1 - IDENTIFICATION OF MAIN PARTS (Fig.A)
1 - Touch display
2 - Air duct
3 - Base
4 - Air outlet
5 - Power cord
6 - Top cover
7 - Air inlet
8 - ON/OFF switch
9 - Air filter
10 - Remote control
11 - Instruction booklet
2 - INSTALLATION
2.1 - WARNINGS

A failure to respect what follows may cause damages to the appliance.
a. Install the appliance on a flat, stable surface and on the floor.
b. The appliance must only be connected to earthed power outlets.
c. Make sure that curtains or other objects do not obstruct the air suction filters.
d. The appliance must always be activated paying attention that there are no obstacles for air suction and output.
e. Do not use the appliance in places used as laundry rooms.
f. The appliance must only be installed in dry places.
g. The appliance must not be activated in the presence of dangerous materials, vapours or liquids.

natural_image
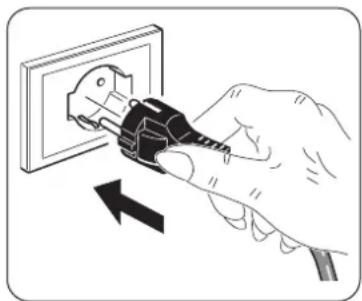
Illustration of a hand using a power plug to insert an electrical socket (no text or symbols)2.2 - ELECTRICAL CONNECTION
The appliance is equipped with a power cable with plug.
Before connecting the appliance, make sure that:
- The voltage and power frequency values match those specified on the appliance plate data, See chapter "Technical data".
- The power supply line is equipped with an effective earth connection and is correctly sized for maximum absorption of the appliance.
natural_image
Illustration of a hand inserting a plug into an electrical outlet with a lightning bolt symbol (no text or labels)EN - 9
3 - USE OF THE APPLIANCE
Some operating modes of the appliance can be selected both via the remote control and from the control panel. The reception of the selected function is confirmed by the emission of a "beep" by the buzzer. It is possible to adjust the angle of the air duct (2) to direct the air outlet.
3.1 - AIR DUCT ADJUSTMENT

Before adjusting the inclination of the air duct, make sure that the product is turned off.
Hold the body of the appliance with one hand and tilt the air duct (2) forward or backward (Fig.C).
3.2 - CONTROL PANEL AND REMOTE CONTROL
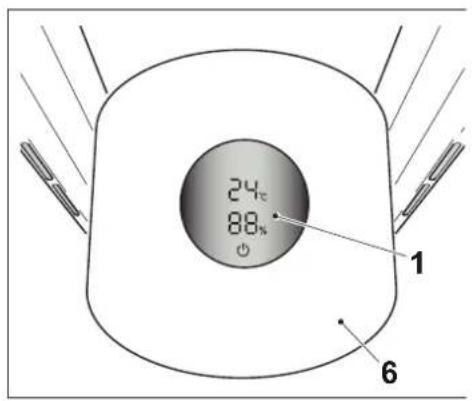
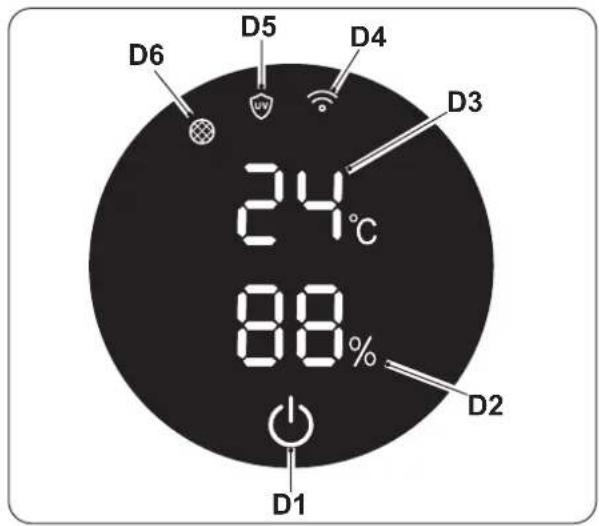
D1. ON/OFF key
D2. Display:
- % humidity
- air speed
- timer
D3. Room temperature detected (°C)
D4. Wi-Fi function active led
D5. "Purifier" mode active led
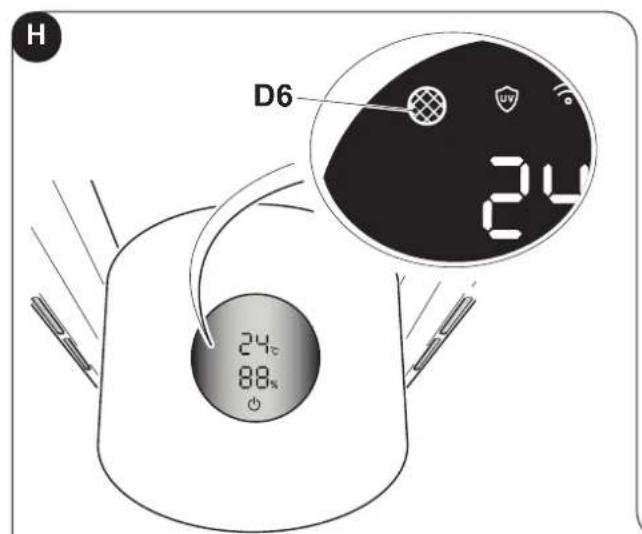
D6. "Filter to be replaced" warning led
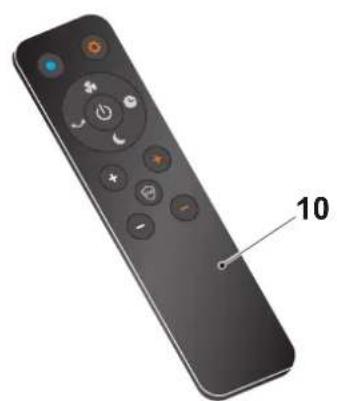
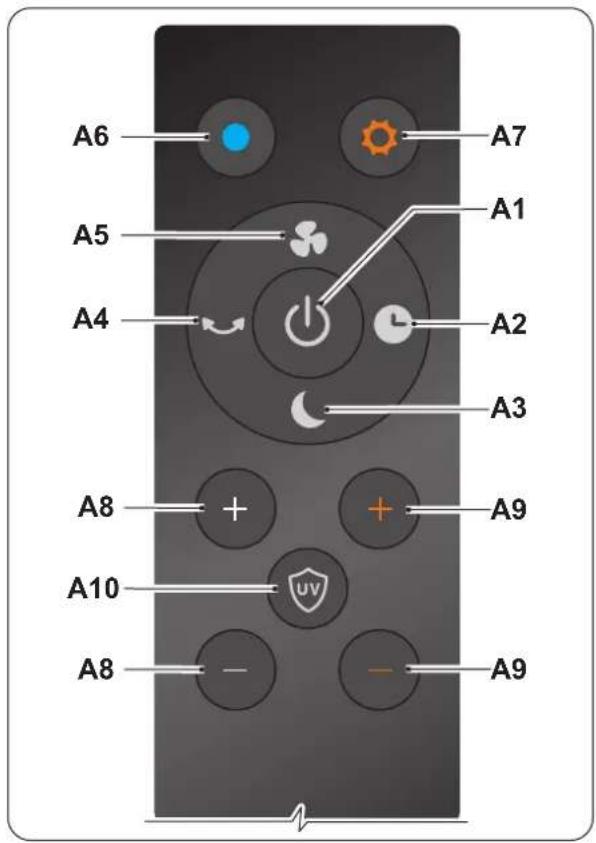
A1. ON/OFF key
A2. "Timer" key
A3. "Sleep" key
A4. "Oscillation" key
A5. "Turbo" key
A6. "Fan" key
A7. "Heater" mode ON/OFF key
A8. Air speed increase/decrease
A9. Temperature increase/decrease (only in heating mode)
A10. "Purifier" mode key
EN - 10
3.3 - USE OF THE REMOTE CONTROL
The remote control supplied with the appliance is the instrument that will allow you to use the appliance in the most comfortable way possible.
It should be handled with care and in particular:
- Keep it dry (do not clean it with water or leave it outdoors in bad weather).
- Avoid dropping or bumping it.
- Keep it out of direct sunlight.

natural_image
Illustration of a black remote control with hand gesture, no text or symbols visible
- The remote control operates by means of an infrared beam.
- Avoid obstacles between the remote control and the appliance during use.
- If other appliances in the room have remote controls (TV, stereo, etc...), there may be interference.
- Electronic and fluorescent lights may interfere with the transmissions between remote control and appliance.
- Remove the batteries in case of prolonged disuse of the remote control.
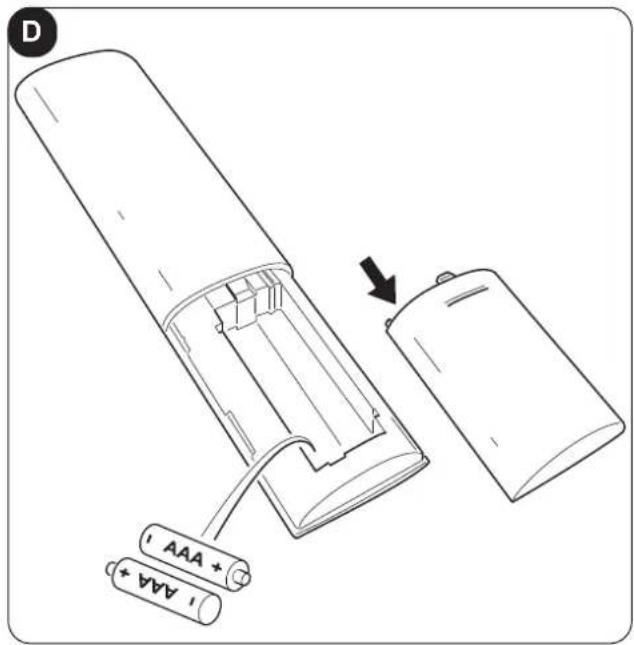
3.3.a - Inserting the batteries (Fig.D)
To insert the batteries correctly:
a. Remove the battery compartment door.
b. Insert the batteries in the appropriate compartment.

Strictly respect the polarities indicated on the bottom of the battery compartment.
3.3.b - Replacing the batteries
The batteries must be replaced if by pressing one of the keys you do not hear the "beep" of the device signal reception.

Always use new batteries.
The use of old batteries could generate malfunctioning of the remote control.

Once discharged, the batteries must be replaced and disposed of in the appropriate collection centres or as required by local regulations.
- If you do not use the remote control for a few weeks or more, remove the batteries. Leaking batteries could damage the remote control.

Do not recharge or disassemble the batteries. Do not throw the batteries into fire. They could burn or explode.

If the battery liquid falls onto the skin or clothes, wash well with clean water. Do not use the remote control with batteries that have leaked.
The chemical products contained in the batteries can cause burns or other risks to health.
EN - 11
3.3.c - Location of the remote control
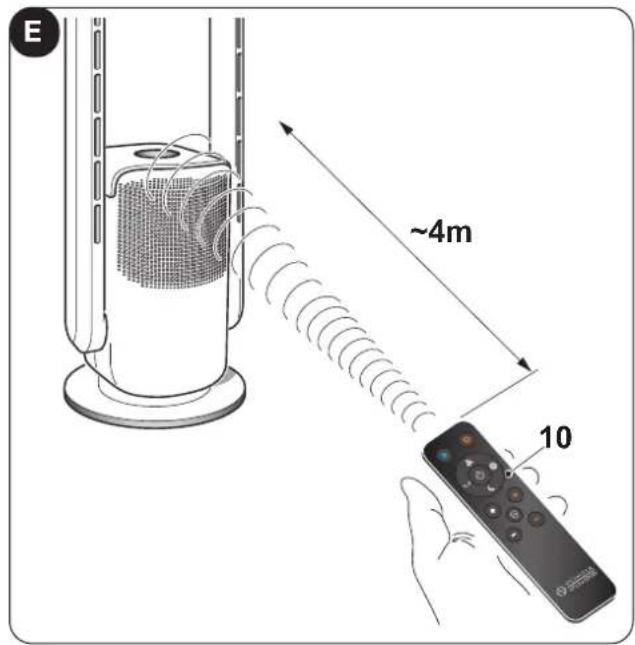
Keep the remote control (10) in a position from which the signal can reach the receiver of the appliance (maximum distance is approx. 4 metres - with charged batteries) (figure E).
The presence of obstacles (furniture, curtains, walls, etc.) between the remote control and the appliance reduces the remote control range.
3.4 - USE OF THE APPLIANCE
Work as follows in order to use the appliance.
3.4.a - Preliminary operations

- Place the appliance on a stable and not inclined base, at least 15 cm. from the wall or from any other object, in order to ensure the correct air circulation.
- Do not obstruct the air outlet/inlet ways.
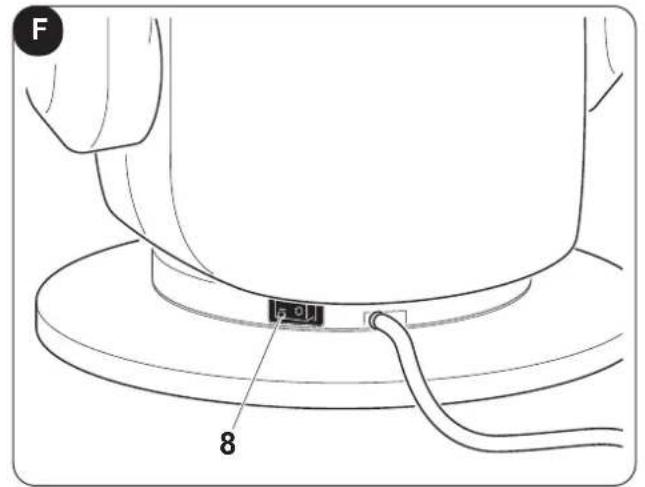
- Insert the plug into the socket, press the ON/OFF switch (8); the appliance emits a "beep" and goes into stand-by.

Before electrically connecting the appliance, make sure the plate data correspond to those of the electricity distribution network.
3.5 - OPERATING INSTRUCTIONS

Each time the keys are pressed, the appliance emits a "beep".
a. Insert the plug into the socket.
b. To turn on the appliance, press the switch (8) (a beep is heard) (Fig.F).
b. To activate the appliance, press the ON/OFF key (D1) on the display, or the ON/OFF key (A1) on the remote control.
c. To turn off the appliance, see the next paragraph.
3.5.a - ON/OFF key
Remote control
In stand-by mode (display off) by pressing any key on the remote control, the display turns on and shows the room temperature (in °C).
By pressing the ON/OFF (A1) key, the appliance turns on and the display shows the room temperature (in °C) and the speed previously set.
To turn off the appliance, press the ON/OFF key (A1) again.
Display
By pressing the ON/OFF (D1) key, the appliance turns on and the display shows the room temperature (in °C) and the speed previously set.
To turn off the appliance, hold down the ON/OFF (D1) key for a few seconds until the appliance emits the second beep.
EN - 12
After a few seconds of operation of the appliance, the display shows the percentage of detected humidity. Without pressing any key for approximately one minute, the display automatically turns off lowers its brightness.
3.5.b - Ventilation air speed

Settable speed varies from 01 (minimum) to 09 (maximum).
Remote control
Air speed can be increased or decreased by means of the keys "+" or "-" (A8).
Press the key (A5) to select “Turbo” mode, on the display appears the symbol “HH”; press the key (A5) again to deactivate the function.
Display
Air speed can be increased or decreased by pressing the key ON/OFF (D1) several times.
3.5.c - Ventilation air speed (heating mode)

Settable speed varies from 01 (minimum) to 04 (maximum).
Remote control
Air speed can be increased or decreased by means of the keys "+" or "-" (A8).
Display
Air speed can be increased or decreased by pressing the key ON/OFF (D1) several times.

In heating mode, the function "Turbo" is not available.
3.5.d - Appliance oscillation
Remote control
While the appliance is running, press the key (A4) and the appliance body starts to rotate alternatively. Press the key (A4) again, the function turns off and the appliance stops in the chosen position.
Display
While the appliance is running, press the ON/OFF key (D1) for approximately 3 seconds, the appliance body starts to rotate alternatively.
Press the ON/OFF key (D1) again for approximately 3 seconds, the function turns off and the appliance stops in the chosen position.
3.5.e - Mode key (only activable from remote control)
3.5.e.1 - Fan mode
To activate this mode, press the key (A6). The temperature shown on the display is WHITE. To change ambient temperature, increase or decrease air speed by means of the keys “+” or “-” (A8).
3.5.e.2 - Heating mode
To activate this mode, press the key (A7). The temperature shown on the display is RED. To increase or decrease temperature (min.1°C - max.30°C), use the keys "+" or "-" (A9). When set, the desired value continues to blink (approximately 10 seconds) to confirm the setting.
- In this function it is possible to decide whether to increase or decrease air speed by means of the keys “+” or “-” (A8).
- To activate this function, the temperature to be set MUST be higher than ambient temperature.
EN - 13
- When ambient temperature reaches the set temperature value, the heating function interrupts and the appliance blows a slight breeze for approximately 40 seconds, then it enters Stand-by mode.
When ambient temperature drops below the set temperature, the heating mode reactivates automatically. - Default temperature is set at 25^ .
• After 9 hours of continuous operation, the appliance automatically stops operation.

WARNING: When the appliance enters heating mode, the air duct (2) overheats. Even after switching off, the appliance may still be hot.

The appliance is equipped with an integrated protection sensor which automatically switches off the appliance if the latter is accidentally overturned or overheats excessively.
In this case:
a. switch off the appliance by means of the ON/OFF switch (8) and disconnect the power plug;
b. let the appliance cool down for 15/20 minutes;
c. restart the appliance.
If the issue persists, disconnect the plug from the power outlet and please contact the retailer or the technical assistance service.
3.5.e.3 - Purifier mode
To activate/deactivate this mode, press key (A10), the LED (D5) appears on the display.

This mode switches off automatically after 1 hour of operation.
3.5.e.4 - Sleep mode
To activate/deactivate this mode, press key (A3), the display shows the symbol "LL".
This function automatically lowers fan speed to a minimum.

This mode cannot be activated in heating mode.
3.5.e.5 - Wi-Fi function (can only be activated from the Display)
To activate this function, keep the ON/OFF key (D1) on the display pressed for a few seconds until the appliance emits the third beep and the LED (D5) starts blinking.
To deactivate this function, keep the ON/OFF key (D1) on the display pressed for a few seconds until the appliance emits the third beep.

When the appliance connects with your smartphone, the LED (D5) stops blinking and remains switched on steadily on the display.

The instructions for connection to the WiFi network and for use oft he App are available on olimpiasplendid.com in the download area.
3.5.f - Timer key (can only be activated from the remote control)
When the appliance is on, press this key and the timer changes according to this sequence:
0h (Timer off) --> 1h --> 2h --> 3h --> .. 8h --> 0h (Timer off) --> ..
The display, after a few seconds from timer setting, returns to display the percentage of detected humidity.
EN - 14
4 - MAINTENANCE AND CLEANING

Before proceeding with any maintenance and cleaning operation, always make sure that you disconnected the power plug from the socket and check that the appliance is not hot.

Do not wash nor soak the appliance in water. Prevent water from entering in contact with the internal components of the appliance. Risk of electric shocks!
natural_image
Illustration of a hand using a power plug to insert an electrical outlet (no text or symbols present)4.1 - CLEANING
4.1.a - Cleaning the appliance and the remote control
a. Use a dry cloth to clean the appliance and the remote control. b. It is possible to use a cloth moistened with cold water to clean the appliance in case it's very dirty.

Do not use a chemically treated or antistatic cloth to clean the appliance.

Do not use gasoline, solvent, polish or similar solvents. Use products could cause the breakage or deformation of the plastic surface.

Make sure the appliance is completely dry before reconnecting the plug to the power socket.
4.1.b - Air inlets and outlets cleaning
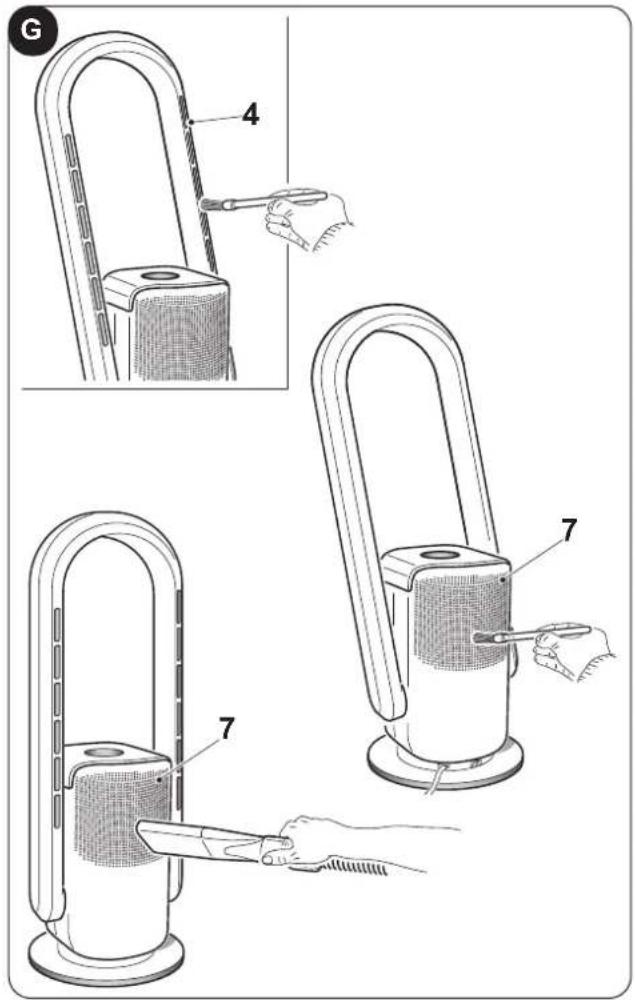
Use a soft-bristled brush or a vacuum cleaner to clean the air inlets and outlets (Fig.G).

Do not allow dust too accumulate in order to avoid malfunctions.
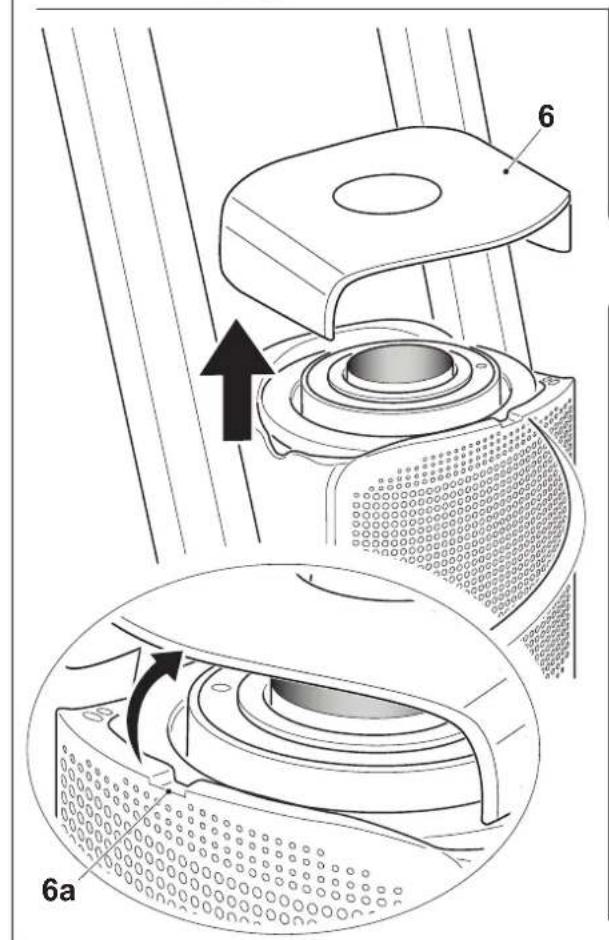
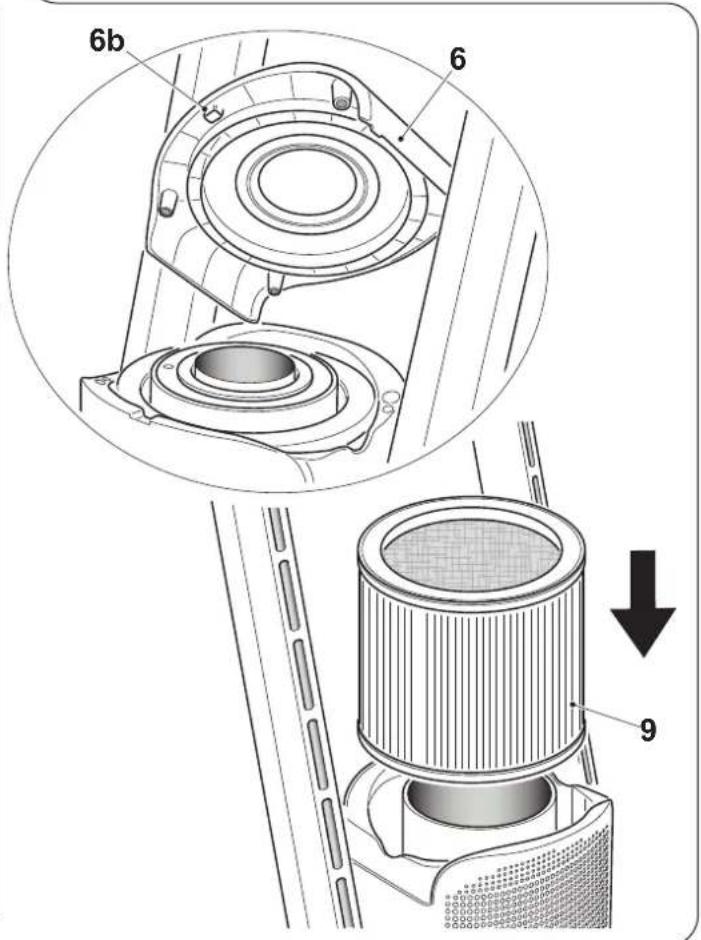
4.1.c - Filter replacement (Fig.H)
After 700 h of operation of the appliance, the LED (D6) activates on the display indicating that the filter MUST be replaced.

Do not use the appliance without filter or if the latter is damaged.

not use the appliance beyond the 700 h of operation without changing the filter.
a. Leverage by means of the recess (6a) and raise the top cover (6), removing it.
b. Raise the filter (9) and extract it.
c. Replace the filter (9) with a new one.
d. Make sure the filter is inserted correctly in its seat, then reposition the cover (6), making the lower pivot (6b) match in the respective fissure located in the rear part of the appliance.

The top cover (6) is equipped with magnets to ease closure.

After the filter is replaced, press the ON/OFF key (A1) on the remote control for approximately 5 seconds; the appliance switches off and usage time (700 h) is reset.
5 - BEFORE STORING THE APPLIANCE AT THE END OF THE SEASON
- Clean the air outlets and inlets as previously described.
- Position the appliance in its original packaging and store it in a dry and fresh environment, far from direct exposition to sunlight.
6 - TECHNICAL DATA

Please refer to the table in the last pages of the manual.

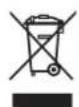
DISPOSAL
This symbol on the product or its packaging indicates that the appliance cannot be treated as normal domestic trash, but must be handed in at a collection point for recycling electric and electronic appliances.
Your contribution to the correct disposal of this product protects the environment and the health of your fellow men. Health and the environment are endangered by incorrect disposal.
Further information about the recycling of this product can be obtained from your local town hall, your refuse collection service, or in the store at which you bought the product.
This regulation is valid only in EU member states.
EN - 16
ILLUSTRATIONS
0 -MISES EN GARDE....1
0.1 - INFORMATIONS GÉNÉRALES .... 1
0.2 - SYMBOLOGIE 1
6 - DONNÉES TECHNIQUES....16
FR - 3
0.3 - MISES EN GARDE GÉNÉRALES
LORSQUE VOUS UTILISEZ DES APPAREILS ÉLECTRIQUES, IL EST TOUJOURS NÉCESSAIRE DE SUIVRE SCRUPULEUSEMENT LES CONSIGNES DE SÉCURITÉ FONDAMENTALES AFIN DE RÉDUIRE LES RISQUES D'INCENDIE ET D'ÉLECTROCHOCS ET ACCIDENTS A PERSONNES, Y COMPRIS CE QUI SUIT :

natural_image
Illustration of a hand using a power plug to insert an electrical socket (no text or symbols present)2.2 - RACCORDEMENT ELECTRIQUE
natural_image
Illustration of a hand inserting a plug into an electrical outlet with a lightning bolt symbol (no text or labels)FR - 9
3 - UTILISATION DE L'APPAREIL
natural_image
Illustration of a hand holding a black remote control with control buttons and a 'OLIMILA PRECIOUS' logo (no text or symbols on the device itself)
natural_image
Illustration of a hand using a power plug to insert an electrical outlet (no text or symbols present)4.1 - NETTOYAGE
ELIMINATION
natural_image
Illustration of a hand using a power plug to insert an electrical socket (no text or symbols present)natural_image
Illustration of a hand using a plug to insert an electrical outlet (no text or symbols)DE - 9
3 - GEBRAUCH DES GERÄTS
natural_image
Illustration of a hand holding a black remote control with control buttons and a 'OLIMILA PRECIOUS' logo (no text or symbols on the device itself)
ENTSORGUNG
natural_image
Illustration of a hand using a power plug to insert an electrical socket (no text or symbols present)natural_image
Illustration of a hand inserting a plug into an electrical outlet with a lightning bolt symbol (no text or labels)ES - 9
3 - USO DEL APARATO
natural_image
Illustration of a black remote control with hand gesture, no text or symbols present
natural_image
Illustration of a hand using a power plug to insert an electrical outlet (no text or symbols present)4.1 - LIMPIEZA
DESGUACE
| Type of heat output/room temperature control | Yes | No |
| Single stage heat output and no room temperature control | □ | ✓ |
| Two or more manual stages, no room temperature control | □ | ✓ |
| With mechanic thermostat room temperature control | □ | ✓ |
| With electronic room temperature control | ✓ | □ |
| Electronic room temperature control plus day timer | □ | ✓ |
| Electronic room temperature control plus week timer | □ | ✓ |
| Other control options | ||
| Room temperature control, with presence detection | □ | ☑ |
| Room temperature control, with open window detection | □ | ☑ |
| With distance control option | □ | ☑ |
| With adaptive start control | □ | ☑ |
| With working time limitation | ☑ | □ |
| With black bulb sensor | □ | ☑ |
X - 2

- ILLUSTRAZIONI
- - USO DELL'APPARECCHIO
- - PULIZIA
- SMALTIMENTO
- MAIN INDEX
- - WARNINGS
- - GENERAL INFORMATION
- - SYMBOLS
- - Editorial pictograms
- Service
- CUSTOMER TECHNICAL SERVICE.
- Index
- Raised hand
- GENERIC DANGER
- DANGER DUE TO HEAT
- DO NOT COVER
- WARNING
- ATTENTION
- ENTION
- - WARNINGS....1
- - MAIN FEATURES AND FUNCTIONING....9
- - INSTALLATION....9
- - USE OF THE APPLIANCE....10
- - MAINTENANCE AND CLEANING ....15
- - BEFORE STORING THE APPLIANCE AT THE END OF THE SEASON ....16
- - TECHNICAL DATA 16
- - GENERAL WARNINGS
- - PROPER USE
- - HAZARDOUS ZONES
- - MAIN FEATURES AND FUNCTIONING
- - IDENTIFICATION OF MAIN PARTS (Fig.A)
- - INSTALLATION
- - WARNINGS
- - ELECTRICAL CONNECTION
- - USE OF THE APPLIANCE
- - AIR DUCT ADJUSTMENT
- - CONTROL PANEL AND REMOTE CONTROL
- - USE OF THE REMOTE CONTROL
- 3.3.a - Inserting the batteries (Fig.D)
- 3.3.b - Replacing the batteries
- 3.3.c - Location of the remote control
- - USE OF THE APPLIANCE
- 3.4.a - Preliminary operations
- - OPERATING INSTRUCTIONS
- 3.5.a - ON/OFF key
- Remote control
- Display
- 3.5.b - Ventilation air speed
- Settable speed varies from 01 (minimum) to 09 (maximum).
- 3.5.c - Ventilation air speed (heating mode)
- Settable speed varies from 01 (minimum) to 04 (maximum).
- In heating mode, the function "Turbo" is not available.
- 3.5.d - Appliance oscillation
- 3.5.e - Mode key (only activable from remote control)
- 3.5.e.1 - Fan mode
- 3.5.e.2 - Heating mode
- 3.5.e.3 - Purifier mode
- 3.5.e.4 - Sleep mode
- 3.5.e.5 - Wi-Fi function (can only be activated from the Display)
- 3.5.f - Timer key (can only be activated from the remote control)
- - MAINTENANCE AND CLEANING
- - CLEANING
- 4.1.a - Cleaning the appliance and the remote control
- 4.1.b - Air inlets and outlets cleaning
- 4.1.c - Filter replacement (Fig.H)
- - BEFORE STORING THE APPLIANCE AT THE END OF THE SEASON
- - TECHNICAL DATA
- DISPOSAL
- ILLUSTRATIONS
- -MISES EN GARDE....1
- - DONNÉES TECHNIQUES....16
- - MISES EN GARDE GÉNÉRALES
- - RACCORDEMENT ELECTRIQUE
- - UTILISATION DE L'APPAREIL
- - NETTOYAGE
- ELIMINATION
- - GEBRAUCH DES GERÄTS
- ENTSORGUNG
- - USO DEL APARATO
- - LIMPIEZA
- DESGUACE
Brand : OLIMPIA SPLENDID
Model : Futura
Category : Air purifier