
MD330UI - Surveillance Camera AVer - Free user manual and instructions
Find the device manual for free MD330UI AVer in PDF.

| Product Type | Dual-mode medical PTZ camera (standard and portable) with infrared night vision |
| Brand | AVer |
| Model | MD330UI |
| Sensor | 1/2.8" Exmor CMOS, 8 megapixels |
| Optical Zoom | 30X |
| Digital Zoom (sensor) | 2X |
| Video Resolutions | 4K/30 (IP/UVC), 1080p/60, 1080p/59.94, 1080p/50, 1080p/30, 1080p/29.97, 1080p/25, 720p/60 |
| Field of View (diagonal) | 75.5° (wide) to 3.1° (tele) |
| Focal Length | f=4.3 mm (wide) to 129 mm (tele) |
| Aperture | f:1.6 (wide) to f:4.7 (tele) |
| Minimum Focus Distance | 0.01 m (wide), 1.2 m (tele) |
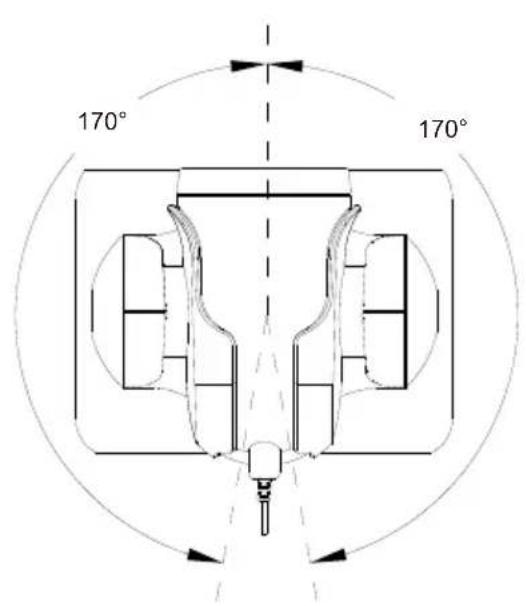
| Pan Angle | ±170° |
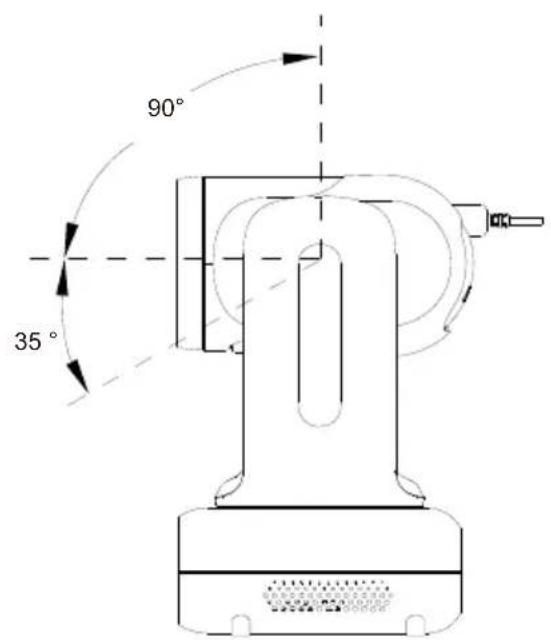
| Tilt Angle | +90° / -35° |
| Pan/Tilt Speed (manual) | 0.1° to 100°/s |
| Preset Speed | 200°/s |
| Number of Presets | 10 (remote), 256 (RS-232 / IP) |
| Control Protocols | VISCA (RS-232 / IP), PELCO-D, PELCO-P, CGI |
| Video Input/Output | HDMI, IP, USB 3.0 Type-B |
| Audio Input/Output | HDMI, IP, USB; built-in speaker, built-in microphones |
| Storage | microSD card (max. 32 GB, SDXC) |
| Network | 10/100/1000 Base-T, DHCP, Static IP, RTSP, RTMP |
| Power Supply | 12 V DC, 3 A (100-240 V AC power adapter included) |
| Power Consumption | 36 W |
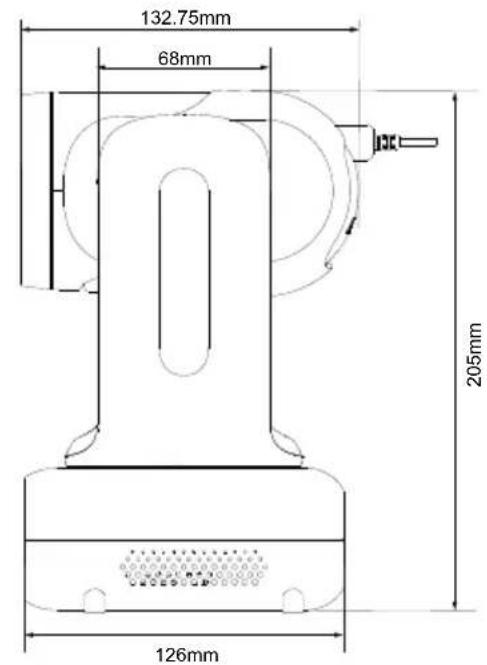
| Dimensions (W x H x D) | 168 x 205 x 126 mm |
| Net Weight | 1.95 kg |
| Usage | Indoor use only |
| Operating Temperature | 0 °C to +35 °C |
| Operating Humidity | 20% to 80% |
| Cleaning and Disinfection | 75% isopropyl alcohol on cloth; do not spray |
| Safety | Kensington security slot, grounding, IEC 60601-1-2 certification (medical grade) |
| Included Accessories | Power adapter, remote control, USB 3.0 Type-B to Type-A cable (1.5 m), USB Type-C to Type-A camera cable (180 cm), mounting screw, QR card |
| Options | RS-232 adapter (3.5 mm to D-Sub 9-pin), ceiling mount bracket |
Frequently Asked Questions - MD330UI AVer
User questions about MD330UI AVer
0 question about this device. Answer the ones you know or ask your own.
Ask a new question about this device
Download the instructions for your Surveillance Camera in PDF format for free! Find your manual MD330UI - AVer and take your electronic device back in hand. On this page are published all the documents necessary for the use of your device. MD330UI by AVer.
USER MANUAL MD330UI AVer
natural_image
Technical line drawing of a mechanical device with concentric circles and a mode dial (no text or symbols)MD330U Series PTZ Camera
— User Manual —
How to Clean and Disinfect
| WarningRisk of personal injury | Do not use cleaning agents containing phenol, as phenol may cause skin burns if not rinsed thoroughly and does not contain sufficient cleaning or disinfectant properties. |
| Caution | 1. The camera is designed for easy cleaning and disinfection.2. Before cleaning the camera, disconnect it from the power source.3. Cleaning procedures should only be carried out by personnel familiar with camera operation.4. Do not spray cleaning fluid, especially water, into any internal electrical equipment or parts of the camera to avoid possible short circuits, corrosion, malfunction and electrical shock hazards to users or service personnel.5. Corrosive cleaning agents may cause discoloration or damage the camera. Before using any cleaning agent, test it in an inconspicuous area. |
| When | Clean the camera before and after use. |
| Steps | 1. Disconnect the camera from a power source.2. Cleaning personnel must wear cleaning gloves.3. Before using cleaning alcohol, make sure it has not expired.4. Use a cleaning cloth dampened with cleaning alcohol (75%).5. Wipe any surface that may come into contact with the camera.6. After wiping the camera, avoid contact with bare hands. |
| Frequency | No regular cleaning is required. Clean before and after use. |
Precautions for Use
AVer does not accept any responsibility for accident or damage during installation if users do not follow the procedures described in this manual.
The AVer MD330U(I) Series PTZ Camera is a high definition medical grade camera designed for physicians and caregivers, and suitable for use in a hospital examination room, patient monitoring and similar medical environments. This non-contact device can be operated by physicians and caregivers without physical contact with patients, to document and update patients' injuries by taking snapshots or record videos.
To installation and operation personnel
The required information including the device's hardware parts, operations and important notice has been written and illustrated in this manual. Except for the information in this manual, no special skills, training and knowledge are required for the operators. Read the user manual thoroughly and operate the device correctly and safely. For common issues, please refer to the
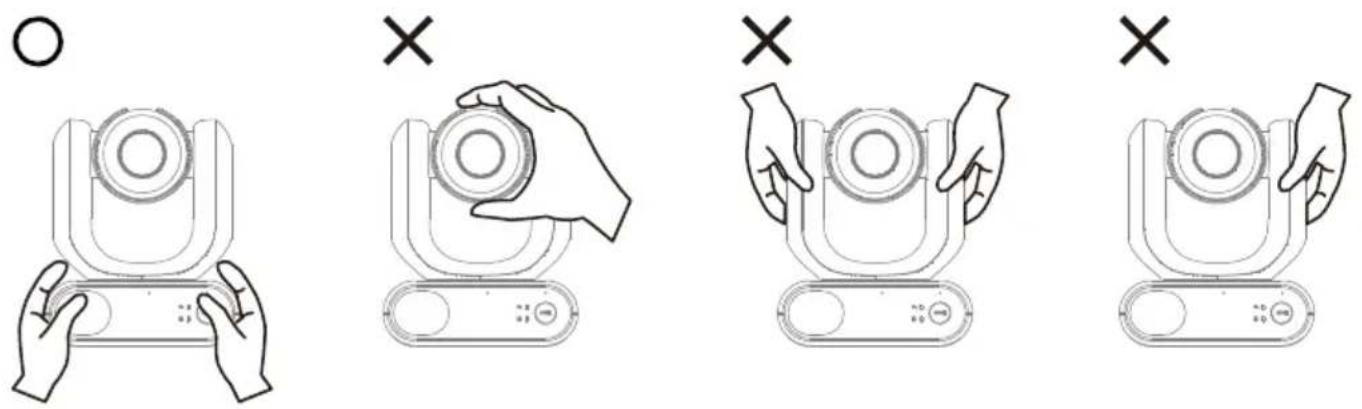
- Transportation
- Hold the bottom of the device with both hands. Do not grab the lens or the lens holder.
- When transporting, unplug the lens cable lens from the lens cable port on the bottom of the device and package the device in its original box.
natural_image
Diagram of a robotic arm with connected cable and connector, showing wiring connection (no text or symbols)- Operating conditions
This device is for indoor use only. Do not install or use the device in the following conditions to avoid malfunction or damage.
- Do not exposed to direct sunlight.
- Do not exposed to rain or water.
- Do not exposed to extreme temperatures. Recommended operating temperatures: 0°C to +35°C; humidity: 20% to 80%.
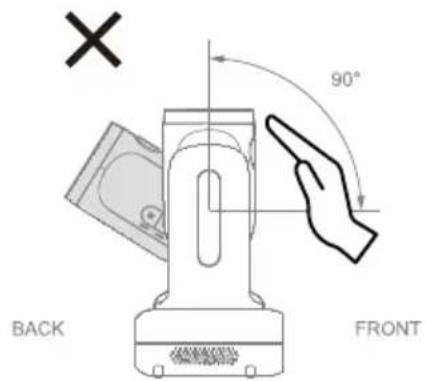
- Do not install the device sideways on a wall.
- At sea, in coastal areas or in locations where corrosive gases are emitted.
- Locations subject to strong vibrations, such as in vehicles or on carts travelling on uneven surfaces. The lens may fall off under strong vibrations.
natural_image
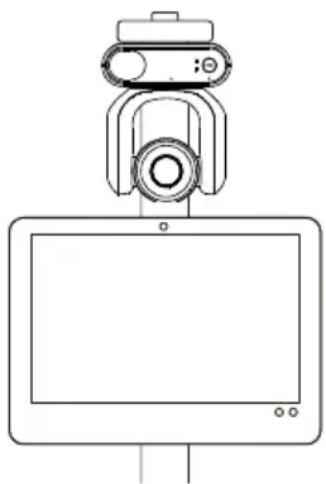
Line drawing of a device with a mounted sensor or camera (no text or symbols)● To ensure the device perform stably over a prolonged period
- Do not use this unit in a location with high temperature and humidity levels, which may cause its parts to deteriorate and shorten its service life.
- Do not subject the device to sudden changes in temperature. Keep a cooling unit or heating unit away from this unit.
- Do not leave the device with the camera facing the sun.
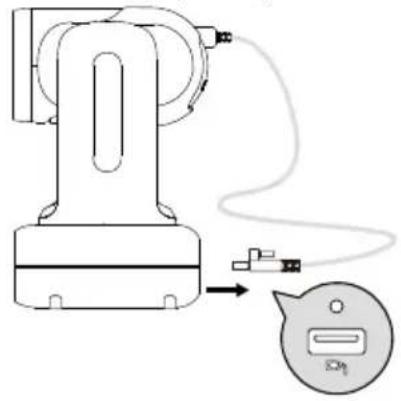
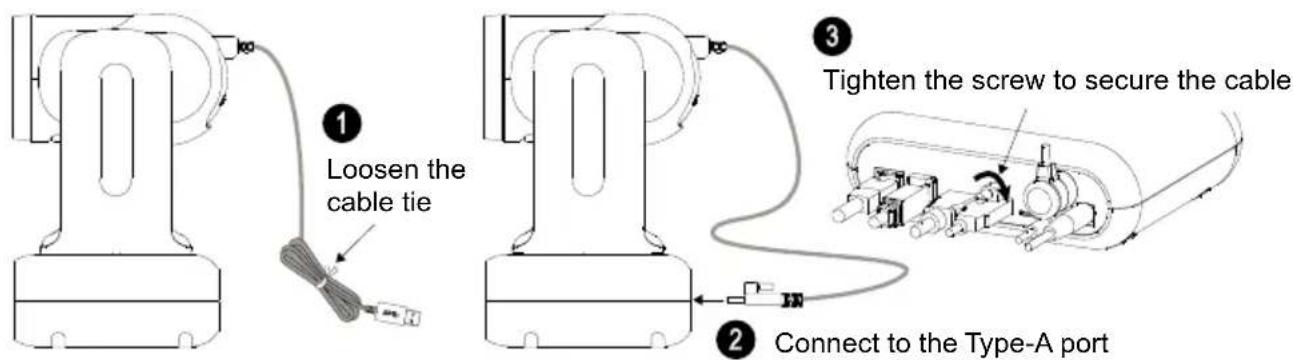
- Operation instructions
- Connect the lens cable to the lens cable port on the bottom of the device and tighten the lens cable screw to secure.

natural_image
Diagram of a robotic arm with attached cable and connector, showing wiring connection (no text or symbols)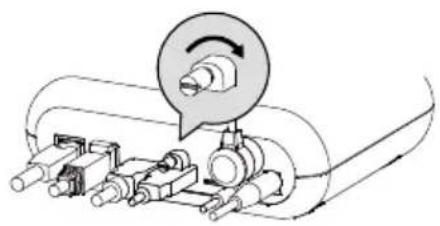
natural_image
Mechanical assembly diagram showing a rotating component with shafts and housing (no text or labels)- Do not connect the lens cable to computers, USB ports, or USB extension cables as doing so will damage the device. The lens cable is not a standard USB cable.
- Make sure the lens cable installed behind the lens is untangled before powering on the device.
- Do not detach the lens in non-Handheld Mode. Please refer to the
- When installing the lens in Handheld Mode, make sure the lens is securely inserted into the lens holder and the latch is properly locked. Please refer to the
- Use the device with care. Do not operate the device beyond its designed limits to avoid damage.
● Always use the supplied power adapter and power cord to connect the device to a power outlet
- Before installation, make sure to disconnect the device from a power outlet.
- Install the device near the power outlet to make sure the power plug can be plugged and unplugged from the power outlet easily.
- To avoid electric arc from damaging other electrical components, connect the power cord to the DC 12V power jack on the device before connecting to a power outlet.
- The length of the power cord should be less than 3 m.
- Do not place the device where the cord can be stepped on as this may fray or damage the cord or the plug.
● Powering off the device
- The device does not have a power switch. Disconnect the device from a power outlet before maintenance, cleaning or in the event of an emergency.
- Maintenance
- The device does not have a power switch. Disconnect the device from a power outlet before maintenance.
- Designate personnel to clean the device. Please refer to the
chapter. - When the device surface is stained, please refer to the
chapter. - Regular maintenance keeps your device operational and safe. Check all parts, including the detachable lens, camera unit and remote control.
● Disposal of the device
- When the device is no longer used, turn off the device and dispose of it properly.
- When disposing of the device or accessories, follow relevant regulations in your country or region and medical facility regarding environmental pollution.
Symbols on this Product
The symbols on this product, including the accessories, represent the following.
 | The WEEE symbol.This symbol indicates that this product must not be disposed of with your other household waste. Instead, you need to dispose of the waste equipment by handing it over to a designated collection point for the recycling of waste electrical and electronic equipment. For more information about where to drop off your waste equipment for recycling, please contact your household waste disposal service or the shop where you purchased the product. |
 | The CE compliance logo.This logo indicates that the product conforms to the relevant guidelines/standards for the European Union harmonization legislation. |
 | The FCC compliance logo.This logo indicates that the product conforms to Federal Communications Commission compliance standards. |
 | The UKCA (UK Conformity Assessed) symbol.This symbol indicates that a product placed on the Great Britain market meets the UKCA Marking requirements. |
 | The RCM compliance logo.This logo indicates that the product conforms with Australian RCM guidelines. |
 | This logo is intended to alert the users to the presence of un-insulated “dangerous voltage” within the product’s enclosure that may be of sufficient magnitude to constitute a risk of electric shock to persons. |
 | This logo is intended to alert the users to the presence of important operating and maintenance (servicing) instructions in the literature accompanying the appliance. |
 | The China RoHS symbol.The figure of this symbol represents the number of years during which no hazardous substances would leak or mutate under normal conditions of use. |
 | The ISO 7010-M002 symbol.Refer to instruction manual/booklet. |
| [WKDA] | The alternating current symbol.This symbol indicates that the power input/output for the product is alternating current. |
| [ZWTT] | The direct current symbol.This symbol indicates that the power input/output for the product is direct current. |
Federal Communication Commission Interference Statement
This device complies with Part 15 of the FCC Rules. Operation is subject to the following two conditions: (1) This device may not cause harmful interference, and (2) this device must accept any interference received, including interference that may cause undesired operation.
This equipment has been tested and found to comply with the limits for a Class B digital device, pursuant to Part 15 of the FCC Rules. These limits are designed to provide reasonable protection against harmful interference in a residential installation. This equipment generates, uses and can radiate radio frequency energy and, if not installed and used in accordance with the instructions, may cause harmful interference to radio communications. However, there is no guarantee that interference will not occur in a particular installation. If this equipment does cause harmful interference to radio or television reception, which can be determined by turning the equipment off and on, the user is encouraged to try to correct the interference by one of the following measures:
- Reorient or relocate the receiving antenna.
- Increase the separation between the equipment and receiver.
- Connect the equipment into an outlet on a circuit different from that to which the receiver is connected.
- Consult the dealer or an experienced radio/TV technician for help.
FCC Caution: Any changes or modifications not expressly approved by the party responsible for compliance could void the user's authority to operate this equipment.
Risk of explosion if battery is replaced by an incorrect type. Dispose of used batteries according to the instructions.
Warning
- To avoid the risk of electric shock, this equipment must only be connected to a supply mains with protective earthing.
- Do not modify this equipment without authorization of the manufacturer.
Caution
Possibly hazardous optical radiation emitted from this product. Do not stare at operation lamp. May be harmful to the eyes.
No warranty or representation, either expressed or implied, is made with respect to the contents of this documentation, its quality, performance, merchantability, or fitness for a particular purpose. Information presented in this documentation has been carefully checked for reliability; however, no responsibility is assumed for inaccuracies. The information contained in this documentation is subject to change without notice.
In no event will AVer Information Inc. be liable for direct, indirect, special, incidental, or consequential damages arising out of the use or inability to use this product or documentation, even if advised of the possibility of such damages.
TRADEMARKS
“AVer” is a trademark owned by AVer Information Inc. Other trademarks used herein for description purpose only belong to each of their companies.
COPYRIGHT
©2024 AVer Information Inc. All rights reserved. | March 25, 2024
All rights of this object belong to AVer Information Inc. Reproduced or transmitted in any form or by any means without the prior written permission of AVer Information Inc. is prohibited. All information or specifications are subject to change without prior notice.
More Help
For FAQs, technical support, software and user manual download, please visit:
Non-USA
Download Center: https://www.aver.com/download-center
Technical Support: https://www.aver.com/technical-support
USA
Download Center: https://www.averusa.com/pro-av/support
Technical Support: https://averusa.force.com/support/s/contactsupport
Contact Information
Headquarters
AVer Information Inc.
8F, No.157, Da-An Rd., Tucheng Dist.,
New Taipei City 23673, Taiwan
Tel: +886 (2) 2269 8535
USA Branch Office
AVer Information Inc., Americas
44061 Nobel Drive, Fremont, CA 94538, USA
Tel: +1 (408) 263 3828
Toll-free: +1 (877) 528 7824
Europe Branch Office
AVer Information Europe B.V.
Westblaak 134, 3012 KM, Rotterdam, The
Netherlands
Tel: +31 (0) 10 7600 550
Japan Branch Office
アバー・インフォメーション株式会社
Vietnam Branch Office
Công ty TNHH AVer Information (Vệt Nam)
How to Clean and Disinfect....2
Precautions for Use....3
Overview ....1
Package Contents ....1
Optional Accessories ....1
Parts Info 2
LED Indicators 3
Dimensions....4
Pan and Tilt Angle....4
Mode Switch....5
Remote Control....6
Shortcuts....7
Installation....8
Table Mount 8
Device Connection....9
Set Up Your Camera....11
OSD Menu....11
IP Address Setup....11
Static IP....11
DHCP....12
OSD Menu Tree....13
Web Interface 16
Access the Web Interface ....16
Live View 18
Camera Control....18
Preset 19
AI Setting....20
Detection....20
Tracking 21
Camera Settings....22
Exposure....22
Image Process....23
Video & Audio 24
Network 26
System....28
AVerCamera Setting Tool....30
Specifications 31
Troubleshooting 34
Appendix 36
VISCA RS-232 Command Table 36
VISCA over IP Settings....44
Pelco-D Command 45
Pelco-P Command....49
CGI Command....50
Overview
The MD330U Series PTZ Camera is a dual-mode medical grade camera designed with a detachable lens. It comes in two models: MD330U (fill light) and MD330UI (infrared night vision).
Package Contents
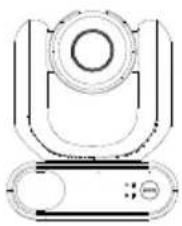
natural_image
Technical line drawing of a mechanical component with no visible text or symbolsMD330U/MD330UI
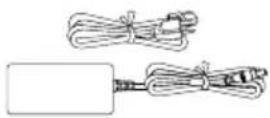
Power Adapter & Power Cord
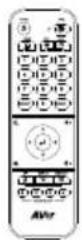
Remote Control
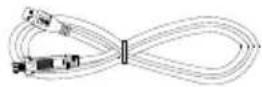
USB 3.0 Type-B to Type-A Cable (1.5m)
natural_image
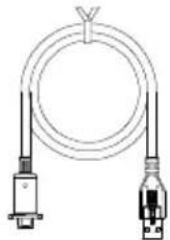
Pure electrical circuit lines without any symbolsUSB 3.0 Type-C to Type-A Lens Cable (180cm)
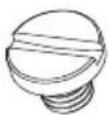
1/4"-20, L=7.5mm
Table Mount Screw (x2)
QR Code Card
Optional Accessories
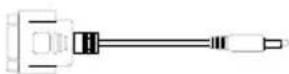
3.5mm to D-Sub 9-pin RS-232 Adapter
natural_image
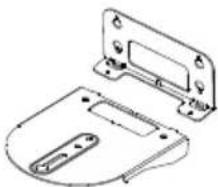
Technical line drawing of a mechanical housing or bracket component (no text or symbols)Wall Mount Bracket (Black/White)
natural_image
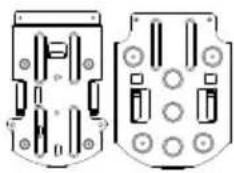
Technical line drawing of two mechanical components with mounting holes and internal slots (no text or symbols)Ceiling Mount Bracket (x2)
Parts Info
- The lens must be detached or installed in Handheld Mode. Use the mode button to switch to between modes.
- Connect only the lens cable to the USB Type-A port. DO NOT connect any USB devices to the USB Type-A port. Doing so may cause electrical damage to your USB devices.
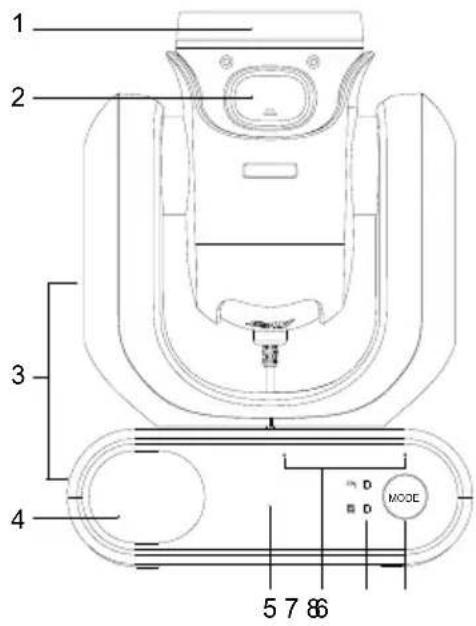
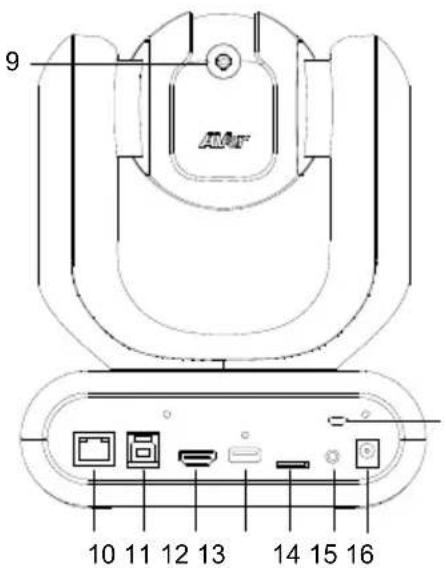

- Lens
- Latch Button
- Camera Body
- Speaker
- IR Sensor
- Microphone Array
-
LED Indicators: Handheld/Standard
-
Mode Button
- Lens Cable
- LAN
- USB 3.0 Type-B
- HDMI
- USB Type-A
- microSD (32GB/SDXC)
-
RS-232
-
DC 12V
- Kensington Lock
- Snapshot Button
- Fill Light Button
- Screw Holes Screw size: 1/4"-20 L=7.5mm (included)
LED Indicators
The illumination of the indicators confirms the camera mode.
| Color | Status | Pattern |
| Flashing orange | Booting up | ●● |
| Solid blue | Normal | ● |
| Solid orange | Standby | ● |
| Flashing orange slowly (1-sec interval) | Muted ● | |
| Flashing orange once | Taking a snapshot | ◎ |
| Flashing orange (0.5-sec interval) | Recording ⊙ | |
| Solid purple | OSD menu is turned on. | ● |
| Flashing purple | Updating firmware | ●● |
Both indicators flash.
- The indicator is mode-sensitive.
- The spare indicator flashes.
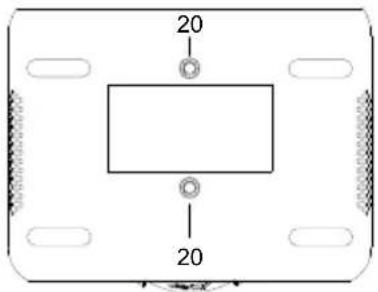
Dimensions
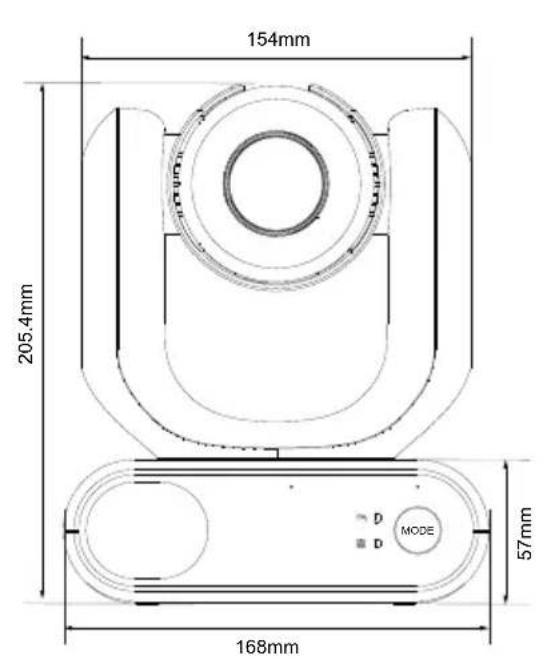
Pan and Tilt Angle
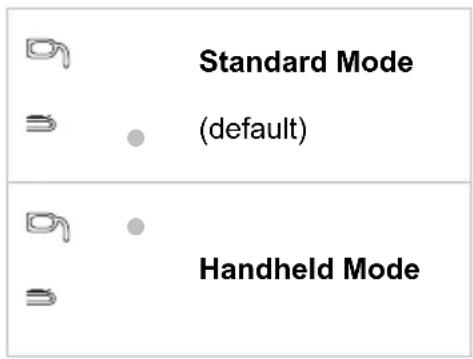
Mode Switch
The lens must be detached or installed in Handheld Mode. Use the mode button to switch between modes and the LED indicators to confirm your current mode.
Detach Camera Head

Install Camera Head
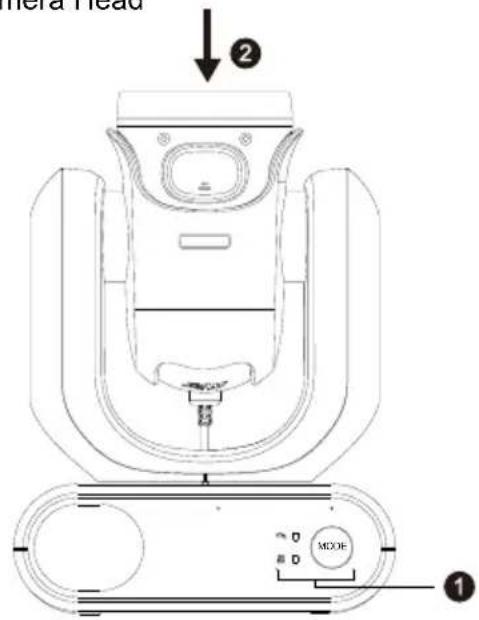
To detach the lens:
- Press the mode button to switch from Standard Mode to Handheld Mode. The lens will automatically turn up.
- Press the latch button.
- Remove the lens from the lens holder.
To install the lens:
- Make sure the camera is in Handheld Mode. If not, press the mode button to switch from Standard Mode to Handheld Mode.
- Insert the lens in the lens holder until you hear a click.
To take snapshots in Handheld Mode:
- Make sure a microSD card has been inserted in the slot.
- Select a focus distance on the web interface (see Camera Control > Focus Near Limit).
- Long press (1 second) the snapshot button to take snapshots. Short press the snapshot button to adjust the focus.
To turn on the fill light in Handheld Mode (MD330U):
- Press the fill light button on the lens to turn it on, and press the button repeatedly to cycle through 3 brightness levels (On > Low > Medium > High > Off).
- With the fill light on, the closest shooting distance should be 4.5 cm.
Remote Control
- To open the OSD menu, press and hold Menu (☐) for 3 seconds.
- To disable remote control, open the OSD menu or the web interface, go to System > Camera Selector > Disable Remote.
- To resume remote control, open the web interface, go to System > Camera Selector > All Channel or assign a number (1, 2, 3, 4) to your camera.
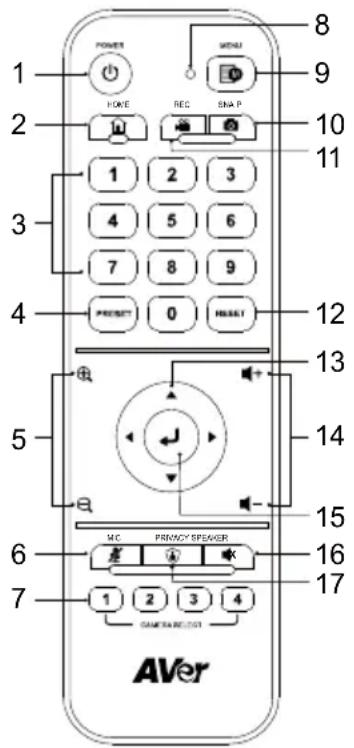
Model: LY033 AAA batteries (x2)
| Name | Function |
| 1. Power | Short press to turn Standby Mode on or off. |
| 2. Home | Move the camera to the Home position. |
| 3. Number Pad | ● Press buttons 0~9 to move the camera to the pre-configured preset positions.● Use the buttons to set up preset positions 0~9. |
| 4. Preset | Use the Preset, Number and Direction Buttons to set up preset positions.1. Use the Direction Buttons to navigate a position. Optionally use the “Zoom +” or “Zoom -” buttons to zoom in/out the image.2. Press and hold Preset, then press the Number Buttons (0~9) to save this preset position. |
| 5. Zoom +/- | Press to zoom in or zoom out the images. |
| 6. MIC | Press to mute the microphone. Press again to unmute. |
| 7. Camera Select | Select a camera to operate. Specify a number in the OSD menu: System > Camera Selector. |
| 8. Remote Control LED | When pressing the buttons on the remote control, the LED will light red. |
| 9. Menu | Press and hold for 3 seconds to open the OSD menu. Edit this setting in the OSD menu: System > Trigger OSD. |
| 10. Snap | Press to take a snapshot image. The images will be stored in the microSD card. |
| 11. Rec | Press to start recording to the micro SD card. Press the button again to stop recording. |
EN


u (nu
fac
our
Fur
u (nu
fac
our
Fur
u (nu
fac
our
Fur
u (nu
fac
our
Fur
u (nu
fac
our
Fur
| 12. Reset | Use the Reset and Number Buttons to cancel a pre-configured preset position. Press and hold Reset, then press the Number Buttons (0~9). |
| 13. Direction | Use the Direction Buttons to navigate the live view. |
| 14. Volume +/- | Press to adjust the volume up or down. |
| 15. Enter | When camera is on: Press Enter to adjust focus once.When accessing the OSD menu: Press Enter to confirm the selection or make a selection. |
| 16. Speaker | Press to mute the speaker. Press again to unmute. |
| 17. Privacy | Press to enter the Privacy mode. The camera will move to the Privacy position and microphone will be off. |
Shortcuts
| Press To | ||
| Menu |  3 seconds 3 seconds | Open the OSD menu. |
| Menu |  | Close the OSD menu. |
| Home |  | Close the OSD menu and return the camera to the Home position. |
| Menu |  n Zoom n Zoom  | MD330U: Cycle through 3 brightness levels (On > Low > Medium > High > Off).MD330UI: Switch between Day mode and Night mode. |
| Menu |  n Zoom n Zoom | MD330UI: Switch between Day mode and Auto mode. |
| 5 five times (55555)Firmware 1.1.1005.1 or later | Turn on DHCP. | |
| 6 six times (666666)Firmware 1.1.1030.0 or later | Reset the camera to factory default settings. | |
| 8 eight times (88888888)Firmware 1.1.1005.1 or later | Set the camera's static IP address to 192.168.1.168. | |
Installation
Table Mount
- Hold the camera by its pedestal with both hands. Do not grab the lens, nor the lens holder.
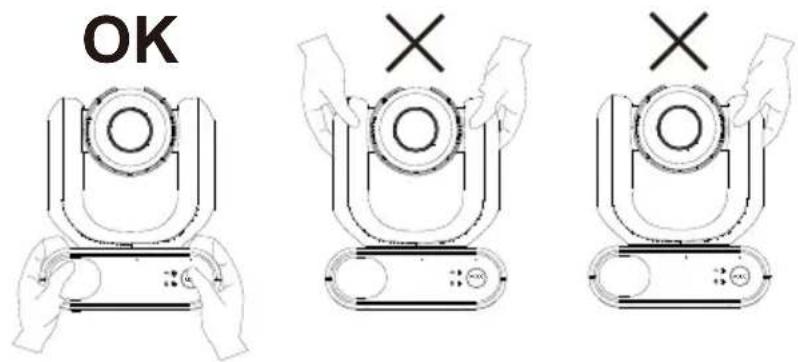
- Place the camera on a flat surface that supports 2kg min.
- Manage all cables to prevent tip-overs or entanglement.
- Secure the camera in place with the included screws.
Device Connection
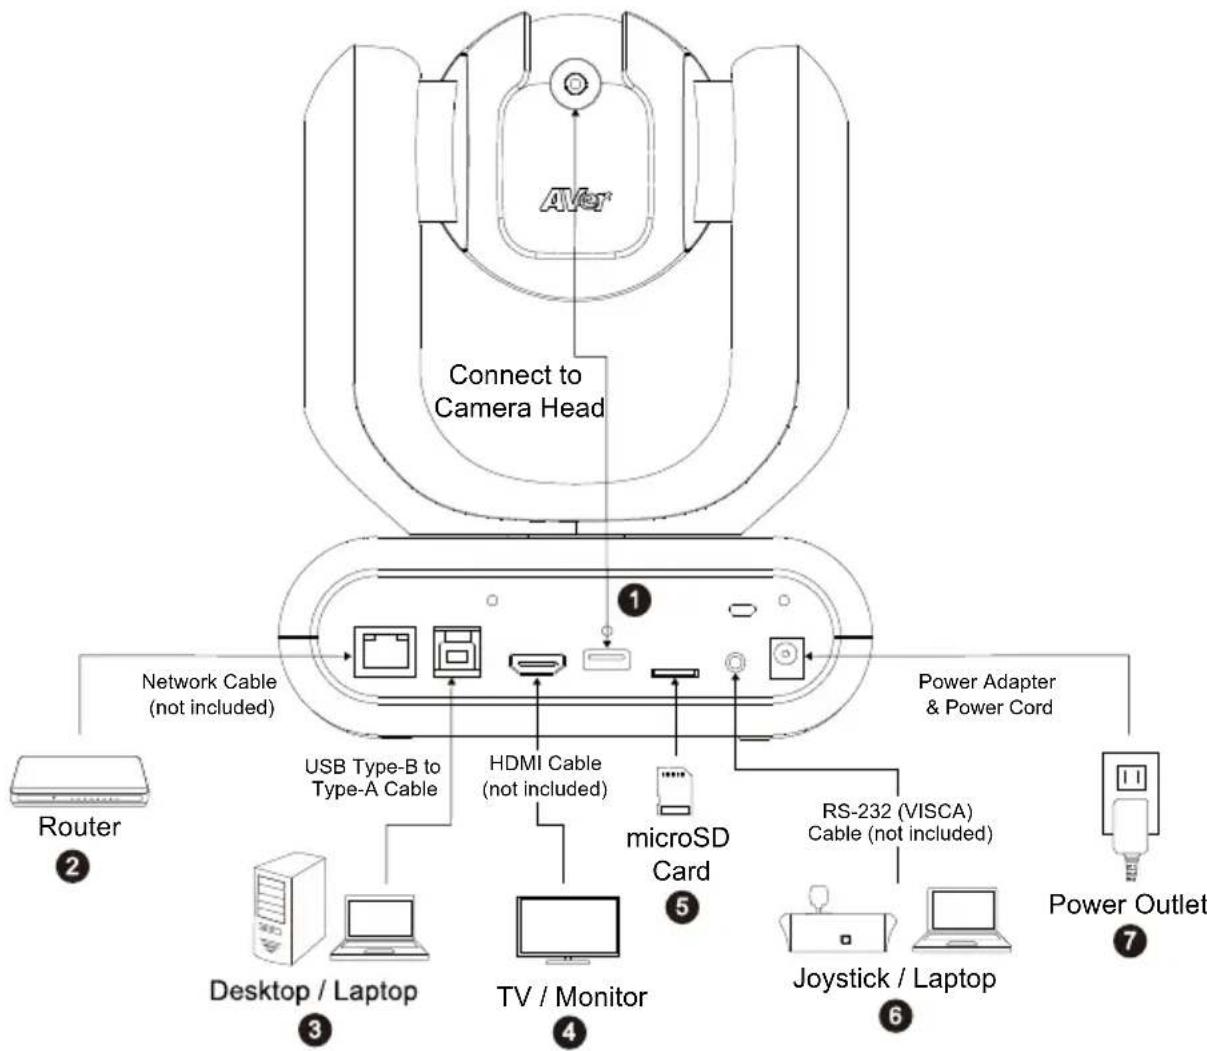
flowchart
graph TD
    A["AVNet"] --> B["Connect to Camera Head"]
    B --> C["Network Cable (not included)"]
    B --> D["USB Type-B to Type-A Cable"]
    B --> E["HDMI Cable (not included)"]
    B --> F["microSD Card"]
    B --> G["RS-232 (VISCA) Cable (not included)"]
    B --> H["Joystick / Laptop"]
    B --> I["Power Outlet"]
    B --> J["Router"]
    B --> K["Desktop / Laptop"]
    B --> L["TV / Monitor"]
- USB Type-A: Connect only the lens cable to the USB Type-A port as illustrated. Plug in the lens cable before powering on the camera.
- LAN: Connect the camera to an IP route (Note 1).
- USB Type-B: Connect the camera to a desktop or laptop for video transmission when using third-party video conferencing software such as Skype or Teams (Note 1).
-
HDMI: Connect the camera to a TV or a monitor to display video output. The camera and the connected TV or monitor must have grounding design. (Note 1).
-
microSD Card: Insert a microSD card to store captured images or recordings (Note 1 and 2).
- Compatible microSD Cards
| Brand | Kingston, SanDisk, Samsung, Lexar |
| Speed Class | C10, U1, U3, V10, V30 |
| Capacity | 16G, 32G |
| Format | FAT32, exFAT |
- RS-232: Connect the camera to a Joystick or laptop to control the camera. You can optionally purchase the RS-232 Adapter. The PIN definition is shown as below (Note 1).
RS-232 Adapter (3.5mm to D-Sub 9-pin)

- Power: The camera and the connected TV or monitor must have grounding design. Use the supplied power adapter and power cord to connect the camera to a power outlet and make sure the power cord of the TV or monitor supports the grounding plug.
Note:
-
Accessory equipment connected to the analog and digital interfaces must be in compliance with the respective nationally harmonized IEC standards (i.e. IEC 60950 for data processing equipment, IEC 60065 for video equipment, IEC 61010-1 for laboratory equipment, and IEC 60601-1 for medical equipment.) Furthermore all configurations shall comply with the requirements of the system in standard IEC 60601-1. Everybody who connects additional equipment to the signal input part or signal output part configures a medical system, and is therefore, responsible that the system complies with the requirements of the system in standard IEC 60601-1. The device is for exclusive interconnection with IEC 60601-1 certified equipment in the patient environment and IEC 60XXX certified equipment outside of the patient environment. If in doubt, consult the technical services department or your local representative.
-
Please insert a microSD card to the card slot before using the Snapshot or Recording functions. To access the microSD card, please refer to Mass Storage in the
chapter for more details. For the recommended microSD cards, please refer to the chapter.
Set Up Your Camera
You can configure camera settings using the OSD menu or the web interface of the camera.
OSD Menu
To access the OSD menu, connect the camera to a monitor or TV using an HDMI cable, and then use the supplied remote control to operate the OSD menu.
Press and hold the menu button 📄 for 3 seconds to bring up the OSD menu. Use directional buttons ▲▼◀▶ to select and press Enter ← to confirm settings.
IP Address Setup
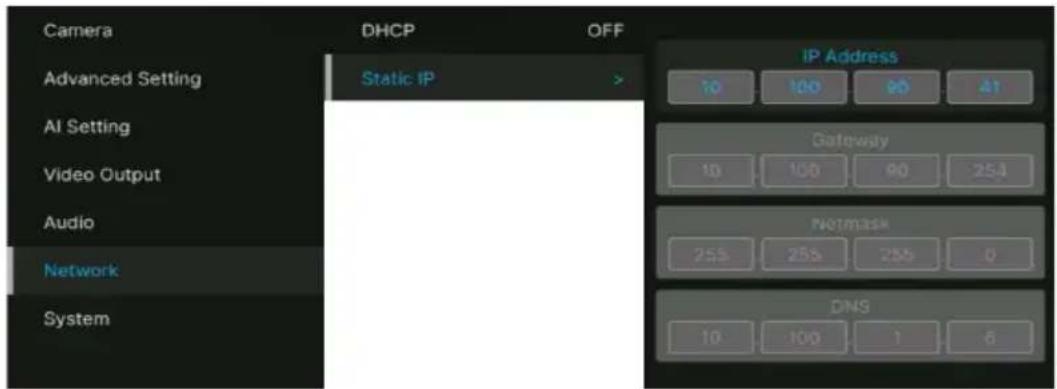
Static IP
-
Press the menu button 📄 on the remote control to bring up the OSD menu.
-
Go to Network > Static IP.
[Note] Turn the DHCP off before setting up static IP (Network > DHCP > OFF).
- Select the IP Address, Gateway, Netmask, and DNS to configure. Press Enter and use the number buttons to enter the value.
DHCP
- Press the menu button 📄 on the remote control to bring-up the OSD menu.
- Select Network > DHCP > On.
- Press Enter ↩ to confirm setting.
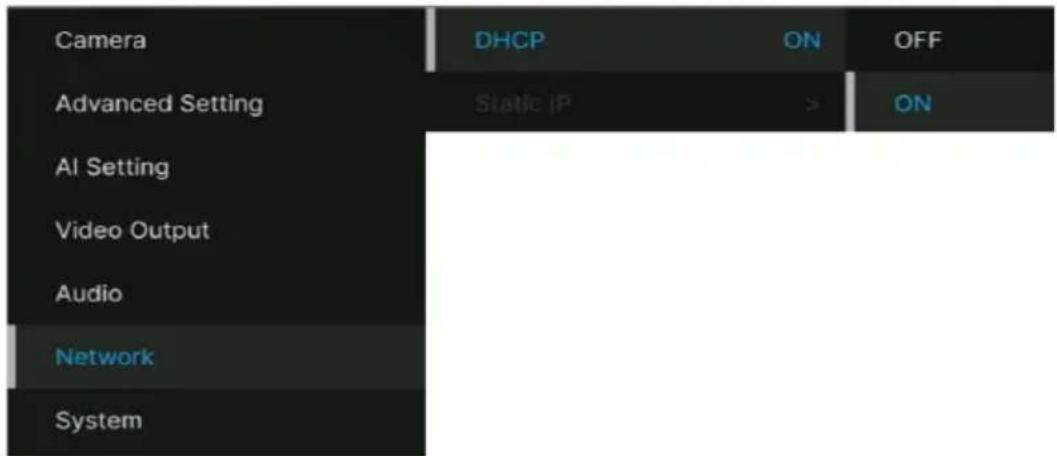
- After turning the DHCP on, you can go to System > Information to view the IP address.
| Camera | Trigger OSD | Long Press | Model Name | MD330U |
| Advanced Setting | Camera Selector | All | Serial Number | 5100399200007 |
| AI Setting | Status OSD | ON | Firmware Version | 1.1,1032.0 |
| Video Output | Language | English | IP | 10.100.90.41 |
| Audio | Information | > | MAC | 00:18:1A:0A:77:CC |
| Network | Factory Default | lens | C020 | |
| System | System Reboot | mcu | A020 |
OSD Menu Tree
| 1^st Level | 2^nd Level | 3^rd Level | 4^th Level |
| Camera | Exposure Mode | Full Auto | Exposure Value |
| Gain Limit Level | |||
| Slow Shutter | |||
| BLC | |||
| WDR | |||
| Shutter Priority | Exposure Value | ||
| Shutter Speed | |||
| Gain Limit Level | |||
| BLC | |||
| Iris Priority | Exposure Value | ||
| Iris Level | |||
| Gain Limit Level | |||
| Slow Shutter | |||
| BLC | |||
| Manual | Iris Level | ||
| Shutter Speed | |||
| Gain Level | |||
| White Balance | Auto | ||
| ATW | |||
| Indoor | |||
| Outdoor | |||
| One push trigger | |||
| Manual | R gain | ||
| B gain | |||
| Pan Tilt Zoom | Preset Speed | 5, 25, 50, 100, 150, 200 | |
| Preset Accuracy | Off / On | ||
| Sensor Zoom | Off / On | ||
| Sensor Zoom Limit | x2 | ||
| Pan Speed | 1~24 | ||
| Tilt Speed | 1~24 | ||
| Zoom Speed | Low / High | ||
| P/T Spd. Relative Z Ratio | Off / On | ||
| Pan L/R Dir. Switch | Off / On | ||
| Focus Mode | Manual / Auto | ||
| Noise filter | Off / Low / Middle / High | ||
| Saturation | 0 1 2 3 4 5 6 7 8 9 10 | ||
| Contrast | 0 1 2 3 4 | ||
| Sharpness | 0 1 2 3 | ||
| Mirror | OFF / ON | ||
| Flip | OFF / ON | ||
| Advanced Setting | Control | Type | RS232 |
| Protocol | VISCA / PELCO D/PELCO P | ||
| Camera Address | 1 2 3 4 5 6 7 | ||
| Baud Rate | 2400 / 4800 / 9600 / 115200 | ||
| IR Cut Filter | Auto / Day / Night | ||
| IR Cut Sensitivity | Low / Middle / High | ||
| Performance Mode | OFF / ON | ||
| Mosaic on Stream | OFF / ON | ||
| Mosaic Mode | Body / Face | ||
| AI Setting Tracking | Setting | Tracking | On/Off |
| Tracking Preset | Save | ||
| Tracking Mode | Face/Eyes | ||
| Tracking Range | Close / Medium / Wide | ||
| Timeout to Preset | 3/5/7/10 sec | ||
| Detection Setting | Detection | On/Off | |
| Detection Mode | Body / Full face | ||
| Video Output Frequency | 60 | ||
| 59.94 | |||
| 50 | |||
| 1080p60 | |||
| 1080p59.94 | |||
| 1080p30 | |||
| 1080p29.97 | |||
| 1080p50 | |||
| 1080p25 | |||
| Audio | Audio Input | Noise Suppression | OFF/ NR DSP/ NR/ NR+BF/ NR Strong |
| Audio Beam Forming | 30,50,70,90,110,130 | ||
| Audio In Volume | Mute / 1~10 | ||
| Audio Output | Output Type | Speaker/HDMI/Both | |
| Output Volume | Mute / 1~10 | ||
| Network | DHCP | OFF / ON | |
| Static IP | IP Address | 192.168.1.168 | |
| Gateway | 192.168.1.254 | ||
| Mask | 255.255.255.0 | ||
| DNS | 8.8.8.8 | ||
| System | Trigger OSD | Click Menu to open, Press Menu 3 sec | |
| Camera Selector | 1,2,3,4, All channel, Disable Remote | ||
| Status OSD | OFF/ON | ||
| Language | English / 中文 / 日本語 | ||
| Change cable Standard cable / Long cable | |||
| Information | Model Name | MD330U(I) | |
| Serial number | xxxxxxxxxxxxx | ||
| Firmware Version | 0.0.0000.00 | ||
| IP | 192.168.1.168 | ||
| MAC | 00:18:1a:04:9e:81 | ||
| lens | xxxx | ||
| mcu | xxxx | ||
| SD Total (MB) | |||
| SD Free (MB) | |||
| Recording Status | Stopped / xx:xx:xx (record timer) | ||
| Factory Default | OFF/ON | ||
| System Reboot | OFF/ON | ||
Web Interface
Connect the camera from a remote site through the internet.
Access the Web Interface
To access the Web interface of the camera, you have to find the IP address of the camera using AVer IPCam Utility or AVer PTZ Management software.
● AVer IPCam Utility
To find the IP address of your cameras using the IPCam Utility installer, follow the steps below.
- Download the IPCam Utility from https://www.aver.com/download-center and run the IPCam Utility.
- Click Search, and all available devices will be listed on the screen.
- Select a camera from the list, the camera info will be displayed in the Settings field.
[Note] The default network of the camera is Static IP (192.168.1.168) and default ID/Password are admin/admin. If you want to configure the network to DHCP, input the ID/Password in the Login field, select the "camera model" on the list, select "DHCP" and then click the Apply button.
![Network Settings [0x80] Channel Connection (C1) [T4V] Search Load File ID Password Network Setting [0x80] User Interface Hardware SmartForm Config. Select: Default Select: All No. Status Progress Default Name Description IP Address IPN Address REC Address IPSL P [1] Winning Paramount Paramount 0.470023 0.250000 0.000000 CPB [2] Winning Paramount Paramount 1.119942 0.621485/1.00000 0.000146/0 CPB Settings Device Name: PROD: X: Back Y: None IP *Auto search will start after update changed * Start data search for time Next IP address: End IP address: Submit Type: Open: Finish Date: Securities Date: OK Cancel Help Help Help Help Name:](/content/2026/04/690577/images/6a5e2bcb30b4d6be36bfe78ea11e1956d0b70bf67cdd7a1686ec2587fccb952e.jpg)
- To access the Web interface, double-click on the IP address in the IPv4 Address column. For the first-time user, you will be prompted with a Login window to change the ID and password.

- Login with the new ID/Password, the Web interface of the camera will be displayed (Chrome browser).
[Note] If IPCam utility cannot find the camera, please check following:
- Please make sure the Ethernet connection of camera is well connected.
- The camera and PC (IPCam Utility) are in the same LAN segment.
● AVer PTZ Management
To find the IP address of your cameras using the AVer PTZ Management, follow the steps below.
- Download the AVer PTZ Management software from https://www.aver.com/download-center
- Download the Windows program and install it.
- After setting up the user ID and password, log in to the software (default User Name/Password: admin/admin).

- On the Main page of PTZ Management, click Setup > Add and then click Auto Search. The cameras connected on the same LAN with the computer will be displayed.
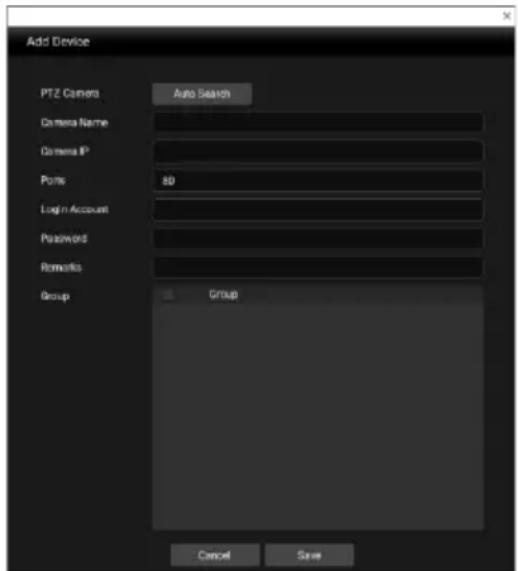
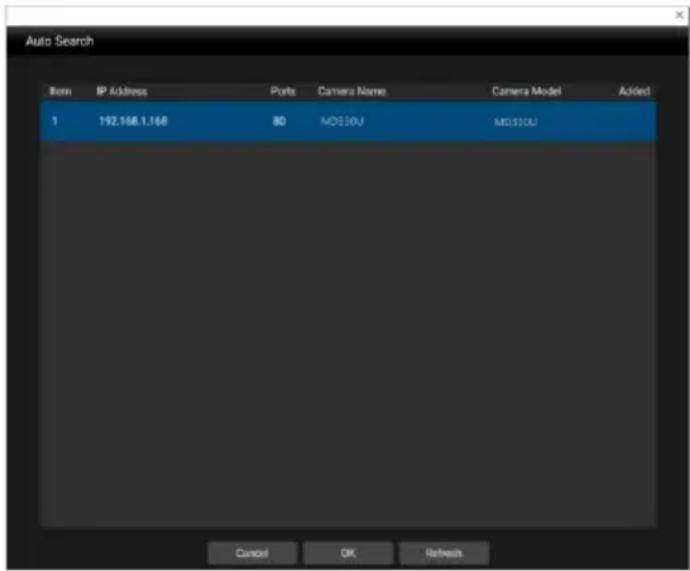
- Click on the camera and input the camera ID and Password to add the camera to the device list (default ID/Password are admin/admin). Click the Go to Web button to access the Web interface of the camera.
Live View
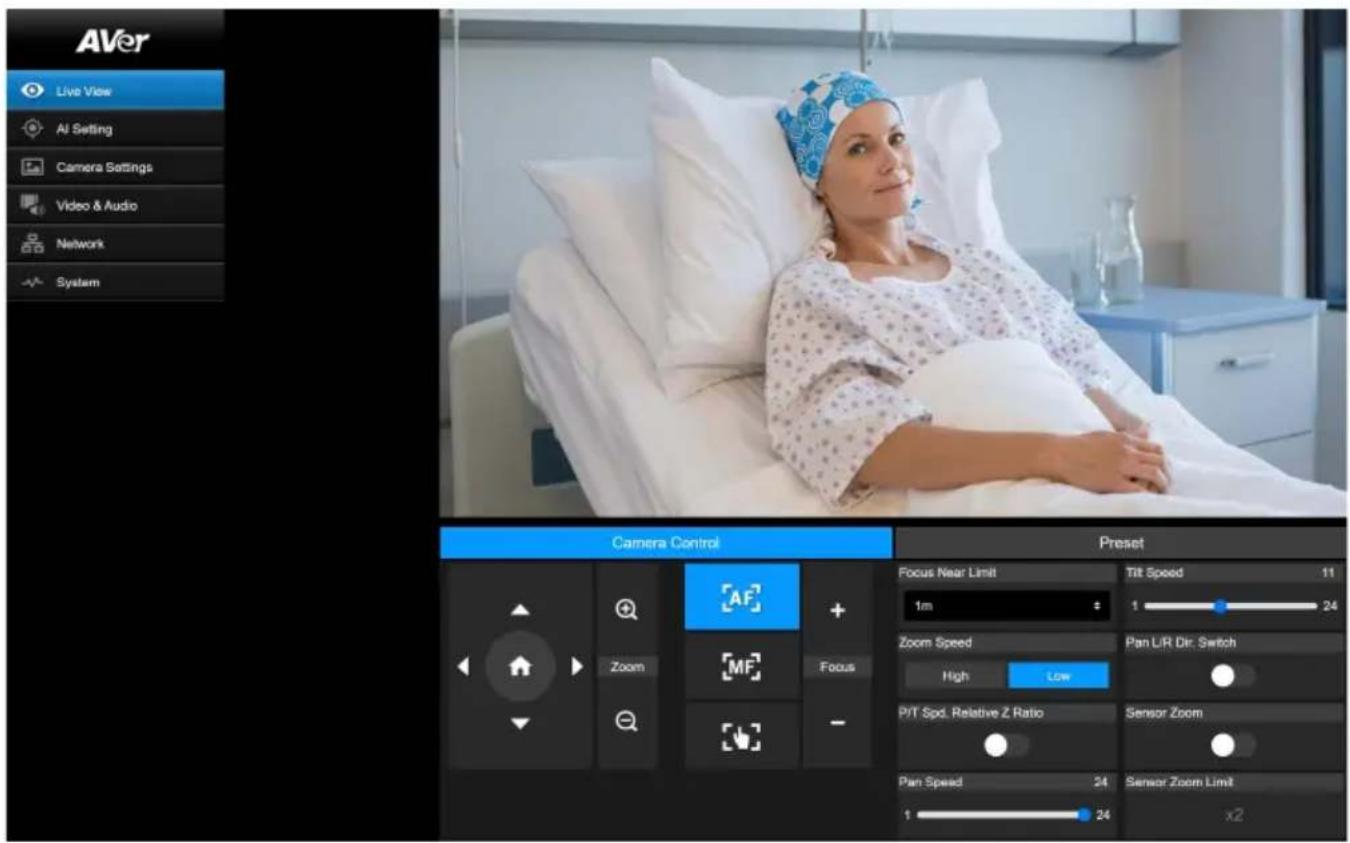
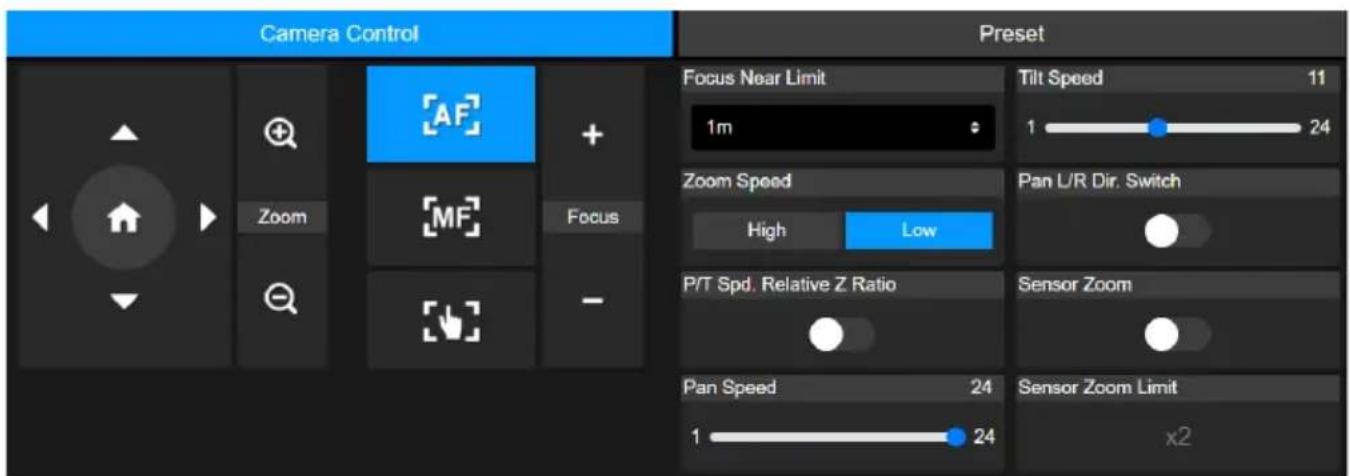
Camera Control
 |
| Turn on Sensor Zoom to enable sensor zoom.Up to 30X optical zoom and 2X sensor zoom (Sensor Zoom Limit). | |
| Focus +- | Auto Focus: Click to automatically focus.Manual Focus: Click to manually focus. Adjust the focus with buttons.One Push Focus: Click to automatically focus once.Focus Near Limit: Set up the nearest focus limit. |
Preset
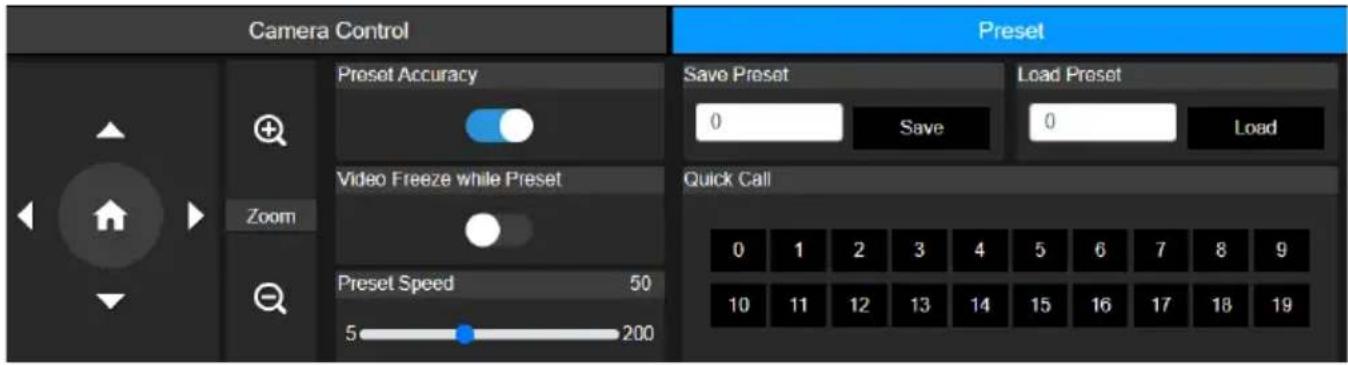
| Item | Description |
| Save Preset | 1. Position the camera using pan, tilt and zoom controls.2. Enter a preset number (0~255) in the Save Preset field and click Save |
| Load Preset | 1. Enter a preset number (0~255) in the Load Preset field and click Load.2. Or click a preset number (0~19) in the Quick Call section. |
| Preset Accuracy | Turn on to improve the accuracy of moving to presets. |
| Video Freeze while Preset | Turn on to display only the live view from presets. The live view from the moving path will not be displayed. |
| Preset Speed | Adjust the camera speed when moving to presets. |
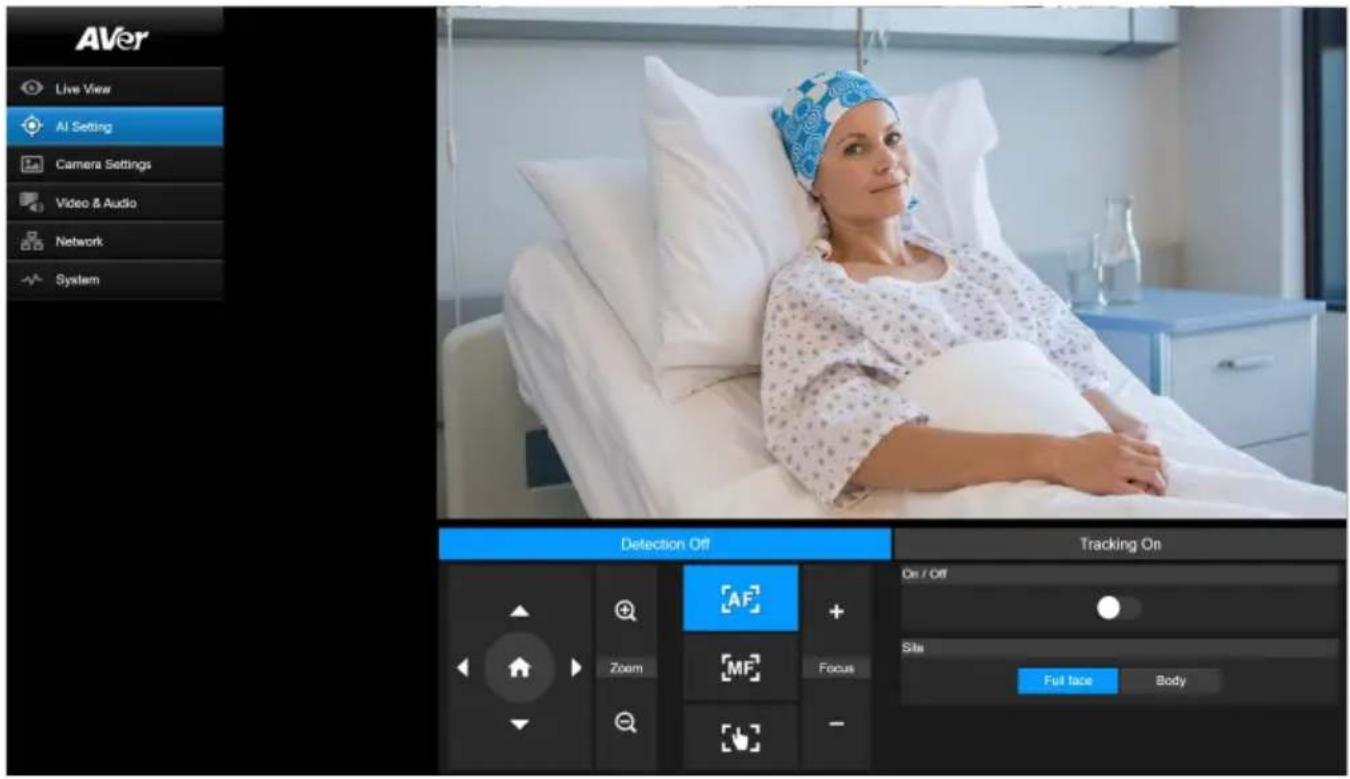
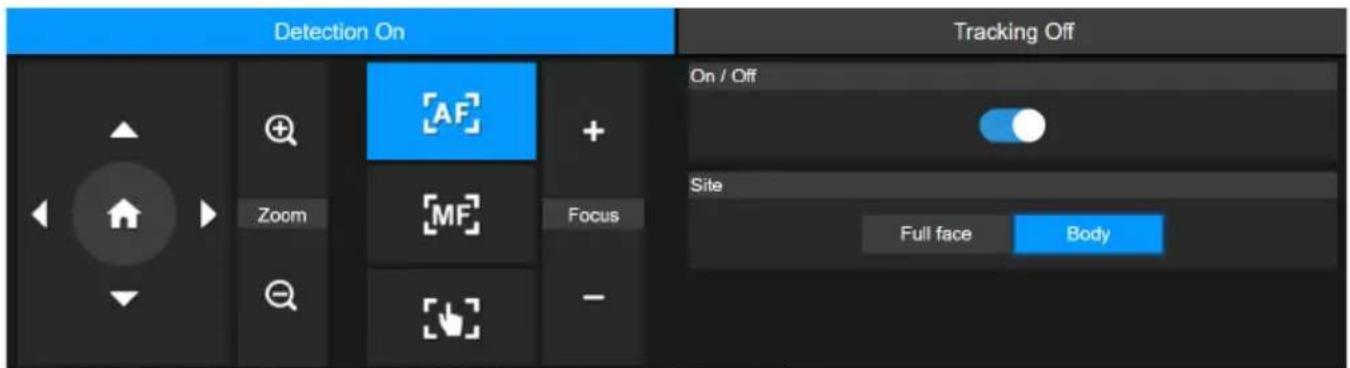
AI Setting
Detection and Tracking can't be turned on at the same time.
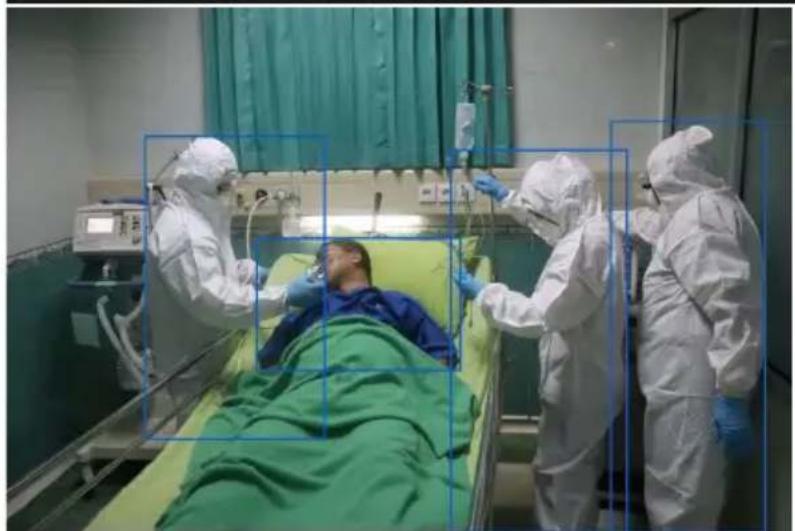
Detection
natural_image
Hospital room scene with medical staff in full PPE attending to a patient in bed (no visible text or symbols)Click the On/Off toggle to turn on face or body detection.
● The camera will frame faces or bodies on screen with blue AI bounding boxes.
- Use API to report AI bounding box coordinates to third-party software.
Tracking
Manually adjusting pan, tilt and zoom controls during tracking will turn the function off.

- Position the camera using pan, tilt and zoom controls and then click Save to save a Tracking Preset. The default is the Home position.
- From the Timeout to preset drop-down list, select an interval before the camera returns to the tracking preset when no one is in view. The default is 3 seconds.
- Click the On/Off toggle to turn on Eyes Tracking when a face is in view.
● One person: The camera will automatically track and zoom in on the face.
- Multiple people: The camera will mark faces in squares. Select a face to automatically track and zoom in on by clicking a square.
- Choose the Tracking Site and Tracking Range.
Camera Settings
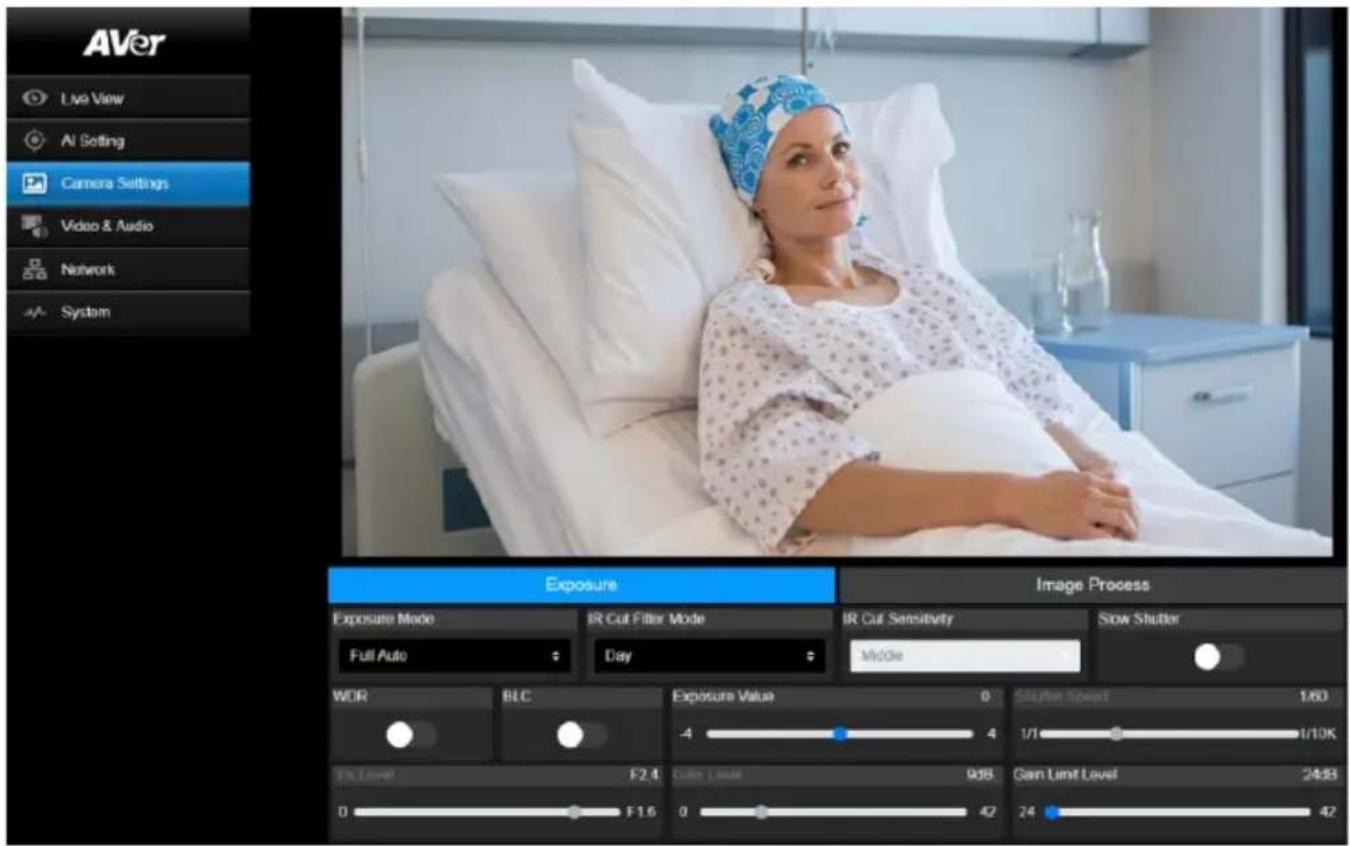
Exposure

| Item | Description |
| Exposure Mode | Choose an exposure mode. |
| WDR | Turn wide dynamic range (WDR) or backlight compensation (BLC) on or off. |
| BLC | |
| Exposure Value | Adjust exposure, shutter, iris and gain. |
| Shutter Speed | |
| Iris Level | |
| Gain Level | |
| Gain Limit Level |
| IR Cut Filter Mode(MD330UI only) | Choose Day mode or Night mode to switch infrared night vision on or off. Or select Auto mode and adjust IR Cut Sensitivity. |
| Slow Shutter | Turn Slow Shutter on or off. |
Image Process
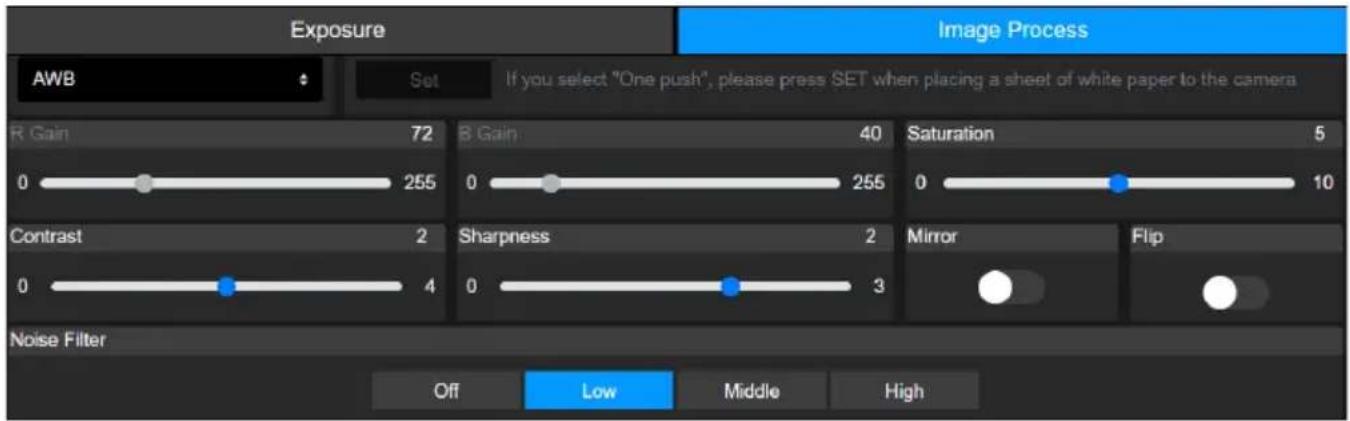
| Item | Description |
| White Balance | Select a white balance mode. WhenManualis selected, you can also adjust theRGainandBGain.WhenOnePushis selected, place a piece of white paper in front of the camera lens and clickSetto calibrate white balance. |
| Saturation | Adjust saturation, contrast and sharpness. |
| Contrast | |
| Sharpness | |
| Mirror | TurnMirrororFlipon or off. |
| Flip | |
| Noise Filter | Select a noise filtering level. |
Video & Audio

Video Setting
| Item | Description |
| Power Frequency (Hz) | Select 50Hz, 59.94Hz or 60Hz based on your country or region. |
| Video Out Resolution | Select a video output resolution.RTSP: Max. 4K/30fpsHDMI: Max. 1080p 60Hz |
| Video Mode | Select a video mode.● USB only: Stream video over USB.● Stream only: Stream video over IP.● USB + Streaming: Stream video over both USB and IP. |
| Stream Video Output | Select a streaming output resolution for the live view. |
| Framerate | Select a framerate |
| Bitrate | Select a bitrate. |
| I-VOP Interval (S) | ● Drag the slider to choose how often I-VOPs appear in a video stream.● Shorter I-VOP intervals result in higher video quality but also larger file sizes. |
| Rate Control | Select VBR or CBR. |
| Encoding Type | Select H.264 or H.265. |
| Mosaic on Stream | Turn on to pixelate the face or body on an RTSP stream for privacy. |
Audio Setting
| Item | Description |
| Audio Output Device | Select an audio source. |
| Microphone Volume | Drag the slider to adjust the microphone volume. |
| Speaker Volume | Drag the slider to adjust the speaker volume. |
| Beamforming Type | Select a beamforming angle. |
| Sampling Rate | Select an AAC sampling rate for IP streaming. |
| Noise Suppression | Select a noise suppression setting. Start with NR before trying other options closer to your use case.● For performance testing, see table below. |
| Encoding Type | AAC |
| Noise Reduction Settings | Use Case Performance* | |
| OFF | Very quiet indoor environment. | Noise is kept. |
| NR DSP | Indoor environment with low noise. | Noise is reduced |
| NR (recommended) | Indoor environment with strong background noise, such as a fan. | Noise is further reduced |
| NR+BF When it is necessary to limit the range of sound collection with specified angle. | √ Noise is removed× Might drop a few words | |
| NR Strong Indoor environment with strong background noise, such as people talking. | √ Noise is removed× Takes longer to process and reduce unusual sounds× Might drop a few words | |
*Performance varies due to many factors, including voice to noise ratio, number of talkers, room size, sound source direction, microphone quality, ambient sounds, and so on. Performance was tested under controlled AVer laboratory conditions.
Network
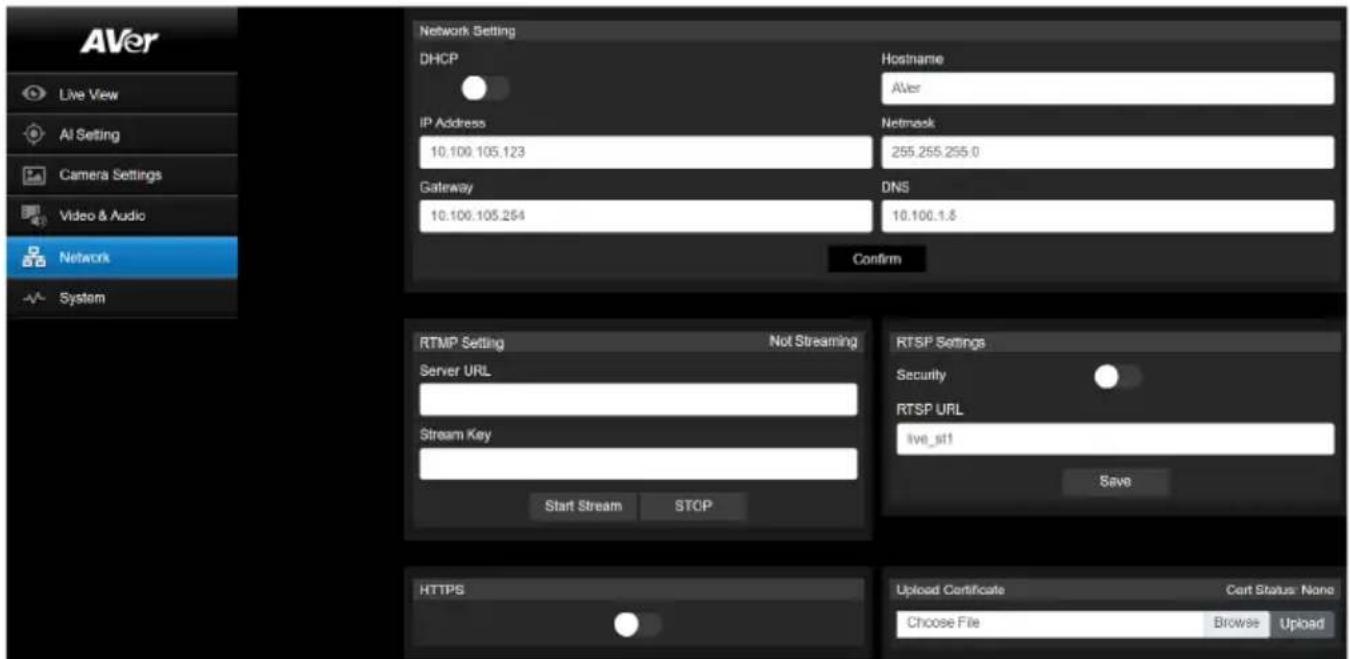
| Item | Description |
| Hostname | The default hostname is AVer. Change the hostname to be displayed on devices such as an IP router. |
| DHCP | Set the network to DHCP or Static IP.DHCP: Turn on DHCP and click Confirm to save the setting. The camera will be assigned IP settings automatically.Static IP: Turn off DHCP, enter IP Address, Netmask, Gateway and DNS, and click Confirm to save the settings. |
| RTMP Setting | Stream live video to a video platform such as YouTube.Enter the Server URL and Stream Key of your video platform.Please refer to the instruction of your platform to obtain the server URL and stream key.Click Start Stream to start streaming, Stop to stop streaming. |
| RTSP Settings | Protect your video stream on media players such as VLC, PotPlayer and QuickTime by ensuring that only authorized users can access it.When Security is turned off:Enter your camera's RTSP URL into the media player.RTSP URL: rtsp://[camera IP address]/live_st1Example: rtsp://192.168.1.100/live_st1When Security is turned on:Enter your camera's RTSP URL and username/password into the media player.RTSP URL: rtsp://[username:password]@[camera IP address]/live_st1Example: rtsp://1:1@192.168.1.100/live_st13. username/password: camera's username/password (web interface login) |
| HTTPS | Enable HTTPS to establish a secure connection between your browser and your camera. To enable HTTPS access on your camera:1. Obtain a SSL certificate for encryption and decryption in base-64 encoded format and use a private key in PKCS#8 format (unencrypted).2. Package the required certificate content into PEM format. The SSL certificate uploaded to the camera must be in PEM format.3. ClickBrowseto select the certificate file, and then clickUpload.4. Turn on HTTPS. |
System
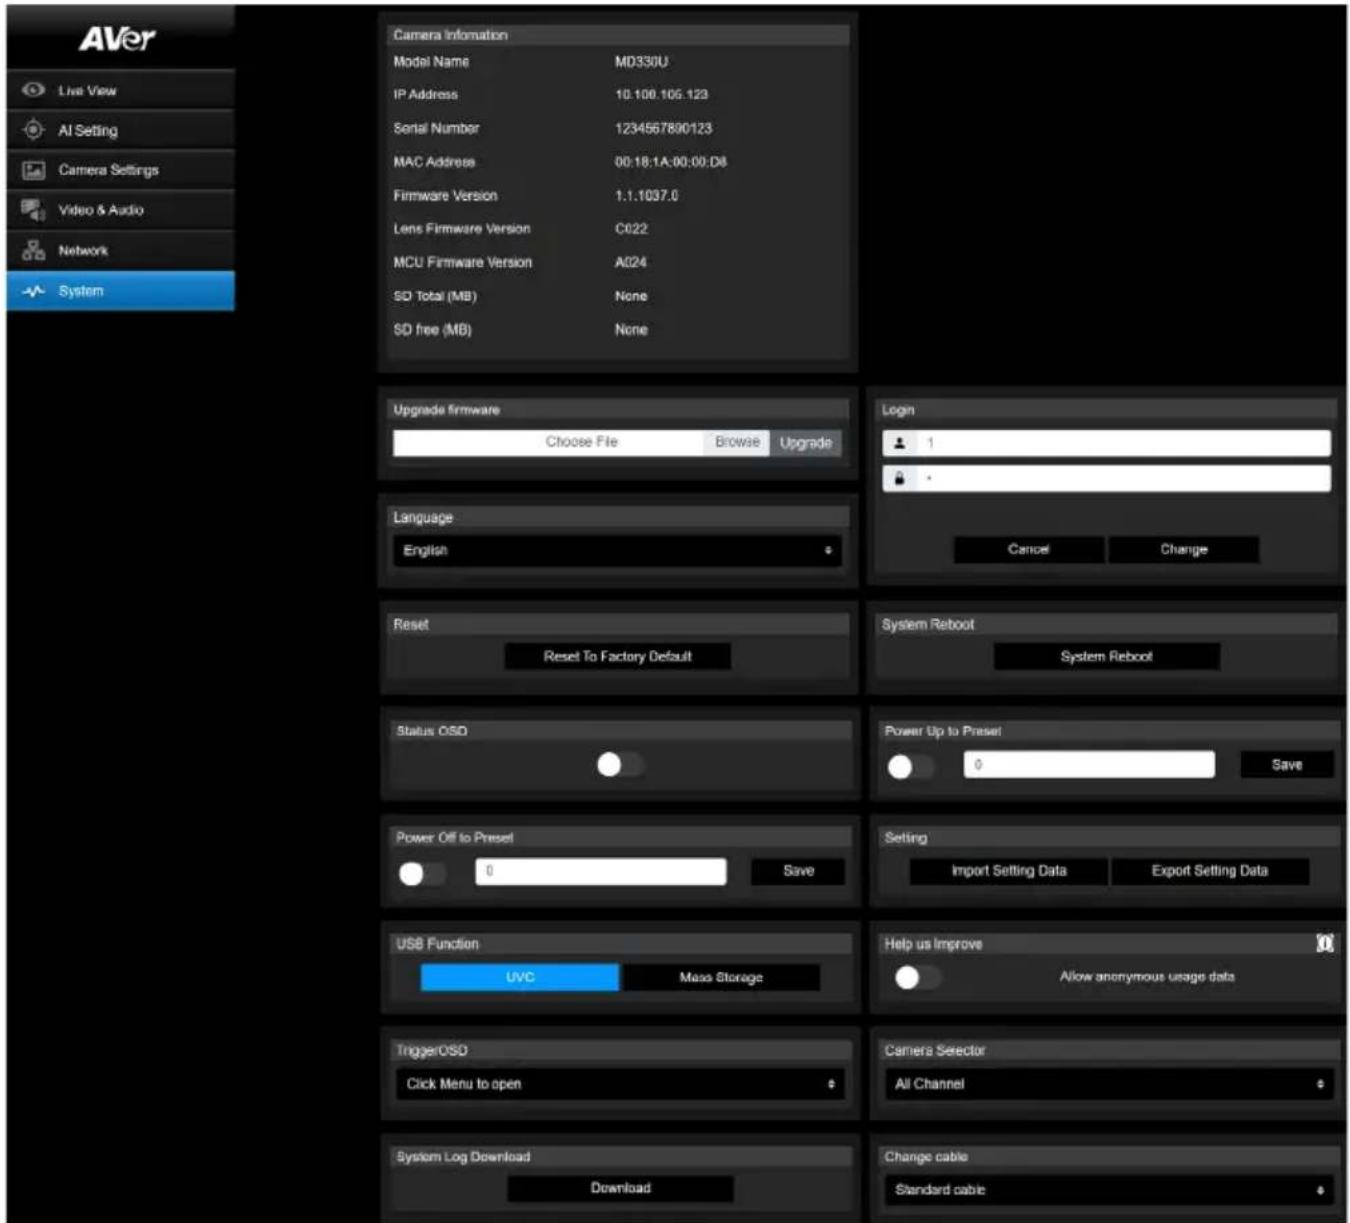
| Item | Description |
| Camera Information | Display camera information. |
| Upgrade Firmware | Follow these steps to upgrade the firmware:1. Download the latest firmware from the AVer Download Center (https://www.aver.com/download-center/).2. On the Web page, go to System > Upgrade firmware.3. Click Browse to select the firmware.4. Click Upgrade to start upgrading the firmware.5. Refresh the browser after the upgrade process is complete.[Note] Keep your camera connected to a power source during firmware upgrade. Network connection will be lost during the process and camera will reboot automatically after upgrading. |
| Login | The default username/password is admin/admin. To change the username/password, enter the new username/password and click Change. |
| Language | Change the web interface language. |
| Reset | Reset the camera to factory default settings. |
| System Reboot | Restart your camera. |
| Status OSD | Enable to display preset status on the HDMI output during functions such as saving, loading and canceling presets. |
| Power Up to Preset | When enabled, the camera will move to the defined position after powering on.Click the toggle to turn on > enter a preset number > click Save.Make sure the preset number has been defined before enabling this function. |
| Power Off to Preset | When enabled, the camera will move to the defined position before powering off.Click the toggle to turn on > enter a preset number > click Save.Make sure the preset number has been defined before enabling this function. |
| Setting | Import or export your camera settings. |
| USB Function | Select UVC or Mass Storage.UVC: Stream video over USB.Mass Storage: Access the inserted microSD card via USB connection.1. Connect the camera to a computer using the included USB 3.0 Type-B to Type-A cable.Make sure a microSD card has been inserted in the slot.3. On the web interface, go to System > USB Function > select Mass Storage. |
| Help Us Improve | Opt-in or opt-out of providing anonymous usage data. |
| Trigger OSD | Select how the OSD menu is opened with the remote control. |
| Camera Selector | Assign a number to your camera that corresponds to the Camera Select buttons on the remote control.When All Channel is selected, no selection is required on the remote control to operate your camera |
| System Log Download | Click to download system log. |
| Change Cable Select a lens cable to be installed. When prompted to reboot, disconnect from power and change the lens cable. | |
AVerCamera Setting Tool
AVerCamera Setting Tool is an application software that supports the operation of AVer PTZ cameras when you stream to a third-party software. It enables users to configure image, audio and video settings without a remote control, as well as connect the camera via USB.
- Download AVerCamera Setting Tool from the AVer website:
(https://www.aver.com/Downloads/search?q=AVer%20Camera%20Setting%20Too). - For details on settings, see
in the user manual for CaptureShare.
Specifications
Camera
| Image Sensor 1/2.8" Exmor CMOS | |
| Effective Picture Elements | 8 Megapixels |
| Output Resolutions | 4K/30 (IP/UVC only), 1080p/60, 1080p/59.94, 1080p/50, 1080p/30, 1080p/29.97, 1080p/25, 720p/60, 720p/59.94, 720p/50, 720p/30 |
| Minimum Illumination | 0.7 lux (IRE50, F1.6, 30fps) |
| S/N Ration | ≥ 50dB |
| Gain Auto, Manual | |
| Shutter Speed 1/1 to 1/10,000 sec | |
| Exposure Control | Auto, Manual, Priority AE (Shutter, IRIS), BLC, WDR |
| White Balance | Auto, Manual |
| Optical Zoom | 30X |
| Viewing Angles | DFOV: 75.5° (Wide) to 3.1° (Tele)HFOV: 68.0° (Wide) to 2.7° (Tele)VFOV: 41.7° (Wide) to 1.5° (Tele) |
| Focal Length | f = 4.3 mm (Wide) to 129 mm (Tele) |
| Aperture (Iris) | F = 1.6 (Wide) to 4.7 (Tele) |
| Minimum Working Distance | Wide: 0.01 m, Tele: 1.2 m |
| Pan / Tilt Angles | Pan: ±170°, Tilt: +90° / -35° |
| Pan / Tilt Speed (Manual) | Pan: 0.1° to 100°/sec, Tilt: 0.1° to 100°/sec |
| Preset Speed | Pan: 200°/sec, Tilt: 200°/sec |
| Preset Position | 10 (IR), 256 (RS-232 / IP) |
| Camera Control - Protocols | VISCA (RS-232 / IP), PELCO-D & PELCO-P (RS-232), CGI (IP) |
| Image Processing | Noise Reduction (2D / 3D), Flip, Mirror |
| Power Frequencies 50Hz / 59.94Hz / 60Hz | |
Speaker
| Embedded Speaker | Yes |
| SPL | 77 dB SPL (1W; 1m) |
| Maximum Output 90 dB SPL | at 0.5 meter |
Microphone
| Built-in Microphone | 2 (Omnidirectional) |
| AI Noise Reduction | Yes |
| Pickup Range | 5 meters |
| Sensitivity | -33 dBFS |
| Frequency Response | 20 Hz to 20,000 Hz |
| Maximum SPL | 133 dB SPL at 0.5 meter |
| Interface | |
| Video Outputs | HDMI, IP, USB |
| Audio Outputs | HDMI, IP, USB |
| microSD Card Slot | Max. 32GB / SDXC |
| General | |
| Power Requirement | 100-240V AC~ to 12V DC === 3.34A* The included Power Adapter (GSM40A12) is manufactured by MEAN WELL Enterprises Co., Ltd. with Class I classification.** The power supply is specified as a part of ME EQUIPMENT. |
| Power Input | 12V DC === 3A |
| Power Consumption 36W | |
| Dimension (W x H x | 168 x 205 x 126 mm |
| Net Weight | 1.95kg |
| Application | Indoor |
| Tally Lamp N/A | |
| Security Kensington Slot | |
| Remote Control | Infrared |
| Operating Conditions | Temperature: 0°C to +35°C; Humidity: 20% to 80%Atmospheric Pressure: 700 ~ 1060hpa |
| Storage and Transportation Conditions | Temperature: -20°C to +60°C; Humidity: 20% to 95%Atmospheric Pressure: 500 ~ 1060hpa |
| IP Streaming | |
| Resolution 4K, 30fps | |
| Network Video Compress Formats | H.264, H.265 |
| Maximum Frame Rate 4K, 30fps | |
| Network interfaces | 10 / 100 / 1000 Base-T |
| Multi-Stream | 2 (RTSP / Web Page), 4K 30fps (max.) |
| Network Protocols | IPv4, TCP, UDP, ARP, ICMP, IGMP, HTTP, DHCP, RTP / RTCP, RTSP, RTMP, VISCA over IP |
| Recording | |
| Cyclic Threshold Rule | Video stream: 720p, 1080p, 4K32Mbps: 1.3GB16Mbps: 700MBOthers: 500MB |
| USB | |
| Connector USB 3.0 | |
| Video Format MJPEG, YUY2 | |
| Audio Format | PCM |
| USB Video Class (UVC) | Video: UVC1.1Audio: UAC1.0 |
| Software Tools | |
| IP Search and Configuration Tool | Support Windows® 7 or later |
Specifications are subject to change without prior notice.
Troubleshooting
What does medical grade mean?
It means the MD330U Series camera is certified under IEC 60601-1-2.
This certification guarantees that the MD330 Series camera effectively limits the generation, propagation, and reception of electromagnetic energy. By doing so, it minimizes the risks of undesirable effects like electromagnetic interference (EMI) or physical damage to other operational equipment.
Can I install the camera upside down?
Yes, make sure to shorten the length of the lens cable by coiling and tying it with a cable tie.
Configure Mirror and Flip functions as needed.
How long is the lens cable?
The lens cable is 180cm.
Can I use an extension USB cable to lengthen the lens cable?
No, doing so may damage the camera. Please contact AVer for optional accessories.
Can I disinfect the camera by spraying alcohol on it?
No, refer to
How to open the on-screen display (OSD) menu?
- Make sure the HDMI cable is connected to your camera and display.
- On the remote control, press and hold Menu for 3 seconds to open the OSD menu.
- A solid purple light on the LED indicator will indicate that the OSD menu is turned on.
The camera suddenly fails to receive my voice and the LED indicator is flashing orange.
● A flashing orange light on the LED indicator indicates that the microphone is muted.
- Upgrade to firmware 1.1 .1030.0 or later to avoid video conferencing software, such as Microsoft Teams or Google Meet, from muting the camera when it deems the received volume too high.
Firmware upgrade and rollback.
- To upgrade:
Firmware 1.1.1017.0 or later can upgrade to the latest version.
Firmware 1.1.1016.0 or before must first upgrade to firmware 1.1.1017.0 before upgrading to the latest version.
- To roll back:
The earliest version you can roll back to is firmware 1.1.1017.0.
There is no picture on the output screen.
- Check all the connectors again as shown in this manual.
- Verify the setting of the display output device.
The picture on the output screen is distorted or the image is blurry.
- Reset all changed settings, if any, to the original manufacturer default setting. On the remote control, press Menu > Factory Default > On.
- Use the Brightness and Contrast menu functions to reduce the distortion if applicable.
- If you discover that the image is blurry or out of focus, click the Auto Focus button on the Web setup page (Live View > Camera Control).
The voice from the speaker is staticky or with undesired noise.
- Keep the camera at least one meter away from other electrical equipment.
- Reset all camera settings to factory default. On the remote control, press Menu > System > Factory Default > On.
- Adjust the Speaker Volume and enable the Noise Suppression function. On the Web Setup page of the camera, go to Video & Audio >Audio Setting.
- Contact the authorized distributor or the point of purchase if the problem resumes.
The snapshot images cannot be found on the microSD card after pressing the Snapshot button on the detachable lens or on the remote control.
- For the Snapshot button on the lens, try to press the button for more than 1 second as a short press is for focus function.
- Double check if the microSD card is inserted properly.
- Double check the specifications and the volume of microSD card, please refer to the
chapter. - Contact the authorized distributor or the point of purchase if the problem resumes.
- You can directly access the microSD card with your computer. To do so,
a. Connect the camera to your computer using the supplied USB 3.0 Type-B to Type-A Cable.
b. On the Web page, go to System > USB Function. Select Mass Storage.
c. You can access the microSD card through your computer now.
Appendix
VISCA RS-232 Command Table
| Command Set | Command | Command Packet | Comments |
| IF_Clear | Broadcast | 88 01 00 01 FF | I/F Clear (Clear Visca connection & command buffer queue) |
| CommandCancel | -- | 8x 2p FF | p: Socket No. (=1or2) |
| CAM_Power | On | 8x 01 04 00 02 FF | Power OFF to Standby modePower ON supported in Standby mode only |
| Off | 8x 01 04 00 03 FF | ||
| CAM_Zoom | Stop | 8x 01 04 07 00 FF | Zoom Control |
| Tele(Standard) | 8x 01 04 07 02 FF | ||
| Wide(Standard) 8x | 01 04 07 03 FF | ||
| Tele(Variable) | 8x 01 04 07 2p FF | p=0 (Low) to 7 (High) | |
| Wide(Variable) 8x | 01 04 07 3p FF | ||
| Direct 8x 01 04 47 | 0p 0q 0r 0sFF | pqrs: Zoom Position, MD330U(I):0x0140~0x54C0 | |
| CAM_DZoom | On | 8x 01 04 06 02 FF | Digital (Sensor) zoom ON/OFF |
| Off | 8x 01 04 06 03 FF | ||
| CAM_Focus | Stop | 8x 01 04 08 00 FF | Focus ControlEach 'Far/Near' needs a 'stop' |
| Far (Standard) | 8x 01 04 08 02 FF | ||
| Near (Standard) 8x | 01 04 08 03 FF | ||
| Far (Variable) | 8x 01 04 08 2p FF | p=0 (Low) to 7 (High) | |
| Near (Variable) | 8x 01 04 08 3p FF | ||
| Auto Focus | 8x 01 04 38 02 FF | AF ON/OFF | |
| Manual Focus | 8x 01 04 38 03 FF | ||
| Auto/Manual | 8x 01 04 38 10 FF | ||
| One Push | 8x 01 04 18 01 FF | ||
| Direct 8x 01 04 48 | 0p 0q 0r 0sFF | pqrs: Focus Position,MD330U(I): 0x0000(wide) ~ 0x4000(tele) | |
| Near Limit | 8x 01 04 28 0p 0q 0r 0sFF | pqrs: Focus Near Limit Position0001: 0.01m0002: 1m0003: 1.5m0004: 2m0005: 3m0006: 6m0007: 10m | |
| CAM_AFMode | Normal AF | 8x 01 04 57 00 FF | Continuous AF ON |
| Zoom Trigger AF | 8x 01 04 57 02 FF Continuous AF OFF, only trigger AF after PTZ done | ||
| CAM_WB | Auto | 8x 01 04 35 00 FF | Normal Auto |
| ATW | 8x 01 04 35 04 FF | ||
| Indoor 8x 01 04 35 01 FF | |||
| Outdoor | 8x 01 04 35 02 FF | ||
| One Push WB | 8x 01 04 35 03 FF | One Push WB mode | |
| Manual | 8x 01 04 35 05 FF | Manual Control mode | |
| One Push Trigger | 8x 01 04 10 05 FF | One Push WB Trigger | |
| CAM_RGain | Reset | 8x 01 04 03 00 FF | Return to 80 (128) value |
| Up 8x 01 04 03 02 FF | Manual Control of R Gain | ||
| Down | 8x 01 04 03 03 FF | ||
| Direct 8x 01 04 43 00 00 0p 0q FF | pq: R Gain 00(0) to FF(255) | ||
| CAM_BGain | Reset | 8x 01 04 04 00 FF | Return to 80 (128) value |
| Up 8x 01 04 04 02 FF | Manual Control of B Gain | ||
| Down | 8x 01 04 04 03 FF | ||
| Direct 8x 01 04 44 00 00 0p 0q FF | pq: B Gain 00(0) to FF(255) | ||
| CAM_AE | Full Auto | 8x 01 04 39 00 FF | Automatic Exposure mode |
| Manual | 8x 01 04 39 03 FF | Manual Control mode | |
| Shutter Priority | 8x 01 04 39 0A FF | Shutter Priority Automatic Exposure mode | |
| Iris Priority | 8x 01 04 39 0B FF | Iris Priority Automatic Exposure mode | |
| CAM_SlowShutter | Auto | 8x 01 04 5A 02 FF | Auto Slow Shutter ON/OFF |
| Manual 8x 01 04 5A 03 FF | |||
| CAM_Shutter | Reset | 8x 01 04 0A 00 FF | Shutter Setting |
| Up | 8x 01 04 0A 02 FF | ||
| Down | 8x 01 04 0A 03 FF | ||
| Direct 8x 01 04 4A 00 00 0p 0q FF | pq: Shutter Position | ||
| CAM_Iris | Reset | 8x 01 04 0B 00 FF | Iris Setting |
| Up 8x 01 04 0B 02 FF | |||
| Down | 8x 01 04 0B 03 FF | ||
| Direct 8x 01 04 4B 00 00 0p 0q FF | pq: Iris Position | ||
| CAM_Gain | Reset | 8x 01 04 0C 00 FF | Gain Setting |
| Up 8x 01 04 0C 02 FF | |||
| Down | 8x 01 04 0C 03 FF | ||
| Direct 8x 01 04 4C 00 00 0p 0q FF | pq: Gain Position | ||
| AE Gain Limit | 8x 01 04 2C 0p FF | p: Gain Position (8 to E: 24db~42db) | |
| CAM_ExpComp | Reset | 8x 01 04 0E 00 FF | Exposure Comp Amount Setting |
| Up | 8x 01 04 0E 02 FF | ||
| Down 8x 01 04 0E | 03 FF | ||
| Direct 8x 01 04 4E | 00 00 0p0q FF | pq: ExpComp Position | |
| CAM_Backlight | On | 8x 01 04 33 02 FF | Back Light Compensation ON/OFF |
| Off | 8x 01 04 33 03 FF | ||
| CAM_LR_Reverse | On | 8x 01 04 61 02 FF | Mirror Image ON/OFF |
| Off | 8x 01 04 61 03 FF | ||
| CAM_Flip | On | 8x 01 04 66 02 FF | Flip ON/OFF |
| Off | 8x 01 04 66 03 FF | ||
| CAM_Preset | Reset | 8x 01 04 3F 00 pp FF | Preset Cancel. pp: Preset Number0x00~0xFF |
| Set | 8x 01 04 3F 01 pp FF | Preset Save. | |
| Recall | 8x 01 04 3F 02 pp FF | Preset Load. | |
| CAM_Menu | On | 8x 01 06 06 02 FF | Menu Display ON/OFF |
| Off 8x 01 06 06 03 | FF | ||
| On/Off | 8x 01 06 06 10 FF | ||
| CAM_MenuEnter | -- | 8x 01 7E 01 02 00 01FF | Enter Submenu |
| CAM_NR | -- | 8x 01 04 53 0p FF | p: Image NR Setting (0:OFF, Level1 to 3) |
| CAM_WDR | On | 8x 01 04 3D 02 FF | Wdr ON/OFF |
| Off | 8x 01 04 3D 03 FF | ||
| CAM_ICR | On | 8x 01 04 01 02 FF | Infrared Mode ON (Night) |
| Off | 8x 01 04 01 03 FF | Infrared Mode OFF (Day) | |
| CAM_AutoICR | On | 8x 01 04 51 02 FF | Auto Infrared mode ON/OFF |
| Off | 8x 01 04 51 03 FF | ||
| Threshold 8x 01 04 | 21 00 00 0p0q FF | pq: ICR OFF(Day)->ON(Night) threshold level00: Low; 01: Middle; 02: High | |
| CAM_IDWrite | -- | 8x 01 04 22 0p 0q 0r 0sFF | pqrs: Camera ID (=0000 to FFFF) |
| Video Format Change | -- 8x 01 7E 01 1E | 0p 0qFF | pq |
| 0x02: 1920x1080P/60 | |||
| 0x03: 1920x1080P/59.94 | |||
| 0x04: 1920x1080P/30 | |||
| 0x05: 1920x1080P/29.97 | |||
| 0x0B: 1280x720p/60 | |||
| 0x0C: 1280x720p/59.94 | |||
| 0x0D: 1920x1080p/50 | |||
| 0x18: 1920x1080p/25 | |||
| 0x26: 1280x720p/50 | |||
| 0x27: 1280x720p/30 | |||
| IR_Receive | On | 8x 01 06 08 02 FF | Infrared remote commander reception ON |
| Pan-tilt Drive | Up | 8x 01 06 01 VV WW 0301 FF | VV: Pan speed setting 0x01 (low speed) to 0x18(high speed)WW: Tilt speed setting 0x01 (low speed) to 0x18(high speed)YYYY: Pan Position 7FFF(170°) to 8000(-170°)(Normalized, CENTER 0000)ZZZZ: Tilt Position 7FFF(90°) to 8000(-35°)(Image Flip: OFF) (Normalized, CENTER 0000) |
| Down 8x 01 06 01 | VV WW 0302 FF | ||
| Left 8x 01 06 01 | VV WW 0103 FF | ||
| Right 8x 01 06 01 | VV WW 0203 FF | ||
| UpLeft 8x 01 06 01 | VV WW 0101 FF | ||
| UpRight 8x 01 06 | 01 VV WW 0201 FF | ||
| DownLeft 8x 01 06 | 01 VV WW 0102 FF | ||
| DownRight 8x 01 | 06 01 VV WW 0202 FF | ||
| Stop 8x 01 06 01 | VV WW 0303 FF | ||
| AbsolutePosition | 8x 01 06 02 VV WW0Y 0Y 0Y 0Y 0Z 0Z 0Z FF | ||
| RelativePosition | 8x 01 06 03 VV WW0Y 0Y 0Y 0Y 0Z 0Z 0Z FF | ||
| Home | 8x 01 06 04 FF | ||
| Reset | 8x 01 06 05 FF | ||
| Freeze | Freeze On | 8x 01 04 62 02 FF | Freeze On Immediately |
| Freeze Off | 8x 01 04 62 03 FF | Freeze Off Immediately | |
| Preset FreezeOn | 8x 01 04 62 22 FF | Freeze On When Running Preset | |
| Preset FreezeOff | 8x 01 04 62 23 FF | Freeze Off When Running Preset | |
| RTMP | On | 8x 01 04 A2 02 FF | RTMP ON/OFF |
| Off | 8x 01 04 A2 03 FF | ||
| Video mode | USB+Stream | 8x 01 04 A3 00 FF | Video mode setting |
| USB only | 8x 01 04 A3 01 FF | ||
| Streaming only | 8x 01 04 A3 03 FF | ||
| Reboot | On | 8x 01 04 A4 FF | System reboot |
| P/T_Spd_Relative_Zoom_Ratio | On | 8x 01 04 A6 02 FF | P/T Speed Relative Zoom Ratio ON/OFF |
| Off | 8x 01 04 A6 03 FF | ||
| Factory Reset | System Factory Reset | 8x 01 04 3F 03 00 FF | |
| Preset Speed Set Preset | 8x 01 06 20 0p FF p=1 (Low) to 6 (High) | ||
| Speed | |||
| Facial Tracking | On | 8x 01 04 7D 02 FF | AI Facial Tracking ON/OFF |
| Off | 8x 01 04 7D 03 FF | ||
| Inquiry Command | Inquiry Packet | Reply Packet | Comments |
| CAM_PowerInq | 8x 09 04 00 FF | y0 50 02 FF | On |
| y0 50 03 FF | Off | ||
| CAM_ZoomPosInq | 8x 09 04 47 FF | y0 50 0p 0q 0r 0s FF | pqrs: Zoom Position |
| CAM_DZoomModelInq 8x 09 04 06 FF | y0 50 02 FF | D-Zoom On | |
| y0 50 03 FF | D-Zoom Off | ||
| CAM_FocusModelInq 8x 09 04 38 FF | y0 50 02 FF | Auto Focus | |
| y0 50 03 FF Manual Focus | |||
| CAM_FocusPosInq | 8x 09 04 48 FF | y0 50 0p 0q 0r 0s FF | pqrs: Focus Position |
| CAM_FocusNearLimitInq | 8x 09 04 28 FF | y0 50 0p 0q 0r 0s FF | pqrs: Focus Near Limit Position |
| CAM_AFModelInq 8x 09 04 57 FF | y0 50 00 FF | Continuous AF ON | |
| y0 50 02 FF Continuous AF OFF, only trigger AF after PTZ done | |||
| CAM_WBModelInq 8x 09 04 35 FF | y0 55 00 FF | Auto | |
| y0 55 04 FF ATW | |||
| y0 55 01 FF | Indoor | ||
| y0 55 02 FF Outdoor | |||
| y0 55 03 FF | One Push WB | ||
| y0 55 05 FF | Manual | ||
| CAM_RGainInq | 8x 09 04 43 FF | y0 50 00 00 0p 0q FF | pq: R Gain |
| CAM_BGainInq | 8x 09 04 44 FF | y0 50 00 00 0p 0q FF | pq: B Gain |
| CAM_AEModelInq | 8x 09 04 39 FF | y0 50 00 FF | Full Auto |
| y0 50 03 FF Manual | |||
| y0 50 0A FF | Shutter Priority | ||
| y0 50 0B FF | Iris Priority | ||
| CAM_SlowShutterModelInq 8x 09 04 5A FF | y0 50 02 FF | Auto | |
| y0 50 03 FF Manual | |||
| CAM_ShutterPosInq | 8x 09 04 4A FF | y0 50 00 00 0p 0q FF | pq: Shutter Position |
| CAM_IrisPosInq | 8x 09 04 4B FF | y0 50 00 00 0p 0q FF | pq: Iris Position |
| CAM_GainPosInq | 8x 09 04 4C FF | y0 50 00 00 0p 0q FF | pq: Gain Position |
| CAM_GainLimitInq | 8x 09 04 2C FF | y0 50 0q FF | p: Gain Limit |
| CAM_ExpCompPosInq | 8x 09 04 4E FF | y0 50 00 00 0p 0q FF | pq: ExpComp Position |
| CAM_BacklightModelInq | 8x 09 04 33 FF | y0 50 02 FF | On |
| y0 50 03 FF | Off | ||
| CAM_LR_Reverse_Inq | 8x 09 04 61 FF | y0 50 02 FFy0 50 03 FF Off | On |
| CAM_Flip_Inq 8x 09 04 66 FF | y0 50 02 FF | On | |
| y0 50 03 FF Off | |||
| CAM_NRInq | 8x 09 04 53 FF | y0 50 0p FF | p: NR Level |
| CAM_WDRInq 8x 09 04 3D FF | y0 50 02 FF | On | |
| y0 50 03 FF | Off | ||
| CAM_ICRModelnq | 8x 09 04 01 FF | y0 50 02 FF | On (Night) |
| y0 50 03 FF | Off (Day) | ||
| CAM_AutoICRModelnq | 8x 09 04 51 FF | y0 50 02 FF | On |
| y0 50 03 FF | Off | ||
| CAM_AutoICRThresholdInq | 8x 09 04 21 FF | y0 50 00 00 0p 0q FF | pq: ICR OFF(Day)->ON(Night) threshold level00: Low; 01: Middle; 02: High |
| CAM_IDInq | 8x 09 04 22 FF | y0 50 0p 0q 0r 0s FF | pqrs: Camera ID |
| CAM_VersionInq | 8x 09 00 02 FF | y0 50 ab cdmn pq rs tu vw FF | abcd: Vendor Code, AVer: 2574 mnpq: Model Code, MD330U(I): 0559rstu: Firmware version (ex: 4025 for 1.1.4025.0)vw: Socket Number (=02) |
| CAM_MenuModelnq 8x 09 06 06 FF | y0 50 02 FF | On | |
| y0 50 03 FF Off | |||
| Video Format Inq 8x 09 06 23 FF | y0 50 02 FF | 1920x1080P/60 | |
| y0 50 03 FF | 1920x1080P/59.94 | ||
| y0 50 04 FF | 1920x1080P/30 | ||
| y0 50 05 FF 1920x1080P/29.97 | |||
| y0 50 0B FF | 1280x720p/60 | ||
| y0 50 0C FF 1280x720p/59.94 | |||
| y0 50 0D FF | 1920x1080p/50 | ||
| y0 50 18 FF 1920x1080p/25 | |||
| y0 50 26 FF | 1280x720p/50 | ||
| y0 50 27 FF 1280x720p/30 | |||
| IR_Receive 8x 09 06 08 FF | y0 50 02 FF | On | |
| y0 50 03 FF Off | |||
| Pan-tiltPosInq | 8x 09 06 12 FF | y0 50 0Y 0Y 0Y 0Y 0Z 0Z 0Z 0Z FF | YYYY: Pan Position 7FFF(170°) to 8000(-170°)(Normalized, CENTER 0000)ZZZZ: Tilt Position 7FFF(90°) to 8000(-35°)(Image Flip: OFF) (Normalized, CENTER 0000) |
| CAM_Preset_Inq | 8x 09 04 3F FF | y0 50 pp FF | Return the last preset number whichhas beenoperated pp:01-FF |
| Pan-tiltMaxSpeedInq | 8x 09 06 11 FF | y0 50 ww zz FF | ww = Pan Max Speed zz = Tilt Max Speed |
| Freeze_Mode_Inq | 8x 09 04 62 01 FF | y0 50 02 FF | On |
| y0 50 03 FF | Off | ||
| Preset_Freeze_Inq 8x 09 04 62 02 FF | y0 50 02 FF | On | |
| y0 50 03 FF | Off | ||
| RTMP_Inq | 8x 09 04 A2 FF | y0 50 02 FF | On |
| y0 50 03 FF | Off | ||
| Video_mode_Inq | 8x 09 04 A3 FF | y0 50 00 FF | USB+Stream |
| y0 50 01 FF | USB only | ||
| y0 50 03 FF | Streaming only | ||
| P/T_Spd_Relative_Zoom_Ratio_Inq | 8x 09 04 A6 FF | y0 50 02 FF | On |
| y0 50 03 FF Off | |||
| Preset_Speed_Inq | 8x 09 06 20 FF | y0 50 0p FF | p=1 (Low) to 6 (High) |
| Firmware version | 8x 09 36 69 04 FF | y0 50 0p 0q 0r 0s 0t0u 0v 0w FF | fw_ver: p.q.rstu.vw |
| Facial Tracking Inq | 8x 09 04 7D FF | y0 50 02 FF | On |
| y0 50 03 FF | Off | ||
| CAM_Hdmi_Port Inq 8x 09 7E 04 79 00FF | y0 50 00 00 00 00 0000 00 00 00 0p 0q 0r0s FF | pqrs: Source physical address (See HDMI VSDB)p:data[A], q:data[B], r:data[C], s:data[D] | |
VISCA over IP Settings
PORT
| Internet protocol IPv4 |
| Transport protocol UDP |
| Port address 52381 |
FORMAT
| byte 0 | byte 1 | byte 2 | byte 3 | byte 4 | byte 5 | byte 6 | byte 7 | byte 8 ~~~ byte 23 | |
| func | Payload type | Payload Length | Sequence number | Payload (1 to 16 bytes) | |||||
| data Value1 Value2 | 1~16(0x0001~0x0010) | 0x00000000 ~ 0xFFFFFFF | VISCA Packet (see page VISCA) | ||||||
Payload type
| Name | Value1 | Value2 | Description |
| VISCA command | 0x01 | 0x00 | Stores the VISCA command. |
| VISCA inquiry | 0x01 | 0x10 | Stores the VISCA inquiry. |
| VISCA reply | 0x01 | 0x11 | Stores the reply for the VISCA command and VISCA inquiry, or VISCA device setting command |
| VISCA device setting command | 0x01 | 0x20 | Stores the VISCA device setting command. |
| Control command | 0x02 | 0x00 | Stores the control command |
| Control reply | 0x02 | 0x01 | Stores the reply for the control command. |
Sequence number
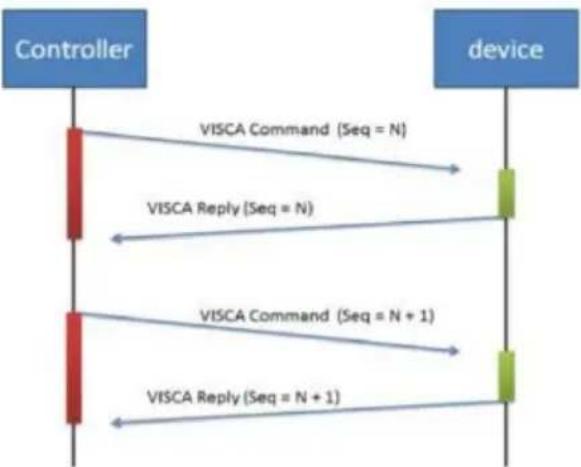
flowchart
graph TD
    A["Controller"] -->|VISCA Command (Seq = N)| B["device"]
    A -->|VISCA Reply (Seq = N)| B
    A -->|VISCA Command (Seq = N + 1)| B
    A -->|VISCA Reply (Seq = N + 1)| B
Sequence number = N
Example
Address locked to "X = 1" for VISCA over IP
| byte 0 | byte 1 | byte 2 | byte 3 | byte 4 | byte 5 | byte 6 | byte 7 | byte 8~~ byte 23 | |
| func | Payload type | Payload Length | Sequence number | Payload (1 to 16 bytes) | |||||
| data | Value1 | Value2 | 1~16(0x0001~0x0010) | 0x00000000 ~ 0xFFFFFFFF | VISCA Packet (see page VISCA) | ||||
| CMD: Power Off | 0x01 | 0x00 | 0x00 | 0x06 | 0x00 | 0x00 | 0x00 | 0x01 | 81 01 04 00 03 FF |
| reply ACK | 0x01 | 0x11 | 0x00 | 0x03 | 0x00 | 0x00 | 0x00 | 0x01 | 90 41 FF |
| reply COMPLETE | 0x01 | 0x11 | 0x00 | 0x03 | 0x00 | 0x00 | 0x00 | 0x01 | 90 51 FF |
| INQ: Power | 0x01 | 0x10 | 0x00 | 0x05 | 0x00 | 0x00 | 0x00 | 0x02 | 81 09 04 00 FF |
| INQ reply | 0x01 | 0x11 | 0x00 | 0x04 | 0x00 | 0x00 | 0x00 | 0x02 | 90 50 03 FF |
VISCA Zoom Table
| Zoom position and zoom ratio (MD330UI) | |
| Parameter | Zoom ratio |
| 0140 | x1 |
| 1720 | x2 |
| 2520 x3 | |
| 2E20 | x4 |
| 3460 x5 | |
| 3920 | x6 |
| 3CA8 | x7 |
| 3FA0 | x8 |
| 4220 x9 | |
| 4448 | x10 |
| 4638 x11 | |
| 47F0 | x12 |
| 4980 x13 | |
| 4AF0 | x14 |
| 4C40 x15 | |
| 4D78 | x16 |
| 4E88 x17 | |
| 4F80 | x18 |
| 5060 | x19 |
| 5120 | x20 |
| 51C8 x21 | |
| 5240 | x22 |
| 5290 x23 | |
| 52E0 | x24 |
| 5330 | x25 |
| 5380 | x26 |
| 53D0 x27 | |
| 5420 | x28 |
| 5470 x29 | |
| 54C0 | x30 |
| 54EC x33 (While digital zoom enabled) | |
| 5510 | x36 (While digital zoom enabled) |
| 552F | x39 (While digital zoom enabled) |
| 5549 | x42 (While digital zoom enabled) |
| 5560 x45 (While digital zoom enabled) | |
| 5574 | x48 (While digital zoom enabled) |
| 5586 x51 (While digital zoom enabled) | |
| 5595 | x54 (While digital zoom enabled) |
| 55A3 | x57 (While digital zoom enabled) |
| 55B0 | x60 (While digital zoom enabled) |
Pelco-D Command
PAN AND TILT COMMANDS
P/T bit(byte4.0) = 0
| byte 1 | byte 2 | byte 3 | byte 4 | byte 5 | byte 6 | byte 7 | |
| func | SYNC | ADDR | cmd 1 | cmd 2 | data1 | data2 | checksum |
| data | 0xFF | 1~8 | cmd 1 | cmd 2 | Pan speed | Tilt speed | 2~6 SUM |
note : speed = 0x00\~0x17
byte3 : command 1
| bit 7 | bit 6 | bit 5 | bit 4 | bit 3 | bit 2 | bit 1 | bit 0 |
| SENSEON | NA | NA | NA | CAMON/OFF | NA | NA | NA |
note : power off : byte3.7 = 0 & byte3.3 = 1 (0x08)
note : power on : byte3.7 = 1 & byte3.3 = 1 (0x88)
byte4: command 2
| bit 7 | bit 6 | bit 5 | bit 4 | bit 3 | bit 2 | bit 1 | bit 0 |
| NA | ZOOMWide | ZOOMTele | TILTDown | TILTUp | PANLeft | PANRight | P/T bit0(always) |
EXTENDED COMMAND SET
P/T bit(byte4.0) = 1
| byte 1 | byte 2 | byte 3 | byte 4 | byte 5 | byte 6 | byte 7 | ||
| func | SYNC | ADDR | data1 | data2 | data3 | data4 | checksum | |
| Set Preset XX | 0xFF | 1~8 | 0x00 | 0x03 | 0x00 | Preset # | 2~6 SUM | |
| Clear Preset XX | 0xFF | 1~8 | 0x00 | 0x05 | 0x00 | Preset # | 2~6 SUM | |
| Go To Preset XX | 0xFF | 1~8 | 0x00 | 0x07 | 0x00 | Preset # | 2~6 SUM | |
| Track ON | 0xFF | 1~8 | 0x00 | 0x65 | 0x00 | 0x00 | 2~6 SUM | |
| Track OFF | 0xFF | 1~8 | 0x00 | 0x67 | 0x00 | 0x00 | 2~6 SUM | |
note : Preset #: 0x01 \~ 0xFF
Pelco-P Command
PAN AND TILT COMMANDS
P/T bit(byte4.0) = 0
| byte 1 | byte 2 | byte 3 | byte 4 | byte 5 | byte 6 | byte 7 | byte 8 | |
| func | STX | ADDR | data1 | data2 | data3 | data4 | ETX | checksum |
| data | 0xA0 | 0~7F | cmd 1 | cmd 2 | Pan speed | Tilt speed | 0xAF | 1~7 XOR |
note : speed = 0x00\~0x17
byte3 : command 1
| bit 7 | bit 6 | bit 5 | bit 4 | bit 3 | bit 2 | bit 1 | bit 0 |
| NA | CAM ON | NA | CAM ON/OFF | NA | NA | NA | NA |
note : power off : byte3.6 = 0 & byte3.4 = 1 (0x10)
note : power on : byte3.6 = 1 & byte3.4 = 1 (0x50)
byte4: command 2
| bit 7 | bit 6 | bit 5 | bit 4 | bit 3 | bit 2 | bit 1 | bit 0 |
| NA | ZOOMWide | ZOOMTele | TILTDown | TILTUp | PANLeft | PANRight | P/T bit0(always) |
EXTENDED COMMAND SET
P/T bit(byte4.0) = 1
| byte 1 | byte 2 | byte 3 | byte 4 | byte 5 | byte 6 | byte 7 | byte 8 | |
| func | STX | ADDR | data1 | data2 | data3 | data4 | ETX | checksum |
| Set Preset XX | 0xA0 | 0~7 | 0x00 | 0x03 | 0x00 | Preset # | 0xAF | 1~7 XOR |
| Clear Preset XX | 0xA0 | 0~7 | 0x00 | 0x05 | 0x00 | Preset # | 0xAF | 1~7 XOR |
| Go To Preset XX | 0xA0 | 0~7 | 0x00 | 0x07 | 0x00 | Preset # | 0xAF | 1~7 XOR |
| Track ON | 0xA0 | 0~7 | 0x00 | 0x65 | 0x00 | 0x00 | 0xAF | 1~7 XOR |
| Track OFF | 0xA0 | 0~7 | 0x00 | 0x67 | 0x00 | 0x00 | 0xAF | 1~7 XOR |
note : Preset #: 0x01 \~ 0xFF
CGI Command
| CGI List for Video Transmission | |||||
| CGI item name | URL Command | Parameter Name | Parameter value | Description | |
| Get JPEG | /snapshot | 1280x720 jpg | |||
| Get 4K JPEG | /cgi-bin?OnePush=n | Step 1: requeset 4k snapshot | |||
| /snapshot?res=4k | Step 2: get 3840x2160 jpg | ||||
| Set RTSP URL | /cgi-bin?SetString= | sys_rtsp_stm1_url, rtsp_url | Set RTSP URL to rtsp_url | ||
| Get RTSP URL | /cgi-bin?GetString= | sys_rtsp_stm1_url | Reply RTSP URL example: sys_rtsp_stm1_url="live_st1" | ||
| Get RTSP stream | rtsp://ip/rtsp_url | Default RTSP url: live_st1rtsp://ip/live_st1 | |||
| CGI List for Camera Control | |||||
| CGI item name | URL Command | Parameter Name | Parameter value | Description | |
| up start | /cgi-bin?SetPtzf= | 1,0,1 | |||
| up end | /cgi-bin?SetPtzf= | 1,0,2 | |||
| down start | /cgi-bin?SetPtzf= | 1,1,1 | |||
| down end | /cgi-bin?SetPtzf= | 1,1,2 | |||
| left start | /cgi-bin?SetPtzf= | 0,1,1 | |||
| left end | /cgi-bin?SetPtzf= | 0,1,2 | |||
| right start | /cgi-bin?SetPtzf= | 0,0,1 | |||
| right end | /cgi-bin?SetPtzf= | 0,0,2 | |||
| zoom_in start | /cgi-bin?SetPtzf= | 2,0,1 | |||
| zoom_in end | /cgi-bin?SetPtzf= | 2,0,2 | |||
| zoom_out start | /cgi-bin?SetPtzf= | 2,1,1 | |||
| zoom_out end | /cgi-bin?SetPtzf= | 2,1,2 | |||
| set preset: | /cgi-bin?ActPreset= | 1,N | N : position | ||
| load preset: | /cgi-bin?ActPreset= | 0,N | N : position | ||
| CGI List for Various Settings | |||||
| CGI item name | URL | Command | Parameter Name | Parameter value | Description |
| exposure value | /cgi-bin?Set= | img_expo_expo,3,N | value | 1 ~ 9 | N : value |
| saturation | /cgi-bin?Set= | img_saturation,3,N | value | 0 ~ 10 | N : value |
| contrast | /cgi-bin?Set= | img_contrast,3,N | value | 0~4 | N : value |
| Reboot | GET(Basic Authentication) | /cgi-bin?OnePush=! | |||
| Factory Reset | GET(Basic Authentication) | /cgi-bin?OnePush=d | |||
| RTMP Start streamming | /cgi-bin?Set= | vdo_rtmp_enable,3,1 | |||
| RTMP Stop streamming | /cgi-bin?Set= | vdo_rtmp_enable,3,0 | |||
| Status get(Model name & mac & FW_VER) | /cgi-bin?GetString= | sys_name&net_mac&sys_fw_version | http://10.100.105.110/cgi-bin?GetString=sys_name&net_mac&sys_fw_version | ||
| Serial No. get | /cgi-bin?GetSerialNumber | http://10.100.105.110/cgi-bin?GetSerialNumber | |||
| uploadwav | /uploadwav/uploadwav?Set= | ado_playback_file,3,N | -1~9 (0~9 for customer) | -1 = OFF, 0 ~ 9 = index | |
| oneclick | /cgi-bin?Set= | ptz_oneclick_x,3,N1&ptz_oneclick_y,3,N2&ptz_one_click_spd,3,N3 | ptz_one_click_spd 1~24 | N1, N2 = X, Y coordinates(1080P, 0,0 at top left)N3=moving speed | |
| IR Cut Filter | /cgi-bin?Set= | img_ircut_filter,3,N | 0 ~ 2 | 0 = Day, 1 = Night, 2 = Auto | |
| IR Cut Filter Sensitivity | /cgi-bin?Set= | img_ircut_sensitivity,3,N | 0 ~ 2 | 0 = Low, 1 = Middle, 2 = High | |
| CGI List for Video Stream | |||||
| Video Stream Resolution | /cgi-bin?Set= | vdo_net_stm_res,3,N | value | 1 / 2 / 4 / 5 / 6 | 1 = 1920x1080;2 = 1280x720;4 = 640x480;5 = 640x360;6 = 3840x2160 |
| Video Stream Framerate | /cgi-bin?Set= | vdo_net_stm_fr,3,N | value | 1 / 5 / 15 / 20 / 30 | frames per second |
| Video Stream Bitrate | /cgi-bin?Set= | vdo_net_stm_bitrate,3,N | value | 0 ~ 7 | 0 = 512 Kbps;1 = 1 Mbps;2 = 2 Mbps;3 = 4 Mbps;4 = 8 Mbps;5 = 16 Mbps;6 = 32 Mbps;7 = Auto |
| Video Stream I-VOPInterval (S) in seconds | /cgi-bin?Set= | vdo_net_stm_intvl,3,N | value | 1 ~ 10 | I-VOP Interval |
| Video Stream Rate Control | /cgi-bin?Set= | vdo_net_stm_ratectrl,3,N | value | 0 / 1 | 0: CBR;1: VBR |
| Video Stream Encoding Type | /cgi-bin?Set= | vdo_net_stm_codec,3,N | value | 1 ~ 2 | 1: H.264;2: H.265 |
| Mosaic on Stream On/Off | /cgi-bin?Set= | vdo_net_stm_mosaic,3,N | value | 0 / 1 | 0: OFF; 1: ON |
| Mosaic on Stream Mode | /cgi-bin?Set= | ai_detect_mode,3,N | value | 0 / 1 | 0: Body; 1: Full face |
| CGI List for Audio | |||||
| CGI item name | URL | Command | Parameter Name | Parameter value | Description |
| Auto Echo Cancel | /cgi-bin? Set= | ado_echo_cancel,3,N | 0 ~ 1 0 = OFF, 1 = ON | ||
| Noise Suppression | /cgi-bin? Set= | ado_noise_suppression,3,N | 0 ~ 4 | 0 = OFF, 1 = NR DSP, 2 = NR, 3 = NR + BF, 4 = NR Strong | |
| Audio Beam Forming | /cgi-bin? Set= | ado_mic_bf_type,3,N | 0 ~ 5 | 0 = 30°, 1 = 50°, 2 = 70°, 3 = 90°, 4 = 110°, 5 = 130° | |
| Audio In Volume | /cgi-bin? Set= | ado_vol,3,N | 0 ~10 | 0 ~ 10 volume | |
| Audio In Mute | /cgi-bin? Set= | ado_mic_mute,3,N | 0 ~ 1 | 0 = Un-mute, 1 = Mute | |
| Output Type | /cgi-bin? Set= | ado_out_path,3,N | 0 ~ 2 | 0 = Speaker, 1 = HDMI, 2 = Both | |
| Output Volume | /cgi-bin? Set= | ado_spk_gain,3,N | 0 ~10 | 0 ~ 10 volume | |
| Output Mute | /cgi-bin? Set= | ado_spk_mute,3,N | 0 ~ 1 | 0 = Un-mute, 1 = Mute | |
| CGI List for AI Setting | |||||
| CGI item name | URL | Command | Parameter Name | Parameter value | Description |
| AI Detection (AI Detection and Eyes tracking are mutually exclusive.) | /cgi-bin?Set= | ai_detect_on,3,N | value | 0 / 1 | 0: OFF; 1: ON |
| AI Detection Site | /cgi-bin?Set= | ai_detect_mode,3,N | value | 0 / 1 | 0: Body; 1: Full face |
| Eyes Tracking On/Off (AI Detection) | /cgi-bin?Set= | trk_tracking_on,3,N | value | 0 / 1 | 0: OFF; 1: ON |
| and Eyes tracking are mutually exclusive.) | |||||
| Tracking Preset | /cgi-bin?ActPreset=1,255 | Save current pos. for eye tracking preset point. | |||
| Timeout to preset | /cgi-bin?Set= | trk_lost_time,3,N | value | 3/5/7/10 | timeout in seconds |
| Tracking Site | /cgi-bin?Set= | trk_mode,3,N | value | 0/1 | 0: Full face; 1: Eyes |
| Tracking Range | /cgi-bin?Set= | trk_sensitivity,3,N | value | 0~2 | 0: Close; 1: Medium; 2: Wide |
| Eyes Tracking On/Off Get | /cgi-bin?Get=trk_tracking_on | ||||
| - Reply | Ontrk_tracking_on=1Offtrk_tracking_on=0 | ||||
| Get detect zone(target frame) number | /cgi-bin?Get=trk_detect_num | ||||
| - Reply trk_detect_num=X | X: number of target frames, 50 max. | ||||
| Get detect zone(target frame) info | /cgi-bin?GetGroup=trk_detect_zones | ||||
| - Reply | trk_detect_zones="trk_num:02.focus:-1.zone[00]:760,09,222,300.zone[01]:660,540,16,22." | focus - current target frame index.zone[NN]:x,y,w,h - 1080P based | (0,0) at top left of video.X,Y,W(width),H(height) is based on the top left of the target frame.“focus:" is followed by the current tracking target frame index.Example: "-1" indicates no target is being tracked.If 3 targets are being detected, “focus:" should be followed by either 0, 1, or 2. | ||
| Select Tracking Target | /cgi-bin?SetString= | TrackingFocusZone,x,y,w,h | x, y: coordinates,w: width,h: height, (0,0 at top left) | Based on the result of trk_detect zones,select tracking target.ex: x=343,y=373, w=213,h=310/cgi-bin?SetString=TrackingFocusZone,343,373,213,310 | |

natural_image
Technical line drawing of a mechanical device with concentric circles and a mode dial (no text or symbols)MD330U 系列 PTZ 攝影機
— 使用手册 —
如何清潔和消毒
natural_image
Diagram of a robotic arm with cable and connector, showing wiring connection to a device (no text or symbols present)- 操作條件
natural_image
Line drawing of a device with a mounted sensor or camera on top, shown in two views (no text or symbols)- 為確保本裝置長期穩定運行
natural_image
Diagram of a robotic arm with connected cable and sensor, showing wiring connection (no text or symbols)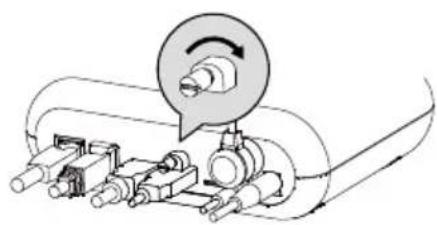
natural_image
Mechanical assembly diagram showing a rotating component with no visible text or symbolsPossibly hazardous optical radiation emitted from this product. Do not stare at operation lamp. May be harmful to the eyes.
臉部追蹤 (Tracking)....21
攝影機設定 (Camera Settings)....22
曝光 (Exposure) 22
natural_image
Technical line drawing of a mechanical component with no visible text or symbolsnatural_image
Pure electrical circuit lines without any symbolsnatural_image
Technical line drawing of a mechanical component with mounting holes and a housing (no text or symbols)壁掛支架 (黑/白)

natural_image
Pure electrical circuit lines without any symbols吊頂式支架 (x2)
產品概觀

水平垂直轉動角度
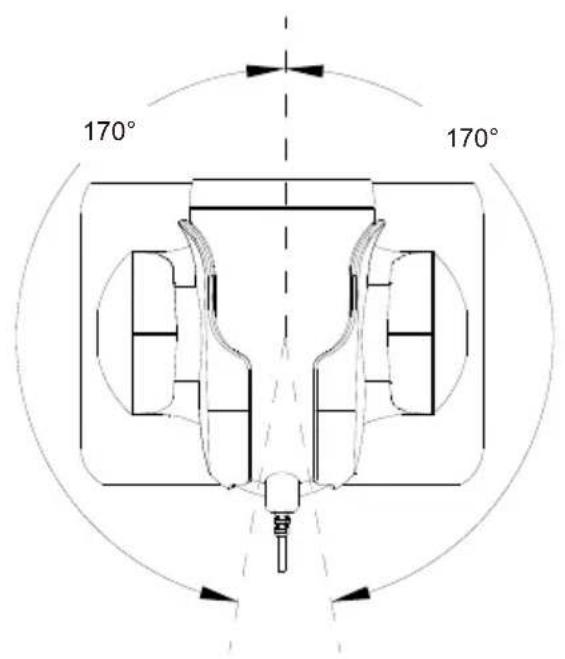
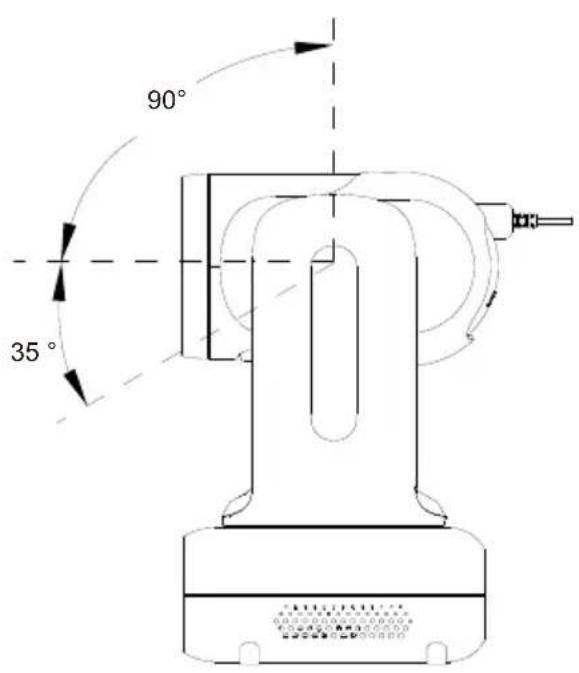
模式切换
IP 位址設定
固定 IP
● AVer IPCam Utility
● AVer PTZ Management
natural_image
Hospital room scene with medical staff in full PPE attending to a patient in bed (no visible text or symbols)| Name | Value1 | Value2 | Description |
| VISCA command | 0x01 | 0x00 | Stores the VISCA command. |
| VISCA inquiry | 0x01 | 0x10 | Stores the VISCA inquiry. |
| VISCA reply | 0x01 | 0x11 | Stores the reply for the VISCA command and VISCA inquiry, or VISCA device setting command |
| VISCA device setting command | 0x01 | 0x20 | Stores the VISCA device setting command. |
| Control command | 0x02 | 0x00 | Stores the control command |
| Control reply | 0x02 | 0x01 | Stores the reply for the control command. |
Sequence number
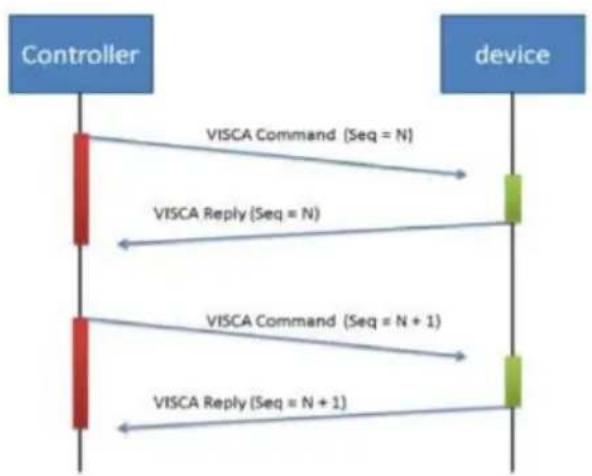
flowchart
graph TD
    A["Controller"] -->|VISCA Command (Seq = N)| B["device"]
    A -->|VISCA Reply (Seq = N)| B
    A -->|VISCA Command (Seq = N + 1)| B
    A -->|VISCA Reply (Seq = N + 1)| B
Sequence number = N
Example
Address locked to "X = 1" for VISCA over IP
| byte 0 | byte 1 | byte 2 | byte 3 | byte 4 | byte 5 | byte 6 | byte 7 | byte 8~~~byte 23 | |
| func | Payload type | Payload Length | Sequence number | Payload (1 to 16 bytes) | |||||
| data | Value1 | Value2 | 1~16(0x0001~0x0010) | 0x00000000 ~ 0xFFFFFFFF | VISCA Packet (see page VISCA) | ||||
| CMD: Power Off | 0x01 | 0x00 | 0x00 | 0x06 | 0x00 | 0x00 | 0x00 | 0x01 | 81 01 04 00 03 FF |
| reply ACK | 0x01 | 0x11 | 0x00 | 0x03 | 0x00 | 0x00 | 0x00 | 0x01 | 90 41 FF |
| reply COMPLETE | 0x01 | 0x11 | 0x00 | 0x03 | 0x00 | 0x00 | 0x00 | 0x01 | 90 51 FF |
| INQ:Power | 0x01 | 0x10 | 0x00 | 0x05 | 0x00 | 0x00 | 0x00 | 0x02 | 81 09 04 00FF |
| INQ reply | 0x01 | 0x11 | 0x00 | 0x04 | 0x00 | 0x00 | 0x00 | 0x02 | 90 50 03 FF |
VISCA 變焦倍率表
| Zoom position and zoom ratio (MD330UI) | |
| Parameter | Zoom ratio |
| 0140 | x1 |
| 1720 | x2 |
| 2520 | x3 |
| 2E20 | x4 |
| 3460 | x5 |
| 3920 | x6 |
| 3CA8 | x7 |
| 3FA0 | x8 |
| 4220 | x9 |
| 4448 | x10 |
| 4638 | x11 |
| 47F0 | x12 |
| 4980 | x13 |
| 4AF0 | x14 |
| 4C40 | x15 |
| 4D78 | x16 |
| 4E88 | x17 |
| 4F80 | x18 |
| 5060 | x19 |
| 5120 | x20 |
| 51C8 | x21 |
| 5240 | x22 |
| 5290 | x23 |
| 52E0 | x24 |
| 5330 | x25 |
| 5380 | x26 |
| 53D0 | x27 |
| 5420 | x28 |
| 5470 | x29 |
| 54C0 | x30 |
| 54EC | x33 (While digital zoom enabled) |
| 5510 | x36 (While digital zoom enabled) |
| 552F | x39 (While digital zoom enabled) |
| 5549 | x42 (While digital zoom enabled) |
| 5560 | x45 (While digital zoom enabled) |
| 5574 | x48 (While digital zoom enabled) |
| 5586 | x51 (While digital zoom enabled) |
| 5595 | x54 (While digital zoom enabled) |
| 55A3 | x57 (While digital zoom enabled) |
| 55B0 | x60 (While digital zoom enabled) |
Pelco-D 指令
PAN AND TILT COMMANDS
P/T bit(byte4.0) = 0
| byte 1 | byte 2 | byte 3 | byte 4 | byte 5 | byte 6 | byte 7 | |
| func | SYNC | ADDR | cmd 1 | cmd 2 | data1 | data2 | checksum |
| data | 0xFF | 1~8 | cmd 1 | cmd 2 | Pan speed | Tilt speed | 2~6 SUM |
note : speed = 0x00\~0x17
byte3 : command 1
| bit 7 | bit 6 | bit 5 | bit 4 | bit 3 | bit 2 | bit 1 | bit 0 |
| SENSEON | NA | NA | NA | CAMON/OFF | NA | NA | NA |
note : power off : byte3.7 = 0 & byte3.3 = 1 (0x08)
note : power on : byte3.7 = 1 & byte3.3 = 1 (0x88)
byte4: command 2
| bit 7 | bit 6 | bit 5 | bit 4 | bit 3 | bit 2 | bit 1 | bit 0 |
| NA | ZOOMWide | ZOOMTele | TILTDown | TILTUp | PANLeft | PANRight | P/T bit0(always) |
EXTENDED COMMAND SET
P/T bit(byte4.0) = 1
| byte 1 | byte 2 | byte 3 | byte 4 | byte 5 | byte 6 | byte 7 | ||
| func | SYNC | ADDR | data1 | data2 | data3 | data4 | checksum | |
| Set Preset XX | 0xFF | 1~8 | 0x00 | 0x03 | 0x00 | Preset # | 2~6 SUM | |
| Clear Preset XX | 0xFF | 1~8 | 0x00 | 0x05 | 0x00 | Preset # | 2~6 SUM | |
| Go To Preset XX | 0xFF | 1~8 | 0x00 | 0x07 | 0x00 | Preset # | 2~6 SUM | |
| Track ON | 0xFF | 1~8 | 0x00 | 0x65 | 0x00 | 0x00 | 2~6 SUM | |
| Track OFF | 0xFF | 1~8 | 0x00 | 0x67 | 0x00 | 0x00 | 2~6 SUM | |
note : Preset #: 0x01 \~ 0xFF
Pelco-P 指令
PAN AND TILT COMMANDS
P/T bit(byte4.0) = 0
| byte 1 | byte 2 | byte 3 | byte 4 | byte 5 | byte 6 | byte 7 | byte 8 | |
| func | STX | ADDR | data1 | data2 | data3 | data4 | ETX | checksum |
| data | 0xA0 | 0~7F | cmd 1 | cmd 2 | Pan speed | Tilt speed | 0xAF | 1~7 XOR |
note : speed = 0x00\~0x17
byte3 : command 1
| bit 7 | bit 6 | bit 5 | bit 4 | bit 3 | bit 2 | bit 1 | bit 0 |
| NA | CAM ON | NA | CAM ON/OFF | NA | NA | NA | NA |
note : power off : byte3.6 = 0 & byte3.4 = 1 (0x10)
note : power on : byte3.6 = 1 & byte3.4 = 1 (0x50)
byte4: command 2
| bit 7 | bit 6 | bit 5 | bit 4 | bit 3 | bit 2 | bit 1 | bit 0 |
| NA | ZOOMWide | ZOOMTele | TILTDown | TILTUp | PANLeft | PANRight | P/T bit0(always) |
EXTENDED COMMAND SET
P/T bit(byte4.0) = 1
| byte 1 | byte 2 | byte 3 | byte 4 | byte 5 | byte 6 | byte 7 | byte 8 | |
| func | STX | ADDR | data1 | data2 | data3 | data4 | ETX | checksum |
| Set Preset XX | 0xA0 | 0~7 | 0x00 | 0x03 | 0x00 | Preset # | 0xAF | 1~7 XOR |
| Clear Preset XX | 0xA0 | 0~7 | 0x00 | 0x05 | 0x00 | Preset # | 0xAF | 1~7 XOR |
| Go To Preset XX | 0xA0 | 0~7 | 0x00 | 0x07 | 0x00 | Preset # | 0xAF | 1~7 XOR |
| Track ON | 0xA0 | 0~7 | 0x00 | 0x65 | 0x00 | 0x00 | 0xAF | 1~7 XOR |
| Track OFF | 0xA0 | 0~7 | 0x00 | 0x67 | 0x00 | 0x00 | 0xAF | 1~7 XOR |
note : Preset #: 0x01 \~ 0xFF
CGI 指令
| CGI List for Video Transmission | |||||
| CGI item name | URL | Command | Parameter Name | Parameter value | Description |
| Get JPEG | /snapshot | 1280x720 jpg | |||
| Get 4K JPEG | /cgi-bin?OnePush=n | Step 1: requeset 4k snapshot | |||
| /snapshot?res=4k | Step 2: get 3840x2160 jpg | ||||
| Set RTSP URL | /cgi-bin?SetString= | sys_rtsp_stm1_url,rtsp_url | Set RTSP URL to rtsp_url | ||
| Get RTSP URL | /cgi-bin?GetString= | sys_rtsp_stm1_url | Reply RTSP URL example: | sys_rtsp_stm1_url="live_st1" | |
| Get RTSP stream | rtsp://ip/rtsp_url | Default RTSP url: live_st1rtsp://ip/live_st1 | |||
| CGI List for Camera Control | |||||
| CGI item name | URL Command Parameter | Name | Parameter value | Description | |
| up start | /cgi-bin?SetPtzf= | 1,0,1 | |||
| up end | /cgi-bin?SetPtzf= | 1,0,2 | |||
| down start | /cgi-bin?SetPtzf= | 1,1,1 | |||
| down end | /cgi-bin?SetPtzf= | 1,1,2 | |||
| left start | /cgi-bin?SetPtzf= | 0,1,1 | |||
| left end | /cgi-bin?SetPtzf= | 0,1,2 | |||
| right start | /cgi-bin?SetPtzf= | 0,0,1 | |||
| right end | /cgi-bin?SetPtzf= | 0,0,2 | |||
| zoom_in start | /cgi-bin?SetPtzf= | 2,0,1 | |||
| zoom_in end | /cgi-bin?SetPtzf= | 2,0,2 | |||
| zoom_out start | /cgi-bin?SetPtzf= | 2,1,1 | |||
| zoom_out end | /cgi-bin?SetPtzf= | 2,1,2 | |||
| set preset: | /cgi-bin?ActPreset= | 1,N | N : position | ||
| load preset: | /cgi-bin?ActPreset= | 0,N | N : position | ||
| CGI List for Various Settings | |||||
| CGI item name | URL | Command | Parameter Name | Parameter value | Description |
| exposure value | /cgi-bin?Set= | img_expo_expo,3,N | value | 1 ~ 9 | N : value |
| saturation | /cgi-bin?Set= | img_saturation,3,N | value | 0 ~ 10 | N : value |
| contrast | /cgi-bin?Set= | img_contrast,3,N | value | 0 ~ 4 | N : value |
| Reboot | GET(Basic Authentication) | /cgi-bin?OnePush=! | |||
| Factory Reset GET(Basic Authentication) | /cgi-bin?OnePush=d | ||||
| RTMP Start streamming | /cgi-bin?Set= | vdo_rtmp_enable,3,1 | |||
| RTMP Stopstreamming | /cgi-bin?Set= vdo_rtmp_enable,3,0 | ||||
| Status get(Model name & mac & FW_VER) | /cgi-bin?GetString= | sys_name&net_mac&sys_fw_version | http://10.100.105.110/cgi-bin?GetString=sys_name&net_mac&sys_fw_version | ||
| Serial No. get /cgi-bin?GetSerialNumber | http://10.100.105.110/cgi-bin?GetSerialNumber | ||||
| uploadwav | /uploadwav/uploadwav?Set= | ado_playback_file,3,N | -1~9 (0~9 for customer) | -1 = OFF, 0 ~ 9 = index | |
| oneclick | /cgi-bin?Set= | ptz_oneclick_x,3,N1&ptz_oneclick_y,3,N2&ptz_one_click_spd,3,N3 | ptz_one_click_spd 1~24 | N1, N2 = X, Y coordinates(1080P, 0,0 at top left)N3=moving speed | |
| IR Cut Filter | /cgi-bin?Set= | img_ircut_filter,3,N | 0 ~ 2 | 0 = Day, 1 = Night, 2 = Auto | |
| IR Cut Filter Sensitivity | /cgi-bin?Set= img_ircut_sensitivity,3,N | 0 ~ 2 0 = Low, | 1 = Middle, 2 = High | ||
| CGI List for Video Stream | |||||
| Video Stream Resolution | /cgi-bin?Set= | vdo_net_stm_res,3,N | value | 1 / 2 / 4 / 5 / 6 | 1 = 1920x1080;2 = 1280x720;4 = 640x480;5 = 640x360;6 = 3840x2160 |
| Video Stream Framerate | /cgi-bin?Set= | vdo_net_stm_fr,3,N | value | 1 / 5 / 15 / 20 / 30 | frames per second |
| Video Stream Bitrate | /cgi-bin?Set= | vdo_net_stm_bitrate,3,N | value | 0 ~ 7 | 0 = 512 Kbps;1 = 1 Mbps;2 = 2 Mbps;3 = 4 Mbps;4 = 8 Mbps;5 = 16 Mbps;6 = 32 Mbps;7 = Auto |
| Video Stream I-VOP Interval (S) | /cgi-bin?Set= | vdo_net_stm_intvl,3,N | value | 1 ~ 10 | I-VOP Interval in seconds |
| Video Stream Rate Control | /cgi-bin?Set= | vdo_net_stm_ratectrl,3,N | value | 0 / 1 | 0: CBR;1: VBR |
| Video Stream Encoding Type | /cgi-bin?Set= | vdo_net_stm_codec,3,N | value | 1 ~ 2 | 1: H.264;2: H.265 |
| Mosaic on Stream On/Off | /cgi-bin?Set= | vdo_net_stm_mosaic,3,N | value | 0 / 1 | 0: OFF; 1: ON |
| Mosaic on Stream Mode | /cgi-bin?Set= | ai_detect_mode,3,N | value | 0 / 1 | 0: Body; 1: Full face |
| CGI List for Audio | |||||
| CGI item name | URL Command | Paramet | er Name | Parameter value | Description |
| Auto Echo Cancel | /cgi-bin?Set= | ado_echo_cancel,3,N | 0 ~ 1 | 0 = OFF, 1 = ON | |
| Noise Suppression | /cgi-bin?Set= | ado_noise_suppression,3,N | 0 ~ 4 0 = | OFF, 1 = NR | DSP, 2 = NR, 3 =NR + BF, 4 = NR Strong |
| Audio Beam Forming | /cgi-bin?Set= | ado_mic_bf_type,3,N | 0 ~ 5 | 0 = 30°, 1 = 50°, 2 = 70°, 3 = 90°, 4= 110°, 5 = 130° | |
| Audio In Volume | /cgi-bin?Set= | ado_vol,3,N | 0 ~10 | 0 ~ 10 volume | |
| Audio In Mute | /cgi-bin?Set= | ado_mic_mute,3,N | 0 ~ 1 | 0 = Un-mute, 1 = Mute | |
| Output Type | /cgi-bin?Set= | ado_out_path,3,N | 0 ~ 2 0 = | Speaker, 1 = | HDMI, 2 = Both |
| Output Volume | /cgi-bin?Set= | ado_spk_gain,3,N | 0 ~10 | 0 ~ 10 volume | |
| Output Mute | /cgi-bin?Set= | ado_spk_mute,3,N | 0 ~ 1 0 = | Un-mute, 1 = | Mute |
| CGI List for AI Setting | ||||||
| CGI item name | URL | Command | Parameter Name | Parameter value | Description | |
| AI Detection (AI Detection and Eyes tracking are mutually exclusive.) | /cgi-bin?Set= ai_detect_on,3 ,N | value | 0 / 1 | 0: OFF; 1: ON | ||
| AI Detection Site | /cgi-bin?Set= ai_detect_mode,3,N | value | 0 / 1 | 0: Body; 1: Full face | ||
| Eyes Tracking On/Off (AI Detection and Eyes tracking are mutually exclusive.) | /cgi-bin?Set= trk_tracking_on,3,N | value | 0 / 1 | 0: OFF; 1: ON | ||
| Tracking Preset | /cgi-bin?ActPreset=1,255 | Save current pos. for eye tracking preset point. | ||||
| Timeout to preset | /cgi-bin?Set= trk_lost_time,3 ,N | value | 3 / 5 / 7 / 10 | timeout in seconds | ||
| Tracking Site | /cgi-bin?Set= | trk_mode,3 ,N | value | 0 / 1 | 0: Full face; 1: Eyes | |
| Tracking Range | /cgi-bin?Set= trk_sensitivity,3,N | value 0~2 | 0: Close; 1: | Medium; 2: Wide |
| Eyes Tracking On/Off Get | /cgi-bin?Get=trk_tracking_on | |||
| - Reply On | trk_tracking_on=1Offtrk_tracking_on=0 | |||
| Get detect zone(target frame) number | /cgi-bin?Get=trk_detect_num | |||
| - Reply trk_detect_ | num=X | X: number of target frames, 50 max. | ||
| Get detect zone(target frame) info | /cgi-bin?GetGroup=trk_detect_zones | |||
| - Reply trk_detect_ | zones="trk_num:02.focus:-1.zone[00]:760,09,222,300.zone[01]:660,540,16,22." | focus - current target frame index.zone[NN] : x,y,w,h - 1080P based | (0,0) at top left of video.X,Y,W(width),H(height) is based on the top left of the target frame.“focus:" is followed by the current tracking target frame index.Example: "-1" indicates no target is being tracked.If 3 targets are being detected, “focus:" should be followed by either 0, 1, or 2. | |
| Select Tracking Target | /cgi-bin?SetString= | TrackingFocusZone,x,y,w,h | x, y: coordinates, w: width, h: height, (0,0 at top left) |

natural_image
Technical line drawing of a mechanical device with concentric circles and a mode dial (no text or symbols)MD330U シリーズ PTZ カメラ
一 ユーザーマニュアル —
清掃と消毒の方法
natural_image
Line drawing of two hands holding a device with a circular top (no text or symbols)×
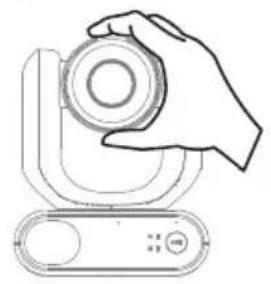
natural_image
Line drawing of a hand holding a circular object above a device (no text or symbols)×
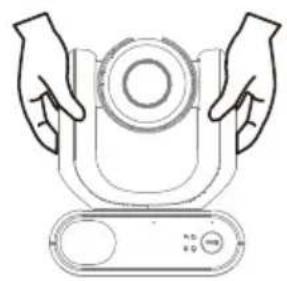
natural_image
Line drawing of two hands holding a circular component with a control panel (no text or symbols)×

natural_image
Line drawing of a hand holding a cylindrical device with a circular top and control panel (no text or symbols)- 輸送
natural_image
Diagram of a robotic arm with connected cable and connector, showing wiring connection (no text or symbols)- 動作条件
natural_image
Line drawing of a device with a mounted sensor or camera (no text or symbols)natural_image
Diagram of a robotic arm with connected sensors and a close-up view showing a device (no text or symbols present)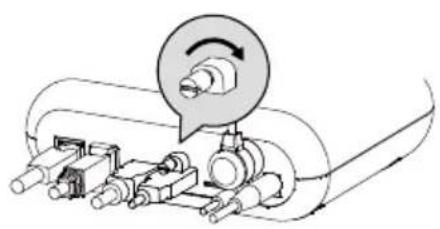
natural_image
Mechanical assembly diagram showing a rotating component with shafts and housing (no text or labels)natural_image
Technical line drawing of a mechanical component with no visible text or symbolsnatural_image
Pure electrical circuit lines without any symbolsnatural_image
Technical line drawing of a mechanical housing or enclosure with mounting holes and internal components (no text or symbols)壁設置用マウント (黒/白)

natural_image
Technical diagram of two mechanical components with mounting holes and housing (no text or symbols)天井取付ブラケット (x2)
各部名称

パン・チルト動作範囲
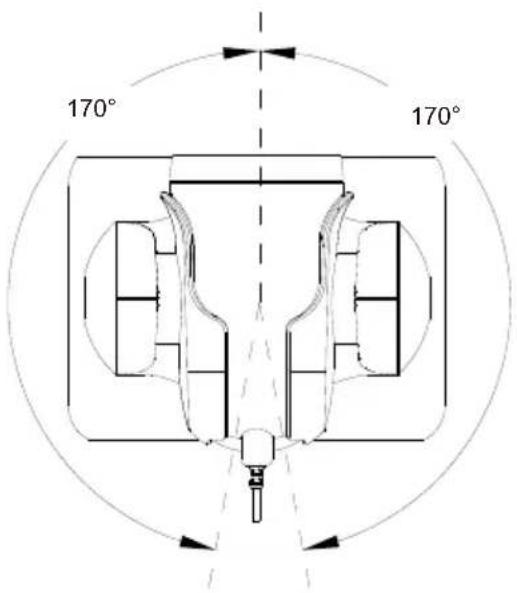
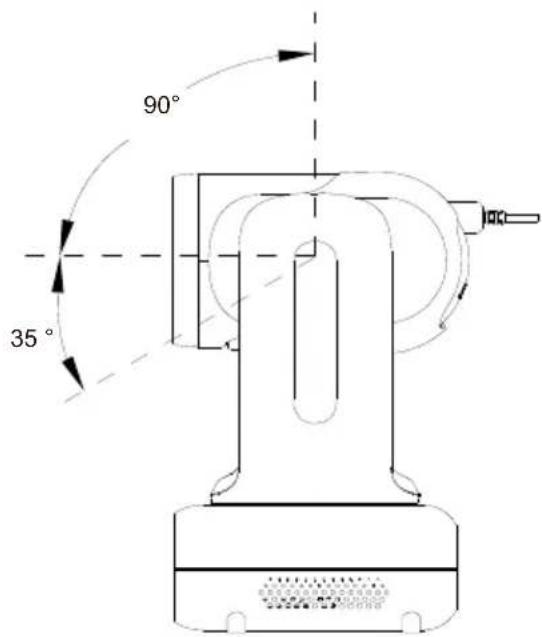
動作モードの切替
IP アドレス設定
固定 IP
● AVer PTZ Management
natural_image
Hospital room scene with medical staff in full PPE attending to a patient in bed (no visible text or symbols)| Name | Value1 | Value2 | Description |
| VISCA command | 0x01 | 0x00 | Stores the VISCA command. |
| VISCA inquiry | 0x01 | 0x10 | Stores the VISCA inquiry. |
| VISCA reply | 0x01 | 0x11 | Stores the reply for the VISCA command and VISCA inquiry, or VISCA device setting command |
| VISCA device setting command | 0x01 | 0x20 | Stores the VISCA device setting command. |
| Control command | 0x02 | 0x00 | Stores the control command |
| Control reply | 0x02 | 0x01 | Stores the reply for the control command. |
Sequence number

flowchart
graph TD
    A["Controller"] -->|VISCA Command (Seq = N)| B["device"]
    A -->|VISCA Reply (Seq = N)| B
    A -->|VISCA Command (Seq = N + 1)| B
    A -->|VISCA Reply (Seq = N + 1)| B
Sequence number = N
Example
Address locked to "X = 1" for VISCA over IP
| byte 0 | byte 1 | byte 2 | byte 3 | byte 4 | byte 5 | byte 6 | byte 7 | byte 8 ~~~ byte 23 | |
| func | Payload type | Payload Length | Sequence number | Payload (1 to 16 bytes) | |||||
| data | Value1 | Value2 | 1~16(0x0001~0x0010) | 0x00000000 ~ 0xFFFFFFFF | VISCA Packet (see page VISCA) | ||||
| CMD: Power Off | 0x01 | 0x00 | 0x00 | 0x06 | 0x00 | 0x00 | 0x00 | 0x01 | 81 01 04 00 03 FF |
| reply ACK | 0x01 | 0x11 | 0x00 | 0x03 | 0x00 | 0x00 | 0x00 | 0x01 | 90 41 FF |
| reply COMPLETE | 0x01 | 0x11 | 0x00 | 0x03 | 0x00 | 0x00 | 0x00 | 0x01 | 90 51 FF |
| INQ: Power | 0x01 | 0x10 | 0x00 | 0x05 | 0x00 | 0x00 | 0x00 | 0x02 | 81 09 04 00 FF |
| INQ reply | 0x01 | 0x11 | 0x00 | 0x04 | 0x00 | 0x00 | 0x00 | 0x02 | 90 50 03 FF |
VISCA ズームテーブル
| Zoom position and zoom ratio (MD330UI) | |
| Parameter | Zoom ratio |
| 0140 | x1 |
| 1720 | x2 |
| 2520 x3 | |
| 2E20 | x4 |
| 3460 x5 | |
| 3920 | x6 |
| 3CA8 | x7 |
| 3FA0 | x8 |
| 4220 x9 | |
| 4448 | x10 |
| 4638 x11 | |
| 47F0 | x12 |
| 4980 x13 | |
| 4AF0 | x14 |
| 4C40 x15 | |
| 4D78 | x16 |
| 4E88 x17 | |
| 4F80 | x18 |
| 5060 | x19 |
| 5120 | x20 |
| 51C8 x21 | |
| 5240 | x22 |
| 5290 x23 | |
| 52E0 | x24 |
| 5330 | x25 |
| 5380 | x26 |
| 53D0 x27 | |
| 5420 | x28 |
| 5470 x29 | |
| 54C0 | x30 |
| 54EC | x33 (While digital zoom enabled) |
| 5510 | x36 (While digital zoom enabled) |
| 552F | x39 (While digital zoom enabled) |
| 5549 | x42 (While digital zoom enabled) |
| 5560 | x45 (While digital zoom enabled) |
| 5574 | x48 (While digital zoom enabled) |
| 5586 | x51 (While digital zoom enabled) |
| 5595 | x54 (While digital zoom enabled) |
| 55A3 | x57 (While digital zoom enabled) |
| 55B0 | x60 (While digital zoom enabled) |
Pelco-D コマンド
PAN AND TILT COMMANDS P/T bit(byte4.0) = 0
| byte 1 | byte 2 | byte 3 | byte 4 | byte 5 | byte 6 | byte 7 | |
| func | SYNC | ADDR | cmd 1 | cmd 2 | data1 | data2 | checksum |
| data | 0xFF | 1~8 | cmd 1 | cmd 2 | Pan speed | Tilt speed | 2~6 SUM |
note : speed = 0x00\~0x17
byte3 : command 1
| bit 7 | bit 6 | bit 5 | bit 4 | bit 3 | bit 2 | bit 1 | bit 0 |
| SENSEON | NA | NA | NA | CAMON/OFF | NA | NA | NA |
note : power off : byte3.7 = 0 & byte3.3 = 1 (0x08)
note : power on : byte3.7 = 1 & byte3.3 = 1 (0x88)
byte4: command 2
| bit 7 | bit 6 | bit 5 | bit 4 | bit 3 | bit 2 | bit 1 | bit 0 |
| NA | ZOOMWide | ZOOMTele | TILTDown | TILTUp | PANLeft | PANRight | P/T bit0(always) |
EXTENDED COMMAND SET P/T bit(byte4.0) = 1
| byte 1 | byte 2 | byte 3 | byte 4 | byte 5 | byte 6 | byte 7 | ||
| func | SYNC | ADDR | data1 | data2 | data3 | data4 | checksum | |
| Set Preset XX | 0xFF | 1~8 | 0x00 | 0x03 | 0x00 | Preset # | 2~6 SUM | |
| Clear Preset XX | 0xFF | 1~8 | 0x00 | 0x05 | 0x00 | Preset # | 2~6 SUM | |
| Go To Preset XX | 0xFF | 1~8 | 0x00 | 0x07 | 0x00 | Preset # | 2~6 SUM | |
| Track ON | 0xFF | 1~8 | 0x00 | 0x65 | 0x00 | 0x00 | 2~6 SUM | |
| Track OFF | 0xFF | 1~8 | 0x00 | 0x67 | 0x00 | 0x00 | 2~6 SUM | |
note : Preset #: 0x01 \~ 0xFF
Pelco-P コマンド
PAN AND TILT COMMANDS P/T bit(byte4.0) = 0
| byte 1 | byte 2 | byte 3 | byte 4 | byte 5 | byte 6 | byte 7 | byte 8 | |
| func | STX | ADDR | data1 | data2 | data3 | data4 | ETX | checksum |
| data | 0xA0 | 0~7F | cmd 1 | cmd 2 | Pan speed | Tilt speed | 0xAF | 1~7 XOR |
note : speed = 0x00\~0x17
byte3 : command 1
| bit 7 | bit 6 | bit 5 | bit 4 | bit 3 | bit 2 | bit 1 | bit 0 |
| NA | CAMON | NA | CAMON/OFF | NA | NA | NA | NA |
note : power off : byte3.6 = 0 & byte3.4 = 1 (0x10)
note : power on : byte3.6 = 1 & byte3.4 = 1 (0x50)
byte4: command 2
| bit 7 | bit 6 | bit 5 | bit 4 | bit 3 | bit 2 | bit 1 | bit 0 |
| NA | ZOOMWide | ZOOMTele | TILTDown | TILTUp | PANLeft | PANRight | P/T bit0(always) |
EXTENDED COMMAND SET P/T bit(byte4.0) = 1
| byte 1 | byte 2 | byte 3 | byte 4 | byte 5 | byte 6 | byte 7 | byte 8 | |
| func | STX | ADDR | data1 | data2 | data3 | data4 | ETX | checksum |
| Set Preset XX | 0xA0 | 0~7 | 0x00 | 0x03 | 0x00 | Preset # | 0xAF | 1~7 XOR |
| Clear Preset XX | 0xA0 | 0~7 | 0x00 | 0x05 | 0x00 | Preset # | 0xAF | 1~7 XOR |
| Go To Preset XX | 0xA0 | 0~7 | 0x00 | 0x07 | 0x00 | Preset # | 0xAF | 1~7 XOR |
| Track ON | 0xA0 | 0~7 | 0x00 | 0x65 | 0x00 | 0x00 | 0xAF | 1~7 XOR |
| Track OFF | 0xA0 | 0~7 | 0x00 | 0x67 | 0x00 | 0x00 | 0xAF | 1~7 XOR |
note : Preset # : 0x01 \~ 0xFF
| CGI List for Video Transmission | |||||
| CGI item name | URL Command | Parameter Name | Parameter value | Description | |
| Get JPEG | /snapshot | 1280x720 jpg | |||
| Get 4K JPEG | /cgi-bin?OnePush=n | Step 1: requeset 4k snapshot | |||
| /snapshot?res=4k | Step 2: get 3840x2160 jpg | ||||
| Set RTSP URL | /cgi-bin?SetString= | sys_rtsp_stm1_url,rtsp_url | Set RTSP URL to rtsp_url | ||
| Get RTSP URL | /cgi-bin?GetString= | sys_rtsp_stm1_url | Reply RTSP URL example:sys_rtsp_stm1_url="live_st1" | ||
| Get RTSP stream | rtsp://ip/rtsp_url | Default RTSP url: live_st1rtsp://ip/live_st1 | |||
| CGI List for Camera Control | |||||
| CGI item name | URL | Command | Parameter Name | Parameter value | Description |
| up start | /cgi-bin?SetPtzf= | 1,0,1 | |||
| up end | /cgi-bin?SetPtzf= | 1,0,2 | |||
| down start | /cgi-bin?SetPtzf= | 1,1,1 | |||
| down end | /cgi-bin?SetPtzf= | 1,1,2 | |||
| left start | /cgi-bin?SetPtzf= | 0,1,1 | |||
| left end | /cgi-bin?SetPtzf= | 0,1,2 | |||
| right start | /cgi-bin?SetPtzf= | 0,0,1 | |||
| right end | /cgi-bin?SetPtzf= | 0,0,2 | |||
| zoom_in start | /cgi-bin?SetPtzf= | 2,0,1 | |||
| zoom_in end | /cgi-bin?SetPtzf= | 2,0,2 | |||
| zoom_out start | /cgi-bin?SetPtzf= | 2,1,1 | |||
| zoom_out end | /cgi-bin?SetPtzf= | 2,1,2 | |||
| set preset: | /cgi-bin?ActPreset= | 1,N | N : position | ||
| load preset: | /cgi-bin?ActPreset= | 0,N | N : position | ||
| CGI List for Various Settings | |||||
| CGI item name | URL | Command | Parameter Name | Parameter value | Description |
| exposure value | /cgi-bin?Set= | img_expo_expo,3,N | value | 1 ~ 9 | N : value |
| saturation | /cgi-bin?Set= | img_saturation,3,N | value | 0 ~ 10 | N : value |
| contrast | /cgi-bin?Set= | img_contrast,3,N | value | 0~4 | N : value |
| Reboot | GET(Basic Authentication) | /cgi-bin?OnePush=! | |||
| Factory Reset | GET(Basic Authentication) | /cgi-bin?OnePush=d | |||
| RTMP Start streamming | /cgi-bin?Set= | vdo_rtmp_enable,3,1 | |||
| RTMP Stop streamming | /cgi-bin?Set= | vdo_rtmp_enable,3,0 | |||
| Status get (Model name & mac & FW_VER) | /cgi-bin?GetString= | sys_name&net_mac&sys_fw_version | http://10.100.105.110/cgi-bin?GetString=sys_name&net_mac&sys_fw_version | ||
| Serial No. get | /cgi-bin?GetSerialNumber | http://10.100.105.110/cgi-bin?GetSerialNumber | |||
| uploadwav | /uploadwav/uploadwav?Set= | ado_playback_file,3,N | -1~9 (0~9 for customer) | -1 = OFF, 0 ~ 9 = index | |
| oneclick | /cgi-bin?Set= | ptz_oneclick_x,3,N1&ptz_oneclick_y,3,N2&ptz_one_click_spd,3,N3 | ptz_one_click_spd 1~24 | N1, N2 = X, Y coordinates(1080P, 0,0 at top left)N3=moving speed | |
| IR Cut Filter | /cgi-bin?Set= | img_ircut_filter,3,N | 0 ~ 2 | 0 = Day, 1 = Night, 2 = Auto | |
| IR Cut Filter Sensitivity | /cgi-bin?Set= | img_ircut_sensitivity,3,N | 0 ~ 2 | 0 = Low, 1 = Middle, 2 = High | |
| CGI List for Video Stream | |||||
| Video Stream Resolution | /cgi-bin?Set= | vdo_net_stm_res,3,N | value | 1 / 2 / 4 / 5 / 6 | 1 = 1920x1080;2 = 1280x720;4 = 640x480;5 = 640x360;6 = 3840x2160 |
| Video Stream Framerate | /cgi-bin?Set= | vdo_net_stm_fr,3,N | value | 1 / 5 / 15 / 20 / 30 | frames per second |
| Video Stream Bitrate | /cgi-bin?Set= | vdo_net_stm_bitrate,3,N | value | 0 ~ 7 | 0 = 512 Kbps;1 = 1 Mbps;2 = 2 Mbps;3 = 4 Mbps;4 = 8 Mbps;5 = 16 Mbps;6 = 32 Mbps;7 = Auto |
| Video Stream I-VOPInterval (S) in seconds | /cgi-bin?Set= | vdo_net_stm_intvl,3,N | value | 1 ~ 10 | I-VOP Interval |
| Video Stream Rate Control | /cgi-bin?Set= | vdo_net_stm_ratectrl,3,N | value | 0 / 1 | 0: CBR;1: VBR |
| Video Stream Encoding Type | /cgi-bin?Set= | vdo_net_stm_codec,3,N | value | 1 ~ 2 | 1: H.264;2: H.265 |
| Mosaic on Stream On/Off | /cgi-bin?Set= | vdo_net_stm_mosaic,3,N | value | 0 / 1 | 0: OFF; 1: ON |
| Mosaic on Stream Mode | /cgi-bin?Set= | ai_detect_mode,3,N | value | 0 / 1 | 0: Body; 1: Full face |
| CGI List for Audio | |||||
| CGI item name | URL | Command | Parameter Name | Parameter value | Description |
| Auto Echo Cancel | /cgi-bin? Set= | ado_echo_cancel,3,N | 0 ~ 1 0 = OFF, 1 = ON | ||
| Noise Suppression | /cgi-bin? Set= | ado_noise_suppression,3,N | 0 ~ 4 | 0 = OFF, 1 = NR DSP, 2 = NR, 3 = NR + BF, 4 = NR Strong | |
| Audio Beam Forming | /cgi-bin? Set= | ado_mic_bf_type,3,N | 0 ~ 5 | 0 = 30°, 1 = 50°, 2 = 70°, 3 = 90°, 4 = 110°, 5 = 130° | |
| Audio In Volume | /cgi-bin? Set= | ado_vol,3,N | 0 ~10 | 0 ~ 10 volume | |
| Audio In Mute | /cgi-bin? Set= | ado_mic_mute,3,N | 0 ~ 1 | 0 = Un-mute, 1 = Mute | |
| Output Type | /cgi-bin? Set= | ado_out_path,3,N | 0 ~ 2 | 0 = Speaker, 1 = HDMI, 2 = Both | |
| Output Volume | /cgi-bin? Set= | ado_spk_gain,3,N | 0 ~10 | 0 ~ 10 volume | |
| Output Mute | /cgi-bin? Set= | ado_spk_mute,3,N | 0 ~ 1 | 0 = Un-mute, 1 = Mute | |
| CGI List for AI Setting | |||||
| CGI item name | URL | Command | Parameter Name | Parameter value | Description |
| AI Detection (AI Detection and Eyes tracking are mutually exclusive.) | /cgi-bin?Set= | ai_detect_on,3,N | value | 0 / 1 | 0: OFF; 1: ON |
| AI Detection Site | /cgi-bin?Set= | ai_detect_mode,3,N | value | 0 / 1 | 0: Body; 1: Full face |
| Eyes Tracking On/Off (AI Detection)and Eyes tracking are mutually exclusive.) | /cgi-bin?Set= | trk_tracking_on,3,N | value | 0 / 1 | 0: OFF; 1: ON |
| Tracking Preset | /cgi-bin?ActPreset=1,255 | Save current pos. for eye tracking preset point. | |||
| Timeout to preset | /cgi-bin?Set= | trk_lost_time,3,N | value | 3/5/7/10 | timeout in seconds |
| Tracking Site | /cgi-bin?Set= | trk_mode,3,N | value | 0/1 | 0: Full face; 1: Eyes |
| Tracking Range | /cgi-bin?Set= | trk_sensitivity,3,N | value | 0~2 | 0: Close; 1: Medium; 2: Wide |
| Eyes Tracking On/Off Get | /cgi-bin?Get=trk_tracking_on | ||||
| - Reply | Ontrk_tracking_on=1Offtrk_tracking_on=0 | ||||
| Get detect zone(target frame) number | /cgi-bin?Get=trk_detect_num | ||||
| - Reply trk_detect_num=X | X: number of target frames, 50 max. | ||||
| Get detect zone(target frame) info | /cgi-bin?GetGroup=trk_detect_zones | ||||
| - Reply | trk_detect_zones="trk_num:02.focus:-1.zone[00]:760,09,222,300.zone[01]:660,540,16,22." | focus - current target frame index.zone[NN]:x,y,w,h - 1080P based | (0,0) at top left of video.X,Y,W(width),H(height) is based on the top left of the target frame.“focus:" is followed by the current tracking target frame index.Example: "-1" indicates no target is being tracked.If 3 targets are being detected, "focus:" should be followed by either 0, 1, or 2. | ||
| Select Tracking Target | /cgi-bin?SetString= | TrackingFocusZone,x,y,w,h | x, y: coordinates,w: width,h: height, (0,0 at top left) | Based on the result of trk_detect_zones,select tracking target.ex: x=343,y=373, w=213,h=310/cgi-bin?SetString=TrackingFocusZone,343,373,213,310 | |

natural_image
Technical line drawing of a mechanical device with concentric circles and a mode dial (no text or symbols)MD330U-Serie PTZ-Kamera
natural_image
Diagram of a robotic arm with connected cable and connector, showing wiring connection (no text or symbols)natural_image
Line drawing of a device with a mounted sensor or camera (no text or symbols)natural_image
Diagram of a robotic arm with connected cable and sensor, showing wiring connection (no text or symbols)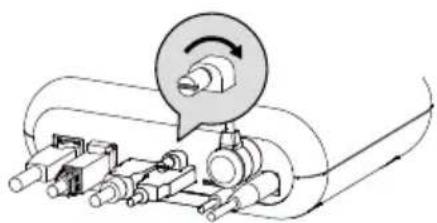
natural_image
Mechanical assembly diagram showing a motor with rotating shaft and housing components (no text or labels)Download Center: https://www.avereurope.com/download-center
Technischer Support: https://www.avereurope.com/technical-support
Exposure (Exposure)....23
Network (Network)....27
System (System)....29
AVerCamera Setting Tool....31
Technische Daten 32
natural_image
Technical line drawing of a mechanical component with no visible text or symbolsMD330U/MD330UI
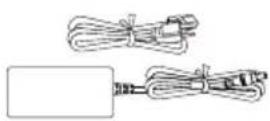
Netzadapter
Netzkabel
Fernbedienung
natural_image
Pure electrical circuit lines without any symbolsnatural_image
Technical line drawing of a mechanical component with mounting holes and a flat plate (no text or symbols)natural_image
Pure electrical circuit lines without any symbols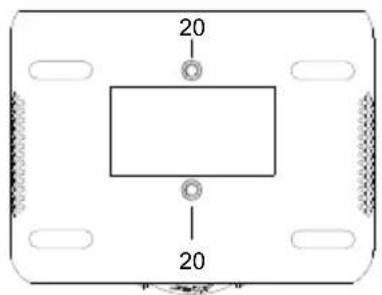


Mode-Schalter
natural_image
Pure diagram of a connector or cable with no text, numbers, or symbols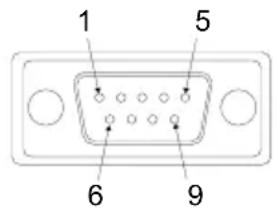
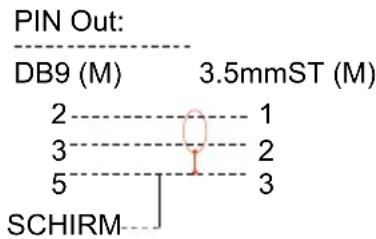
● AVer IPCam Utility
● AVer PTZ Management
natural_image
Hospital room scene with medical staff in full PPE attending to a patient in bed (no visible text or symbols)| Name | Value1 | Value2 | Description |
| VISCA command | 0x01 | 0x00 | Stores the VISCA command. |
| VISCA inquiry | 0x01 | 0x10 | Stores the VISCA inquiry. |
| VISCA reply | 0x01 | 0x11 | Stores the reply for the VISCA command and VISCA inquiry, or VISCA device setting command |
| VISCA device setting command | 0x01 | 0x20 | Stores the VISCA device setting command. |
| Control command | 0x02 | 0x00 | Stores the control command |
| Control reply | 0x02 | 0x01 | Stores the reply for the control command. |
Sequence number

flowchart
graph TD
    A["Controller"] -->|VISCA Command (Seq = N)| B["device"]
    A -->|VISCA Reply (Seq = N)| B
    A -->|VISCA Command (Seq = N + 1)| B
    A -->|VISCA Reply (Seq = N + 1)| B
Sequence number = N
Example
Address locked to "X = 1" for VISCA over IP
| byte 0 | byte 1 | byte 2 | byte 3 | byte 4 | byte 5 | byte 6 | byte 7 | byte 8~~ byte 23 | |
| func | Payload type | Payload Length | Sequence number | Payload (1 to 16 bytes) | |||||
| data | Value1 | Value2 | 1~16(0x0001~0x0010) | 0x00000000 ~ 0xFFFFFFFF | VISCA Packet (see page VISCA) | ||||
| CMD: Power Off | 0x01 | 0x00 | 0x00 | 0x06 | 0x00 | 0x00 | 0x00 | 0x01 | 81 01 04 00 03 FF |
| reply ACK | 0x01 | 0x11 | 0x00 | 0x03 | 0x00 | 0x00 | 0x00 | 0x01 | 90 41 FF |
| reply COMPLETE | 0x01 | 0x11 | 0x00 | 0x03 | 0x00 | 0x00 | 0x00 | 0x01 | 90 51 FF |
| INQ:Power | 0x01 | 0x10 | 0x00 | 0x05 | 0x00 | 0x00 | 0x00 | 0x02 | 81 09 04 00FF |
| INQ reply | 0x01 | 0x11 | 0x00 | 0x04 | 0x00 | 0x00 | 0x00 | 0x02 | 90 50 03 FF |
VISCA-Zoom-Tabelle
| Zoom position and zoom ratio (MD330UI) | |
| Parameter | Zoom ratio |
| 0140 | x1 |
| 1720 | x2 |
| 2520 x3 | |
| 2E20 | x4 |
| 3460 x5 | |
| 3920 | x6 |
| 3CA8 | x7 |
| 3FA0 | x8 |
| 4220 x9 | |
| 4448 | x10 |
| 4638 x11 | |
| 47F0 | x12 |
| 4980 x13 | |
| 4AF0 | x14 |
| 4C40 x15 | |
| 4D78 | x16 |
| 4E88 x17 | |
| 4F80 | x18 |
| 5060 | x19 |
| 5120 | x20 |
| 51C8 x21 | |
| 5240 | x22 |
| 5290 x23 | |
| 52E0 | x24 |
| 5330 | x25 |
| 5380 | x26 |
| 53D0 x27 | |
| 5420 | x28 |
| 5470 x29 | |
| 54C0 | x30 |
| 54EC | x33 (While digital zoom enabled) |
| 5510 | x36 (While digital zoom enabled) |
| 552F | x39 (While digital zoom enabled) |
| 5549 | x42 (While digital zoom enabled) |
| 5560 | x45 (While digital zoom enabled) |
| 5574 | x48 (While digital zoom enabled) |
| 5586 | x51 (While digital zoom enabled) |
| 5595 | x54 (While digital zoom enabled) |
| 55A3 | x57 (While digital zoom enabled) |
| 55B0 | x60 (While digital zoom enabled) |
Pelco-D-Befehl
PAN AND TILT COMMANDS P/T bit(byte4.0) = 0
| byte 1 | byte 2 | byte 3 | byte 4 | byte 5 | byte 6 | byte 7 | |
| func | SYNC | ADDR | cmd 1 | cmd 2 | data1 | data2 | checksum |
| data | 0xFF | 1~8 | cmd 1 | cmd 2 | Pan speed | Tilt speed | 2~6 SUM |
note : speed = 0x00\~0x17
byte3 : command 1
| bit 7 | bit 6 | bit 5 | bit 4 | bit 3 | bit 2 | bit 1 | bit 0 |
| SENSEON | NA | NA | NA | CAMON/OFF | NA | NA | NA |
note : power off : byte3.7 = 0 & byte3.3 = 1 (0x08)
note : power on : byte3.7 = 1 & byte3.3 = 1 (0x88)
byte4: command 2
| bit 7 | bit 6 | bit 5 | bit 4 | bit 3 | bit 2 | bit 1 | bit 0 |
| NA | ZOOMWide | ZOOMTele | TILTDown | TILTUp | PANLeft | PANRight | P/T bit0(always) |
EXTENDED COMMAND SET P/T bit(byte4.0) = 1
| byte 1 | byte 2 | byte 3 | byte 4 | byte 5 | byte 6 | byte 7 | ||
| func | SYNC | ADDR | data1 | data2 | data3 | data4 | checksum | |
| Set Preset XX | 0xFF | 1~8 | 0x00 | 0x03 | 0x00 | Preset # | 2~6 SUM | |
| Clear Preset XX | 0xFF | 1~8 | 0x00 | 0x05 | 0x00 | Preset # | 2~6 SUM | |
| Go To Preset XX | 0xFF | 1~8 | 0x00 | 0x07 | 0x00 | Preset # | 2~6 SUM | |
| Track ON | 0xFF | 1~8 | 0x00 | 0x65 | 0x00 | 0x00 | 2~6 SUM | |
| Track OFF | 0xFF | 1~8 | 0x00 | 0x67 | 0x00 | 0x00 | 2~6 SUM | |
note : Preset #: 0x01 \~ 0xFF
Pelco-P-Befehl
PAN AND TILT COMMANDS P/T bit(byte4.0) = 0
| byte 1 | byte 2 | byte 3 | byte 4 | byte 5 | byte 6 | byte 7 | byte 8 | |
| func | STX | ADDR | data1 | data2 | data3 | data4 | ETX | checksum |
| data | 0xA0 | 0~7F | cmd 1 | cmd 2 | Pan speed | Tilt speed | 0xAF | 1~7 XOR |
note : speed = 0x00\~0x17
byte3 : command 1
| bit 7 | bit 6 | bit 5 | bit 4 | bit 3 | bit 2 | bit 1 | bit 0 |
| NA | CAMON | NA | CAMON/OFF | NA | NA | NA | NA |
note : power off : byte3.6 = 0 & byte3.4 = 1 (0x10)
note : power on : byte3.6 = 1 & byte3.4 = 1 (0x50)
byte4: command 2
| bit 7 | bit 6 | bit 5 | bit 4 | bit 3 | bit 2 | bit 1 | bit 0 |
| NA | ZOOMWide | ZOOMTele | TILTDown | TILTUp | PANLeft | PANRight | P/T bit0(always) |
EXTENDED COMMAND SET P/T bit(byte4.0) = 1
| byte 1 | byte 2 | byte 3 | byte 4 | byte 5 | byte 6 | byte 7 | byte 8 | |
| func | STX | ADDR | data1 | data2 | data3 | data4 | ETX | checksum |
| Set Preset XX | 0xA0 | 0~7 | 0x00 | 0x03 | 0x00 | Preset # | 0xAF | 1~7 XOR |
| Clear Preset XX | 0xA0 | 0~7 | 0x00 | 0x05 | 0x00 | Preset # | 0xAF | 1~7 XOR |
| Go To Preset XX | 0xA0 | 0~7 | 0x00 | 0x07 | 0x00 | Preset # | 0xAF | 1~7 XOR |
| Track ON | 0xA0 | 0~7 | 0x00 | 0x65 | 0x00 | 0x00 | 0xAF | 1~7 XOR |
| Track OFF | 0xA0 | 0~7 | 0x00 | 0x67 | 0x00 | 0x00 | 0xAF | 1~7 XOR |
note : Preset # : 0x01 \~ 0xFF
CGI-Befehl
| CGI List for Video Transmission | |||||
| CGI item name | URL Command | Parameter Name | Parameter value | Description | |
| Get JPEG | /snapshot | 1280x720 jpg | |||
| Get 4K JPEG | /cgi-bin?OnePush=n | Step 1: requeset 4k snapshot | |||
| /snapshot?res=4k | Step 2: get 3840x2160 jpg | ||||
| Set RTSP URL | /cgi-bin?SetString= | sys_rtsp_stm1_url,r tsp_url | Set RTSP URL to rtsp_url | ||
| Get RTSP URL | /cgi-bin?GetString= | sys_rtsp_stm1_url | Reply RTSP URL example:sys_rtsp_stm1_url="live_st1" | ||
| Get RTSP stream | rtsp://ip/rtsp_url | Default RTSP url: live_st1rtsp://ip/live_st1 | |||
| CGI List for Camera Control | |||||
| CGI item name | URL | Command | Parameter Name | Parameter value | Description |
| up start | /cgi-bin?SetPtzf= | 1,0,1 | |||
| up end | /cgi-bin?SetPtzf= | 1,0,2 | |||
| down start | /cgi-bin?SetPtzf= | 1,1,1 | |||
| down end | /cgi-bin?SetPtzf= | 1,1,2 | |||
| left start | /cgi-bin?SetPtzf= | 0,1,1 | |||
| left end | /cgi-bin?SetPtzf= | 0,1,2 | |||
| right start | /cgi-bin?SetPtzf= | 0,0,1 | |||
| right end | /cgi-bin?SetPtzf= | 0,0,2 | |||
| zoom_in start | /cgi-bin?SetPtzf= | 2,0,1 | |||
| zoom_in end | /cgi-bin?SetPtzf= | 2,0,2 | |||
| zoom_out start | /cgi-bin?SetPtzf= | 2,1,1 | |||
| zoom_out end | /cgi-bin?SetPtzf= | 2,1,2 | |||
| set preset: | /cgi-bin?ActPreset= | 1,N | N : position | ||
| load preset: | /cgi-bin?ActPreset= | 0,N | N : position | ||
| CGI List for Various Settings | |||||
| CGI item name | URL | Command | Parameter Name | Parameter value | Description |
| exposure value | /cgi-bin?Set= | img_expo_expo,3,N | value | 1 ~ 9 | N : value |
| saturation | /cgi-bin?Set= | img_saturation,3,N | value | 0 ~ 10 | N : value |
| contrast | /cgi-bin?Set= | img_contrast,3,N | value | 0~4 | N : value |
| Reboot | GET(Basic Authentication) | /cgi-bin?OnePush=! | |||
| Factory Reset | GET(Basic Authentication) | /cgi-bin?OnePush=d | |||
| RTMP Start streamming | /cgi-bin?Set= | vdo_rtmp_enable,3,1 | |||
| RTMP Stop streamming | /cgi-bin?Set= | vdo_rtmp_enable,3,0 | |||
| Status get (Model name & mac & FW_VER) | /cgi-bin?GetString= | sys_name&net_mac&sys_fw_version | http://10.100.105.110/cgi-bin?GetString=sys_name&net_mac&sys_fw_version | ||
| Serial No. get | /cgi-bin?GetSerialNumber | http://10.100.105.110/cgi-bin?GetSerialNumber | |||
| uploadwav | /uploadwav/uploadwav?Set= | ado_playback_file,3,N | -1~9 (0~9 for customer) | -1 = OFF, 0 ~ 9 = index | |
| oneclick | /cgi-bin?Set= | ptz_oneclick_x,3,N1&ptz_oneclick_y,3,N2&ptz_one_click_spd,3,N3 | ptz_one_click_spd 1~24 | N1, N2 = X, Y coordinates(1080P, 0,0 at top left)N3=moving speed | |
| IR Cut Filter | /cgi-bin?Set= | img_ircut_filter,3,N | 0 ~ 2 | 0 = Day, 1 = Night, 2 = Auto | |
| IR Cut Filter Sensitivity | /cgi-bin?Set= | img_ircut_sensitivity,3,N | 0 ~ 2 | 0 = Low, 1 = Middle, 2 = High | |
| CGI List for Video Stream | |||||
| Video Stream Resolution | /cgi-bin?Set= | vdo_net_stm_res,3,N | value | 1 / 2 / 4 / 5 / 6 | 1 = 1920x1080;2 = 1280x720;4 = 640x480;5 = 640x360;6 = 3840x2160 |
| Video Stream Framerate | /cgi-bin?Set= | vdo_net_stm_fr,3,N | value | 1 / 5 / 15 / 20 / 30 | frames per second |
| Video Stream Bitrate | /cgi-bin?Set= | vdo_net_stm_bitrate,3,N | value | 0 ~ 7 | 0 = 512 Kbps;1 = 1 Mbps;2 = 2 Mbps;3 = 4 Mbps;4 = 8 Mbps;5 = 16 Mbps;6 = 32 Mbps;7 = Auto |
| Video Stream I-VOPInterval (S) in seconds | /cgi-bin?Set= | vdo_net_stm_intvl,3,N | value | 1 ~ 10 | I-VOP Interval |
| Video Stream Rate Control | /cgi-bin?Set= | vdo_net_stm_ratectrl,3,N | value | 0 / 1 | 0: CBR;1: VBR |
| Video Stream Encoding Type | /cgi-bin?Set= | vdo_net_stm_codec,3,N | value | 1 ~ 2 | 1: H.264;2: H.265 |
| Mosaic on Stream On/Off | /cgi-bin?Set= | vdo_net_stm_mosaic,3,N | value | 0 / 1 | 0: OFF; 1: ON |
| Mosaic on Stream Mode | /cgi-bin?Set= | ai_detect_mode,3,N | value | 0 / 1 | 0: Body; 1: Full face |
| CGI List for Audio | |||||
| CGI item name | URL | Command | Parameter Name | Parameter value | Description |
| Auto Echo Cancel | /cgi-bin? Set= | ado_echo_cancel,3,N | 0 ~ 1 0 = OFF, 1 = ON | ||
| Noise Suppression | /cgi-bin? Set= | ado_noise_suppression,3,N | 0 ~ 4 | 0 = OFF, 1 = NR DSP, 2 = NR, 3 = NR + BF, 4 = NR Strong | |
| Audio Beam Forming | /cgi-bin? Set= | ado_mic_bf_type,3,N | 0 ~ 5 | 0 = 30°, 1 = 50°, 2 = 70°, 3 = 90°, 4 = 110°, 5 = 130° | |
| Audio In Volume | /cgi-bin? Set= | ado_vol,3,N | 0 ~10 | 0 ~ 10 volume | |
| Audio In Mute | /cgi-bin? Set= | ado_mic_mute,3,N | 0 ~ 1 | 0 = Un-mute, 1 = Mute | |
| Output Type | /cgi-bin? Set= | ado_out_path,3,N | 0 ~ 2 | 0 = Speaker, 1 = HDMI, 2 = Both | |
| Output Volume | /cgi-bin? Set= | ado_spk_gain,3,N | 0 ~10 | 0 ~ 10 volume | |
| Output Mute | /cgi-bin? Set= | ado_spk_mute,3,N | 0 ~ 1 | 0 = Un-mute, 1 = Mute | |
| CGI List for AI Setting | |||||
| CGI item name | URL | Command | Parameter Name | Parameter value | Description |
| AI Detection (AI Detection and Eyes tracking are mutually exclusive.) | /cgi-bin?Set= | ai_detect_on,3,N | value | 0 / 1 | 0: OFF; 1: ON |
| AI Detection Site | /cgi-bin?Set= | ai_detect_mode,3,N | value | 0 / 1 | 0: Body; 1: Full face |
| Eyes Tracking On/Off (AI Detection)and Eyes tracking are mutually exclusive.) | /cgi-bin?Set= | trk_tracking_on,3,N | value | 0 / 1 | 0: OFF; 1: ON |
| Tracking Preset | /cgi-bin?ActPreset=1,255 | Save current pos. for eye tracking preset point. | |||
| Timeout to preset | /cgi-bin?Set= | trk_lost_time,3,N | value | 3/5/7/10 | timeout in seconds |
| Tracking Site | /cgi-bin?Set= | trk_mode,3,N | value | 0/1 | 0: Full face; 1: Eyes |
| Tracking Range | /cgi-bin?Set= | trk_sensitivity,3,N | value | 0~2 | 0: Close; 1: Medium; 2: Wide |
| Eyes Tracking On/Off Get | /cgi-bin?Get=trk_tracking_on | ||||
| - Reply | Ontrk_tracking_on=1Offtrk_tracking_on=0 | ||||
| Get detect zone(target frame) number | /cgi-bin?Get=trk_detect_num | ||||
| - Reply trk_detect_num=X | X: number of target frames, 50 max. | ||||
| Get detect zone(target frame) info | /cgi-bin?GetGroup=trk_detect_zones | ||||
| - Reply | trk_detect_zones="trk_num:02.focus:-1.zone[00]:760,09,222,300.zone[01]:660,540,16,22." | focus - current target frame index.zone[NN]:x,y,w,h - 1080P based | (0,0) at top left of video.X,Y,W(width),H(height) is based on the top left of the target frame.“focus:" is followed by the current tracking target frame index.Example: "-1" indicates no target is being tracked.If 3 targets are being detected, “focus:" should be followed by either 0, 1, or 2. | ||
| Select Tracking Target | /cgi-bin?SetString= | TrackingFocusZone,x,y,w,h | x, y: coordinates,w: width,h: height, (0,0 at top left) | Based on the result of trk_detect_zones,select tracking target.ex: x=343,y=373, w=213,h=310 | |
| /cgi-bin?SetString=TrackingFocusZone,343,373,213,310 | |||||

natural_image
Technical line drawing of a mechanical device with concentric circles and a mode dial (no text or symbols)natural_image
Diagram of a robotic arm connecting a cable to a device with an icon of a device inside (no text or symbols)natural_image
Line drawing of a device with a mounted sensor or camera on top, mounted on a tablet screen (no text or symbols)natural_image
Diagram of a robotic arm with connected cable and connector, showing motion direction (no text or symbols)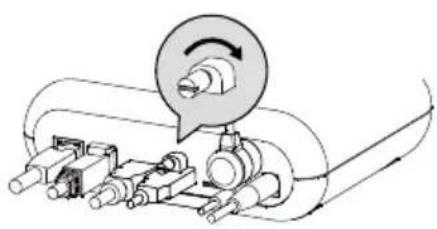
natural_image
Mechanical assembly diagram showing a rotating component with shafts and housing (no text or labels)Assistance Technique: https://www.avereurope.com/technical-support
Réglage IA (AI Setting)....21
Exposition (Exposure)....23
Commande Pelco-P....50
Commande CGI....51
Vue d'ensemble
natural_image
Technical line drawing of a mechanical device with no visible text or symbolsMD330U/MD330UI
natural_image
Pure electrical circuit lines without any symbolsnatural_image
Technical line drawing of a mechanical housing component (no text or symbols)Montage mural (Noir/Blanc)
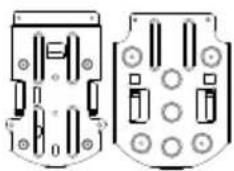
natural_image
Two technical diagrams showing internal components with no visible text or symbols
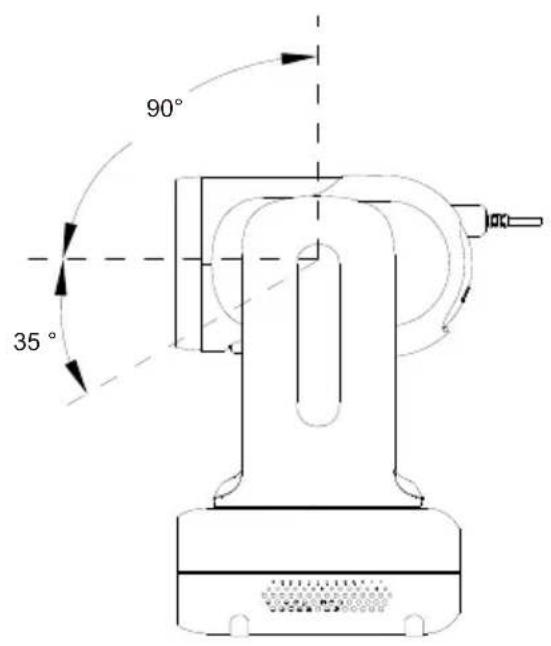
Commutateur de mode
natural_image
Technical line drawing of a USB cable connector (no text or symbols)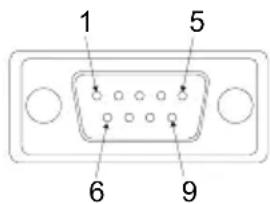
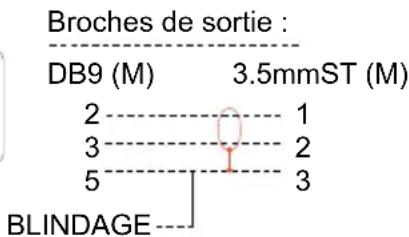
● AVer IPCam Utility
● AVer PTZ Management
natural_image
Hospital room scene with medical staff in full PPE attending to a patient in bed (no visible text or symbols)Exposition (Exposure)
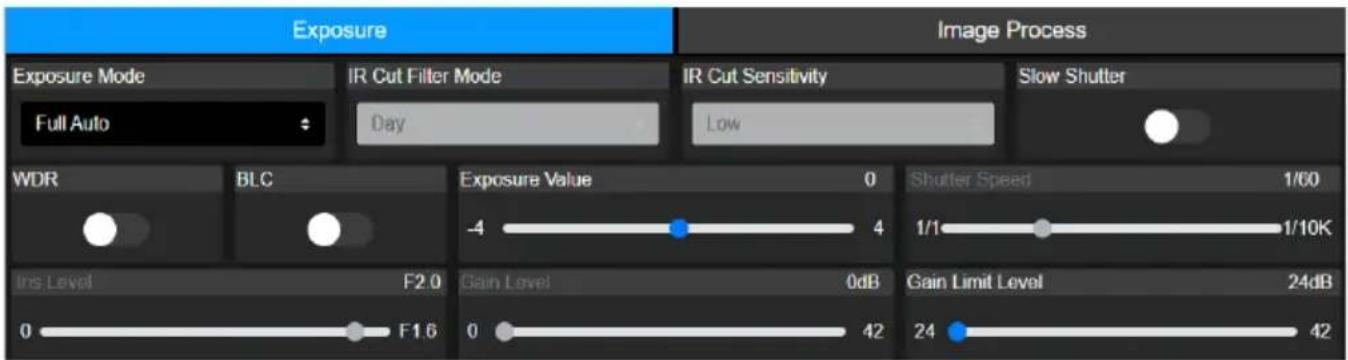
| Name | Value1 | Value2 | Description |
| VISCA command | 0x01 | 0x00 | Stores the VISCA command. |
| VISCA inquiry | 0x01 | 0x10 | Stores the VISCA inquiry. |
| VISCA reply | 0x01 | 0x11 | Stores the reply for the VISCA command and VISCA inquiry, or VISCA device setting command |
| VISCA device setting command | 0x01 | 0x20 | Stores the VISCA device setting command. |
| Control command | 0x02 | 0x00 | Stores the control command |
| Control reply | 0x02 | 0x01 | Stores the reply for the control command. |
Sequence number

flowchart
graph TD
    A["Controller"] -->|VISCA Command (Seq = N)| B["device"]
    A -->|VISCA Reply (Seq = N)| B
    A -->|VISCA Command (Seq = N + 1)| B
    A -->|VISCA Reply (Seq = N + 1)| B
Sequence number = N
Example
Address locked to "X = 1" for VISCA over IP
| byte 0 | byte 1 | byte 2 | byte 3 | byte 4 | byte 5 | byte 6 | byte 7 | byte 8~~ byte 23 | |
| func | Payload type | Payload Length | Sequence number | Payload (1 to 16 bytes) | |||||
| data | Value1 | Value2 | 1~16(0x0001~0x0010) | 0x00000000 ~ 0xFFFFFFFF | VISCA Packet (see page VISCA) | ||||
| CMD: Power Off | 0x01 | 0x00 | 0x00 | 0x06 | 0x00 | 0x00 | 0x00 | 0x01 | 81 01 04 00 03 FF |
| reply ACK | 0x01 | 0x11 | 0x00 | 0x03 | 0x00 | 0x00 | 0x00 | 0x01 | 90 41 FF |
| reply COMPLETE | 0x01 | 0x11 | 0x00 | 0x03 | 0x00 | 0x00 | 0x00 | 0x01 | 90 51 FF |
| INQ: Power | 0x01 | 0x10 | 0x00 | 0x05 | 0x00 | 0x00 | 0x00 | 0x02 | 81 09 04 00 FF |
| INQ reply | 0x01 | 0x11 | 0x00 | 0x04 | 0x00 | 0x00 | 0x00 | 0x02 | 90 50 03 FF |
Tableau de Zoom VISCA
| Zoom position and zoom ratio (MD330UI) | |
| Parameter | Zoom ratio |
| 0140 | x1 |
| 1720 | x2 |
| 2520 x3 | |
| 2E20 | x4 |
| 3460 x5 | |
| 3920 | x6 |
| 3CA8 | x7 |
| 3FA0 | x8 |
| 4220 x9 | |
| 4448 | x10 |
| 4638 x11 | |
| 47F0 | x12 |
| 4980 x13 | |
| 4AF0 | x14 |
| 4C40 x15 | |
| 4D78 | x16 |
| 4E88 x17 | |
| 4F80 | x18 |
| 5060 | x19 |
| 5120 | x20 |
| 51C8 x21 | |
| 5240 | x22 |
| 5290 x23 | |
| 52E0 | x24 |
| 5330 | x25 |
| 5380 | x26 |
| 53D0 x27 | |
| 5420 | x28 |
| 5470 x29 | |
| 54C0 | x30 |
| 54EC | x33 (While digital zoom enabled) |
| 5510 | x36 (While digital zoom enabled) |
| 552F | x39 (While digital zoom enabled) |
| 5549 | x42 (While digital zoom enabled) |
| 5560 | x45 (While digital zoom enabled) |
| 5574 | x48 (While digital zoom enabled) |
| 5586 | x51 (While digital zoom enabled) |
| 5595 | x54 (While digital zoom enabled) |
| 55A3 | x57 (While digital zoom enabled) |
| 55B0 | x60 (While digital zoom enabled) |
Commande Pelco-D
PAN AND TILT COMMANDS
P/T bit(byte4.0) = 0
| byte 1 | byte 2 | byte 3 | byte 4 | byte 5 | byte 6 | byte 7 | |
| func | SYNC | ADDR | cmd 1 | cmd 2 | data1 | data2 | checksum |
| data | 0xFF | 1~8 | cmd 1 | cmd 2 | Pan speed | Tilt speed | 2~6 SUM |
note : speed = 0x00\~0x17
byte3 : command 1
| bit 7 | bit 6 | bit 5 | bit 4 | bit 3 | bit 2 | bit 1 | bit 0 |
| SENSEON | NA | NA | NA | CAMON/OFF | NA | NA | NA |
note : power off : byte3.7 = 0 & byte3.3 = 1 (0x08)
note : power on : byte3.7 = 1 & byte3.3 = 1 (0x88)
byte4: command 2
| bit 7 | bit 6 | bit 5 | bit 4 | bit 3 | bit 2 | bit 1 | bit 0 |
| NA | ZOOMWide | ZOOMTele | TILTDown | TILTUp | PANLeft | PANRight | P/T bit0(always) |
EXTENDED COMMAND SET P/T bit(byte4.0) = 1
| byte 1 | byte 2 | byte 3 | byte 4 | byte 5 | byte 6 | byte 7 | ||
| func | SYNC | ADDR | data1 | data2 | data3 | data4 | checksum | |
| Set Preset XX | 0xFF | 1~8 | 0x00 | 0x03 | 0x00 | Preset # | 2~6 SUM | |
| Clear Preset XX | 0xFF | 1~8 | 0x00 | 0x05 | 0x00 | Preset # | 2~6 SUM | |
| Go To Preset XX | 0xFF | 1~8 | 0x00 | 0x07 | 0x00 | Preset # | 2~6 SUM | |
| Track ON | 0xFF | 1~8 | 0x00 | 0x65 | 0x00 | 0x00 | 2~6 SUM | |
| Track OFF | 0xFF | 1~8 | 0x00 | 0x67 | 0x00 | 0x00 | 2~6 SUM | |
note : Preset #: 0x01 \~ 0xFF
Commande Pelco-P
PAN AND TILT COMMANDS P/T bit(byte4.0) = 0
| byte 1 | byte 2 | byte 3 | byte 4 | byte 5 | byte 6 | byte 7 | byte 8 | |
| func | STX | ADDR | data1 | data2 | data3 | data4 | ETX | checksum |
| data | 0xA0 | 0~7F | cmd 1 | cmd 2 | Pan speed | Tilt speed | 0xAF | 1~7 XOR |
note : speed = 0x00\~0x17
byte3 : command 1
| bit 7 | bit 6 | bit 5 | bit 4 | bit 3 | bit 2 | bit 1 | bit 0 |
| NA | CAMON | NA | CAMON/OFF | NA | NA | NA | NA |
note : power off : byte3.6 = 0 & byte3.4 = 1 (0x10)
note : power on : byte3.6 = 1 & byte3.4 = 1 (0x50)
byte4: command 2
| bit 7 | bit 6 | bit 5 | bit 4 | bit 3 | bit 2 | bit 1 | bit 0 |
| NA | ZOOMWide | ZOOMTele | TILTDown | TILTUp | PANLeft | PANRight | P/T bit0(always) |
EXTENDED COMMAND SET P/T bit(byte4.0) = 1
| byte 1 | byte 2 | byte 3 | byte 4 | byte 5 | byte 6 | byte 7 | byte 8 | |
| func | STX | ADDR | data1 | data2 | data3 | data4 | ETX | checksum |
| Set Preset XX | 0xA0 | 0~7 | 0x00 | 0x03 | 0x00 | Preset # | 0xAF | 1~7 XOR |
| Clear Preset XX | 0xA0 | 0~7 | 0x00 | 0x05 | 0x00 | Preset # | 0xAF | 1~7 XOR |
| Go To Preset XX | 0xA0 | 0~7 | 0x00 | 0x07 | 0x00 | Preset # | 0xAF | 1~7 XOR |
| Track ON | 0xA0 | 0~7 | 0x00 | 0x65 | 0x00 | 0x00 | 0xAF | 1~7 XOR |
| Track OFF | 0xA0 | 0~7 | 0x00 | 0x67 | 0x00 | 0x00 | 0xAF | 1~7 XOR |
note : Preset # : 0x01 \~ 0xFF
Commande CGI
| CGI List for Video Transmission | |||||
| CGI item name | URL Command | Parameter Name | Parameter value | Description | |
| Get JPEG | /snapshot | 1280x720 jpg | |||
| Get 4K JPEG | /cgi-bin?OnePush=n | Step 1: requeset 4k snapshot | |||
| /snapshot?res=4k | Step 2: get 3840x2160 jpg | ||||
| Set RTSP URL | /cgi-bin?SetString= | sys_rtsp_stm1_url,r tsp_url | Set RTSP URL to rtsp_url | ||
| Get RTSP URL | /cgi-bin?GetString= | sys_rtsp_stm1_url | Reply RTSP URL example:sys_rtsp_stm1_url="live_st1" | ||
| Get RTSP stream | rtsp://ip/rtsp_url | Default RTSP url: live_st1rtsp://ip/live_st1 | |||
| CGI List for Camera Control | |||||
| CGI item name | URL | Command | Parameter Name | Parameter value | Description |
| up start | /cgi-bin?SetPtzf= | 1,0,1 | |||
| up end | /cgi-bin?SetPtzf= | 1,0,2 | |||
| down start | /cgi-bin?SetPtzf= | 1,1,1 | |||
| down end | /cgi-bin?SetPtzf= | 1,1,2 | |||
| left start | /cgi-bin?SetPtzf= | 0,1,1 | |||
| left end | /cgi-bin?SetPtzf= | 0,1,2 | |||
| right start | /cgi-bin?SetPtzf= | 0,0,1 | |||
| right end | /cgi-bin?SetPtzf= | 0,0,2 | |||
| zoom_in start | /cgi-bin?SetPtzf= | 2,0,1 | |||
| zoom_in end | /cgi-bin?SetPtzf= | 2,0,2 | |||
| zoom_out start | /cgi-bin?SetPtzf= | 2,1,1 | |||
| zoom_out end | /cgi-bin?SetPtzf= | 2,1,2 | |||
| set preset: | /cgi-bin?ActPreset= | 1,N | N : position | ||
| load preset: | /cgi-bin?ActPreset= | 0,N | N : position | ||
| CGI List for Various Settings | |||||
| CGI item name | URL | Command | Parameter Name | Parameter value | Description |
| exposure value | /cgi-bin?Set= | img_expo_expo,3,N | value | 1 ~ 9 | N : value |
| saturation | /cgi-bin?Set= | img_saturation,3,N | value | 0 ~ 10 | N : value |
| contrast | /cgi-bin?Set= | img_contrast,3,N | value | 0~4 | N : value |
| Reboot | GET(Basic Authentication) | /cgi-bin?OnePush=! | |||
| Factory Reset | GET(Basic Authentication) | /cgi-bin?OnePush=d | |||
| RTMP Start streamming | /cgi-bin?Set= | vdo_rtmp_enable,3,1 | |||
| RTMP Stop streamming | /cgi-bin?Set= | vdo_rtmp_enable,3,0 | |||
| Status get (Model name & mac & FW_VER) | /cgi-bin?GetString= | sys_name&net_mac&sys_fw_version | http://10.100.105.110/cgi-bin?GetString=sys_name&net_mac&sys_fw_version | ||
| Serial No. get | /cgi-bin?GetSerialNumber | http://10.100.105.110/cgi-bin?GetSerialNumber | |||
| uploadwav | /uploadwav/uploadwav?Set= | ado_playback_file,3,N | -1~9 (0~9 for customer) | -1 = OFF, 0 ~ 9 = index | |
| oneclick | /cgi-bin?Set= | ptz_oneclick_x,3,N1&ptz_oneclick_y,3,N2&ptz_one_click_spd,3,N3 | ptz_one_click_spd 1~24 | N1, N2 = X, Y coordinates(1080P, 0,0 at top left)N3=moving speed | |
| IR Cut Filter | /cgi-bin?Set= | img_ircut_filter,3,N | 0 ~ 2 | 0 = Day, 1 = Night, 2 = Auto | |
| IR Cut Filter Sensitivity | /cgi-bin?Set= | img_ircut_sensitivity,3,N | 0 ~ 2 | 0 = Low, 1 = Middle, 2 = High | |
| CGI List for Video Stream | |||||
| Video Stream Resolution | /cgi-bin?Set= | vdo_net_stm_res,3,N | value | 1 / 2 / 4 / 5 / 6 | 1 = 1920x1080;2 = 1280x720;4 = 640x480;5 = 640x360;6 = 3840x2160 |
| Video Stream Framerate | /cgi-bin?Set= | vdo_net_stm_fr,3,N | value | 1 / 5 / 15 / 20 / 30 | frames per second |
| Video Stream Bitrate | /cgi-bin?Set= | vdo_net_stm_bitrate,3,N | value | 0 ~ 7 | 0 = 512 Kbps;1 = 1 Mbps;2 = 2 Mbps;3 = 4 Mbps;4 = 8 Mbps;5 = 16 Mbps;6 = 32 Mbps;7 = Auto |
| Video Stream I-VOP | /cgi-bin?Set= | vdo_net_stm_intvl,3,N | value | 1 ~ 10 | I-VOP Interval |
| Interval (S) in seconds | |||||
| Video Stream Rate Control | /cgi-bin?Set= | vdo_net_stm_ratectrl,3,N | value | 0 / 1 | 0: CBR;1: VBR |
| Video Stream Encoding Type | /cgi-bin?Set= | vdo_net_stm_codec,3,N | value | 1 ~ 2 | 1: H.264;2: H.265 |
| Mosaic on Stream On/Off | /cgi-bin?Set= | vdo_net_stm_mosaic,3,N | value | 0 / 1 | 0: OFF; 1: ON |
| Mosaic on Stream Mode | /cgi-bin?Set= | ai_detect_mode,3,N | value | 0 / 1 | 0: Body; 1: Full face |
| CGI List for Audio | |||||
| CGI item name | URL | Command | Parameter Name | Parameter value | Description |
| Auto Echo Cancel | /cgi-bin? Set= | ado_echo_cancel,3,N | 0 ~ 1 0 = OFF, 1 = ON | ||
| Noise Suppression | /cgi-bin? Set= | ado_noise_suppression,3,N | 0 ~ 4 | 0 = OFF, 1 = NR DSP, 2 = NR, 3 = NR + BF, 4 = NR Strong | |
| Audio Beam Forming | /cgi-bin? Set= | ado_mic_bf_type,3,N | 0 ~ 5 | 0 = 30°, 1 = 50°, 2 = 70°, 3 = 90°, 4 = 110°, 5 = 130° | |
| Audio In Volume | /cgi-bin? Set= | ado_vol,3,N | 0 ~10 | 0 ~ 10 volume | |
| Audio In Mute | /cgi-bin? Set= | ado_mic_mute,3,N | 0 ~ 1 | 0 = Un-mute, 1 = Mute | |
| Output Type | /cgi-bin? Set= | ado_out_path,3,N | 0 ~ 2 | 0 = Speaker, 1 = HDMI, 2 = Both | |
| Output Volume | /cgi-bin? Set= | ado_spk_gain,3,N | 0 ~10 | 0 ~ 10 volume | |
| Output Mute | /cgi-bin? Set= | ado_spk_mute,3,N | 0 ~ 1 | 0 = Un-mute, 1 = Mute | |
| CGI List for AI Setting | |||||
| CGI item name | URL | Command | Parameter Name | Parameter value | Description |
| AI Detection (AI Detection and Eyes tracking are mutually exclusive.) | /cgi-bin?Set= | ai_detect_on,3,N | value | 0 / 1 | 0: OFF; 1: ON |
| AI Detection Site | /cgi-bin?Set= | ai_detect_mode,3,N | value | 0 / 1 | 0: Body; 1: Full face |
| Eyes Tracking On/Off (AI Detection)and Eyes tracking are mutually exclusive.) | /cgi-bin?Set= | trk_tracking_on,3,N | value | 0 / 1 | 0: OFF; 1: ON |
| Tracking Preset | /cgi-bin?ActPreset=1,255 | Save current pos. for eye tracking preset point. | |||
| Timeout to preset | /cgi-bin?Set= | trk_lost_time,3,N | value | 3/5/7/10 | timeout in seconds |
| Tracking Site | /cgi-bin?Set= | trk_mode,3,N | value | 0/1 | 0: Full face; 1: Eyes |
| Tracking Range | /cgi-bin?Set= | trk_sensitivity,3,N | value | 0~2 | 0: Close; 1: Medium; 2: Wide |
| Eyes Tracking On/Off Get | /cgi-bin?Get=trk_tracking_on | ||||
| - Reply | Ontrk_tracking_on=1Offtrk_tracking_on=0 | ||||
| Get detect zone(target frame) number | /cgi-bin?Get=trk_detect_num | ||||
| - Reply trk_detect_num=X | X: number of target frames, 50 max. | ||||
| Get detect zone(target frame) info | /cgi-bin?GetGroup=trk_detect_zones | ||||
| - Reply | trk_detect_zones="trk_num:02.focus:-1.zone[00]:760,09,222,300.zone[01]:660,540,16,22." | focus - current target frame index.zone[NN]:x,y,w,h - 1080P based | (0,0) at top left of video.X,Y,W(width),H(height) is based on the top left of the target frame.“focus:" is followed by the current tracking target frame index.Example: "-1" indicates no target is being tracked.If 3 targets are being detected, "focus:" should be followed by either 0, 1, or 2. | ||
| Select Tracking Target | /cgi-bin?SetString= | TrackingFocusZone,x,y,w,h | x, y: coordinates,w: width,h: height, (0,0 at top left) | Based on the result of trk_detect_zones,select tracking target.ex: x=343,y=373, w=213,h=310/cgi-bin?SetString=TrackingFocusZone,343,373,213,310 | |

natural_image
Technical line drawing of a mechanical device with concentric circles and a mode dial (no text or symbols)natural_image
Diagram of a robotic arm with connected cable and connector, showing wiring connection (no text or symbols)natural_image
Line drawing of a device with a mounted sensor or camera on top, shown without any text or symbols.natural_image
Diagram of a robotic arm with attached cable and connector, showing wiring connection (no text or symbols)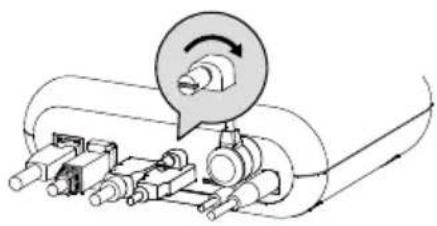
natural_image
Mechanical assembly diagram showing a rotating component with motion arrows (no text or labels)Optional Accessories ....1
natural_image
Technical line drawing of a mechanical device with no visible text or symbolsMD330U/MD330UI
natural_image
Pure electrical circuit lines without any symbolsUSB 3.0 Type-C to Type-A Cable del objetivo (180cm)
1/4"-20, L=7.5mm
Tornillos de montaje (x2)
Optional Accessories
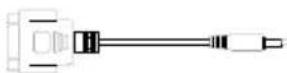
Adaptador RS-232
3,5 mm a D-Sub (9 pines)
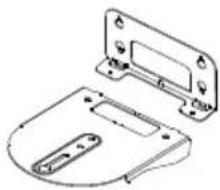
natural_image
Technical line drawing of a mechanical housing or bracket component (no text or symbols)natural_image
Technical diagram of two mechanical components with circular features and mounting holes (no text or symbols)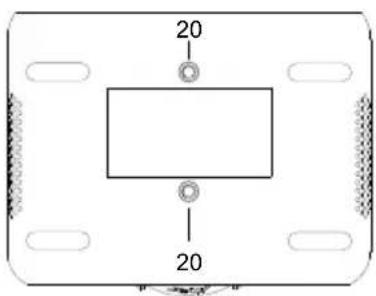


● AVer IPCam Utility
● AVer PTZ Management
natural_image
Hospital room scene with medical staff in full PPE attending to a patient in bed (no visible text or symbols)Video Setting
| Name | Value1 | Value2 | Description |
| VISCA command | 0x01 | 0x00 | Stores the VISCA command. |
| VISCA inquiry | 0x01 | 0x10 | Stores the VISCA inquiry. |
| VISCA reply | 0x01 | 0x11 | Stores the reply for the VISCA command and VISCA inquiry, or VISCA device setting command |
| VISCA device setting command | 0x01 | 0x20 | Stores the VISCA device setting command. |
| Control command | 0x02 | 0x00 | Stores the control command |
| Control reply | 0x02 | 0x01 | Stores the reply for the control command. |
Sequence number
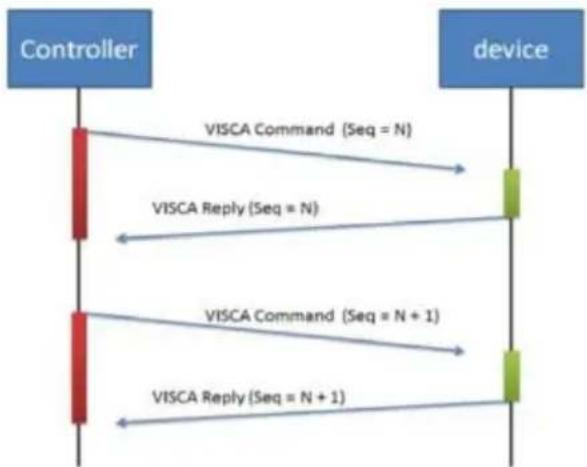
flowchart
graph TD
    A["Controller"] -->|VISCA Command (Seq = N)| B["device"]
    A -->|VISCA Reply (Seq = N)| B
    A -->|VISCA Command (Seq = N + 1)| B
    A -->|VISCA Reply (Seq = N + 1)| B
Sequence number = N
Example
Address locked to "X = 1" for VISCA over IP
| byte 0 | byte 1 | byte 2 | byte 3 | byte 4 | byte 5 | byte 6 | byte 7 | byte 8 ~~~ byte 23 | |
| func | Payload type | Payload Length | Sequence number | Payload (1 to 16 bytes) | |||||
| data | Value1 | Value2 | 1~16(0x0001~0x0010) | 0x00000000 ~ 0xFFFFFFFF | VISCA Packet (see page VISCA) | ||||
| CMD: Power Off | 0x01 | 0x00 | 0x00 | 0x06 | 0x00 | 0x00 | 0x00 | 0x01 | 81 01 04 00 03 FF |
| reply ACK | 0x01 | 0x11 | 0x00 | 0x03 | 0x00 | 0x00 | 0x00 | 0x01 | 90 41 FF |
| reply COMPLETE | 0x01 | 0x11 | 0x00 | 0x03 | 0x00 | 0x00 | 0x00 | 0x01 | 90 51 FF |
| INQ:Power | 0x01 | 0x10 | 0x00 | 0x05 | 0x00 | 0x00 | 0x00 | 0x02 | 81 09 04 00FF |
| INQ reply | 0x01 | 0x11 | 0x00 | 0x04 | 0x00 | 0x00 | 0x00 | 0x02 | 90 50 03 FF |
Tabla de Zoom VISCA
| Zoom position and zoom ratio (MD330UI) | |
| Parameter | Zoom ratio |
| 0140 | x1 |
| 1720 | x2 |
| 2520 x3 | |
| 2E20 | x4 |
| 3460 x5 | |
| 3920 | x6 |
| 3CA8 | x7 |
| 3FA0 | x8 |
| 4220 x9 | |
| 4448 | x10 |
| 4638 x11 | |
| 47F0 | x12 |
| 4980 x13 | |
| 4AF0 | x14 |
| 4C40 x15 | |
| 4D78 | x16 |
| 4E88 x17 | |
| 4F80 | x18 |
| 5060 | x19 |
| 5120 | x20 |
| 51C8 x21 | |
| 5240 | x22 |
| 5290 x23 | |
| 52E0 | x24 |
| 5330 | x25 |
| 5380 | x26 |
| 53D0 x27 | |
| 5420 | x28 |
| 5470 x29 | |
| 54C0 | x30 |
| 54EC | x33 (While digital zoom enabled) |
| 5510 | x36 (While digital zoom enabled) |
| 552F | x39 (While digital zoom enabled) |
| 5549 | x42 (While digital zoom enabled) |
| 5560 | x45 (While digital zoom enabled) |
| 5574 | x48 (While digital zoom enabled) |
| 5586 | x51 (While digital zoom enabled) |
| 5595 | x54 (While digital zoom enabled) |
| 55A3 | x57 (While digital zoom enabled) |
| 55B0 | x60 (While digital zoom enabled) |
Comando de Pelco-D
PAN AND TILT COMMANDS
P/T bit(byte4.0) = 0
| byte 1 | byte 2 | byte 3 | byte 4 | byte 5 | byte 6 | byte 7 | |
| func | SYNC | ADDR | cmd 1 | cmd 2 | data1 | data2 | checksum |
| data | 0xFF | 1~8 | cmd 1 | cmd 2 | Pan speed | Tilt speed | 2~6 SUM |
note : speed = 0x00\~0x17
byte3 : command 1
| bit 7 | bit 6 | bit 5 | bit 4 | bit 3 | bit 2 | bit 1 | bit 0 |
| SENSEON | NA | NA | NA | CAMON/OFF | NA | NA | NA |
note : power off : byte3.7 = 0 & byte3.3 = 1 (0x08)
note : power on : byte3.7 = 1 & byte3.3 = 1 (0x88)
byte4: command 2
| bit 7 | bit 6 | bit 5 | bit 4 | bit 3 | bit 2 | bit 1 | bit 0 |
| NA | ZOOMWide | ZOOMTele | TILTDown | TILTUp | PANLeft | PANRight | P/T bit0(always) |
EXTENDED COMMAND SET P/T bit(byte4.0) = 1
| byte 1 | byte 2 | byte 3 | byte 4 | byte 5 | byte 6 | byte 7 | ||
| func | SYNC | ADDR | data1 | data2 | data3 | data4 | checksum | |
| Set Preset XX | 0xFF | 1~8 | 0x00 | 0x03 | 0x00 | Preset # | 2~6 SUM | |
| Clear Preset XX | 0xFF | 1~8 | 0x00 | 0x05 | 0x00 | Preset # | 2~6 SUM | |
| Go To Preset XX | 0xFF | 1~8 | 0x00 | 0x07 | 0x00 | Preset # | 2~6 SUM | |
| Track ON | 0xFF | 1~8 | 0x00 | 0x65 | 0x00 | 0x00 | 2~6 SUM | |
| Track OFF | 0xFF | 1~8 | 0x00 | 0x67 | 0x00 | 0x00 | 2~6 SUM | |
note : Preset #: 0x01 \~ 0xFF
Comando de Pelco-P
PAN AND TILT COMMANDS P/T bit(byte4.0) = 0
| byte 1 | byte 2 | byte 3 | byte 4 | byte 5 | byte 6 | byte 7 | byte 8 | |
| func | STX | ADDR | data1 | data2 | data3 | data4 | ETX | checksum |
| data | 0xA0 | 0~7F | cmd 1 | cmd 2 | Pan speed | Tilt speed | 0xAF | 1~7 XOR |
note : speed = 0x00\~0x17
byte3 : command 1
| bit 7 | bit 6 | bit 5 | bit 4 | bit 3 | bit 2 | bit 1 | bit 0 |
| NA | CAMON | NA | CAMON/OFF | NA | NA | NA | NA |
note : power off : byte3.6 = 0 & byte3.4 = 1 (0x10)
note : power on : byte3.6 = 1 & byte3.4 = 1 (0x50)
byte4: command 2
| bit 7 | bit 6 | bit 5 | bit 4 | bit 3 | bit 2 | bit 1 | bit 0 |
| NA | ZOOMWide | ZOOMTele | TILTDown | TILTUp | PANLeft | PANRight | P/T bit0(always) |
EXTENDED COMMAND SET P/T bit(byte4.0) = 1
| byte 1 | byte 2 | byte 3 | byte 4 | byte 5 | byte 6 | byte 7 | byte 8 | |
| func | STX | ADDR | data1 | data2 | data3 | data4 | ETX | checksum |
| Set Preset XX | 0xA0 | 0~7 | 0x00 | 0x03 | 0x00 | Preset # | 0xAF | 1~7 XOR |
| Clear Preset XX | 0xA0 | 0~7 | 0x00 | 0x05 | 0x00 | Preset # | 0xAF | 1~7 XOR |
| Go To Preset XX | 0xA0 | 0~7 | 0x00 | 0x07 | 0x00 | Preset # | 0xAF | 1~7 XOR |
| Track ON | 0xA0 | 0~7 | 0x00 | 0x65 | 0x00 | 0x00 | 0xAF | 1~7 XOR |
| Track OFF | 0xA0 | 0~7 | 0x00 | 0x67 | 0x00 | 0x00 | 0xAF | 1~7 XOR |
note : Preset # : 0x01 \~ 0xFF
Comando de CGI
| CGI List for Video Transmission | |||||
| CGI item name | URL Command | Parameter Name | Parameter value | Description | |
| Get JPEG | /snapshot | 1280x720 jpg | |||
| Get 4K JPEG | /cgi-bin?OnePush=n | Step 1: requeset 4k snapshot | |||
| /snapshot?res=4k | Step 2: get 3840x2160 jpg | ||||
| Set RTSP URL | /cgi-bin?SetString= | sys_rtsp_stm1_url,r tsp_url | Set RTSP URL to rtsp_url | ||
| Get RTSP URL | /cgi-bin?GetString= | sys_rtsp_stm1_url | Reply RTSP URL example:sys_rtsp_stm1_url="live_st1" | ||
| Get RTSP stream | rtsp://ip/rtsp_url | Default RTSP url: live_st1rtsp://ip/live_st1 | |||
| CGI List for Camera Control | |||||
| CGI item name | URL | Command | Parameter Name | Parameter value | Description |
| up start | /cgi-bin?SetPtzf= | 1,0,1 | |||
| up end | /cgi-bin?SetPtzf= | 1,0,2 | |||
| down start | /cgi-bin?SetPtzf= | 1,1,1 | |||
| down end | /cgi-bin?SetPtzf= | 1,1,2 | |||
| left start | /cgi-bin?SetPtzf= | 0,1,1 | |||
| left end | /cgi-bin?SetPtzf= | 0,1,2 | |||
| right start | /cgi-bin?SetPtzf= | 0,0,1 | |||
| right end | /cgi-bin?SetPtzf= | 0,0,2 | |||
| zoom_in start | /cgi-bin?SetPtzf= | 2,0,1 | |||
| zoom_in end | /cgi-bin?SetPtzf= | 2,0,2 | |||
| zoom_out start | /cgi-bin?SetPtzf= | 2,1,1 | |||
| zoom_out end | /cgi-bin?SetPtzf= | 2,1,2 | |||
| set preset: | /cgi-bin?ActPreset= | 1,N | N : position | ||
| load preset: | /cgi-bin?ActPreset= | 0,N | N : position | ||
| CGI List for Various Settings | |||||
| CGI item name | URL | Command | Parameter Name | Parameter value | Description |
| exposure value | /cgi-bin?Set= | img_expo_expo,3,N | value | 1 ~ 9 | N : value |
| saturation | /cgi-bin?Set= | img_saturation,3,N | value | 0 ~ 10 | N : value |
| contrast | /cgi-bin?Set= | img_contrast,3,N | value | 0~4 | N : value |
| Reboot | GET(Basic Authentication) | /cgi-bin?OnePush=! | |||
| Factory Reset | GET(Basic Authentication) | /cgi-bin?OnePush=d | |||
| RTMP Start streamming | /cgi-bin?Set= | vdo_rtmp_enable,3,1 | |||
| RTMP Stop streamming | /cgi-bin?Set= | vdo_rtmp_enable,3,0 | |||
| Status get (Model name & mac & FW_VER) | /cgi-bin?GetString= | sys_name&net_mac&sys_fw_version | http://10.100.105.110/cgi-bin?GetString=sys_name&net_mac&sys_fw_version | ||
| Serial No. get | /cgi-bin?GetSerialNumber | http://10.100.105.110/cgi-bin?GetSerialNumber | |||
| uploadwav | /uploadwav/uploadwav?Set= | ado_playback_file,3,N | -1~9 (0~9 for customer) | -1 = OFF, 0 ~ 9 = index | |
| oneclick | /cgi-bin?Set= | ptz_oneclick_x,3,N1&ptz_oneclick_y,3,N2&ptz_one_click_spd,3,N3 | ptz_one_click_spd 1~24 | N1, N2 = X, Y coordinates(1080P, 0,0 at top left)N3=moving speed | |
| IR Cut Filter | /cgi-bin?Set= | img_ircut_filter,3,N | 0 ~ 2 | 0 = Day, 1 = Night, 2 = Auto | |
| IR Cut Filter Sensitivity | /cgi-bin?Set= | img_ircut_sensitivity,3,N | 0 ~ 2 | 0 = Low, 1 = Middle, 2 = High | |
| CGI List for Video Stream | |||||
| Video Stream Resolution | /cgi-bin?Set= | vdo_net_stm_res,3,N | value | 1 / 2 / 4 / 5 / 6 | 1 = 1920x1080;2 = 1280x720;4 = 640x480;5 = 640x360;6 = 3840x2160 |
| Video Stream Framerate | /cgi-bin?Set= | vdo_net_stm_fr,3,N | value | 1 / 5 / 15 / 20 / 30 | frames per second |
| Video Stream Bitrate | /cgi-bin?Set= | vdo_net_stm_bitrate,3,N | value | 0 ~ 7 | 0 = 512 Kbps;1 = 1 Mbps;2 = 2 Mbps;3 = 4 Mbps;4 = 8 Mbps;5 = 16 Mbps;6 = 32 Mbps;7 = Auto |
| Video Stream I-VOP | /cgi-bin?Set= | vdo_net_stm_intvl,3,N | value | 1 ~ 10 | I-VOP Interval |
| Interval (S) in seconds | |||||
| Video Stream Rate Control | /cgi-bin?Set= | vdo_net_stm_ratectrl,3,N | value | 0 / 1 | 0: CBR;1: VBR |
| Video Stream Encoding Type | /cgi-bin?Set= | vdo_net_stm_codec,3,N | value | 1 ~ 2 | 1: H.264;2: H.265 |
| Mosaic on Stream On/Off | /cgi-bin?Set= | vdo_net_stm_mosaic,3,N | value | 0 / 1 | 0: OFF; 1: ON |
| Mosaic on Stream Mode | /cgi-bin?Set= | ai_detect_mode,3,N | value | 0 / 1 | 0: Body; 1: Full face |
| CGI List for Audio | |||||
| CGI item name | URL | Command | Parameter Name | Parameter value | Description |
| Auto Echo Cancel | /cgi-bin? Set= | ado_echo_cancel,3,N | 0 ~ 1 0 = OFF, 1 = ON | ||
| Noise Suppression | /cgi-bin? Set= | ado_noise_suppression,3,N | 0 ~ 4 | 0 = OFF, 1 = NR DSP, 2 = NR, 3 = NR + BF, 4 = NR Strong | |
| Audio Beam Forming | /cgi-bin? Set= | ado_mic_bf_type,3,N | 0 ~ 5 | 0 = 30°, 1 = 50°, 2 = 70°, 3 = 90°, 4 = 110°, 5 = 130° | |
| Audio In Volume | /cgi-bin? Set= | ado_vol,3,N | 0 ~10 | 0 ~ 10 volume | |
| Audio In Mute | /cgi-bin? Set= | ado_mic_mute,3,N | 0 ~ 1 | 0 = Un-mute, 1 = Mute | |
| Output Type | /cgi-bin? Set= | ado_out_path,3,N | 0 ~ 2 | 0 = Speaker, 1 = HDMI, 2 = Both | |
| Output Volume | /cgi-bin? Set= | ado_spk_gain,3,N | 0 ~10 | 0 ~ 10 volume | |
| Output Mute | /cgi-bin? Set= | ado_spk_mute,3,N | 0 ~ 1 | 0 = Un-mute, 1 = Mute | |
| CGI List for AI Setting | |||||
| CGI item name | URL | Command | Parameter Name | Parameter value | Description |
| AI Detection (AI Detection and Eyes tracking are mutually exclusive.) | /cgi-bin?Set= | ai_detect_on,3,N | value | 0 / 1 | 0: OFF; 1: ON |
| AI Detection Site | /cgi-bin?Set= | ai_detect_mode,3,N | value | 0 / 1 | 0: Body; 1: Full face |
| Eyes Tracking On/Off (AI Detection)and Eyes tracking are mutually exclusive.) | /cgi-bin?Set= | trk_tracking_on,3,N | value | 0 / 1 | 0: OFF; 1: ON |
| Tracking Preset | /cgi-bin?ActPreset=1,255 | Save current pos. for eye tracking preset point. | |||
| Timeout to preset | /cgi-bin?Set= | trk_lost_time,3,N | value | 3/5/7/10 | timeout in seconds |
| Tracking Site | /cgi-bin?Set= | trk_mode,3,N | value | 0/1 | 0: Full face; 1: Eyes |
| Tracking Range | /cgi-bin?Set= | trk_sensitivity,3,N | value | 0~2 | 0: Close; 1: Medium; 2: Wide |
| Eyes Tracking On/Off Get | /cgi-bin?Get=trk_tracking_on | ||||
| - Reply | Ontrk_tracking_on=1Offtrk_tracking_on=0 | ||||
| Get detect zone(target frame) number | /cgi-bin?Get=trk_detect_num | ||||
| - Reply trk_detect_num=X | X: number of target frames, 50 max. | ||||
| Get detect zone(target frame) info | /cgi-bin?GetGroup=trk_detect_zones | ||||
| - Reply | trk_detect_zones="trk_num:02.focus:-1.zone[00]:760,09,222,300.zone[01]:660,540,16,22." | focus - current target frame index.zone[NN]:x,y,w,h - 1080P based | (0,0) at top left of video.X,Y,W(width),H(height) is based on the top left of the target frame.“focus:" is followed by the current tracking target frame index.Example: "-1" indicates no target is being tracked.If 3 targets are being detected, “focus:" should be followed by either 0, 1, or 2. | ||
| Select Tracking Target | /cgi-bin?SetString= | TrackingFocusZone,x,y,w,h | x, y: coordinates,w: width,h: height, (0,0 at top left) | Based on the result of trk_detect_zones,select tracking target.ex: x=343,y=373, w=213,h=310/cgi-bin?SetString=TrackingFocusZone,343,373,213,310 | |
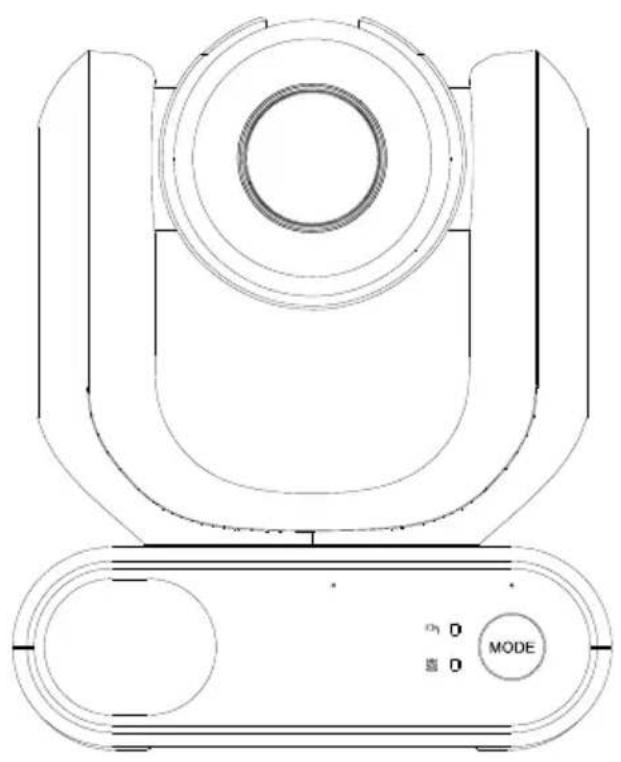
natural_image
Technical line drawing of a mechanical device with concentric circles and a mode dial (no text or symbols)natural_image
Diagram of a robotic arm with attached sensor and connector, showing wiring connection (no text or symbols)natural_image
Line drawing of a device with a mounted sensor or camera (no text or symbols)natural_image
Diagram of a robotic arm with attached cable and connector, showing wiring connection (no text or symbols)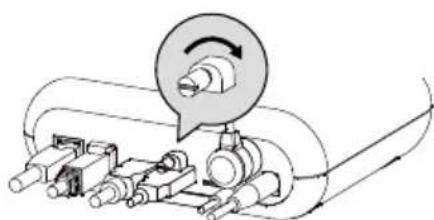
natural_image
Mechanical assembly diagram showing a rotating component with a magnified inset (no text or symbols)Centro download: https://www.avereurope.com/download-center
Assistenza tecnica: https://www.avereurope.com/technical-support
Rete (Network)....26
Sistema (System)....28
AVerCamera Setting Tool....30
Specifiche 31
natural_image
Technical line drawing of a mechanical device with no visible text or symbolsMD330U/MD330UI
natural_image
Simple line drawing of a coiled cable with two connectors (no text or symbols)natural_image
Technical line drawing of a mechanical housing or bracket component (no text or symbols)natural_image
Technical line drawing of two mechanical components with no visible text or symbols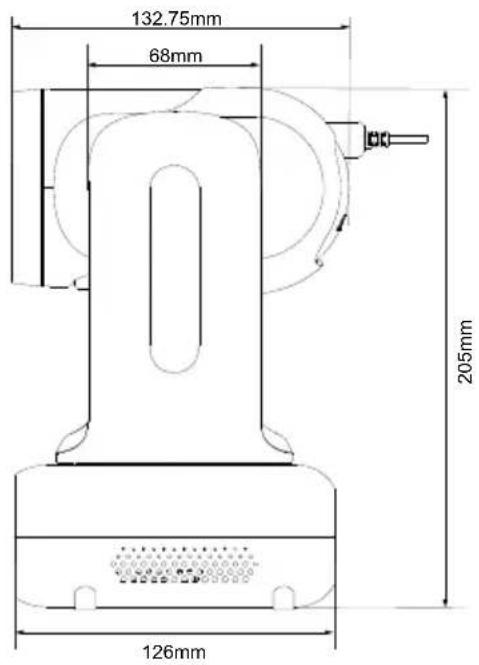
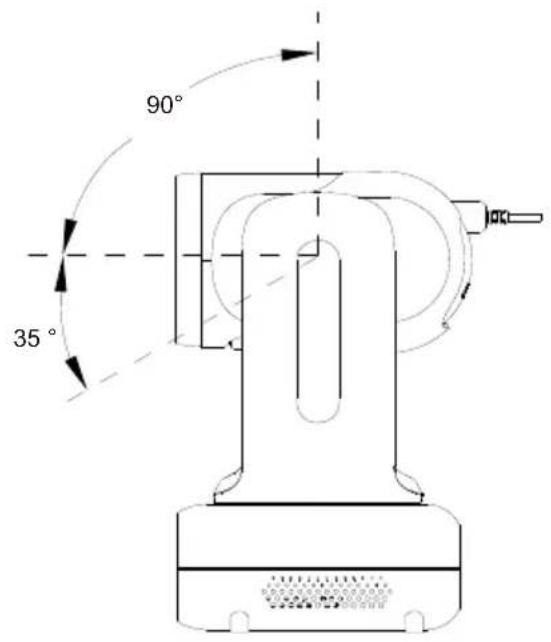
Cambio modalità
● AVer IPCam Utility
● AVer PTZ Management
natural_image
Hospital room scene with medical staff in full PPE attending to a patient in bed (no visible text or symbols)| Name | Value1 | Value2 | Description |
| VISCA command | 0x01 | 0x00 | Stores the VISCA command. |
| VISCA inquiry | 0x01 | 0x10 | Stores the VISCA inquiry. |
| VISCA reply | 0x01 | 0x11 | Stores the reply for the VISCA command and VISCA inquiry, or VISCA device setting command |
| VISCA device setting command | 0x01 | 0x20 | Stores the VISCA device setting command. |
| Control command | 0x02 | 0x00 | Stores the control command |
| Control reply | 0x02 | 0x01 | Stores the reply for the control command. |
Sequence number

flowchart
graph TD
    A["Controller"] -->|VISCA Command (Seq = N)| B["device"]
    A -->|VISCA Reply (Seq = N)| B
    A -->|VISCA Command (Seq = N + 1)| B
    A -->|VISCA Reply (Seq = N + 1)| B
Sequence number = N
Example
Address locked to "X = 1" for VISCA over IP
| byte 0 | byte 1 | byte 2 | byte 3 | byte 4 | byte 5 | byte 6 | byte 7 | byte 8~~ byte 23 | |
| func | Payload type | Payload Length | Sequence number | Payload (1 to 16 bytes) | |||||
| data | Value1 | Value2 | 1~16(0x0001~0x0010) | 0x00000000 ~ 0xFFFFFFFF | VISCA Packet (see page VISCA) | ||||
| CMD: Power Off | 0x01 | 0x00 | 0x00 | 0x06 | 0x00 | 0x00 | 0x00 | 0x01 | 81 01 04 00 03 FF |
| reply ACK | 0x01 | 0x11 | 0x00 | 0x03 | 0x00 | 0x00 | 0x00 | 0x01 | 90 41 FF |
| reply COMPLETE | 0x01 | 0x11 | 0x00 | 0x03 | 0x00 | 0x00 | 0x00 | 0x01 | 90 51 FF |
| INQ: Power | 0x01 | 0x10 | 0x00 | 0x05 | 0x00 | 0x00 | 0x00 | 0x02 | 81 09 04 00 FF |
| INQ reply | 0x01 | 0x11 | 0x00 | 0x04 | 0x00 | 0x00 | 0x00 | 0x02 | 90 50 03 FF |
Tabella Zoom VISCA
| Zoom position and zoom ratio (MD330UI) | |
| Parameter | Zoom ratio |
| 0140 | x1 |
| 1720 | x2 |
| 2520 x3 | |
| 2E20 | x4 |
| 3460 x5 | |
| 3920 | x6 |
| 3CA8 | x7 |
| 3FA0 | x8 |
| 4220 x9 | |
| 4448 | x10 |
| 4638 x11 | |
| 47F0 | x12 |
| 4980 x13 | |
| 4AF0 | x14 |
| 4C40 x15 | |
| 4D78 | x16 |
| 4E88 x17 | |
| 4F80 | x18 |
| 5060 | x19 |
| 5120 | x20 |
| 51C8 x21 | |
| 5240 | x22 |
| 5290 x23 | |
| 52E0 | x24 |
| 5330 | x25 |
| 5380 | x26 |
| 53D0 x27 | |
| 5420 | x28 |
| 5470 x29 | |
| 54C0 | x30 |
| 54EC | x33 (While digital zoom enabled) |
| 5510 | x36 (While digital zoom enabled) |
| 552F | x39 (While digital zoom enabled) |
| 5549 | x42 (While digital zoom enabled) |
| 5560 | x45 (While digital zoom enabled) |
| 5574 | x48 (While digital zoom enabled) |
| 5586 | x51 (While digital zoom enabled) |
| 5595 | x54 (While digital zoom enabled) |
| 55A3 | x57 (While digital zoom enabled) |
| 55B0 | x60 (While digital zoom enabled) |
Comando Pelco-D
PAN AND TILT COMMANDS
P/T bit(byte4.0) = 0
| byte 1 | byte 2 | byte 3 | byte 4 | byte 5 | byte 6 | byte 7 | |
| func | SYNC | ADDR | cmd 1 | cmd 2 | data1 | data2 | checksum |
| data | 0xFF | 1~8 | cmd 1 | cmd 2 | Pan speed | Tilt speed | 2~6 SUM |
note : speed = 0x00\~0x17
byte3 : command 1
| bit 7 | bit 6 | bit 5 | bit 4 | bit 3 | bit 2 | bit 1 | bit 0 |
| SENSEON | NA | NA | NA | CAMON/OFF | NA | NA | NA |
note : power off : byte3.7 = 0 & byte3.3 = 1 (0x08)
note : power on : byte3.7 = 1 & byte3.3 = 1 (0x88)
byte4: command 2
| bit 7 | bit 6 | bit 5 | bit 4 | bit 3 | bit 2 | bit 1 | bit 0 |
| NA | ZOOMWide | ZOOMTele | TILTDown | TILTUp | PANLeft | PANRight | P/T bit0(always) |
EXTENDED COMMAND SET
P/T bit(byte4.0) = 1
| byte 1 | byte 2 | byte 3 | byte 4 | byte 5 | byte 6 | byte 7 | ||
| func | SYNC | ADDR | data1 | data2 | data3 | data4 | checksum | |
| Set Preset XX | 0xFF | 1~8 | 0x00 | 0x03 | 0x00 | Preset # | 2~6 SUM | |
| Clear Preset XX | 0xFF | 1~8 | 0x00 | 0x05 | 0x00 | Preset # | 2~6 SUM | |
| Go To Preset XX | 0xFF | 1~8 | 0x00 | 0x07 | 0x00 | Preset # | 2~6 SUM | |
| Track ON | 0xFF | 1~8 | 0x00 | 0x65 | 0x00 | 0x00 | 2~6 SUM | |
| Track OFF | 0xFF | 1~8 | 0x00 | 0x67 | 0x00 | 0x00 | 2~6 SUM | |
note : Preset #: 0x01 \~ 0xFF
Comando Pelco-P
PAN AND TILT COMMANDS P/T bit(byte4.0) = 0
| byte 1 | byte 2 | byte 3 | byte 4 | byte 5 | byte 6 | byte 7 | byte 8 | |
| func | STX | ADDR | data1 | data2 | data3 | data4 | ETX | checksum |
| data | 0xA0 | 0~7F | cmd 1 | cmd 2 | Pan speed | Tilt speed | 0xAF | 1~7 XOR |
note : speed = 0x00\~0x17
byte3 : command 1
| bit 7 | bit 6 | bit 5 | bit 4 | bit 3 | bit 2 | bit 1 | bit 0 |
| NA | CAMON | NA | CAMON/OFF | NA | NA | NA | NA |
note : power off : byte3.6 = 0 & byte3.4 = 1 (0x10)
note : power on : byte3.6 = 1 & byte3.4 = 1 (0x50)
byte4: command 2
| bit 7 | bit 6 | bit 5 | bit 4 | bit 3 | bit 2 | bit 1 | bit 0 |
| NA | ZOOMWide | ZOOMTele | TILTDown | TILTUp | PANLeft | PANRight | P/T bit0(always) |
EXTENDED COMMAND SET P/T bit(byte4.0) = 1
| byte 1 | byte 2 | byte 3 | byte 4 | byte 5 | byte 6 | byte 7 | byte 8 | |
| func | STX | ADDR | data1 | data2 | data3 | data4 | ETX | checksum |
| Set Preset XX | 0xA0 | 0~7 | 0x00 | 0x03 | 0x00 | Preset # | 0xAF | 1~7 XOR |
| Clear Preset XX | 0xA0 | 0~7 | 0x00 | 0x05 | 0x00 | Preset # | 0xAF | 1~7 XOR |
| Go To Preset XX | 0xA0 | 0~7 | 0x00 | 0x07 | 0x00 | Preset # | 0xAF | 1~7 XOR |
| Track ON | 0xA0 | 0~7 | 0x00 | 0x65 | 0x00 | 0x00 | 0xAF | 1~7 XOR |
| Track OFF | 0xA0 | 0~7 | 0x00 | 0x67 | 0x00 | 0x00 | 0xAF | 1~7 XOR |
note : Preset # : 0x01 \~ 0xFF
Comando CGI
| CGI List for Video Transmission | |||||
| CGI item name | URL Command | Parameter Name | Parameter value | Description | |
| Get JPEG | /snapshot | 1280x720 jpg | |||
| Get 4K JPEG | /cgi-bin?OnePush=n | Step 1: requeset 4k snapshot | |||
| /snapshot?res=4k | Step 2: get 3840x2160 jpg | ||||
| Set RTSP URL | /cgi-bin?SetString= | sys_rtsp_stm1_url,rtsp_url | Set RTSP URL to rtsp_url | ||
| Get RTSP URL | /cgi-bin?GetString= | sys_rtsp_stm1_url | Reply RTSP URL example:sys_rtsp_stm1_url="live_st1" | ||
| Get RTSP stream | rtsp://ip/rtsp_url | Default RTSP url:live_st1rtsp://ip/live_st1 | |||
| CGI List for Camera Control | |||||
| CGI item name | URL | Command | Parameter Name | Parameter value | Description |
| up start | /cgi-bin?SetPtzf= | 1,0,1 | |||
| up end | /cgi-bin?SetPtzf= | 1,0,2 | |||
| down start | /cgi-bin?SetPtzf= | 1,1,1 | |||
| down end | /cgi-bin?SetPtzf= | 1,1,2 | |||
| left start | /cgi-bin?SetPtzf= | 0,1,1 | |||
| left end | /cgi-bin?SetPtzf= | 0,1,2 | |||
| right start | /cgi-bin?SetPtzf= | 0,0,1 | |||
| right end | /cgi-bin?SetPtzf= | 0,0,2 | |||
| zoom_in start | /cgi-bin?SetPtzf= | 2,0,1 | |||
| zoom_in end | /cgi-bin?SetPtzf= | 2,0,2 | |||
| zoom_out start | /cgi-bin?SetPtzf= | 2,1,1 | |||
| zoom_out end | /cgi-bin?SetPtzf= | 2,1,2 | |||
| set preset: | /cgi-bin?ActPreset= | 1,N | N : position | ||
| load preset: | /cgi-bin?ActPreset= | 0,N | N : position | ||
| CGI List for Various Settings | |||||
| CGI item name | URL | Command | Parameter Name | Parameter value | Description |
| exposure value | /cgi-bin?Set= | img_expo_expo,3,N | value | 1 ~ 9 | N : value |
| saturation | /cgi-bin?Set= | img_saturation,3,N | value | 0 ~ 10 | N : value |
| contrast | /cgi-bin?Set= | img_contrast,3,N | value | 0~4 | N : value |
| Reboot | GET(Basic Authentication) | /cgi-bin?OnePush=! | |||
| Factory Reset | GET(Basic Authentication) | /cgi-bin?OnePush=d | |||
| RTMP Start streamming | /cgi-bin?Set= | vdo_rtmp_enable,3,1 | |||
| RTMP Stop streamming | /cgi-bin?Set= | vdo_rtmp_enable,3,0 | |||
| Status get (Model name & mac & FW_VER) | /cgi-bin?GetString= | sys_name&net_mac&sys_fw_version | http://10.100.105.110/cgi-bin?GetString=sys_name&net_mac&sys_fw_version | ||
| Serial No. get | /cgi-bin?GetSerialNumber | http://10.100.105.110/cgi-bin?GetSerialNumber | |||
| uploadwav | /uploadwav/uploadwav?Set= | ado_playback_file,3,N | -1~9 (0~9 for customer) | -1 = OFF, 0 ~ 9 = index | |
| oneclick | /cgi-bin?Set= | ptz_oneclick_x,3,N1&ptz_oneclick_y,3,N2&ptz_one_click_spd,3,N3 | ptz_one_click_spd 1~24 | N1, N2 = X, Y coordinates(1080P, 0,0 at top left)N3=moving speed | |
| IR Cut Filter | /cgi-bin?Set= | img_ircut_filter,3,N | 0 ~ 2 | 0 = Day, 1 = Night, 2 = Auto | |
| IR Cut Filter Sensitivity | /cgi-bin?Set= | img_ircut_sensitivity,3,N | 0 ~ 2 | 0 = Low, 1 = Middle, 2 = High | |
| CGI List for Video Stream | |||||
| Video Stream Resolution | /cgi-bin?Set= | vdo_net_stm_res,3,N | value | 1 / 2 / 4 / 5 / 6 | 1 = 1920x1080;2 = 1280x720;4 = 640x480;5 = 640x360;6 = 3840x2160 |
| Video Stream Framerate | /cgi-bin?Set= | vdo_net_stm_fr,3,N | value | 1 / 5 / 15 / 20 / 30 | frames per second |
| Video Stream Bitrate | /cgi-bin?Set= | vdo_net_stm_bitrate,3,N | value | 0 ~ 7 | 0 = 512 Kbps;1 = 1 Mbps;2 = 2 Mbps;3 = 4 Mbps;4 = 8 Mbps;5 = 16 Mbps;6 = 32 Mbps;7 = Auto |
| Video Stream I-VOP | /cgi-bin?Set= | vdo_net_stm_intvl,3,N | value | 1 ~ 10 | I-VOP Interval |
| Interval (S) in seconds | |||||
| Video Stream Rate Control | /cgi-bin?Set= | vdo_net_stm_ratectrl,3,N | value | 0 / 1 | 0: CBR;1: VBR |
| Video Stream Encoding Type | /cgi-bin?Set= | vdo_net_stm_codec,3,N | value | 1 ~ 2 | 1: H.264;2: H.265 |
| Mosaic on Stream On/Off | /cgi-bin?Set= | vdo_net_stm_mosaic,3,N | value | 0 / 1 | 0: OFF; 1: ON |
| Mosaic on Stream Mode | /cgi-bin?Set= | ai_detect_mode,3,N | value | 0 / 1 | 0: Body; 1: Full face |
| CGI List for Audio | |||||
| CGI item name | URL | Command | Parameter Name | Parameter value | Description |
| Auto Echo Cancel | /cgi-bin? Set= | ado_echo_cancel,3,N | 0 ~ 1 0 = OFF, 1 = ON | ||
| Noise Suppression | /cgi-bin? Set= | ado_noise_suppression,3,N | 0 ~ 4 | 0 = OFF, 1 = NR DSP, 2 = NR, 3 = NR + BF, 4 = NR Strong | |
| Audio Beam Forming | /cgi-bin? Set= | ado_mic_bf_type,3,N | 0 ~ 5 | 0 = 30°, 1 = 50°, 2 = 70°, 3 = 90°, 4 = 110°, 5 = 130° | |
| Audio In Volume | /cgi-bin? Set= | ado_vol,3,N | 0 ~10 | 0 ~ 10 volume | |
| Audio In Mute | /cgi-bin? Set= | ado_mic_mute,3,N | 0 ~ 1 | 0 = Un-mute, 1 = Mute | |
| Output Type | /cgi-bin? Set= | ado_out_path,3,N | 0 ~ 2 | 0 = Speaker, 1 = HDMI, 2 = Both | |
| Output Volume | /cgi-bin? Set= | ado_spk_gain,3,N | 0 ~10 | 0 ~ 10 volume | |
| Output Mute | /cgi-bin? Set= | ado_spk_mute,3,N | 0 ~ 1 | 0 = Un-mute, 1 = Mute | |
| CGI List for AI Setting | |||||
| CGI item name | URL | Command | Parameter Name | Parameter value | Description |
| AI Detection (AI Detection and Eyes tracking are mutually exclusive.) | /cgi-bin?Set= | ai_detect_on,3,N | value | 0 / 1 | 0: OFF; 1: ON |
| AI Detection Site | /cgi-bin?Set= | ai_detect_mode,3,N | value | 0 / 1 | 0: Body; 1: Full face |
| Eyes Tracking On/Off (AI Detection)and Eyes tracking are mutually exclusive.) | /cgi-bin?Set= | trk_tracking_on,3,N | value | 0 / 1 | 0: OFF; 1: ON |
| Tracking Preset | /cgi-bin?ActPreset=1,255 | Save current pos. for eye tracking preset point. | |||
| Timeout to preset | /cgi-bin?Set= | trk_lost_time,3,N | value | 3/5/7/10 | timeout in seconds |
| Tracking Site | /cgi-bin?Set= | trk_mode,3,N | value | 0/1 | 0: Full face; 1: Eyes |
| Tracking Range | /cgi-bin?Set= | trk_sensitivity,3,N | value | 0~2 | 0: Close; 1: Medium; 2: Wide |
| Eyes Tracking On/Off Get | /cgi-bin?Get=trk_tracking_on | ||||
| - Reply | Ontrk_tracking_on=1Offtrk_tracking_on=0 | ||||
| Get detect zone(target frame) number | /cgi-bin?Get=trk_detect_num | ||||
| - Reply trk_detect_num=X | X: number of target frames, 50 max. | ||||
| Get detect zone(target frame) info | /cgi-bin?GetGroup=trk_detect_zones | ||||
| - Reply | trk_detect_zones="trk_num:02.focus:-1.zone[00]:760,09,222,300.zone[01]:660,540,16,22." | focus - current target frame index.zone[NN]:x,y,w,h - 1080P based | (0,0) at top left of video.X,Y,W(width),H(height) is based on the top left of the target frame.“focus:" is followed by the current tracking target frame index.Example: "-1" indicates no target is being tracked.If 3 targets are being detected, "focus:" should be followed by either 0, 1, or 2. | ||
| Select Tracking Target | /cgi-bin?SetString= | TrackingFocusZone,x,y,w,h | x, y: coordinates,w: width,h: height, (0,0 at top left) | Based on the result of trk_detect_zones,select tracking target.ex: x=343,y=373, w=213,h=310/cgi-bin?SetString=TrackingFocusZone,343,373,213,310 | |
- MD330U Series PTZ Camera
- How to Clean and Disinfect
- Precautions for Use
- To installation and operation personnel
- - Transportation
- - Operating conditions
- ● To ensure the device perform stably over a prolonged period
- - Operation instructions
- ● Always use the supplied power adapter and power cord to connect the device to a power outlet
- ● Powering off the device
- - Maintenance
- ● Disposal of the device
- Symbols on this Product
- Federal Communication Commission Interference Statement
- Warning
- Caution
- TRADEMARKS
- COPYRIGHT
- More Help
- Non-USA
- USA
- Contact Information
- Headquarters
- USA Branch Office
- Europe Branch Office
- Japan Branch Office
- Vietnam Branch Office
- How to Clean and Disinfect....2
- Precautions for Use....3
- Overview ....1
- Installation....8
- Device Connection....9
- Set Up Your Camera....11
- AVerCamera Setting Tool....30
- Specifications 31
- Troubleshooting 34
- Appendix 36
- Overview
- Package Contents
- Optional Accessories
- Parts Info
- LED Indicators
- Dimensions
- Pan and Tilt Angle
- Mode Switch
- To detach the lens:
- To install the lens:
- To take snapshots in Handheld Mode:
- To turn on the fill light in Handheld Mode (MD330U):
- Remote Control
- Shortcuts
- Installation
- Table Mount
- Device Connection
- Note:
- Set Up Your Camera
- OSD Menu
- IP Address Setup
- Static IP
- DHCP
- Web Interface
- Access the Web Interface
- ● AVer IPCam Utility
- ● AVer PTZ Management
- Live View
- Camera Control
- Preset
- AI Setting
- Tracking
- Camera Settings
- Exposure
- Video & Audio
- Network
- System
- AVerCamera Setting Tool
- Specifications
- Troubleshooting
- What does medical grade mean?
- Can I install the camera upside down?
- How long is the lens cable?
- Can I use an extension USB cable to lengthen the lens cable?
- Can I disinfect the camera by spraying alcohol on it?
- How to open the on-screen display (OSD) menu?
- The camera suddenly fails to receive my voice and the LED indicator is flashing orange.
- Firmware upgrade and rollback.
- - To upgrade:
- - To roll back:
- There is no picture on the output screen.
- The picture on the output screen is distorted or the image is blurry.
- The voice from the speaker is staticky or with undesired noise.
- The snapshot images cannot be found on the microSD card after pressing the Snapshot button on the detachable lens or on the remote control.
- Appendix
- VISCA over IP Settings
- Pelco-D Command
- Pelco-P Command
- CGI Command
- MD330U 系列 PTZ 攝影機
- - 操作條件
- - 為確保本裝置長期穩定運行
- 產品概觀
- 模式切换
- IP 位址設定
- 固定 IP
- Pelco-D 指令
- Pelco-P 指令
- CGI 指令
- MD330U シリーズ PTZ カメラ
- - 輸送
- - 動作条件
- 各部名称
- 動作モードの切替
- IP アドレス設定
- Pelco-D コマンド
- Pelco-P コマンド
- MD330U-Serie PTZ-Kamera
- AVerCamera Setting Tool....31
- Technische Daten 32
- Mode-Schalter
- Pelco-D-Befehl
- Pelco-P-Befehl
- CGI-Befehl
- Vue d'ensemble
- Commutateur de mode
- Exposition (Exposure)
- Commande Pelco-D
- Commande Pelco-P
- Commande CGI
- Comando de Pelco-D
- Comando de Pelco-P
- Comando de CGI
- Cambio modalità
- Comando Pelco-D
- Comando Pelco-P
- Comando CGI
Brand : AVer
Model : MD330UI
Category : Surveillance Camera