
H12S - Vacuum Cleaner DREAME - Free user manual and instructions
Find the device manual for free H12S DREAME in PDF.
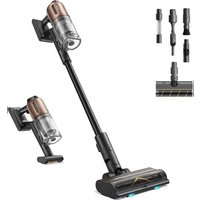
| Product Type | Cordless stick vacuum |
| Brand | Dreame |
| Model | H12S |
| Rated Voltage | 21.6 V |
| Rated Power | 300 W |
| Clean Water Tank Capacity | 900 mL |
| Dirty Water Tank Capacity | 700 mL |
| Charging Time | Approximately 3.5 hours |
| Drying Time | 1 hour |
| Cleaning Modes | Auto, Turbo, Suction |
| Functions | Floor cleaning, suction, self-cleaning, drying |
| Display Screen | Battery indicator, dirt concentration, error messages |
| Maintenance and Cleaning | Dirty water tank, filter, roller brush, tube, dirt sensor |
| Safety | Overheat protection, automatic shutdown, lithium battery |
| Spare Parts | Roller brush (replace every 3-6 months), filter (replace every 3-6 months) |
| Power Supply | Charging station 120 V~60 Hz |
| Operating Temperature | 4 °C to 40 °C |
Frequently Asked Questions - H12S DREAME
User questions about H12S DREAME
0 question about this device. Answer the ones you know or ask your own.
Ask a new question about this device
Download the instructions for your Vacuum Cleaner in PDF format for free! Find your manual H12S - DREAME and take your electronic device back in hand. On this page are published all the documents necessary for the use of your device. H12S by DREAME.
USER MANUAL H12S DREAME
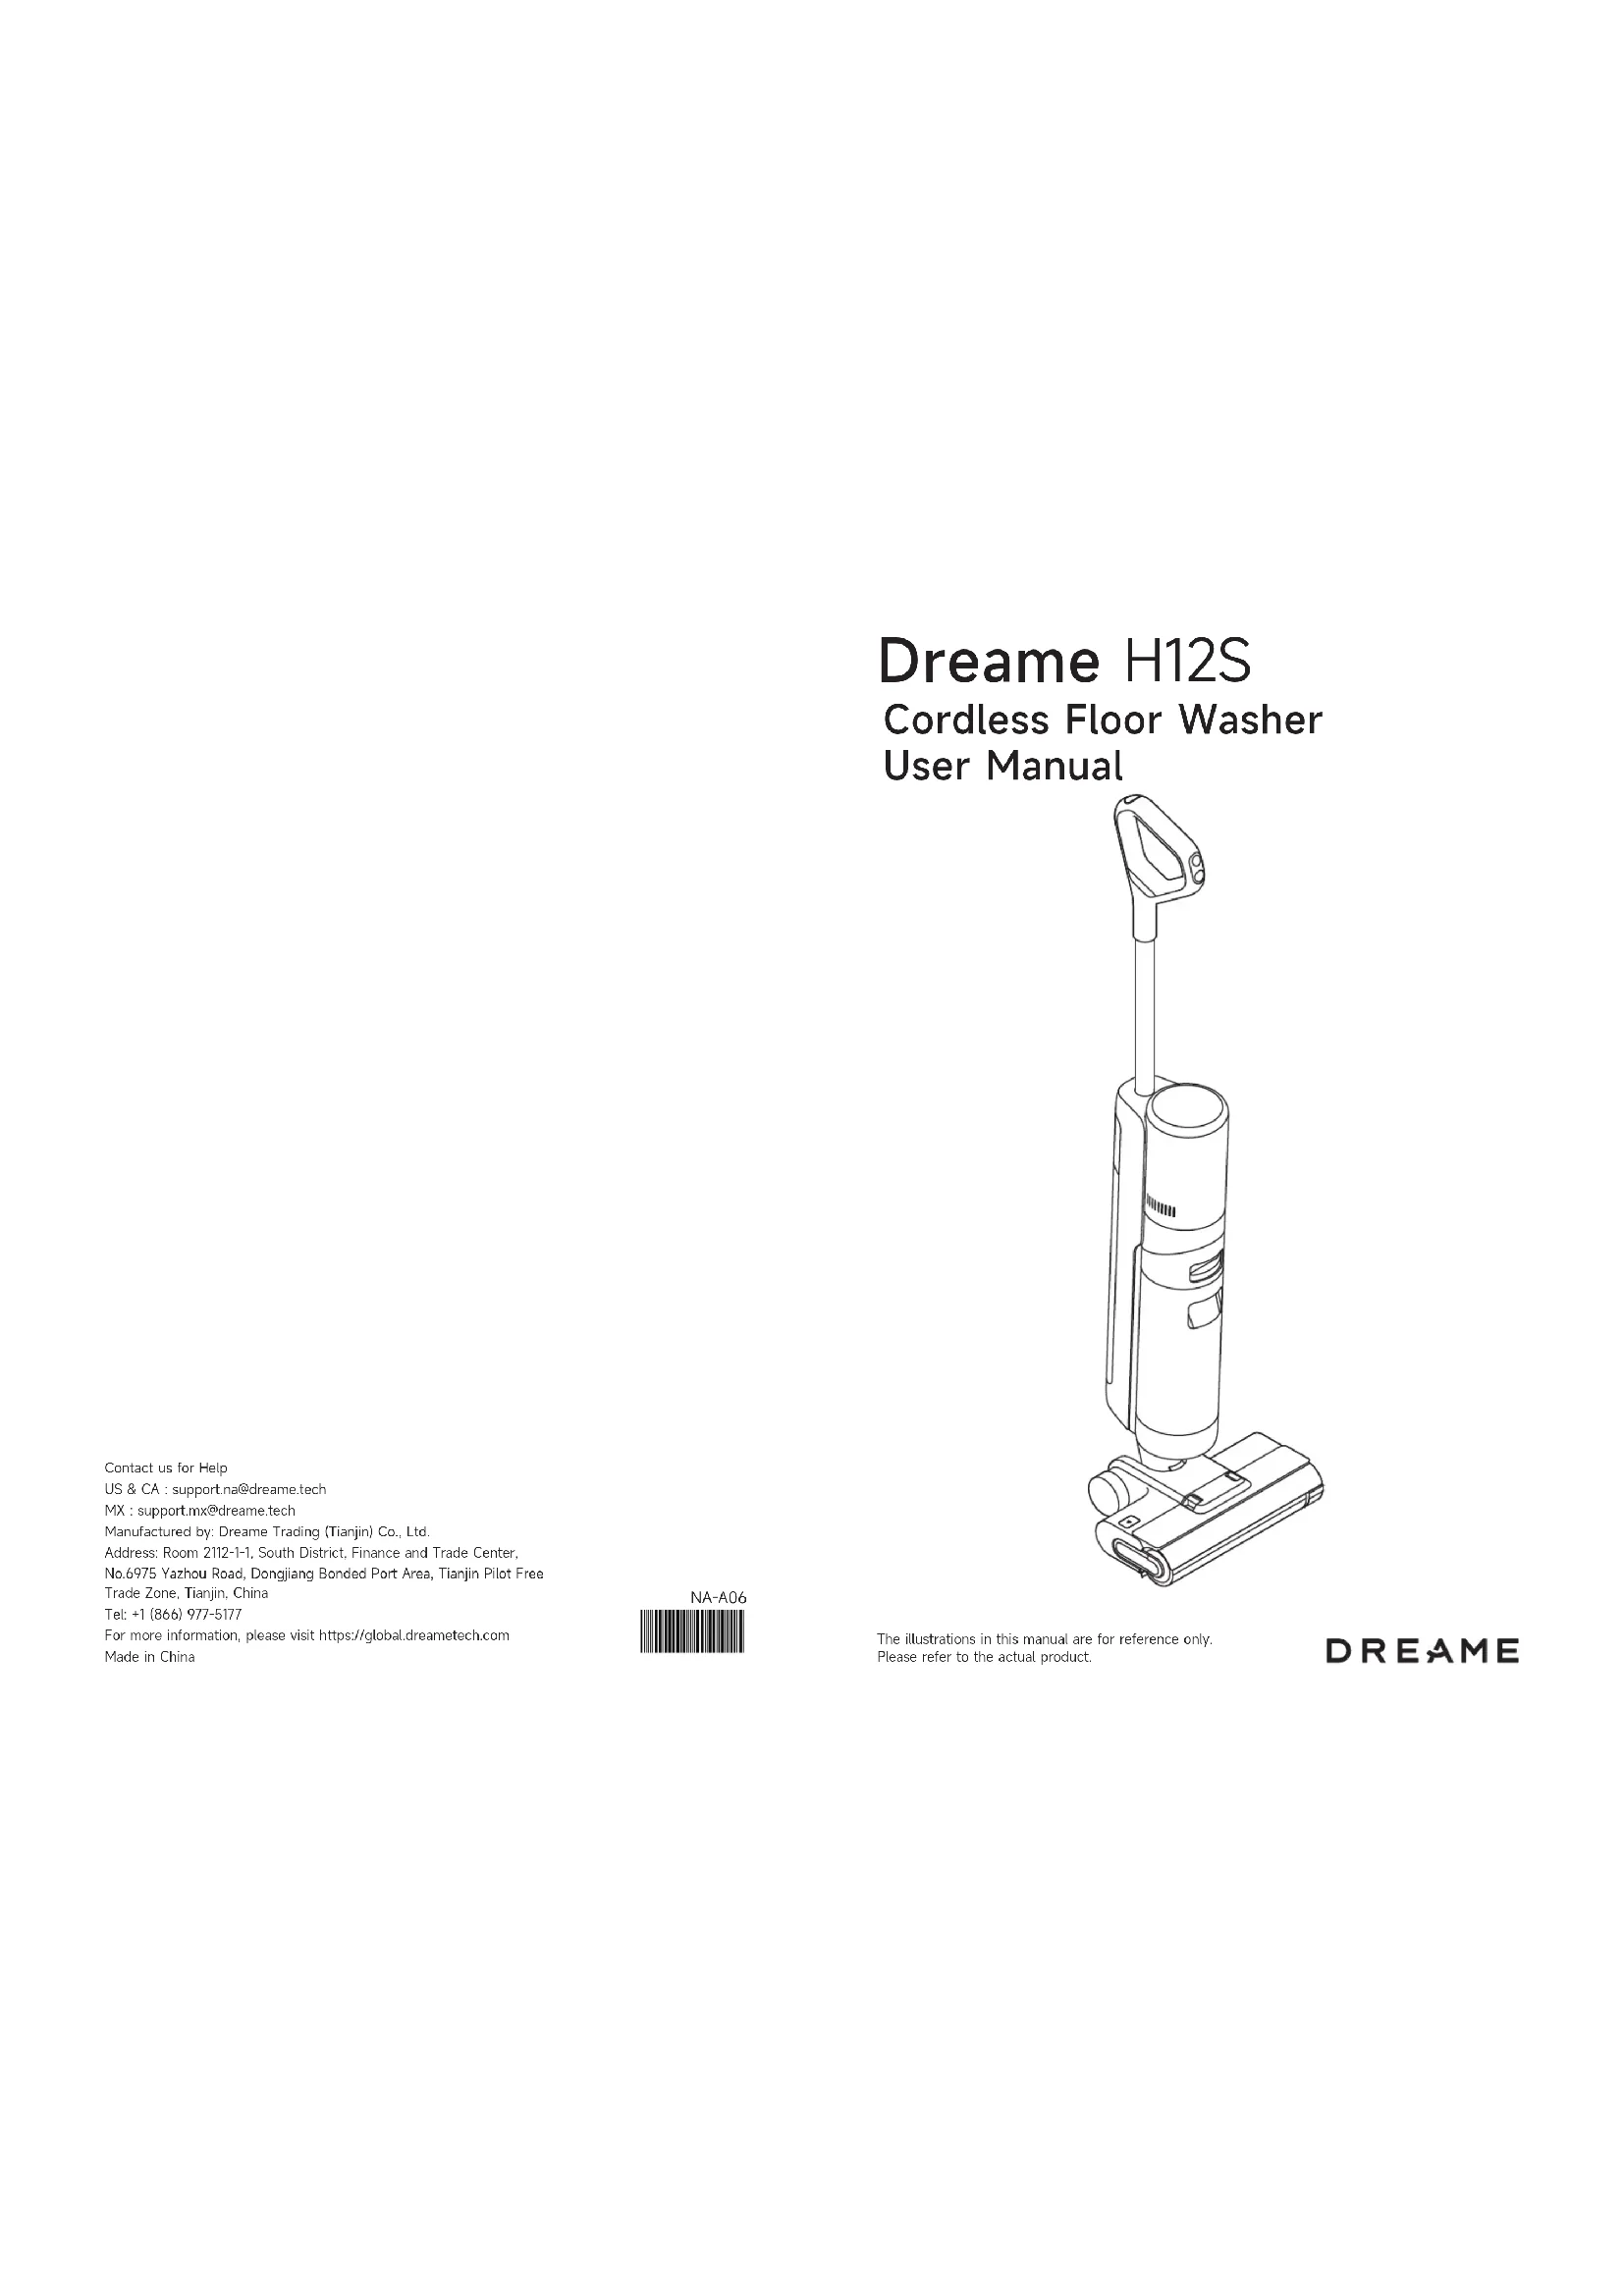
Cordless Floor Washer User Manual
natural_image
Line drawing of a vacuum cleaner with attached circuit board (no text or symbols)Contact us for Help
US & CA : support.na@dreame.tech
MX : support.mx@dreame.tech
Manufactured by: Dreame Trading (Tianjin) Co., Ltd.
Address: Room 2112-1-1, South District, Finance and Trade Center,
No.6975 Yazhou Road, Dongjiang Bonded Port Area, Tianjin Pilot Free
Trade Zone, Tianjin, China
Tel: +1 (866) 977-5177
For more information, please visit https://global.dreametech.com
Made in China
NA-A06
The illustrations in this manual are for reference only. Please refer to the actual product.
DREAME
THANK YOU
FOR PURCHASING THIS DREAME VACUUM.
The high-quality product is engineered for optimal performance. If you have any questions on the product, please contact us: support.us@dreame.tech

Contents
EN User Manual 01
Please scan the QR code for the User Manual.
Safety Information

IMPORTANT SAFETY INSTRUCTIONS
When using an electrical appliance, basic precautions should always be followed, including the following:
READ ALL INSTRUCTIONS BEFORE USING (THIS APPLIANCE). Failure to follow the warnings and instructions may result in electric shock, fire and/or serious injury.
SAVE THESE INSTRUCTIONS
Household use only.
WARNING- To reduce the risk of fire, electric shock, or injury:
- Do not use outdoor. Do not use on wet surfaces during charging.
- Do not allow to be used as a toy. Close attention is necessary when used by or near children, pets or plants.
- Use only as described in this manual. Use only manufacturer's recommended attachments.
- Do not use with damaged cord or plug. If appliance is not working as it should, has been dropped, damaged, left outdoors, or dropped into water, return it to a service center.
- Do not pull or carry by cord, use cord as a handle, close a door on cord, or pull cord around sharp edges or corners. Do not run appliance over cord. Keep cord away from heated surfaces.
- Do not unplug by pulling on cord. To unplug, grasp the plug, not the cord. - Do not handle charging base, including charging base plug, and charging base terminals with wet hands.
- Do not put any object into openings. Do not use with any opening blocked; keep free of dust, lint, hair, and anything that may reduce air flow.
- Keep hair, loose clothing, fingers, and all parts of body away from openings and moving parts.
- Turn off all controls before unplugging.
- Use extra care when cleaning on stairs.
- Do not use to pick up flammable or combustible liquids, such as gasoline, or use in areas where they may be present.
- Do not pick up anything that is burning or smoking, such as cigarettes, matches, or hot ashes.
• To reduce the risk of fire, do not use a flammable or combustible liquid to clean a floor.
- Do not use without water tank and/or filter in place.
- Prevent unintentional starting. Ensure the switch is in the off-position before picking up or carrying the appliance. Carrying the appliance with your finger on the switch or energizing appliance that have the switch on invites accidents.
- Recharge only with the charging base specified by the manufacturer. A charging base that is suitable for one type of appliance may create a risk of fire when used with another one.
- Under abusive conditions, liquid may be ejected from the battery; avoid contact. If contact accidentally occurs, flush with water. If liquid contacts eyes, additionally seek medical help. Liquid ejected from the battery may cause irritation or burns.
ENE Safety Information
- Do not use a battery pack or appliance that is damaged or modified. Damaged or modified battery packs may exhibit unpredictable behavior resulting in fire, explosion or risk of injury.
- Do not expose a battery pack or appliance to fire or excessive temperature. Exposure to fire or temperature above 130^ C / 266^ F may cause explosion.
- Follow all charging instructions and do not charge the battery pack or appliance outside of the temperature range specified in the instructions. Charging improperly or at temperatures outside of the specified range may damage the battery and increase the risk of fire.
- Have servicing performed by a qualified repair person using only identical replacement parts. This will ensure that the safety of the appliance is maintained.
- Do not modify or attempt to repair the appliance or the battery pack except as indicated in the instructions for use and care.
• Always turn off this appliance before cleaning and maintenance.
• To reduce the risk of fire and electric shock due to internal component damage, use only dreame cleaning fluid intended for use with this appliance. See the Cleaning Fluid section of this manual.
• This appliance contains batteries that are non-replaceable. - The appliance should be stored, used and charged only in the temperature range of 4^ / 39.2^ 40^ / 104^ .
- Use appliances only with specifically designated battery packs. Use of any other battery packs may create a risk of injury and fire.
- When battery pack is not in use, keep it away from other metal objects, like paper clips, coins, keys, nails, screws or other small metal objects, that can make a connection from one terminal to another. Shorting the battery terminals together may cause burns or a fire.
- Risk of injury. Brush may start unexpectedly. Keep the switch in off position before cleaning or servicing.
| --- | Direct current |
| ~ | Alternating current |
FCC Information
| Compliance Information | |
| Product Name Cordless Floor Washer with Charging Base | |
| Produce Model | Cordless Floor Washer Model: HHR30BCharging Base Model: HCBG |
| Compliance Statement | This device complies with part 15 of the FCC Rules. Operation is subject to the following two conditions: (1) This device may not cause harmful interference, and (2) this device must accept any interference received, including interference that may cause undesired operation. |
| Correspondence of the responsible party in USA | |
| Company DREAM TECHNOLOGY USA INC | |
| Address 16192 Coastal Highway, Lewes, Delaware 19958, County of Sussex | |
| Email support.us@dreame.tech | |
Caution:
This device complies with Part 15 of the FCC Rules / Innovation, Science and Economic Development Canada's licence-exempt RSS(s). Operation is subject to the following two conditions: (1) this device may not cause harmful interference. (2) this device must accept any interference received, including interference that may cause undesired operation. Changes or modifications not expressly approved by the party responsible for compliance could void the user's authority to operate the equipment.
This equipment has been tested and found to comply with the limits for a Class B digital device, pursuant to part 15 of the FCC Rules. These limits are designed to provide reasonable protection against harmful interference in a residential installation. This equipment generates uses and can radiate radio frequency energy and, if not installed and used in accordance with the instructions, may cause harmful interference to radio communications. However, there is no guarantee that interference will not occur in a particular installation. If this equipment does cause harmful interference to radio or television reception, which can be determined by turning the equipment off and on, the user is encouraged to try to correct the interference by one or more of the following measures:
—Reorient or relocate the receiving antenna.
—Increase the separation between the equipment and receiver.
—Connect the equipment into an outlet on a circuit different from that to which the receiver is connected.
—Consult the dealer or an experienced radio/TV technician for help.
Product Overview
Packing List
natural_image
Technical line drawing of a mechanical assembly or mounting bracket (no text or symbols)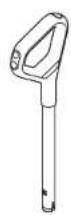
Handle
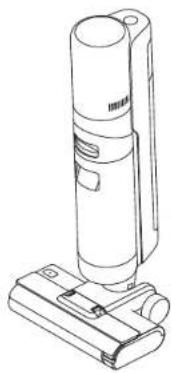
natural_image
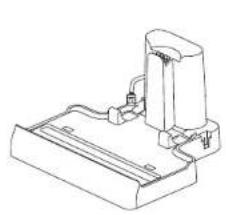
Line drawing of a handheld vacuum cleaner with attached base (no text or symbols)Main BodyCharging Base


Storage Box
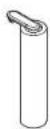
Spare Brush Roller

Replacement Filter
Product Overview
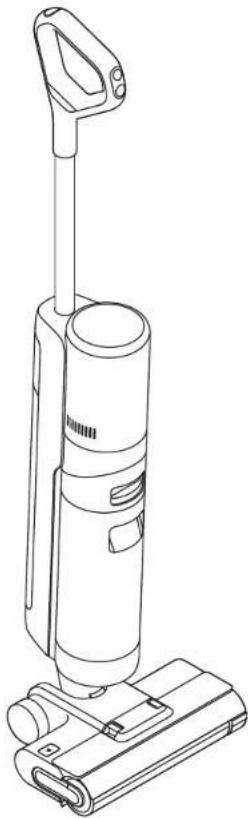
Vacuum
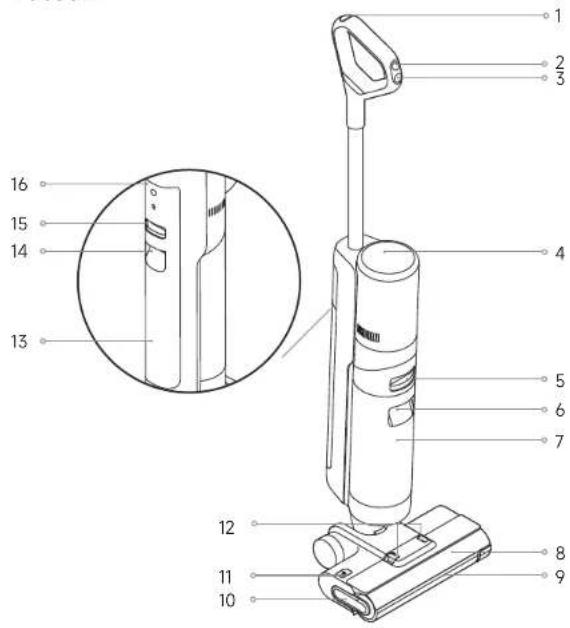
- Self-Cleaning Button
- Mode Switch
- ⏻ Power Switch
- Display Screen
- Used Water Tank Release Button
- Used Water Tank Handle
-
Used Water Tank
-
Brush Roller Cover
- Brush Roller
- Brush Roller Handle
- Brush Roller Release Button
- Brush Roller Cover Release Buttons
- Clean Water Tank
-
Clean Water Tank Handle
-
Clean Water Tank Release Button
- Voice Prompt Button
- Press briefly to activate the voice prompt or adjust the volume.
- Press and hold for 3 seconds to set the language. Press to switch between languages. Press and hold to confirm the selection.
ENE Product Overview
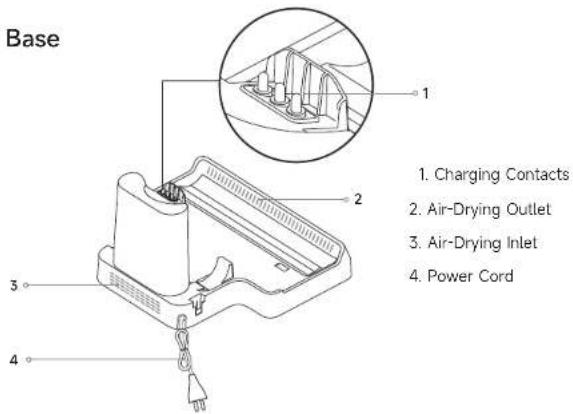
Charging Base
Display Screen
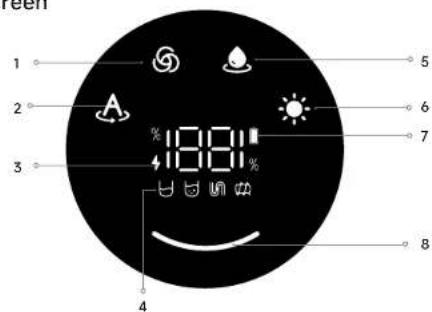
- Turbo Mode
- Auto Mode
- Charging Indicator
- Breathing Orange : Battery level × 20%
- Breathing Green: Battery level > 20%
Error Messages4.
Insufficient water in the Clean Water Tank
Used Water Tank full
Un Blocked tube
Brush roller stuck
- Suction Mode
- Drying Mode
- Low Battery Indicator
- Solid Orange Battery level ≈ 20%
• Solid Green: Battery level > 20%
- Dust Concentration Indicator
The color of the curve changes with the
amount of dust in real time.
Note: If the appliance is not working properly, the screen display will show an error message. Please 67 order to the troubleshooting table to find your solution.
Installation
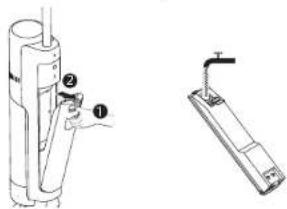
Installing the Storage Box
Install the storage box onto the charging base.
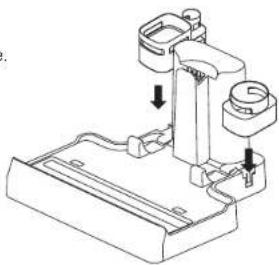
natural_image
Technical line drawing of a mechanical assembly with no visible text or symbolsInstalling the Handle
Insert the end of the handle vertically into the port on the top of the vacuum as indicated until you hear a click.
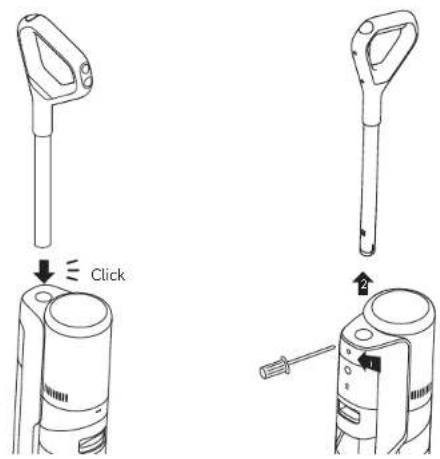
Note: To disassemble, press the contacts in the hole on the back of the appliance with the appropriate tool and pull the handle upwards at the same time.
Charging
- Place the charging base against a wall on level ground and connect it to a power source. Fully charge the appliance before first use.
- Place the appliance on the charging base. When charging, the number on the display screen represents the current battery level as a percentage. When the number reaches 100, the battery is fully charged.
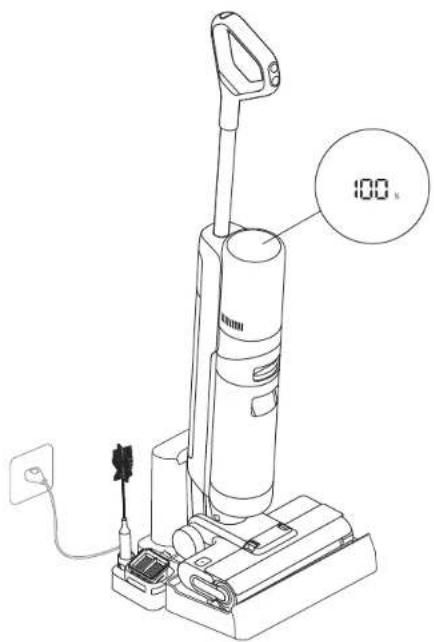
Note:
- If there is no operation within 10 minutes of being fully charged, the vacuum will enter sleep mode. Please restart the appliance if you need to use it.
• To extend the battery life time, the battery keeps cooling down for about one hour automatically after you have used the appliance for a long time.
How to Use
Filling the Clean Water Tank
Press the Clean Water Tank release button and pull the tank outwards to remove it. Remove the cover of the Clean Water Tank and fill the tank with clean water. Install the Clean Water Tank and ensure it clicks into place.
Adding Cleaning Fluid
For better cleaning performance, it is recommended to add 0.34 oz (10 ml) detergent with the bottle cap into the full Clean Water Tank, then shake gently and evenly for use. Note: Do not add any liquids other than the officially-approved cleaner. The cleaner can be available on the official online store. Refer to the cleaning solution label for specific usage instructions.
WARNING: To reduce the risk of fire and electric shock due to internal component damage, use only dreame AWH10 cleaning fluid intended for use with the appliance.
Starting Cleaning
Gently step on the brush cover and recline the appliance backwards. Press the power switch to start operating.

Note:
• Do not vacuum any foamy liquids.
• The appliance will be suspended in the upright position while running.
• The appliance is suitable for cleaning floors, marble, tiles and other hard surfaces.
- Do not recline the appliance backwards more than 140° to prevent the appliance from leaking water.
- When the appliance is in operation, do not lift it off the ground or lay it flat. Doing so may cause the used water to flow into the motor.
How to Use
Switching Modes
Press the mode switch to switch among the Auto mode. Turbo mode and the Suction mode according to your needs.
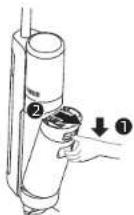
Cleaning the Used Water Tank
Press the Used Water Tank release button to take out the tank. Remove the tank cover and pour out the used water. Close the tank cover and re-install the tank before use.
One-Press Self-Cleaning
- Place the appliance back onto the base while you finish cleaning. Ensure that the water in the Clean Water Tank is sufficient for self-cleaning.
- Briefly press the self-cleaning button on the top of the handle to start/stop self-cleaning.
- Please empty the Used Water Tank after self-cleaning is completed and drying mode has been engaged. Press the button to exit the drying mode.
Note: The self-cleaning function can be enabled only when the appliance is being charged and the battery level is more than 20%.
How to Use
Drying Mode
- Press and hold self-cleaning button for 3 seconds to activate drying mode.
- The appliance will be charged once drying is completed.
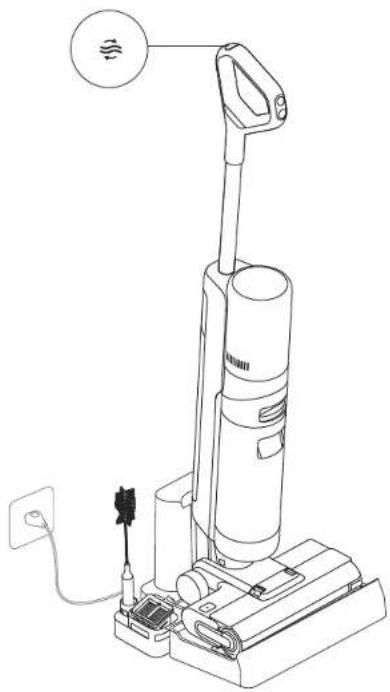
natural_image
Line drawing of a vacuum cleaner with attached power outlet and plug (no text or symbols)Note:
- After self-cleaning is complete, promptly clean the Used Water Tank. Clean the charging base if there are any stains left on the base.
- If cleaning the brush roller manually, please air-dry it thoroughly or dry it by using drying mode several times to ensure a good drying effect.
Care & Maintenance
Tips:
- Turn off the appliance before maintenance. Do not touch the power switch.
- Replace parts if needed. The parts must be replaced by those available from the manufacturer or its service agent.
- If the vacuum is not used for an extended period, fully charge it, unplug the power plug, and store the vacuum in a cool, low-humidity environment away from direct sunlight. To avoid over-discharge of the battery, charge the vacuum at least once every 3 months.
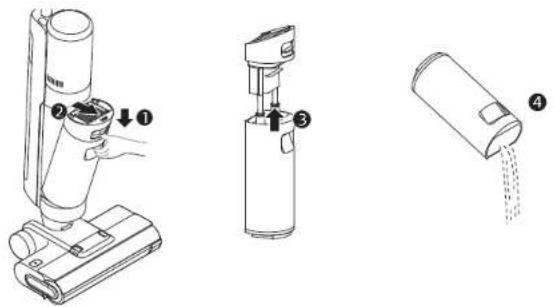
Cleaning the Used Water Tank and the Filter
- Press the Used Water Tank release button, and pull the Used Water Tank outwards to remove it.
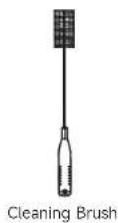
- Rinse the Used Water Tank and the tank cover with water, the provided cleaning brush can be used to clean the inner wall of the tank.
natural_image
Illustration of a hand pouring liquid into a cylindrical container using a handheld device (no text or symbols)- Take out the filter from the Used Water Tank cover. Remove the tank cover and pour out the wastewater.
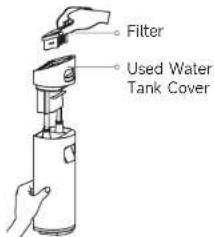
- Re-install the filter and the Used Water Tank cover. Then re-install the Used Water Tank until you hear a click.

Note:
- If the filter is dirty, rinse it with clean water and dry it completely before use. - Replacing the filter every 3 to 6 months is recommended.
12 1312 13
Care & Maintenance
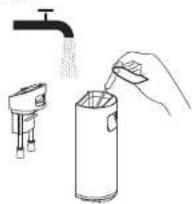
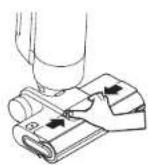
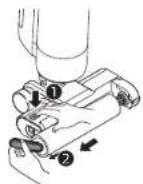
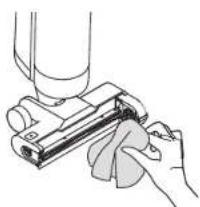
Cleaning the Brush Assembly
-
First, press the brush roller cover release buttons inwards on both sides to remove the brush roller cover. Press the brush roller release button, and the brush roller handle will pop out. Pull it to take out the brush roller.
-
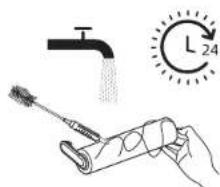
Clear any hair and debris caught on the brush roller with the provided cleaning brush. Rinse the brush roller with clean water and dry it completely.
-
Wipe the suction inlet with a dry cloth or wet tissue. Do not rinse the brush assembly with water.
-
Re-install the brush roller and the brush roller cover until you hear a click.
natural_image
Hand holding a mechanical component, possibly a tool or device, with no visible text or symbols.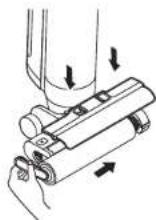
Note:
- Clean as needed. Alternating use of the two provided brush rollers is recommended. - Replacing the brush roller every 3 to 6 months is recommended.
Care & Maintenance
Cleaning the Tube and the Dirt Sensor
Remove the Used Water Tank, gently wipe the tube and the dirt sensor with a wet cloth before use.
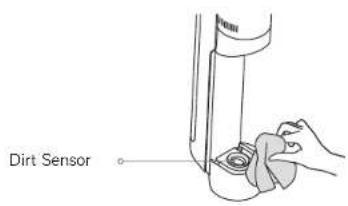
Note: Do not rinse the tube or the dirt sensor.
Troubleshooting
If an error occurs, the appliance will stop working. Please refer to the following table for troubleshooting. If the problem persists, please contact customer service.
| Error Possible Cause | Solution | |
| The appliance does not work | The appliance is out of battery or its battery level is low | Fully charge its battery before use |
| The appliance is in the upright position | Recline the appliance backwards | |
| Blockage activated overheat protection mode | Clear the blockage and wait until the temperature returns normal | |
| The Used Water Tank is full Empty the Used Water Tank | ||
| The parts are not properly installed | Ensure all parts are properly in place | |
| The appliance charges slowly | The temperature of the battery is too low or too high | Wait until the battery's temperature returns normal |
| The suction power of the appliance is weak | The filter is clogged Cleaning the filter | |
| The suction inlet or tube is blocked by a foreign object | Clean the tube and the suction inlet | |
| The motor is making a strange noise | There is too much used water in the Used Water Tank | Empty the Used Water Tank |
| The suction inlet is blocked | Clear any blockage in the suction inlet | |
| The dust concentration indicator is solid red | The dirt sensor needs cleaning | The dirt sensor is in the tube. Follow tube cleaning instructions |
| The cleaning solution concentration is too high | Dilute the cleaning solution with water at the recommended ratio | |
| A third-party cleaning solution caused a large amount of foam | Use only the officially-approved cleaning solution | |
| The display screen does not light up while charging | The charging base cable is not plugged into the electrical outlet | Make sure the charging base cable is plugged in |
| The appliance is not placed onto the charging base properly | Make sure the appliance is placed onto the charging base properly | |
Troubleshooting
| No water is coming out of the appliance | The Clean Water Tank is not properly installed in place, or the water in the Clean Water Tank is insufficient | Re-install or fill the Clean Water Tank |
| It takes 30 second to dampen the brush roller | Turn on the appliance and check again in 30 seconds | |
| The vent leaks water | A collision or a sharp pull causes water to enter the motor | Move the appliance gently back and forth while it is turned on |
| The filter is not completely dry after being cleaned | Dry the filter completely before use | |
| Self-cleaning fails | The brush roller may be jammed by large debris | Open the brush roller cover to check and clean the brush roller |
| The appliance is not placed onto the charging base properly | Make sure the appliance is being charged before self-cleaning | |
| Self-cleaning cannot be enabled if the battery level is lower than 20% | The self-cleaning function can only be enabled when the appliance is being charged and the battery level is more than 20% | |
| The Used Water Tank is not installed in place, or the Used Water Tank is full | Re-install or empty the Used Water Tank | |
| The Clean Water Tank is not installed in place, or the water in the Clean Water Tank is insufficient | Re-install or fill the Clean Water Tank | |
| Poor drying performance or strange noise while drying | The air outlet and air inlet of the charging base may be blocked | Check and clear the blockage of air outlet and air inlet |
For additional support, contact us via support.us@dreame.tech
Tel: +1 (866) 977-5177
Error Prompts and Solutions
If the appliance is not working properly, the screen display will show an error message. Please refer to the troubleshooting table to find your solution.
| Error Icon Possible Cause Solution | ||
| Insufficient water in the Clean Water Tank | Fill the Clean Water Tank | |
| The Used Water Tank is full | Empty the Used Water Tank | |
| Brush roller stuck | Clean the brush roller with the provided cleaning brush | |
| Blocked tube | Check whether the filter is clogged Alternatively, clean the tube and the dirt sensor | |
| Error Code | Possible Cause Solution | |
| E1-E7 | Error | Restart the appliance for troubleshooting.If the problem persists, please contact customer service |
| H1-H6 | ||
| H7 Battery overheating | Wait until the battery's temperature returns normal | |
Specifications
| Vacuum | |||
| Model HHR30B | Charging Time approx. 3.5 hours | ||
| Drying time 1 hour | |||
| Rated Voltage 21.6 | V === | Rated Power 300 | W |
| Used Water Tank Capacity | 700 mL/ 23.67 fl oz | Clean Water Tank Capacity | 900 mL/30.4 fl oz |
| Charging Base | |||
| Model HCBG | |||
| Rated Input | 120 V~60 Hz0.8 A (charging) | Rated Output 28 V | === 1.68 A |
| Rated Power(during drying) | 110 W | Rated Power(during charging) | 45 W |
• The lithium-ion battery pack contains substances that are hazardous to the environment. Before disposing of the appliance, please first remove the battery pack, then discard, or recycle it in accordance with local laws and regulations of the country or region it is used in.
• The appliance must be disconnected from the power supply when removing the battery. Keep batteries out of the reach of children. Never put batteries in mouth. If swallowed, contact your physician or local poison control.
• Under abusive conditions, never contact the battery from which the liquid may be ejected. If contact accidentally occurs, rinse with water. If liquid contacts eyes, seek medical help immediately. Liquid ejected from the battery may cause irritation or burns.
natural_image
Technical line drawing of a handheld device with a handle and a base, showing a mechanical assembly (no text or symbols)Remarque :
natural_image
Line drawing of a vacuum cleaner with attached circuit board and power outlet (no text or symbols)natural_image
Illustration of a hand pouring liquid into a cylindrical container using a handheld device (no text or symbols)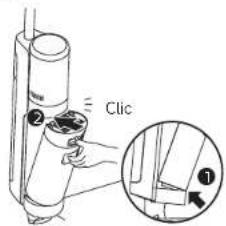
natural_image
Hand holding a mechanical component with a cylindrical part inserted (no text or symbols visible)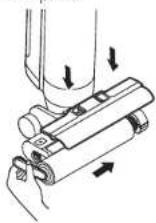
Remarque :
natural_image
Line drawing of a handheld device with a cylindrical top and base (no text or symbols)Filtro de repuesto
natural_image
Technical line drawing of a handheld device with a handle and a base, showing a mechanical assembly (no text or symbols)natural_image
Line drawing of a vacuum cleaner with attached power outlet and wiring (no text or symbols)natural_image
Illustration of a hand pouring liquid into a spray bottle using a tap (no text or symbols)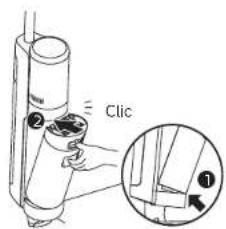
Nota:
natural_image
Hand holding a mechanical component with a cylindrical part inserted (no text or symbols visible)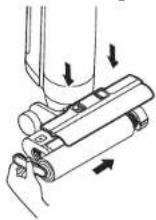
Nota:

- Cordless Floor Washer User Manual
- THANK YOU
- Contents
- Safety Information
- IMPORTANT SAFETY INSTRUCTIONS
- SAVE THESE INSTRUCTIONS
- WARNING- To reduce the risk of fire, electric shock, or injury:
- ENE Safety Information
- Caution:
- Product Overview
- ENE Product Overview
- Installation
- Charging
- Note:
- How to Use
- Filling the Clean Water Tank
- Adding Cleaning Fluid
- Starting Cleaning
- Switching Modes
- Cleaning the Used Water Tank
- One-Press Self-Cleaning
- Drying Mode
- Care & Maintenance
- Cleaning the Used Water Tank and the Filter
- Cleaning the Brush Assembly
- Cleaning the Tube and the Dirt Sensor
- Troubleshooting
- Error Prompts and Solutions
- Specifications
- Nota:
Brand : DREAME
Model : H12S
Category : Vacuum Cleaner