305677 - Alarm clock radio Bearware - Free user manual and instructions
Find the device manual for free 305677 Bearware in PDF.


| Product type | Radio alarm clock |
| Brand | Bearware |
| Model | 305677 |
| Power supply | 5 V DC via 5V2A EU power adapter (coaxial plug) |
| Frequency ranges | FM: 87.5 – 108 MHz; DAB: 174.928 – 239.200 MHz |
| Transmission power | 0 dBm |
| Display | 12/24 hour, adjustable backlight (5 levels) |
| Projection | Projected time on wall/ceiling, adjustable angle up to 180°, image inversion |
| Alarm functions | Dual independent alarm, source selection (beep, DAB, FM), snooze (9 min), progressive volume |
| Radio functions | DAB and FM, auto and manual scan, 20 presets per band, RDS/DAB info display |
| Sleep function | Adjustable timer: off, 5, 15, 30, 60, 90 minutes |
| USB port | 1 USB type A charging port (5V output) |
| Operating temperature | 0 °C to +40 °C |
| Care and cleaning | Unplug before cleaning; use a soft, dry cloth; do not use harsh solvents |
| Safety | Do not open the device; do not expose to water, heat, or open flames; follow the instructions in the manual |
| Package contents | Projection alarm clock, 5V2A EU power adapter, user manual |
| Repairability | The device contains no user-serviceable parts; any opening voids the warranty |
| General information | Brand: Bearware; Model: 305677; Category: Radio alarm clock |
Frequently Asked Questions - 305677 Bearware
User questions about 305677 Bearware
0 question about this device. Answer the ones you know or ask your own.
Ask a new question about this device
Download the instructions for your Alarm clock radio in PDF format for free! Find your manual 305677 - Bearware and take your electronic device back in hand. On this page are published all the documents necessary for the use of your device. 305677 by Bearware.
USER MANUAL 305677 Bearware
Thank you for choosing an Bearware product. Please read the following user manual carefully so as to get the most from the product you have purchased. Before using the product, first check that the delivered item is complete, accurate and undamaged.
1. Scope of delivery
- Projection alarm clock
- 5V2A EU power adapter
- User manual
2. Technical data
| Power supply | 5V DC (via DC coaxial jack)5V DC USB type A socket (charging port) |
| Transmitting power 0 dBm | |
| Frequency range | FM 87.5 – 108 MHzDAB 174.928 - 239.200 MHz |
| Features | USB charging port12/24-hour displayVarious alarm modes (Beep, DAB and FM radio)DAB and FM RadioSnooze function180° flip projection display |
| Ambient temperature 0°C to + 40°C or 32°F to 104°F | |
3. Functions
The projection alarm clock allows you to project the current time, for example, onto a wall or room ceiling. You can adjust two different alarm settings using the dual alarm.
It can wake you up with a "beep" sound or, optionally, with your favourite radio station. Using the movable projector, the projection can also be displayed on any desired place.
4. Product details
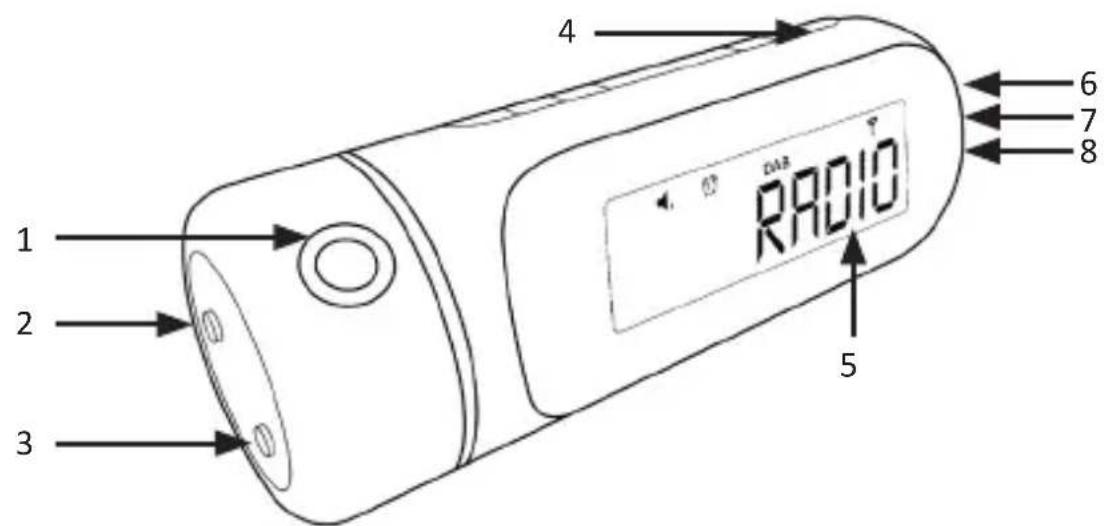
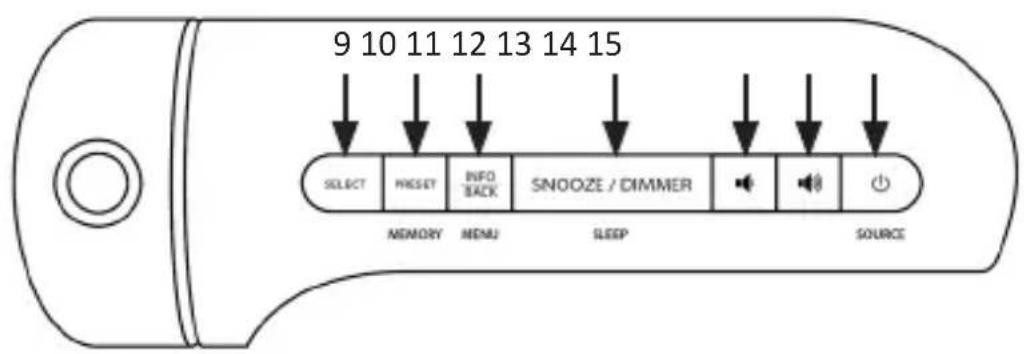
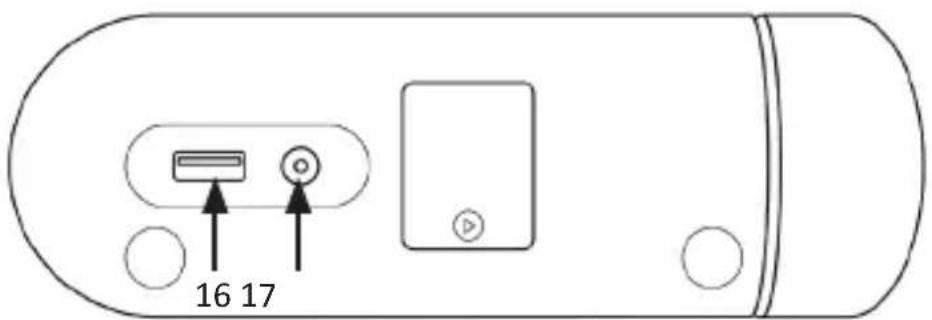
| Number Name | |
| 1 Projector | |
| 2 "Projector On / Off" button | |
| 3 180° flip button | |
| 4 Control panel | |
| 5 Display | |
| 6 "UP" button | |
| 7 "ALARM" button | |
| 8 "DOWN" button | |
| 9 "SELECT" button | |
| 10 "PRESET" button | |
| 11 "MENU" button (INFO / BACK button) | |
| 12 "SNOOZE/DIMMER/SLEEP" button | |
| 13 "Reduce volume" button | |
| 14 "Increase volume" button | |
| 15 "Radio ON/OFF" button | |
| 16 USB charging output | |
| 17 DC power supply | |
Display
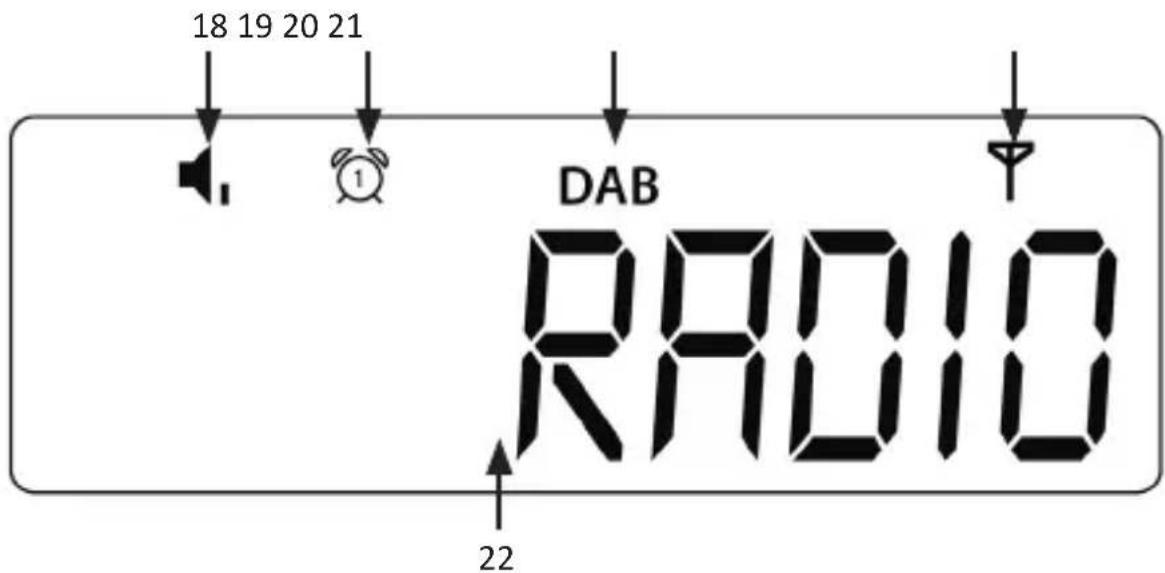
| Number Name | |
| 18 Volume display | |
| 19 Alarm display | |
| 20 DAB / FM display | |
| 21 Reception display | |
| 22 Time /Radio station/Alarm display | |
5. Initial use
Take the device out of the package and remove all the packaging material.
Connect the power adapter to a properly installed socket and to the projection alarm clock. The device is then ready for use and scans for the time via the DCF signal.
6. Setting the time
Normally, the projection alarm clock automatically scans for the time via the DCF signal after the device is switched on. If not, please proceed as follows:
- Press and hold the "MENU" button (INFO/BACK) in DAB or FM mode.
- Press the buttons "UP" or "DOWN" to scroll through the options until you see "System".
- Press the "SELECT" button to confirm the "System" option.
-
Press the buttons "UP" or "DOWN" to scroll through the options.
-
Select the "TIME SETUP" option and confirm it using the "SELECT" button.
-
To confirm an option, press the SELECT button.
- To set a value (e.g. the time), press the button. Optionally, to select a value, press the SELECT button.
- To return to the previous menu/screen, press the BACK button.
The "Time Setting" menu contains the following options:
- Set time (Setting the time: HH:MM)
- Set date (Setting the date: DD-MM-YY)
- Automatic update (To specify how the radio updates the time and date information. Select "From Radio" to update the information from the radio signals or "No Update" to stop the automatic update.
• 12/24H format (Setting the time format: 12 or 24 hours)
Note: You can also access the time settings menu in standby mode. To do this, press and hold the "MENU" button when the radio is switched off.
7. Setting the alarm
The radio comes with 2 alarm settings.
- Press the "ALARM" button to choose between alarm 1 and alarm 2. Then press the "SELECT" button to confirm the selection.
- Press the "UP" or "DOWN" button to select alarm "ON". Press the "SELECT" button to confirm the selection.
- Press the "UP" or "DOWN" button to set the alarm time, and then press the "SELECT" button.
- Press the "UP" or "DOWN" button to set the alarm minutes, and then press the "SELECT" button.
- Press the "UP" or "DOWN" button to scroll through the options for alarm frequency. Then press the "SELECT" button to confirm the selection. The alarm frequency defines how often the alarm is active.
Frequency options: Daily, once, on weekends and weekdays. If you selected "Once", you will be prompted to set a specific date.
- Press the "UP" or "DOWN" button to scroll through the source options, and then press the SELECT button to confirm the selection. The source defines the sound source of the alarm.
Possible sources: DAB, FM and Buzzer. If DAB or FM is selected, the last played station is used as the alarm.
- Press the "UP" or "DOWN" buttons to adjust the volume. Then press the SELECT button. This setting sets the volume of the alarm clock. The alarm setting is now saved.
If the alarm setting is active (ON), the corresponding alarm symbol (1 or 2) is shown on the display. The alarm goes off at the set time. The volume is gradually increased until it reaches the set volume. The corresponding alarm symbol flashes on the display.
8. Turning off the alarm
- Press the "ALARM" button to choose between alarm 1 and alarm 2. Then press the "SELECT" button to confirm the selection.
- Press the "UP" or "DOWN" button to select alarm "OFF". Then press the "SELECT" button to confirm the selection. If the alarm setting is deactivated (OFF), the corresponding alarm symbol (1 or 2) disappears from the display.
- Press the "Radio ON/OFF" button to deactivate the alarm sound.
9. Snooze function
- Press the "SNOOZE" button to temporarily deactivate the alarm sound. The snooze time is 9 minutes. The radio returns to the standby mode in the snooze phase. The alarm goes off again when the snooze time has elapsed.
- To cancel the snooze time and the alarm, please press the "POWER" button.
10. Sleep function
The sleep function specifies the time period after which the radio switches off automatically.
When the radio is switched on, please press the "SNOOZE" button repeatedly to select a sleep time (options: Off, 5, 15, 30, 60 and 90 minutes).
As soon as a sleep time is set, the sleep symbol is shown on the display. The radio switches off automatically when the sleep time has elapsed.
11. Dimming the display
In standby mode, press the "SNOOZE/DIMMER" button to adjust the brightness of the display (5 levels).
12. Radio function
Programming the radio
Before using the radio function, make sure that the antenna is extended appropriately.
DAB setting
Select DAB mode to listen to DAB stations
- Press the "POWER" button to switch on the radio.
- Press the "SOURCE" button to select DAB mode. The DAB mode symbol is shown on the display.
Scanning for DAB stations
If you are using the radio for the first time or if the station list is empty, the radio automatically scans for the stations.
Proceed as follows to scan for stations manually:
- In DAB mode, press and hold the "MENU" button until "STATION SCAN" is shown on the display.
- Press the "SELECT" button.
- Press the "UP" or "DOWN" button to select "FULL SCAN" or "MANUAL TUNE".
FULL SCAN: Performs a wide-range scan for DAB stations and saves them automatically.
MANUAL TUNE: Press the "UP" or "DOWN" button to manually tune the frequency.
- Press the "SELECT" button to confirm the selection.
Tuning to a DAB station
- In DAB mode, press the "UP" or "DOWN" button to scroll through the DAB stations in the station list.
- Press the "SELECT" button to set the selected DAB station.
Saving preset stations
You can save up to 20 DAB stations as preset stations.
Set a DAB station.
- Press and hold the "PRESET" button. The display shows "XX-(station name) or "XX-EMPTY". "XX" is the preset number (1-20).
- Press the "UP" or "DOWN" button to select a preset number.
- Press the "SELECT" button to confirm. The DAB station is saved under the selected preset number. Repeat steps 1-4 to save other preset stations.
- To set a preset station, press the "PRESET" button once, then the "UP" or "DOWN" button to scroll through the list of preset stations. Then press the "SELECT" button to confirm the selection.
- To change the DAB station mapped to a preset number, repeat steps 1 to 4 to overwrite the existing DAB station.
Displaying DAB information
Press the "MENU" button repeatedly to display the DAB information (such as program type, frequency, time, date, if available).
Using the DAB menus
- In DAB mode, press and hold the "MENU" button to open the DAB menu.
- Press the "UP" or "DOWN" button to scroll through the following options. Then press the "SELECT" button to confirm the selection.
FM setting
Selecting the FM mode
-
Press the "POWER" button to switch on the radio.
-
Press the "ON/OFF" button to select the FM mode. The FM mode symbol is shown on the display.
Scanning for FM stations
In FM mode, press the "SELECT" button to activate automatic scanning for the next available FM station. The scanning stops once an FM radio station is found.
Tuning the FM frequency
- In FM mode, press the "UP" or "DOWN" button to adjust the frequency down or up.
- After adjusting the frequency up or down, press the "SELECT" button to activate automatic scanning for the next available FM station in the selected tuning direction up or down.
Saving preset stations
You can save up to 20 FM stations as preset stations.
-
Set a FM station.
-
Press and hold the "PRESET" button. The display shows "XX-(frequency) or "XX-EMPTY". "XX" is the preset number (1-20).
-
Press the "UP" or "DOWN" button to select a preset number.
-
Press the "SELECT" button to confirm. The FM station is saved under the selected number. Repeat steps 1-4 to save other preset stations.
-
To set a preset station, press the "PRESET" button once, then the "UP" or "DOWN" button to scroll through the list of preset stations. Then press the "SELECT" button to confirm the selection.
-
To change the FM station mapped to a number, repeat steps 1 to 4 to overwrite the existing station.
Displaying RDS information
Press the "MENU" button repeatedly to display the RDS information (such as radio text, program type, time and date, if available).
Using the FM menus
- In FM mode, press and hold the "MENU" button to open the FM menu.
- Press the "UP" or "DOWN" button to scroll through the following options.
Then press the "SELECT" button to confirm the selection.
Scan (to define how the radio searches for the next available station. Select "DX" to scan only for stations with strong reception, or "LOCAL" to scan for all stations regardless of signal strength.)
13. Projection
Press the "Projector On/Off" button to project the current time onto a wall. Rotate the projector (up to 180°) to adjust the projection angle.
Press the "180° FLIP" button to flip the projected image.
Note: Time is projected on the ceiling or wall of a dark room. The maximum projection distance is 1-3 meters.
14. Charging port
A Type-A USB charging port is provided at the back of the clock.
You can use this charging port, for example, to connect the charging cable of your smartphone and charge it.
Please note that only the Type-A USB port is designed as a charging port.
15. DRC (Dynamic Range Control) (only in DAB mode)
This option allows you to add or remove certain amount of compensation for the differences in dynamic range between the radio stations. Select one of the following options.
- DRC off: Compensation is not applied.
- DRC low: Medium compensation is applied.
- DRC high: Maximum compensation is applied.
15. Factory Reset
This setting deletes all user defined settings and replaces them with the original default settings. Select "Yes" to confirm a factory reset.
If the device does not respond or works irregularly, it could be due to an electrostatic discharge (ESD) or a power surge that caused the internal microcontroller to shut down automatically. In such cases, disconnect the mains adapter from the socket. Wait for at least 3 minutes and reconnect the mains cable to the socket. The device is now reset. In this case, you will need to set the time and alarm again.

16. Additional safety guidelines for this device
- Do not place any open flames such as candles on the device.
- Do not place the product in a closed bookshelf without adequate ventilation.
- The ventilation slits should not be obstructed or blocked by objects.
- The device should neither be exposed to dripping or splashing water nor to other fluids and never immersed.
- The product should not be exposed to direct sunlight.
- Do not use any aggressive cleaning agents or solvents for cleaning. Wipe the device using a clean and soft cloth.
- Please pull out the mains plug before cleaning.
- Never try to insert wires, pins or other similar objects into the venting slits or openings of the device.

17. Safety instructions and disclaimer
Never try to open the device to repair or make modifications. Avoid contact with the mains voltage. Do not short-circuit the product. The device is not waterproof, hence please use it only in dry surroundings. Protect it from high humidity, water and snow. Keep the product away from high temperatures.
Do not expose the product to sudden changes in temperature or strong vibrations, as this could damage the electronic components. Check the product for any damage before using it. The product should not be used if it was subject to impact or has been damaged in some other manner. Please comply with the local regulations and restrictions. Do not use the product for purposes other than those described in the user manual. This product is not a toy. Keep it out of the reach of children or mentally disabled persons. Any repair or modification to the product, which is not carried out by the original supplier, will void any warranty and guarantee claims.
The product should only be used by those who have read and understood this user manual. The specifications of the product may be changed without any special prior notification.
18. Disposal instructions
In line with the European WEEE directive, electrical and electronic products should not be disposed of along with domestic waste. Their components must be sent separately for recycling or disposal, as improper disposal of toxic and dangerous components may permanently damage the environment.
According to the electrical and electronic equipment act (ElektroG), you are obliged (as a consumer) to return (free of charge) electrical and electronic products to the manufacturer, the point of sale or public collection points at the end of their service life. The relevant local laws regulate the details in this regard. The symbol displayed on the product, in the user manual or/and on the packaging refers to these regulations. With this manner of sorting, recycling and disposal of used products, you make an important contribution towards protecting our environment.

WEEE directive 2012/19/EU
WEEE Register no.: DE 67896761
The company WD Plus GmbH hereby certifies that the device 305677 complies with the fundamental requirements and all other relevant stipulations of the directive 2014/53/EU. A complete conformity statement can be obtained from: WD Plus GmbH, Wohlenbergstraße 16, 30179 Hannover; http://downloads.ganzeinfach.de/search/model/305677
DOWNLOADS & MANUALS
- Scope of delivery
- Technical data
- Functions
- Product details
- Display
- Initial use
- Setting the time
- Setting the alarm
- Turning off the alarm
- Snooze function
- Sleep function
- Dimming the display
- Radio function
- Programming the radio
- DAB setting
- Scanning for DAB stations
- Tuning to a DAB station
- Saving preset stations
- Displaying DAB information
- Using the DAB menus
- FM setting
- Selecting the FM mode
- Scanning for FM stations
- Tuning the FM frequency
- Displaying RDS information
- Using the FM menus
- Projection
- Charging port
- DRC (Dynamic Range Control) (only in DAB mode)
- Factory Reset
- Additional safety guidelines for this device
- Safety instructions and disclaimer
- Disposal instructions
Brand : Bearware
Model : 305677
Category : Alarm clock radio