BAT20GD10 - Scissors Klein Tools - Free user manual and instructions
Find the device manual for free BAT20GD10 Klein Tools in PDF.


User questions about BAT20GD10 Klein Tools
0 question about this device. Answer the ones you know or ask your own.
Ask a new question about this device
Download the instructions for your Scissors in PDF format for free! Find your manual BAT20GD10 - Klein Tools and take your electronic device back in hand. On this page are published all the documents necessary for the use of your device. BAT20GD10 by Klein Tools.
USER MANUAL BAT20GD10 Klein Tools
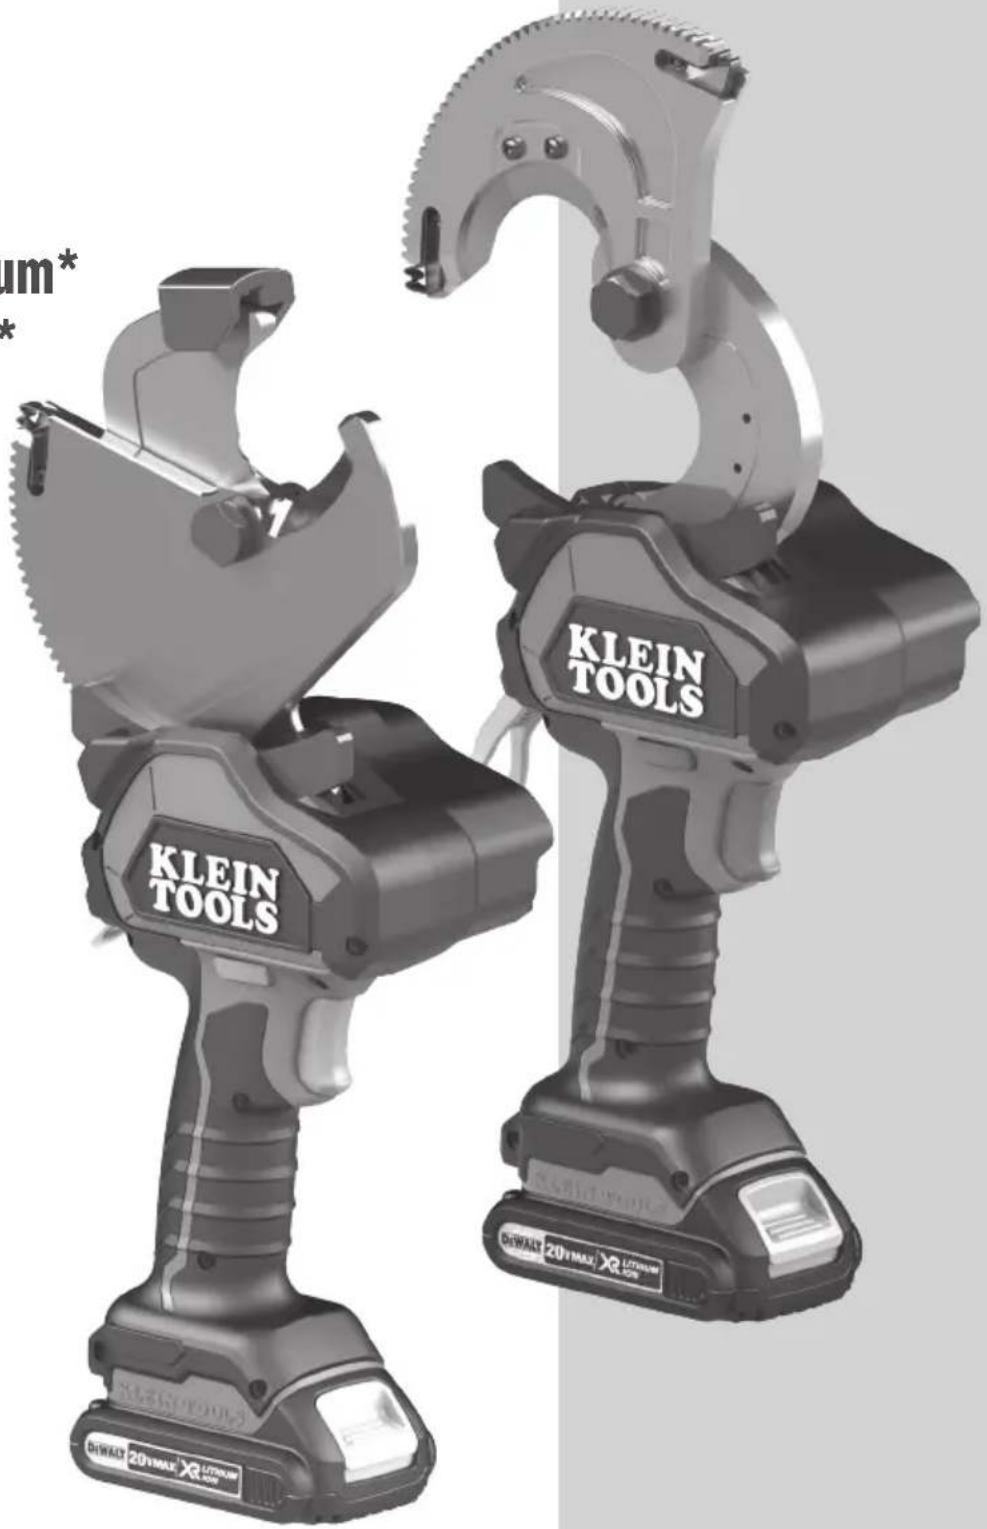
Battery-Powered Geared Cable Cutters
- 20V Lithium Ion
• Cuts up to: 1590 MCM ACSR* 1500 MCM Aluminum* 1000 MCM Copper* 1/2" EHS*
*See specific models for capacities
natural_image
Two KLEIN TOOLS robotic tools with attached clips, displayed against a plain background (no text or symbols on the tools themselves)ESPAÑOL pg. 13
FRANÇAIS pg. 25
GENERAL SPECIFICATIONS
Klein Tools BAT20-G Series Geared Cable Cutters are designed for professional cable cutting applications.
• Power Source: 20V Li-Ion battery
- Cutting Capacity: For the exact cutting capacity of your model, please refer to markings on tool blade or visit www.kleintools.com.
Specifications subject to change.
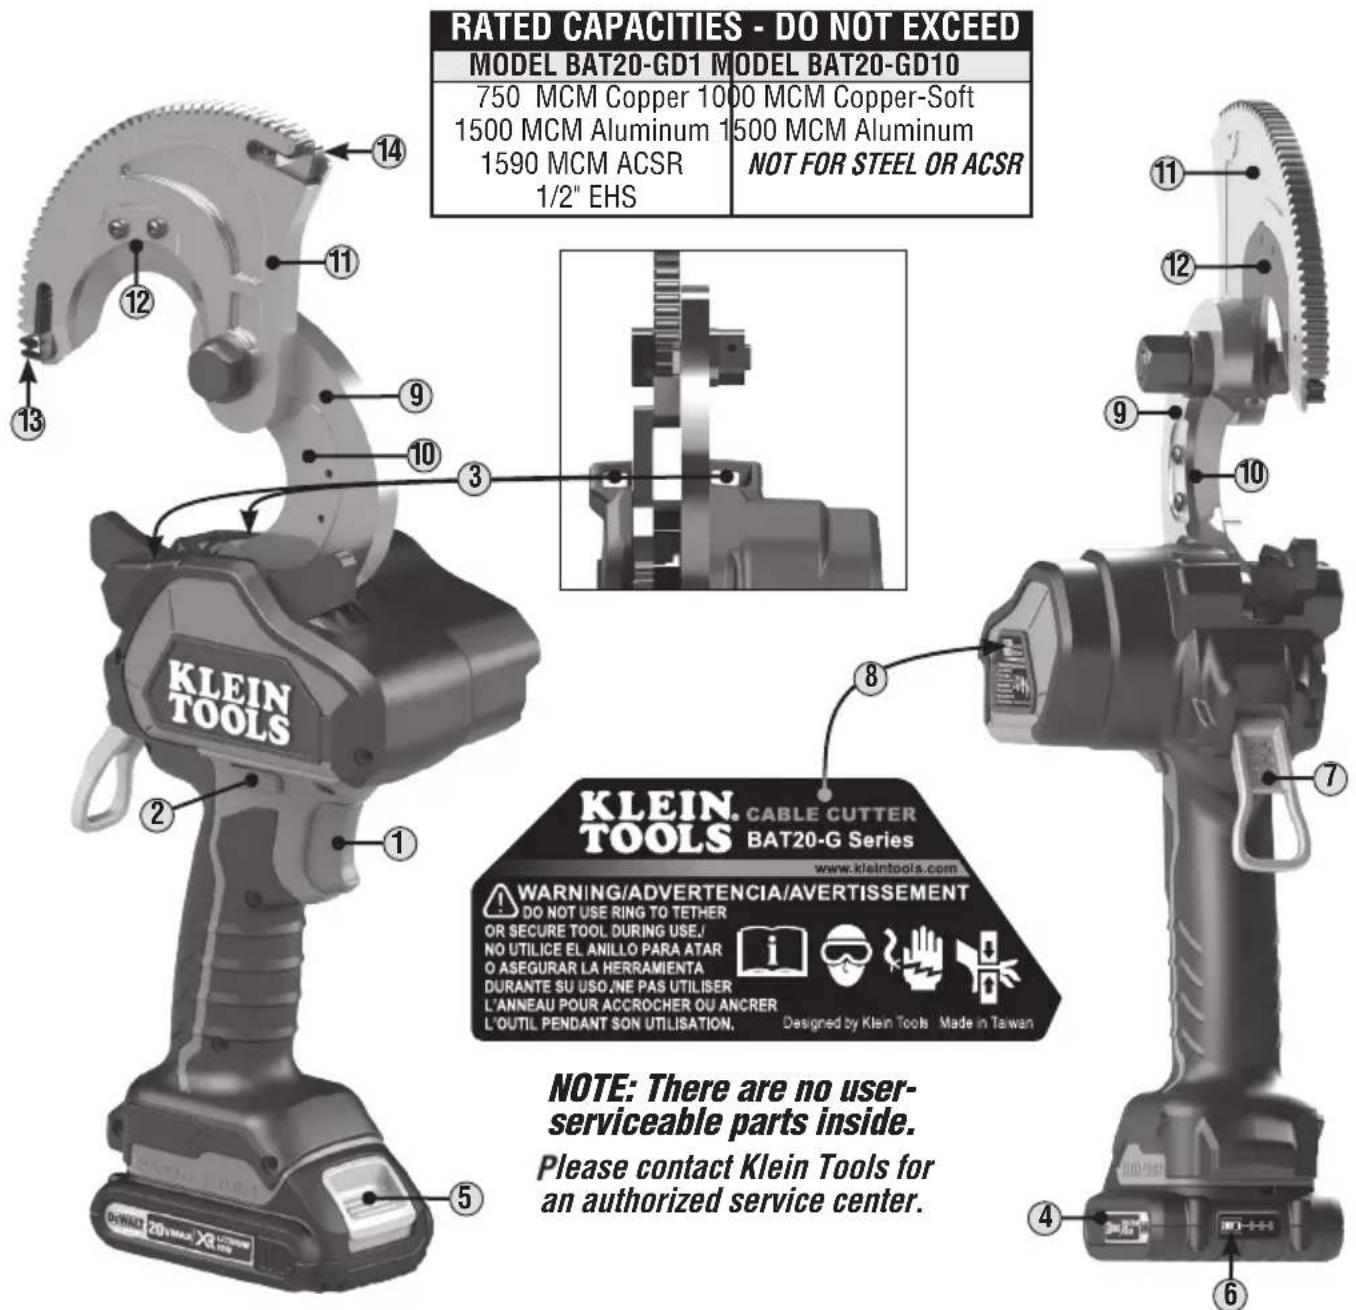
FEATURE DETAILS - CLOSED-JAW MODELS
text_image
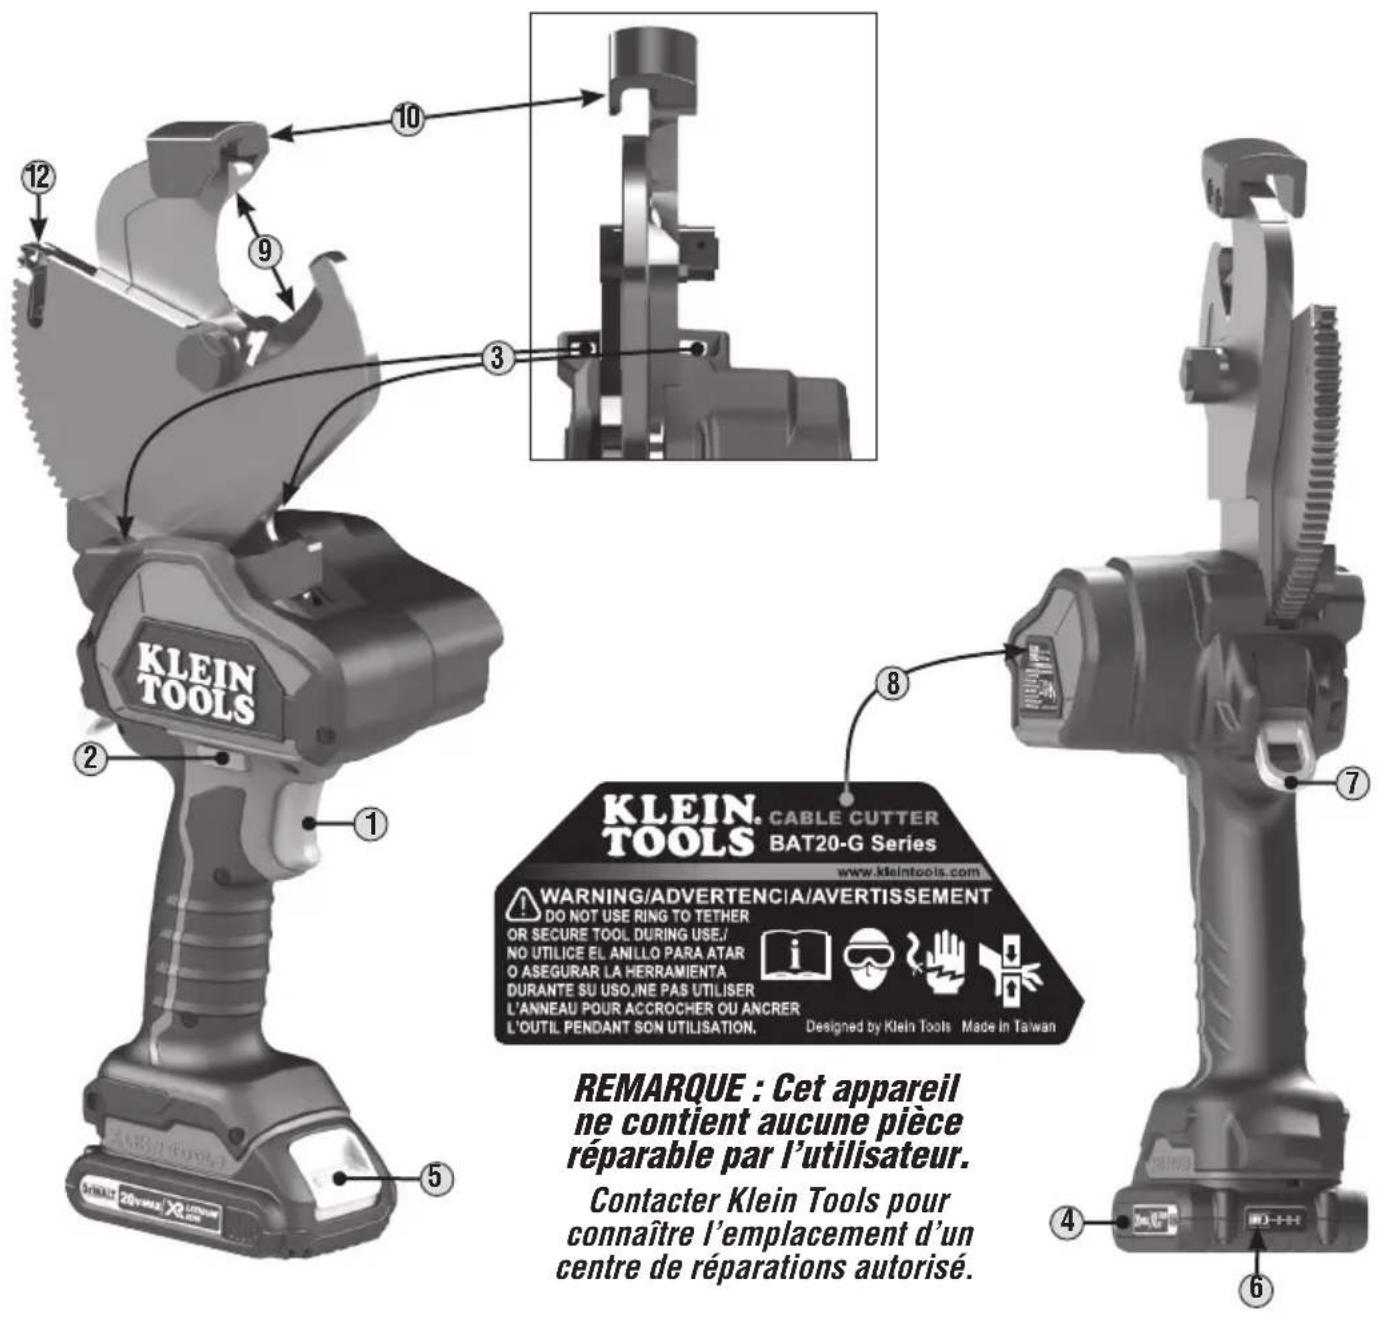
RATED CAPACITIES - DO NOT EXCEED MODEL BAT20-GD1 MODEL BAT20-GD10 750 MCM Copper 1000 MCM Copper-Soft 1500 MCM Aluminum 1500 MCM Aluminum 1590 MCM ACSR NOT FOR STEEL OR ACSR 1/2" EHS KLEIN TOOLS KLEIN. CABLE CUTTER BAT20-G Series www.kleintools.com WARNING/ADVERTENCIA/AVERTISSEMENT DO NOT USE RING TO TETHER OR SECURE TOOL DURING USE./ NO UTILICE EL ANILLO PARA ATAR O ASEGURAR LA HERRAMIENTA DURANTE SU USO./NE PAS UTILISER L'ANNEAU POUR ACCROCHER OU ANCRER L'OUTIL PENDANT SON UTILISATION. Designed by Klein Tools Made in Taiwan NOTE: There are no user- serviceable parts inside. Please contact Klein Tools for an authorized service center.1 Trigger
2 Forward/Reverse/Lock Trigger Button
3 Work Lights (x2)
4 Battery pack
5 Battery release button
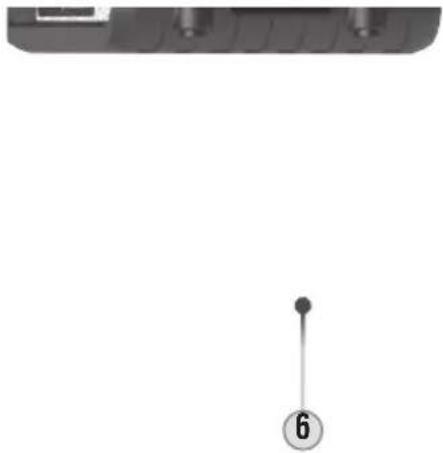
6 Fuel gauge button
7 Lift ring
8 Side Warning Label
9 Fixed blade carrier
10 Fixed blade replaceable insert
11 Moving blade carrier
12 Moving blade replaceable insert
13 Replaceable forward gear guide
14 Replaceable reverse gear guide
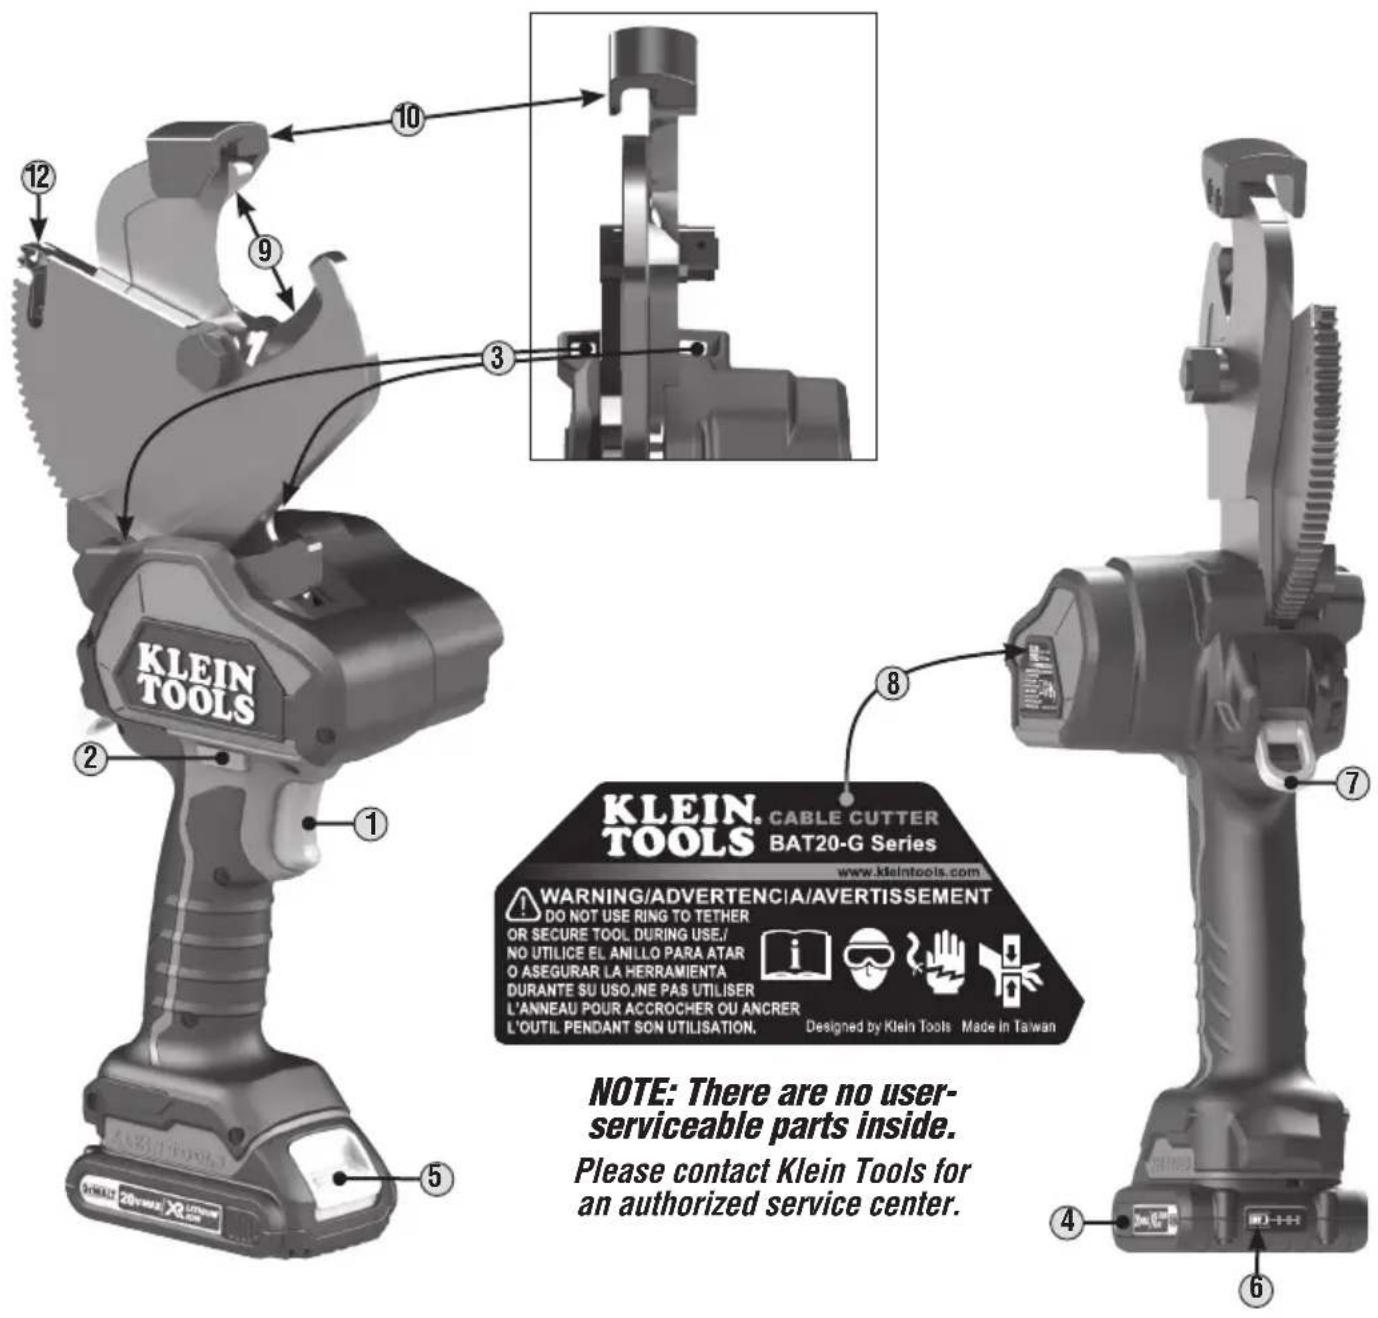
FEATURE DETAILS - OPEN-JAW MODELS
RATED CAPACITIES - DO NOT EXCEED
MODEL BAT20-G2 MODEL BAT20-G7
400 MCM Copper 600 MCM Copper
900 MCM Aluminum 1000 MCM Aluminum
795 MCM ACSR | NOT FOR STEEL OR ACSR
text_image
KLEIN TOOLS KLEIN. CABLE CUTTER BAT20-G Series www.kleintools.com WARNING/ADVERTENCIA/AVERTISSEMENT DO NOT USE RING TO TETHER OR SECURE TOOL DURING USE./ NO UTILICE EL ANILLO PARA ATAR O ASEGURAR LA HERRAMIENTA DURANTE SU USO JNE PAS UTILISER L'ANNEAU POUR ACCROCHER OU ANCRER L'OUTIL PENDANT SON UTILISATION. Designed by Klein Tools Made in Taiwan NOTE: There are no user- serviceable parts inside. Please contact Klein Tools for an authorized service center.1 Trigger
2 Forward/Reverse/Lock Trigger Button
3 Work Lights (x2)
4 Battery pack
5 Battery release button
6 Fuel gauge button
7 Lift ring
8 Side Warning Label
9 Blades
10 Blade Guide
11 Replaceable forward gear guide (not shown)
12 Replaceable reverse gear guide
DEFINITIONS
The definitions below describe the level of severity for each signal word used in this manual:
DANGER: Indicates an imminently hazardous situation which, if not avoided, will result in death or serious injury.
WARNING: Indicates a potentially hazardous situation which, if not avoided, could result in death or serious injury.
CAUTION: Indicates a potentially hazardous situation which, if not avoided, may result in minor or moderate injury.
NOTICE: Indicates a practice not related to personal injury which, if not avoided, may result in property damage.
⚠️ WARNINGS
- DO NOT use under wet conditions or in presence of flammable liquids or gases.
- This is a professional power tool. DO NOT let children come into contact with the tool. Supervision is required when inexperienced operators use this tool.
- Never modify the power tool or any part of it. Damage or personal injury could result.
SAFETY
To ensure safe operation and service of the drill, follow these instructions. Failure to observe these warnings can result in electric shock, fire, severe injury or death.
1) Work Area Safety
a) Keep work area clean and well lit. Cluttered or dark areas invite accidents.
b) Do not operate power tools in explosive atmospheres, such as in the presence of flammable liquids, gases or dust. Power tools create sparks which may ignite the dust or fumes.
c) Keep children and bystanders away while operating a power tool. Distractions can cause you to lose control.
2) Electrical Safety
a) Avoid body contact with earthed or grounded objects. There is an increased risk of electric shock if your body is earthed or grounded.
b) Do not expose power tools to rain or wet conditions. Water entering a power tool will increase the risk of electric shock.
c) Do not abuse the battery charger cord. Never use the cord for carrying, pulling or unplugging. Keep cord away from heat, oil, sharp edges or moving parts. Damaged or entangled cords increase the risk of electric shock.
d) When operating the battery charger outdoors, use an extension cord suitable for outdoor use. Use of a cord suitable for outdoor use reduces the risk of electric shock.
e) If operating the battery charger in a damp location is unavoidable, use a ground fault circuit interrupter (GFCI) protected supply. Use of a GFCI reduces the risk of electric shock.
3) Personal Safety
a) Stay alert, watch what you are doing and use common sense when operating a power tool. Do not use a power tool while you are tired or under the influence of drugs, alcohol or medication. A moment of inattention while operating power tools may result in serious personal injury.
b) Use personal protective equipment. Always wear eye protection. Protective equipment such as dust mask, non-skid safety shoes, hard hat, or hearing protection used for appropriate conditions will reduce personal injuries.
c) Prevent unintentional starting. Ensure the trigger lock is engaged before connecting to battery pack, picking up or carrying the tool. Carrying power tools with your finger on the switch invites accidents.
d) Do not overreach. Keep proper footing and balance at all times. This enables better control of the power tool in unexpected situations.
e) Dress properly. Do not wear loose clothing or jewelry. Keep your hair, clothing and gloves away from moving parts. Loose clothes, jewelry or long hair can be caught in moving parts.
SAFETY
4) Power Tool Use and Care
a) Do not force the power tool. Use the correct power tool for your application. The correct power tool will do the job better and safer at the rate for which it was designed.
b) Remove the battery pack from the power tool before making any adjustments, changing accessories, or storing power tools. Such preventive safety measures reduce the risk of starting the power tool accidentally.
c) Store idle power tools out of the reach of children and do not allow persons unfamiliar with the power tool or these instructions to operate the power tool. Power tools are dangerous in the hands of untrained users.
d) Maintain power tools. Check for misalignment or binding of moving parts, breakage of parts and any other condition that may affect the power tool's operation. If damaged, have the power tool repaired before use. Many accidents are caused by poorly maintained power tools.
e) Use the power tool, dies, accessories, etc. in accordance with these instructions, taking into account the working conditions and the work to be performed. Use of the power tool for operations different from those intended could result in a hazardous situation.
5) Battery Tool Use and Care
a) Recharge only with the charger specified by the manufacturer. A charger that is suitable for one type of battery pack may create a risk of fire when used with another type of battery pack.
b) Use power tools only with specifically designated battery packs. Use of any other battery packs may create a risk of injury and fire.
c) When battery pack is not in use, keep it away from other metal objects like paper clips, coins, keys, nails, screws, or other small metal objects that can make connection from one terminal to another. Shorting the battery terminals together may cause burns or a fire.
d) Under abusive conditions, liquid may be ejected from the battery; avoid contact. If contact accidentally occurs, flush with water. If liquid contacts eyes, additionally seek medical help. Liquid ejected from the battery may cause irritation or burns.
6) Service
a) Have your power tool serviced by a qualified repair person using only identical replacement parts. This will ensure that the safety of the power tool is maintained. Contact Klein Tools for authorized service centers.
7) Additional Specific Safety Rules
ALWAYS use safety glasses. Everyday eyeglasses are NOT safety glasses.
8) Equipment
WARNING: Always wear proper personal hearing protection that conforms to ANSI S12.6 (S3.19) during use. Under some conditions and duration of use, noise from this product may contribute to hearing loss.
CAUTION: When not in use, place tool on its side on a stable surface where it will not cause a tripping or falling hazard. Some tools with large battery packs will stand upright on the battery pack but may be easily knocked over.
SAFETY
9) Important Safety Instructions for All Battery Packs

WARNING: SHOCK HAZARD. Do not allow any liquid to get inside the charger. Electric shock may result.

WARNING: BURN HAZARD. To reduce the risk of injury, charge only DeWALT rechargeable battery packs. Other types of batteries may overheat and burst resulting in personal injury and property damage.
NOTICE: Under certain conditions, with the charger plugged into the power supply, the charger can be shorted by foreign material. Foreign materials of a conductive nature, such as, but not limited to, grinding dust, metal chips, steel wool, aluminum foil or any buildup of metallic particles should be kept away from the charger cavities. Always unplug the charger from the power supply when there is no battery pack in the cavity. Unplug the charger before attempting to clean.
- When ordering replacement battery packs, be sure to include the catalog number and voltage. Consult the chart at the end of this manual for compatibility of chargers and battery packs.
- The battery pack is not fully charged out of the carton. Before using the battery pack and charger, read the safety instructions below and then follow charging procedures outlined.
- DO NOT charge or use the battery pack in explosive atmospheres, such as in the presence of flammable liquids, gases or dust. Inserting or removing the battery pack from the charger may ignite the dust or fumes.
- NEVER force the battery pack into the charger. Do not modify the battery pack in any way to fit into a non-compatible charger as battery pack may rupture causing serious personal injury. Consult the chart at the end of this manual for compatibility of batteries and chargers.
- Charge the battery packs only in designated DeWALT chargers.
- DO NOT splash or immerse in water or other liquids.
- DO NOT store or use the tool and battery pack in locations where the temperature may reach or exceed 104°F (40°C) (such as sheds or metal buildings in summer). For best life store battery packs in a cool, dry location. NOTE: Do not store the battery packs in a tool.
- DO NOT incinerate the battery pack even if it is severely damaged or is completely worn out. The battery pack can explode in a fire. Toxic fumes and materials are created when lithium ion battery packs are burned.
- If battery contents come into contact with the skin, immediately wash area with mild soap and water. If battery liquid gets into the eye, rinse water over the open eye for 15 minutes or until irritation ceases. If medical attention is needed, the battery electrolyte is composed of a mixture of liquid organic carbonates and lithium salts.
- Contents of opened battery cells may cause respiratory irritation. Provide fresh air. If symptoms persist, seek medical attention.

WARNING: FIRE HAZARD. Never attempt to open the battery pack for any reason. If the battery pack case is locked or damaged, do not insert into the charger. Do not crush, drop or damage the battery pack. Do not use battery pack or charger that has received a sharp blow, been dropped, run over or damaged in any way (e.g., forced with a nail, hit with a hammer, stepped on). Damaged battery packs should be returned to the service later for recycling.

WARNING: FIRE HAZARD. Do not store or carry the battery pack so that metal objects can contact exposed battery terminals. For example, do not place the battery pack in aprons, pockets, tool boxes, product kit boxes, drawers, etc., with loose nails, screws, keys, etc. Transporting batteries can possibly cause fires if the battery terminals inadvertently come in contact with conductive materials such as keys, coins, hand tools and the like. The US Department of Transportation Hazardous Material Regulations (HMR) actually prohibit transporting batteries in commerce or on airplanes (e.g., packed in suitcases and carry-on luggage) UNLESS they are properly protected from short circuits. So when transporting individual battery packs, make sure that the battery terminals are protected and well insulated from materials that could contact them and cause a short circuit.

WARNING: BURN HAZARD. Battery liquid may be flammable if exposed to spark or flame.
SAFETY
10) Important Safety Instructions for All Battery Chargers
- Before using the charger, read all instructions and cautionary markings on the charger, battery pack and product using the battery pack.
- DO NOT attempt to charge the battery pack with any chargers other than the ones in this manual. The charger and battery pack are specifically designed to work together.
- These chargers are NOT intended for any uses other than charging DeWALT rechargeable batteries. Any other uses may result in risk of fire, electric shock or electrocution.
- DO NOT expose the charger to rain or snow.
- Pull by the plug rather than the cord when disconnecting the charger. This will reduce the risk of damage to the electric plug and cord.
- Make sure that the cord is located so that it will not be stepped on, tripped over or otherwise subjected to damage or stress.
- DO NOT place any object on top of the charger or place the charger on a soft surface that might block the ventilation slots and result in excessive internal heat. Place the charger in a position away from any heat source. The charger is ventilated through slots in the top and the bottom of the housing.
- DO NOT operate the charger with a damaged cord or plug.
- DO NOT operate the charger if it has received a sharp blow, been dropped or otherwise damaged in any way. Take it to an authorized service center.
- DO NOT disassemble the charger; take it to an authorized service center when service or repair is required. Incorrect reassembly may result in a risk of electric shock, electrocution or fire.
- Disconnect the charger from the outlet before attempting any cleaning. This will reduce the risk of electric shock. Removing the battery pack will not reduce this risk.
- NEVER attempt to connect two chargers together.
- The charger is designed to operate on standard 120 volt household electrical power. Do not attempt to use any other voltage. (This does not apply to vehicular chargers.)
- When operating a charger outdoors, always provide a dry location and use an extension cord suitable for outdoor use. Use of a cord suitable for outdoor use reduces the risk of electric shock.
- DO NOT use an extension cord unless it is absolutely necessary. Use of improper extension cord could result in risk of fire, electric shock or electrocution.
- An extension cord must have adequate wire size (AWG or American Wire Gauge) for safety. The smaller the gauge number of the wire, the greater the capacity of the cable, that is, 16 gauge has more capacity than 18 gauge. An undersized cord will cause a drop in line voltage resulting in loss of power and overheating. When using more than one extension to make up the total length, be sure each individual extension contains at least the minimum wire size. The table below shows the correct size to use depending on cord length and nameplate ampere rating. If in doubt, use the next heavier gauge. The lower the gauge number, the heavier the cord:
| Minimum Gauge for Cord Sets | |||||
| Ampere Rating (Amps) | Volts Total Length of Cord | ||||
| 120 V | 25' (7.6 m) | 50' (15.2 m) | 100' (30.5 m) | 150' (45.7 m) | |
| 240 V | 50' (15.2) | 100' (30.5) | 200' (61.0) | 300' (91.4) | |
| More Than Not More Than AWG | |||||
| 0 6 18 16 16 14 | 14 12 | ||||
| 6 10 18 16 14 12 | |||||
| 10 | 12 16 16 14 | ||||
| 12 | 16 14 12 | Not Recommended | |||
SAFETY
11) Additional Specific Safety Rules
ALWAYS WEAR CERTIFIED SAFETY EQUIPMENT:
• ANSI Z87.1 eye protection (CAN/CSA Z94.3).
• ANSI S12.6 (S3.19) hearing protection.
• NIOSH/OSHA/MSHA respiratory protection.
- Wear safety goggles or other eye protection. Flying particles can cause permanent eye damage. ALWAYS use safety glasses. Everyday eyeglasses are NOT safety glasses. Also use face or dust mask if cutting operation is dusty.
- Accessories and tools get hot during operation. Wear gloves when touching them.
- Air vents often cover moving parts and should be avoided. Loose clothes, jewelry or long hair can be caught in moving parts.
- Use clamps or other practical way to secure and support the workpiece to a stable platform. Holding the work by hand or against your body is unstable and may lead to loss of control.
BATTERY CHARGING INSTRUCTIONS
Battery Charger Models DCB107, DCB112, DCB113, DCB115
- This Class B digital apparatus complies with Canadian ICES-003.
- This device complies with Part 15 of the FCC Rules and Industry Canada License exempt RSS standard(s). Operation is subject to the following two conditions:
1) This device may not cause harmful interference, and 2) This device must accept any interference received, including interference that may cause undesired operation.
NOTE: This equipment has been tested and found to comply with the limits for a Class B digital device, pursuant to Part 15 of the FCC Rules. These limits are designed to provide reasonable protection against harmful interference in a residential installation. This equipment generates, uses and can radiate radio frequency energy and, if not installed and used in accordance with the instructions, may cause harmful interference to radio communications. However, there is no guarantee that interference will not occur in a particular installation. If this equipment does cause harmful interference to radio or television reception, which can be determined by turning the equipment off and on, the user is encouraged to try to correct the interference by one or more of the following measures:
- Reorient or relocate the receiving antenna.
- Increase the separation between the equipment and receiver.
- Connect the equipment into an outlet on a circuit different from that to which the receiver is connected.
- Consult the dealer or an experienced radio/TV technician for help.
Changes or modifications not expressly approved by the party responsible for compliance could void the user's authority to operate the equipment.
Battery Charging
Your tool uses a DeWALT charger. Be sure to read all safety instructions before using your charger.
- Plug the charger into an appropriate outlet before inserting the battery pack.
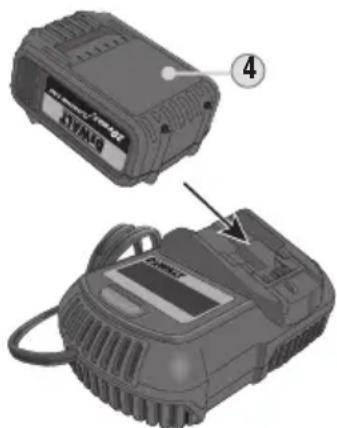
- Insert the battery pack ④ into the charger, making sure the pack is fully seated in charger. The red light will blink continuously, indicating the charging process has started.
- The completion of charge will be indicated by the red light remaining ON continuously. The pack is fully charged and may be used at this time or left in the charger.
natural_image
Two views of a portable electronic device with labeled parts (no text or symbols visible)BATTERY CHARGING INSTRUCTIONS
Charge Indicators
Your charger is designed to detect certain problems that can arise. Problems are indicated by the red light flashing at a fast rate. If this occurs, re-insert the battery pack into the charger. If the problem persists, try a different battery pack to determine if the charger is working properly. If the new pack charges correctly, then the original pack is defective and should be returned to a service center or other collection site for recycling. If the new battery pack elicits the same trouble indication as the original, have the charger and the battery pack tested at an authorized service center.
Your charger has the following indicators: Pack Charging, Pack Charged, Hot/Cold Delay.
HOT/COLD DELAY: The above model chargers have a hot/cold delay feature. When the charger detects a battery that is too hot or too cold, it automatically starts a delay, suspending charging. The red light will continue to blink, but a yellow indicator light will be illuminated during this suspension. Once the battery has reached an optimum temperature, the yellow light will turn off and the charger will automatically resume the charging procedure. This feature ensures maximum battery life.
LEAVING THE BATTERY PACK IN THE CHARGER: The charger and battery pack can be left connected with the charge indicator showing Pack Charged.
WEAK BATTERY PACKS: Weak batteries will continue to function but should not be expected to perform as much work.
FAULTY BATTERY PACKS
These chargers will not charge a faulty battery pack. The charger will indicate faulty battery pack by refusing to light. NOTE: This could also indicate a problem with the charger.
WALL MOUNTING
These chargers are designed to be wall mountable or to sit upright on a table or work surface. If wall mounting, locate the charger within reach of an electrical outlet. Mount the charger securely using drywall screws at least 1" (25.4 mm) long, screwed into wood to an optimal depth leaving approximately 7/32" (5.5 mm) of the screw exposed.
IMPORTANT CHARGING NOTES
- Longest life and best performance can be obtained if the battery pack is charged when the air temperature is between 65 °F and 75 °F (18 °–24 °C). DO NOT charge the battery pack in an air temperature below 40 °F (4.5 °C), or above 104 °F (40 °C). This is important and will prevent serious damage to the battery pack.
- The charger and battery pack may become warm to the touch while charging. This is a normal condition, and does not indicate a problem. To facilitate the cooling of the battery pack after use, avoid placing the charger or battery pack in a warm environment such as in a metal shed or an uninsulated trailer.
- A cold battery pack will charge at about half the rate of a warm battery pack. The battery pack will charge at a slower rate throughout the entire charging cycle and will not return to maximum charge rate even if the battery pack warms.
- If the battery pack does not charge properly:
a. Check operation of receptacle by plugging in a lamp or other appliance;
b. Check to see if receptacle is connected to a light switch which turns power off when you turn out the lights;
c. Move the charger and battery pack to a location where the surrounding air temperature is approximately 65^ F– 75^ F ( 18^ – 24^ C);
d. If charging problems persist, take the tool, battery pack and charger to your local DeWALT service center.
-
The battery pack should be recharged when it fails to produce sufficient power on jobs which were easily done previously. DO NOT CONTINUE to use under these conditions. Follow the charging procedure. You may also charge a partially used pack whenever you desire with no adverse effect on the battery pack.
-
Foreign materials of a conductive nature such as, but not limited to, grinding dust, metal chips, steel wool, aluminum foil, or any buildup of metallic particles should be kept away from charger cavities. Always unplug the charger from the power supply when there is no battery pack in the cavity. Unplug the charger before attempting to clean.
-
DO NOT freeze or immerse the charger in water or any other liquid.
BATTERY CHARGING INSTRUCTIONS
WARNING: SHOCK HAZARD. DO NOT allow any liquid to get inside the charger. Electric shock may result.
WARNING: BURN HAZARD. DO NOT submerge the battery pack in any liquid or allow any liquid to enter the battery pack. Never attempt to open the battery pack for any reason. If the plastic housing of the battery pack breaks or cracks, return to a service center for recycling.
INSTALLING & REMOVING BATTERY PACK
NOTE: For best results, make sure your battery pack is fully charged.
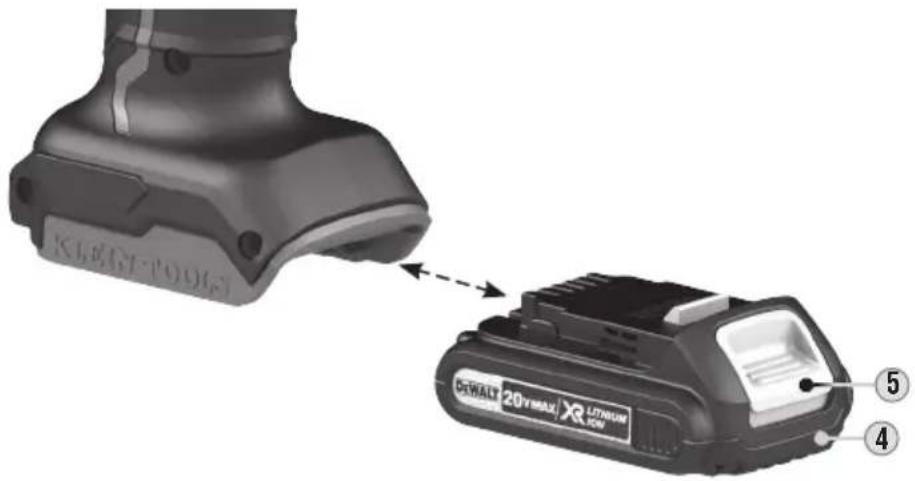
- To install the battery pack ④ into the tool, align the battery pack with the rails inside the tool's handle and slide it into the handle until the battery pack is firmly seated in the tool and ensure that it does not disengage.
- To remove the battery pack from the tool, press the release button ⑤ and firmly pull the battery pack out of the tool handle. Insert it into the charger as described in the charger section of this manual.
NOTE: After removing the battery pack, squeeze the trigger for three seconds to dissipate any electric charge that may still be in the tool.
text_image
KENT-TOOJ DEWALT 20 T MAX X® LTRUM LED ⑤ ④FUEL GAUGE BATTERY PACKS 6
Some DeWALT battery packs include a fuel gauge which consists of three green LED lights that indicate the level of charge remaining in the battery pack. To actuate the fuel gauge, press and hold the fuel gauge button. A combination of the three green LED lights will illuminate, designating the level of charge left. When the level of charge in the battery is below the usable limit, the fuel gauge will not illuminate and the battery will need to be recharged.
NOTE: The fuel gauge is only an indication of the approximate charge left on the battery pack, according to the indicators shown here. It does not indicate tool functionality and is subject to variation based on product components, temperature and end-user application.
For more information regarding fuel gauge battery packs, please call 1-800-4-DeWALT (1-800-433-9258) or visit www.dewalt.com.
natural_image
Close-up of a mechanical component with a numbered point '6' and a small circle, no visible text or symbols.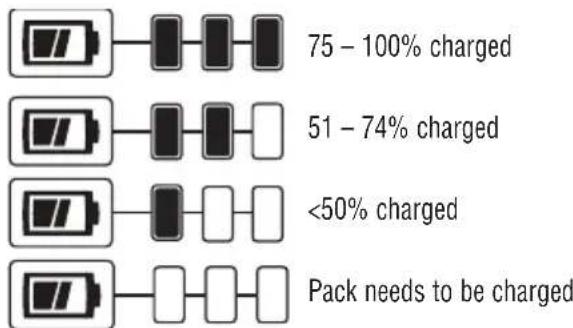
text_image
75 - 100% charged 51 - 74% charged <50% charged Pack needs to be chargedOPERATING INSTRUCTIONS
- Inspect the tool before and after every use. DO NOT use this tool if it is damaged in any way. Inform Klein Tools® authorized distributors or contact Klein Tools in case of any abnormalities or malfunctions of the product.
- Check for loose parts before using. Personal injury can be caused by operating poorly maintained tools.
- To avoid injury, keep hands away from the tool head and workpiece during operation.
- Remove battery pack while servicing, replacing dies, or storing the tool.
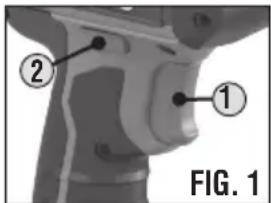
FORWARD/REVERSE/LOCK TRIGGER BUTTON ② (FIG. 1): There are three settings on this button: Forward (to cut through cables), Reverse (to back the blade out), and Locked position (prevents tool from operating in either direction).
NOTE: For safety purposes, keep the tool in the locked position when preparing cable and when moving or storing.
NOTE: To prevent damage to the battery, the cable cutter may stop mid-cut if battery voltage drops below a safe level.
NOTE: The cable cutter may stop if internal temperatures become too high. The system will reset in 5 seconds to allow tool to open. Once removed from cable, allow 30 minutes for internal components to cool before resuming cutting.
CUTTING CABLE (FIG. 2):
- With the button in forward position, Place the cable to be cut between the blades ⑨ and press the trigger ① to advance the cutting blade.
- Hold the trigger until the cable is cut completely.
- If required, switch the Forward/Reverse/Lock Button to the Reverse position to retract the cutting blade. For closed-jaw models, after completing the cut you can reverse the blade to retract it to its original position, or continue to advance the blade until it disengages from the internal gears. When this happens, move the Forward/Reverse/Lock Trigger Button to the locked position and manually rotate cutting blade around to re-engage the blade into the tool. DO NOT force or push the blade into the gear mechanism.
BLADE GUIDES (Open-Jaw models only) 10: The blade guide is designed to help align internal drive gears with cutting blades. As a result, the blade guide can make noise while engaging. This is normal and will not harm the tool. Over time, the blade guides may not engage as easily and may need replacing. Please contact Klein Tools for an authorized repair center.
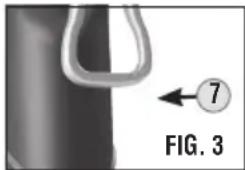
LIFT RING ⑦ (FIG. 3): The lift ring is intended for moving the tool into hard-to-reach areas. Securely fasten lifting device to the ring before moving the tool. Follow all worksite rules.
WARNING: To reduce the risk of serious personal injury, DO NOT use the lift ring for tethering or securing the tool to a person or object during use when elevated.
text_image
① ② FIG. 1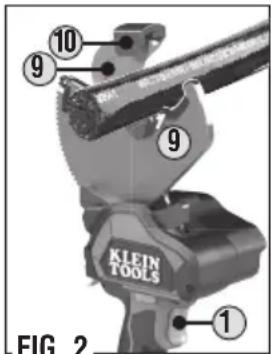
text_image
10 9 9 KLEIN TOSLS FIG. 2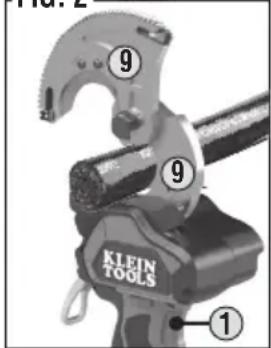
text_image
Part 2 ⑨ ⑨ ① KIFIN TOOLS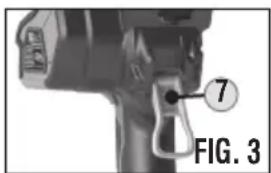
text_image
7 FIG. 3MAINTENANCE
- Have your power tool serviced by a qualified repair person using only identical replacement parts. This will ensure that the safety of the power tool is maintained. Contact Klein Tools for authorized service centers. Visit www.kleintools.com for service manual and replacement part list.
- The charger and battery pack are NOT serviceable. To assure product SAFETY and RELIABILITY, repairs, maintenance and adjustments should be performed by a DeWALT factory service center, a DeWALT authorized service center or other qualified service personnel.
CLEANING
Tool:
- Blow dirt and dust out of all air vents with clean, dry air at least once a week. To minimize the risk of eye injury, always wear ANSI Z87.1 approved eye protection when performing this.
- Never use solvents or other harsh chemicals for cleaning the non-metallic parts of the tool. These chemicals may weaken the plastic materials used in these parts. Use a cloth dampened only with water and mild soap. Never immerse any part of the tool into a liquid.
Charger:
WARNING: SHOCK HAZARD. Disconnect the charger from the AC outlet before cleaning. Dirt and grease may be removed from the exterior of the charger using a cloth or soft non-metallic brush. DO NOT use water or any cleaning solutions.
STORAGE
The best storage place is one that is cool and dry, away from direct sunlight and excess heat or cold. For prolonged storage, it is recommended to store a fully charged battery pack in a cool, dry place out of the charger for optimal results. NOTE: Battery packs should not be stored completely depleted of charge. The battery pack will need to be recharged before use.
WARRANTY – CABLE CUTTER
Klein Tools Battery Operated Tools, manufactured and sold for commercial or industrial uses, are warranted to be free from defects in materials and workmanship.
THERE ARE NO IMPLIED WARRANTIES OF MERCHANTABILITY OR FITNESS. At its option, Klein will repair, replace, or refund the purchase price of any product which fails to conform to this warranty under normal use and service. There are no user serviceable parts in this tool. This warranty does not apply if repairs have been made or attempted by non-Klein Tools Authorized Repair Centers, if alterations have been made, or if the tool has been abused or misused.
IN NO EVENT SHALL KLEIN TOOLS BE LIABLE FOR INCIDENTAL OR CONSEQUENTIAL DAMAGE. Some states do not allow exclusion or limitation of incidental or consequential damages, so the above limitation or exclusion may not apply to you.
See www.kleintools.com/warranty for additional information.
WARRANTY – CHARGERS AND BATTERY PACKS
DeWALT chargers are covered by:
Three Year Limited Warranty: DeWALT will repair, without charge, any defects due to faulty materials or workmanship for three years from the date of purchase. This warranty does not cover part failure due to normal wear or tool abuse. For further detail of warranty coverage and warranty repair information, visit www.dewalt.com or call 1-800-4-DeWALT (1-800-433-9258). This warranty does not apply to accessories or damage caused where repairs have been made or attempted by others. This warranty gives you specific legal rights and you may have other rights which vary in certain states or provinces.
DeWALT battery packs are covered by:
Two Years free service on Packs: DCB201, DCB203, DCB203BT, DCB207.
Three Years free service on Packs: DCB200, DCB204, DCB204BT, DCB205.
Product warranty voided if the battery pack is tampered with in any way. DeWALT is not responsible for any injury caused by tampering and may prosecute warranty fraud to the fullest extent permitted by law.
For more information on DeWALT service or warranties, visit www.dewalt.com or call 1-800-4-DeWALT (1-800-433-9258).
DISPOSAL
Do not place equipment and its accessories in the trash. Items must be properly disposed of in accordance with local regulations. Please see www.epa.gov or www.erecycle.org for additional information.
THE RBRC™ SEAL
The RBRC™ (Rechargeable Battery Recycling Corporation) Seal on the nickel cadmium, nickel metal hydride or lithium ion batteries (or battery packs) indicate that the costs to recycle these batteries (or battery packs) at the end of their useful life have already been paid. In some areas, it is illegal to place spent nickel cadmium, nickel metal hydride or lithium ion batteries in the trash or municipal solid waste stream and the RBRC program provides an environmentally conscious alternative.

RBRC™ has established programs in the United States and Canada to facilitate the collection of spent nickel cadmium, nickel metal hydride or lithium ion batteries. Help protect our environment and conserve natural resources by returning the spent nickel cadmium, nickel metal hydride or lithium ion batteries to an authorized DeWALT service center or to your local retailer for recycling. You may also contact your local recycling center for information on where to drop off the spent battery RBRC™ is a registered trademark of the Rechargeable Battery Recycling Corporation.
WARNING: EXPLOSION HAZARD. DO NOT INCINERATE BATTERY PACK.
DEWALT and the DEWALT logo are trademarks of Stanley Black & Decker, Inc, or an affiliate thereof and are used under license.
CUSTOMER SERVICE
KLEIN TOOLS, INC.
450 Bond Street Lincolnshire, IL 60069
1-844-395-3235
ESPAÑOL
natural_image
Two views of a portable electronic device with labeled parts (no text or symbols visible)text_image
① ② FIG. 1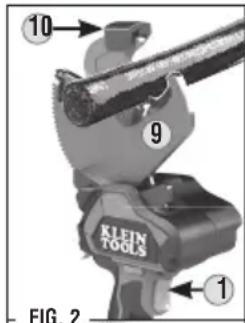
text_image
10 9 KLEIN TOOLS 1 FIG. 2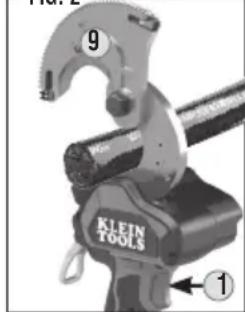
text_image
9 KLEIN TOOLS ①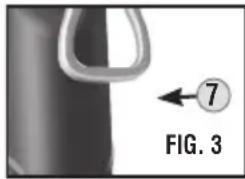
text_image
7 FIG. 3MANTENIMIENTO
natural_image
Two KLEIN TOOLS robotic tools with attached hardware, displayed against a plain background (no text or symbols on the tools themselves)CARACTÉRISTIQUES GÉNÉRALES
Aluminium, 900 MCM Aluminium, 1000 MCM
ACSR, 795 MCM
NE COUPE PAS L'ACIER OU L'ACSR
text_image
KLEIN TOOLS KLEIN. CABLE CUTTER BAT20-G Series www.kleintools.com WARNING/ADVERTENCIA/AVERTISSEMENT DO NOT USE RING TO TETHER OR SECURE TOOL DURING USE./ NO UTILICE EL ANILLO PARA ATAR O ASEGURAR LA HERRAMIENTA DURANTE SU USO JNE PAS UTILISER L'ANNEAU POUR ACCROCHER OU ANCRER L'OUTIL PENDANT SON UTILISATION. Designed by Klein Tools Made in Taiwan REMARQUE : Cet appareil ne contient aucune pièce réparable par l'utilisateur. Contacter Klein Tools pour connaître l'emplacement d'un centre de réparations autorisé.natural_image
Two views of a portable electronic device with labeled parts (no text or symbols visible)INSTRUCTIONS DE CHARGEMENT DU BLOC-PILES
text_image
② ① FIG. 1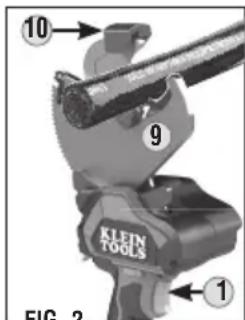
text_image
10 9 KLEIN FOOLS 1 FIG. 2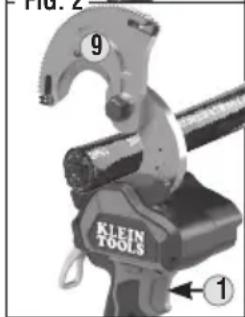
text_image
9 KLEIN FOLS ①