302645 - Mouse Titanwolf - Free user manual and instructions
Find the device manual for free 302645 Titanwolf in PDF.


User questions about 302645 Titanwolf
0 question about this device. Answer the ones you know or ask your own.
Ask a new question about this device
Download the instructions for your Mouse in PDF format for free! Find your manual 302645 - Titanwolf and take your electronic device back in hand. On this page are published all the documents necessary for the use of your device. 302645 by Titanwolf.
USER MANUAL 302645 Titanwolf
Table of contents (languages)
- Deutsch....3
- English....13
- Français....24
- Italiano....36
- Español....47
Inhaltsverzeichnis
Titanwolf\_Specialist.exe
text_image
Macro Manager Select Macro Key Press Sequence Record Option Start Recording Record delays between key Loop Times New Delete OK Cancelnatural_image
Diagram showing a device with a button and a circular pattern, connected by a downward arrow (no text or symbols)- Scope of supply 14
- Specifications .... 14
- System requirements .... 14
- Installation.... 15
- Software settings ...... 16
- Adjusting the weight 21
- Resetting to factory settings....22
- Safety instructions and Disclaimer 22
- Disposal instructions .... 22
Thank you for choosing a TITANWOLF product. Please read the following user manual carefully to have an enjoyable experience with your purchased product.
1. Scope of supply
• Specialist Wired Gaming Mouse
- 6 x 4g weights (already fitted)
- User manual
- Software CD
2. Specifications
- perfectly designed to meet the needs of gamers: up to 10800 DPI, variable polling rate up to 1000Hz
- PixArt PMW3336 sensor ensures accurate gaming and a more thrilling gaming experience in conjunction with Omron mouse buttons
- 12 programmable buttons, storable setting profiles, 6 x 4g weights to customise the handling, configurable LED lighting
- 7 DPI levels
• 4-way mouse scrolling wheel - durable gliding pads, 5 side buttons, ergonomic design for right-handed people, rubberised surface for better grip, gold-plated USB connector
- Ambient temperature: +0-3°C to 35-40°C
3. System requirements
- Operating system: Microsoft® Windows® 10 (32/64bit), Windows® 8.1, Windows® 8 (32/64bit), Windows® 7 (32/64bit), Windows® Vista (32/64bit), Windows® XP (32/64bit)
- Hard disk: 20MB of free disk space is required
4. Installation
Connect the device to a free USB port on your computer.
An installation is necessary to use the gaming mouse that you have purchased. For this purpose, insert the driver CD into your drive. The automatic playback opens.
Click on "Run autorun.exe" to start the installation. If you need to install the software manually, then open the contents of the software CD and then start the "Titanwolf_specialist.exe"

Titanwolf\_Specialist.exe
A confirmation prompt is displayed that needs to be accepted with "Yes".

Now follow the instructions of the installation wizard to carry out the installation properly.
Once the process is completed, you can stop the installation program by clicking on "Finish". The software is now fully installed and can be used immediately.
5. Software settings
You have the option of carrying out many settings in the configuration software of the gaming mouse. Six freely configurable profiles are available, which you can choose from using the software under the menu item "Config". Additional information about the setting options are given below which are profile-independent and relate to a specific profile, and are suitable for creating macros.
5.1 General profile settings
- Info (“?”): Info panel with software version and homepage
- Reset All: It is possible to reset the settings of the current profile back to the factory settings using the "Reset" button.
5.2 Configuring the profiles
The options, which are explained in detail below, can be individually configured and saved for each of the profiles. Select a profile using the mouse in the "CON-FIG" menu (bottom left of the software) or create a new profile. You can store up to 6 profiles.
To configure a new profile, click on "New" and select a profile name by editing the profile with a double click. Close the configuration screen using the "X" in the profile window. Make the desired profile settings and confirm using the "Apply" button.
To change profiles, click on the "CONFIG" button and then click on the desired profile. You can load the profile by selecting it, closing the profile window using "X" and clicking on "Apply".
5.2.1 General
text_image
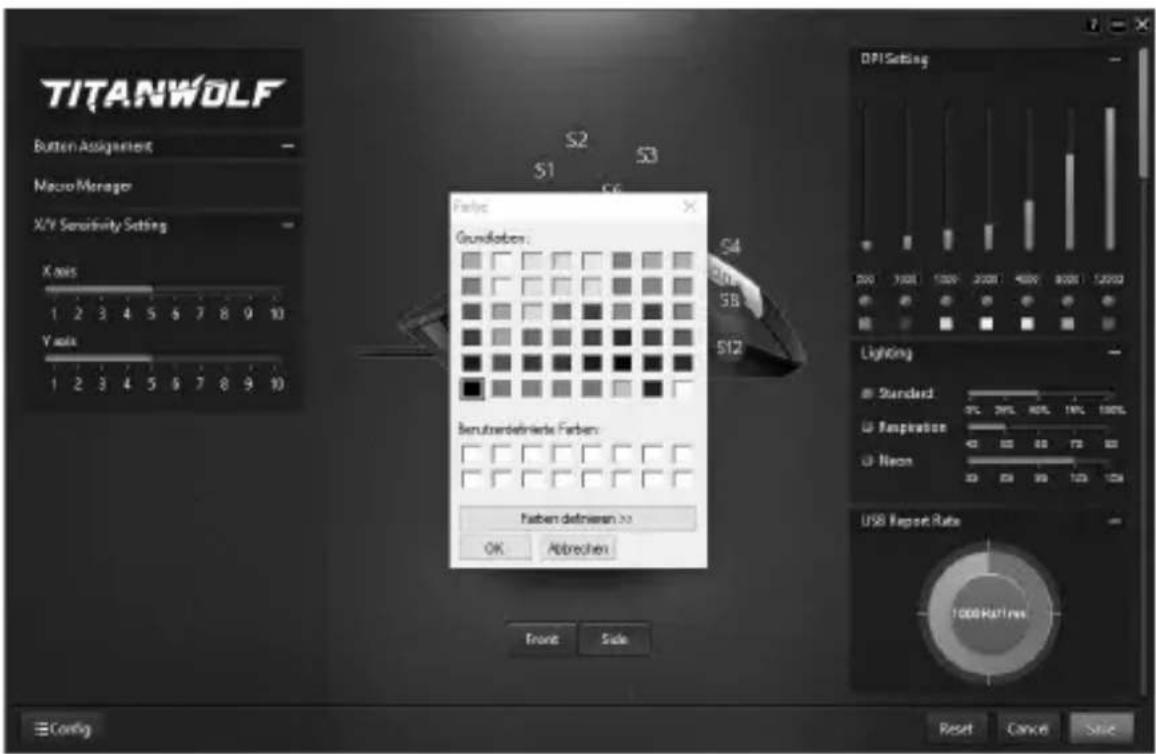
TITANWOLF Button Assignment Macro Manager 3/V Sensitivity Setting 1 2 3 4 5 6 7 Front Side DVI Setting Lighting USB Report Rate Mouse Speed Double Click Speed Scroll Speed Angle Snap Config Reset Cancel Save- Lighting: You can configure the light effects individually in the "Lightning" menu item. You can choose between continuous light (standard), blinking light (respiration) or a colour changing mode (neon) and configure it according to your needs.
- USB report rate (polling rate): Select your preferred polling rate to define the intervals at which the mouse sends the position data to the computer. A polling rate of 1000 Hz means that data is sent 1000 times per second
- Double-click speed: The double-click speed defines the maximum time between two clicks, so that it can be registered as a double click and not two individual clicks.
- Scrolling speed: The scrolling speed of the mouse wheel can be configured here.
- Angle snapping: In "angle snapping", all the mouse movements are smoothed out. This function is useful, for example, when playing. As a final result, the mouse pointer is distorted less, which can be beneficial. You can switch "angle snapping" on or off in this menu item.
- X/Y sensitivity setting: You can customise the sensitivity of the Y and X axis in this menu item.
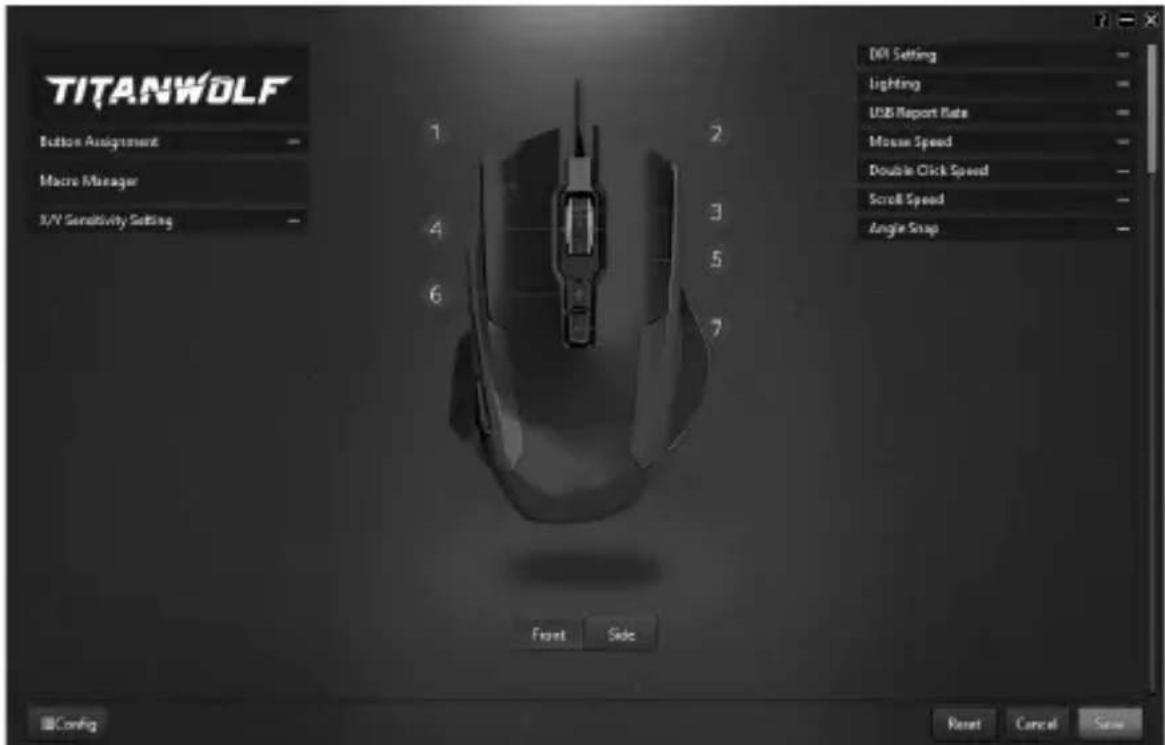
- Configuring the mouse buttons: The buttons at the top of the mouse as well as those at the side can be freely configured. Please click on "Front" or "Side" to make the desired settings. To reconfigure a button, click on the number corresponding to the desired button in the list on the left of the mouse diagram. The mapping of numbers and buttons is shown in the diagram. You can not only choose from preconfigured options, but also make individual settings. A special feature is the option of creating macros, which is explained in detail later in section 5.3. (page 8).
Note: Please remember the "Z" and "Y" are reversed. To configure, use the other letter than the one desired to get the right result.
5.2.2 DPI
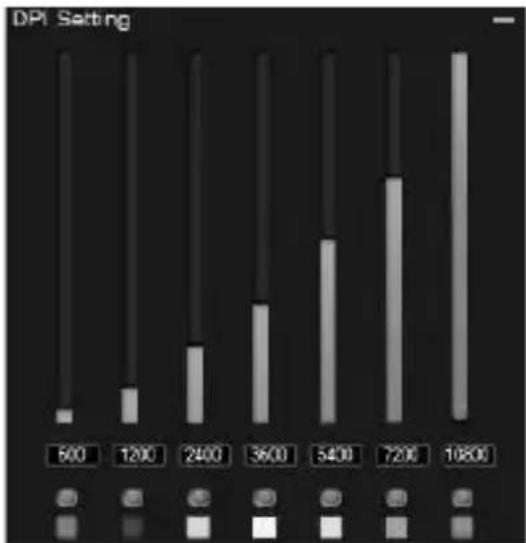
In the DPI settings, you have the option of configuring 7 individual DPI levels or disabling them if desired. You can choose different DPI values between 50 and 10800 DPI as desired using the 7 DPI levels.
Note: When changing the profile and if the "DPI setting" window is open, it may happen that the DPI values displayed cannot be edited directly on the profile DPI. In such cases, close and open the "DPI settings" once. To update the display of the DPI bar, close and open the Software once.
bar
| DPI Setting | Value | |---|---| | 500 | 50 | | 1200 | 100 | | 2400 | 200 | | 3600 | 300 | | 5400 | 400 | | 7200 | 600 | | 10800 | 900 |5.2.3 LED
You can customise the LED lighting of the logo and mouse wheel accordingly. You can select the colour, brightness and breathing-speed (pulsing) as desired to customise the appearance. The "Standard" option allows you to illuminate the LEDs continuously. The "Respiration" option makes the LED blink. The "Neon" option causes the LED to change colours one after the other.
text_image
TITANWOLF Button Assignment Macro Manager X/Y Sensitivity Setting X axis 1 2 3 4 5 6 7 8 9 10 Y axis 1 2 3 4 5 6 7 8 9 10 S2 S3 S1 S2 Failure Grundfiber: S4 SB S12 Benutzerbehnte Farben: Farben definierten >> OK Abtrechen DPI Setting Lighting Standard Impetition Neon USB Export Rate Front Side Reset Cancel Save Config5.3 Creating macros
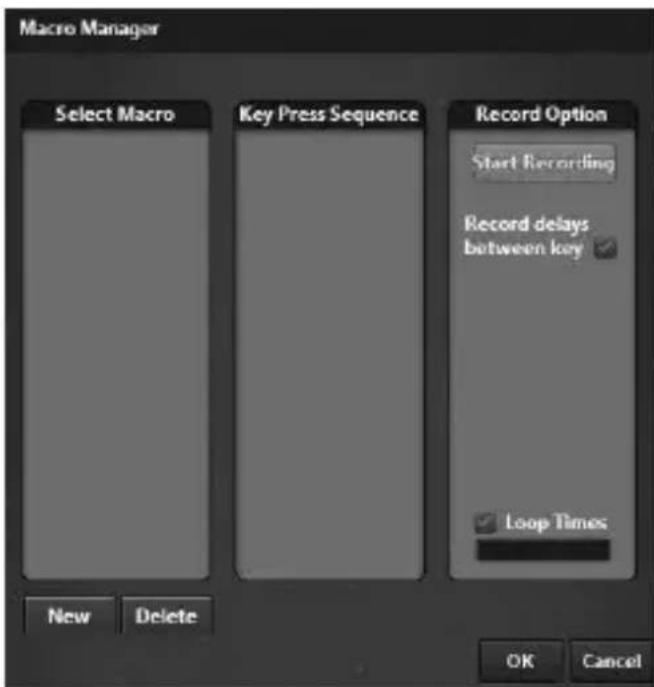
Macros are recordings of specific key sequences, which can be run by pressing a single mouse button depending on the configuration. This can, for example, be keystrokes or mouse commands. To define a macro, click the "Macro Manager" button in the left section of the software.
To start recording a new macro, first click on "New". Then, define a name by double clicking on the macro. The recording can be started using the "Start recording" button and stopped using the "Stop recording" button. Additional options are available on the right side of the Macro Manager for recording the steps. Thus you can

define whether the time between pressing the individual buttons and the stop times are measured and recorded, so that the recorded macro is executed several times when the mouse button is pressed. You can customise other settings by right clicking on the "Key Press Sequence" field. This may be, for example, a delay of 50 ms between the desired keystrokes. You can also edit the recorded steps individually later on.
text_image
Macro Manager Select Macro Key Press Sequence Record Option Start Recording Record delays between key Loop Times New Delete OK CancelNote: Please remember the "Z" and "Y" are reversed. To configure, use the other letter than the one desired to obtain the right result. Special characters and the numpad cannot be used as a macro.
6. Adjusting the weight
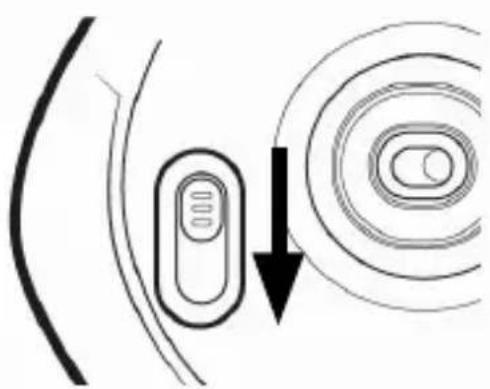
A switch, which can be used to unlock the weight compartment, is located at the bottom of the mouse.
natural_image
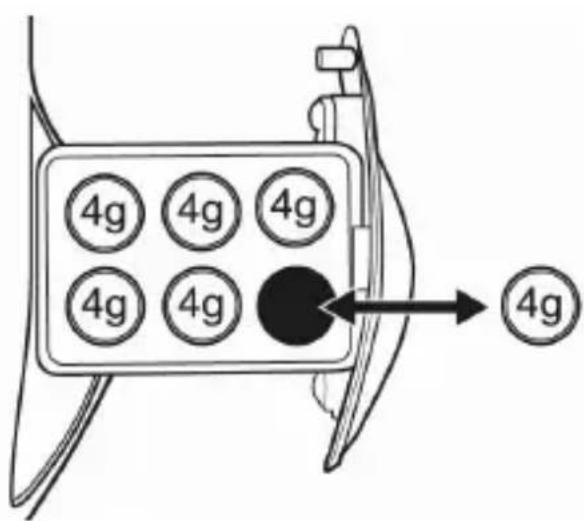
Diagram showing a curved line with an arrow pointing to concentric circular patterns (no text or symbols)The compartment with the weights can be removed from the side of the mouse.
text_image
4g 4g 4g 4g 4g 4g 4g 4gNow you can add or remove weights to arrive at your preferred mouse weight. Before closing the cover, ensure that the weights are complete and placed straight inside the place holders, to prevent any damage to the mouse.
7. Resetting to factory settings
It is possible to reset the settings of the current profile back to the factory settings using the "RESET" button in the bottom section of the software.

8. Safety instructions and liability disclaimer
Never try to open the device to carry out repairs or conversions. Avoid contact with mains voltages. Do not short-circuit the product. The device is not certified for use in the open air; only use it in dry conditions. Protect it from high humidity, water and snow. Keep it away from high temperatures. Do not subject the device to sudden changes in temperature or heavy vibration as this might damage electronic components. Examine the device for damage before using it. The unit should not be used if it has received an impact or has been damaged in any other way. Please observe national regulations and restrictions. Do not use the device for purposes other than those described in the instructions. This product is not a toy. Keep it out of the reach of children or mentally impaired persons. Any repair or alteration to the device not carried out by the original supplier, will invalidate the warranty or guarantee. The product may only be used by persons who have read and understood these instructions. The device specifications may change without any separate prior notice to this effect.

9. Disposal instructions
Electrical and electronic devices may only be disposed of in accordance with the European WEEE Directive and not with household rubbish. Components must be disposed of or recycled separately as dangerous, toxic elements can inflict sustained damage on the environment if they are disposed of incorrectly. As a consumer, you are bound by the Electrical and Electronic Devices Act (ElektroG) to return electrical and electronic goods free of charge at the end of their useful life to the manufacturer, the place of purchase or to specially set up, public collection points. The details in each case are governed by national law. The symbol on the product, the operating instructions and/or the packaging refers to these regulations. By separating materials in this way, recycling and disposing of old devices, you are making an important contribution towards protecting our environment. For information on authorised collection points in your area, please contact your local city or municipal administration.

CE

WEEE guideline: 2012/19/EU
WEEE register number: DE 67896761
WD Plus GmbH, herewith declares that this product 302645 conforms to the principle requirements and other relevant stipulations. The complete Declaration of Conformity can be obtained from: WD Plus GmbH, Wohlenbergstraße 16, 30179 Hanover
Table des matières
Titanwolf\_Specialist.exe
text_image
Macro Manager Select Macro Key Press Sequence Record Option Start Recording Record delays between key Loop Times New Delete OK Cancelnatural_image
Diagram showing a device with a button and a circular pattern, connected by a downward arrow (no text or symbols)Titanwolf\_Specialist.exe
text_image
Macro Manager Select Macro Key Press Sequence Record Option Start Recording Record delays between key ✓ Loop Times New Delete OK Cancelnatural_image
Diagram showing a device with a button and a circular pattern, connected by a downward arrow (no text or symbols)Titanwolf\_Specialist.exe
text_image
Macro Manager Select Macro Key Press Sequence Record Option Start Recording Record delays between key Loop Times New Delete OK Cancelnatural_image
Pure diagram of a device with concentric circular patterns and an arrow indicating direction (no text or symbols)ENG: Current drivers, user manuals and other relevant documents for this product can be found on our homepage.
text_image
QR code image containing encoded data, no visible human-readable textMO-FR 9:30am - 18pm CET
text_image
QR code image containing encoded data, no visible human-readable textCSL-gaming.de
WD Plus GmbH
Wohlenbergstraße 16
30179 Hannover, DE
V1.2