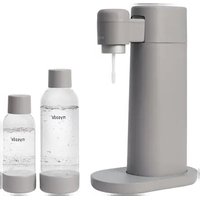
Toby - Sparkling water machine MySoda - Free user manual and instructions
Find the device manual for free Toby MySoda in PDF.


User questions about Toby MySoda
0 question about this device. Answer the ones you know or ask your own.
Ask a new question about this device
Download the instructions for your Sparkling water machine in PDF format for free! Find your manual Toby - MySoda and take your electronic device back in hand. On this page are published all the documents necessary for the use of your device. Toby by MySoda.
USER MANUAL Toby MySoda
Sparkling water maker
natural_image
Product photo of a modern water dispenser with a smaller water bottle and glass, set against a pink circular background (no text or symbols visible)Instruction Manual
English 4
Français 12
Deutsch 20
Nederlands 28
Italia 36
Suomi 44
Svenska 52
Dansk 60
Norsk 68
Polska 76
text_image
CONGRATULATIONS. You're about to enjoy sparkling water that's better for both you and the planet. Your new sparkling water maker looks, feels and smells like wood. Because it's made of wood. Each Toby sparkling water maker we produce is a unique piece just like a tree in a forest.How a tree transforms into a sparkling water maker
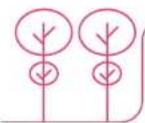
Raw material from sustainably managed forests
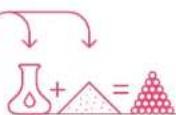
Wood based, renewable biocomposites produced from industries of cellulose and several industries.
By combining these two completely renewable ingredients we create an ideal replacement for food-based plants
This material is used in the production of Toby sparkling water makes.
MYSODA WOODY SYTON DO WODY GAZOWNNEZAWEND PRODUKCYJNY
THIRD PARTY CERTIFIED COMMERCIAL WOODLAND
BIOPOLYMER - WOOD CHIPS - BIOCOMPOSITE
We hope you enjoy this sustainably made sparkling water maker for many years. Material for this device is provided by UPM - The Biofore Company. Read more about our sustainability efforts on myoda.eu/sustainability
UPM Formi EcoAce

IMPORTANT SAFEGUARDS
Read the instructions in this manual carefully before using the sparkling water maker. Always follow the instructions and safety precautions. Using the device against the instructions and precautions may result in damage to the device and personal injury.
Keep this manual for yourself and other users of the device.
The following warnings apply to the use of the sparkling water maker, the water bottles and the carbon dioxide (CO2) cylinders used within it.
WARNINGS FOR THE DEVICE AND THE USE OF IT
- This product is not designed or intended for use by children under 12 years of age. Adult supervision is necessary when the device is used by children.
- This appliance is not intended for use by persons (including children) with reduced physical, sensory, or mental capabilities, or lack of experience and knowledge, unless they are closely supervised and instructed concerning use of the appliance by a person responsible for their safety.
- WARNING ① Do not use the appliance if you notice or suspect a defect or damage. Contact your dealer, importer or manufacturer.
- Do not make any modifications or repairs to the device and accessories. Repairs may be made only by our authorized service personnel.
- Never remove the water bottle during carbonation. Do not disperse a CO2 cylinder unless a Mysode water bottle is attached to your sparkling water maker.
- Only carbonate drinking water. Add flavours after carbonation.
- Always place the device on a level, stable, and water-resistant surface.
- The device must always be in an upright position when used
- Do not immerse the device in water and do not clean it during use.
- Only use the device when a filled bottle is inserted.
II. Never attempt to carbonate an empty bottle with CO2 - Before each use, inspect that the CO2 cylinder is firmly attached to the device
- Never transport the device with a full water bottle attached to it.
- Never transport the device with the CO2 cylinder attached to it.
- Use only Mysoda water bottles with this device.
- Never use sharp tools, abrasives or chemical cleaners to clean the device. For cleaning, we recommend a mild hand dishwashing detergent and a soft damp cloth.
- The device warranty is only valid for non-commercial use.
WARNINGS FOR THE WATER BOTTLE
-
Do not store water bottles in a freezer.
-
Do not store water bottles in a dishwasher or in hot water.
-
Do not store water bottles close to any heat source, such as an oven or stove or inside a hot car.
- Check the expiration time on the water bottle before using it. The expiry date is indicated in the form of month / year. Do not use an expired bottle after the last month of use.
- Do not use the bottle if deformed, scratched, or discoloured, or if the expiration date has passed.
- In the above cases, replace the water bottle with a new one.
- Never place a bottle in a dishwasher. Never use brushes, abrasives, or chemical cleaners. Hand wash bottle with mild detergent and warm water. If necessary, use a soft bottle brush.
WARNINGS FOR CARBON DIOXIDE (CO2) CYLINDER
-
Inspect the CO2 cylinder before use. If the cylinder or the valve attached to it is damaged, do not use it, but contact your dealer, importer or manufacturer.
-
Do not attempt to modify, puncture or incinerate the cylinder.
-
Do not throw the cylinder or cause it to fall.
-
Do not store the CO2 cylinder in a freezer.
-
If the CO2 cylinder is colder or warmer than room temperature, it must be gradually brought to room temperature. Do not place it in the freezer or on a heat source to speed up the process.
-
WARNING Food Safety Hazard:
- Use only food / beverage grade carbon dioxide cylinders purchased from an authorized dealer.
- Never use a carbon dioxide cylinder intended for non-food use.
-
Never use any adapter that permits use of non-beverage grade CO2 or non-beverage CO2 cylinders.
-
WARNING ① CO2 cylinder contents are under pressure.
32 WARNING ① Explosion Hazard. Always store CO2 cylinders in a cool, dry place, away from any type of heat exposure. Exposing to heat can cause cylinder pressure to build and release CO2 gas unexpectedly.
33 WARNING ① Do not touch the cylinder if CO2 is being released: wait until all the CO2 is discharged and the cylinder has come to room temperature. In the event of a leak, ventilate the house or apartment well, if you feel unwell, contact your doctor.
34 WARNING ⚠ Frostbite injury risk. Rapid depletion of CO2 gas can cause skin to freeze
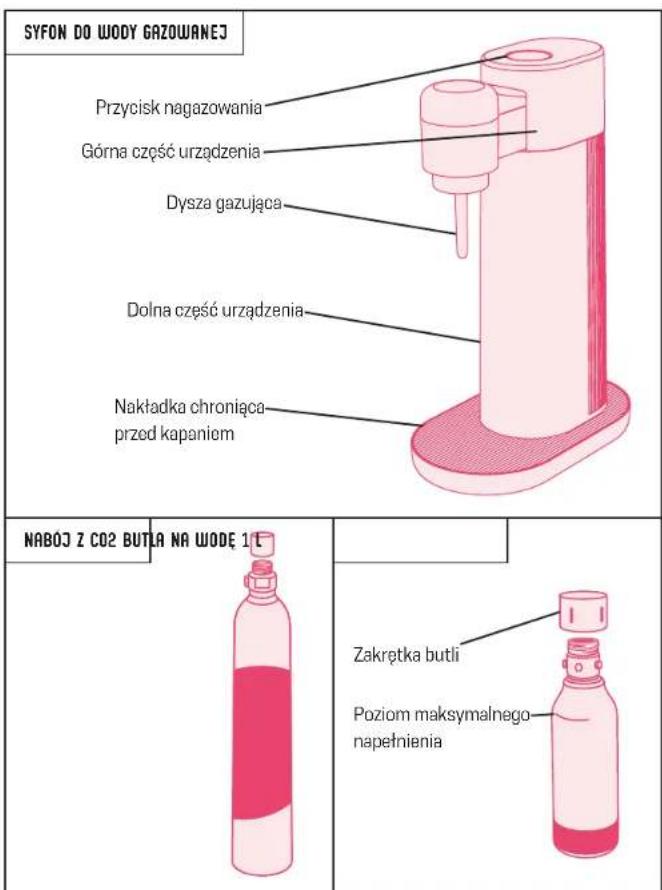
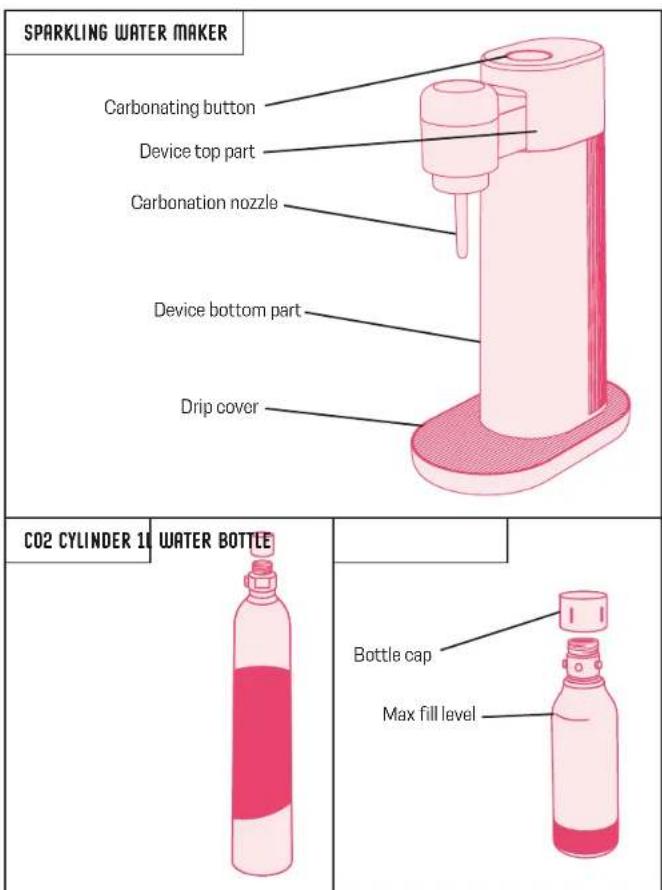
PARTS AND FEATURES
text_image
SPARKLING WATER MAKER Carbonating button Device top part Carbonation nozzle Device bottom part Drip cover CO2 CYLINDER 1 WATER BOTTLE Bottle cap Max fill level
BEFORE THE FIRST USE: Hand-wash the water bottle with warm water and hand dishwashing detergent. Rinse well and wipe outside with a soft cloth to dry. WARNING: Never wash water bottles in a dishwasher or in hot water. Harsh chemicals will damage the water bottle.
INSTALLING THE CO2 CYLINDER

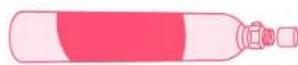
NOTE: The device can use 60 litre and 130 litre CO2 cylinders. 130 litre cylinders are available on a limited basis and only in certain countries.
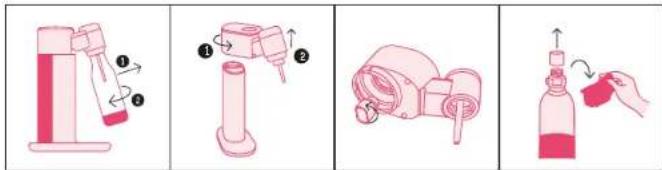
text_image
Illustration showing four-step cleaning and spraying process steps with numbered instructions- Remove the water bottle by pulling the bottle and carbonation nozzle towards yourself, and then unscrew it (one quarter clockwise).
- Uninstall the top part of the device body by turning it anti-clockwise.
- Unscrew the black thread protective cap on the top part of the device body.
- Remove the seal and cap from the CO2 cylinder.
text_image
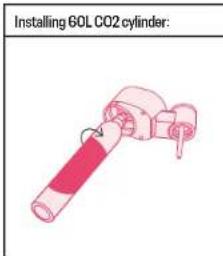
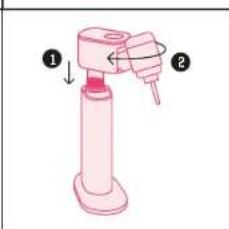
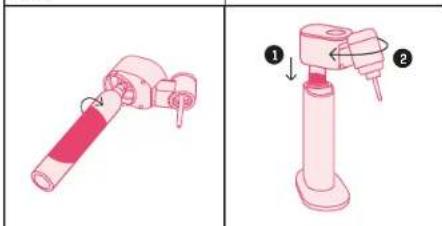
Installing 60L CO2 cylinder:5a. Install the CO2 cylinder by screwing it clockwise. Attach the cylinder firmly enough, but do not tighten too much
text_image
Diagram of a spray gun with labeled parts, showing two numbered components and directional arrows.6a. Carefully insert the CO2 cylinder and top part together to the bottom part. Turn the top part clockwise until it clicks into place.
After the CO2 cylinder is empty, replace the CO2 cylinder in the same way as the first time you installed the cylinder.
CHANGING THE CO2 CYLINDER:
text_image
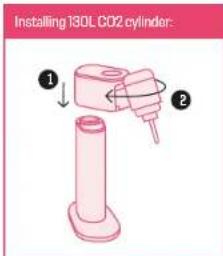
Installing 13DL CO2 cylinder:5b. Carefully insert the top part to the bottom part. Turn the top part clockwise until it clicks into place.
text_image
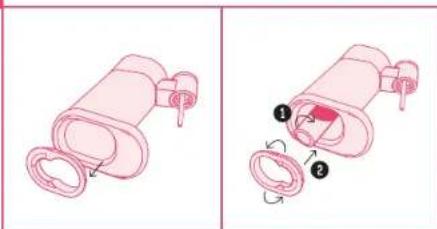
Diagram showing two-step assembly of a mechanical component with labeled parts and directional arrows6b. If you are using a 130 litre CO2 cylinder, turn over the adapter on the bottom of the unit, so that you can install a larger cylinder.
HOW TO MAKE SPARKLING WATER
text_image
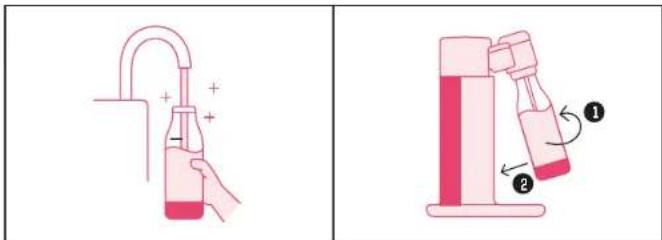
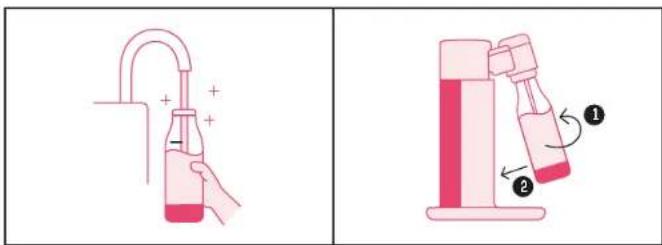
Diagram illustrating a laboratory apparatus with labeled parts and directional arrows indicating motion or movement.- Fill the water bottle with cold water up to the fill line
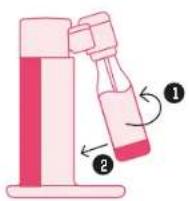
2. To insert the water bottle, make sure that the device is in a fully upright position and the bottle quick-lock is angled forward. Then insert the bottle in quick-lock and turn one quarter anti-clockwise to lock. Push the bottle towards the device to a vertical position.
natural_image
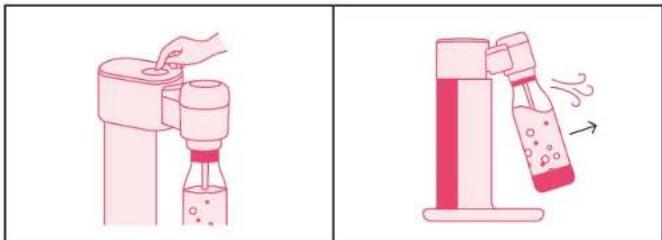
Illustration of two different water purifier setups: one using a hand mixer, the other with a bottle and droplet being added (no text or symbols)- Push the carbonation button 2–3 times, stop when you hear a hissing sound.
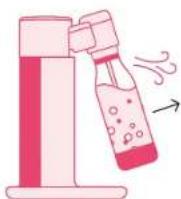
4. Pull the bottle towards yourself to release pressure inside the bottle.

natural_image
Illustration of a bottle being heated by a stand, with a person observing (no text or symbols)- Release the bottle by turning it by one quarter clockwise.
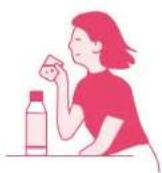
6. Enjoy your carbonated water or add desired flavour.

NOTE: Only use compatible CO2 cylinders and Mysoda water bottles. Never carbonate if the bottle is empty, not fully inserted with water or if water is above the fill line.
CARE AND CLEANING OF YOUR DEVICE
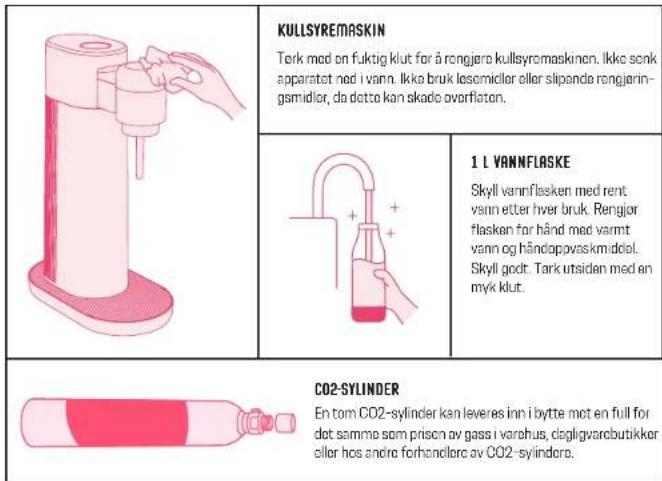
| SPARKLING WATER MAKER: To clean your sparkling water maker, wipe with a clamp cloth. Do not immarse the device in water. Do not use any solvents or abrasive cleaners, since this could damage the surface. | |
| WATER BOTTLE: Rinse the water bottle with clean water after each use. Wash the bottle by hand with warm water and hand dishwashing detergent. Rinse well. Wipe the outside with a soft cloth to dry. | |
| CO2 CYLINDER: A used CO2 cylinder can be refilled by your Mysoda dealer. Return the empty cylinder so that you only pay for the gas refill.. | |
Useful tips:
| Use as cold water as possible. You can cool down the water in a refrigerator before adding bubbles. | |
| Buy a couple of extra water bottles for your home so that you can provide sparkling water and other fresh beverages for even a larger party. | |
| Buy another CO2 cylinder in your home so that you can replace it as soon as you run out of gas. Extra cylinders are available from Mysoda dealers. | |
| Check out Mysoda flavor concentrate selection. Our range includes naturally sweetened and sugar-free options for many tastes. | |
| By using well-flowing Mysoda flavors you can mix your drink directly in the glass. This keeps your water bottles clean and fresh longer. | |
| By adjusting the amount of flavour concentrate, you can prepare a drink that tastes just right for you. |
TECHNICAL SPECIFICATIONS
Max. operating pressure: 10 bar/145 Psi
Max. operating temperature: 40°C/104°F
Bottle capacity: 1.0 L (33.8 oz.)
Max. filling volume of the bottle: 0.85L (28,7 oz)
Requires no electricity
Mysoda is a registered trademark of Mysoda Oy.
WARRANTY
We want to make sure that you enjoy your Mysoda sparkling water maker for a long time. To ensure a complete user experience for you, our equipment has a twenty-four (24) month warranty from the date of purchase. Our warranty is valid for household use.
The warranty does NOT cover the following:
- Defects caused by carbonating other liquid than water.
- Wear and tear under normal consumer use (e.g. discoloration).
- Defects and damage resulting from the use of a water bottle after expiration time.
- Defects and damage caused by a CO2 Cylinder used past its expiration date.
- Defects due to damage during transport and any abnormal household use.
- Defects due to the use of CO2 cylinders sold by non-authorized dealers.
- Defects due to improper use, modification or commercial use of the sparkling water maker.
If your Mysoda device needs servicing, contact your local Mysoda retailer or contact
Mysoda directly by emailing us at info@mysoda.eu or visiting our website: www.mysoda.eu.
mysoda.eu
TROUBLESHOOTING
ISSUE
PROBABLE CAUSE SOLUTION
| Water bottle can't be attached to the quick lock | Quick lock is in wrong position | Pull the quick lock and nozzle towards yourself. Attach the bottle by turning one quarter anti-clockwise |
| Water bottle can't be released from the quick lock | Water bottle is in wrong position gently | pull the water bottle towards yourself until it reaches its fully forward tilt position. Release the bottle by turning one quarter clockwise. |
| Water bottle overflows during the carbonation | Bottle is overfilled | Fill the bottle with water up to the fill line indicating the maximum level |
| Carbonating button is pressed too long | Do not press the carbonating button for longer than 1-2 seconds at a time | |
| Water is not well carbonated/bubbly enough | CO2 cylinder is running low | Replace the used CO2 cylinder with a new one |
| Water is too warm | Make sure the water used is as cold as possible as CO2 dissolves better in cold water | |
| CO2 cylinder is not screwed in tight enough | Screw the CO2 cylinder tightly into the device | |
| CO2 cylinder leaks after installation | CO2 cylinder is not screwed in tight | Remove the CO2 cylinder and reattach it securely. Do it by hand, do not use tools. Do not overtight. |
| 130 litro cylinder can't be installed | The bottom adapter is in the wrong position | Uninstall the bottom adapter and put it back the other way round. |
| Small, white ice particles form around the nozzle during the carbonation | This is normal, especially when the water is cold | |
| Device makes a whistling noise during the carbonation | This is normal and ends once the carbonation is completed |
text_image
Diagram showing two mechanical device configurations with labeled parts and directional arrows indicating movement or force.text_image
Diagram showing three stages of a hairdryer tool with labeled parts and directional arrows indicating movement.text_image
Diagram illustrating a laboratory apparatus with labeled parts and directional arrows indicating motion or movement.natural_image
Two-step illustration showing a hand washing a bottle and pouring liquid from a stand, with an arrow indicating the process (no text or symbols)natural_image
Illustration of a bottle being heated by a stand, with a person observing (no text or symbols)text_image
Illustration showing four-step cleaning and assembly process steps with numbered instructionstext_image
Illustration showing two different mechanical or electrical components with numbered labels indicating step-by-step assembly.text_image
Diagram showing three-step assembly of a pump device with labeled parts and directional arrows indicating motion.text_image
Diagram illustrating a laboratory apparatus with labeled parts and directional arrows indicating motion or movement.natural_image
Illustration of two different water purifier setups: one using a hand mixer, the other with a bottle and droplet being washed (no text or symbols)natural_image
Illustration of a pink bottle being heated by a stand, with a person observing (no text or symbols)WAARSCHUWINGEN VOOR DE WATERFLES
text_image
Illustration showing four-step steps of a hairdryer tool: holding a brush, pressing a tube, adjusting a pressure gauge, and pouring liquid into a bottle.text_image
Illustration showing two-step assembly of a mechanical device with labeled parts and directional arrowstext_image
Diagram showing three-step assembly of a pump device with labeled parts and directional arrows indicating motion.text_image
Diagram illustrating a laboratory apparatus with labeled parts and directional arrows indicating motion or movement.natural_image
Illustration of two different water purifier setups: one using a hand mixer, the other with a bottle and bubbles being dried (no text or symbols)natural_image
Illustration of a bottle being heated by a stand, and a person drinking from a bottle (no text or symbols)text_image
Illustration showing four-step steps of a hairdryer tool: holding a brush, pressing a tube, adjusting the device, and pouring liquid into a bottle.text_image
Illustration showing two-step assembly of a mechanical device with labeled parts and directional arrowstext_image
Diagram showing three-step assembly of a pump device with labeled parts and directional arrows indicating motion.text_image
Diagram illustrating a laboratory apparatus with labeled parts and directional arrows indicating motion or movement.natural_image
Illustration of two different water purifier setups with a hand placing a bottle into a stand, showing liquid transfer and suction (no text or symbols)natural_image
Illustration of a bottle being heated by a stand, with a person observing (no text or symbols)text_image
Illustration showing four steps of a hairdryer tool: step 1 to step 2, step 3 to step 4, and step 4 to handle a bottle with a red liquid.text_image
Illustration showing two-step assembly of a mechanical device with labeled parts and directional arrowstext_image
Diagram showing three-step assembly of a pump device with labeled parts and directional arrows indicating motion.text_image
Diagram showing two laboratory apparatus setups with labeled parts and directional arrows indicating motion or movement.natural_image
Illustration of two different water purifier setups: one with a hand operating the filter, the other with a bottle being washed (no text or symbols)natural_image
Illustration of a bottle being heated by a stand, with a person observing (no text or symbols)natural_image
Illustration of a hand using a handheld device to lift a cylindrical container (no text or symbols visible)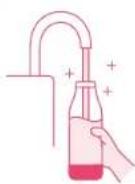
TEKNISET TIEDOT
text_image
Illustration showing four-step steps of a hairdryer tool: holding a brush, pressing a tube, spraying water, and adding a red liquid.text_image
Illustration showing two different types of hairpin tool tips, labeled with step numbers 1 and 2.text_image
Diagram showing three-step assembly steps of a pump device with labeled parts and directional arrowstext_image
Diagram illustrating a laboratory apparatus with labeled parts and directional arrows indicating motion or movement.natural_image
Illustration of two different water purifier setups: one with a hand placing liquid, the other with a bottle pouring liquid (no text or symbols)natural_image
Illustration showing a bottle being heated by a stand and a person drinking from a bottle (no text or symbols)flowchart
graph LR
    A["Seedling with seedlings"] --> B["Seedling with seedlings in a seedling product of root, then to be added or converted into a seedling"]
    B --> C["Add feed into a seedling with seedlings being added into a seedling, then to be added or converted into a seedling part of the root"]
    C --> D["Final product output"]
text_image
Illustration showing four-step cleaning and spraying process steps with numbered instructionstext_image
Illustration showing two-step assembly of a mechanical device with labeled parts and directional arrows5a. Installer CO2-cylinderen ved at skrue den i urets retning. Fastgor cylinderen korrekt, man uden at stramma den for meget.
SÅDAN UDSKIFTES CO2-CYLINDEREN
text_image
Diagram showing three-step assembly of a pump device with labeled parts and directional arrows indicating motion.text_image
Diagram showing two laboratory apparatus setups with labeled components and directional arrows indicating motion or movement.natural_image
Illustration of two different water purifier setups: one with a hand cleaning the top, the other with a bottle being washed with bubbles (no text or symbols)natural_image
Illustration showing a syringe being heated by a bottle and then placed on a table, with a person observing (no text or symbols present)natural_image
Illustration of a hand using a handheld device to lift a cylindrical container (no text or symbols visible)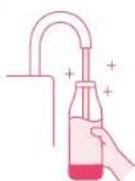
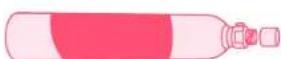
TEKNISKE SPECIFICATIONER
Maks. driftstryk: 10 bar/145 Psi
Maks. driftstemperatur: 40 °C/104 °F
Flaskens kapacitet: 1,0 l (33,8 oz.)
Flaskens maksimale fyldevolumen: 0,85 l (28,7 oz)
The material for being drafting lavalitz shopping
Tehrased from the independent produce was still the adjuvant production
Used to obtain a dose to halt from besei ingred in onea rapier than ideal ionizing for fescal heat plot.
Darmaherar, brakas i prodikasyjern loby kulty, ramakar

flowchart
graph TD
    A["Tree Plant"] --> B["Soil Treatment"]
    B --> C["Processing Unit"]
    C --> D["Storage System"]
SKOGORUNSONRÅDE SERTIFISERT
AV TREDIE PART
BOPOLYMER • SAGHIS • BIKOMPOSITI PRODUSSIONSABRANK MYSODA TCHY KILLSYBRASKINER
Vi håpen du val ha plade av denne horskraftige kurlpromaskinen i mange Jr. Materialet til dette apparstet av Ivert av UPM – The Biofore Company Les mer om våde Bøndelkraftsittlak på upreda ou sustainability
UPM Formi EcoAce

VIKTIGE SIKKERHETSTILTAK
text_image
Illustration showing four-step cleaning and spraying process steps with numbered instructions- Fjør vanntflasken ved å trekke flasken og karbonseringsdysen mot deg, og skru den doretter las (en kvart omdreining i retning med klokken).
- Demonter den overse delen av apparathuset ved å vriden mot klokken.
- Skrullas den svarte beskyt telsesheeten på den overste delen av apparathuset.
- Fjern tebringen og hetten fra CO2-sylinderen.
60L:
text_image
Illustration showing two-step assembly of a mechanical device with labeled parts and directional arrowstext_image
Diagram showing three-step assembly of a pump device with labeled parts and directional arrows indicating motion.5b. Vri den øverste delen med klukken til den klikker på plass.
Gb. Hvis du bruker en 130 liters CO2-sylinder, snur du adapteren på bunnen av enheton, slik at du kan installere en større sylinder.
SLIK LAGER DU KULLSYREVANN
text_image
Diagram showing two laboratory apparatus setups with labeled parts and directional arrows indicating motion or movement.natural_image
Illustration of two laboratory glassware setups: one using a syringe, the other showing liquid being poured into a stand (no text or symbols)- Trykk 2–3 ganger på karboniseringsknappen, og stopp när du herer en susende lyd.
natural_image
Illustration showing a bottle being heated by a stand and a person drinking from a bottle (no text or symbols present)RENGJ∅RING OG VEDLIKEHOLD AV APPARATET
flowchart
graph LR
    A["Compound addition"] --> B["Reaction with addition"]
    B --> C["Product formation"]
    C --> D["Final product delivery"]
CERTYFIKIONIANE MIEZALEŻNE LASY BIOPOLUMER - VIÓRY DRENNIANE - BIKOMPOŻYT
PRZEZNACZONE DO GELÓW! GOSPODARCZYCH
MYSDATORYSYFON DO NOOY GAZIONANE ZARAD PRODUKCHIN
PODZESPOŁY I FUNKCJE