BLENDER STYLANCE - Blender Create - Free user manual and instructions
Find the device manual for free BLENDER STYLANCE Create in PDF.

| Product type | Blender / Mixer |
| Brand | Create |
| Model | BLENDER STYLANCE |
| Use | Domestic |
| Bowl material | Glass |
| Bowl capacity | With max level mark (exact capacity not specified) |
| Number of speeds | 3 (Low, Medium, High) via rotary knob |
| Automatic programs | 3: Ice Crush, Smoothie, Interval |
| Safety | Safety switch, overheating protection, overcurrent protection |
| Cleaning the bowl | Washable with water (do not use abrasive products) |
| Cleaning the base | Wipe with a damp cloth, do not immerse |
| Blades | Very sharp, handle with care |
| Power supply | Check voltage on rating plate |
| Included accessories | Glass jar, lid, measuring cap, blade assembly |
| Repairability | Entrust to a qualified professional |
| Environmental protection | Compliant with WEEE directives, recycling at end of life |
Frequently Asked Questions - BLENDER STYLANCE Create
User questions about BLENDER STYLANCE Create
0 question about this device. Answer the ones you know or ask your own.
Ask a new question about this device
Download the instructions for your Blender in PDF format for free! Find your manual BLENDER STYLANCE - Create and take your electronic device back in hand. On this page are published all the documents necessary for the use of your device. BLENDER STYLANCE by Create.
USER MANUAL BLENDER STYLANCE Create
natural_image
Line drawing of a blender with control knob and handle (no text or symbols)ASSEMBLEA DELLA BROCCA 28
PRIMA DI USARE 28
Thank you very much for choosing our blender. Before using the appliance, read these instructions carefully for its correct use.
The included safety precautions reduce the risk of electric shock, injury and even death if strictly followed. Please keep this manual in a safe place for future reference, along with the completed product warranty card, original product packaging and proof of purchase. If possible, pass these instructions on to the next owner of the appliance. Follow basic safety precautions and accident prevention rules at all times when using an appliance. We decline all liability arising from non-compliance with these instructions by customers.
SECURITY INSTRUCTIONS
When using any electrical appliance, basic safety precautions should always be followed.
Please read all instructions for use carefully before using this product.
- The blades are very sharp, handle with care. Be careful when handling the sharp blades during cleaning, emptying the container and user maintenance of the product.
- When cleaning the appliance, please use a dry cloth, do not use water to clean the motor base, as it may cause injury due to misuse.
- Always turn off the product and disconnect it from the mains if it is left unattended and before assembling, disassembling, cleaning or going near moving parts while in use.
- Do not immerse the product or allow the power cord and plug to come into contact with water or other liquid.
- This appliance is designed for normal household use only. Do not use this appliance outdoors.
- Your voltage should correspond to the voltage printed on the type plate located on the bottom of the motor housing. When connected to a power outlet, the motor must always be off (switch in the OFF position).
- This appliance will not work without the jar or blades attached to the motor housing.
- Before turning on the mixer, make sure the jar is properly assembled and placed on the motor housing with the lid on.
- Do not use with no load in the jar (solid or liquid ingredients). Don't overfill the pitcher either.
- Do not use the product if the blade is curved or damaged.
- Keep hands and utensils out of the bowl while it is operating to reduce the risk of serious injury to persons or damage to the mixer. A spatula can be used, but should be used only when the mixer is not running.
- Do not let cord hang over edge of table or counter, or touch hot surfaces.
- If the power cord is damaged, it must be replaced with a cord from the manufacturer, your after-sales service agent or a qualified person to prevent a possible accident.
- Do not place the appliance on or near severe heat exposures such as a hot gas or electric burner or oven.
- Keep this appliance and its cord out of the reach of children.
- This appliance can be used by children aged from 8 years and above and persons with reduced physical, sensory or mental capabilities or lack of experience and knowledge if they have been given supervision or instruction concerning use of the appliance in a safe way and understand the hazards involved. Children must not play with the appliance. Cleaning and maintenance of the appliance must not be carried out by children without supervision.
- Do not put hot ingredients (over 60^ ) in the jar.
- When using the product, do not touch the surfaces of the jar that may be hot. Use the parts provided for it.
- Great care must be taken when moving an appliance containing hot oil or other hot liquids, pay attention to prevent personal injury.
• Always operate with the mixer lid securely in place.
- Avoid contact with moving parts.
- Do not attempt to remove the mixer jar from the motor base during operation of this appliance.
- The use of accessories, such as canning jars, not recommended by the appliance manufacturer may result in a risk of fire, electric shock, or personal injury. Use only the included accessories.
- Do not use the appliance for other than its intended use.
- If the product works with abnormal noise or shake seriously. Stop using this product and send it to the after-sales service agent for inspection. Never repair the product yourself.
- To store the product after using the product, repackage the product and store it in a dry place and avoid sun exposure. Make sure that children cannot reach the product.
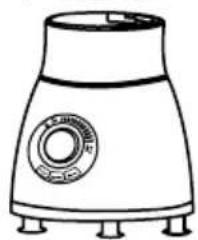
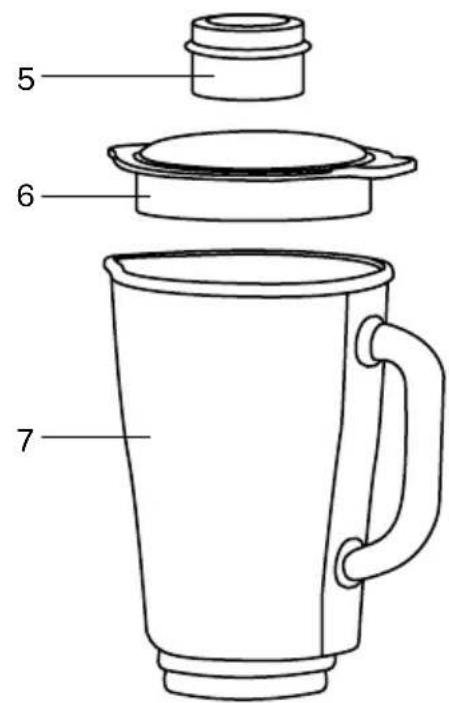
PARTS LIST
WHOLE PRODUCT
- Blade holder
- Pitcher background
- Control Panel
- Main unit
- Measuring cap
- Top
- Glass jar
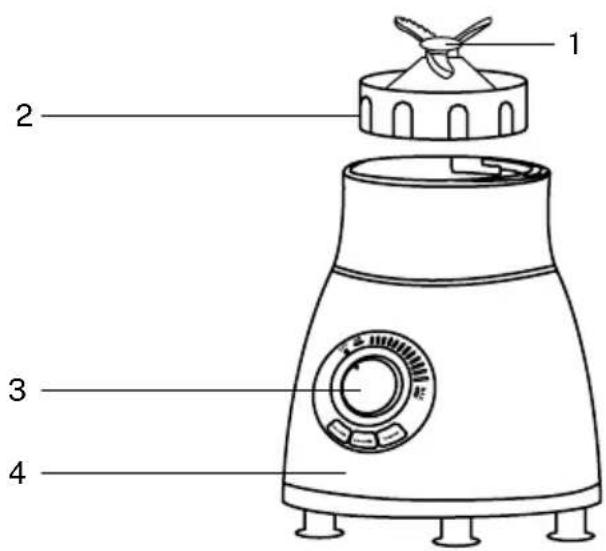
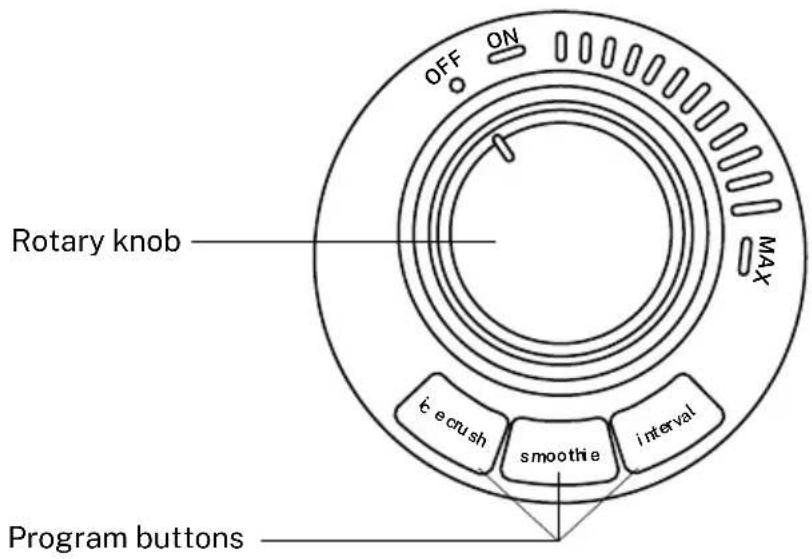
CONTROL PANEL
BEFORE USING
- Clean all parts before using your appliance for the first time.
- Uncoil the required amount of cable from the cable housing at the bottom of the motor housing and plug it into a power outlet.
PITCHER ASSEMBLY
Caution: The blade is very sharp, handle it with care.
- Carefully place the blade assembly in the bottom of the jar.
- Secure carafe firmly on retaining ring.

natural_image
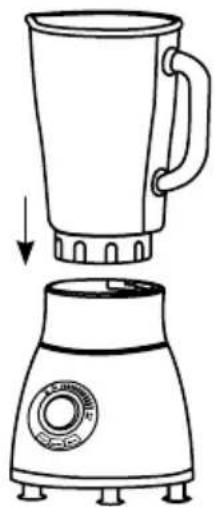
Line drawing of a blender with a handle and base, showing an arrow indicating compression or cooling process (no text or symbols)PITCHER PLACEMENT
- Make sure the switch is in the OFF position.
- Place the carafe on the main unit and push it down until it locks into place.
natural_image
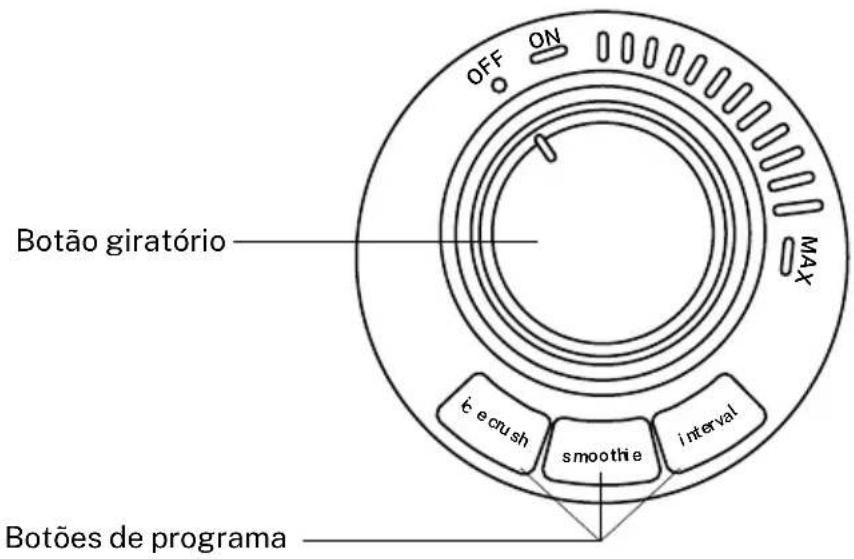
Line drawing of a blender with a handle and base, showing top-down view (no text or symbols)- In the wheel panel: OFF means off; ON implies standby mode, you can use the program function; and MAX is a continuous speed control where the maximum speed remains at the same MAX.
- Use the rotary button to turn on, turn off and change the speed.
- The blender has three different programs to choose from: "ice crush" to crush ice; smoothie for smoothie; and "interval" to cut intermittently (turn, stop, turn, stop, etc.).
- Turn the button to ON and choose your program. If the product works in “Smoothie” mode, press the “Smoothie” button, the product will stop working and enter standby mode. If you press another function mode, the product will switch to the corresponding new mode.
- The maximum capacity of the jug is indicated on it, do not allow it to exceed the maximum indicated on the level mark.
- This blender does not allow its operation if it is empty, as a suggestion use 2 parts of fruit and 3 of water (with fruits such as carrots, apples, etc.) and the operating time should not exceed 2 minutes.
Caution:
- The mixer has a safety switch. If the blender jar is not in position or if you remove it during operation, the product will not work. You need to put the blender jar in its correct position, turn the knob to "0" position, and then you can start using the product.
- Includes overheat protection. If the product overload works for a long time, the thermal limiter will stop the product to prevent the motor from overheating. If the thermal limiter works, reduce the load on the mixer jar and wait almost 30 minutes for the motor to cool down, then use the product again. If the LED light continues to flash but the product still does not work, please wait another 10-20 minutes.
• Over current protection. If you blend very hard or large foods incorrectly, the blade may get stuck and the current limiter will stop the product. If the current limiter is in operation, turn off the product and remove the very hard or very large food, then use the product again.
SHAKE
- Put the food to be processed in the jar.
- Put the lid firmly on the jar. Insert the gauge cap into the cap opening and turn clockwise to lock.
- Plug it in, then turn ON and choose the "Smoothie" program.
- Speeds:
-
Low: Light mixes with liquid ingredients.
• Half: Thicker consistency, with a mixture of liquid and solid ingredients.
• High: Instant energy burst. -
After use, always turn the switch to the OFF position and unplug the main unit.
-
To remove the carafe, lift it up; no need to twist it.
PRACTICAL TIPS
- For best results when making a smoothie when using solid ingredients, add small portions to the pitcher gradually rather than adding a large amount all at once.
- Cut the food into small pieces (2-3 cm).
- Always start by mixing solid ingredients with a small amount of liquid. Then gradually add more liquid through the lid opening.
• Always use the unit with your hand positioned on top. - Be careful with hot liquids.
- When preparing mayonnaise, oil can be added through the plug hole in the lid.
- We recommend that you use the "Interval" mode when mixing solid or highly viscous ingredients to prevent the blade from sticking.
| Parameters | Food | Velocity | Time | Preparation |
| Shake | All liquids, drinks and hot soups | Low | 40 - 60 seconds | |
| To mash | Vegetables, fruits, sauces, baby food. | Half 1.5 - 2min | 2cm pieces | |
| Mixture | Pancake batterYogurt-based drinks and desserts | Low-Medium | 1 minute1.5 - 2min | |
| Emulsify Mayonnaise | Half 1.5 - 2min | |||
| Chop Ice (100g) | High 20 seconds |
CLEANING
- Before starting to clean, make sure that the power switch and the speed regulator are in the "0" position, remove the plug from the mains.
- Do not immerse the motor housing in water. Clean with a damp cloth only.
• Water can be used to clean the blender jar, but not cleaning agents or other liquids. - After emptying the pitcher, fill it with water. Attach it to the main unit and turn the switch to the "Interval" setting several times.
• Empty the jar and rinse it. - Make sure the jar is empty before unscrewing the fixing ring. Take care when handling the blade.
• After washing the parts, rinse them with clean water and dry them well.
In compliance with the directives: 2012/19/EU and 2015/863/EU on the restriction of the use of hazardous substances in electrical and electronic equipment, as well as their waste disposal. The crossed bin symbol shown on the packaging indicates that the product at the end of its useful life will be collected as separate waste. Therefore, any product that has reached the end of its useful life should be delivered to waste disposal centers specialized in the separate collection of waste electrical and electronic equipment, or returned to the retailer when purchasing similar new equipment, in one for a base. Proper separate collection for subsequent commissioning of equipment sent for recycling, treatment and disposal in an environmentally compatible manner helps prevent possible negative effects on the environment and health and optimizes recycling and reuse of waste. the components that make up the device. The abusive disposal of the product by the user implies the application of administrative sanctions in accordance with the laws.
natural_image
Line drawing of a blender with a handle and base, showing an arrow indicating compression or cooling process (no text or symbols)natural_image
Line drawing of a blender with a handle and lid, showing top-down view (no text or symbols)PAINEL DE CONTROLE
ANTES DE USAR
natural_image
Line drawing of a blender with a handle and base, showing an arrow indicating compression or cooling process (no text or symbols)COLOCAÇÃO DO JARRO
natural_image
Line drawing of a blender with handle and base, showing top-down view (no text or symbols)natural_image
Line drawing of a blender with a handle and base, showing an arrow indicating compression or cooling process (no text or symbols)PLACEMENT DU LANCEUR
natural_image
Line drawing of a blender with a handle and base, showing top-down view (no text or symbols)ASSEMBLEA DELLA BROCCA
natural_image
Line drawing of a blender with a handle and base, showing an arrow indicating compression or cooling process (no text or symbols)natural_image
Line drawing of a blender with handle and base, showing top-down view (no text or symbols)natural_image
Line drawing of a blender with a handle and base, showing an arrow indicating compression or cooling process (no text or symbols)PITCHER-PLATZIERUNG
natural_image
Line drawing of a blender with a handle and lid, showing top-down view (no text or symbols)natural_image
Line drawing of a blender with a handle and base, showing an arrow indicating compression or cooling process (no text or symbols)PLAATSING WERPER
natural_image
Line drawing of a mug with handle and side port, no text or symbols present