DWOAS4ED - Grass trimmer DEWALT - Free user manual and instructions
Find the device manual for free DWOAS4ED DEWALT in PDF.

| Product Type | Edger accessory |
| Brand | DeWalt |
| Model | DWOAS4ED |
| Intended use | Professional and residential edging |
| Engine compatibility | DeWalt engines (sold separately) |
| Blade | Steel blade with wear indicators |
| Depth adjustment | By knob on front wheel; recommended depth 2.5 cm |
| Edging guide | Integrated guide for straight cuts along pathways |
| Power source | DeWalt cordless engine (battery pack 18-60 V max) |
| Engine attachment | By knob and locking button with three positions |
| Estimated weight | 1.5 kg |
| Dimensions (L x W x H) | Approximately 100 x 20 x 20 cm |
| Materials | Reinforced plastic, steel |
| Maintenance | Cleaning with compressed air; avoid chemicals |
| Storage | In a dry place, out of reach of children; do not hang by the handle |
| Safety | Safety glasses and hearing protection recommended; keep bystanders away |
| Replacement parts | Blade, spacer, hex nut (13/17 mm) |
| Repairability | Repairs by DeWalt authorized service center |
| Warranty | 3 years tool, 2 years battery pack; free maintenance contract for 1 year |
| Package contents | Edger accessory, mounted blade, user guide |
Frequently Asked Questions - DWOAS4ED DEWALT
User questions about DWOAS4ED DEWALT
0 question about this device. Answer the ones you know or ask your own.
Ask a new question about this device
Download the instructions for your Grass trimmer in PDF format for free! Find your manual DWOAS4ED - DEWALT and take your electronic device back in hand. On this page are published all the documents necessary for the use of your device. DWOAS4ED by DEWALT.
USER MANUAL DWOAS4ED DEWALT
English (original instructions) 3
Components
1 Blade
2 Cut adjustment knob
3 Edger attachment pole
4 Locking rod
Composants
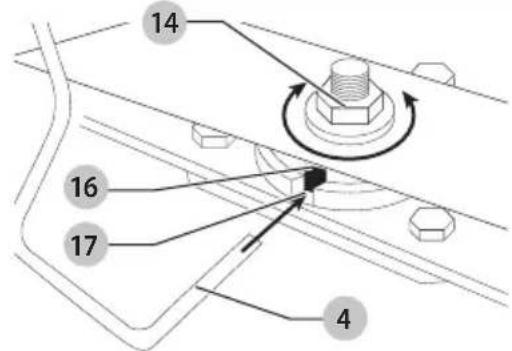
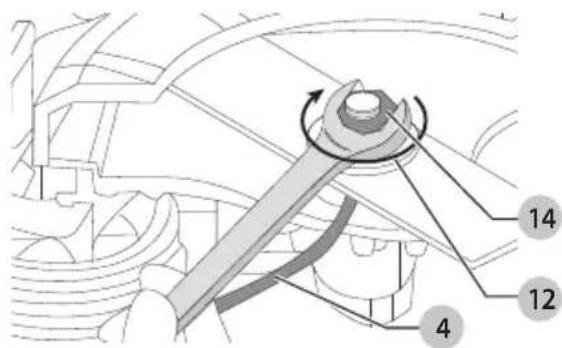
Fig. D
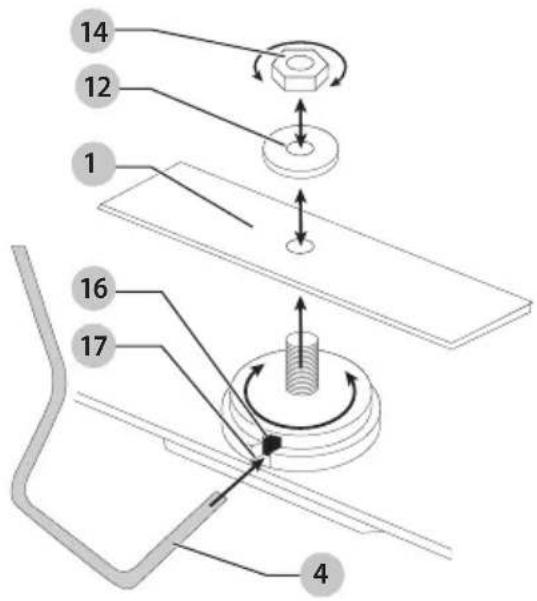
Fig. E
natural_image
Line drawing of hands operating a mechanical device with clamps (no text or symbols)Fig. F Fig. G
natural_image
Illustration of a person using a long-handled tool to clean or manage a lawn, with arrows indicating direction (no text or symbols)
WARNING: Read all safety warnings and all instructions. Failure to follow the warnings and instructions may result in electric shock, fire and/or serious injury.

WARNING: To reduce the risk of injury, read the instruction manual.
Intended Use
This edger attachment is to be used only with DEWALT powerheads. This edger has been designed for professional and residential edging applications.
DO nOT use this appliance for any job except that for which it is intended.
DO nOT use under wet conditions or in the presence of flammable liquids or gases.
DO nOT let children come into contact with the tool. Supervision is required when inexperienced operators use this tool.
Definitions: Safety Alert Symbols and Words
This instruction manual uses the following safety alert symbols and words to alert you to hazardous situations and your risk of personal injury or property damage.
DANGER: Indicates an imminently hazardous situation which, if not avoided, will result in death or serious injury.
WARNING: Indicates a potentially hazardous situation which, if not avoided, could result in death or serious injury.
CAUTION: Indicates a potentially hazardous situation which, if not avoided, may result in minor or moderate injury.
(### without word) Indicates a safety related message.
NOTICE: Indicates a practice not related to personal injury which, if not avoided, may result in property damage.
GENERAL POWER TOOL SAFETY WARNINGS
WARNING: Read all safety warnings, instructions, indications and specifications provided with
this power tool. Failure to follow all instructions listed below may result in electric shock, fire and/or serious injury.
SAVE ALL WARNINGS AND INSTRUCTIONS FOR FUTURE REFERENCE.
The term "power tool" in the warnings refers to your mains-operated (corded) power tool or battery-operated (cordless) power tool.
1) Work Area Safety
a) Keep work area clean and well lit. Cluttered or dark areas invite accidents.
b) Do not operate power tools in explosive atmospheres, such as in the presence of flammable liquids, gases or dust. Power tools create sparks which may ignite the dust or fumes.
c) Keep children and bystanders away while operating a power tool. Distractions can cause you to lose control.
2) Electrical Safety
a) Power tool plugs must match the outlet. Never modify the plug in any way. Do not use any adapter plugs with earthed (grounded) power tools. Unmodified plugs and matching outlets will reduce risk of electric shock.
b) Avoid body contact with earthed or grounded surfaces, such as pipes, radiators, ranges and refrigerators. There is an increased risk of electric shock if your body is earthed or grounded.
c) Do not expose power tools to rain or wet conditions. Water entering a power tool will increase the risk of electric shock.
d) Do not abuse the cord. Never use the cord for carrying, pulling or unplugging the power tool. Keep cord away from heat, oil, sharp edges or moving parts. Damaged or entangled cords increase the risk of electric shock.
e) When operating a power tool outdoors, use an extension cord suitable for outdoor use. Use of a cord suitable for outdoor use reduces the risk of electric shock.
f) If operating a power tool in a damp location is unavoidable, use a ground fault circuit interrupter (GFCI) protected supply. Use of a GFCI reduces the risk of electric shock.
3) Personal Safety
a) Stay alert, watch what you are doing and use common sense when operating a power tool. Do not use a power tool while you are tired or under the influence of drugs, alcohol or medication. A moment of inattention while operating power tools may result in serious personal injury.
b) Use personal protective equipment. Always wear eye protection. Protective equipment such as a dust mask, non-skid safety shoes, hard hat, or hearing protection used for appropriate conditions will reduce personal injuries.
c) Prevent unintentional starting. Ensure the switch is in the off-position before connecting to power source and/or battery pack, picking up or carrying the tool. Carrying power tools with your finger on the switch or energizing power tools that have the switch on invites accidents.
d) Remove any adjusting key or wrench before turning the power tool on. A wrench or a key left attached to a rotating part of the power tool may result in personal injury.
e) Do not overreach. Keep proper footing and balance at all times. This enables better control of the power tool in unexpected situations.
f) Dress properly. Do not wear loose clothing or jewelry. Keep your hair, clothing and gloves away from moving parts. Loose clothes, jewelry or long hair can be caught in moving parts.
English
g) If devices are provided for the connection of dust extraction and collection facilities, ensure these are connected and properly used. Use of dust collection can reduce dust-related hazards.
h) Do not let familiarity gained from frequent use of tools allow you to become complacent and ignore tool safety principles. A careless action can cause severe injury within a fraction of a second.
4) Power Tool Use and Care
a) Do not force the power tool. Use the correct power tool for your application. The correct power tool will do the job better and safer at the rate for which it was designed.
b) Do not use the power tool if the switch does not turn it on and off. Any power tool that cannot be controlled with the switch is dangerous and must be repaired.
c) Disconnect the plug from the power source and/or remove the battery pack, if detachable, from the power tool before making any adjustments, changing accessories, or storing power tools. Such preventive safety measures reduce the risk of starting the power tool accidentally.
d) Store idle power tools out of the reach of children and do not allow persons unfamiliar with the power tool or these instructions to operate the power tool. Power tools are dangerous in the hands of untrained users.
e) Maintain power tools and accessories. Check for misalignment or binding of moving parts, breakage of parts and any other condition that may affect the power tool's operation. If damaged, have the power tool repaired before use. Many accidents are caused by poorly maintained power tools.
f) Keep cutting tools sharp and clean. Properly maintained cutting tools with sharp cutting edges are less likely to bind and are easier to control.
g) Use the power tool, accessories and tool bits etc. in accordance with these instructions, taking into account the working conditions and the work to be performed. Use of the power tool for operations different from those intended could result in a hazardous situation.
h) Keep handles and grasping surfaces dry, clean and free from oil and grease. Slippery handles and grasping surfaces do not allow for safe handling and control of the tool in unexpected situations.
5) Battery Tool Use and Care
a) Recharge only with the charger specified by the manufacturer. A charger that is suitable for one type of battery pack may create a risk of fire when used with another battery pack.
b) Use power tools only with specifically designated battery packs. Use of any other battery packs may create a risk of injury and fire.
c) When battery pack is not in use, keep it away from other metal objects, like paper clips, coins, keys, nails, screws or other small metal objects,
that can make a connection from one terminal to another. Shorting the battery terminals together may cause burns or a fire.
d) Under abusive conditions, liquid may be ejected from the battery; avoid contact. If contact accidentally occurs, flush with water. If liquid contacts eyes, additionally seek medical help. Liquid ejected from the battery may cause irritation or burns.
e) Do not use a battery pack or tool that is damaged or modified. Damaged or modified batteries may exhibit unpredictable behavior resulting in fire, explosion or risk of injury.
f) Do not expose a battery pack or tool to fire or excessive temperature. Exposure to fire or temperature above 265 °F (130 °C) may cause explosion.
g) Follow all charging instructions and do not charge the battery pack or tool outside the temperature range specified in the instructions. Charging improperly or at temperatures outside the specified range may damage the battery and increase the risk of fire.
6) Service
a) Have your power tool serviced by a qualified repair person using only identical replacement parts. This will ensure that the safety of the power tool is maintained.
b) Never service damaged battery packs. Service of battery packs should only be performed by the manufacturer or authorized service providers.
IMPORTANT SAFETY INSTRUCTIONS
WARNING: To reduce risk of injury:
• Before any use, be sure everyone using this unit reads and understands all safety instructions and other information contained in this manual.
- Save these instructions and review frequently.
WARNING: When using electric gardening appliances, basic safety precautions should always be followed to reduce risk of fire, electric shock, and personal injury, including the following.
- Avoid Dangerous Environment – Don't use appliances in damp or wet locations.
- Don't Use In Rain.
- Keep Children Away – All visitors should be kept at a distance from work area.
- Dress Properly – Do not wear loose clothing or jewelry. They can be caught in moving parts. Use of rubber gloves and substantial footwear is recommended when working outdoors. Wear protective hair covering to contain long hair.
- Use Safety Glasses – Always use face or dust mask if operation is dusty.
- Use Right Appliance – Do not use appliance for any job except that for which it is intended.
-
Don't grasp the exposed cutting blades or cutting edges when picking up or holding the appliance.
-
Don't Force Appliance – It will do the job better and with less likelihood of a risk of injury at the rate for which it was designed.
- Don't Overreach – Keep proper footing and balance at all times.
- Stay Alert – Watch what you are doing. Use common sense. Do not operate appliance when you are tired.
- Disconnect Appliance – Remove the battery when not in use, before servicing, when changing accessories such as blades, and the like.
- Store Idle Appliances Indoors – When not in use, appliances should be stored indoors in dry, and high or locked-up place – out of reach of children.
- Maintain Appliance With Care – Keep cutting edge sharp and clean for best performance and to reduce the risk of injury. Follow instructions for lubricating and changing accessories. Inspect appliance power source periodically, and if damaged, have it repaired by an authorized service facility. Keep handles dry, clean, and free from oil and grease.
- Check Damaged Parts – Before further use of the appliance, a guard or other part that is damaged should be carefully checked to determine that it will operate properly and perform its intended function. Check for alignment of moving parts, binding of moving parts, breakage of parts, mounting, and any other condition that may affect its operation. A guard or other part that is damaged should be properly repaired or replaced by an authorized service center unless indicated elsewhere in this manual.
SAVE THESE INSTRUCTIONS
Additional Safety Warnings
WARNING: To reduce the risk of rebound (wide) injury, work going away from any nearby solid object such as wall, steps, large stone, tree, etc.
- GUARD – Do not use this appliance without guard attached.
- BLADE – Keep blade area clean.
- KEEP FACE, HANDS AND FEET CLEAR OF CUTTING AREA AT ALL TIMES. The rotating line performs a cutting function use care when trimming around screens and desirable plantings.
- KEEP ALL BYSTANDERS AWAY – at a safe distance from work area, especially children. MAKE SURE that other persons and pets are at least 100' (30 m) away.
- BEFORE LANDSCAPING OR TRENCHING, check for buried electrical cables.
- USE GREAT CARE when working close to solid objects and where necessary, do trimming by hand.
-
DAMAGE TO UNIT – If you strike or become entangled with a foreign object, stop appliance immediately, , check for damage and have any damage repaired before further operation is attempted.
-
DO NOT OPERATE portable electric appliances in gaseous or explosive atmospheres. Motors in these appliances normally spark, and the sparks might ignite fumes.
- STAY ALERT – Do not operate this unit when you are tired, ill, or under the influence of alcohol, drugs, or medication.
- DO NOT immerse appliance in water or squirt it with a hose.
- DO NOT allow any liquid to get inside it. If appliance does get wet, allow to dry for a minimum of 48 hours.
• DO NOT clean with a pressure washer. - DO NOT store the appliance on or adjacent to fertilizers or chemicals.
- DO NOT charge appliance in rain, or in wet locations.
- REPLACEMENT PARTS: When servicing use only identical replacement parts.
Additional Safety Information
WARNING: Never modify the power tool or any part of in damage or personal injury could result.
WARNING: ALWAYS use safety glasses. Everyday eyeglasses are NOT safety glasses. Also use face or dust mask if operation is dusty. ALWAYS WEAR CERTIFIED SAFETY EQUIPMENT:
• ANSI Z87.1 eye protection (CAN/CSA Z94.3),
• ANSI S12.6 (S3.19) hearing protection,
• NIOSH/OSHA/MSHA respiratory protection.
WARNING: Some dust contains chemicals known to state of California to cause cancer, birth defects or other reproductive harm. Some examples of these chemicals are:
• compounds in fertilizers,
• compounds in insecticides, herbicides and pesticides,
• arsenic and chromium from chemically treated lumber.
To reduce your exposure to these chemicals, wear approved safety equipment such as dust masks that are specially designed to filter out microscopic particles.
WARNING: Use of this tool can generate and/or expose dust, which may cause serious and permanent respiratory or other injury. Always use NIOSH/OSHA approved respiratory protection appropriate for the dust exposure. Direct particles away from face and body.
WARNING: Always wear proper personal hearing production that conforms to ANSI S12.6 (S3.19)
during use. Under some conditions and duration of use, noise from this product may contribute to hearing loss.
CAUTION: When not in use, place tool on its side on a stable surface where it will not cause a tripping or falling hazard. Some tools with a large battery pack will stand upright but may be easily knocked over.
ENGLISH
• Air vents often cover moving parts and should be avoided. Loose clothes, jewelry or long hair can be caught in moving parts.
The label on your tool may include the following symbols. The symbols and their definitions are as follows:
BPM.....beats per minute V.....volts
min ...... minutes
=== or DC......direct current .../min......per minute
RPM......revolutionsper minute
A......amperes
Hz ......hertz
W.....watts
Wh.....watt hours
n_0 .....no load speed n .....rated speed
⚠️ ......safety alert symbol
wearrespiratory protection
☐ .... wear eye protection
☐ Class II Construction (double insulated)
○ ....wearhearing protection
readall documentation
Hotsurface. Do not touch.
△.... avoid staring at light
\~ or AC......alternating current Ah......amphours
ASSEMBLY AND ADJUSTMENTS
WARNING: To reduce the risk of serious personal injury, turn unit off and remove the battery pack before making any adjustments or removing/installing attachments or accessories. An accidental start-up can cause injury.
Powerhead (Fig. B)
(DEWALT powerhead sold separately)
WARNING: To reduce risk of injury:
Before any use, be sure everyone using this product reads and understands all safety instructions and other information contained in the powerhead and attachment manuals.
- Never apply power without an attachment being properly mounted to the powerhead.
WARNING: To reduce the risk of serious personal injury, turn unit off and remove the battery pack before making any adjustments or removing/installing attachments or accessories. An accidental start-up can cause injury.
Your attachment is designed such that the powerhead can separate from the brush cutter attachment by turning the knob 6 counterclockwise, depressing the latching button 10 and gently pulling them apart by their poles 3, 6.
This should only be done with the power switch off and the battery pack removed. Inside the upper powerhead pole 6 is a mechanical coupling that will spin if the powerhead is turned on. This coupling can cause injury if contacted while the powerhead is operating.
NOTE: Ensure the attachment is fully engaged and the knob is fully tightened before operating. Check for proper engagement and tightness during use.
Assembling the Edger Attachment to the Powerhead (Fig. A, B, E)
- The upper powerhead pole 7 is equipped with three latching holes 8, 9, 10 for the latching button 10.
- When installing the edger attachment pole 3 into the upper powerhead pole 7, use the arrows 11 to align the latching button 10 with latching hole 8, as shown in Fig. B
NOTE: To properly engage the latching button 10 with the latching hole 8, slightly rotate the powerhead pole 7 and move it axially until the latching button engages the latching hole.
DO NOT insert the latching button into latching hole 9, or 10. Doing so will position the edger head in an incorrect orientation which could create a safety hazard. Latching holes 9 and 10 are for other attachments.
- Turn the knob 6 to secure the attachment.
- When properly assembled, it should look like Fig. E. If it does not, do not use, disassemble and re-align the edger attachment 3 so the latching button 10 engages with latching hole 8 as shown in Fig. B.
WARNING: Always check to make sure that the knobs are completely secured in place. If the knobs are not completely secured it could result in the assemblies becoming disconnected creating a hazardous condition. Periodically check the connections to ensure that the knobs are completely secured in place.
Blade (Fig. C, D)
WARNING: To reduce the risk of serious personal injury, turn unit off and remove the battery pack before making any adjustments or removing/installing attachments or accessories, or prior to cleaning. An accidental start-up can cause injury.
WINING: Wait for blade to come to complete stop.
The blade 1, spacer 12 and a hex head nut 14 should be attached to your edger in the order shown. Please check that the blade has been properly mounted before using your edger. The edger blade has two wear indicators that show when blade needs to be replaced.
NOTE: To increase blade life, keep initial cutting depth at minimum and increase depth setting as blade wears.
Blade Replacement
WARNING: Use gloves and proper eye protection. Turn the anger on its side. Be careful of sharp edges of blade. WARNING: Blade rotates momentarily after the switch is caused.
- Remove battery.
- Remove edger attachment from the powerhead. Reverse the steps under Assembling the Edger Attachment to the Powerhead.
Removing the Cutting Blade
-
Align the shaft bushing hole 16 with the locking rod slot 17 and insert a locking rod 4 into the bushing hole as shown in Fig. C Hold the locking rod 4 in position.
-
While holding the locking rod 4, remove the flange nut 14 by turning it clockwise with a 13 mm or 17 mm wrench (not supplied) as shown in Fig. D
- Remove the blade spacer 12 and the blade 1 as shown in Fig. D. Examine all pieces for damage and replace if necessary.
Installing the New Cutting Blade (Fig. D)
- Install new blade 1 on shoulder of the blade cutter shaft bushing 19 as shown in Fig. D.
- Align the shaft bushing hole 16 with the locking rod slot 17 and insert a locking rod 4 into the bushing hole.
- Hold the locking rod in position.
- Install the blade spacer 12 on the blade so that the wide flat side faces the blade.
- Install flange nut 14 with the flange against the blade spacer 12 and securely tighten with a 13 mm or 17 mm wrench (not supplied).
- Tighten nut counterclockwise against the blade while holding the locking rod:
- If using a torque wrench and an 13 mm or 17 mm socket tighten to: 325 -335 in lb, 27 - 28 ft. lb, 37 - 38 Nm.
- Without a torque wrench, use a 13 mm or 17 mm closed-end or socket wrench, turning the nut until the blade retainer is snug against the shaft bushing. Ensure that the blade is installed correctly, then rotate the nut an additional 1/4 to 1/2 turn counterclockwise.
- Remove the locking rod from the locking rod slot 17.
Cut Depth Adjustment (Fig. A, E)
WARNING: To reduce the risk of serious personal injury, turn unit off and remove the battery pack before making any adjustments or removing/installing attachments or accessories, or prior to cleaning. An accidental start-up can cause injury.
The front wheel can be adjusted to allow a deeper or shallower cut, and to increase the life of the blade.
- Wait for blade to come to complete stop.
- Remove battery.
- Loosen the cut depth knob 2.
-
Slide the wheel up or down to the desired height. nOTE: Lowering the wheel will decrease the cutting depth. Rasing the wheel will increase the cutting depth. The recommend depth for edging is 1" (2.5 cm). nOTE: Thick overgrowth may drag on the guard. Reduce the cut depth to the minimum to help reduce this effect.
-
Tighten knob firmly.
Edge Guide (Fig. F)
The edge guide is useful for cutting a straight path along sidewalks.
OPERATION
WARNING: To reduce the risk of serious personal injury, turn unit off and remove the battery pack before making any adjustments or removing/installing attachments or accessories. An accidental start-up can cause injury.
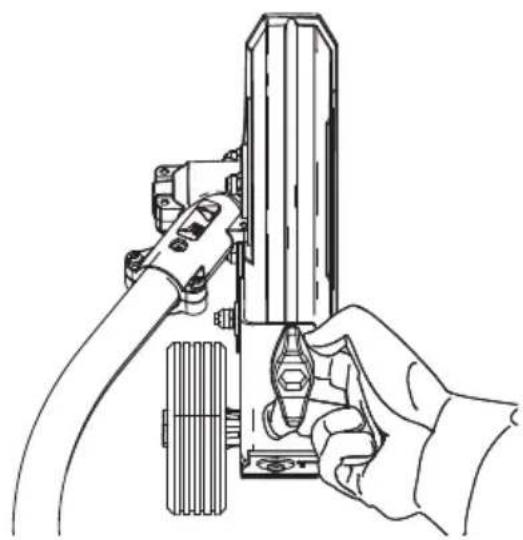
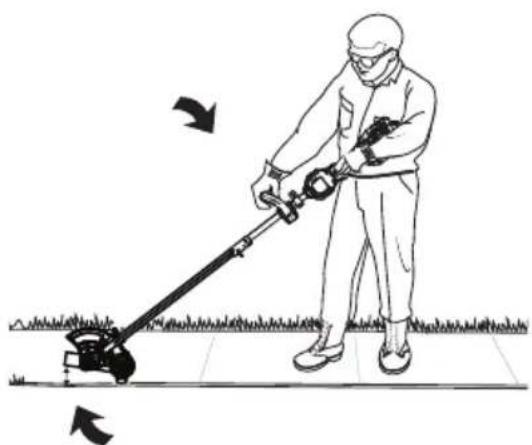
Proper Hand Position (Fig. G)
WARNING: To reduce the risk of serious personal injury, ALWAYS use proper hand position as shown.
WARNING: To reduce the risk of serious personal injury, ALWAYS hold securely in anticipation of a sudden reaction.
WARNING: Hold the tool using only the designated gripping surfaces: The powerhead handle and the auxiliary handle.
WARNING: Do not use the pole as a gripping surface.
Proper hand position requires one hand on the powerhead handle 15 and one hand on the auxiliary handle 16.
Usage
- Set cut depth at 1" (2.5 cm)", refer to Assembly and Adjustments Instructions.
- Before starting the edger, line up the tool so the edge guide rests against the edge of the paved surface. The wheel should be on the paved surface when edging.
NOTE: When there is heavy overgrowth of grass over the paved surface it may drag on the guard. An initial cut may be required with the edger on the grass side. This may require reducing the depth of cut (refer to Cut Depth Adjustment instructions).
- To avoid kickback of edger, tilt the handle down so the blade is above the ground.
- Turn switch ON and allow blade to spin without moving tool.
- Slowly lift the handle to lower the blade, finding the edge of the paved surface and start edging. Then move tool forward slowly along edge of paved surface, keeping the edge guide pressed lightly against the pavement edge.
- For the first edging each season, it is best to move forward slowly because grass is thickest then. Subsequent edging will be completed more rapidly. If the tool slows down, back it up an inch or two until the blade comes up to normal speed. During edging some sparks may be generated from hitting stones. This is normal. Do not attempt to edge when the grass or soil is wet or moist—for electrical safety and to prevent clogging of the blade chamber. If you must edge under conditions that cause the blade chamber to become clogged, release trigger, wait for blade to come to complete stop. Remove battery pack and remove clogged material with a stick. To continue to operate the tool in a clogged condition will seriously overload the motor.
CAUTION: Do not attempt to unclog the blade diameter by dropping or tapping the tool on the ground. This can damage the unit. Keep hands clear of edge guide and blade when cleaning as these wear to a very sharp point during edging.
Landscaping/Trenching
WARNING: Before Landscaping or Trenching, inspect a unsure there are no exposed or buried cables, pipes or other objects that may create a hazard or interfere with operating the edger. Set depth to only
ENGLISH
that required for the job. Do not overload. If tool slows, pull back slightly and wait until blade comes up to normal speed.
MAINTENANCE
WARNING: To reduce the risk of serious personal injury, turn unit off and remove the battery pack before making any adjustments or removing/installing attachments or accessories. An accidental start-up can cause injury.
Your DEWALT power tool has been designed to operate over a long period of time with a minimum of maintenance. Continuous satisfactory operation depends upon proper tool care and regular cleaning.
Cleaning
WARNING: Blow dirt and dust out of all air vents with dry air at least once a week. To minimize the risk of eye injury, always wear ANSI Z87.1 approved eye protection when performing this procedure.
WARNING: Never use solvents or other harsh chemicals for cleaning the non-metallic parts of the tool. These chemicals may weaken the plastic materials used in these parts. Use a cloth dampened only with water and mild soap. Never let any liquid get inside the tool; never immerse any part of the tool into a liquid.
Storage
DANGER: Remove the battery. Wait for blade to come to complete stop.
Remove and clean any debris from the outside of the edger and inside of guard before storage. Refer to MAINTENANCE section. If necessary, the edger may be stored by hanging on a hook by its handle.
CAUTION: Do not hang edger on the switch trigger. NOTICE: Do not store the tool on or adjacent to fertilizers or chemicals. Such storage can cause rapid corrosion.
Preventing Corrosion
Fertilizers and other garden chemicals contain agents that greatly accelerate the corrosion of metals. If you use the tool in areas where fertilizers or chemicals have been used, the tool should be cleaned immediately afterwards. Wipe all exposed parts with a damp cloth. You may lubricate only metal parts with a light petroleum based oil. When cleaning, DO NOT immerse tool in water or squirt it with a hose.
Accessories
WARNING: Since accessories, other than those offered by DEWALT, have not been tested with this product, use of such accessories with this tool could be hazardous. To reduce the risk of injury, only DEWALT recommended accessories should be used with this product.
Recommended accessories for use with your tool are available at extra cost from your local dealer or authorized service center. If you need assistance in locating any accessory, please contact DEWALT call 1-800-4-DEWALT (1-800-433-9258) or visit our website:www.dewalt.com.
Repairs
The charger and battery pack are not serviceable. There are no serviceable parts inside the charger or battery pack.
WARNING: To assure product SAFETY and RELIABILITY, repairs, maintenance and adjustment (including brush inspection and replacement, when applicable) should be performed by a DEWALT factory service center or a DEWALT authorized service center. Always use identical replacement parts.
Register Online
Thank you for your purchase. Register your product now for:
- WARRANTY SERVICE: Registering your product will help you obtain more efficient warranty service in case there is a problem with your product.
- CONFIRMATION OF OWNERSHIP: In case of an insurance loss, such as fire, flood or theft, your registration of ownership will serve as your proof of purchase.
• FOR YOUR SAFETY: Registering your product will allow us to contact you in the unlikely event a safety notification is required under the Federal Consumer Safety Act. - Register online at www.dewalt.com
Three Year Limited Warranty
DEWALT will repair or replace, without charge, any defects due to faulty materials or workmanship for three years from the date of purchase (two years for batteries). This warranty does not cover part failure due to normal wear or tool abuse. For further detail of warranty coverage and warranty repair information, visit www.dewalt.com or call 1-800-4-DEWALT (1-800-433-9258). This warranty does not apply to accessories or damage caused where repairs have been made or attempted by others. THIS LIMITED WARRANTY IS GIVEN IN LIEU OF ALL OTHERS, INCLUDING THE IMPLIED WARRANTY OF MERCHANTABILITY AND FITNESS FOR A PARTICULAR PURPOSE, AND EXCLUDES ALL INCIDENTAL OR CONSEQUENTIAL DAMAGES. Some states do not allow limitations on how long an implied warranty lasts or the exclusion or limitation of incidental or consequential damages, so these limitations may not apply to you. This warranty gives you specific legal rights and you may have other rights which vary in certain states or provinces. In addition to the warranty DEWALT tools are covered by our:
1 YEAR FREE SERVICE
DEWALT will maintain the tool and replace worn parts caused by normal use, for free, any time during the first two years. after purchase.
2 YEARS FREE SERVICE ON DEWALT BATTERY PACKS
DC9071, DC9091, DC9096, DC9182, DC9280, DC9360, DCB120, DCB122, DCB124, DCB127, DCB201, DCB203BT, DCB207, DCB361
3 YEARS FREE SERVICE ON DEWALT BATTERY PACKS
DCB200, DCB203, DCB204, DCB204BT, DCB205, DCB205BT, DCB206, DCB208, DCB230, DCB240, DCB606, DCB609, DCB612, DCB615
NOTE: Battery warranty voided if the battery pack is tampered with in any way. DEWALT is not responsible for any injury caused by tampering and may prosecute warranty fraud to the fullest extent permitted by law.
90 DAY MONEY BACK GUARANTEE
If you are not completely satisfied with the performance of your DEWALT Power Tool or Nailer for any reason, you can return it within 90 days from the date of purchase with a receipt for a full refund – no questions asked.
LATIN AMERICA: This warranty does not apply to products sold in Latin America. For products sold in Latin America, see country specific warranty information contained in the packaging, call the local company or see website for warranty information.
FREE WARNING LABEL REPLACEMENT: If your warning labels become illegible or are missing, call 1-800-4-DEWALT (1-800-433-9258) for a free replacement.
FRAnÇAis
DC9071, DC9091, DC9096, DC9182, DC9280, DC9360, DCB120, DCB122, DCB124, DCB127, DCB201, DCB203BT, DCB207, DCB361
CONTRAT D'ENTRETIEN GRATUIT DE TROIS ANS SUR LES BLOC-PILES DEWALT
DCB200, DCB203, DCB204, DCB204BT, DCB205, DCB205BT, DCB206, DCB208, DCB230, DCB240, DCB606, DCB609, DCB612, DCB615
Eje Central Lázaro Cárdenas No. 18 - Local (55) 5588 9377 D, Col. Obrera
MERIDA, YUC
Calle 63 #459-A - Col. Centro (999) 928 5038
MONTERREY, N.L.
Av. Francisco I. Madero 831 Poniente - Col. (818) 375 23 13 Centro
PUEBLA, PUE
17 Norte #205 - Col. Centro (222) 246 3714
QUERETARO, QRO
Av. San Roque 274 - Col. San Gregorio (442) 2 17 63 14
SAN LUIS POTOSI, SLP
DC9071, DC9091, DC9096, DC9182, DC9280, DC9360, DCB120, DCB122, DCB124, DCB127, DCB201, DCB203BT, DCB207, DCB361
DCB200, DCB203, DCB204, DCB204BT, DCB205, DCB205BT, DCB206, DCB208, DCB230, DCB240, DCB606, DCB609, DCB612, DCB615
* Maximum initial battery voltage (measured without a workload) is 20, 60 or 120 volts. Nominal voltage is 18, 54 or 108. (120V Max* is based on using 2 D EWALT 60V Max* lithium-ion batteries combined.)
NOTE: The Bluetooth® word mark and logos are registered trademarks owned by the Bluetooth®, SIG, Inc. and any use of such marks by DEWALT is under license. Other trademarks and trade names are those of their respective owners.
NING: Use of any other battery packs may create a risk of injury and fire.