
HVC6463DA - Vacuum Cleaner HISENSE - Free user manual and instructions
Find the device manual for free HVC6463DA HISENSE in PDF.
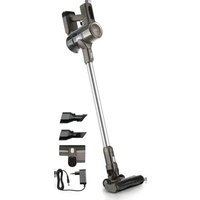


| Product Type | Vacuum Cleaner |
| Brand | Hisense |
| Model | HVC6463DA |
| Nominal Appliance Voltage | 25.2 V / 2000 mA |
| Nominal Power | 400 W |
| Nominal Adapter Voltage | 32 V / 450 mA |
| Battery Type | Lithium-ion |
| Runtime (Low Speed) | Up to 60 minutes |
| Runtime (Medium Speed) | Up to 35 minutes |
| Runtime (High Speed) | Up to 13 minutes |
| Number of Speeds | 3 (Low, Medium, High) |
| Filter Type | Washable Filter |
| Dust Bin Capacity | Not specified |
| Battery Charge Indicator | Digital |
| Foreign Object Indicator in Brush | Yes |
| Full Dust Bin Indicator | Yes |
| Included Accessories | Suction tube, flexible hose, 2-in-1 motorized brush, narrow nozzle, round brush, special "Beds" attachment, wall mount with adapter and power cord, 3 screws |
| Charging Method | On the docking station or via removable battery |
| Weight | Not specified |
| Dimensions | Not specified |
Frequently Asked Questions - HVC6463DA HISENSE
User questions about HVC6463DA HISENSE
0 question about this device. Answer the ones you know or ask your own.
Ask a new question about this device
Download the instructions for your Vacuum Cleaner in PDF format for free! Find your manual HVC6463DA - HISENSE and take your electronic device back in hand. On this page are published all the documents necessary for the use of your device. HVC6463DA by HISENSE.
USER MANUAL HVC6463DA HISENSE
7 OdaTOK 3a noCTeHnHa
8 SIneH npkaC o aanTep n Ka6en 3a HanojyBaHe
93aBpTKn
CKJIONYBAHbE HA ANAPATOT
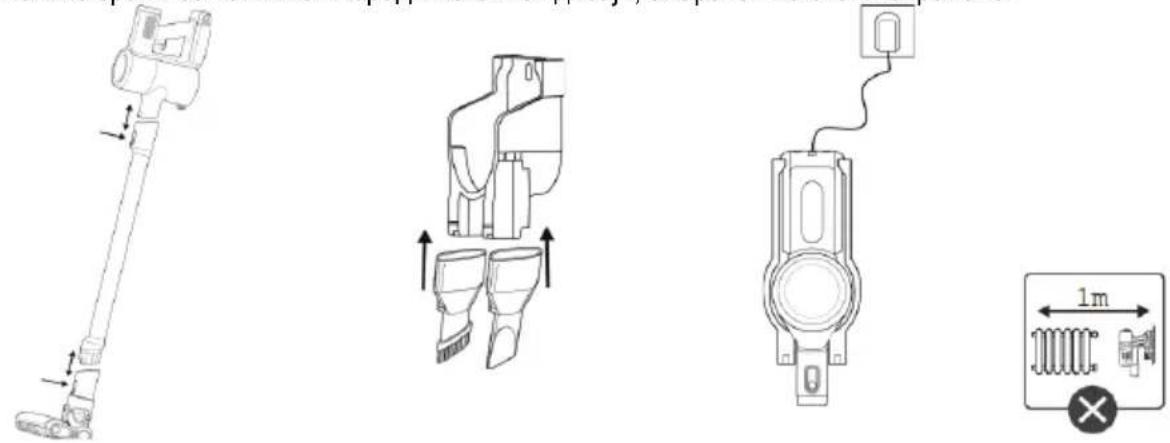
CocTabeTe rN cEeBKeIte n NOBp3eTe rO rOpHnOT dJIco MToOpHaTa eINHua, a DOJIHNOT dJIco CyeTkata 3a NODOT. Anapatot e npabunHO cKnoneH co Toa wTo anapatot e cBpCTo pniucbpCTeH do XJneboBITE. Co anapatot ce nCnpaUyBa n cTAnuata 3a noHHe hae Ha Koja Moke da ce nOcTaBaT Dba NOMaJn DoaToCu 3a cknaDnpaHe. CtaHnUata 3a noHHe Tpe6a da 6nDE noCTaBeHa ha HajMaJky 1 m OndaneueHoct od Koe 6nTo TeJIo wTO 3paUn co TOnnHa. Iopadn HerOBnOT dIn3ajH, anapatot He cTOn nCnpaBeHo.
KOPNCTEHE HA IPIPABOCMYKAJKATA
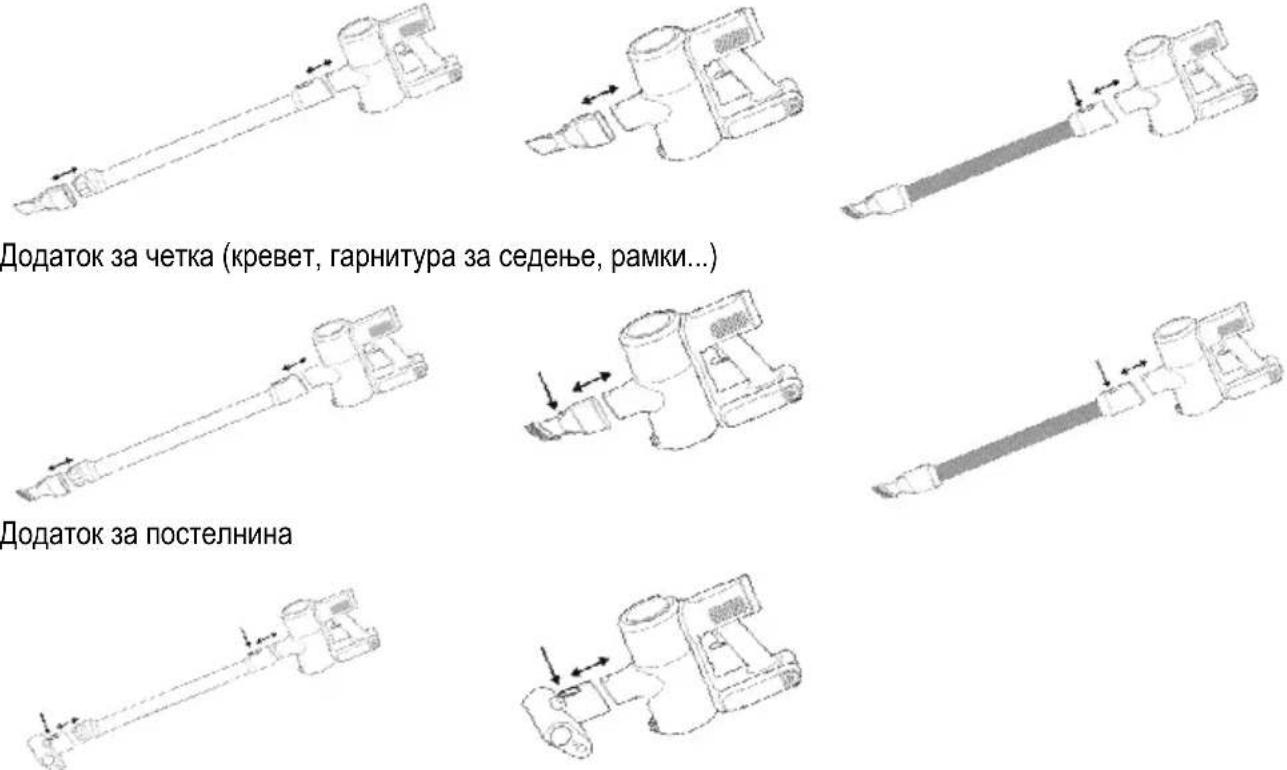
LcEKnTe MoKe Da Ce npnilarOdat No JeIb6, a YeTkata Ce npnKaUyBa Ha Koja 6nlo ZeBka, KaKo N DnpeKTHO Ha MOTOpHaTaeDInHua. PpIKnyOuTe 3a CmYkaHe nTo Taka Ce BkIoNyBaat Ha ZeBkata Ha npabocMykAJIkata Ha MOTOpHaTaeDInHua. PpITncheTe ro KonHTo Ha YETkata NII N ZeBkata 3a Da ro Ipomehnte DoaTOKOT no notpe6a.
YeKa 3a nOi: KopnCTeTe ja 3a CMyKaHbE Ha cekakOB TIN Ha nOi (cMyKaHbE cyBn IIOOBN).

ДоаТOKOT 3a TeCHи npocToP e HameHET 3a CmyKaHe Ha TeCHn TeUko DoCTaHn MeCTa (aRn, raphNtypn 3a ceDeIbe, najaKOBmpeXn, 3ad padJaTOpn...).
IOJIHEHE HA ANAPATOT
AdaanTepot n Ka6eIOT 3a nonHeBe ce Beke MOHTnpaHn BO cTaHncaTa 3a nonHeBe. Ako He cakate da ja noHNite npabocmykakata Ha cTaHncaTa 3a nonHeBe, I Pokpaj PpeDyPpeDyBaHaTa, Be MoJIme CneDeTe rN yNaTcBaTa 3a 6e36eNo OTcPaNyBaHe Ha aadTepot n Ka6eIOT 3a nonHeBe.
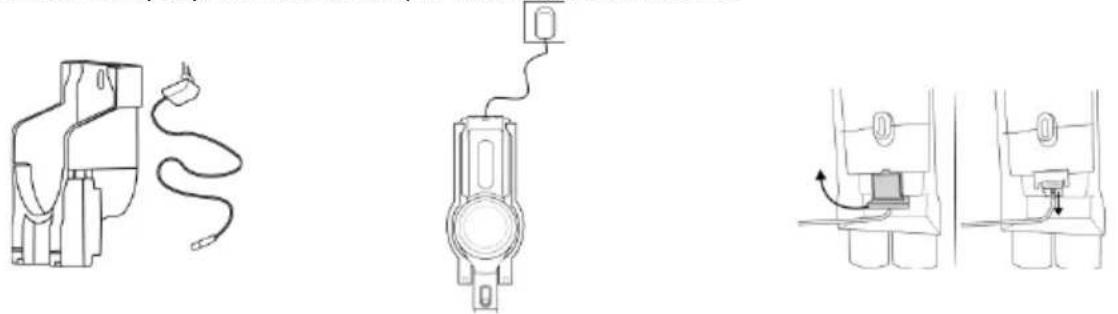
AnapaTOMoKe Da Ce NOnHn Ha CTaHnCata 3a NOnHeBe Hn KaJa 6BnO Dpyra NOBpUnHa. PnTnChTe ro KOnYeTo Ha 3aHaTcPana Ha npabocmykakata 3a 6e36eNHO da Ja n3BaJnte 6atepnjata od anapatot. Ha OBOJ NaHH, 6atepnjata MoKe Da Ce NOnHn OndenHo OD npabocmykakata.
3a 6e36eHocT, npenopayBame da ro noCTabnte anapatot Hajmky 1 metap noaneky od hajbnckoto TeNo 3paunco tonnHa 3a BpeMe Ha npoecOT ha nonHebe.
Anapatot He Moke da Ce Bknyu 3a Bpe Me Ha npoecOT Ha noJIheHe.
OTCTPAHYBAHbE HA BATEPNJATA OI PPABOCMYKAJKATA
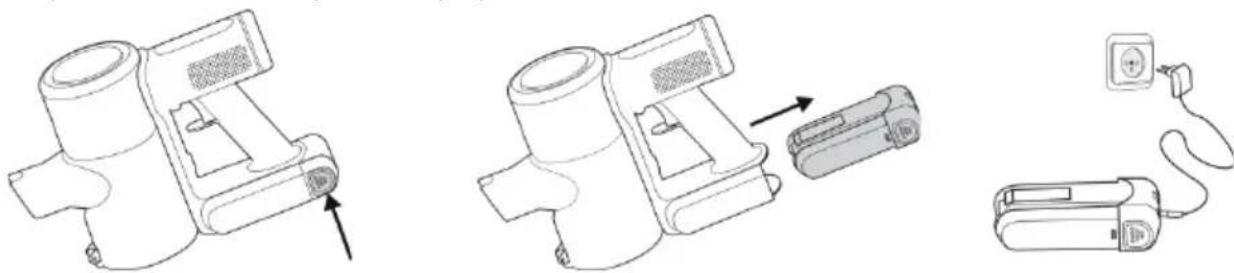
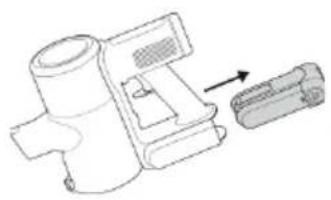
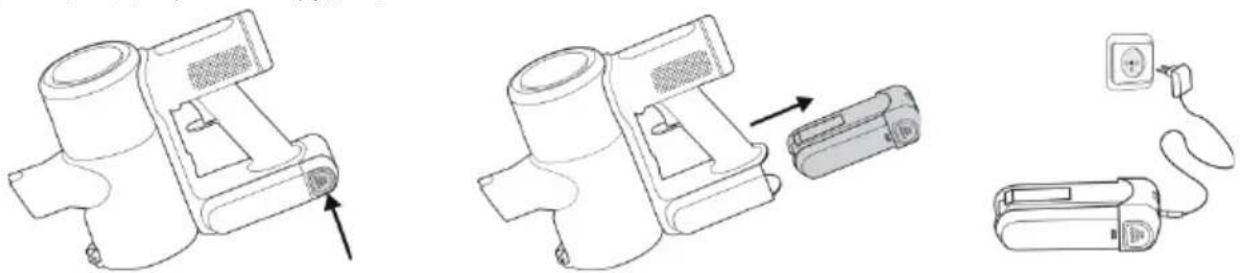
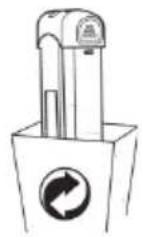
Press the button to open the dust container and remove the battery.
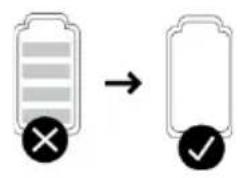
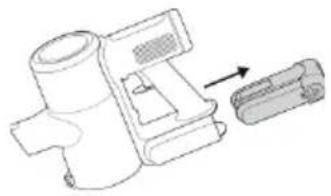
To safely remove the battery, make sure it is completely empty. If the battery of the device does not come out, follow the instructions in the illustrated manual.
OPERATING THE DUST CONTAINER
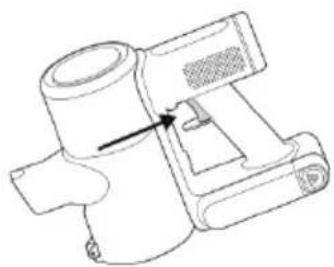
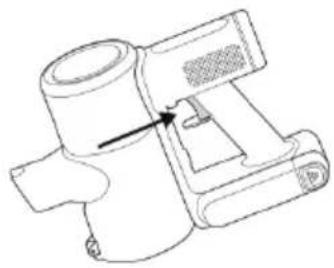
The on/off button is located on the handle of the motor unit.
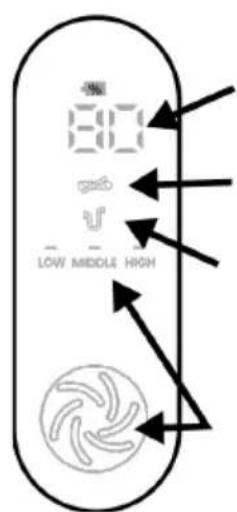
The device has a battery charge indicator. It shows the current battery level during use or during the charging process.
This icon appears if a foreign object is stuck or jammed in the brush. When this icon is activated, turn off the device and remove the foreign object.
This icon appears when the dust container is full. When this icon is activated, empty the dust container before using the dust container again.
The speed control is located on the battery charge indicator.
The device has three power levels: Low - 60 min. work / Medium (up to 35 min. work) / High (up to 13 min. work with one charge).
CLEANING THE DUST CONTAINER
Cleaning the dust container and the filter

There is a cap at the bottom of the dust container that can be removed for thorough cleaning of the filter with a special accessory. Cleaning the filter this way is recommended during cleaning with the dust container if the dust container is filled before you finish cleaning. We recommend cleaning the filter and the dust container after each use.
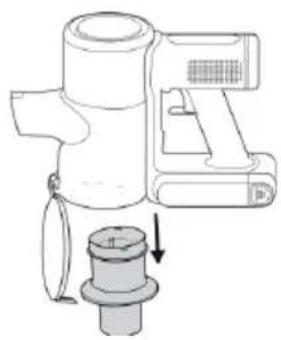
To empty the dust container, press the button on the right side of the handle of the motor unit. The bottom cap will open. Turn the inner cap counterclockwise to remove it. Properly replace the dust container and turn it in the opposite direction. Then close the cap. The dust container is correctly installed when you hear a click.
To remove the dust container, press the button in the middle of the inner side of the handle counterclockwise. The filter can be removed from the top side, while the filter cap can be removed by pressing the cap at the bottom of the dust container. When you put the dust container back on the motor unit, make sure all parts are correctly assembled and installed. Check that the front part of the dust container aligns with the grooves of the motor unit. The dust container is correctly installed when you hear a click.
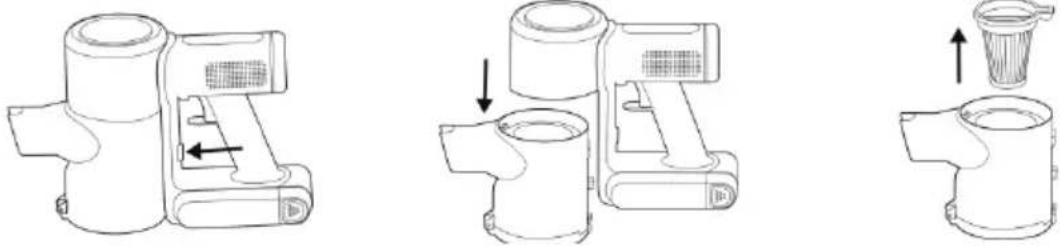
The dust container, filter, and filter frame are washable; however, make sure these parts are completely dry before reassembling them. Uninterrupted operation can only be ensured if the parts are dry; using wet parts may lead to malfunctions resulting from improper use. It is not recommended to dry the parts in direct sunlight.
IMPORTANT: Check the filter for damage. If the filter is damaged, it must be replaced; otherwise, the motor unit may be damaged by the vacuumed debris.
Cleaning the filter
Press the release button on the back of the dust container to remove the cyclone. Use scissors or another sharp tool to carefully cut along the marked line in the cyclone to remove the filter or the filter holder. Do not cut the filter holder, as this may damage the cyclone. Reinstall the cyclone by correctly aligning the arrows on the cyclone with the slots and press it back into place. The cyclone is correctly installed when it clicks into place and the arrows align with the slots on the dust container.
| Име на поживODOT: | Правосмужка |
| Номинален наонн на anapatot: | 25,2 V / 2000 mA / литунь-jонскь батерп |
| Номинална мokhoeст на anapatot: | 400W |
| Наон на щадперот: | 32 V: 450 mA |
General precautions
When using the vacuum cleaner always observe the following basic safety precautions: Carefully read this instruction manual and only use the appliance in accordance with the instructions herein. Before using the appliance for the first time, remove all protective film or plastics. // Never leave the appliance unattended during use. // Before using the appliance, carefully assemble all of its parts. // Only use the appliance indoors and in dry areas. // Only use the appliance with the parts recommended by the manufacturer. // Do not use the appliance if it has been dropped, if it is damaged, if it has been kept outdoors, or if it has been dropped or immersed in a liquid. // Regular cleaning can extend the appliance's useful life. // Make sure your hair, loose parts of your garments, fingers or other parts of the body do not come into contact with the vents or moving parts of the appliance. // The appliance complies with all required standards regarding electricity, and radio interference regulations. // The appliance is not intended to be used by children and persons with impaired physical or mental abilities. This appliance may be used by children aged 8 years and more, and by persons with reduced physical, sensory or mental capabilities or lack of experience and knowledge, if they are supervised during the use of the appliance or if they have been provided relevant instructions regarding the use of the appliance in a safe way, and they understand the hazards involved. Keep children under supervision while they are using the appliance and make sure they do not play with it. // Children should not perform any cleaning or maintenance tasks on the appliance, unless they are older than 8 years, and they do so under supervision. // Switch off the appliance after use.
Danger
Do not immerse the main unit/appliance housing or the charging base in water or any other liquid and do not rinse them under running water.
Special warnings
Before connecting the appliance or the charging base with the power cord to the power mains, make sure the indicated voltage matches the voltage of the power mains in your home. Do not use a damaged vacuum cleaner or a damaged charging base (or adapter, depending on your vacuum cleaner model). If the charging base (or adapter) is damaged, replace it only with an original spare part in order to avoid danger. A transformer is integrated into the adapter. Removal and replacement of the adapter with another one are not allowed as this may lead to a dangerous situation. Only charge the vacuum cleaner with the supplied adapter and charging base. The adapter may heat up during charging. This is a normal occurrence (depending on your model, if it has an adapter). Switch off the appliance during charging. Never use the vacuum cleaner without filters or filtering unit in place. The exhaust vents may not be blocked during vacuum cleaning. Only use the appliance for household purposes and indoors. Keep the suction vents clean and free in order to ensure optimum and unimpeded suction power of the appliance. It is highly recommended to regularly clean the open parts of the suction hose, and to remove dust, hair, or anything else that may block the airflow. Before cleaning the support or the charging base, unplug it from the power socket. Never use the vacuum cleaner to clean up embers or filings, cigarette butts,
matches, liquids (e.g. water, carpet cleaning foam), or sharp or pointed objects (broken glass etc.). Keep the suction tube or the open part of the appliance away from your face and body. Never use the appliance to vacuum construction material (such as fine sand, lime, cement powder, toner dust etc.). This can cause damage to the appliance.
Problems and solutions
| Problem | Possible reason | Solution |
| Not working. | The battery is dead. The handy VC is not assembled correctly. | Charge. Assemble the handy VC correctly. |
| Suction power has decreased. | The dust cup is full. Block in filter. Block in the air inlet tunnel or on the roller of electrical brush. | Pour out the dust. Clean or change filter. Clean the electrical brush. |
| The VC is not charging. | The charger is not connected on socket. The connector of charger is not connected to the hole of base body. The handy VC is not assembled to the body. | Connect the charger on socket. Connect the charger with base body of VC. Assemble the handy VC on body. |
| Use very short time after charging. | Not enough charging time. The battery is aging. | Charge according to instruction. Change the battery. |
Environment
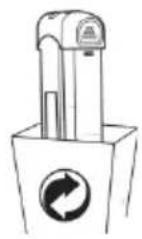
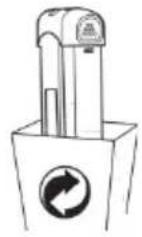
Do not throw away the appliance with the normal household waste at the end of its life. Hand it in at an official collection point for recycling. By doing this, you help to preserve the environment.
This appliance is marked according to the European directive 2012/19/EU on Waste Electrical and Electronic Equipment (WEEE). This guideline is the frame of a European-wide validity of return and recycling on Waste Electrical and Electronic Equipment.
Guarantee & service
If you need information or if you have a problem, please contact the Hisense Customer Care Centre in your country (the phone number is in the worldwide guarantee leaflet). If there is no Customer Care Centre in your country, go to your local Hisense dealer or contact the Service department of Hisense domestic appliances.
Note: The warranty on the battery of the vacuum cleaner is 12 months.
For personal use only!
For easier transport, some appliance parts are packed separately and safely placed in the main packaging unit. Before first use, read and observe the instructions for assembly and safe use.
Due to its design, the appliance is not free-standing. Therefore, we recommend safe placement on the charging station. The appliance is intended for household use, for dry vacuum cleaning.
APPLIANCE PARTS
1 Housing with motor unit, battery, and dust bin
2 Suction tube
3 Flexible hose
4 2-in-1 motorized brush
5 Narrow nozzle
6 Dust attachment
7 Bedding attachment
8 Wall holder with adapter and power cord
9 3 screws
APPLIANCE ASSEMBLY
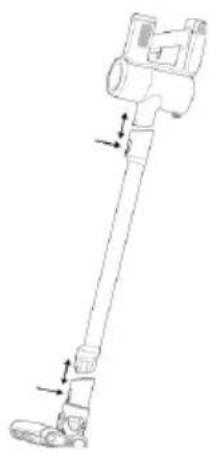
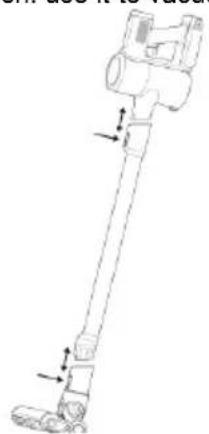
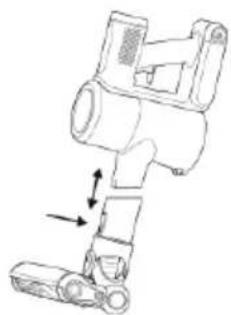
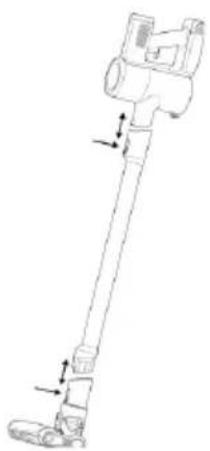
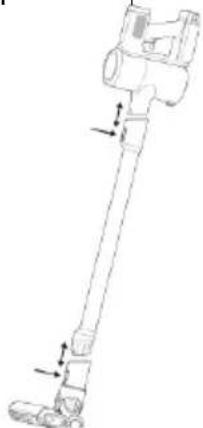
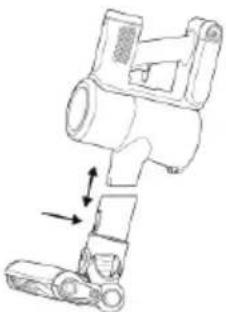
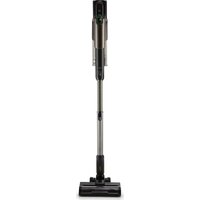
Assemble the tubes and connect the upper part to the motor unit and the lower part to the floor brush. The appliance is correctly assembled when it is firmly attached all the way to the grooves.
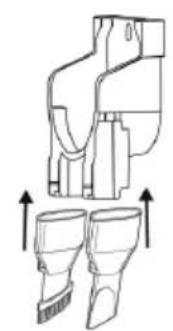
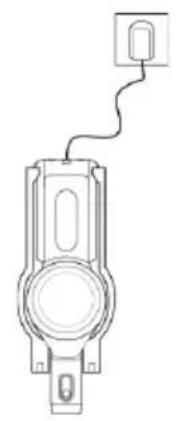
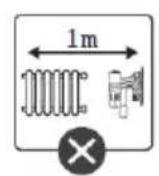
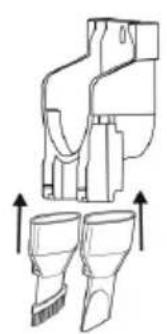
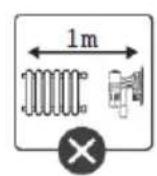
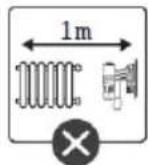
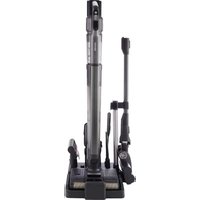
Also supplied with the appliance is the charging station onto which two smaller attachments may be placed for storage. The charging station should be placed at least 1 m away from any heat-radiating body. Due to its design, the appliance is not free-standing.
USE OF THE VACUUM CLEANER
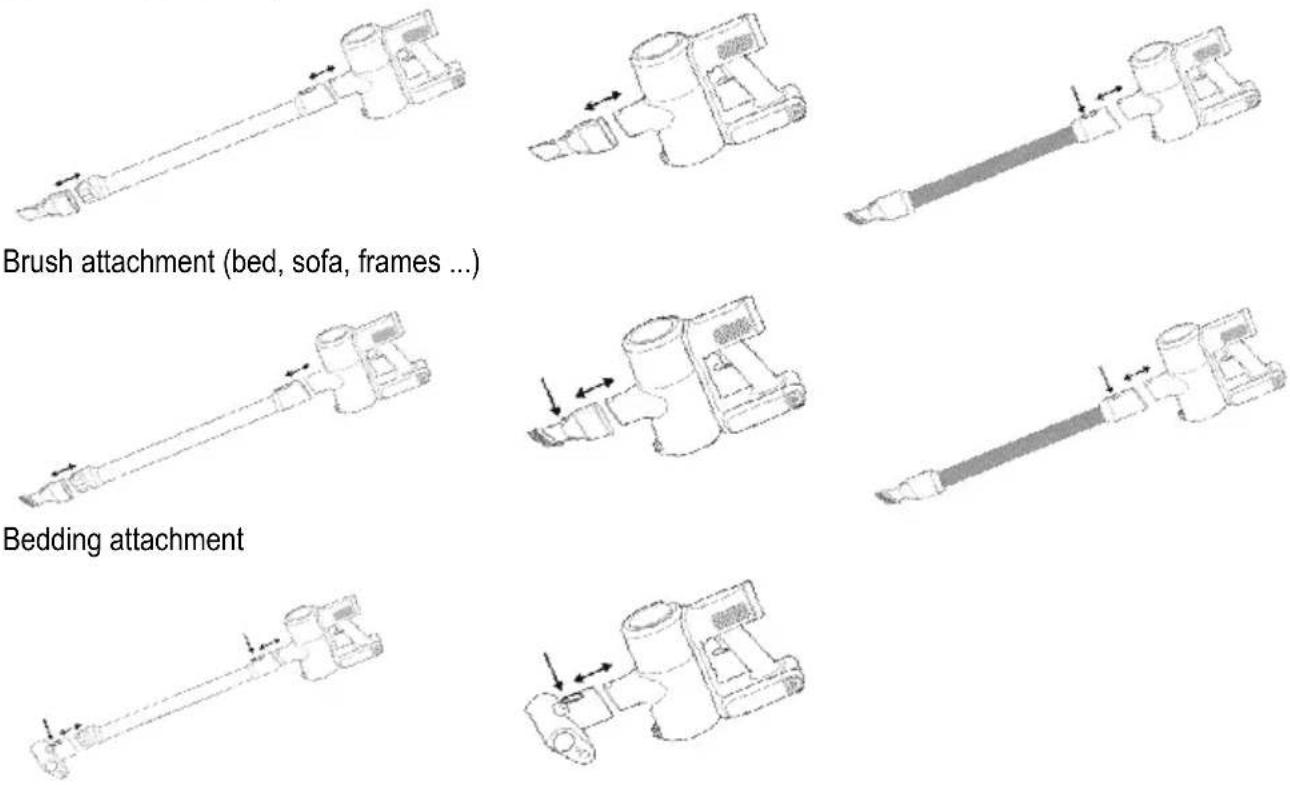
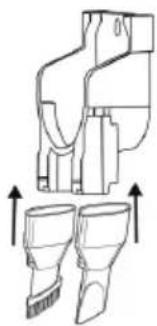
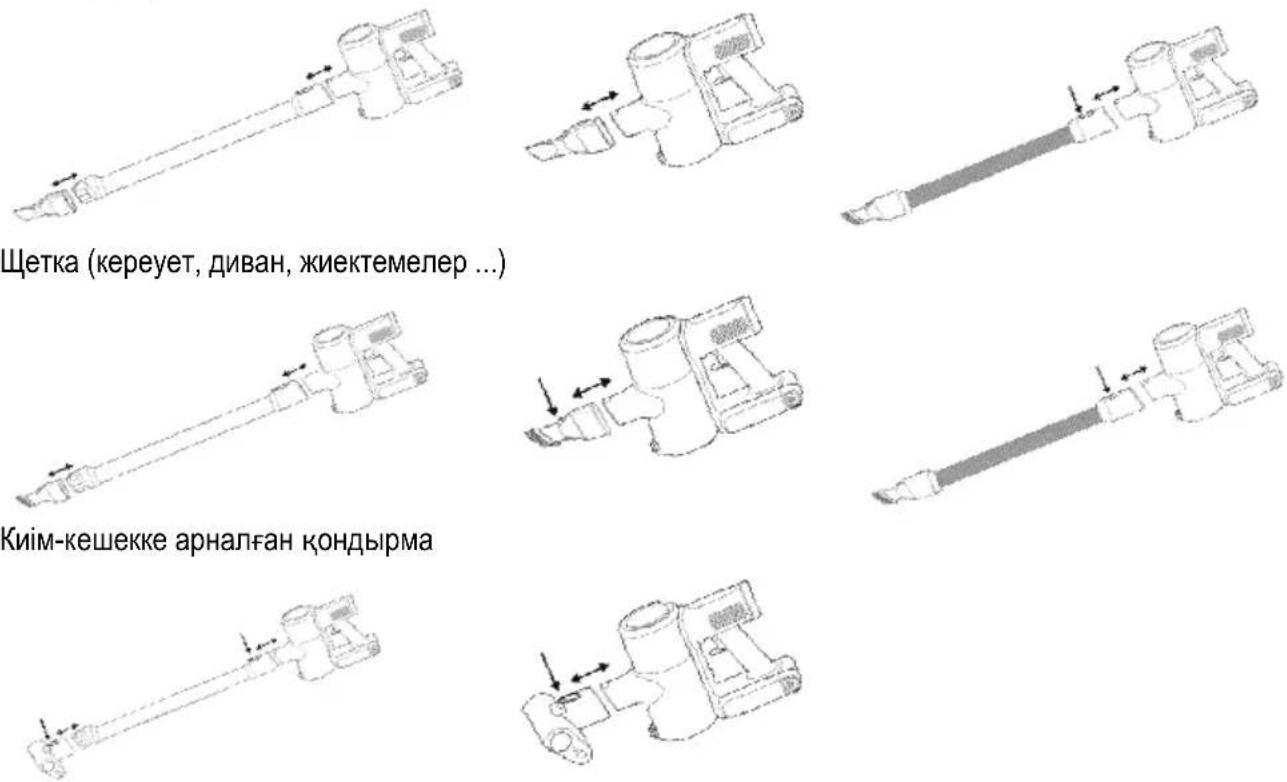
Tubes can be adjusted as desired, and the brush fits on any tube, as well as directly onto the motor unit. Vacuuming attachments also fit on both the vacuuming tube and the motor unit. Press the button on the brush or the tube to change the attachment as required.
Floor brush: use it to vacuum any type of flooring (vacuum cleaning dry flooring).
The narrow nozzle attachment is intended for vacuuming narrow hard-to-reach spots (corners, sofa, spider webs, behind the radiators ...).
CHARGING THE APPLIANCE
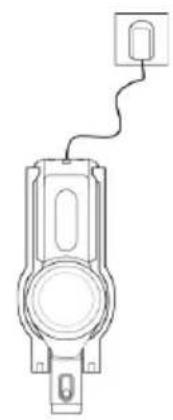
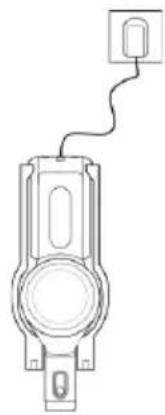
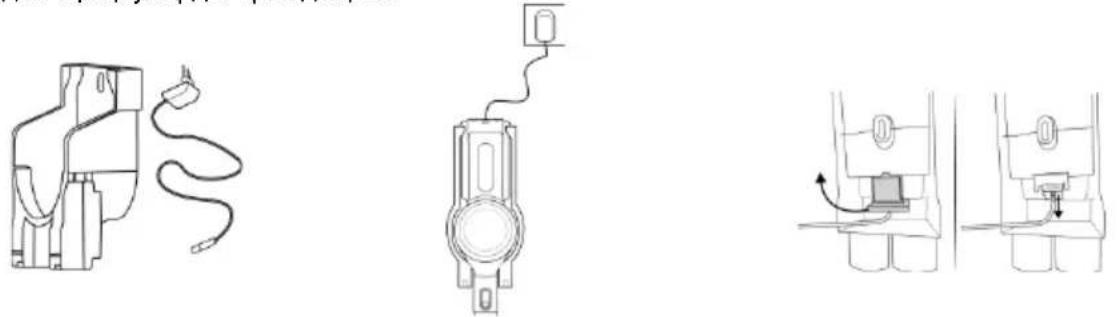
Adapter and the charging cord are already installed in the charging station. If you do not wish to charge the vacuum cleaner on the charging station, despite the warnings, please observe the instructions for safe removal of the adapter and charging cord.
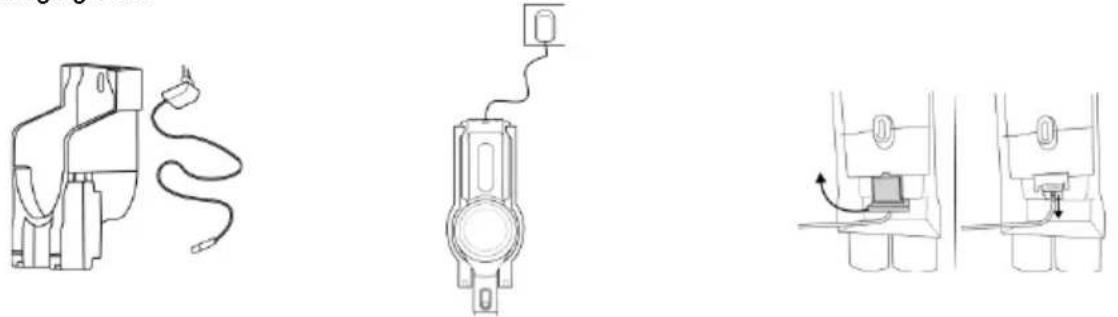
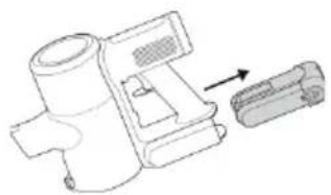
The appliance can be charged on both the charging station and any other surface. Press the button on the back of the vacuum cleaner to safely remove the battery from the appliance. This way, the battery can also be charged separately from the vacuum cleaner.
For safety, we recommend placing the appliance at least 1 metre away from the nearest heat-radiating body during the charging process.
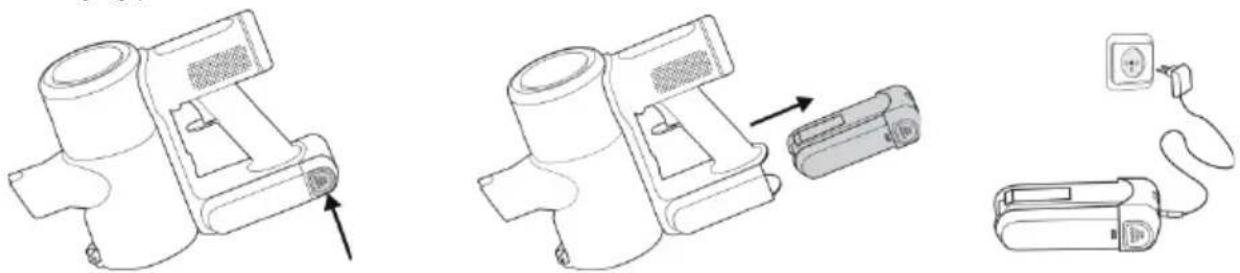
Removing the battery from the vacuum cleaner
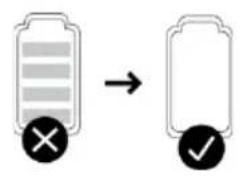
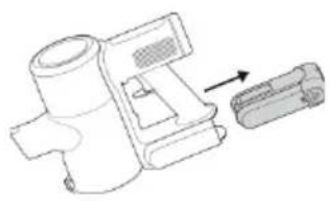
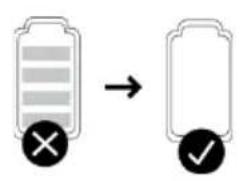
Before discarding the vacuum cleaner, please remove the battery.
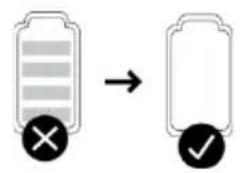
To safely remove the battery, make sure it is completely empty. If the appliance battery is not removable, observe the instructions in the pictorial instructions booklet.
The on/off button is located on the motor unit handle
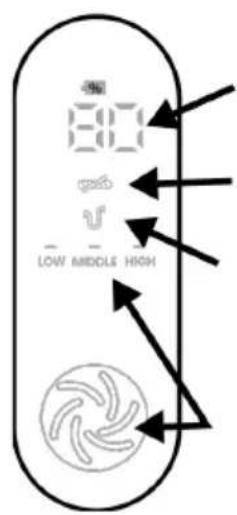
The appliance has a digital battery charge indicator. It indicates the current battery charge during use or during the charging process.
This icon lights up if a foreign object is lodged or entangled in the brush. When this icon is lit, locate and remove the foreign object.
This icon lights up when the dust bin is full. When this icon is lit, empty the bin before using or resuming the use of the vacuum cleaner.
The speed control button is located on the battery charge indicator. The appliance has three vacuuming speeds:
Low - up to 60 min. of operation / medium (up to 35 min. of operation) / High (up to 13 min. of operation on a single charge)
CLEANING THE VACUUM CLEANER
Cleaning the dust bin and the filter
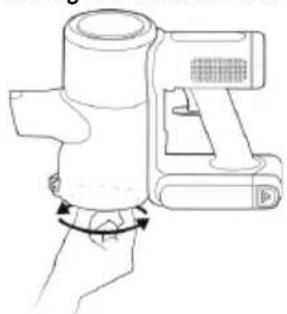
There is a knob on the bottom part of the dust bin that can be rotated to partially clean the filter by means of a special attachment. Cleaning the filter in this way is recommended during vacuum cleaning if the dust bin is full before you are done with the cleaning. We recommend cleaning the filter and the dust bin after each use.
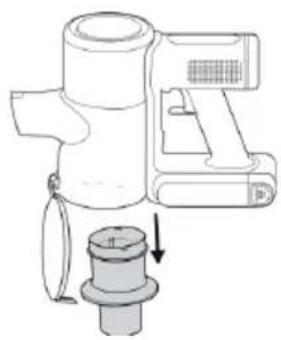
To empty the dust bin, pull the lever on the right-hand side of the motor unit handle. The bottom part of the cover will open. Rotate the inner part of the large filter to the left to remove it. Correctly replace the dust bin and rotate it in the opposite direction. Then, close the cover. The dust bin is correctly placed once you hear a click.
To remove the dust bin, push the button in the middle of the inner side of the handle to the left. The filter can be removed from the top side, while the filter container can be removed by pressing on the button on the rear bottom part of the dust bin. When replacing the dust bin onto the motor unit, make sure all parts are correctly assembled and installed. Make sure the two plugs on the dust bin's front part are aligned with the grooves on the motor unit. The dust bin is correctly placed once you hear a click.
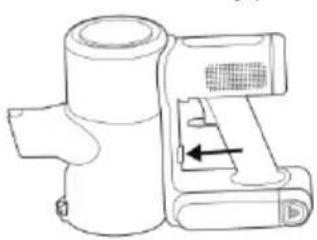
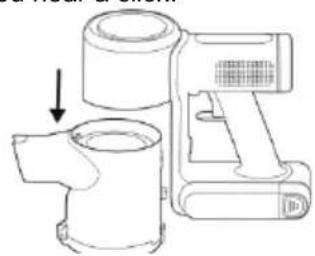
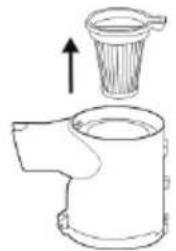
The dust bin, the filter, and the filter frame are washable; however, make sure these parts are completely dry before reassembling them. Flawless operation can only be ensured if the parts are dry; failure to dry the parts could lead to problems resulting from incorrect use. Drying the parts in direct sunlight is not recommended.
Clean the filter carefully to prevent tearing it. If the filter is damaged, it must be replaced; otherwise, the debris you are vacuuming may damage the motor unit.
Cleaning the brush
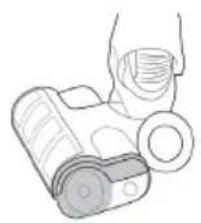
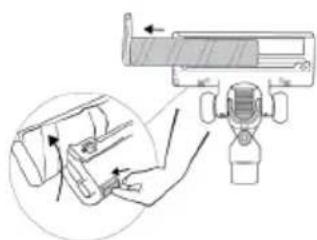
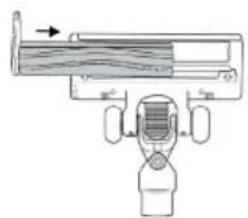
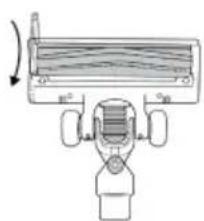
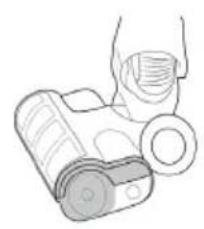
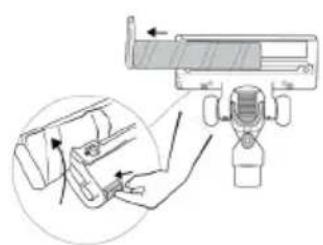
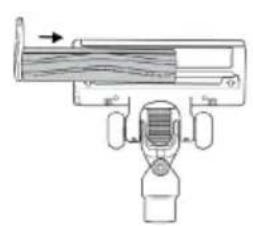
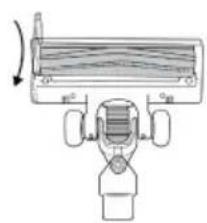
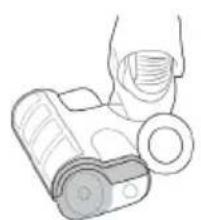
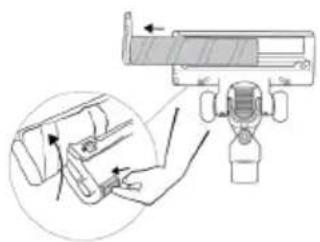
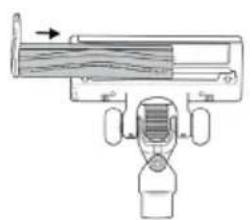
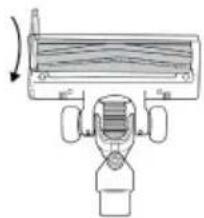
Press the small button on the rear part of the brush to remove the roller. Use scissors or some other blade to carefully cut along the groove in the roller to remove any fabric or hair entangled on the roller. Do not pull on the entangled threads, as this may damage the bristles on the roller. Replace the roller by correctly inserting the side of the roller into the groove and fasten it. The roller is correctly in place when it latches in and the outer part sits firmly inside the brush.
| Product name: | Vacuum cleaner |
| Appliance nominal voltage: | 25,2 V / 2000 mA / lithium-ion batteries |
| Appliance nominal power: | 400W |
| Adapter voltage: | 32 V: 450 mA |
General notes
Do not immerse the body of the vacuum cleaner in water or other liquids, and do not rinse it under water.
Special instructions
Before connecting the appliance to the mains, make sure that the voltage indicated on the rating plate corresponds to that of the mains. Do not use the vacuum cleaner or the charging base (or adapter, depending on the model) if they are damaged. If the charging base (or adapter) is damaged, replace it only with an original spare part to prevent danger. The adapter contains a transformer. Disassembling the adapter or replacing it with another one is not allowed, as this may lead to a dangerous situation. Charge the vacuum cleaner only with the adapter for the charging base from the kit. The adapter may heat up during use. This is normal. (Depending on the model, if there is an adapter). Turn off the appliance during charging. Never use the vacuum cleaner if the filter is missing or if the filter cover is not in place. The ventilation openings should not be blocked during operation of the appliance. Use the appliance only for household purposes and in enclosed spaces. Keep the ventilation openings clean to ensure optimal and unobstructed ventilation. It is strongly recommended to clean
the removable parts of the brush regularly and to remove hair, lint, and other things that could block the airflow. Before storing the appliance and the charging base, remove them from the socket. Never use the vacuum cleaner to collect flammable liquids, gases, acids, liquids (water, oil from detergents), or sharp objects (broken glass, etc.). The brush and the open part of the appliance should be kept away from your face and body. Do not use the appliance to collect construction materials (plaster, cement, toner dust, etc.). This may damage the appliance.
Troubleshooting
| ПюбLEM | Възможна рpreciина | Реценье |
| He paBOTи. | БаTERпЯТа e ИЗTOSUЕнa. РьЧИТа прахOCмУКачka He e сгЛобЕнa правилно. | Зареде. СгЛобЕTe рьчНа трахOCмУКачka правилно. |
| СиЛATA Na ВсмУКВанe e habаляla. | TopбИчКATA 3a пax e nbЛнa. ФиNTьрВТ e БлOKИран. БлOKИран e канДВТ 3a ВхОДЯШьЗДух иli рОлЕрВТ Ha eЛeKТprUeCKATAЧETКa. | Отстранete прахa. Почистete по Смение ФиNTьрa. Почистete e ЛeKТprUeCKATA ЧETКa. |
| ПрахOCмYКauчКATA He ce 3apexДа. | ЗаряДНOTO ySTPoICTBO He e CBbP3aHо С КOLTAKТа Ha eЛeKТprUeCKATA Мржа. КоЕКТOPВТ Ha 3apяДНOTO ySTpoICTBO He e CBbP3aH c ИЗВODa Ha 6a3aTа 3a Заржданe. РьЧИТа прахOCмYКaчka He e ГロБ�нa С Корпуca. | Свьржete заряДНOTO ySTpoICTBO c КоТаКТа Ha eЛeKТprUeCKATA Мржа. Свьржete заряДНOTO ySTpoICTBO c Бa3aTа 3a 3apexДaHе Ha прахOCмYКaчka СгЛобete рьчНа трахOCmYKaчka С корпуca. |
| РавOTи 3a MнOTO Кратko BpeMe спeД ЗapexДaнeto. | ВрemeTo 3a 3apexДaHе He e OCTaTbUHо. Врeme. БaTERпЯТa OCTAPЯВa. | Сmeneteя според ИнструкцINTE. Зареде 6baterяta. |
Environment
Do not dispose of the appliance with normal household waste at the end of its life. Dispose of it at a collection point for recycling. This way you will help protect the environment.
This appliance is marked in accordance with European Directive 2012/19/EU regarding the disposal of used electrical and electronic equipment (WEEE).
This marking indicates the possibility of returning and recycling used electrical and electronic equipment throughout Europe.
Warranty and Service
If you need additional information or have problems with the appliance, please contact the Hisense customer service center in your country (the phone number is in the warranty booklet for the international warranty of the appliance). If there is a customer service center in your country, contact your local Hisense representative or contact a specialized service for Hisense household appliances.
Note: The warranty for the battery of the vacuum cleaner is 12 months.
For household use only!
For easier transport, some parts of the appliance are packed separately and placed safely in the main package.
Before first use, read and follow the instructions for installation and safe use.
The device is not free-standing. This prevents unsafe positioning of the charging station. The device is intended only for dry cleaning for home use.
PARTS OF THE DEVICE
1 Body with locking block, 2 Dust container 3 Locking button for battery and compartment for filter 4 Motor with fan 5 Screen cover 6 Handle for dust control 7 Attachment for crevice 8 Wall bracket with adapter and 9 Screw for securing cable
ASSEMBLY OF THE DEVICE
First, attach the upper part to the locking block and the lower part to the dust container. The device is correctly assembled if it is securely fastened in the brackets.
The device comes with a charging station, on which two additional attachments for storage can be placed. The charging station must be placed at a distance of at least 1 m from any heat-emitting body. Due to its construction, the device is not free-standing.

1 Batteries, accumulators and waste must be disposed of separately
2 Do not dispose of in household waste
5 Do not incinerate
6 Do not dispose of in water
7 Do not dispose of with other waste
8 Contains batteries and electronic components
9 Recycling
INSTRUCTIONS FOR USE
Instructions for use: Before using the device, read the instructions carefully and follow them. Keep the instructions for future reference and pass them on to any subsequent users.
Before starting work, confirm that the battery is fully charged. The charging station must be placed at least 1 meter away from the work area. Do not use the device if it is damaged.
SAFETY INSTRUCTIONS
Follow the instructions for installing the brushes, and only use the brush that is suitable for the surface being cleaned. 1. The safety instructions confirm the correct brush, and also the appropriate cleaning agent. If the brush needs to be replaced, remove the old brush from the brush holder and insert the new one.
Intended use: The device is intended for cleaning floors and similar surfaces (e.g., laminate, tiles, linoleum, parquet, etc.).
Chemical cleaning agents are not suitable for use (e.g., polish, wax, solvents, etc.).
BEFORE STARTING WORK
The battery and charger must be placed on the charging station. If the safety instructions are not followed, the battery and charger may be damaged.
Before starting work, and also after each use, the battery must be charged. To charge the battery, press the button on the control panel. The battery can only be charged with the original charger.
For safety, the device must be placed at least 1 meter away from the work area during charging.
It is not possible to use the device while it is charging.
CHARGING THE BATTERY
Before using the device, check that the battery is fully charged.
To charge the battery, connect it to the power supply. If the battery is not fully charged, follow the instructions in the manual.
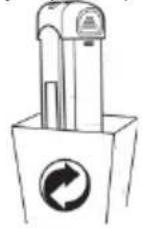
CHARGING THE BATTERY
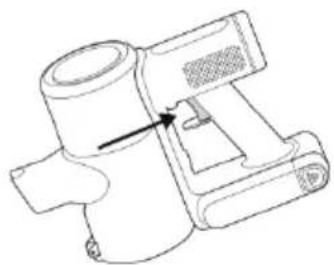
The on/off switch is located on the control panel.
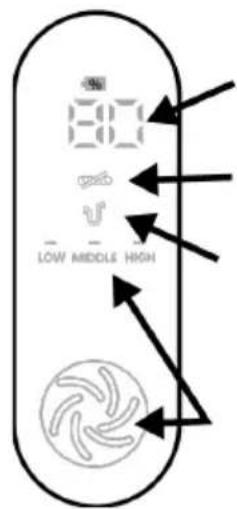
Charge the battery, install the battery, indicators bar. The indicator lamp indicates the battery is charging, the indicator lamp is lit.
If the battery is completely discharged or damaged, this sign appears. When this sign appears, the battery is completely discharged, remove it.
This sign indicates that the battery is too hot or damaged. If this sign appears, remove the battery and let it cool down before using it again.
The control unit is located on the battery charger.
The control unit has: voltage 60V. Current / voltage (35 min. current) / high (one charge 13 min. current)
CLEANING AND MAINTENANCE
Cleaning the device
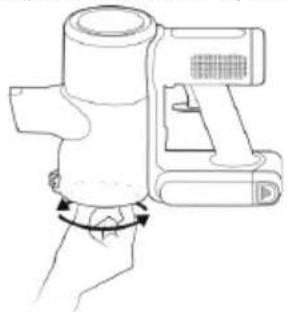
Before cleaning the device, make sure it is turned off and the power cord is unplugged. If the device is not working properly, do not clean it while it is connected to the power supply. Clean the device with a dry cloth only after it has cooled down.
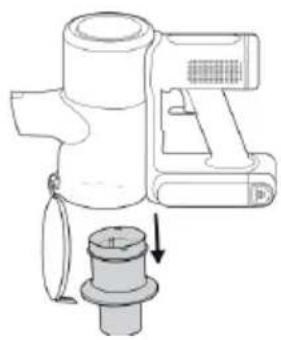
To clean the device, remove the battery pack. The battery pack is located at the bottom. To remove the battery, press the release button. Insert the battery pack into the slot and push it until it clicks into place. If the battery is not inserted correctly, the device will not operate.
To remove the battery, press the release button on the battery pack. The battery can be removed, and the battery container can be removed from the device. When installing the battery pack, make sure it is correctly aligned and inserted. If the battery is not inserted correctly, the device will not operate.
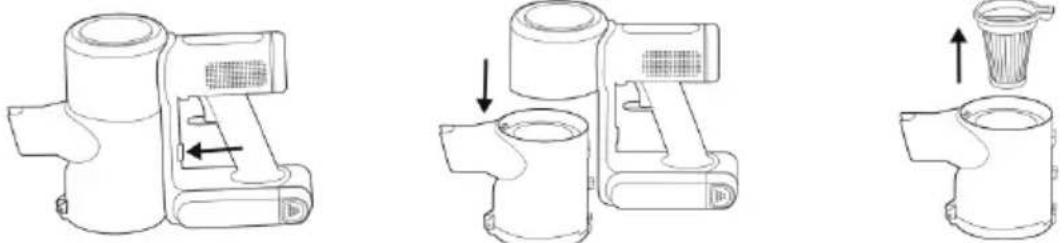
The device can be used with the battery and the power cord; however, it is recommended to use the battery for safety. If the battery is damaged, replace it with a new one; if the battery is leaking, dispose of it properly. Do not expose the battery to high temperatures.
Dispose of the battery properly, do not throw it away. If the battery is damaged, it must be replaced; otherwise, the device may be damaged.
Cleaning
Before using the vacuum cleaner, the filters must be installed. To ensure the motor operates correctly, the filters must be properly inserted. The vacuum cleaner can be used with or without the dust bag. Before use, check the filter and its protective cover. If the filter is damaged, replace it with a new one.
CHARGING THE APPLIANCE
CHARGING THE APPLIANCE
USING THE VACUUM CLEANER WITH CORD
REMOVING THE BATTERY FROM THE CORDED VACUUM CLEANER
Before disposing of the vacuum cleaner, remove the battery.
To safely remove the battery, make sure it is completely discharged. If the battery cannot be removed from the device, follow the instructions in the illustrated instruction booklet.
OPERATING THE VACUUM CLEANER
INSTRUCTION MANUAL FR
- CKJIONYBAHBE HA ANAPATOT
- KOPNCTEHE HA IPIPABOCMYKAJKATA
- IOJIHEHE HA ANAPATOT
- OTCTPAHYBAHBE HA BATEPNJATA OI PPABOCMYKAJKATA
- OPERATING THE DUST CONTAINER
- CLEANING THE DUST CONTAINER
- CLEANING THE FILTER
- GENERAL PRECAUTIONS
- DANGER
- SPECIAL WARNINGS
- ENVIRONMENT
- GUARANTEE & SERVICE
- APPLIANCE PARTS
- APPLIANCE ASSEMBLY
- USE OF THE VACUUM CLEANER
- CHARGING THE APPLIANCE
- REMOVING THE BATTERY FROM THE VACUUM CLEANER
- CLEANING THE VACUUM CLEANER
- CLEANING THE DUST BIN AND THE FILTER
- CLEANING THE BRUSH
- GENERAL NOTES
- SPECIAL INSTRUCTIONS
- WARRANTY AND SERVICE
- PARTS OF THE DEVICE
- ASSEMBLY OF THE DEVICE
- INSTRUCTIONS FOR USE
- SAFETY INSTRUCTIONS
- BEFORE STARTING WORK
- CHARGING THE BATTERY
- CLEANING AND MAINTENANCE
- USING THE VACUUM CLEANER WITH CORD
- REMOVING THE BATTERY FROM THE CORDED VACUUM CLEANER
- OPERATING THE VACUUM CLEANER
- INSTRUCTION MANUAL FR
Brand : HISENSE
Model : HVC6463DA
Category : Vacuum Cleaner