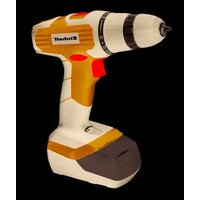
BT-CD 18/3 - Drill EINHELL - Free user manual and instructions
Find the device manual for free BT-CD 18/3 EINHELL in PDF.


| Product Type | Cordless Drill/Driver |
| Brand | Einhell |
| Model | BT-CD 18/3 |
| Power Supply | Li-Ion battery 18 V (2 batteries included) |
| No-Load Speed | 0-350 / 0-1100 rpm (2 speeds) |
| Torque Levels | 19+1 (including drilling position) |
| Chuck Capacity | 10 mm max, keyless chuck |
| Forward/Reverse | Yes |
| Battery Type | Ni-Cd or Li-Ion (depending on version) |
| Charging Voltage | 3.6-18 V DC |
| Charging Current | 1.5 A max |
| Charger Mains Voltage | 230-240 V ~ 50-60 Hz |
| Charging Time | Approximately 1 hour |
| Weight | 1.7 kg |
| Sound Pressure Level | 65.3 dB(A) (uncertainty K=3 dB) |
| Sound Power Level | 76.3 dB(A) (uncertainty K=3 dB) |
| Vibrations (Drilling in Metal) | ≤ 2.5 m/s² (uncertainty K=1.5 m/s²) |
| Vibrations (Screwdriving) | ≤ 2.5 m/s² (uncertainty K=1.5 m/s²) |
| Main Functions | Drilling, screwdriving, 2 speeds, torque adjustment, battery charge indicator |
| Maintenance and Cleaning | Clean with a damp cloth, no solvents, keep ventilation slots clean |
| Safety | Wear hearing protection, dust mask, safety goggles mandatory |
| Spare Parts and Repairability | Spare parts available on request; the device requires no internal maintenance |
| General Information | Intended use: drilling in wood, metal, plastic and screwdriving; domestic use only |
Frequently Asked Questions - BT-CD 18/3 EINHELL
User questions about BT-CD 18/3 EINHELL
0 question about this device. Answer the ones you know or ask your own.
Ask a new question about this device
Download the instructions for your Drill in PDF format for free! Find your manual BT-CD 18/3 - EINHELL and take your electronic device back in hand. On this page are published all the documents necessary for the use of your device. BT-CD 18/3 by EINHELL.
USER MANUAL BT-CD 18/3 EINHELL
Caution - Read the operating instructions to reduce the risk of inquiry

Wear ear-muffs. The impact of noise can cause damage to hearing.

Wear a breathing mask. Dust which is injurious to health can be generated when working on wood and other materials. Never use the device to work on any materials containing asbestos!

Wear safety goggles. Sparks generated during working or splinters, chips and dust emitted by the device can cause loss of sight.
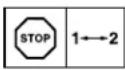
Change the gear only when the drill is at a standstill. If you fail to observe this point, the gearing may be damaged.
·15·
GB
Important!
When using the equipment, a few safety precautions must be observed to avoid injuries and damage. Please read the complete operating instructions and safety regulations with due care. Keep this manual in a safe place, so that the information is available at all times. If you give the equipment to any other person, hand over these operating instructions and safety regulations as well. We cannot accept any liability for damage or accidents which arise due to a failure to follow these instructions and the safety instructions.
1. Safety regulations
The corresponding safety information can be found in the enclosed booklet. Caution!
Read all safety regulations and instruction
Any errors made in following the safety regulations and instructions may result in an electric shock, fire and/or serious injury.
Keep all safety regulations and instruction in a safe place for future use.
2. Layout and items supplied
2.1 Layout (Fig. 1a/1b)
- Torque adjustment (setting ring)
- Quick-change drill chuck
- Changeover switch
- On/Off switch
- Battery
- Charging unit
- Charging cable
- Pushlock button
- Magnetic screw holder
- Selector switch for 1st/2nd gear
- Battery capacity
- Switch for battery capacity indicator
2.2 Items supplied
Please check that the article is complete as spcificed in the scope of delivery. If parts are missing, please contact our service center or the nearest branch of the DIY store where you made your purchase at the latest within 5 work days after purchasing the article and upon presentation of a valid bill of purchase. Also, refer to the warranty table in the warranty provisions at the end of the operating instructions.
·16·
- Open the packaging and take out the equipment with care.
- Remove the packaging material and any packaging and/or transportation braces (if available).
- Check to see if all items are supplied.
- Inspect the equipment and accessories for transport damage.
If possible, please keep the packaging until the end of the guarantee period.
Important!
The equipment and packaging material are not toys. Do not let children play with plastic bags, fols or small parts. There is a danger of swallowing or suffocating!
Cordless drill/screwdriver
Battery (2x)
Charging unit
Original operating instructions
- Safetyinstructions
3. Proper use
The cordless drill/screwdriver is designed for tightening and undoing screws, as well as for drilling in wood, metal and plastic.
The equipment is to be used only for its prescribed purpose. Any other use is deemed to be a case of misuse. The user / operator and not the manufacturer will be liable for any damage or injuries of any kind caused as a result of this.
Please note that our equipment has not been designed for use in commercial, trade or industrial applications. Our warranty will be voided if the machine is used in commercial, trade or industrial businesses or for equivalent purposes.
GB
4. Technical data
Motor supply voltage: 18 V DC
Idling speed: 0-350/0-1100 min ^-1 Torque settings: 19+1
Clockwise/Counter-clockwise: Yes
Clamping range of drill chuck: max. 10 mm
Battery charge voltage: 3,6-18 V DC
Battery charge current: max. 1,5 A
Battery charger supply voltage: 230-240 V ~ 50-60 Hz
Charging time: approx. 1 hour
Battery type: NiCd
Weight: 1.7 kg
Sound and vibration
Sound and vibration values were measured in accordance with EN 60745.
Lp sound pressure level 65.3 dB(A) K_b4 uncertainty .3 dB L_Va sound power level 76.3 dB(A) K_Va uncertainty .3 dB
Wear ear-muff s.
The impact of noise can cause damage to hearing.
Total vibration values (vector sum of three directions) determined in accordance with EN 60745.
Drilling in metal
Vibration emission value a_h≤ 2.5m / s^2 K uncertainty = 1.5~m / s^2
Screwing without hammer action Vibration emission value _h≤ 2.5m / s^2 K uncertainty = 1.5~m / s^2
Warning!
The specified vibration value was established in accordance with a standardized testing method. It may change according to how the electric equipment is used and may exceed the specified value in exceptional circumstances.
The specified vibration value can be used to compare the equipment with other electric power tools.
The spocified vibration value can be used for initial assessment of a harmful effect.
17
GB
6. Operation
6.1 Charging the battery (Fig. 2-3)
- Remove the battery pack (5) from the handle (Fig. 2) by pressing the pushlock buttons (8) on the left and right side of the battery pack (5).
- Check that your mains voltage is the same as that marked on the rating plate. Plug the charging cable (7) of the charging unit (6) into the power socket. The green LED on the charging unit then comes on.
- Insert the battery pack (5) into the battery charger (6). The red LED will come on to indicate that the battery pack is boing charged. Charging has fi nished when the red LED goes out and the green LED comes on again. The battery pack may become a little warm during the charging process. This is normal.
If the battery pack fails to charge, check for the following:
Voltage at the power socket
Good contact at the charging contacts of the charging unit
If the battery pack still fails to charge, send
the charging unit
and the battery pack
to our customer service center.
To ensure that the battery pack provides long service, you should take care to recharge it promptly.
You must recharge the battery pack when you notice that the power of the cordless equipment drops. Never fully discharge the battery pack. This will cause it to develop a defect!
6.2 Torque setting (Fig. 4 / Item 1)
The cordless screwdriver is fitted with a mechanical torque selector.
The torque for a particular screw size is set with the setting ring (1). The torque is dependent on a number of factors:
- On the type and hardness of the material involved
On the type and length of the screws used
- On the requirements that the screw connection has to satisfy
The grating disengagement of the coupling indicates that the selected torque level has been reached.
Caution! Only ever adjust the setting ring when the equipment is at a standstill.
6.3 Drilling (Fig. 4/Item 1)
For drilling purposes, adjust the setting ring for the torque to the last setting "Drill". In the drill setting the slip coupling is non-functional. The maximum torque is available for drilling.
6.4 Changeover switch (Fig. 5/Item 3)
The slide switch above the On/Off switch is for setting the direction of rotation of the cordless screwdriver and for preventing the cordless screwdriver from being switched on inadvertently. You can select between clockwise and counterclockwise rotation. To avoid causing damage to the gearing, the direction of rotation must only be changed when the screwdriver is at a standstill. When the slide switch is in the middle position, the On/Off switch is blocked.
6.5 On/Off switch (Fig. 5/Item 4)
Infiniely variable speed control is possible with the OrvOff switch. The further you push the switch, the higher the speed of the cordless screwdriver.
6.6 Changing the bit (Fig. 6)
Caution Set the changeover switch (3) to its center position whenever you carry out any work (for example changing the tool, maintenance work, etc.) on the cordless screwdriver.
Open the chuck (2).
- The chuck opening (a) must be large enough to hold the tool (drill bit or screwdriver bit).
* Select the suitable tool. Push the tool as possible into the chuck opening (a).
- Tighten the chuck (2) and then check that the tool is secure.
6.7 Screwing
It is advisable to use self-centering screws (e.g. Torx, cross recessed head) as these will enable you to work safely and reliably. Always make sure that the bit used is of the same size and shape as the screw. Set the torque to suit the screw size as specified in the instructions.
6.8 Magnetic screw holder (Fig. 4/Item 9)
Screws can be placed on the magnetic screw holder for easy reach during operation.
GB
6.9 Selector switch for 1st/2nd gear (Fig.4 / Item 10)
You can work with a higher or lower speed depending on the position of the selector switch. Change the gear only when the drill is at a standstill. If you fail to observe this point, the gearing may be damaged.
6.10 Battery capacity indicator (Fig. 2/item 11)
Press the button for the battery capacity indicator (12). The LCD display of the battery capacity indicator (11) shows the charge status of the battery using 5 bars.
All bars are shown:
The battery is fully charged.
2 to 4 bars are shown:
The battery has an adequate remaining charge.
One bar is shown:
The battery is empty, recharge the battery.
7. Cleaning, maintenance and ordering of spare parts
Always pull out the mains power plug before starting any cleaning work.
7.1 Cleaning
- Keep all safety devices, air vents and the motor housing free of dirt and dust as far as possible. Wipe the equipment with a clean cloth or blow it with compressed air at low pressure.
We recommend that you clean the device immediately each time you have finished using it.
Clean the equipment regularly with a moist cloth and some soft soap. Do not use cleaning agents or solvents; these could attack the plastic parts of the equipment. Ensure that no water can seep into the device. The ingress of water into an electric tool increases the risk of an electric shock.
7.2 Maintenance
There are no parts inside the equipment which require additional maintenance.
7.3 Ordering replacement parts:
Please quote the following data when ordering
replacement parts.
Type of machine
Article number of the machine
Identification number of the machine
- Replacement part number of the part required
For our latest prices and information please go to www.isc-gmbh.info
8. Disposal and recycling
The equipment is supplied in packaging to prevent it from being damaged in transit. The raw materials in this packaging can be reused or recycled. The equipment and its accessories are made of various types of material, such as metal and plastic. Never place defective equipment in your household refuse. The equipment should be taken to a suitable collection center for proper disposal. If you do not know the whereabouts of such a collection point, you should ask in your local council offices.
9. Storage
Store the equipment and accessories out of children's reach in a dark and dry place at above freezing temperature. The ideal storage temperature is between 5 and 30^ . Store the electric tool in its original packaging.

GB
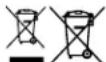
For EU countries only
Never place electric power tools or batteries in your household refuse!
Recycling alternative to the requested returning of equipment: Instead of returning the equipment to the manufacturer, the owner of the electrical equipment is obliged to ensure that the equipment is properly disposed of if relinquishing ownership. The old equipment as well as any batteries can be returned to a suitable collection point that will dispose of the equipment in accordance with the national recycling and waste disposal regulations. This does not apply to any accessories or aids without electrical components supplied with the old equipment.
The reprinting or reproduction by any other means, in whole or in part, of documentation and papers accompanying products is permitted only with the express consent of the ISC GmbH.
Subject to technical changes
20
GB
Warranty provisions
isc GmbH or the DIY store where you made you purchase guarantees the repair of defects or replacement of the equipment in accordance with the overview below. Statutory guarantee claims are unaffected.
| Category Example Warranty | ||
| Defect with regard to material or construction | 24 months | |
| Wear parts* Drill chuck 6 months | ||
| Consumables* Bit inserts/drill bits | Warranty only in case of an im- | mediate defect (24 hours after purchase / date on the bill) |
| Missing parts 5 work days | ||
- Not necessarily included in the scope of delivery!
For consumables, wear parts and missing parts iSC GmbH guarantees the correction of defects or a new delivery only if the defect is reported within 24 hours (consumables), 5 work days (missing parts) or 6 months (wear parts) after purchase and the purchase date is verified with the bill.
In case of defects concerning the material or construction, we kindly request you to submit the equipment together with the fully completed warranty card supplied with the equipment. It is important that you enter an exact description of the defect.
To do so, answer the following questions:
Did the equipment work at all or was it defective from the beginning?
Did you notice anything (symptom or defect) prior to the failure?
What malfunction does the equipment have in your opinion (main symptom)? Describe this malfunction.
·21·
GB
Warranty certificate
Dear Customer,
All of our products undergo strict quality checks to ensure that they reach you in perfect condition. In the unlikely event that your device develops a fault, please contact our service department at the address shown on this guarantee card. Of course, if you would prefer to call us then we are also happy to offer our assistance under the service number printed below. Please note the following terms under which guarantee claims can be made:
- These guarantee terms cover additional guarantee rights and do not affect your statutory warranty rights. We do not charge you for this guarantee.
- Our guarantee only covers problems caused by material or manufacturing defects, and it is restricted to the rectification of these defects or replacement of the device. Please note that our devices have not been designed for use in commercial, trade or industrial applications. Consequently, the guarantee is invalidated if the equipment is used in commercial, trade or industrial applications or for other equivalent activities. The following are also excluded from our guarantee: compensation for transport damage, damage caused by failure to comply with the installation/assembly instructions or damage caused by unprofessional installation, failure to comply with the operating instructions (e.g. connection to the wrong mains voltage or current type), misuse or inappropriate use (such as overloading of the device or use of non-approved tools or accessories), failure to comply with the maintenance and safety regulations, ingress of foreign bodies into the device (e.g. sand, stones or dust), effects of force or external influences (e.g. damage caused by the device being dropped) and normal wear resulting from proper operation of the device. This applies in particular to rechargeable batteries for which we nevertheless issue a guarantee period of 12 months. The guarantee is rendered null and void if any attempt is made to tamper with the device.
- The guarantee is valid for a period of 2 years starting from the purchase date of the device. Guarantee claims should be submitted before the end of the guarantee period within two weeks of the defect being noticed. No guarantee claims will be accepted after the end of the guarantee period. The original guarantee period remains applicable to the device even if repairs are carried out or parts are replaced. In such cases, the work performed or parts fitted will not result in an extension of the guarantee period, and no new guarantee will become active for the work performed or parts fitted. This also applies when an on-site service is used.
- In order to assert your guarantee claim, please send your defective device postage-free to the address shown below. Please enclose either the original or a copy of your sales receipt or another dated proof of purchase. Please keep your sales receipt in a safe place, as it is your proof of purchase. It would help us if you could describe the nature of the problem in as much detail as possible. If the defect is covered by our guarantee then your device will either be repaired immediately and returned to you, or we will send you a new device.
Of course, we are also happy offer a chargeable repair service for any defects which are not covered by the scope of this guarantee or for units which are no longer covered. To take advantage of this service, please send the device to our service address.
Also refer to the restrictions of this warranty concerning wear parts/consumables and missing parts as set forth in the warranty conditions in these operating instructions.
22



6.1 Nabijeni akumulatoru (obr. 2-3)
- Akumulator (5) yvtahnout z rukojei (obr. 2), pitom stlacit akupdokva tlickta (8) na prave a levo strane akupdatoru (5).
- Porovnejte, zda soulhasi sifove napeti uvedene na typovem stitku se sifovym napetim, ktere je k dispozici. Zastrche nabijeci kabel (7) naJIbcecky (6) do zasuvky. Zelena LED na naibiece sa rozsviti.
3.Zastréte akumulator (5) do nabijécky (6). Červéná LED signalizuje, ze je akumulator nabij. Nabijeni je unokćenco. kdy z Červéná LED zhasně a zolóná LED so opét rozviti. Čehem nabijeni se akumulator muze trochu ohířt, to je ośvěn normaíni.
Pokud by nabijeni akumulatorveho chiaku nebylo所提供 zkontrolute
zda je v zasuvce sifovnapeti.
- zda je bezvadny kontakt na nabijecich kontaktech nabijeciček.
Pokud by jeste stale nabjeni nebylo możne, prosimo Vasy, abstye
nabijecku
- aakumulatorovcianek poslali naš zákaznicky servis.
V zojmu dlouh vizotosti akumulatoru, byste se meli starat o vcsnab nabitu akumulatorovho chlanku. Toto je vkaedern pfipade tfeba tehyd, kdyz jzistne, ze kyon akumulatorovhe sroubovaku kiesla. Akumulatorovy chlakn nikdy kompletne nevybjbeJe. Tolo vede k defektu akumulatorovhe chlankul
6.2 Nastaveni toceveho momentu (obr.4/pol.1)
6.1 Nablite akumulatora (obr. 2-3)
- Akumulator (5) vytiahnile z rukovále (obr. 2), pristom stáče aretačné tlacidí (8) na pravěj a favoj strana akumulatorá (5).
- Porovnajite, csi sivevo napivu eduvene na typovom stiku zodpoveda pritornemu elektrickemu napatiu siete. Nabijaci kabel (7) nabijacky (6) zaufute do zasuvky. Začne blikat zelená kontrolka LED na nabijacke
- Zasufte akumulator (5) na babijačku (6). Červena kontrkloka LED signalizujce, ze prebicha nabijanie akumulatora. Nabijanie je ukonçćeni, k od zhašne corvona kontrkloka LED a znova sa rozsvieti zelena kontrkloka LED. Počas procesu nabijania možo dōjst k Čiastocnému zohiatiu akumulatora, ko je věsak upine normalne.
Ak by nemalo by możné nablite akumulátrora, skontrolute prosim
ci je vzasuvke pritomne siefove napatie.
ci je kontakt na nabijacich kontakloch
nabijaacky v bezchybnom stave.
Ak by esta stale nemalo byt maybe naktiie akumulatora prosime vas, aby ste
- nablaacku
aakumulator
zaslān māsū zakaznickemu servisu.
V zaujme dlhej zivostnoi akumulatora by ste sa mali postarat o vcaene opatovne rabijanie akumalara. To je potrebné v každom priadve tved, ked'zistne, ze sa vykonnakumulatorovhe skrukova zactne zizvajovf. Akumulator y nemal by nikidya uplne vbytly. To totzi videk p koskodeniu akumulatorai
6.2 Nastavenie točívěho momentu (obr. 4/pol. 1)
GB explains the following conformity according to EU directives and norms for the following product
2-10H3N3-10H3N3-10H3N3-10H3N3-10H3N3-10H3N3-10H3N3-10H3N3-10H3N3-10H3N3-10H3N3-10H3N3-10H3N3-10H3N3-10H3N3-
E-APKNTBHTA HNOHNT 38 APKNTKTR
TA-Orbital light ADR skinfication agakenin uyguunugu belirr
69/68/69/EC-90/91/EC 2021/5/15
X 2011/65/EC
2006/42/EC
□Annex IV
Notified Body: Notified Body
Reg.No:
2000/14/EC
Annex V
Annex VI
Nase:measured 2. KWSU
P=KW,EC=cm Not ed Badr
□2006/28/EC
Emission No.:


图
T
时间
1
1
1
1
.
1
First CE:12
Art.-No.:49
Subject to change without notice
Archive-File/Rec
Documents regl
Wissenveg 22, D-94405 Landau, Germany
90
-91·

EH07/2012(01)