
Handy Clipper - Electric mower LANAFORM - Free user manual and instructions
Find the device manual for free Handy Clipper LANAFORM in PDF.

| Product type | Rechargeable electric clipper |
| Brand | Lanaform |
| Model | Handy Clipper |
| Dimensions | Not specified in the manual |
| Weight | Not specified in the manual |
| Power source | Rechargeable nickel-cadmium battery, AC adapter |
| Runtime | Approximately 45 minutes after an 8-hour charge |
| Charging time | 8 hours (first charge: 24 hours) |
| Blade | Ceramic, stainless steel, adjustable to 4 rotary positions |
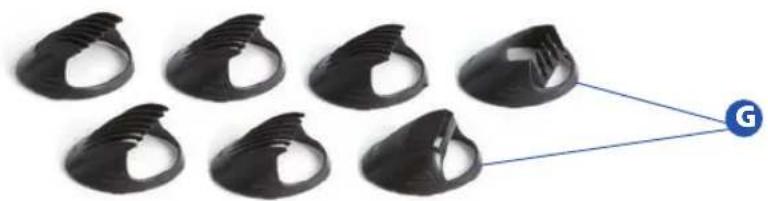
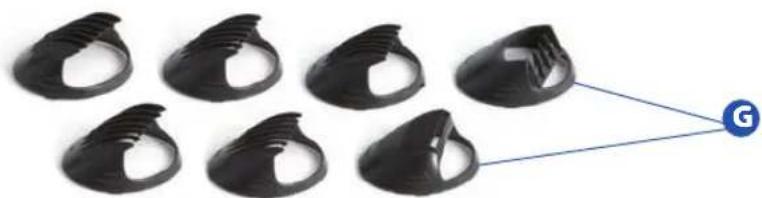
| Accessory combs | 7 combs: 0, 2, 4, 6 mm, thinning comb, left and right taper combs |
| Turbo function | Yes, instant increase in motor speed |
| Usage | Home use, haircutting |
| Maintenance | Clean the blades with the provided brush, wipe with a dry cloth, lubricate if unused for a long time |
| Safety | Do not immerse in water, keep out of reach of children, do not use with damaged blade |
| Warranty | 2 years against defects in materials and workmanship |
| Included accessories | 7 combs, cleaning brush, adjustable strap, AC adapter |
| Country of origin | Belgium (headquarters) |
| Repairability | Spare parts available from the manufacturer or after-sales service |
| Battery type | Nickel-cadmium (Ni-Cd), recyclable |
Frequently Asked Questions - Handy Clipper LANAFORM
User questions about Handy Clipper LANAFORM
0 question about this device. Answer the ones you know or ask your own.
Ask a new question about this device
Download the instructions for your Electric mower in PDF format for free! Find your manual Handy Clipper - LANAFORM and take your electronic device back in hand. On this page are published all the documents necessary for the use of your device. Handy Clipper by LANAFORM.
USER MANUAL Handy Clipper LANAFORM
LANAFORM®

Handy Clipper
7 in 1

4

44

12

52

20

60

28

68

36

76

LANAFORM®
Handy Clipper
INTRODUCTION
natural_image
Six black plastic clips arranged in a grid, with one clip connected to a blue circle labeled 'G' (no text or symbols on clips)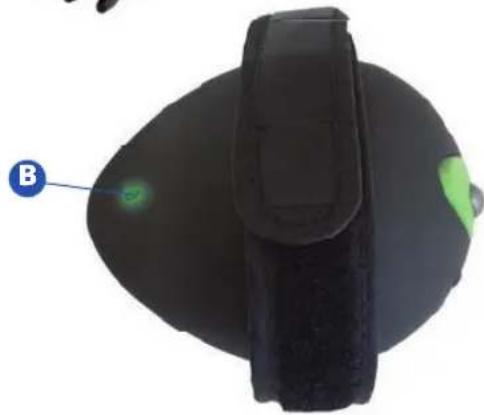
natural_image
Top-down view of a black electronic device with a green indicator light and label 'B' pointing to it (no text or symbols on the device itself)
LANAFORM®
Handy Clipper
Utilisation
natural_image
Close-up of hands holding a black compact device with a silver lid and striped pattern on the side (no visible text or symbols)FIGURE A

natural_image
Close-up of hands holding a black circular device with a metallic lens (no visible text or symbols)FIGURE B
natural_image
Six black plastic clip components arranged in two rows, connected to a blue circular icon labeled 'G' (no text or symbols on the clips themselves)
natural_image
Top-down view of a black ergonomic device with a green indicator light and label B (no text or symbols on the device itself)
LANAFORM®
Handy Clipper
Gebruik
natural_image
Close-up of hands holding a black camera lens and a circular object with striped pattern (no text or symbols visible)FIGURE A

natural_image
Close-up of hands holding a black circular device with a metallic grille (no visible text or symbols)FIGURE B
We would like to thank you for choosing the rechargeable Handy Clipper from Lanaform.
Robust and easy to use, the Handy Clipper is intended for domestic use.
You can easily reach all cutting areas thanks to its rotary function.
With its 7 combs, you can easily suit cutting length to your hair.
It is rechargeable and fitted with a stronger, ceramic blade that requires no sharpening.
We hope that this product will provide entire satisfaction.
Please read the following instructions carefully before using your Handy Clipper.
Technical characteristics:

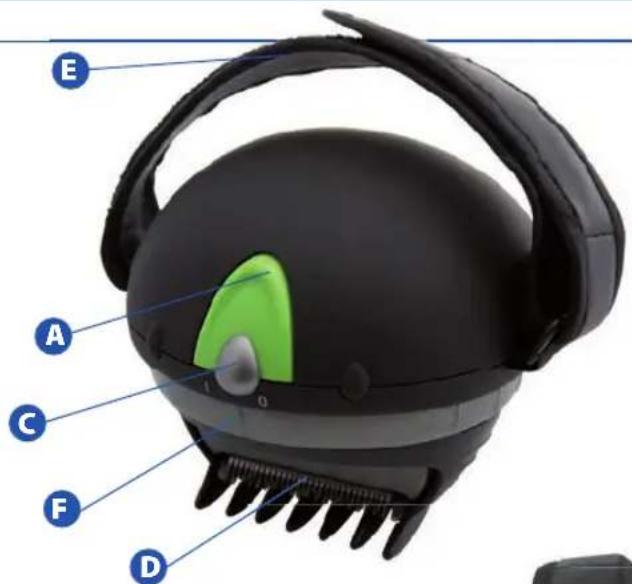
Turbo button

Charging indicator light

ON/OFF switch

Stainless steel blade

Adjustable neck cord

Rotating mechanism for adjusting the blade

7 Accessory combss

natural_image
Top-down view of a black ergonomic device with a green indicator light and label B (no text or symbols on the device itself)
natural_image
Six black plastic clip components arranged in two rows, connected to a blue circular icon labeled 'G' (no text or symbols on the clips themselves)
LANAFORM®
Handy Clipper
Utilisation
How to operate the clipper
Attach the selected accessory comb. Position the ON/OFF switch to ON (I) to start the clipper. When cutting is finished, always switch the clipper to OFF (0).
How to attach the accessory combs
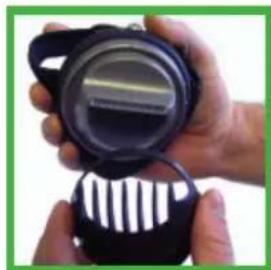
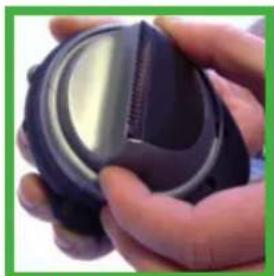
When changing accessory combs, check that the blade faces upwards. (See figure A). Align the two ribs on each side of the accessory comb with the corresponding positions on the unit. Press the palm of your hand against the comb and push the comb gently on to the blade until it is in the correct position. If there is any resistance, do not force the comb, but place a drop of oil on the internal surface of the comb. Take care when pressing your hand against the comb. This unit is supplied with seven accessory combs: 0, 2, 4, 6 mm, taper comb and left-hand and right-hand layering combs.
How to adjust the blade
The blade can be rotated into four different positions to provide greater flexibility before and during cutting (see figure B). To modify the blade position, turn the unit OFF (0). Hold the blade adjusting mechanism beneath the clipper; turn carefully until it is fixed in the required position. Turn the clipper ON (1). Once cutting has been completed, always turn the unit OFF (0).
How to increase the speed
Just by touching the turbo button, the motor speed is instantly increased. This is ideal for thicker types of hair
natural_image
Close-up of hands holding a black camera lens and a striped case (no text or symbols visible)FIGURE A

natural_image
Close-up of hands holding a black circular device with a metallic grille (no visible text or symbols)FIGURE B
How to recharge the unit
To recharge the unit, turn it OFF (0) and connect the adaptor to the unit. Connect the adaptor to the electrical power supply; making sure that the electrical power supply voltage is the same as the adaptor's (the unit's LED will light up to show that the batteries are being charged). When you charge the batteries for the first time, the unit must charge for at least 24 hours; after that the charging time drops to 8 hours.
An 8-hour charge will provide about 45 minutes use. After charging is complete, disconnect the adaptor from the power supply and then remove the connecting plug from the base of the unit. The unit is now ready for use.
REMARK: the electrical power supply may become slightly hot. This does not indicate any abnormal operation of the unit.
Precautions to take when charging the batteries :
-
To ensure maximum battery life :
-
DO NOT charge the unit continuously for periods longer than 3 days.
- Do NOT operate the unit from the mains power supply if the batteries are fully charged.
- Do NOT charge and do NOT store this unit near to radiators or other sources of heat or in places where it is exposed to direct sunlight.
- Do NOT recharge this unit in a damp place, check that the temperature of the room does not drop below 0°C (32°F) and does not exceed 40°C (104°F).
-
We suggest that the unit be completely discharged every two to three months and then completely recharged. Allow the unit to operate until it stops functioning, switch it off and then recharge it fully.
-
Disconnect the unit from the electrical power supply when it has finished charging.

LANAFORM®
Handy Clipper
Advice for cutting hair
- Fully charge your new Handy Clipper
- Before starting to cut your hair, brush your hair so that it lies in its natural direction.
- Attach the largest accessory guide to your clipper if you are not certain about the desired length of hair. You now have the choice of four guides according to the final length required.
- Place the palm of your hand on the clipper with your index finger underneath the sliding switch ON/OFF (I/O) and adjust the supporting cord across the back of your hand so that it is supported comfortably.
- Slide the ON/OFF button to the ON position and start to cut your hair, starting with each side of the head; follow the shape of your head.
- The Handy Clipper is ergonomic and fits comfortably in the palm of your hand while you are cutting your hair.
- It is not necessary to bend your wrist, simply carry on adjusting the direction of the blades by turning the blade adjusting mechanism in order to follow the shape of your head and to continue cutting.
- The hair will feed into the clipper under the force of gravity.
- Continue cutting right round to the back of your head and then towards the other side while continuously adjusting the position of the blades to ensure an easy cut.
- Now brush out your hair to remove any cutting debris. This operation will show up any irregularities that may need to be trimmed again.
- Carefully and gently follow the shape of your hair above and behind the ears and towards the base of the neck. Fold the ear gently forwards to make it easier to cut behind the ear.
- For longer styles of hair, or hair covering the ears, use hairdresser's scissors and cut to the required length.
-
Cut sideboards using the straight comb, moving gently upwards in the mass of hair and then use the clipper to remove the amount of hair as required.
-
Your Handy Clipper is equipped with a turbo option that is recommended for dry or long hair.
Cleaning and storage
Cleaning the unit
Remove any hair residue from the blades using the cleaning brush supplied. Wipe down the unit using a clean, dry cloth.
Maintenance
If the clipper is to remain unused for a long period of time, lubricate both sides of the blades with the oil supplied in order to prevent them from seizing.
Storage
Always disconnect the unit when it is not being used.
Always store the unit in a dry place. Do not pull on the power cord and do not twist it. Do not wind the power cord around the unit since this may give rise to premature failure of the cord and consequent breakage. If the unit's power supply cord is damaged, it must be replaced by the supplier from whom you bought your clipper or by an equally qualified person in order to avoid all danger. Check the power supply cord regularly in order to detect any sign of wear or damage (especially at those points where the cord enters the unit and the adaptor).
Important safety advice
ATTENTION: Do not allow the adaptor to come into contact with any water. To avoid any damage, do not immerse the unit in water. Keep this unit out of the reach of children and disabled persons. Keep young children under close surveillance to ensure that they do not play with the unit.
The Handy Clipper is not intended to be used by persons (including children) with reduced sensorial or mental capacities, or by persons lacking experience or knowledge unless they are acting under the responsibility of a person in charge of their safety, and they have received instructions concerning the use of the unit

LANAFORM®
Handy Clipper
Always attach the power supply cable to the unit before connecting the adaptor to the power supply. Always disconnect the unit when it is not being used.
Only use this unit for the purposes for which it was designed, as described in this manual. Do not use accessories that are not recommended by the manufacturer.
In order to avoid any damage to the skin, great care is needed when using the unit without the guide comb/cutting guide. If the guide or the blade is damaged or broken, stop using the unit immediately and replace them, continuing to use the unit may result in the skin being scratched or cut.
If the power supply cord is damaged, it must be replaced by a special power cord or a similar one available from the supplier or his after-sales service.
Protection of the environment
Before disposing of this product at the end of its useful life, you must remove the rechargeable batteries. Follow the procedure described below:
- Disconnect the unit from the electrical power supply.
- Using a suitable screwdriver, remove the screws situated on the back of the unit.
- Remove the cover. Disconnect the battery pack.
- The internal batteries used with the unit are nickel-cadmium; these batteries must be recycled or disposed of correctly. Do NOT throw Ni-Cd batteries in your (ordinary) dustbin.
- You may now dispose of the main clipper unit in complete safety
LIMITED GUARANTEE
LANAFORM ^® guarantees that this product is free of all manufacturing and material defects for a period of two years from the date of purchase, except under the following circumstances: the guarantee for this LANAFORM ^® product does not cover damage resulting from incorrect or improper use, accidental damage, the addition of an unapproved accessory, any modification to the product or any other situation outside the control of LANAFORM ^® .
LANAFORM ^® is not liable for any accidental, consequential or special damage.
All implied guarantees as to the suitability of the product are limited to a total duration of two years from the date of initial purchase.
On reception, LANAFORM® will, as it deems fit, repair or replace your personal clipper and will return it to you carriage paid. This guarantee is only valid through the LANAFORM® Service Centre. In the event that this unit is repaired by any person other than the LANAFORM® Service Centre, the guarantee is null and void.
LANAFORM®
NV LANAFORM SA
Zoning de Cornemont
natural_image
Six black plastic clip components arranged in a grid, connected to a blue circular icon labeled 'G' (no text or symbols on the clips themselves)
natural_image
Close-up of a black ergonomic device with a green indicator light and label B (no text or symbols on the device itself)
LANAFORM®
Handy Clipper
Verwendung
natural_image
Close-up of hands holding a black camera lens and a circular object with striped pattern (no text or symbols visible)FIGURE A

natural_image
Close-up of hands holding a black circular object with a metallic rim, no visible text or symbolsFIGURE B
natural_image
Six black plastic clip components arranged in a grid, connected to a blue circular icon labeled 'G' (no text or symbols on the clips themselves)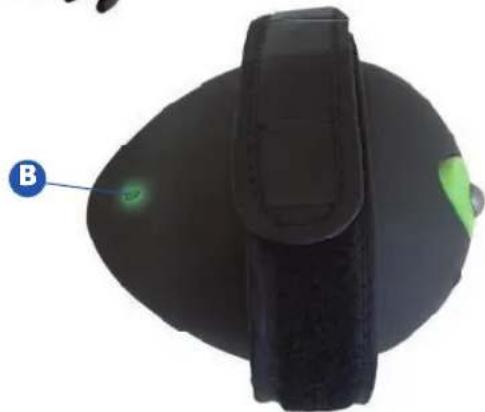
natural_image
Close-up of a black ergonomic device with a green indicator light and label B (no text or symbols on the device itself)
LANAFORM®
Handy Clipper
Utilizzo
natural_image
Close-up of hands holding a black camera lens and a circular object with striped pattern (no text or symbols visible)FIGURE A
natural_image
Close-up of hands holding a black circular device with a metallic lens (no visible text or symbols)FIGURE B

natural_image
Six black plastic clip components arranged in a grid, connected to a blue circular icon labeled 'G' (no text or symbols on the clips themselves)
natural_image
Top-down view of a black ergonomic device with a green indicator light and label B (no text or symbols on the device itself)
LANAFORM®
Handy Clipper
UTILIZACIÓN
natural_image
Close-up of hands holding a black circular device with a reflective surface, partially covered by a striped pattern (no text or symbols visible)FIGURE A

natural_image
Close-up of hands holding a black circular device with a metallic lens (no visible text or symbols)FIGURE B

natural_image
Six black plastic clip components arranged in a grid, connected to a blue circular icon labeled 'G' (no text or symbols on the clips themselves)
natural_image
Top-down view of a black ergonomic device with a green indicator light and label B (no text or symbols on the device itself)
LANAFORM®
Handy Clipper
Utilização
natural_image
Close-up of hands holding a black camera lens and a striped circular object (no text or symbols visible)FIGURE A

natural_image
Close-up of hands holding a dark circular object with a metallic ring, no visible text or symbolsFIGURE B
Recarga do aparelho
natural_image
X-ray or radiographic image of a human head showing internal neural structures (no text or symbols visible)
LANAFORM®
Handy Clipper

natural_image
Six black plastic clip components arranged in two rows, connected by a blue arrow labeled 'G' pointing to the rightmost clip (no text or symbols on the clips themselves)
natural_image
Close-up of a black ergonomic device with a green indicator light and label B (no text or symbols on the device itself)
LANAFORM®
Handy Clipper
Uporaba
natural_image
Close-up of hands holding a black camera lens and a striped circular object (no text or symbols visible)FIGURE A

natural_image
Close-up of hands holding a black circular device with a metallic grille (no visible text or symbols)FIGURE B
Punjenje aparata

natural_image
Six black plastic clip components arranged in a grid, connected to a blue circular icon labeled 'G' (no text or symbols on the clips themselves)
natural_image
Top-down view of a black ergonomic device with a green indicator light and label B (no text or symbols on the device itself)
LANAFORM®
Handy Clipper
Uporaba
Uporaba aparata za striženje
natural_image
Close-up of hands holding a black circular device with a reflective surface and striped pattern (no text or symbols visible)FIGURE A

natural_image
Close-up of hands holding a black circular device with a metallic lens (no visible text or symbols)FIGURE B
Polnjenje aparata
Pri polnjenju aparata vedno najprej preverite, će je gumb na poziciji OFF (0) in nato priključite adapter. Priključite adapter na električno omrežje, će ste preverili, da napetost omrežja ustreza napetosti adapterja (zasvetila bo LED lučka, ki opozarja, da se baterije aparata polnijo). Pred prvo uporabo se mora aparat polniti najmanj 24 ur; pri nadaljnjem polnjenju je čas polnjenja 8 ur.

natural_image
Six black plastic clip components arranged in a grid, connected to a blue circular icon labeled 'G' (no text or symbols on the clips themselves)
natural_image
Top-down view of a black ergonomic device with a green indicator light and label B (no text or symbols on the device itself)
LANAFORM®
Handy Clipper
Kullanma
natural_image
Close-up of hands holding a black camera lens and a striped case (no text or symbols visible)FIGURE A

natural_image
Close-up of hands holding a black circular device with a metallic grille (no visible text or symbols)FIGURE B
Cihazın şarji
Rechargeable 360° Trimmer
NV LANAFORM® SA
Zoning de Cornémont