
IAN 446566 - Inflatable pool Livarno Lux - Free user manual and instructions
Find the device manual for free IAN 446566 Livarno Lux in PDF.

| Product Type | Inflatable Pool |
| Brand | Livarno Lux |
| Model | IAN 446566 |
| Dimensions (inflated) | approx. 300 x 76 cm (diameter x height) |
| Fill Volume | approx. 3,618 liters |
| Max Operating Pressure | 0.4 bar (5.8 psi) |
| Filter Pump | Model 53011A, 12 V, 50 Hz, 25 W, IPX7 |
| Pump Flow Rate | 1,200 l/h |
| Power Supply | Primary: 230-240 V ~ 50 Hz; Secondary: 12 V ~ |
| Power Protection | IP65 |
| Connector | IP44 |
| Minimum Inflation Temperature | 15 °C |
| Number of People for Assembly | 2 |
| Assembly Time | approx. 30 minutes |
| Material | PVC (plastic) |
| Delivery Contents | Mini pool, filter pump, 2 hoses, 2 strainer baskets, 4 hose clamps, 4 screws, hose adapter, repair kit, 2 plastic plugs, instruction manual |
| Use | Above-ground pool for private use |
| Safety | Constant supervision required, no jumping, barrier recommended, rescue equipment nearby |
| Maintenance | Regular cleaning, water treatment (chlorine, pH), filter cartridge to be cleaned/replaced every 2 weeks |
| Warranty | 3 years |
Frequently Asked Questions - IAN 446566 Livarno Lux
User questions about IAN 446566 Livarno Lux
0 question about this device. Answer the ones you know or ask your own.
Ask a new question about this device
Download the instructions for your Inflatable pool in PDF format for free! Find your manual IAN 446566 - Livarno Lux and take your electronic device back in hand. On this page are published all the documents necessary for the use of your device. IAN 446566 by Livarno Lux.
USER MANUAL IAN 446566 Livarno Lux
natural_image
Exterior view of a modern office building (no signage)QUICK-UP-POOL INKL. FILTERPUMPE QUICK-UP POOL INCLUDING FILTER PUMP PISCINE QUICK-UP AVEC POMPE DE FILTRATION
图□
Borob - Novod to poinution
Pool: Instructors for us
- 041 - mairdions of the
ther pu
(四) (五)
QUICK-UP ZEWMBAD INCL FILTERPROM
WATER OF ZEWERS INTEL.
- 2017年-中国银行股份有限公司
flowchart
graph TD
    A[" gears"] --> B[" motor "]
    B --> C[" gear "]
    C --> D[" motor "]
    D --> E[" gear "]
    E --> F[" motor "]
    F --> G[" gear "]
    G --> H[" motor "]
    H --> I[" gear "]
    I --> J[" motor "]
    J --> K[" gear "]
    K --> L[" motor "]
    L --> M[" gear "]
    M --> N[" motor "]
    N --> O[" gear "]
    O --> P[" motor "]
    P --> Q[" gear "]
    Q --> R[" motor "]
    R --> S[" gear "]
    S --> T[" motor "]
    T --> U[" gear "]
    U --> V[" motor "]
    V --> W[" gear "]
    W --> X[" motor "]
    X --> Y[" gear "]
    Y --> Z[" motor "]
flowchart
graph TD
    A["Component 1"] --> B["Component 2"]
    B --> C["Component 3"]
    C --> D["Component 4"]
    D --> E["Component 5"]
    E --> F["Component 6"]
    F --> G["Component 7"]
    G --> H["Component 8"]
    H --> I["Component 9"]
    I --> J["Component 10"]
    J --> K["Component 11"]
    K --> L["Component 12"]
    L --> M["Component 13"]
    M --> N["Component 14"]
    N --> O["Component 15"]
    O --> P["Component 16"]
    P --> Q["Component 17"]
    Q --> R["Component 18"]
    R --> S["Component 19"]
    S --> T["Component 20"]
D
E
natural_image
Line drawing of a large bowl with water droplets and a small connected tube (no text or symbols)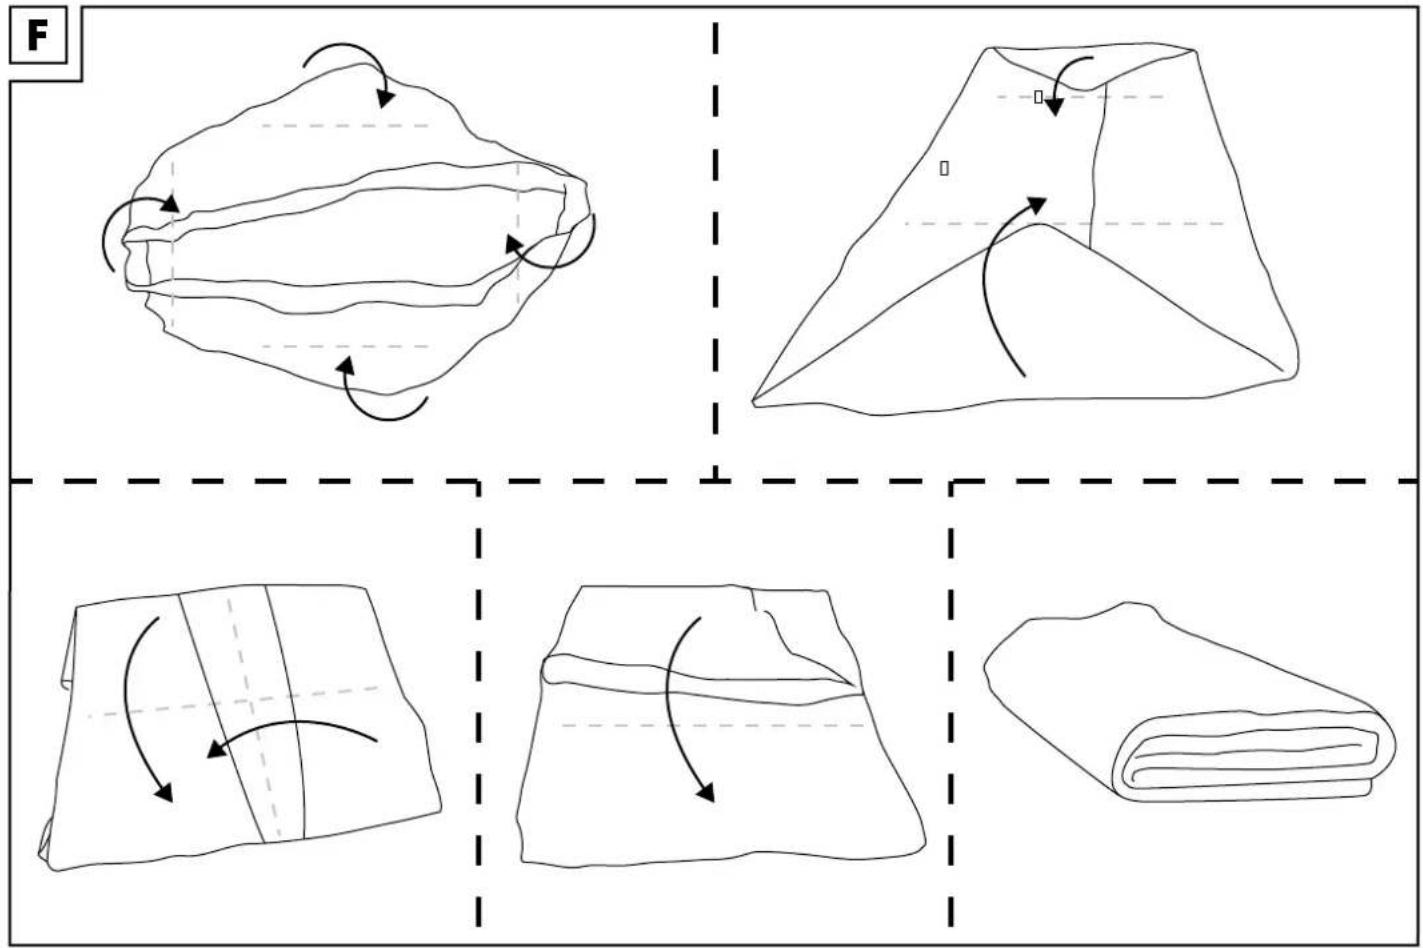
DE AT CH
WICHTIG, FÜR SPÄTERE BEZUGNAHME AUFBEWAHREN: SORGFÄLTIG LESEN!
GB IE
IMPORTANT, RETAIN FOR FUTURE REFERENCE: READ CAREFULLY!
FR BE
Scope of delivery 23
Parts list 23
Technical data 23
Intended use 23
Symbols used 23
Safety instructions 23
Danger to life! 23
Safety of non-swimmers! 23
Safety features 23
Safety equipment 23
Safe use of the mini-pool 23
Risk of injury! 23
Avoiding material damage! 23
Selecting a location 24
Assembling the mini-pool 24
Inflating the mini-pool 24
Filling the product with water 24
Impact of water quality 24
Accessibility 25
Disassembling the mini-pool 25
Folding up the mini-pool 25
Care, storage, repairs, maintenance .....25
Care 25
Storage 25
Repairs 26
Maintenance 26
Disposal 26
Notes on the guarantee
and service handling 26
Discolourations and their possible causes .....27
Stains and their possible causes 27
Filter pump
Original operating instructions ..... 29
Parts list 30
Technical data 30
Intended use 30
Safety instructions ....30
Risk of electrical shock! 30
Connecting the filter pump 30
Operating the filter pump 31
Repairs, maintenance 31
Troubleshooting 31
Disposal 31
Declaration of conformity 32
FR BE
Veiligheidsuitrusting....44
Mini-Pool oppompen 45
Pokyny k likvidaci....69
Pokyny k likvidaci....74
No. 2 Yan He Road, Xia Bian Avenue, Chang An Town, DongGuan City, GuangDong Province
DELTA SPORT HANDOLSKONITOR (GMBH) Whagelkemp 6 | 22387 Hamburg | Germany
DELTA-SPORT HANDELSKONTOR GMBH
Wrogekamp 6
22397 Homburg
Germany
+40 105 40 627 310 0
info@delta-sport.com
www.delta-sport.com
You have chosen to purchase a high-quality product. Familiarise yourself with the product before using it for the first time.

Read the following instructions for use carefully.
Use the product only as described and only for the given areas of application. Store these instructions for use carefully. When passing the product on to third parties, please also hand over all accompanying documents. Carefully read, understand, and follow all instructions contained in this document before assembling and using the mini-pool. These warnings, instructions, and safety guidelines cover some general risks associated with leisure activities in the water but they cannot cover all hazards and risks in all cases. Caution, common sense, and good judgement are required when engaging in any water activity. This information must be kept for later use. The manufacturer's instructions must be complied with unless otherwise stipulated in other regulations and/or unless the manufacturer's instructions are contrary to existing provisions.
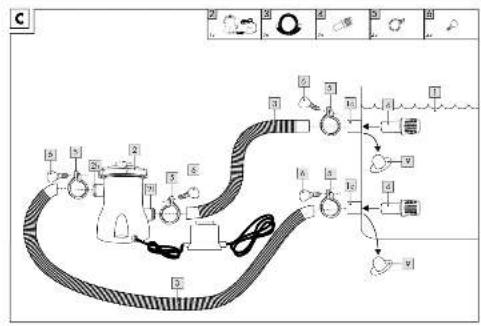
Scope of delivery (fig. A)
1 x mini-pool (1)
1 x filter pump (2)
2 x hose for filter pump (3)
2 x perforated screen (4)
4 x clamp (5)
4 x clamp screw (6)
1 x hose adapter (7)
1 x repair kit and ventilation tube (8)
2 x plastic stopper (9)
1 x instructions for use
Parts list
Mini-pool (1) (fig. A)
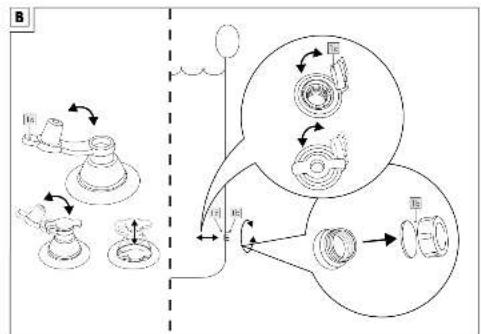
Inflation valve (1a) (fig. B)
Valve cover for outflow (1b) (fig. B)
2-part outflow valve incl. plug (1c) (fig. B)
Filter pump valve (1d) (fig. C)
Technical data
Pool:
Dimensions (inflated):
approx. 300 x 76cm (∅ x h)
Fill capacity: approx. 3,618L

Date of manufacture (month/year):
12/2023
Number of people required for assembly:
2 people
Minimum assembly time: 30min
Intended use
The product is designed as a mini-pool, which is to be set up on the ground and which has been constructed to withstand the internal pressure. The product is not suitable (not even in part) to be sunk into the ground.
Symbols used

Warning. Never leave your child
unattended - Risk of drowning.

Warning. No jumping.
Risk of injury!

Warning.
Wear personal flotation devices.

Warning. Do not tilt.

Please read carefully and retain for future reference.
Safety instructions
The use of a mini-pool assembly kit assumes that it meets the safety provisions that are described in the maintenance instructions. Pay particular attention to safeguarding access to the mini-pool to prevent drowning and any other serious injuries, since children under the age of 5 may unexpectedly gain access, and when children are bathing they must be under uninterrupted adult supervision.

Danger to life!
- Never allow children to play with packaging materials or the product unsupervised. Suffocation hazard!

Safety of non-swimmers!
- A competent adult must provide constant, active, and attentive supervision of weak and non-swimmers at all times. (You are reminded that the greatest risk of drowning is among children under 5 years of age).
- When in use, designate a competent adult as a supervisor.
- Weak and non-swimmers should wear personal flotation devices whenever they enter the mini-pool.
- When the mini-pool is not being used or supervised, remove all play items from the pool and the pool area to prevent children from being attracted there.
- When the mini-pool is not being used or supervised, remove all play items and objects (e.g. chairs, large toys, etc.) that might give a child easy access to the mini-pool from the mini-pool area.

Safety features
- It is recommended to set up a barrier (and secure all doors and windows, if any such exist) in order to prevent unauthorised access to the mini-pool.
- Personal protective equipment, barriers, pool covers, alarm systems, and similar security devices are sensible aids but they are not replacements for continuous and competent supervision by adults.

Safety equipment
- It is recommended to keep rescue equipment (e.g. a lifebelt) close to the pool.
- Keep a functioning telephone and list of emergency numbers close to the mini-pool.

Safe use of the mini-pool
- All users, especially children, are encouraged to learn how to swim.
- Learn first aid (cardiopulmonary resuscitation) and update your skills and knowledge regularly. This can make a life-saving difference in an emergency.
- Instruct all pool users, including children, about what to do in an emergency.
- Never jump into shallow water. This can lead to serious injury or death.
- Do not use the mini-pool under the influence of alcohol or medications that may impair the ability to use the pool safely.
- If pool covers are used, remove them completely from the water surface before entering the mini-pool.
- Always keep the water purified and hygienically safe to protect the users of the mini-pool from water-borne diseases. Consult the Instructions for Use for the guidelines on water purification.
- Keep chemicals (e.g. products for water purification, cleaning, or disinfection) out of the reach of children.
- The use and installation of electrical devices in the vicinity of the mini-pool must be in accordance with the national regulations.

Risk of injury!
- Follow the instructions on the label.
- Do not bring any sharp or pointed objects with you.
- Protect the product from contact with any dubious liquids or acids. This may otherwise cause irreparable damage.
- Protect the product from excessive heat and cold! Be careful with lit cigarettes!
- Do not make any technical modifications to the product. Modifications of any kind compromise use of the product and nullify the warranty.
- Never use the product under the influence of alcohol, drugs, or medications.
- Under no circumstances should the inflated product be transported by vehicle.
- Do not use the product if there is a leak and is losing air.

Avoiding material damage!
- Avoid contact with corrosive, sharp, or dangerous items, chemicals, or liquids. Should this nevertheless happen to occur, inspect the pool thoroughly for damage.
- Warning. Avoid using sunscreen and skin care products containing alcohol. Sunscreen and skin care products containing alcohol can cause the colour coating of PVC inflatables to peel. This can lead to stains on your body, your clothing, and other objects that come into contact.
- Keep the product away from fire and hot objects (e.g. lit cigarettes).
- All inflatables are susceptible to cold. For this reason never unfold and inflate the product at a temperature lower than 15^
- Inflate the product's air chamber to a maximum operating pressure of 0.4 bar (5.8 psi).
- In the event that the air pressure increases in the hot sun, it must be balanced accordingly by letting out air.
Open the valve and let out some air whenever the pressure is above 0.4 bar (5.8 psi).
- Make sure that the product, especially when inflated, does not come into contact with stones, gravel, or sharp objects and does not rub or scrape against anything as this can cause damage.
- Use only the correct pump adapter to insert into the valve. The valve may otherwise become damaged.
- Do not use a compressor to inflate the product.
- Do not over-inflate because you then risk tearing open the welded seams. Close the valve properly after inflating.
- Using auxiliary equipment not permitted for the mini-pool (e.g. ladders, covers, pumps, etc.) can lead to risk of injury or damage.
- Check the product for damage or wear before each use. The product may be used only when in good working order and condition!
Selecting a location
WARNING. Mini-pools that are placed on uneven surfaces tend to leak, deform, or collapse, leading to material damage or serious bodily harm to those who are in or around the mini-pool!
WARNING. Personal injury hazard! Do not use sand when setting up. If the use of an "aid for levelling" is needed, it is highly likely your set-up location is unsuitable.
WARNING! Set the mini-pool up at a location where continuous supervision is possible in order to avoid the risk of small children drowning.
WARNING! Select your set-up location carefully because grass and other desirable plants growing underneath the product will die. In addition, be sure not to install the product on surfaces on which vigorous plants and weeds frequently grow because both can pierce through the product.
WARNING! The mini-pool must be within reach of a 230-240 volt mains connection protected by a circuit breaker operated by residual current (FI circuit breaker). The product must be set up at a minimum distance of 2 metres from the power source but no further than the length of the filter pump cord. Under no circumstances may an extension cable be used to extend the range for connection.
Comply with the following instructions before you set the product up.
-
Select a suitable surface that is firm, flat (no humps or mounds), and completely level. There may not be a slope of more than 3^ at any point on the set-up site.
-
Make sure that the site is free from branches, stones, sharp-edged and other foreign objects so that the product does not become damaged.
-
Select a location where the product will not be beneath power cables or trees. Take care also that there are no underground pipes, supply lines, or cables on the site.
-
Insofar as possible, select a location where your product will be in direct sunlight. This will heat up the water in the pool.
Assembling the mini-pool
At least two people should assemble
the product. You will need around 30 minutes just for the assembly, not including site preparation and filling up with water. Contact the Service Hotline if you have any questions or need assistance with the assembly.
Follow the individual assembly steps in the order indicated.
- Select a smooth and clean surface with enough space to unpack the product. Check that all individual parts are present and in good order and condition.
- When assembling the product for the second and subsequent times, you should inspect it for any possible damage, holes, and tears, and these should be sealed as described later.
- It is recommended that you do not fill the mini-pool with groundwater, water obtained from drilling, or from wells: typically, such water contains organic substances contaminated with nitrates and phosphates. You are advised to fill the mini-pool with water from the public drinking water supply.
Inflating the mini-pool
WARNING!
- Avoid inflating the air chambers too much because there is the risk of over-stretching the welded seams and even tearing them open.
- The operating pressure may increase in the sun. Balance out the operating pressure by letting out the air from the mini-pool.
- Use standard commercial foot pumps or double-stroke piston pumps with matching adapter attachments and pressure gauge to inflate the mini-pool.
- Do not use a compressor or compressed-air bottle to inflate the mini-pool. This can cause damage.
- Do not inflate the pool next to pointed or sharp objects or on rough or pebbly ground.
• Always inflate the air chamber fully.
IMPORTANT!
- Only open the valve to inflate and to let out air. It may otherwise become contaminated.
- The area around the valve must always be clean and dry.
- Make sure that no sand or other contaminants get into the valve.
Important!
- The optimal operating pressure for the air chamber is 0.4 bar (5.8 psi).
- Open the valve seal (1a) (fig. B).
- Inflate the air chamber until the product is sufficiently firm. Make sure that the air chamber is positioned centrally over the mini-pool.
Note: The air chamber must feel firm to the touch but still give when pressed gently with the thumb. Do not inflate the air chamber too tightly, as it might burst or the seams could become damaged.
- Close back the valve outlet.
Filling the product with water
WARNING. If more than 2.5-5cm of water collects on one side before the middle has filled up, the mini-pool is standing unevenly and has to be positioned correctly. To do this, pull the outflow plug (1c) out and let the water drain off completely. Place the mini-pool in another even location.
- Close the outflow plug (1c), screw the valve cover (1b) onto the outflow valve (fig. B), and close the filter pump valves (1d) with the plastic stoppers (9) on the inside of the mini-pool (fig. C). Fill the product with water slowly. Do not leave the product unattended while filling.
Note: The mini-pool automatically straightens up with the volume of water.
- Once 2.5cm of water is spread uniformly over the floor of the mini-pool, smooth out the floor. Pull out the outer wall from the upper edge all around the floor of the pool.
Impact of water quality
To keep the coating performing efficiently, and for aesthetic considerations, appropriate treatment procedures and/or recommendations of the pool manufacturer should be applied in a timely manner. Before applying cleaning products it is essential that you read the manufacturer's product instructions and instructions for use in order to check their compatibility with the top layer of the polyester skin. These products and procedures must correspond to the recommendations made herein.
Although the water used for filling generally comes from the public drinking water network, it can also come from a drill hole, tank, or well. In such case, a regular analysis of the water, including physical-chemical analysis, is vital in order to verify the possible presence of any metals (iron, copper, manganese) that may have a negative impact on the top layer, as there is a risk that colour stains will form due to metal sulphides. An analysis is the basis for the approaches required in order to ensure good quality of water for bathing as well as stability of the top layer. This quality analysis of the water used for filling must be assessed and approved by the mini-pool manufacturer.
However, the tartaric stabilisation and/or the formation of metals must be avoided. It is recommended to use calcium sequestering agents (lime scale remover or descaler) and sequestering agents for metal ions for this purpose.
WARNING. Calcium sequestering agents (lime scale remover or descaler) and sequestering agents for metal ions often contain phosphorus or phosphorous bonding agents that can cause or promote the growth of algae and/or can have an influence on measurements (of free chlorine, redox potential) with online devices. For this reason, when measuring with online systems, preference should be given to ion exchangers and/or metal filters in the water line (before water runs into the pool).
The use of products and/or treatment processes must be validated by a professional, since irreversible damage could occur to the surface layer in particular combinations.
When disinfecting with the aid of products based on stabilised chlorine or of stabilisers only, the dosage recommended by the manufacturer (which should be in accordance with "EN 16713-3") must be applied. Renewing water after a purifier/purge filter must make it possible to prevent a concentration of cyanuric acid of more than 75mg/l.
Otherwise a reduction of (at least) 30% in the mini-pool volume is required so as not to damage the surface layer.
Follow the instructions provided by the manufacturer for winter storage. No shock disinfection may be performed shortly before covering up the mini-pool because within 8 hours of disinfecting there is a risk of chemical damage to the coating of the mini-pool.
Accessibility

WARNING!
Never leave your child unattended - Risk of drowning.
A competent adult must provide constant, active, and attentive supervision of weak and non-swimmers at all times. (You are reminded that the greatest risk
of drowning is among children under 5 years of age).
Keep a telephone or another means of communication ready near the pool to give information to emergency services if needed.
Even when the pool is not in use the following steps must be considered:
- Make the mini-pool inaccessible to the extent possible (e.g. by locking doors, windows, and access routes to the swimming pool; and/or
• by installing a protective device; and/or
• by emptying the mini-pool.
Disassembling the mini-pool
WARNING. When draining the water make sure that there are no children downstream and opposite the outflow. The water flow might carry the children away with it.
To store the product at season's end or for a lengthy period of non-use, proceed as follows:
- Disconnect the filter pump (2) from the power source.
- Connect your garden hose with the hose adapter (7), open the outflow plug (1c), and position the other end of the hose so that the water can drain off harmlessly.
Note: Please follow the local regulations regarding specific requirements for disposing of water from swimming pools.
- Disconnect the hoses of the filter pump (3) from the mini-pool.
- Open the valve (1a) to let the air escape. If necessary, use the ventilation tube (8) to allow the air to escape from the valve quickly.
- Let the mini-pool dry out completely. This is best done in the sun.
- Close all valves before folding up the mini-pool.
Folding up the mini-pool (fig. F)
- Fold the protruding sides inwards to form a rectangular shape.
- Fold each half of the rectangle inwards to make a smaller rectangle.
- Fold the ends backwards.
- Coil the product up into a small rectangle.
Care, storage, repairs, maintenance
Care

WARNING!
Do not use aggressive cleaning agents, brushes with metal bristles, or sharp-edged or metallic objects such as knives. Use only mild detergent.
WARNING. The purpose of the filter pump (2) included in delivery is to remove dirt and small particles from the water. However a consistent chemical water treatment is required for clean water free of algae and harmful bacteria. Ask a specialist retailer about materials to use, such as chlorine, shock treatments, algaecides, and other chemicals.
WARNING. Never add chemicals to the mini-pool when people are inside. This can cause skin and eye irritations! Never add chemicals or substances to the mini-pool if you cannot verify their correct use. Ask a specialist retailer regarding what chemicals to use, their guidelines and instructions.
WARNING. Owners of mini-pools are required to test the water regularly to determine the pH and chlorine levels in the water and to make adjustments when necessary. Ask a specialist retailer about suitable test kits and their instructions for use.
WARNING. Failure to comply with these maintenance instructions can seriously endanger the health of bathers, especially that of children.
When the mini-pool is in use its filter system should be in operation long enough each day for the total water volume to be recycled completely at least once (approx. 4-5 hours). In order to guarantee the adequate cleanliness and hygiene of the water in the mini-pool throughout the whole season, comply with the following instructions:
-
Correct and continuous use of basic chemical products for swimming pools is required in order to maintain an appropriate pH level in the water of the mini-pool. Moreover, the use of such chemicals prevents the growth of harmful bacteria and algae in the water and supports the filter pump in keeping your water clean. The following chemicals are suitable for your mini-pool:
-
Chlorine in the form of tablets, granules, or liquid: Disinfects the mini-pool water and prevents the growth of algae.
• Chemicals that control the pH level: Serve to correct the pH level and make the water either more or less acidic. - Algaecides: Are used to destroy algae.
- "Shock treatment" (super-chlorination): Eliminates certain organic and other combined compounds that impair the clarity of the water. Ask a specialist retailer about the use of specific chemicals. State the nominal filled volume of your mini-pool and give them a water sample, if asked. They can best advise you regarding suitable chemicals, suitable amounts of chemicals, and effective use.
- Chlorine may never come into direct contact with the cladding of the mini-pool until it is first completely dissolved. Chlorine in the form of tablets or granules must first be dissolved in advance in a bucket filled with water before it is added to the water of the mini-pool. Liquid chlorine must be added to the mini-pool water slowly and uniformly over various areas.
Danger! Never pour water onto chemicals.
Add the chemicals to the water. Never mix separate chemicals. Add them to the water separately so that the first chemical has dissolved completely and spread before you add the second.
-
When temperatures are high, clean the mini-pool several times each week to limit algae formation manually. Ask a specialist retailer about what cleaning agents to use, e.g. pool-floor suction cleaners, nets, brushes, etc.
-
Ask a specialist retailer about purchasing a test kit to check the pH level.
Note: An excessive concentration of chlorine, as well as low (acidic) pH levels, can damage the mini-pool cladding and immediate remedial steps are required if the test result indicates either of the two conditions.
-
Inspect the filter pump cartridge every two weeks (or more frequently if the mini-pool is used frequently). Clean or replace it when necessary, e.g. If it is no longer white. Initially, it can be hosed down with a water hose. If it is still no longer white, it must be replaced. Checking regularly maintains the effectiveness of the filter pump.
-
Make sure that the mini-pool does not overflow by accident because of rain or any other precipitation, whenever it has water in it. Otherwise, the mini-pool may become damaged. Reduce the water level immediately.
Storage

WARNING!
If the product is stored improperly, there is the risk of mildew forming.
If you live in a climate zone in which the mini-pool is not used throughout the year, it is very strongly recommended to drain out the water, clean it thoroughly, let it dry, and store it in a protected location outside the season.
- Store the product in a clean, well-ventilated, and dry place away from direct sunlight where it is not exposed to wide variations in temperature.
- Store the product in a location that is inaccessible to children and securely locked.
- Do not place any heavy or sharp-edged objects on the product.
- Inspect the product after lengthy storage for signs of wear or ageing.
Repairs

WARNING!
Check the mini-pool for loss of pressure, holes, and tears before use each time. If the mini-pool is losing air, this may be because of a leak on the valve, a defective valve, or a leak in the mini-pool.
When there is more serious damage do not perform repairs yourself under any circumstances. You can repair minor damage with the repair kit (8) supplied.
Leaks
Use only appropriate adhesives to repair leaks on the mini-pool (1). Repairs made with unsuitable adhesives can lead to further damage!
You can obtain suitable adhesives from a specialist retailer.
Note: You can repair small areas (smaller than 2mm) with the adhesive just by applying the adhesive directly to the area. For larger areas (more than 2mm) proceed as follows:
- Let the air out of the pool (1) completely.
- Clean the area for repair thoroughly.
- Dry the cleaned area.
- Take one of the patches and trim a piece that covers the damaged area and overlaps by 1.5cm on all sides.
- Press the patch down firmly on the leak area with a soft object. Be sure to work on an even surface without wrinkles or folds. Gently remove any air bubbles with a rounded object, working from the inside towards the outside.
- Allow the patch to dry for at least 12 hours after repair.
Important: Check that the repaired area is waterproof before you fill the mini-pool with water after repair. When there is very serious damage do not perform repairs yourself under any circumstances. Take the mini-pool to a specialist workshop for repair.
Maintenance
The owner is primarily responsible for the maintenance of the mini-pool and maintenance of the accessories.
The following should be avoided:
- overdoses of water treatment agents other than those indicated in EN 16713-3 as well as their direct contact with the top layer (since this can lead to irreversible discolouration);
- mechanical impacts (e.g. falling blunt objects such as sunshades, garden chairs, diving equipment, etc.) can cause dents or deep scratches on the top layer;
- unusual rubbing together of two surfaces;
- contact over a long period of oxidisable metal objects or organic materials with the top layer.
The water line is particularly susceptible to deposits such as lime, metals, or other greasy products (sun lotion) that may be deposited on the top layer. Regular maintenance of the water line is recommended to prevent these deposits getting inside the top layer and making cleaning impossible.
Regular and careful maintenance should be performed using appropriate products that do not scour and are compatible with the top layer. Never use cleaning products that are not intended for swimming pools (household cleaners) and/or abrasive cleaning agents.
Disposal

Dispose of the product and packaging materials in accordance with current local regulations. Store the packaging materials (foil bags, for example) out of the reach of children. For further information about disposal of the product no longer needed, contact your local council. Dispose of the product and the packaging in an environmentally friendly manner.

The Recycling Code distinguishes different materials to be returned for recycling. The Code consists of the recycling symbol for the recycling process and a number that identifies the material.
Notes on the guarantee and service handling
The product was produced with great care and under continuous quality control. DELTA-SPORT HANDELSKONTOR GmbH gives private end customers a three-year guarantee on this product from the date of purchase (guarantee period) in accordance with the following provisions. The guarantee is only valid for material and manufacturing defects. The guarantee does not cover parts that are subject to normal wear and tear and that are thus considered wear parts (e.g. batteries) and it does not cover fragile parts such as switches or parts that are made of glass. Claims under this guarantee are excluded if the product has been used incorrectly, improperly, or contrary to the intended purpose, or if the provisions in the instructions for use were not observed, unless the end customer proves that a material or manufacturing defect exists that was not caused by one of the aforementioned circumstances.
Claims under the guarantee can only be made within the guarantee period by presenting the original sales receipt. Please therefore keep the original sales receipt. The guarantee period is not extended by any repairs carried out under the guarantee, under statutory guarantees, or as a gesture of goodwill. This also applies to replaced and repaired parts.
If you wish to make a claim please first contact the service hotline mentioned below or contact us by e-mail. If there is a guarantee case, then the product will be repaired or replaced free of charge to you or the purchase price will be refunded, depending on our choice. There are no further rights from the guarantee.
Your legal rights, in particular guarantee claims against the respective seller, are not limited by this guarantee.
IAN: 446566_2307
GB Service Great Britain Tel.: 0800 404 7657 E-Mail: deltasport@lidl.co.uk
IE Service Ireland
Tel.: 1800 101010 E-Mail: deltasport@lidl.ie
Discolourations.and.their.possible.causes.
Despite using high-performance materials and taking into consideration all of the aforementioned precautions, unusual stains may appear because of ageing. It is important to remember that the top layer gradually becomes discoloured because of ageing and the effects of UV rays.
The following may cause accelerated discolouration:
- use of unsuitable products and procedures for water preparation that do not match the manufacturer's recommendations;
- excessive mechanical impact (tidal swimming pools, floating layers of ice, automatic cleaners, and brushes, etc.);
- high water temperature;
- impact of the materials and the manufacturing process.
Sometimes a slight difference in colour appears between the areas that are immersed in the water and the areas that lie above the surface of the water.
This is quite normal.
Stains.and.their.possible.causes
Because of the many influencing factors, such as those mentioned above, it is extremely difficult to determine what causes stains. Stains that occur above the waterline are rarely deep in the top layer.
The following table shows the possible causes of stains once the mini-pool is in normal operation. To find the possible causes a sensible approach is to implement the measures described in the following record sheet: If these are unsuccessful, possible influences of the manufacturing process may be involved.
| Types.of.stainPossible. | causePossible.solution | |
| Whitish stain on the floor of the mini-pool. | Wrong water preparation Stains are irreversible and cannot be repaired. | |
| Decomposition of organic substances (humus, twigs, leaves) that are in direct contact with the top layer. The effect is more considerable when there has been contact over a longer period of time. | ||
| Whitish stains on the floor of the mini-pool and on the walls. | Excessive concentration of chemical products. Stains are irreversible and cannot be remedied. | |
| Whitish stains at the waterline | Lime scale deposits These deposits can be prevented by using calcium sequestering agents and by maintaining the pH level balance.Cleaning is possible before placement by using a suitable product, solvent-free and non-abrasive, while taking care not to scratch the layer.Control the water hardness regularly to reduce this effect e.g. with a pre-installed ion exchanger. | |
| unsuitable chemicals and/or abrasives Irreversible and untreated milky or bleached areas | ||
| Presence of algae | ||
| Decomposition of organic substances (leaves, dirt, vegetation) | This can be prevented by regular maintenance of the mini-pool (cleaning). | |
| Use of copper sulphate in pure or mixed form and application of the Cu/Ag process | Irreversible. These products are not allowed in this type of mini-pool. | |
| unintentional presence of oxidisable metal parts (metal deposits ...) | ||
| Earthingathe mini-pool: Earthing the water in the mini-pool can reduce this effect. Earthing must be via a different ground rod than the one for the security of the house. This functional earthing will merely permit leakage currents to be dissipated so as to limit the electrical charge of the pool water. | ||
| Migration of metal through the top layer (cobalt-based gel layer) | ||
| Presence of metal ions (copper, iron, manganese ...) in excessive concentrations and dark, insoluble metal sulphides | The use of metal ion sequestering agents is recommended to prevent high concentrations of metal ions that may contribute towards the formation of permanent staining on the top layer of the mini-pool.b | |
| Suntan lotions and cosmetics that float on the surface of the water, combustion of hydrocarbons from wood or charcoal fire, car exhausts, aeroplane exhausts, or any other pollution from the immediate vicinity or more distant surroundings of the mini-pool. | ||
| Green stains Since they are organic in origin, these stains only occur when living organisms are present (algae, fungi, etc.) and may be related to a significant disturbance in the balance of the water preparation. | See operating instructions and tips of the mini-pool manufacturer, for the filter unit or chemicals. | |
| Types.of.stainPossible. | ble.causePossible.solution | |
| Pink stains These are generally found on seal parts and caused by bacteria that grow on components of these plastic parts and may be related to the water preparation. If PHMB is used for disinfection in the presence of copper, there is a risk of pink stains forming. | ||
| Yellow stains Presence of pollen or red algae, agricultural work, greasy products (suntan lotion or cosmetics), organic remnants (decomposition of plants) or dirt | ||
| some calcium compounds, which are used in chemical products (pebble-shaped), tablets | ||
| When the water in the mini-pool is prepared with bromine, it can cause stains (from yellow to brown) due to the combination of a higher dosage than the manufacturer recommendation and a pH level lower than 6.9. | In most cases these stains are irreversible. | |
| Shock disinfection with an oxidising agent can lead to the formation of gas that burns the mini-pool surface where it is not in contact with water. | It is important to react as soon as the stains appear. The manufacturer of the swimming pool is to be informed, who will give instructions on how to proceed depending on the type of stains. | |
| ^a WARNING: [Earthing the swimming pool promotes the corrosion of metal parts. When no electrical current reaches the mini-pool, no earthing is needed - see DIN VDE 0100-702.] ^b WARNING: Calcium sequestering agents often contain phosphorus or phosphorous bonding agents that can cause or increase the growth of algae and/or can affect measurements (of free chlorine, redox potential) with on-line devices. For this reason, when measuring with on-line systems, preference should be given to ion exchangers and/or metal filters in the water line (before water runs into the pool). | ||
FILTER.PUMP
GB IE
FILTER.PUMP
Original operating instructions
Parts list
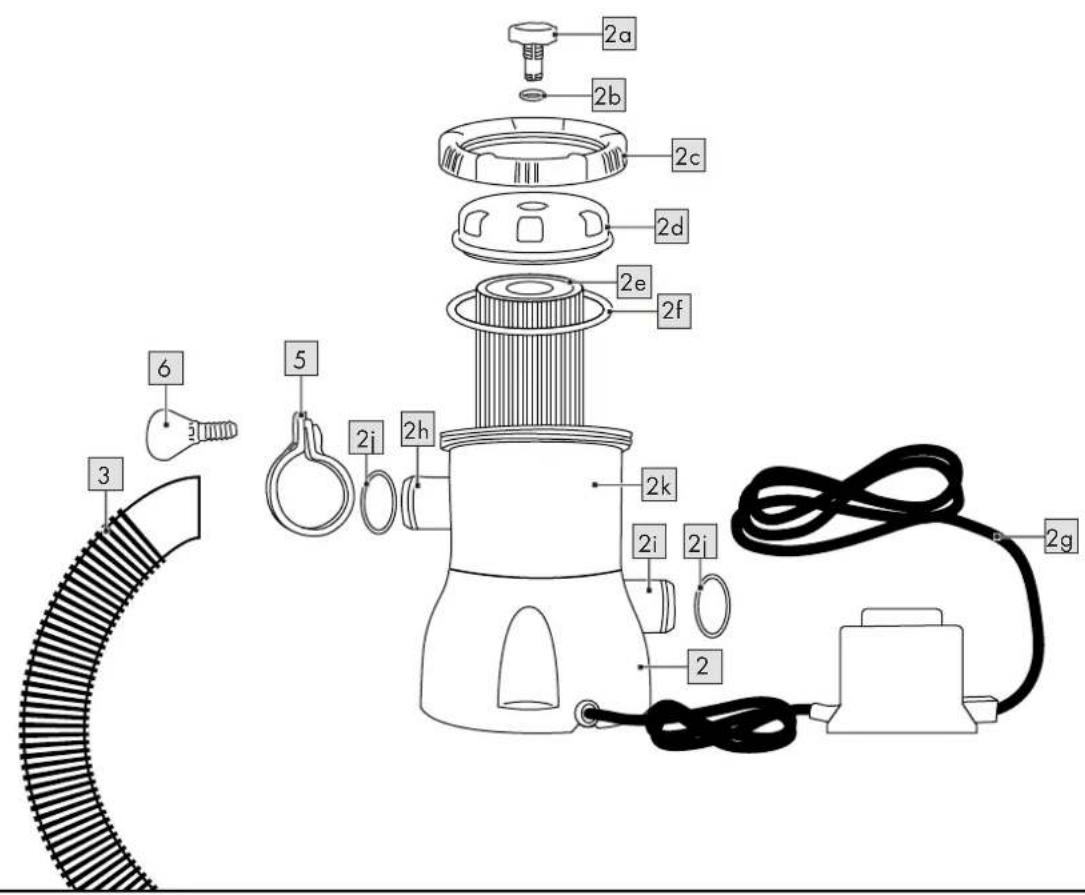
Filter pump (2) (fig. D)
Air release valve (2a)
Sealing ring for air release valve (2b)
Filter housing cover holder (2c)
Filter housing cover (2d)
Filter pump cartridge (2e)
Filter housing rubber seal (2f)
Mains cord (2g)
Inlet (2h)
Outlet (2i)
O-ring (2j)
Filter housing (2k)
Hose for filter pump (3) (fig. C)
Perforated screen (4) (fig. C)
Clamp (5) (fig. C)
Clamp screw (6) (fig. C)
Plastic stopper (9) (fig. C)
Technical data
Use only this pump for this mini-pool.
Model: 53011A, 12V, 50 Hz, 25 W, Maximum IPX7
Flow rate: 1,200 L/h
Pump power-supply unit:
Stermay HT-53011A-1
IP 65
Plug IP 44
Primary: 230-240V \~ 50 Hz
Secondary: 12V \~, 3000mA, 36VA, 0.83PF
□ = Protection Level II
Manufacturer: DongGuan Huatao Metal&Plastic Products Co., Ltd.
No. 2 Yan He Road, Xia Bian Avenue, Chang An Town, DongGuan City, GuangDong Province Importer: DELTA-SPORT Handelskontor GmbH
Wragekamp 6, 22397 Hamburg
Germany

UK Conformity Assessed
Delta-Sport Handelskontor GmbH hereby declares that this product meets the following basic requirements, as well as other important regulations:
Electromagnetic Compatibility Regulations 2016
The Restriction of the Use of Certain Hazardous Substances in Electrical and Electronic Equipment Regulations 2012
Supply of Machinery (Safety) Regulations 2008

hereby declares that this product meets
the following basic requirements, as well as other important regulations:
2014/30/EU - EMC Directive
2011/65/EU - RoHS Directive
2006/42/EC - Machinery Directive
Intended use
The filter pump is for cleaning and maintenance of the water quality and may be connected only to the mini-pools provided. The mini-pool and the filter pump have been developed for private use in the leisure sector.
Safety instructions
- This product can be used by children above the age of 8 and by people with reduced physical, sensory, or mental capacities or by those lacking experience and knowledge provided they are supervised or have been instructed in the safe use of the product and understand the risks involved. Children may not play with the product. Cleaning and user maintenance may not be performed by children without supervision.
- WARNING. Use only the 53011A pump included in delivery and supplied by the manufacturer: DongGuan Huatao Metal&Plastic Products Co., Ltd.
- WARNING. Inspect all clamps and accessories before starting the pump.
- WARNING. Do not bury the power supply cord. Place the power supply cord where it cannot be damaged by lawnmowers, hedge trimmers or other devices.
- WARNING. Do not use the filter pump to empty the pool. The pump may be used only on an erectable pool, not on one that has been sunk into the ground.
- WARNING. Power supply cord and input cable are not interchangeable. Should the power supply cord or the input cable become damaged, the power-supply unit or pump must be disposed of.
- WARNING. Pump and adapter may not be installed at locations where they may be subject to flooding or where there is no suitable power outlet available.
- WARNING. Make sure that the external power outlet is protected with a residual-current-operated circuit breaker (FI/RCD) with a maximum trip current of 30 mA.
- WARNING. The filter pump must be attached to a stable base with screws before it is switched on.
- WARNING. Take care that the filter pump motor does not overheat. Ensure that the pump is always full of water so that it does not operate when empty. Incorrect use can lead to overheating and subsequent damage due to the motor burning out.
- WARNING. If air remains in the system, this makes the pump work faster and leads to damage. Switch the filter pump off and open the air release valve (2a) slightly to allow all air to escape from the hose and the filter pump.
- WARNING. The pump must be supplied via a residual-current-operated protective device with a rated differential current of not more than 30 mA.
- WARNING. The power-supply unit should be installed at least 2m away from the mini-pool. The mains plug should be located 3.5m away from the pool.
- WARNING. The pump should be firmly anchored to the ground to prevent it from possibly tipping over. Ask a specialist retailer regarding what screws or bolts to use.
Risk of electrical shock!
Defective electrical installation or too high a mains current can lead to electrical shocks. Connect the pump only to an easily accessible power plug so that you can quickly disconnect it from the mains supply in case of a failure.
- Connect the pump only to a correctly installed shock-proof socket and then only if the supply voltage of the socket matches the information on the product label.
- The pump may not be used when people are in the water.
- Do not operate the pump if it shows visible signs of damage or if the power cord and/or power plug is defective.
- If the power cord to the pump is damaged, the pump must be disposed of.
- Do not open the housing. Entrust repairs to professionals. Contact a specialist workshop. In the event of repairs being made independently (by the owner or by a third party) improper connections, or incorrect operation, liability and warranty claims are excluded.
- Only parts matching the original equipment data can be used in repairs.
- This pump contains electrical and mechanical parts that are indispensable to protect against potential hazards.
- Do not immerse the pump, power cord, or power plug in water or other fluids.
- Never touch the power plug with wet hands.
- Never pull the power plug out of the socket by the power cord; always hold the power plug instead.
- Never use the power cord to carry the product.
- Keep the pump, power plug, and power cord away from open flame and hot surfaces.
- Place the power cord so that no one can trip over it.
Connecting the filter pump
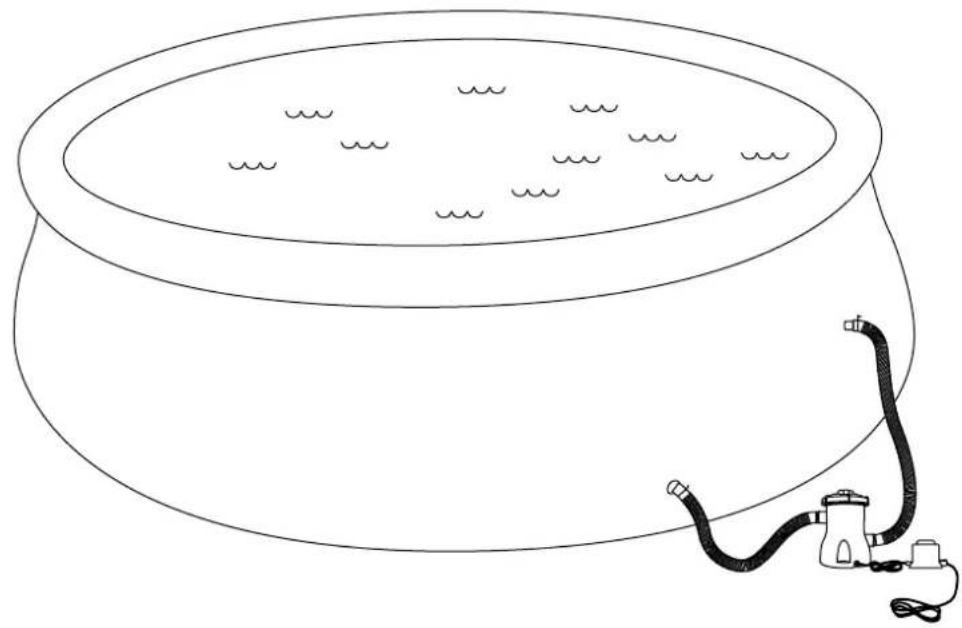
- Assemble the mini-pool completely and fill it with water.
- Remove all parts of the filter pump (2) and hoses (3) from the packaging.
- Set up the filter pump so that it stands 20cm to 1m below the water level.
Note: The filter pump must be mounted on an even and stable base. On the bottom of the filter pump there are drill holes for appropriate assembly materials (not included in delivery).
- Place the filter pump cartridge (2e) in the filter housing (2) (fig. D). Ensure that the filter pump cartridge is located fully in the filter housing.
- Place the filter housing rubber seal (2f) on the filter housing (fig. D).
-
Place the filter housing cover (2d) on the filter housing (fig. D).
-
Tighten the filter housing cover by turning clockwise.
- Connect the first hose of the filter pump (3) to the inlet (2h) of the filter pump with the aid of the clamp (5) and the clamp screw (6) (fig. C).
- Connect the other end of the hose to the mini-pool's lower hose connection (1d) (fig. C).
- Turn the air release valve (2a) slowly one to two rotations anticlockwise.
- Connect the second hose to the mini-pool's upper hose connection (1d) and to the outlet (2i) of the filter pump.
Operating.the.filter.pump
- Make sure that the mini-pool (1) is completely full of water and that the filter pump (2) has been set up at a suitable location.
- Remove the plastic stopper (9) from the filter pump valve (1d) on the inside of the mini-pool (fig. C).
- When water flows into the filter pump, trapped air is able to escape via the air release valve (2a).
- Then close the air release valve slowly by turning clockwise.
- Connect the mains cord (2g) to a suitable power outlet and let the filter pump run until the water is sufficiently clean.
Repairs,.maintenance
Before each maintenance disconnect the power supply from the filter pump (2).
Do not place the filter pump in tall grass as this may lead to overheating.
Should you detect any damage or defects in the filter pump, take it to a specialist workshop for repair or else replace it with a new one. Do not make any technical modifications to the product.
Do not use solvents to clean the filter pump.
- Disconnect the mains cord (2g) from the power supply completely.
- Detach the filter housing cover (2d) and its cover holder (2c) by turning it anticlockwise.
- Clean the filter pump cartridge (2e) and if need be replace it with a new one.
- Check the inside of the filter housing (2k). If there are dirt or deposits inside, rinse them out with clear water.
- Reassemble all parts and plug in the mains cord again.
Troubleshooting
- The filter pump does not work.
- Check for burnt or tripped fuses, check for loose electrical wiring.
- Inspect the motor. If the motor is overheated or overloaded, switch the device off. Let the motor cool down.
- Consult a specialist.
- The motor runs but little or no water is being pumped.
- Check for blockages in the inlet or outlet hose inside the pool walls.
-
Tighten the hose clamps, inspect the hose for damage, and check the water level in the pool.
-
Clean the filter pump cartridge more frequently. Use a garden hose to do so.
- Replace the filter pump cartridge.
-
Consult a specialist.
-
The filter pump no longer draws water.
-
Make sure that the water level in the pool with the pump switched off is at least 5cm above the suction port.
- Make sure that the extraction hose is in good order and condition.
- Check the filter pump cartridge for soiling; clean it when necessary. Use a garden hose for this.
-
Consult a specialist.
-
The filter pump is not cleaning the water.
-
Set correct chlorine content and pH value.
- Replace or clean the filter pump cartridge. Use a garden hose to do so.
- Check the filter cartridge for damage and replace if necessary.
- Run the pump for a good while.
- Remove dirt from the screens in the pool wall.
- Consult a specialist.
Disposal
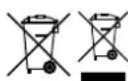
The accompanying symbol indicates that this device complies with Directive 2012/19/EU. This directive indicates that you may
not dispose of this device along with basic household waste at the end of its useful life and instead must hand it in to specifically designated collection sites, valuable substance collection stations, or waste disposal facilities.
Look after the environment and dispose of waste properly.
Batteries may not be disposed of with household waste. They may contain toxic heavy metals and are subject to hazardous waste treatment. The chemical symbols of the heavy metals are as follows: Cd = cadmium, Hg = mercury, Pb = lead. Dispose of used batteries at a municipal collection site.

For further information about disposal of the product no longer needed, contact your local council. Dispose of the product and the packaging in an
environmentally friendly manner. Store the packaging materials (foil bags, for example) out of the reach of children.

Note the label on the packaging materials when separating waste, as these are labelled with abbreviations (a)
and numbers (b) with the following meaning:
1-7: plastics / 20-22: paper and cardboard / 80-98: composite materials.
The product and the packaging materials can be recycled, dispose of them separately for better treatment of waste.

DELTA-SPORT
DELIA SPORT HANDELSKONTOR GMBH | Wrogelösp 6 | 22397 Homburg | Germany
DELTA SPORT HANDELSKONTOR GMBH
Wrogelomp 6
22397 Homburg
Germany
-49(03)401273150
info@dselntn-sipart.com
www.delta-sport.com
Original Declaration of Conformity
We, the company
declare that this declaration of conformity is issued under the sole responsibility of the manufacturer.
IAN: 446566
Article: Filter Pump
Model-No.: 53011A
The above-mentioned article(s) are in conformity with the relevant Community harmonisation legislation:
| Directive / Requirement | Harmonised standards |
| Machinery2006/42/EC | EN60335-1:2012/A15:2021EN60335-2-41:2021/A11:2021, EN62233:2008 |
| EMC2014/30/EU | EN IEC 55014-1:2021, EN IEC 55014-2:2021, EN IEC 61000-3-2:2019+A1:2021, EN61000-3-3:2013+A1:2019+A2:2021 |
| RoHS 2011/65/EU | EN 62321-1:2013 |
The object of the declaration described above is in conformity with directive 2011/65/EU of the European Parliament and of the Council of 8 June 2011 on the restriction of the use of certain hazardous substances in electrical and electronic equipment. This declaration is issued under the sole responsibility of the manufacturer.

Hamburg, 09.08.2023
Place, Date
Benjamin Struve, Quality Manager
Name, Function
Geschäftsführung
Stefino Schechter
Philipsch
Hondelungsgünter Horsburg
(18) 56003
V67-16: DE134805841
Sr-Nr: 50/714800311
Bionkverbindung
DZ Bank AG
Hargi L.8
Konto | Account
(USD) 03.06 14 34 50
(18) 00 00 14 34 50
USD 16.00 02.61.18
EUR 15 1799303
IBAN
DE66 2006.0000.0300.1434.50
(0)(1) 2000 0000 0000 1434 50
DF3625050001800026118
DE27 2505 0000 0151 7983 03
SWIFT | BIC
GENO DE FF 200
NOVA DE ZHI XOX
HAMBURG
SHANGHAI
HOCHI MINH CITY
CHICAGO
ISTANBUL
Félicitations !
No. 2 Yan He Road, Xia Bian Avenue, Chang An Town, DongGuan City, GuangDong Province
2011/65/UE - Directive RoHS
2006/42/CE - Directive relative aux machines
Benjamin Struve, Quality Manager
Nom, fonction
Geschäftsführung
Stelma Schodder Philip Kaff
Hondelssregister Homburg HTB 50603
VdF-No: DE134895641 Sr-No: 50714000311
Bankverbindung
DZ Bank AG
hard : B
Kenta | Account
USD 03.00 14.34 50 EUR 00.00 14.34 50
USD 18.00 (2.01) 19 EUR 15.17 (60.30)
IBAN
DE66 2006 0000 C300 1434 50 DE31 2006 0000 0009 1434 50
DE36 2505 0000 1800 0261 18 DE27 2505 0500 0151 7983 03
SWIFT | BIC
GENO DE FE 200
NOLA DE ZH300
HAMBURG
SHANGHAI
HOCHIMINH CITY
CHICAGO
ISTANBUL
Gefeliciteerd!
Mini-Pool (1) (afb. A)
Opblaasventiel (1a) (afb. B)
Veiligheidsuitrusting
No. 2 Yan He Road, Xia Bian Avenue, Chang An Town, DongGuan City, GuangDong Province Importeur: DELTA-SPORT Handelskontor GmbH
Wragekamp 6, D-22397 Hamburg Germany
Pro duct: Filterpomp
Modellnr.: 53011A
Benjamin Struve, Quality Manager
Naam, functie
Geschäftsführung
Stefan Schuldler Philip Kahl
Model: 53011A, 12V, 50 Hz, 25 W,
maksymalnie
IPX7
Producent: DongGuan Huatao Metal&Plastic Products Co., Ltd.
No. 2 Yan He Road, Xia Bian Avenue, Chang An Town, DongGuan City, GuangDong Province Importer: DELTA-SPORT Handelskontor GmbH Wragekamp 6, 22397 Hamburg Niemcy
Benjamin Struve, Quality Manager
Hamburg, 09.08.2023 r.
Miejscowość, data
Nazwisko, funkcja
Geschäftsführung
Stefan Schroder
Philip Kohl
No. 2 Yan He Road, Xia Bian Avenue, Chang An Town, DongGuan City, GuangDong Province Importér: DELTA-SPORT Handelskontor GmbH Wragekamp 6, 22397 Hamburg
Germany

DELTA-SPORT HANDELSKONITOR (SMBH | Whagelkamp 6) | 22397 Hamburg | Germany
DELTA-SPORT HANDELSKONTOR GMBH
Wrigenkamp 6
22397 Hamburg
Germany
Benjamin Struve, Quality Manager
Jméno, funkce
| Geschäfts/ührung | Bonnverbindung | Kento | Account | IBAN | SWIFT | BIC | |
| Stefon SchröderPhilip Kohl | Handelsregister HamburgHHB 96603 | DZ Bank AG | USD 03.00 14 34 50EUR 00.00 14 34 50 | DE06 2006 0000 0300 1434 50DE31 2006 0000 0000 1434 50 | GENO DEFF 200 |
| VAT-No: DF13489584TSt-Ne: 5071400311 | Nord LR | USD 18 00 02 61 18EUR 15 17 98 30 3 | DE36 2505 0000 1800 0761 18DE27 2505 0000 0151 7983 03 | NDLA DE 2H KXX | |
| HAMBURG | SHANGHAI | HO CHI MINH CITY | CHICAGO | ISTANBUL | |
Blahoželáme!
No. 2 Yan He Road, Xia Bian Avenue, Chang An Town, DongGuan City, GuangDong Province
Benjamin Struve, Quality Manager
meno, funkcia
Geschäftsführung
Stefan Schroder
Philip Kohl
Handelsregdster Handelurg
HRB 96003
VAT-No.: DE114895841
Sr.-te: 50/71A/00311
Bankverbindung
(2) Bank AG
Nord Li
Konto | Account
USD: 02.00 14 34 50
EUR 00 00 LK 34 50
USD 18.00.02.61.18
(0.9 15 17 98 30 3
法定代表人
0856 2096 0300 0300 1454 50
(DE3) 2006 0000 0000 1434 50
DE36 25075-0000-180010291.18
DE27 25050000 0161798303
SWIFT | BIC
GENO DE PF 306
NOLA DE 2813001
HAMBURG
SHANGHAI
HOCHI MINH CITY
CHICAGO
ISTANBUL