Baby Presto - Bottle sterilizer Lionelo - Free user manual and instructions
Find the device manual for free Baby Presto Lionelo in PDF.

User questions about Baby Presto Lionelo
0 question about this device. Answer the ones you know or ask your own.
Ask a new question about this device
Download the instructions for your Bottle sterilizer in PDF format for free! Find your manual Baby Presto - Lionelo and take your electronic device back in hand. On this page are published all the documents necessary for the use of your device. Baby Presto by Lionelo.
USER MANUAL Baby Presto Lionelo
text_image
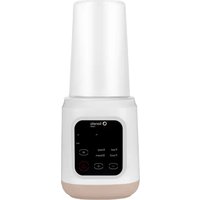
Warm Med Hot Boiled Dechlor 888 mL 88°C Setting Temp Current Temp Power BatteryDear Customer!
In case of any questions or comments on the purchased product, please contact us: help@lionelo.com
Producer:
BrandLine Group Sp. z o. o.
Recommended operating conditions of the device
Voltage: 230 V / 50 Hz
Power: 1000W
Important information
Please read this manual before using the product to familiarize yourself with its functions and use it as intended.
Failure to follow the safety instructions and use not in accordance with the instructions may cause harm to health.
Keep this instruction manual for future reference.
- The device may be used by children at least 8 years old and persons with reduced physical, sensory or mental capabilities, as well as persons without relevant knowledge and experience in the use of the device, if they are supervised or have been previously instructed in the safe use of the device and the risks involved.
- This device is not a toy. Do not allow children to play with it. Keep the device out of the reach of children.
- The device is intended for domestic use only. The device is not suitable for outdoor use. It should not be used for other purposes incompatible with its intended use.
- If the device is overfilled, boiling water may be poured outside.
- Place the cover so that the steam is directed away from the handle.
- Use the device only with the base provided by the manufacturer.
- Avoid spilling water on the electrical connector.
- The surface of the heating element may remain hot for some time after use.
- Hot water can cause serious burns. If there is hot water in the device, handle it with care.
- Do not repair or modify the device yourself. These operations can only be performed by an authorized service center.
- Cleaning and maintenance of the device by children is allowed only if they are over 8 years old and under supervision. Keep the device and its cord out of the reach of children under 8 years old.
- Do not let the power cord hang over the edge of a table or countertop. Do not bring the power cord into contact with hot parts. Do not pull it over sharp edges.
- Plug the device into a grounded power outlet only. Make sure the power cord is properly connected to the power source.
- Use a power supply with parameters corresponding to those indicated on the device's label to power
the device.
- Use the device on a flat surface resistant to high temperatures. Do not move the device during operation or when there is hot water in it.
- Use only original accessories and spare parts.
- Regularly check the device for damage. Do not use a damaged device. Do not try to repair the device yourself – contact an authorized repair center. If the power cord is damaged, it should be replaced by the manufacturer to avoid danger.
- During installation, removal and cleaning, the device must be turned off and disconnected from the power supply.
- Keep the device away from sharp edges and sources of heat and moisture. The device should not be exposed to direct sunlight.
- Do not immerse the device or the power cord in water or other liquids.
- Avoid overheating the device.
- Before turning on the device, make sure there is water in it. Never turn on the device if there is no water in it.
- When exposed to hot water, the surface of the device may become hot. Use caution.
- Always check the temperature of the food before giving it to the baby.
- Wait for the device to cool down before cleaning.
- Decalcify the device regularly, every 2-4 weeks, depending on the hardness of the water used.
- Do not dose while decalcifying.
- Do not touch hot surfaces. Use handles.
- Do not put the device in water or pour water to wash it. Clean it with a soft, damp cloth.
- It is forbidden to turn on the heating function without water in the tank exceeding the minimum indicator.
- Do not boil anything other than tap or filtered water.
- It is recommended to replace the water with fresh water after 24h.
- The device remains on for 24h from the last use.-


The product complies with the requirements of European Union directives.
In accordance with Directive 2012/19/EU, this product is subject to separate collection. The product should not be disposed of with municipal waste as it may pose a risk to the environment
and human health. Return the used product to the recycling centre for electrical and electronic equipment.
Device diagram (fig. A)
- Cover handle
- Cover
- Gasket
- Metal underside of the cover
- Internal glass container
- Container handle
-
Outer cover of the container
-
Body of the control panel
- Faucet
- Container base
- Base body
- Bottle base
- Base cover
Control panel (fig. B)
- Function display
- Display of the set value of temperature / water volume
- Function button
-
On/off switch
-
Decrease / increase the set value
- Water dosage button
- Display of the current water temperature
- Lock button
Use
Filling the water
- Place the device on a flat and stable surface.
- Open the lid (2, fig. A), pour in tap water or filtered water, making sure that the water level exceeds the minimum indicator and is no higher than the 2000 ml volume indicator. Close the cover, then place the container on the base body.
NOTE
Before the first use, boil the water and then pour it out.
Water dosage
NOTE
It is forbidden to turn on the heating function without water in the tank exceeding the minimum indicator.
- Plug the device into a power outlet.
- Touch the on/off switch (4, fig. B) to go to the operating state. To switch to the standby state touch it again.
- To unlock water dosing touch and hold the lock button (8, fig. B). A single informational tone and the activation of the faucet's LED backlight (9, fig. A) will signal that dosing is unlocked. If no operation is performed for 10 seconds, the device will automatically activate the lock (this will be signaled by a single information signal and the switching off of the backlight).
- Set the bottle into which you want to dispense water on the bottle base (12, fig. A). Touch the water dosage button (6, fig. B). After 3 seconds, the device will start dosing water at the default volume of 30 ml.
- Use the decrease / increase setting buttons (5, fig. B) to decrease or increase the water dosing volume by 5 ml in the range of 30 - 500 ml.
- With a single touch on the water dosage button (6, fig. B) you can increase the set volume by 30 ml. Touching and holding the button will rapidly increase the set water volume as long as the button is held. The device will start dosing water 3 seconds after the volume setting.
The set water volume display (2, fig. B) will show the target volume of dosed water.
The device has a memory function for setting the dosed water volume (even when the device is unplugged).
Device functions
Temperature maintenance functions:
-
Warm - In standby mode, touch the on/off switch (4, fig. B), and then touch the function button (3, fig. B) once. Once the water has heated up to 35^ (this will be signaled by a triple information signal), the device will go into temperature holding mode.
-
Med - In standby mode, touch the on/off switch (4, fig. B), and then double-tap the function button (3, fig. B). Once the water has heated up to 55^ (this will be signaled by a triple information signal), the device will go into temperature holding mode.
- Hot - In standby mode, touch the on/off switch (4, fig. B), and then touch the function button 3 times (3, fig. B). Once the water has heated up to 70^ (this will be signaled by a triple information signal), the device will go into temperature holding mode.
Boiling function (Boiled)
In standby mode, touch the on/off switch (4, fig. B), and then touch the function button 4 times (3, fig. B). The water will boil (indicated by a triple information signal), and after it has cooled down, the device will switch to the 45^ C holding state.
Dechlorination function (Dechlor)
In standby mode, touch the on/off switch (4, fig. B), and then touch the function button 5 times (3, fig. B). The device will boil the water for 15 minutes (the end will be signaled by a triple information signal), and after the water has cooled down, the device will go into the 45^ C holding state.
NOTE
The currently selected function is shown in the function display (1, fig. B).
In each function, the decrease / increase buttons of the set value (5, fig. B) allow you to manually increase or decrease the temperature by 5^ C in the range of 35 - 95^ C. The target temperature will be displayed by the set temperature value display (2, fig. B), while the current water temperature display (7, fig. B) will show the actual water temperature. The device maintains the temperature for 24 hours.
Cleaning
- Unplug the device after each use and before cleaning. Wait for the device to cool down before cleaning.
- Empty the device of water.
- Wipe the housing and the inside of the heater using a soft damp cloth, then wipe dry with a clean cloth or paper towel.
NOTE
Do not use scouring sponges, scouring agents or any caustic substances or chemicals for cleaning.
Do not scratch the surface of the hot plate with metal sharp objects or other cleaning tools to avoid damaging it.
To prevent scale buildup, use the cleanest water possible.
Decalcification
It is recommended to decalcify regularly every 2-4 weeks, depending on the hardness of the water, to ensure proper operation of the device.
- Pour 100 ml of white vinegar and 200 ml of cold water into the device.
- Turn on the device, then boil the water and let the solution sit in the device for 10 minutes.
-
Set the dosage to 270~ml and let the vinegar-water solution flow through the dosing system.
-
Unplug the device and wait for it to cool down before emptying it.
- Pour the solution out of the device. Pour fresh water into the device, rinse out the remaining solution, and then empty the device. Repeat the operation twice.
- Pour 1000 ml of clean water into the tank, stand the container under the faucet, and then set the water dosing to 250 ml. When the dosage is finished, empty the substituted container and repeat the operation two more times.
- If the decalcification effect is unsatisfactory, repeat the entire process.
NOTE
Decalcifiers based on citric acid can also be used.
Do not use other types of decalcifiers.
Troubleshooting
| Problem Solution | |
| Error E1 • The container cannot be detected. | • If the water container leaves the base during product operation, Error E1 will be displayed and the power will be automatically cut off.• If the container is placed back in the base within 10 minutes, the previous operating condition will be restored. |
| Error E3 | • No water in the container. Pour water into the container in a volume that exceeds the minimum indicator.• f a problem occurs during operation, error E3 will be displayed and the power will be automatically cut off. The operation of the device will return to normal after natural cooling (water can be added for faster cooling). |
The photos are for reference only, the actual look of the products may differ from the ones shown in the pictures.
PL
Drogi Kliencie!
BrandLine Group Sp. z o.o.
BrandLine Group Sp. z o.o.