Aqua Pleasure - Inflatable spa LANAFORM - Free user manual and instructions
Find the device manual for free Aqua Pleasure LANAFORM in PDF.

User questions about Aqua Pleasure LANAFORM
0 question about this device. Answer the ones you know or ask your own.
Ask a new question about this device
Download the instructions for your Inflatable spa in PDF format for free! Find your manual Aqua Pleasure - LANAFORM and take your electronic device back in hand. On this page are published all the documents necessary for the use of your device. Aqua Pleasure by LANAFORM.
USER MANUAL Aqua Pleasure LANAFORM
natural_image
Close-up of hands holding a small object, possibly food or medical item, with no visible text or symbols.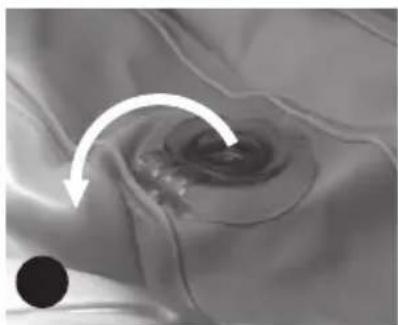
natural_image
Close-up of a textured surface with a curved arrow pointing to a circular feature, no visible text or symbols.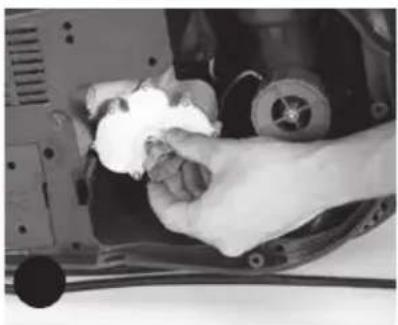
natural_image
Close-up of a hand cleaning a car engine component with a white cloth (no visible text or symbols)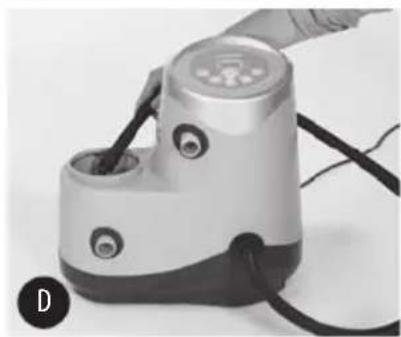
natural_image
Close-up of a handheld electronic device with black cables and a metallic top, no visible text or symbols.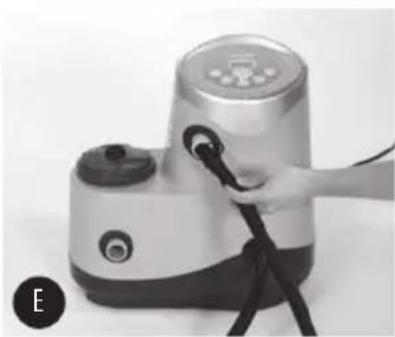
natural_image
Hand holding a black cable inserted into a silver appliance, no visible text or symbolsDiagram 9 • Schema 9 • Abb. 9 • Grafički prikaz 9 • Slika 9
natural_image
Interior view of a device showing internal components and wiring (no visible text or symbols)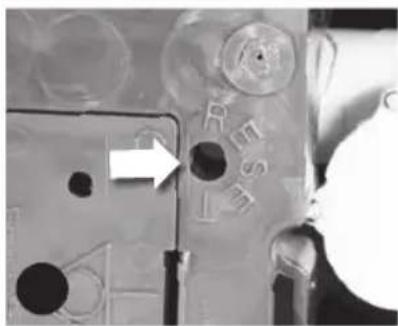
natural_image
Close-up of a mechanical component with circular features and an arrow pointing to a hole (no visible text or symbols)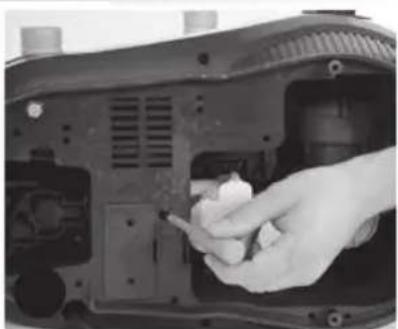
natural_image
Close-up of a hand using a tool to adjust or install electronic components on a device (no visible text or symbols)Thank you for your interest in the LANAFORM Aqua Pleasure®. This spa bath will allow you to enjoy the benefits of hydrotherapy both inside and outside your home. With its 88 hydrojets and a water temperature of up to 40^ Celsius, you can enjoy a soothing and relaxing massage at any time of day. The benefits of the warm water, together with the feeling of weightlessness and the gentle combination of the water jets and air pressure, will reduce your stress and fatigue in minutes, all while easing your muscles and joints. Thanks to these 3 features, you will leave your spa bath feeling calm and relaxed.
PLEASE READ ALL THE INSTRUCTIONS BEFORE USING YOUR SPA BATH, PARTICULARLY THE ESSENTIAL SAFETY INFORMATION:
Please always follow the basic security precautions below when installing and using this electrical equipment:
RISK OF ELECTRIC SHOCK
- The spa bath is protected by a differential circuit breaker set to a residual operating current not exceeding 30mA . This device must be tested before each use.
- If the power cord is damaged, it must be replaced with an identical cord available from your supplier or their post-sales service.
- To reduce the risk of electrocution, do not use an extension cable to connect the unit to the power supply.
- No part of the equipment (filtration pump etc.) must be placed over the bath during use.
- Live components, except those with a very low voltage not exceeding 12V, should not be within reach of persons inside the spa bath appliances on the ground must always be connected by a fixed cable; electrical components must be placed or fixed in a manner which prevents them from falling into the bath.
- The spa bath must be positioned at a distance of not less than 3.5m from the connection to the power supply.
- Domestic electrical installations must conform to the standard NFC 15-100 criteria (specific to France).
- To avoid all risk of electrocution, do not use the spa bath outside when it is raining.
- The spa bath must not be operated by children under the age of 14.
- Do not allow children in or near to the spa bath without the supervision of a responsible adult. Keep the spa bath covered and locked when not in use. Refer to the instructions provided for the locking cover.
- Do not bury the cable. Position the cable in such a way as to minimise the risk of access to lawn mowers, chainsaws or other equipment.
- To avoid any damage to the spa bath, keep pets away from it.
• Always remove the protective cover of the spa bath before engaging the massage function. - Never switch on or use the spa bath if there is any chance that the water may be frozen.
• Install the spa bath at least 1.5 metres from any metal surface. - Never start up the spa bath if the suction guards are broken or missing. Never replace a suction device yourself. Instead, ask your supplier or their post-sales service team to inspect and repair the equipment.
- Never use other electrical equipment when in your spa or if you are wet. Never place any electrical device, such as a lamp, telephone, radio or television, within 1.5 metres of your spa bath.
HEALTH PRECAUTIONS
- This device is not intended to be used by persons (including children) with physical, sensory or mental disability, or by persons lacking appropriate experience or knowledge, unless they are supervised or have been given instruction concerning the use of the device by a person responsible for their safety. Children must be supervised to ensure that they do not play with the device.
-
Danger of drowning: do not allow children near the spa bath without supervision. To avoid accidents, ensure that children can never use the tub unsupervised.
-
Excessive water temperatures can pose a risk of foetal damage in pregnant women. Pregnant women should always take medical advice before using a spa bath.
- The water in a spa bath should never exceed 40°C. Temperatures between 38°C (100°F) and 40°C (104°F) are considered safe for a healthy adult. Lower temperatures are recommended for young children, and for extended use exceeding ten minutes.
- Before entering a spa bath, the user should check the water temperature with an accurate thermometer.
- The use of drugs, alcohol, or medication before or during spa bath use may lead to loss of consciousness with the risk of drowning.
- Persons suffering from obesity or with a medical history of heart disease, low or high blood pressure, circulatory system problems, or diabetes should consult a physician before using the spa bath.
- Persons taking medication should consult a doctor before using the spa bath, as some medication may induce drowsiness leading to risk of drowning, or may affect heart rate, blood pressure, and circulation.
- Never pour water hotter than 40^ directly into the bath.
- Only use the spa bath when an appropriate person is available to come to your assistance if necessary.
- Persons suffering from infections or injuries should not use the spa bath without consulting a physician beforehand.
- If you feel faint or drowsy, get out of the spa bath and consult a physician immediately.
WARNING:
The use of alcohol, drugs, and medication can greatly increase the risk of fatal hyperthermia. Hyperthermia occurs when the internal temperature of the body reaches a level above normal, which is 37^ C ( 98.6^ F). The symptoms of hyperthermia include a raised body temperature, dizziness, lethargy, drowsiness and fainting. Other effects of hyperthermia include: failure to perceive heat, failure to recognize the need to exit the spa bath, unawareness of impending hazard, foetal damage in pregnant women, loss of consciousness resulting in a danger of drowning.
ADDITIONAL ADVICE
- The spa bath should not be used when the water is at a temperature below 10^ (50°F).
- Do not use a spa bath immediately following strenuous exercise.
- To avoid injury, take care when entering and exiting the spa bath.
- To avoid damaging the pump, never operate the spa bath without water.
- Prolonged immersion in a spa bath may be injurious to your health. We recommend that you use the spa for no more than 10 minutes per session.
- Never add water to the chemicals; always add the chemical products to water, to avoid chemical reactions which could cause strong fumes or dangerous vapours.
Note : refer to the section on water care which gives advice on adding chemicals to the water in the spa bath.
PRODUCT SPECIFICATIONS
| Seating capacity 4 persons (2 adults and 2 children) | |
| Water capacity (100%) 800L | |
| External diameter 192 cm | |
| Internal diameter 140 cm | |
| Height 73 cm | |
| Electrical power 220-240V, 50 Hz | |
| Heating element 1940W (to a water temperature of 15°) | |
| Air jets 500W | |
| Power cable 4.5 m | |
| Filter pump AC 12V/60W | 2300L/H |
| Heat rate +/- 2°C/Hr (+/- 4°F/Hr) | |
| Maximum temperature 40°C (104°F) | |
| Weight when full 828 kg |
INSTALLATION INSTRUCTIONS
Description of components (diagram 1):
A: PVC safety cover
B: Pump
C: Spa bath
D: Safety lock
E: Inflation hose
F: Hose connector
G: Water inlet and outlet adaptors
H: Drainage outlet hose
I: Repair kit
J: Filter
K: Drainage adaptor
L: Drainage valve
LOCATION OF INSTALLATION SITE
Due to the combined weight of the spa bath, the water, and the users, it is extremely important that the tub be installed on a smooth, level surface, able to support the weight evenly. If the spa bath is positioned on a surface which does not meet these criteria, any damage caused will not be covered by the warranty. It is the responsibility of the spa bath owner to ensure the suitability of the site at all times.
A. INDOOR INSTALLATION
To install your spa bath indoors, please adhere to the specific requirements below:
- The surface must be able to support the weight of the spa bath and its contents.
- Pay particular attention to the floor underneath the spa bath. Select a surface which will not be damaged or stained.
• The surface must be level and not slippery. - Proper drainage is essential for all interior installation. If you are constructing a new room for your spa bath, a floor drain is recommended.
- A spa bath naturally produces humidity. Consider the effects of air moisture on any wood, paper etc in the proposed location. To minimise these effects, ensure that a means of ventilation is available in the area chosen. An architect can advise you whether additional ventilation is required.
NOTE: Do not position the spa bath on carpet or any other material which could be damaged by moisture.
B. EXTERIOR INSTALLATION
- Wherever you choose to install the spa bath, it must be positioned on a solid surface. If installing the spa bath outdoors, ensure that there are no sharp objects which could damage it, and that the area is level and stable. Prevent dirt and debris from collecting in your spa bath by placing a mat beside it on which to wipe your feet before entering. You might also consider placing a small basin of water nearby, in which bathers can rinse their feet before getting into the tub.
- When filling, emptying or using the spa bath, there is the chance of water spillage. The tub should therefore be installed near a ground drain.
- Do not allow the surface of the spa bath to be exposed to direct sunlight for long periods.
C. CHECKING THE CIRCUIT BREAKER
NOTE: Before each use of your spa bath, it is essential to test the RCD circuit breaker supplied. It is also important to ensure that the device is set to a residual current not exceeding 30mA.
- Insert the circuit breaker plug into the power socket. (diagram 2.1.)
- First press the "Reset" button. Check that the indicator light is red. (diagram 2.2)
- Next press the "Test" button. The indicator light should go off. (diagram 2.3.)
- Press the "Reset" button again. The indicator light should be red. (diagram 2.4.)
If all the above steps go smoothly, the spa bath is ready for use and the LCD screen will light up.
D. ASSEMBLY
- Spread out the spa bath and cover, checking that the holes are lined up (diagram 3.A.).
- Connect one end of the inflator hose (diagram 1.E.) to the black pump adaptor (diagram 3.B.).
- Check the RCD circuit breaker plug as described in point C and then press the massage button to activate the pump (diagram 3.C).
- First inflate the bottom chamber of the spa bath and then the main air chambers, starting with chamber 1 and finishing with 3 (diagrams 3.D.1. & 3.D.2.). It is advisable to only inflate the main chambers to 80% capacity at first, to allow you to adjust the shape and check that all the adaptors are correctly positioned, before completing the inflation.
WARNING: Only use the pump provided to inflate the spa bath. Do not use high pressure pumps, which could burst the tub and cause damage or injury.
How to use the main chamber valves
- Open the first valve cover, insert the end of the inflation hose and inflate the chamber (diagrams 4.A. and 4.B.).
- When the chamber is fully inflated, replace the valve cover (diagram 4.C.).
- To deflate, simply pull back the valve cover fully (diagram 4.D.).
WARNING: Ensure that the pump is fully disconnected from the power supply before connecting it to the spa bath.
- Connect the pump to the spa bath (diagram 5.A.1.).
Attach the different pump adaptors to the bath adaptors, ensuring that the colours at the ends correspond. Connect each of the two black hose connectors to the black ends of the pump and the spa bath. Check that the joints are secure and tighten the adaptors manually to ensure a good fit.
-
Place the filter in the housing provided. To do this, open the cover at the top of the pump (diagram 5.B.1; 5.B.2) by turning it anticlockwise. Put the filter in place and close the cover.
-
Fill the spa bath using a garden hose, ensuring that the level of water reaches the marker on the inner wall of the spa bath (diagram 5.C.).
-
Place the safety cover (diagram 1.A.) on the spa bath and attach it using the zip closure. A padlock is supplied with the unit to secure the tub.
How to change the padlock combination
- The default combination is 000.
- Press the black button while selecting your own code using the number wheels.
WARNING: The protective cover is not a substitute for adult supervision; children should always be supervised around the spa bath.
WARNING: The operation of your spa bath may be affected if you do not follow the instructions below. Never run the pump without water. Any resulting damage will not be covered by the warranty.
NOTE: To ensure proper operation of the device, it is essential to bleed the pump filter before each use to release the air inside it.
- Open the air release valve at the top of the pump by turning the knob anticlockwise. For maximum ventilation, give two full turns of the pump valve. More than two full turns may detach the pump valve (diagram 6.1.).
NOTE: if the knob does become detached, simply replace it and turn it clockwise to reposition the air release valve. - Once the pump valve is open, water will begin to flow round the pump, releasing the air in the system. This process will take about 1 minute, depending on the amount of water in the spa bath and in the pump.
- Close the valve by turning it clockwise.
- Once the pump valve is cleared of trapped air, wipe up any excess water from the pump.
CONTROL PANEL
(Diagram 7)
When lit up, the LED control panel shows the current water temperature automatically.
7.A. Hydro jet massage button: use this button to activate the massage system, which shuts off automatically after 30 minutes. When the spa bath is in massage mode, the filter is turned off. Also the massage function cannot be activated at the same time as the water heater.
7.B. Water filter button: this button turns the water filter pump on and off. The light above the water filter button glows blue when the pump is activated.
7.C. Water heater button: use this button to activate the water heater. The pump heats the bath until the water temperature is 1^ C higher than the temperature level set. The heating system will restart when the temperature falls 2^ C below the set level. The button indicator flashes when the heater is activated. The heating system can increase the temperature quickly, by approximately 1.5 to 2^ C (3-4°F) per hour.
NOTE: when the heating system is on, the filter system stops automatically. This is normal.
When the heating system is turned off, the filter system turns on again. Again, this is normal.
7.D. Temperature mode ( ^ C/ ^ F): The temperature can be displayed in both Fahrenheit and Celsius. To switch from one to the other, press this button.
7.E&7.F. Raising and lowering the water temperature: the indicator lights flash when the raise/lower temperature button is pressed. While they are flashing, you can select the desired temperature. When the buttons are held down, the values rise or fall rapidly. The new temperature setting will remain displayed for 5 seconds.
NOTE: the default temperature setting is 40^ C ( 104^ F) on first start-up. It can be adjusted from 20^ C ( 68^ F) to 40^ C ( 104^ F).
The control panel setting can be locked. To do this, hold down the buttons for increasing and decreasing the temperature simultaneously for three seconds. To unlock the control panel, repeat this process.
EN
DRAINAGE
To empty the spa bath, follow the instructions below:
- Turn off all the bath functions and disengage the pump.
- Connect the drainage adaptor (diagram 1.K.) supplied with the spa bath, by screwing it into the drainage outlet hose (diagrams 1.H and 8.A.).
- Connect the other end of the drainage adaptor to a garden hose (not supplied) using a clip available from any specialist supplier.
- Open the drainage valve at the base of the bath to empty the water (diagram 8.B.).
- Gently tilt the spa bath using the handles, to allow any remaining water to drain out.
- Remove the filter and empty the water from the pump, ensuring that it has been fully unplugged beforehand. We also recommend that you unscrew the drainage valve on the pump (diagram 8.C.) and empty it of water.
- Then plug in the pump and use the massage function to dry the inside of the pump as illustrated in diagrams 8.D. and 8.E.
- Finally, dry the spa bath and the pump.
CLEANING AND MAINTENANCE
CLEANING
During use, residue from detergents and chemical products (pH, chlorine, etc.) will gradually accumulate in the spa bath. To clean the tub, use soap and water, and then rinse. For water maintenance, consult the directions described in the relevant section.
NOTE: Do not use abrasive cleaners or hard brushes to clean the spa bath.
STORAGE
Before storing the unit, check that there is no water left in the tub or in the pump in order to extend its lifetime. Ensure that the tub is clean and dry, as well as the filter pump and various hoses. Remove the pump cover and take out the filter cartridge. You are advised to store the spa bath in its original packaging in a warm, dry place.
NOTE: plastic can become brittle and susceptible to cracking if exposed to sub-zero temperatures. Freezing can seriously damage the bath. Damage caused by inappropriate winter storage may invalidate your warranty.
REPAIR OF THE SPA BATH
If the surface of the spa bath is damaged, use the repair kit provided. Dry the area to be repaired; apply the glue supplied in the kit to the repair patch, and affix it to the damaged area. Smooth the surface to remove any air bubbles.
FILTER MAINTENANCE
WARNING: Ensure that the pump is fully unplugged before undertaking maintenance, to avoid risk of injury or electrocution.
-
To prevent water draining from the pump, place the two adaptors (diagram 1.G.) onto the two connectors on the inner wall of the spa bath. This will prevent water from escaping during cleaning or replacement of the filter cartridge.
-
Clear the air from the pump by unscrewing the bleed valve at the top of the pump as described above (diagram 6).
-
Remove the filter by pulling it from the pump housing.
- The filter cartridge can be rinsed off with a garden hose and re-used. However, if the filter cartridge is still dirty and discoloured, it should be replaced. It is advisable to replace the filter every two weeks if the unit is in regular use.
- Insert the clean cartridge into the centre of the pump housing.
- Check that the seal of the pump cap is securely positioned at the edge of the housing.
- Replace the pump cap.
- Position and secure the safety cap by turning it clockwise.
- Remove the two adaptors from the inside of the tub. This will allow the water to flow out of the pump.
- Plug the pump in again and open the valve to bleed out the air.
- Restart the pump following the procedure described above.
- Test the circuit breaker again before starting up the spa bath.
WATER MAINTENANCE
Poor water quality can be highly detrimental to health. It is therefore important to keep the water in your spa bath clean. We recommend that you follow the instructions below to treat the water in your bath:
- Clear any debris from the water surface (leaves, insects, etc.) before each session. Cover the spa bath with the protective top cover when not in use.
- Filter the water regularly to remove any bacteria. The filter cartridge should be cleaned daily, and replaced every two weeks, depending on the frequency of use.
- We recommend that you change the water in the spa bath if the water quality deteriorates to avoid risks from bacteria. The frequency of this may vary from 3 to 30 days, depending on how often the tub is used and the level of cleaning and maintenance.
- To avoid the development of bacteria in your spa bath, and to ensure the water is of a good quality, pool cleaning products should be used in addition to the filter pump water treatment. Contact your local pool supplier for further advice about water maintenance kits for your spa bath. Carefully follow the manufacturer's instructions regarding the use of chemical products.
Check the water quality of your spa bath after each use. Any damage to the tub caused by incorrect use of chemical products or poor water maintenance will not be covered by the warranty.
We therefore recommend that you:
- Maintain the water at a pH level between 7.2 and 7.6. If the pH is below 7.2, the water is acidic and corrosion may occur. If the pH is higher than 7.6, the water is alkaline, and there is a risk of calcium deposits, the water may become cloudy and algae may develop.
WARNING: In addition to the above, an incorrect pH may cause irritation of the skin and eyes, an unpleasant odour and a rapid fall in the chlorine level.
- The ideal level of alkalinity depends on a number of factors including the type of water treatment used, and the hardness of the water used to fill the tub (tap water). We recommend an alkalinity level of between 80 and 120 ppm (parts per million).
- The water in the spa bath must generally contain a chlorine level of 3 to 5 ppm to ensure effective disinfectant action. Obtain a kit to test the chemical balance of the water before each use of your spa bath. A chemical imbalance may damage your tub or the pump.
TROUBLESHOOTING
LANAFORM ^® strives to supply the highest standard of products on the market. However, should a problem arise, do not hesitate to contact us or your authorised dealer. The table below gives some useful tips to help you identify and resolve
the most common problems.
If any trouble arises in everyday use, please consult the following table:
| PROBLEM PROBABLE CAUSE SOLUTION | ||
| The LCD screen displays the message “High water temperature indicator” or “Low water temperature indicator” and the heating system is not working correctly. | The water in the spa bath is above 45°C (113°F) or below 2°C (36°F) | Turn off the spa bath, unplug the pump and check that the water temperature is between 2°C and 44°C (36°F and 111°F) |
| The LCD screen displays the message “High water temperature indicator” and none of the functions will start. | The water in the spa bath is above 50°C (122°F) | Ask a qualified electrician to reset the thermostat (see below). |
| The water pressure is not strong enough to activate the heating system. | The inlet and outlet valves on the inside of the tub wall are obstructedThe filter is dirtyThe water level is too lowThe bleed valve has not been opened before starting up the spa bath | Clear the inlet and outlet valves on the inside of the tub wallClean the filterAdd water up to the indicated levelBleed the air from the pump as previously indicated |
| The pump is not working Power failure | The RCD circuit breaker is damaged | Check the power supplyAsk a qualified electrician to check the device or its connection and/or your power supply |
| The heating system is not working properly | Temperature set too lowFilter cartridge is dirtyInflatable protection cover is wrongly positionedIncorrect water level | Set the temperature to a higher levelClean/change the filter cartridgeRe position the inflatable protection coverAdjust the quantity of water to the level indicated |
| The massage function is not working The pump is overheatedThe automatic 30 minute pump shutdown has activated | Unplug the pump. Once the pump has cooled down, plug it back in and press the massage button to start the massage function | |
| The filter function is not working | Filter cartridge is dirty | Clean/change the filter cartridge |
| Water is leaking out The spa bath has a rip or hole Use the repair kit | ||
| The water is cloudy Inadequate filter timeFilter cartridge is dirtyInadequate water treatment | Increase the filter timeClean/change the filter cartridgeRefer to the chemical manufacturer's instructions | |
RESETTING THE THERMOSTAT
The thermostat must be reset by a qualified electrician, by following the steps below:
- Turn off the spa bath and insert the inlet and outlet adaptors on the inside wall of the tub.
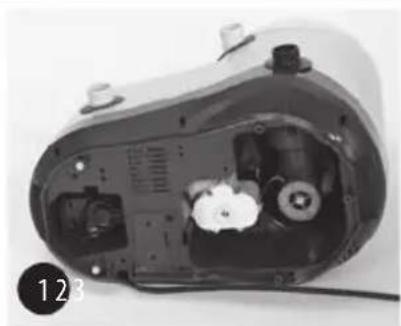
- Unplug the pump, disconnect the hoses and turn over the pump (diagram 9.A).
-
Into the cavity marked "Reset", insert a sharp point (not supplied) no more than 0.9 cm in diameter but at least 10 cm long (diagrams 9.B. and 9.C.).
-
Press gently until a low signal can be heard. The pump is now reset.
- Connect the pump to the spa bath as explained above. Remove the adaptors from the inside wall of the tub and the RCD can be plugged in again.
ADVICE REGARDING THE DISPOSAL OF WASTE
- All the packaging is composed of materials that pose no hazard for the environment and which can be disposed of at your local sorting centre to be used as secondary raw materials. The cardboard may be disposed of in a paper recycling bin. The packaging film must be taken to your local sorting and recycling centre.
- When you have finished using the device, please dispose of it in an environmentally friendly way and in accordance with the law.
LIMITED WARRANTY
LANAFORM ^® guarantees this product against any material or manufacturing defect for a period of two years from the date of purchase, except in the circumstances described below.
The LANAFORM ^® guarantee does not cover damage caused as a result of normal wear to this product. In addition, the guarantee covering this LANAFORM ^® product does not cover damage caused by abusive or inappropriate or incorrect use, accidents, the use of unauthorized accessories, changes made to the product or any other circumstance, of whatever sort, that is outside LANAFORM ^® 's control.
LANAFORM ^® may not be held liable for any type of circumstantial, indirect or specific damage.
All implicit guarantees relating to the suitability of the product are limited to a period of two years from the initial date of purchase as long as a copy of the proof of purchase can be supplied.
On receipt, LANAFORM ^® will repair or replace your appliance at its discretion and will return it to you. The guarantee is only valid through LANAFORM ^® 's Service Centre ^® . Any attempt to maintain this product by a person other than LANAFORM ^® 's Service Centre will render this guarantee void.