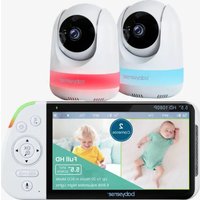
Max View - Baby monitors BABYSENSE - Free user manual and instructions
Find the device manual for free Max View BABYSENSE in PDF.


| Product type | Wireless digital video baby monitor |
| Brand | Babysense |
| Model | Max View |
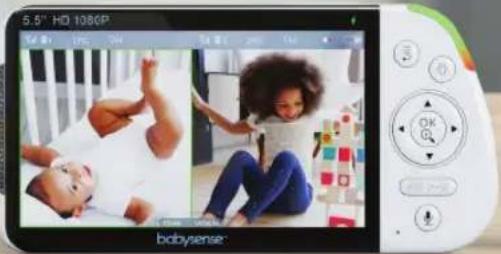
| Parent unit screen | 5.5 inch TFT LCD, 1920x1080 pixel resolution |
| Frequency | 2.4 GHz FHSS |
| Transmission range | Up to 300 meters in open space (no obstacles) |
| Parent unit power supply | 5V/1.2A AC adapter; built-in rechargeable Li-ion battery 3.8V 5000mAh |
| Baby unit power supply | 5V/1.2A AC adapter |
| Parent unit battery life | Up to 20 hours in VOX mode, up to 12 hours in continuous operation |
| Charging time | Approximately 8 hours |
| Night vision | Yes, infrared LEDs (940nm) for automatic black-and-white vision |
| Audio features | Two-way talk, talk-back (speak to baby), lullabies and white noise |
| VOX mode | Yes, 3 sensitivity levels (low, medium, high) and can be disabled |
| Room temperature | Temperature display, adjustable high/low temperature alarm |
| Digital zoom | 2x and 4x |
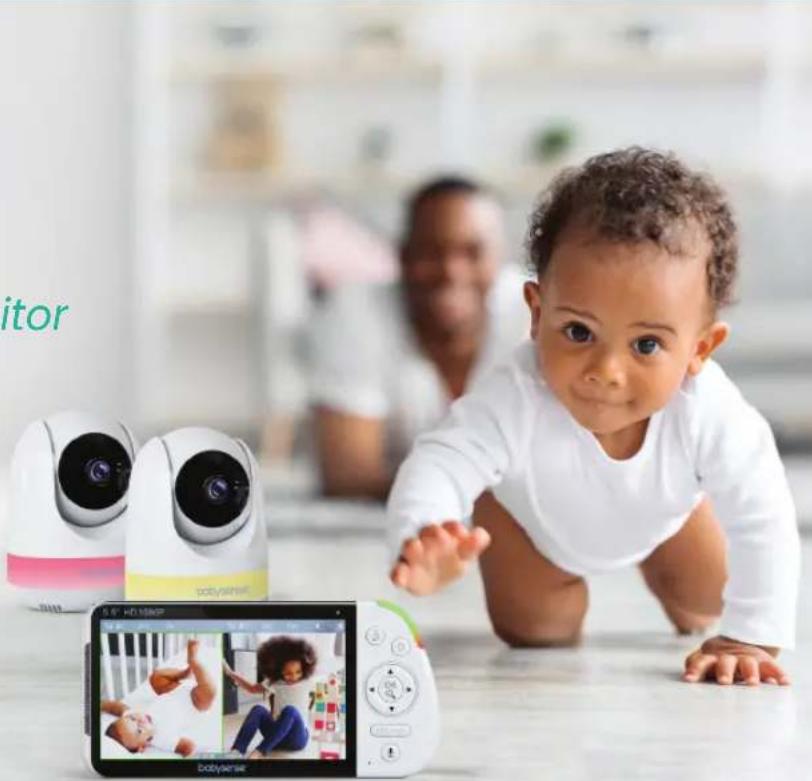
| Split screen | Yes, for up to 4 cameras (display of 2 cameras side by side) |
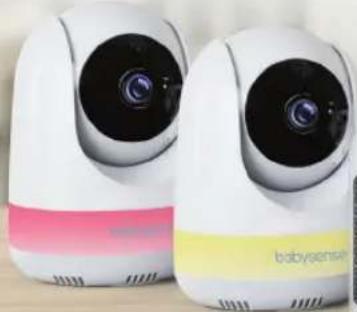
| Nightlight | Built into baby unit, 3 intensities and 6 colors + rainbow mode |
| Number of supported cameras | Up to 4 cameras (Max View model with 1 or 2 cameras included) |
| Wall mount | Possible, screws included |
| Safety | Complies with Industry Canada CNR standards; power cord out of reach (distance > 2 meters) |
| Maintenance | Clean with a slightly damp soft cloth; do not use detergents or solvents |
| Warranty | 1 year against manufacturing defects and materials |
Frequently Asked Questions - Max View BABYSENSE
User questions about Max View BABYSENSE
0 question about this device. Answer the ones you know or ask your own.
Ask a new question about this device
Download the instructions for your Baby monitors in PDF format for free! Find your manual Max View - BABYSENSE and take your electronic device back in hand. On this page are published all the documents necessary for the use of your device. Max View by BABYSENSE.
USER MANUAL Max View BABYSENSE
Wireless Digital Video Baby Monitor
Watch, Listen and Talk to Your Baby
Models: Max View - 1 Camera
Max View - 2 Cameras
For any product related question please contact us at:
support@babysensemonitors.com
www.babysensemonitors.com
United Kingdom Authorised Representative
OBELIS UK | info@obelis.co.uk
Sandford Gate East Point Business Park Oxford OX4 6LB U.K.
Tel +44.1491.378012
European Authorised Representative
OBELIS s.a | email@obelis.net
Boulevard Général Wahis 53, 1030 Brussels, Belgium
Tel +(32) 2.732.59.54 | Fax +(32) 2.732.60.03
1. Warnings and Safety Instructions
Follow these safety precautions to prevent fire, injury or damage to the product.
Read and keep instructions: It is very important that you read all the safety and operating instructions before the Babysense Video Monitor is operated.
Please retain your purchase receipt as you will need to produce it if warranty service is required.
1.1 WARNINGS
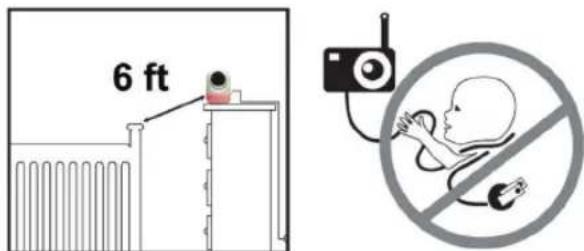
- STRANGULATION HAZARD: Children can become entangled in cords. Make sure the Baby Unit, Parent Unit and mains adaptor cables are kept out of reach of your baby and other young children at all times, at least 6 feet away.
- CHOKING HAZARD: This product contains small parts which may cause chocking. Exercise care when unpacking and assembling the product and keep the small parts away from children.
• RISK OF SUFFOCATION: Keep all packaging materials and protective foils out of reach of children. - DANGER FROM POWER CORDS: To avoid possible danger from power cords, the cords should be secured and never be hung on or near the crib. Never place the Baby unit or Parent unit inside your baby's crib, bed or playpen.
• DO NOT HANDLE ROUGHLY, DROP OR THROW: Babysense video monitor is a high-quality electronic device which must be handled with care.
• This product is designed for INDOOR USE ONLY. - WATER AND MOISTURE: The product should not be exposed to rain, moisture, or splashing. Never use or place the product in or near moisture or water.
- THIS PRODUCT CANNOT REPLACE RESPONSIBLE ADULT SUPERVISION: Your video monitor is designed to be an aid and should not be used as a substitute for responsible and proper adult supervision of a child.
• POWER SOURCE: This product should only be used with the AC power adapters supplied by the manufacturer, as included in this package.
ENG
- VENTILATION: This product should not be used on a bed, sofa, rug or similar surface that may block the ventilation or speaker openings, or be placed in an enclosed area, such as a bookcase or drawer that may impede air flow. Never cover the product with clothes, towels, blankets or any other item.
- THIS PRODUCT IS NOT A TOY: It should be kept out of children's reach.
- KEEP AWAY FROM SOURCES OF HEAT: This unit should not be exposed to direct heat sources such as a candle, stove, radiator, heat register or other appliance that emit heat. The unit should not be left in direct sunlight.
- BATTERY: Before you use the product, we recommend you fully charge the battery of the Parent Unit, so that it continues to work if you disconnect it from the power supply to carry it to another location.
- INSTALLATION LOCATION: The installation location plays an important role in ensuring proper operation. Therefore, maintain a distance of at least 5 feet from other electronic equipment, such as microwave ovens or Wi-Fi routers, otherwise they could cause interference. If this occurs, move the baby and parent units to another location.
- RANGE: Range of all baby monitors is always measured in an open space. The actual range may be shortened due to environmental obstacles (such as concrete walls).
• DAMAGE REQUIRING SERVICE: This product should be serviced by qualified personnel only.
• DO NOT TRY TO OPEN AND REPAIR THE PRODUCT: If you have any problems with the product, please contact the authorized distributor. - In case of unusual noises or smells originating from the device, immediately disconnect the product from the power outlet and contact authorized distributor.
• If the product becomes dirty, use a lightly damp soft cloth to wipe surfaces, taking care to not allow water into any openings.
IMPORTANT: Babysense Video Monitor is designed only for hearing the baby's voice and seeing the images of the baby. This product is not a medical device and should not be used as a substitute for responsible adult supervision. It is important that you regularly check on your baby personally.
1.2 Safety Instructions for AC Power Adapter
• The adapter should not be exposed to direct heat sources such as a candle, stove, radiator, heat register or other appliance that emit heat.
- During continual use, the power adapters may become warm to the touch. This is normal and should not be a cause of concern.
- Examine intactness of the power cord and its plug.
- The adapter must be handled with care: do not handle roughly, drop or throw.
- When removing the power adapter from the wall outlet, hold and pull from the receptacle.
- Do not pull on the cable itself or bend the cable as that will put additional stress on the cable and could lead to damages.
- Do not touch the power adapter with wet hands or allow liquids to spill on it.
- Make sure the mains adaptor cables are kept out of reach of your baby and other young children at all times. To avoid possible danger from power cords, the cords should be secured and never be hung on or near the crib.
ENG
- Do not replace the plugs or cable on your power adapter. This product should only be used with the AC power adapters supplied by the manufacturer, as included in this package.
- Never cut, damage or bend the power cord.
- Do not put any objects on top of the power cord, which could cause overheating, damage, combustion and electrocution.
- Do not leave the power adapter connected to the wall outlet when it is not plugged into the Baby or Parent Unit.
WARNING:
- Do not replace the power cord with non-original substitutes. Improper connection may cause electrocution.
- Do not place the AC adaptor cable in a high wear and tear location. Never use a frayed or compromised cord.
- Intended for indoor use only.
1.3 Safety Instructions for Li-ion battery (Non removable pre-installed battery)
- Do not attempt to repair or adjust any of the electrical or mechanical functions of the unit.
- Do not dismantle, cut, open, crush, bend, puncture, or shred cells or batteries.
- If a battery leaks, do not let the battery liquid touch skin or eyes. If this happens, immediately flush the affected areas with water, and seek medical assistance.
- The battery should not be exposed to direct sunlight or heat sources such as a candle, stove, radiator, heat register or other appliance that emit heat.
- Do not modify, remanufacture, attempt to insert foreign objects into the battery, or immerse or expose it to water or other liquids. Batteries may explode if damaged.
- Use only the battery pack supplied with the product or the same type, sold by the manufacturer or its authorized distributors. Improper use or use of unapproved batteries may present a risk of fire, explosion, or other hazards, and may invalidate the warranty.
- If you believe the battery is damaged, remove product from the charger and stop using the product.
- Never use a damaged battery.
1.4 Information on disposal of product
Always dispose of your product (with the non removable pre-installed battery) at the end of their life in an environmentally responsible way and in accordance with your local waste disposal requirements.
All cardboard and paper packaging materials should be recycled in accordance with your local council waste regulations.
Thank you for choosing Babysense Video Monitor from Hisense Ltd.
ENG
2. Overview
2.1 Pack Contents
- Parent Unit x 1
• Baby Unit (Camera) x1 (x2 in Max View 2 camera model)
• AC Power Adapter x 2 (x3 in Max View 2 camera model)
• Wall mounting screw set x1 (x2 in Max View 2 camera model) - User Manual x 1
2.2 Parent Unit Overview
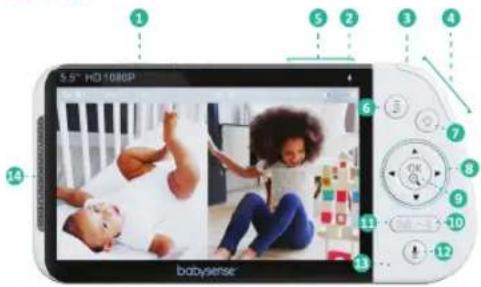
- Power ON/OFF/SLEEP Button
- Charging LED
- Power LED
- Volume Level LEDs
- Volume Up/Down Buttons
- MENU/EXIT Button
- Night Light
- Menu Navigation Keys; Pan & Tilt Navigation Keys
- OK/ZOOM Button
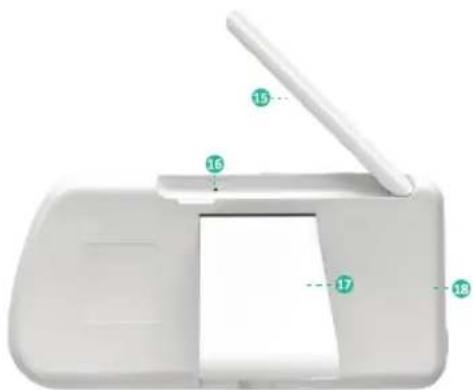
-
Camera Switch Button
-
Split Screen Button
- Talk Back Button
- Microphone
- Speaker
- Antenna
- Reset Hole (Under the Antenna)
- Stand
- Charging Port
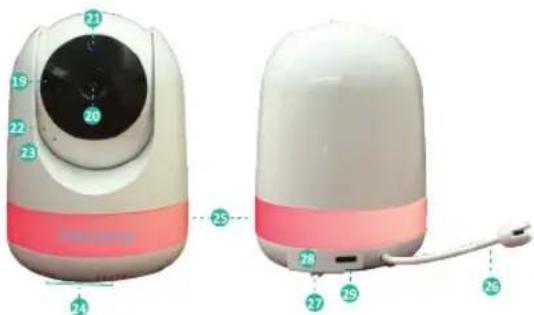
2.3 Baby Unit Overview
- Infrared LEDs
- Lens
- Light Sensor (Night Vision)
- Power LED
- Microphone
- Speaker
- Night Light
- Temperature Sensor
- ON/OFF Switch
- Charging Port
- PAIR Button (On the Bottom)
3. Getting Started
3.1 Powering the Baby Unit (Camera)
- Connect the Camera Power Adapter to the Charging Port (28) on the back bottom of the Baby Unit.
- Plug the AC power adapter into the wall outlet.
- Ensure the ON/OFF switch (27) is in the ON position.
- The unit will power on automatically and the green power LED (22) will light up.
- Use the ON/OFF switch (27) to turn the Baby Unit off.
NOTE: Only use the AC power adapter included in this package.
ENG
ENG
3.2 Powering the Parent Unit
- The adapter should not be exposed to direct heat sources such as a candle, stove, radiator, heat register or other appliance that emit heat.
- Connect the Parent Unit Power Adapter to the Charging Port (18) on the left side of the Parent Unit.
- Plug the AC power adapter into the wall outlet.
- Press and hold the Power button (1) on the top left side of the Parent Unit for 5 seconds to turn the unit on.
- Once the Parent Unit is turned on, the green power LED (3) will light up and "Babysense" logo will display on the LCD.
- Press and hold the Power button (1) on the top left side of the Parent Unit for 5 seconds to turn the unit off.
NOTE: Only use the AC power adapter included in this package.
NOTE: The Parent Unit is supplied with a built-in rechargeable Li-ion battery (3.8V 5000mAh). We recommend whenever possible, keep the Parent Unit plugged in to keep the battery charged.
3.3 Charging the Parent Unit
- Connect the power adapter to the Charging Port (18) on the left side of the Parent Unit.
- Plug the AC power adapter into the wall outlet.
- Charging LED (2) on the Parent Unit will light up in RED to indicate charging.
- When the unit is turned on, the battery charging icon will appear at the top right corner of the LCD screen.
• Full battery indicator (4 fixed bars) will appear at the top right corner of the LCD screen, indicating the battery is fully charged. The charging LED (2) will turn red while the battery is charging. The charging LED (2) will turn green once the battery is fully charged.
NOTE: Before the first use or after a long product storage, it is recommended to fully charge the Parent Unit prior to operating the monitor. It takes approximately 8 hours to fully charge the battery.
NOTE: The monitor can be operated normally during the charging process.
NOTE: Low Battery Warning - The battery icon turns red on the LCD screen to indicate that the battery is low. The warning is accompanied with an acoustic beep sound, indicating that the battery needs to be recharged.
* Alert Volume can be adjusted in the Parent Unit menu, see details in the section Warning Alert Volume Setting".
3.4 Set Up
• Once both the Baby and Parent Units are switched on, the display on the Parent Unit will show the video captured by the Baby Unit(s).
- Baby Unit(s) are paired to the Parent Unit when supplied. There is no need to pair the units again unless the Baby Unit loses its link with the Parent Unit. To renew the pairing of your units or pair a new/additional Baby Unit, follow the procedure described in "Section: Pairing the Baby Unit (Camera) with the Parent Unit".
- The Baby Unit should be placed at least 6 feet away from the baby's crib on a flat surface. Alternatively, it can be wall mounted.
- Never place the Baby Unit inside the crib, bed or playpen.
• Make sure the unit and cords are out of reach of the baby and other young children.
• To avoid a strangulation hazard, the power cords should be secured and never hung on the crib or near the baby.
- Place the baby monitor in a place where the air can circulate freely and avoid blocking the ventilation and speaker openings.
- Aim the camera (s) to best optimize the viewing area: Select a location for the camera that provides a clear view of the area you want to monitor, which is free from dust, and is not in line-of-sight to a strong light source or direct sunlight. Avoid installing the camera where there are thick walls or obstructions between the camera and the monitor.
- To use your Parent Unit and Baby Unit together, you must be able to establish a radio link between them; the range may be affected by environmental conditions/obstacles (See more details in Troubleshooting Section - "Interference or poor reception")
4. Operating the Monitor
4.1 Menu Icon Overview
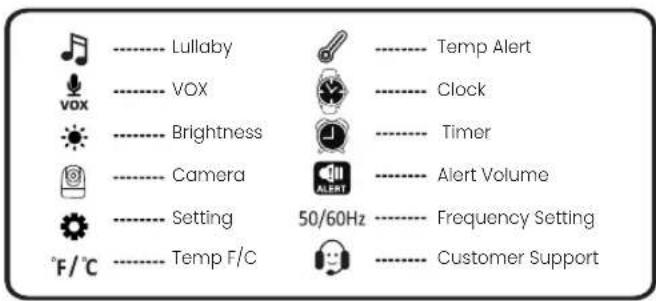
ENG
4.2 Lullaby & White Noise Setting
You can soothe your baby to sleep by playing 5 pre-programmed lullabies from the Baby Unit.
The monitor also features White Noise, which is an effective way to soothe a crying infant and lull your newborn to sleep. The Lullaby and White Noise features are controlled remotely from the Parent Unit.
- Press ≡ to access the menu, choose ♩ and press ⚙
- Select the lullaby you want to play.
- Navigate with Ⓤ to select the desired duration and music volume
- In order to stop the lullaby playback, select ♪x
- Press to exit the menu
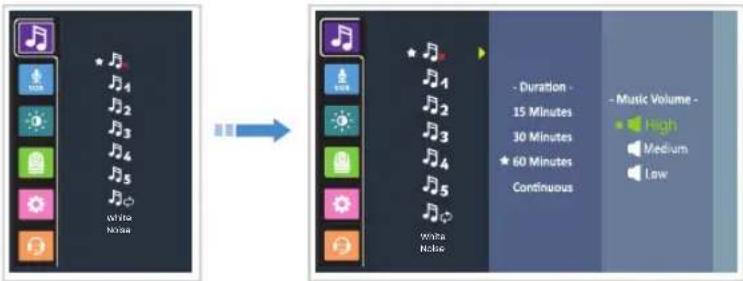
NOTE: Once the lullaby function is turned on, the lullaby icon will be displayed on top of the LCD screen.
The lullaby default setting is OFF.
When selecting the loop mode only the 5 melodies are played; the White Noise is excluded.
ENG
4.3 VOX Mode
When using the VOX function, the sound and video transmission will stop (standby mode) if the Baby Unit does not register any sound within 30 seconds.
While in standby mode, the LCD screen turns off. Once the Baby Unit registers a sound, louder than the set sensitivity level, it will automatically start transmitting the signal (sound and video) to the Parent Unit and the LCD screen will turn on.
To change the VOX Level please follow the instructions below:
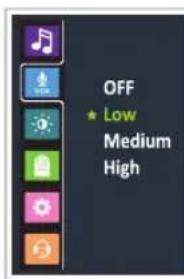
- Press ≡ to access the menu, choose and press
- Navigate with Ⓧ to select the desired vox level.

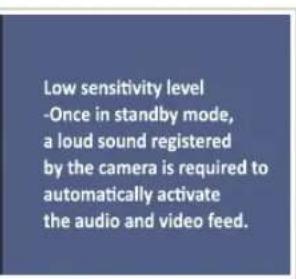
VOX - LOW - Low sensitivity level - higher sound level is required to reactivate the transmission
VOX - MEDIUM - Medium sensitivity level - medium sound level is required to reactivate the transmission
VOX - HIGH - High sensitivity level - low sound level is required to reactivate the transmission
VOX - OFF - Constant transmission - no standby mode.
NOTE: To resume the video and audio signal manually on your parent unit when VOX function is on, briefly press any key on your Parent Unit.
NOTE: VOX default setting is OFF.
When VOX Mode is active, sound detected from either camera will wake the display and show the respective camera.
ENG
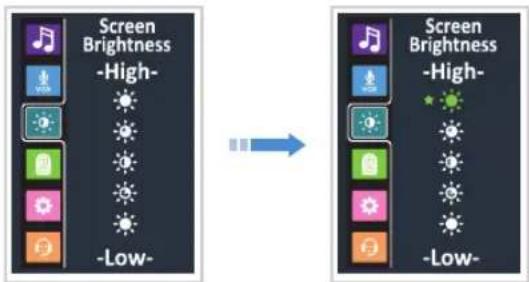
4.4 Brightness Adjustment
- Press to access the menu, choose and press
- Navigate with ⓞ to select the desired brightness
- Press ≡ to exit the menu

4.5 Pairing the Baby Unit (Camera) with the Parent Unit
The Baby Unit is paired to the Parent Unit when supplied. There is no need to pair the units again unless the Baby Unit loses its link with the Parent Unit. To renew the pairing of your units or pair a new/additional Baby Unit, follow the procedure below if unsuccessful, please repeat the pairing process:
NOTE: Before you begin pairing, make sure to have the Baby and Parent Units side by side and turned on.
- Press to access the menu, choose and press
- Navigate with Ⓧ to select the camera you want to pair and press ⎄
- Press and hold the Pair Button at the back of the camera until the pairing process is complete
- Press ≡ to exit the menu
![graph LR A["PAIR DELETE"] --> B["-->"] B --> C["PAIR DELETE"] C --> D["1"] C --> E["2"] C --> F["3"] C --> G["4"] D --> H["Press and hold the pair button at the back of the camera"] E --> H F --> H G --> H](/content/2026/04/681347/images/e06404d6b67247baff95bd24964587725f9c0106fe473ece625776be05ed4b95.jpg)
12
4.6 Deleting the Baby Unit (Camera)
- Press 5 to access the menu, choose 📄
- Navigate with Ⓐ to select DELETE option
- Navigate with Ⓞ to select the camera you want to delete
- Navigate with Ⓧ to select DELETE and press Ⓥ
- Press ≡ to exit the menu
![graph LR A["Start"] --> B["PAIR DELETE"] B --> C{Split} C -->|1| D["Exit 1"] C -->|2| E["Exit 2"] C -->|3| F["Exit 3"] C -->|4| G["Exit 4"]](/content/2026/04/681347/images/0f6829e56b1cbbd810ac85fadf71605c3fc0b452b0f67183fc783c4b722a9742.jpg)
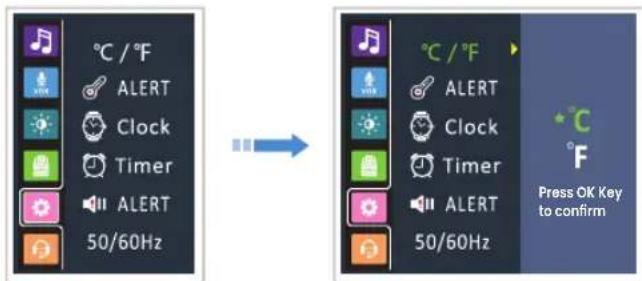
4.7 Temperature Scale Setting
The temperature reading from the temperature sensor (26) at the back of the Baby Unit will be displayed on the top of the screen. To switch between °F (Fahrenheit) and °C (Celsius) follow the below instructions:
- Press to access the menu, choose and press
- Navigate with Ⓧ to select the desired scale
- Press ⓞ button to confirm
- Press ≡ to exit the menu
ENG
ENG
NOTE: The monitor features a built-in automatic temperature alert. The monitor will alert (visual indication) when the temperature in baby's room is too high (90°F and higher) or too low (55°F and lower).
NOTE: Make sure the temperature sensor is not positioned too close to the camera body as it may affect the correct temperature reading. It is recommended to stretch out the sensor, so it is as far away from the camera body as possible. Also, it is recommended to place the camera in an area where there is good air circulation and not in a closed cornered area where the temperature tends to be higher.
4.8 Temperature Alert Setting
This function is to alert if the temperature in baby's room is too low or too high.
NOTE: The temperature alert default setting is: <15 °C/59 °F and >31 °C/89 °F.
To change the temperature alert levels, please follow the below instructions:
- Press 5 to access the menu, choose and press
- Navigate with ⏻ to select and press
- Navigate with Ⓤ to select the desired option and temperature and press ⏻
- Press to exit the menu
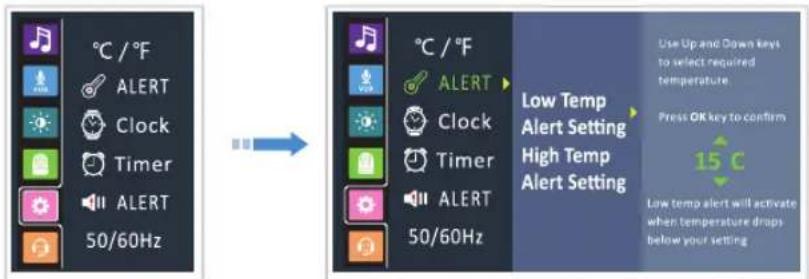
NOTE: If the OFF option is selected for Alerts then, in case of high/low temp warning, there will be no acoustic notification heard and only a visual notification seen.
14
4.9 Time and Time Format Setting
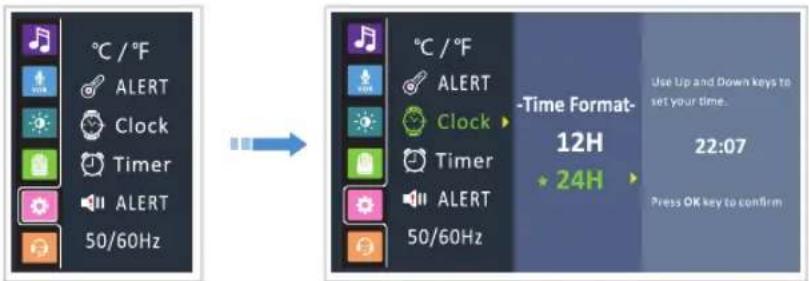
This function allows you to choose the desired time format: 12H or 24H and set your time.
- Press to access the menu, choose and press
- Navigate with Ⓞ to select and press
- Navigate with Ⓧ to select the desired format, and set the time
- Press ⏻ button to confirm
- Press ≡ to exit the menu
4.10 Timer Setting
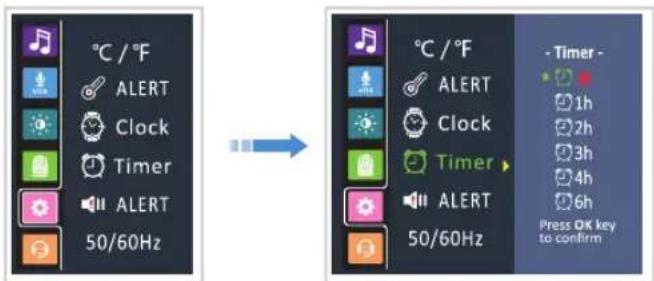
- Press to access the menu, choose and press
- Navigate with Ⓧ to select Ⓧ and press Ⓧ
- Navigate with Ⓧ to select the desired time
- Press ⏱ button to confirm
- Press to exit the menu
ENG
ENG
4.11 Warning Alert Volume Setting
This setting controls the volume of an audio "beep" sound alerting when the Parent Unit is low on battery, High/Low Temp alert or out of range (no connection to Baby Unit). You can set a lower volume level during the night and higher level during the day.
- Press to access the menu, choose and press
- Navigate with Ⓞ to select 📋 and press
- Navigate with do select the desired alert volume
- Press ⓕ button to confirm
- Press to exit the menu
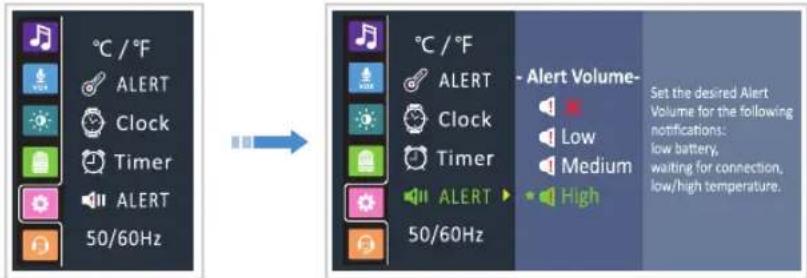
NOTE: Selecting the OFF option will mute all alerts. In case of low battery, high/low temp or out of range, there will be no acoustic notification heard.
4.12 Frequency Setting
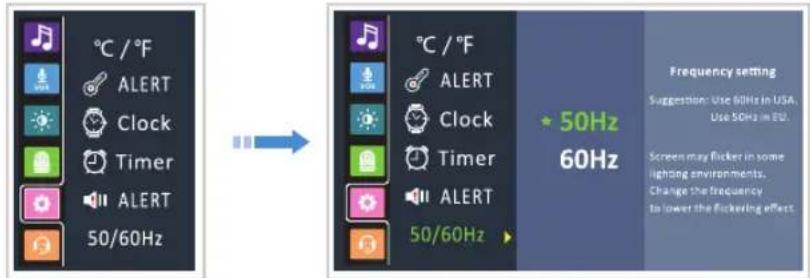
This function allows you to choose desired frequency format 60Hz (for US) or 50Hz (for EU).
The screen may flicker in some lighting environments and changing the Frequency Setting helps lower the flickering effect.
- Press ≡ to access the menu, choose and press
- Navigate with to select and press
- Navigate with ⏻ to select the desired frequency
- Press ⏻ button to confirm
- Press to exit the menu
4.13 Volume Adjustments
- Press the VOLUME UP/DOWN buttons (5) to increase/decrease the sound coming out of the parent unit.
NOTE: In normal use, it is recommended to set the volume at level 3 and below. Higher volume levels are intended for loud/noisy environments.
NOTE: If the volume on the Parent Unit is set too high and the Baby and Parent Units are close to each other, a high-pitched noise may be heard (also known as feedback or static noise).
ENG
4.14 Night Light
This monitor features a night light integrated into the Baby Unit (25), allowing you to remotely activate a comforting glow to baby's room. There are 3 light levels (from low to high) and 6 colors to choose from.
- Press the 🧑 button on your Parent Unit to choose the desired color and light intensity. You may also select the Rainbow mode where the colors will automatically change between all 6 colors, at the selected intensity and speed.
NOTE: The Night Light status icon will be displayed on top of the LCD screen.
![graph TD A["OFF"] --> B["White"] C["Low"] --> D["Blue"] E["Med"] --> F["Red"] G["High"] --> H["Yellow"] I["Green"] --> J["Purple"] K["Blue"] --> L["ON"] M["Yellow"] --> L N["Purple"] --> L O["Slow"] --> P["ON"] Q["Med"] --> P R["Fast"] --> P](/content/2026/04/681347/images/585f758cb71299a55d5e086f46b99824a30248af526095cbd620120d23d87746.jpg)
4.15 Zoom Mode
This baby monitor features two-zoom levels: x2 and x4.
- Press the ⓣ button once to activate "x2" zoom option
- Press the ⓞ button twice to activate "x4" zoom option
- Press the ⏻ button again to exit zoom option
NOTE: This function is not available when SPLIT SCREEN mode is ON.
18
4.16 Switching between the paired Baby Units (Cameras)
- To switch between paired cameras – briefly press the CAMERA SWITCH button (10) on your Parent Unit.
NOTE: This function is only available when two or more cameras are paired.
4.17 SCAN Mode - Automatic switching between the paired Baby Units (Cameras)
You can set the SCAN (loop) mode and each paired Baby Unit will be displayed on the screen for 15-20 seconds and then the screen will automatically change to the next paired Baby Unit.
- Press and hold the CAMERA SWITCH button (10) to activate the automatic SCAN mode. A "SCAN MODE ON" message will appear on the screen and a loop sign will appear next to the camera number on the top of LCD screen.
- Press the CAMERA SWITCH button (10) to deactivate the Scan mode
4.18 Split Screen Setting
You can see images from two Baby Units side by side on your Parent Unit by enabling the SPLIT SCREEN setting.
- Press Split Screen Button (11) to activate Split Screen Mode
- Press Split Screen Button (11) to deactivate Split Screen Mode
NOTE: This function is only available when two or more cameras are paired.
NOTE: If 4 cameras are paired and Split-Screen Mode is selected then cameras 1 and 2 will be seen in one Split-Screen view and cameras 3 and 4 will be seen in the next Split-Screen view.
4.19 Talk to Baby
- Press and hold the Talk Back Button (12) and speak into the Microphone (13) to talk to your baby or partner in the baby's room via Baby Unit.
- Release the button when you are finished talking.
NOTE: While the "Talk to Baby" function is in use, there is no possibility to hear the sounds from the Baby Unit. Releasing the talk button allows one to hear the sounds from the baby's room again.
ENG
4.20 Parent Unit Screen ON/OFF (Audio only mode)
- Briefly press the POWER button (1) to turn the LCD screen ON/OFF
5. Maintenance
All of the following maintenance procedures should only be performed when Baby and Parent Units are unplugged and off.
- Clean the surfaces of the Baby and Parent Units with a soft, fluff-free cloth.
- Never use cleaning agents or solvents.
- If the units become dirty, use a lightly damp cloth to wipe surfaces, taking care not to allow water into any openings.
6. Troubleshooting
| Possible cause/solutionProblem | |
| No reception on the Parent Unit | The power adapters may not be properly connected.Ensure that the Baby and Parent Units are ON.Adjust the monitor antenna to vertical position.Make sure the Baby and Parent Units are not far away from each other.Baby and Parent Units may not be properly paired. Follow PAIRING instructions. |
| Interference or poor reception | Move the Baby Unit closer to Parent unit.Use of other 2.4GHz products, such as wireless networks (Wi-Fi routers), Bluetooth systems, or microwave ovens, may cause interference with this product, so keep the baby monitor at least 5ft (1.5m) away from these types of products or turn them off if they appear to be causing interference.The Baby or Parent Units may be too close to metal objects.The battery power may be too low. |
| Image frozen on the Parent Unit | Restart the Baby Unit (unplug the power adapter from the wall outlet, wait for approx. 5 seconds and plug it back into the wall outlet).Reset the Parent Unit by pressing the RESET Hole (16), located at the back of the Parent Unit, under the Antenna (15). |
ENG
| Possible cause/solutionProblem | |
| A high-pitched sound is heard from the units (feedback, static) | The Baby Unit and Parent Unit may be too close to each other. Move them further apart.The volume on the Parent Unit may be set too high. Lower the volume. |
| Cannot hear the baby sounds on the Parent Unit | Volume setting on the Parent Unit may be too low. Increase the volume.Battery power may be too low. Recharge the battery. |
| Background noises | In a quiet environment, surrounding the Parent Unit, decrease the volume on your Parent Unit to level 3 and below.In a loud environment, surrounding the Parent Unit, increase the volume to the maximum level |
| Picture is black and white | Automatic Night vision mode may be on. Increase lighting around the camera to force monitor out of night vision mode. |
| Lines/marks across the screen | Camera Lens is dirty. Follow the Maintenance procedure.Confirm that power adapters are properly connected.Reset the Parent unit by pressing the RESET Hole (16), located at the back of the Parent Unit, under the Antenna (15). |
| The rechargeable battery will not charge, or no charge light shows | The power adapter may not be properly connected.Switch to another wall outlet.Switch between the Baby Unit and Parent Unit power adapters. |
IMPORTANT: If the above troubleshooting guide did not help you solve your problem, please contact our customer service via:
Email - support@babysensemonitors.com
Toll Free Number - (833) 568-2229 (USA ONLY)
Telephone Number - (+972) 3-9566604 (INTERNATIONAL)
ENG
- Specifications
| • VBM55Product Model | |
| • 2.4GHz FHSSFrequency | |
| • GFSKType of Modulation | |
| • 4 MbpsData Rate | |
| • 3.5 MHzChannel Bandwidth | |
| • Up to 980 feet / 300 meters (open space - no obstructions)Transmission Range | |
| • 5V, 1.2 Input Voltage | |
| Power Adapter | • Input: 100-240VAC 50 / 60Hz, 200mA Max;• Output: 5V, 1.2A; |
| • 5.5" TFT LCD (1920*1080 pixels)LCD Screen | |
| Rechargeable battery(pre-installed in Parent Unit) | • Model: 6048II5P• 3.8V, 5000 mAh |
| Operating time with battery fully charged (Parent Unit)* It takes about 8 hours to fully charge the battery. | • Approx. up to 20 hours (VOX on)• Approx. up to 12 hours (Monitor on) |
| • 18dBmTransmitting Power | |
| • 1/2.9" Color CMOSImage sensor type | |
| • 940nmIR LED Type | |
| Operation Environment | • Indoor use only; Temperature: 32-104°F / 0-40°C• Humidity: 5% to 90% rh. (relative humidity) |
8. FCC Statements
This device complies with part 15 of the FCC Rules. Operation is subject to the following two conditions:
(1) This device may not cause harmful interference.
(2) This device must accept any interference received, including interference that may cause undesired operation.
NOTE 1: This equipment has been tested and found to comply with the limits for a Class B digital device, pursuant to part 15 of the FCC Rules. These limits are designed to provide reasonable protection against harmful interference in a residential installation.
This equipment generates, uses and can radiate radio frequency energy and, if not installed and used in accordance with the instructions, may cause harmful interference to radio communications. However, there is no guarantee that interference will not occur in a particular installation. If this equipment does cause harmful interference to radio or television reception, which can be determined by turning the equipment off and on, the user is encouraged to try to correct the interference by one or more of the following measures:
- Reorient or relocate the receiving antenna.
- Increase the separation between the equipment and receiver.
- Connect the equipment into an outlet on a circuit different from that to which the receiver is connected.
- Consult the dealer or an experienced radio/TV technician for help.
NOTE 2: Any changes or modifications to this unit not expressly approved by the party responsible for compliance could void the user's authority to operate the equipment.
9. IC Statements
This device complies with Industry Canada license-exempt RSS standard(s):
Operation is subject to the following Two conditions:
(1) this device may not cause interference, and
(2) this device must accept any interference, including interference that may cause undesired operation of the device.
We take quality very seriously. This is why all of our products come with a one-year warranty from the original purchase date against defects in workmanship and materials. If you have warranty or support issues, please contact our customer service.
11. Customer Support
If you have any problems setting up or using this product, you will find useful tips and information in the Troubleshooting section of this user guide. If you have any further questions about using the product after reviewing the resources above or would like to purchase replacement parts or accessories, please contact us via:
Email - support@babysensemonitors.com
US Toll-Free number (833) 568-2229 (USA ONLY)
Telephone Number - (+972) 3-9566604 (INTERNATIONAL)
NOTE: You can always find our contact details in the setting menu in your Parent Unit.
-
Press to access the menu, choose and press
-
Press to exit the menu

IMPORTANT:
Please retain your purchase receipt and attach to the back page of this user manual as you will need to produce this if warranty service is required.
UKCA DECLARATION OF CONFORMITY
Manufacturer:
Name: HISENSE Ltd. Address: 27 Shuked St
Address: 27 Shaked Street, Hevel Modi in Industrial Park 7319900, Israel.
UK Autherised Representative:
Name: OBELIS UK Ltd.
Address: Sandford Gate, East Point Business Park, Oxford, OX4 6LB, United Kingdom
We, Hisense Ltd., hereby declare, under our sole responsibility, that the below referenced product has been tested for UK regulations, including the following harmonized standards, and is in conformity with essential requirements of the Radio Equipment regulations 2017 (SI. 2017/1206) and the Restriction of the Use of Certain Hazardous Substances in Electrical and Electronic Equipment Regulations 2012 (S.I. 2012/3032):
Product's model & name: Max View (VBM55), Video Baby Monitor
| Part identification: Max View VBM55RX (monitor) | |
| Safety | BS EN IEC 62368-1:2020+A11:2020 |
| Health | BS EN IEC 62311:2020 |
| EMC | ETSI EN 301 489-1 V2.2.3 (2019-11) |
| ETSI EN 301 489-17 V3.2.4 (2020-09) | |
| BS EN 55032:2015+A11:2020 | |
| BS EN 55035:2017+A11:2020 | |
| BS EN 61000-3-3:2013/A1:2019 | |
| Radio | ETSI EN 300 328 V2.2.2 (2019-07) |
| RoHS | EN IEC 63000:2018 |
| Part identification: Max View VBM55TX (camera) | |
| Safety | BS EN IEC 62368-1:2020+A11:2020 |
| Health | BS EN IEC 62311:2020 |
| EMC | ETSI EN 301 489-1 V2.2.3 (2019-11) |
| ETSI EN 301 499-17 V3.2.4 (2020-09) | |
| BS EN 55032:2015+A11:2020 | |
| BS EN 55035:2017+A11:2020 | |
| BS EN 61000-3-3:2013/A1:2019 | |
| RSI EN 300 328 V2.2.2 (2019-07) | |
| Radio | ETSI EN 300 328 V2.2.2 (2019-07) |
| RoHS | EN IEC 63000:2018 |
Natalie Shukrun, VP Quality and Product
HISENSE LTD. VAT No. 51168357
27 Shaked St.
Hevel Modi'in Industrial Park Tel: 03-9566604 Fax: 03-9566607
Date: March 28 th , 2023
Date: March 28th, 2023
Hewel Modi in Industrial Park, Israel
27 Shaked St.
HISENSE LTD.
| Part Identification: Max View VBMS5X (Monday) | |
| Safety | EN IEC 62368-1:2020+A11:2020 |
| Health | EN IEC 63311:2020 |
| EMC | EN 55035:2017+A11:2020 |
| EN 55035:2017+A11:2020 | |
| EN 61000-3-3:2013/A1:2019 | |
| EN 55035:2017+A11:2020 | |
| EN 61000-3-3:2013/A1:2019 | |
| Radio | ETSI EN 301 489-1 V2:23 (2019-11) |
| ETSI EN 301 489-1 V2:23 (2019-11) | |
| RoHS | EN IEC 63000:2018 |
| Part Identification: Max View VBMS5X (Wednesday) | |
| Safety | EN IEC 62368-1:2020+A11:2020 |
| Health | EN IEC 63311:2020 |
| EMC | EN 55035:2017+A11:2020 |
| EN 61000-3-3:2013/A1:2019 | |
| EN 55035:2017+A11:2020 | |
| EN 61000-3-3:2013/A1:2019. | |
| EN 55035:2017+A11:2020 | |
| EN 61000-3-3:2013/A1:2019 | |
| EN 55035:2017+A11:2020 | |
| EN 61000-3-3:2013/A1:2 | |
| EN 55035:2017+A11:2020 | |
| EN 61000-3-3:2013/A1:2019 | |
| EN 55035:2017+A11:2020 | |
| EN 61000-3-3:2013/A1:2,2019 | |
| EN 55035:2017+A11:2020 | |
| EN 61000-3-3:2013/A1:2019 | |
| EN 55035:2017+A11:2020 | |
| EN 61000-3-3:2013/A1:2;2019 | |
| EN 55035:2017+A11:2020 | |
| EN 61000-3-3:2013/A1:2;2019 | |
| EN 55035:2017+A11:2020 | |
| EN 61000-3-3:2020/A1:2;2019 | |
| EN 55035:2017+A11:2020 | |
| EN 61000-3-3:2020/A1:2;2019 | |
| EN 55035:2017+A11:2020 | |
| EN 61000-3:3:2020/A1:2;2019 | |
| EN 55035:2017+A11:2020 | |
| EN 61000-3-3:2020/A1:2;2019 | |
| EN 55035:2017+A11:2020 | |
| EN 62368-1:2020+A11:2020 | |
| RoHS | EN IEC 63000:2018 |
Product's model & name: Max View (VBM55), Video Baby Monitor
We, Hinesy Ltd., hereby declear, under our sole responsibility, has the below reference product has been tested for EU regulations, including the following harmonized standards, and is in conformity with essential requirements of the Radio Equipment Directive 2014/35/EU (RED) and restriction of hazardous substances Directive 2011/65/EU (RHS);
Address: Boulevard General Walls 53, 1030 Brussels, Belgium
European Authored Representative:
(1) 本次股东大会的召集和召开程序
Address: 27 Shaked Street, Hevel Mode in Industrial Park 731990. Israel.
Nove Hiense Ltd
The following table is a duplicate of the first two entries to be corrected.
EC DECJARALION OF CONFORMITY

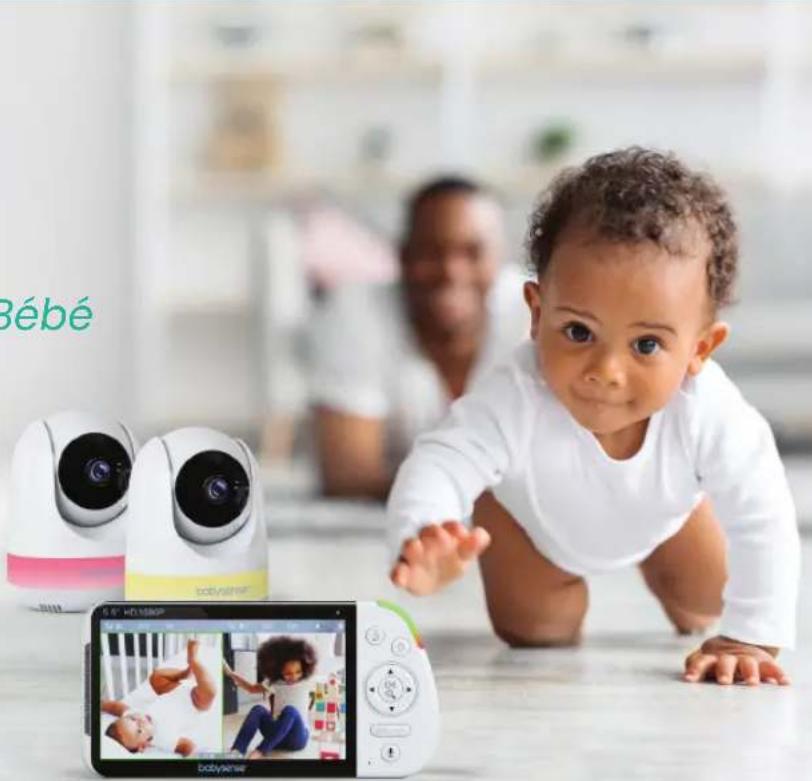
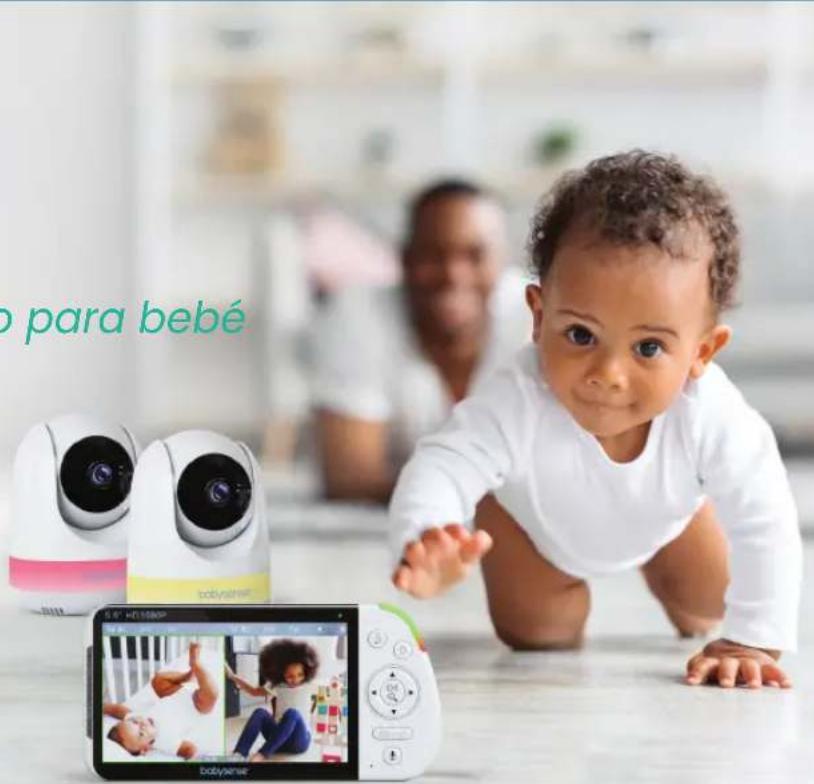
Max View
By babysense™
5.5" Écran partagé
support@babysensemonitors.com
www.babysensemonitors.com
FRE

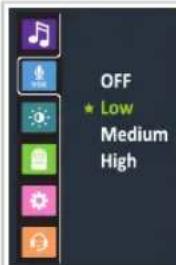
Low sensitivity level -Once in standby mode, a loud sound registered by the camera is required to automatically activate the audio and video feed.
Email - support@babysensemonitors.com
Telephone Number - (+972) 3-9566604 (INTERNATIONAL)
- Caractéristiques
IMPORTANT:
support@babysensemonitors.com
www.babysensemonitors.com
SPA
3. Primeros pasos
4.13 Ajustes de Volumen
4.15 Zoom Digital
Email - support@babysensemonitors.com
Telephone Number - (+972) 3-9566604 (INTERNATIONAL)
- Especificaciones
IMPORTANTE:
support@babysensemonitors.com
www.babysensemonitors.com
ITA
3. Iniziamo

4.15 Zoom Digitale
Email - support@babysensemonitors.com
Telephone Number - (+972) 3-9566604 (INTERNATIONAL)
- Caratteristiche
Email - support@babysensemonitors.com
Telephone Number - (+972) 3-9566604 (INTERNATIONAL)
IMPORTANT:
support@babysensemonitors.com
www.babysensemonitors.com
GER
3. Erste Schritte
HINWEIS:
4.13 Volumen Anpassungen
Email - support@babysensemonitors.com
Telephone Number - (+972) 3-9566604 (INTERNATIONAL)
- Spezifikationen
Email - support@babysensemonitors.com
Telephone Number - (+972) 3-9566604 (INTERNATIONAL)
WICHTIG:
Made by Hisense Ltd.
27 Shaked St. Hevel Modlin
Industrial Park,
7319900 ISRAEL
Tel +972-3-9566604
www.hisense.co.il
www.babysensemonitors.com

- WIRELESS DIGITAL VIDEO BABY MONITOR
- WARNINGS AND SAFETY INSTRUCTIONS
- 1.1 WARNINGS
- ENG
- 1.2 SAFETY INSTRUCTIONS FOR AC POWER ADAPTER
- WARNING
- 1.3 SAFETY INSTRUCTIONS FOR LI-ION BATTERY (NON REMOVABLE PRE-INSTALLED BATTERY)
- 1.4 INFORMATION ON DISPOSAL OF PRODUCT
- OVERVIEW
- 2.1 PACK CONTENTS
- 2.2 PARENT UNIT OVERVIEW
- 2.3 BABY UNIT OVERVIEW
- GETTING STARTED
- 3.1 POWERING THE BABY UNIT (CAMERA)
- 3.2 POWERING THE PARENT UNIT
- 3.3 CHARGING THE PARENT UNIT
- 3.4 SET UP
- OPERATING THE MONITOR
- 4.1 MENU ICON OVERVIEW
- 4.2 LULLABY & WHITE NOISE SETTING
- 4.3 VOX MODE
- 4.4 BRIGHTNESS ADJUSTMENT
- 4.5 PAIRING THE BABY UNIT (CAMERA) WITH THE PARENT UNIT
- 12
- 4.6 DELETING THE BABY UNIT (CAMERA)
- 4.7 TEMPERATURE SCALE SETTING
- 4.8 TEMPERATURE ALERT SETTING
- 14
- 4.9 TIME AND TIME FORMAT SETTING
- 4.10 TIMER SETTING
- 4.11 WARNING ALERT VOLUME SETTING
- 4.12 FREQUENCY SETTING
- 4.13 VOLUME ADJUSTMENTS
- 4.14 NIGHT LIGHT
- 4.15 ZOOM MODE
- 4.16 SWITCHING BETWEEN THE PAIRED BABY UNITS (CAMERAS)
- 4.17 SCAN MODE - AUTOMATIC SWITCHING BETWEEN THE PAIRED BABY UNITS (CAMERAS)
- 4.18 SPLIT SCREEN SETTING
- 4.19 TALK TO BABY
- 4.20 PARENT UNIT SCREEN ON/OFF (AUDIO ONLY MODE)
- MAINTENANCE
- TROUBLESHOOTING
- FCC STATEMENTS
- IC STATEMENTS
- CUSTOMER SUPPORT
- IMPORTANT
- UKCA DECLARATION OF CONFORMITY
- EC DECJARALION OF CONFORMITY
- MAX VIEW
- BY BABYSENSE™
- PRIMEROS PASOS
- 4.13 AJUSTES DE VOLUMEN
- 4.15 ZOOM DIGITAL
- IMPORTANTE
- INIZIAMO
- 4.15 ZOOM DIGITALE
- ERSTE SCHRITTE
- HINWEIS
- 4.13 VOLUMEN ANPASSUNGEN
- WICHTIG
Brand : BABYSENSE
Model : Max View
Category : Baby monitors