
AB81A2DG - Vacuum Cleaner AEG - Free user manual and instructions
Find the device manual for free AB81A2DG AEG in PDF.

| Brand | AEG |
| Model | AB81A2DG |
| Product type | Canister vacuum cleaner with bag |
| Power supply | Mains 220-240 V |
| Standby consumption | 0.5 W |
| Container capacity | s-bag dust bag (ultra long performance) |
| Filter type | Washable exhaust filter (blue frame) or replaceable (green frame); motor filter |
| Power adjustment | Manual (+/- buttons on handle) and automatic (AUTO mode) |
| Lighting | Front LED on AllFloor Auto brush (turns on automatically) |
| Remote control | On the handle (CR1632 battery) |
| Included accessories | AeroPro hose, telescopic tube, AllFloor Auto LED brush, 3-in-1 accessory, turbo brush, mini turbo brush, ParkettoPro brush, FlexPro Plus brush, Furniture brush (depending on model) |
| Storage system | Side or bottom parking, pause position |
| Cable length | Not specified (automatic rewinder) |
| Noise level | Not specified |
| Weight | Not specified |
| Maintenance | Replace bag when red indicator; washable filter cleaning approx. every 4 uses; replace motor filter after 5 bag changes |
| Safety | Automatic shutdown in case of overheating; protection against water suction (requires repair) |
| Spare parts | s-bag bags, filters (exhaust and motor), brushes, batteries |
Frequently Asked Questions - AB81A2DG AEG
User questions about AB81A2DG AEG
0 question about this device. Answer the ones you know or ask your own.
Ask a new question about this device
Download the instructions for your Vacuum Cleaner in PDF format for free! Find your manual AB81A2DG - AEG and take your electronic device back in hand. On this page are published all the documents necessary for the use of your device. AB81A2DG by AEG.
USER MANUAL AB81A2DG AEG
Thank you for choosing AEG 8000 bagged vacuum cleaner. Always use original accessories and spare parts to get the best results. This product is designed with the environment in mind. All plastic parts are marked for recycling purposes.
Before starting
- Read this manual carefully.
- Check that all parts described are included.
- Pay special attention to the safety precautions!
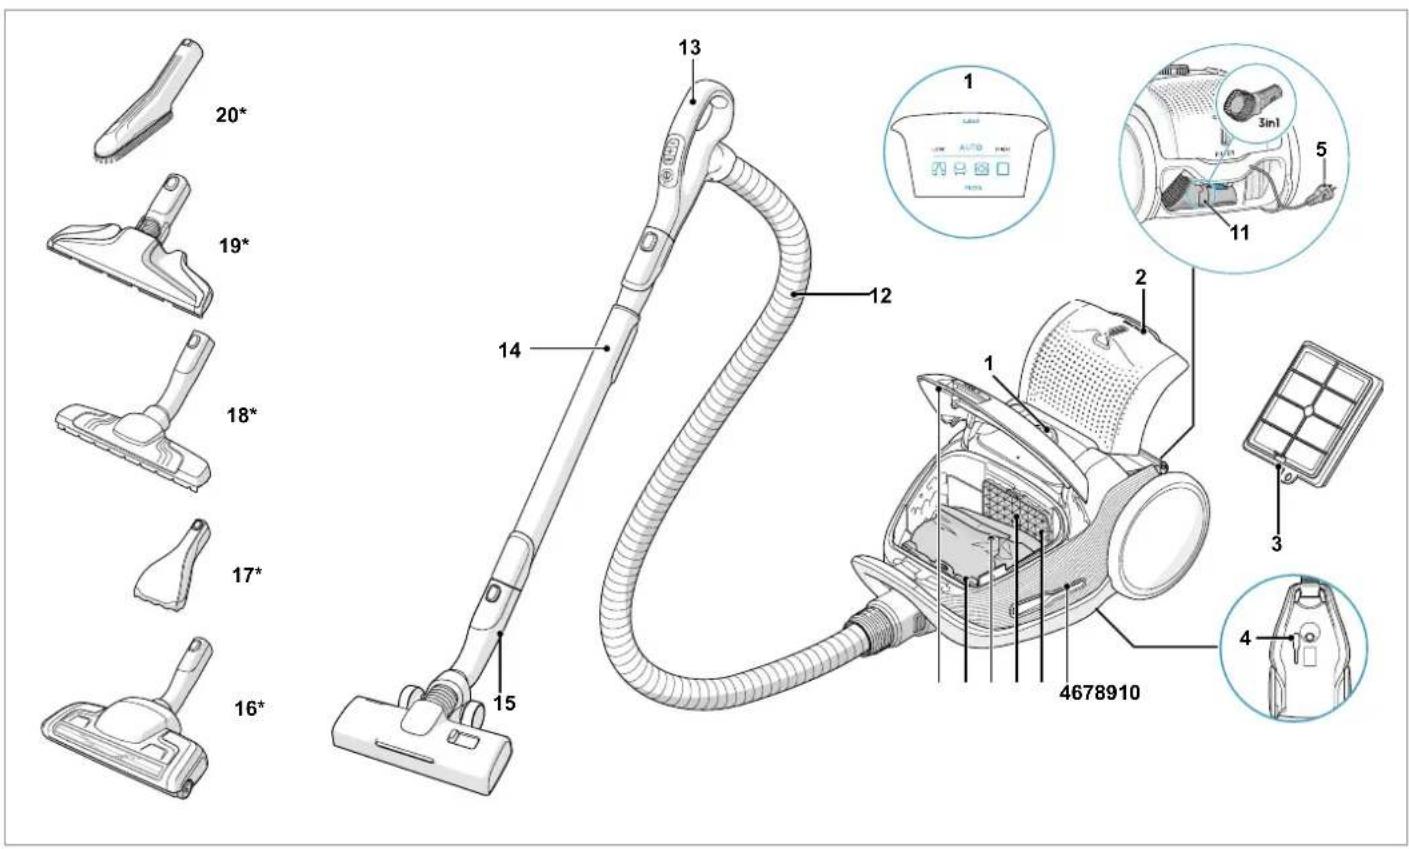
DESCRIPTION OF 8000 VACUUM CLEANER
- Display
- Exhaust filter lid
- Exhaust filter
- Parking slots
- Power cord
- Motor filter
- Motor filter holder
- S-bag
- S-bag® holder
- Dust compartment cover
- 3in1 tool
-
AeroPro hose
-
AeroPro handle
- AeroPro telescopic tube
- AllFloor Auto LED nozzle
- Turbo nozzle*
- Mini Turbo nozzle*
- ParkettoPro nozzle*
-
FlexProPlus nozzle
20.Furniture nozzle -
Certain models only
Power consumption in standby: 0.5W
HOW TO USE THE VACUUM CLEANER
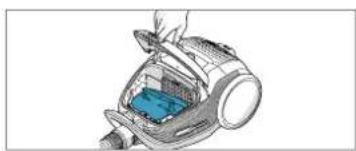
Open the dust compartment cover by pulling the S-BAG button. Check that the dust bag (s-bag) is in place.
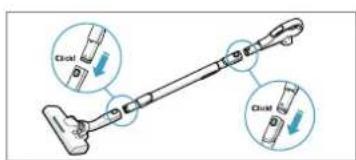
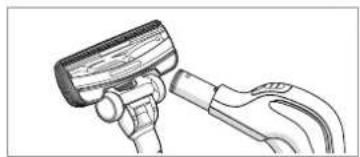
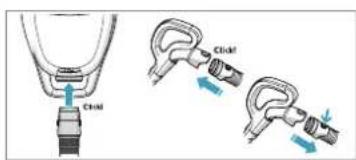
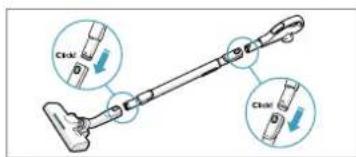
Attach the telescopic tube to the nozzle. Attach the telescopic tube to the hose handle (to remove it, press the lock button and pull).
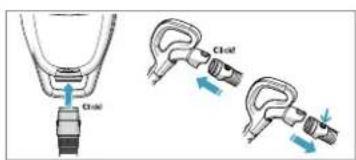
Insert the hose into the cleaner (to remove it, press the lock buttons and pull). Insert the hose into the hose handle until the lock button clicks (to release it, press the lock button and pull).

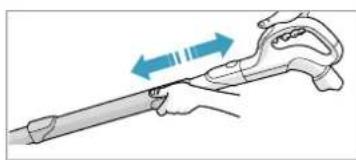
Adjust the telescopic tube by holding the lock with one hand and pulling the handle with the other hand.
START/STOP THE VACUUM CLEANER AND ADJUST SUCTION POWER
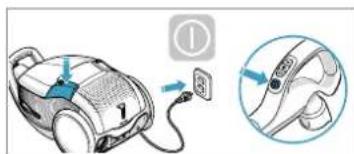
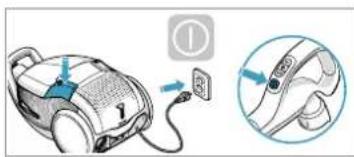
Pull out the power cord and plug it into the mains. Press the ON/OFF button to turn the cleaner on/off. Indicators light up, LOW/HIGH indicator lights up from left to right and back. Press the ON/OFF button on the remote control to turn the cleaner on/off.
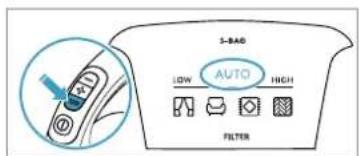
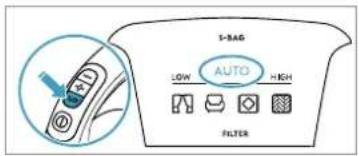
Adjust suction power: The cleaner starts in AUTO mode (automatic power regulation). AUTO indicator is illuminated on the display and LOW/HIGH indicator pulses. To regulate power manually press +/- button on handle. Press AUTO button to return to auto-function.
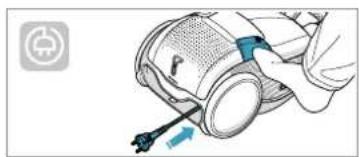
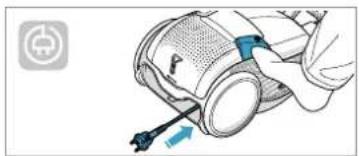
After cleaning, push the REWIND button to rewind the cable.
PARKING POSITIONS
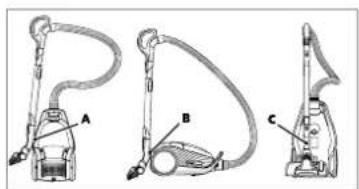
Use parking position on the side (A) or underneath (C) to carry and store the cleaner. At the back (B) when you pause (save your back).
REPLACING THE DUSTBAG, S-BAG
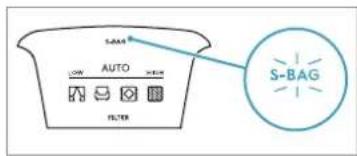
Replace the s-bag when S-BAG indicator lights up in red (green light: bag is OK, yellow light: soon time to replace bag).
NB: Always change the s-bag when S-BAG indicator is illuminated or has red light even if the s-bag is not full (it may be blocked) and after using carpet cleaning powder. For best possible performance, use the Ultra Long Performance bag which is especially developed for your cleaner. Other synthetic s-bags can also be used. Do not use paper dust bags! www.s-bag.com
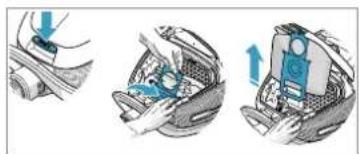
Open the dust compartment cover by pulling the S-BAG button. Pull the cardboard handle to close and remove the s-bag
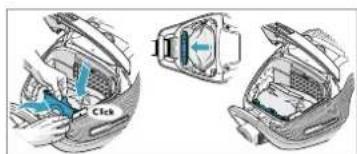
Insert a new s-bag by pushing the cardboard straight down in its tracks. Close the lid. If the s-bag is not properly placed or is missing, the lid will not close.
When you start the cleaner after s-bag replacement, it takes 10 seconds before the S-BAG indicator turns off or turns green.
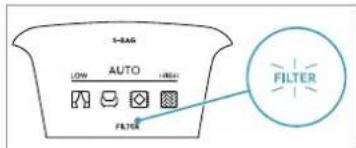
REPLACING THE FILTERS
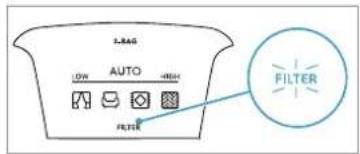
Replace/clean the filter when filter indicator lights up in red. Green light indicates that the filter is ok. It lights up briefly when you start the vacuum cleaner.
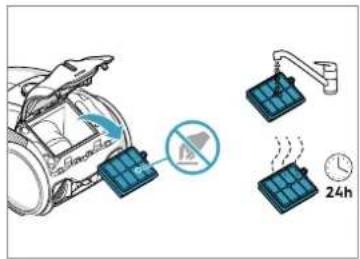
Pull the FILTER button to open the filter lid. Use original s-filters. Remove the filter and check the reference on the frame to define type. Replace with a new filter or clean it. Rinse the inside (dirty side) in lukewarm tap water. Tap the filter frame to remove the water. Repeat the process four times.
NB: Do not use cleaning agents. Avoid touching the filter surface. Let the filter dry completely (min. 24 h in room temperature) before putting back! Change the washable filter at least once a year or when it is very dirty or damaged. Do not remove the L-shaped foam under the filter.
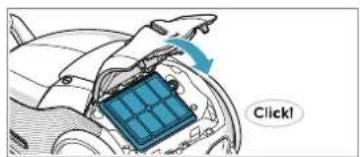
After replacing the filter, close the filter lid until it is clicked back into place. If the filter lid comes off, position the hinges at the bottom and push the filter lid until it is clicked back into place.
NB: When you start the cleaner after filter replacement, It takes 10 seconds before the FILTER indicator turns green or turns off.
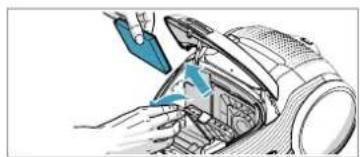
Replace the motor filter when dirty or after every 5th s-bag. Push the filter holder down and pull it out. Exchange the filter and close the lid.
VACUUMING WITH THE UNIVERSAL NOZZLE
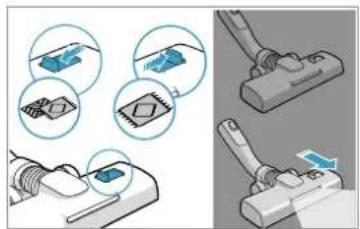
For deep cleaning on carpet, change the nozzle setting with the slider to Carpet mode. Icon illustrates recommended floor type. Move the nozzle forward. The front light turns on automatically after a few seconds. When the nozzle is not used, the light turns off automatically after a few seconds.
CLEANING THE UNIVERSAL NOZZLE
Disconnect the nozzle from the tube. Clean with the hose handle.
CLEANING THE TURBO NOZZLE
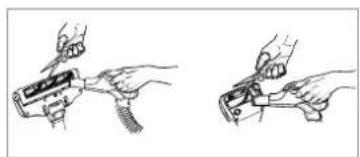
Disconnect the nozzle from the tube and remove entangled threads etc by snipping them away with scissors. Use the hose handle to clean the nozzle.
3IN1 ACCESSORY TOOL
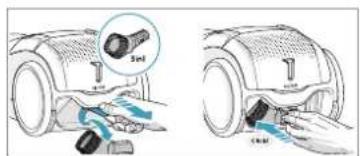
Pull the textile tab to take out 3in1 tool. The tool has 3 functions, see pictures on next page. After usage, put it back in its place.
CHANGING THE BATTERIES
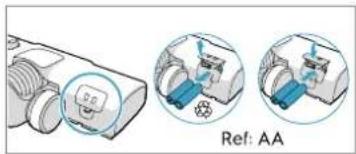
Change batteries when front lights start blinking fast. Use 2 AA batteries.
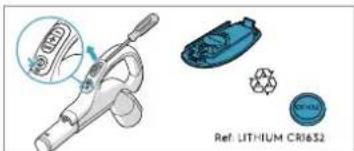
Change battery when light indicator turns red or is not responding when pressing any button. Use only batteries type LITHIUM CR1632
This ap t f t a t t t t t t t t t t t t t t t t t t t t t t t t t t t t t t t t t t t t t t t t t t t t t t t t t t f.
TIPS ON HOW TO GET THE BEST RESULTS
| NOZZLE/ACCESSORY | USE FOR: | NOZZLE/ACCESSORY | USE FOR: |
| 3In1 accessory tool123 | 3 tools in 1:1. Dusting tool for hard surfaces(bookshelves, skirting boards etc).2. Upholstery tool for textiles (curtains,upholstery etc).3. Crevice tool for narrow spaces (behindradiators etc). | AllFloor Auto LED nozzle(with front lights) | Universal nozzle:- For all floor types, secures excellent dust pick upboth on carpets and hard floors.- Recommended to use Allfloor mode, whichenables going from hard floor to carpet withoutadjusting the setting.- For deep cleaning on carpet, change the nozzlesetting with the slider to Carpet mode.- Front light helps to detect dust and dirt in darkspaces (under furniture etc). |
| Turbo nozzle* Carpet nozzle: | - Brushes and vacuums at the same time(best pick up of hair, fibres etc).- Brush roller is driven by the airflow ofthe vacuum cleaner.- Not suitable for carpets with very deeppiles and long fringes, anti-slip carpetslike door mats or water resistant carpets.Use universal nozzle instead. | Mini Turbo nozzle* | Upholstery nozzle:- Brushes and vacuums at the same time (bestpick up of hair, fibres etc).- For textile furniture, car seats, mattresses etc.- Brush roller is driven by the airflow of thevacuum cleaner.- Not suitable for carpets with very deep pile andlong fringes as it can get stuck in the rotatingbrush roll. |
| ParketoPro nozzle* | Hard floor nozzle:- For gentle cleaning of hard floor(parquet, wooden floor, tiles etc).- Best dust pick up on hard floor withcrevice. | FlexProPlus nozzle* | Hardfloor nozzle:- For reach under/between furniture, corners andother obstacles.- Can easily turn 180 degrees for direct access tonarrow spaces. |
| Furniture nozzle* | Delicate Surfaces Tool:- Removes fine particles and dust fromdelicate surfaces in your home | ||
With AUTO-function the cleaner automatically adjust the suction power
in order to give an optimal cleaning performance and comfort on every surface. For manual regulation, follow graphics for optimal performance.
TROUBLESHOOTING
| PROBLEM SOLUTION | |
| The vacuum cleaner does not start | • Check that the cable is connected to the mains. • Check that the plug and cable are not damaged. • Check for a blown fuse. • Check if the battery indicator lamp in the remote control handle responds (certain models only). |
| The s-bag* indicator light is illuminated | • Check if the s-bag* is full or blocked. • If you have already changed the s-bag*, change the motor filter. |
| The filter indicator light is illuminated Change, or wash (if washable), the exhaust filter. | |
| The cleaner stops | The cleaner might be overheated: disconnect it from the mains; check if the nozzle, tube, hose or filters are blocked. Let the cleaner cool down for 30 minutes before plugging it in again. If the cleaner still does not work, contact an authorized AEG service centre. |
| Reduction of suction capacity versus normal | • Check if the s-bag is full or blocked. • Check if the motor filter is clogged and needs changing. • Check if nozzle is blocked and needs to be cleared. • Check if hose is blocked by squeezing it gently. However, be careful in case the obstruction has been caused by glass or needles caught inside the hose. Note: The warranty does not cover any damage to the hose caused by cleaning it. |
| Water has been sucked into the vacuum cleaner | It will be necessary to replace the motor at an authorized AEG service centre. Damage to the motor caused by the penetration of water is not covered by the warranty. |
| For any further problems, contact an authorized AEG service centre. | |
FRANCAIS
REEMPLACEMENT DES FILtres
TPONOXPHESHTHEHAEKTPIKHEKOYNA

AvoiTe To kalmu Taou wpuou oukoync oKovnc tpaBwvtac to koumi S-BAG.Beaiowte ot n oakoula oKovnc (s-bag) eivai otn 0eon tnc.
EioayetyeTov Eukamto OALyva otk oouta (ya vTo apaipoeTe, nathote ta koumia aopalionc KATpaaheTOT).EioayetyeTov Eukamto OALyva otny avtiatoxn lahmyexptoKoumi aopaiionc va Koumawei me evay xO Kaik (yia va Toaapaiolte, nathote to Koumi aopaiionc kaltpahtetotv).
Uv6eOTOVtAekoIKOwIyva OTOAKPOUIO. Uv6eTeTov TnEaKoIKoOwIyvaOnIaBn TOU EKAIMTou wIyva (Yia va Tov aapaiEe, nATRto TE KOUPI aopaiionc kItpaBteTov).
PuguioteTov nlaekomiko oawlya KpatwTacnv aapaleia me to eva xepai kalpaWvTacnlaBn me to aa.
ENEPTONIOIHJH/ANIENEPTONOOIHTHHEAEKTPIKH2 KOYNAKAI PYOMIHTHSIXYOANAPPOH
TpaBnE TPOC ta EeW TO KAwDIO
TPOPOOoiAC KAI OUVDEOTo
OTNV PICA. PAnTHOE To KOUNI
EVEpyoONiOnc/ANEVPEyONiOnc
(ON/OFF) YA VA EVEpyoONiOncKAI
VA AEVEpyoONiOncTe N OKouNa. OI
EVSEIEc AVaBOv, n EVSEIeN LOW/
HIGH aVaBeIa NO Ta apiotepa npoc
TA DEGIA KAI NLO. PAnTHOE To KOUNI
EVEpyoONiOnc/ANEVPEyONiOnc
(ON/OFF) OTO TNlambdaipiotnpio YIA VA
EVEpyoONiOne/TANEVPEyONiOneTn
OKouNa.
Puθμiote tyn IoXu avappopnonc: H
koUta eevpyoIeiai otny autoupatn
λeIoUPyia (autoupatn puθμion tnc
IoXuoc). H evδεiη AUTO (AYTOMATH)
avβe iotny oθovn kai n evδεiη LOW/
HIGH avβe μθμika. Ia va puθμiαeTE
tny IoXu xεiPokivnta, naHote to
kouμi +/- ση λaβn. Patnate oTo
kouμi AUTO yia va επιρεψεte ΘnV
autoupatn λeIoUPyia.
VOOR U VAN START GAAT
Use parking position on the side (A) or underneath (C) to carry and store the cleaner. At the back (B) when you pause (save your back).
DE STOFZUIGERZAK, S-BAG*, VERVANGEN


- Before starting
- DESCRIPTION OF 8000 VACUUM CLEANER
- HOW TO USE THE VACUUM CLEANER
- START/STOP THE VACUUM CLEANER AND ADJUST SUCTION POWER
- PARKING POSITIONS
- REPLACING THE DUSTBAG, S-BAG
- REPLACING THE FILTERS
- VACUUMING WITH THE UNIVERSAL NOZZLE
- CLEANING THE UNIVERSAL NOZZLE
- CLEANING THE TURBO NOZZLE
- 3IN1 ACCESSORY TOOL
- CHANGING THE BATTERIES
- TIPS ON HOW TO GET THE BEST RESULTS
- With AUTO-function the cleaner automatically adjust the suction power
- FRANCAIS
- REEMPLACEMENT DES FILtres
- TPONOXPHESHTHEHAEKTPIKHEKOYNA
- ENEPTONIOIHJH/ANIENEPTONOOIHTHHEAEKTPIKH2 KOYNAKAI PYOMIHTHSIXYOANAPPOH
- VOOR U VAN START GAAT
- DE STOFZUIGERZAK, S-BAG*, VERVANGEN
Brand : AEG
Model : AB81A2DG
Category : Vacuum Cleaner