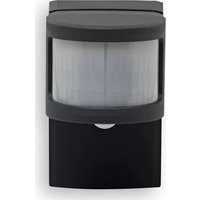
HmIP-SMO230 - Motion detector Homematic IP - Free user manual and instructions
Find the device manual for free HmIP-SMO230 Homematic IP in PDF.


User questions about HmIP-SMO230 Homematic IP
0 question about this device. Answer the ones you know or ask your own.
Ask a new question about this device
Download the instructions for your Motion detector in PDF format for free! Find your manual HmIP-SMO230 - Homematic IP and take your electronic device back in hand. On this page are published all the documents necessary for the use of your device. HmIP-SMO230 by Homematic IP.
USER MANUAL HmIP-SMO230 Homematic IP
natural_image
White plastic container with a transparent lid, shown against a solid blue background (no text or symbols visible)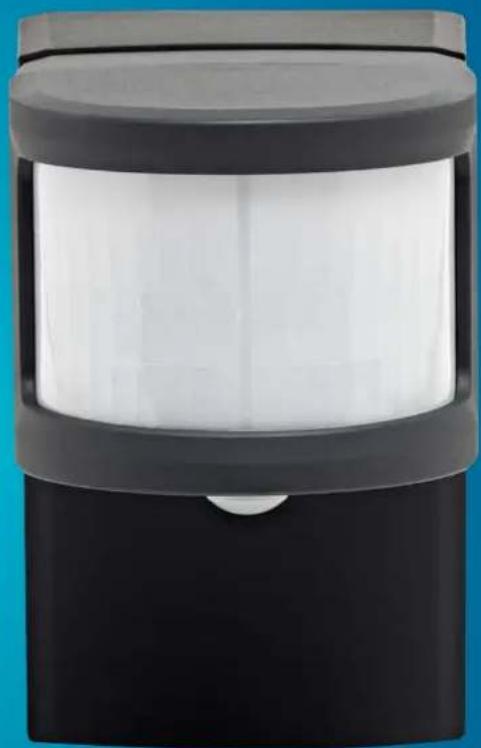
natural_image
Black and white cylindrical device with a circular lens, no visible text or symbols
Installation and operating manual

text_image
E A B C D EAbbildung 1
Montageplatte:
text_image
TOP F N L1 11 H J G H IAbbildung 2
5 Allgemeine Systeminformationen
natural_image
Cross-sectional diagram of a mechanical device showing internal components and directional arrows (no text or symbols)Abbildung 5
natural_image
Cross-sectional diagram of a mechanical device showing internal components and a blue arrow indicating direction (no text or symbols)Abbildung 6
natural_image
Top-down schematic of a room layout with furniture and a blue indicator light (no text or symbols)Abbildung 8
natural_image
Technical diagram of a mechanical component with blue arrows indicating directional flow or movement (no text or symbols present)Abbildung 11
natural_image
Technical line drawing of a mechanical device with a blue arrow pointing to a component (no text or symbols present)Abbildung 13

natural_image
Line drawing of a hand using a digital pressure monitor to press or interact with a device (no text or symbols present)Abbildung 14
1 Package contents....19
2 Information about this manual....19
3 Hazard information ....19
4 Function and device overview....20
5 General system information 21
6 Detection range 21
7 Installation....22
7.1 General notes on installation 22
7.2 Avoiding false alarms 23
7.3 Safety-relevant installation instructions....24
7.4 Installation....25
8 Start-up....27
9 Function test 29
10 Troubleshooting.... 29
10.1 Command not confirmed 29
10.2 Duty cycle 29
10.3 Error codes and flashing sequences 30
11 Restoring factory settings 31
12 Maintenance and cleaning 31
13 General information about radio operation 31
14 Disposal....32
15 Technical specifications....33
1 Package contents
1x Motion detector with switching actuator – outdoor
2x Screws
2x Plugs
1x Operating manual
2 Information about this manual
Please read this manual carefully before operating your Homematic IP components. Keep the manual so you can refer to it at a later date if you need to. If you hand over the device to other persons for use, please hand over this manual as well.
Symbols used:

Important! This indicates a hazard.

Please note: This section contains important additional information!
3 Hazard information

Do not open the device. It does not contain any parts that need to be maintained by the user. In the event of an error, please have the device checked by an expert.

We accept no liability for damage to property or personal injury caused by improper use or the failure to observe the hazard warnings. In such cases, all warranty claims are void. We accept no liability for any consequential damage.

For safety and licensing reasons (CE), unauthorized change and/or modification of the device is not permitted.

The device is not a toy: do not allow children to play with it. Do not leave packaging material lying around. Plastic films/bags, pieces of polystyrene, etc. can be dangerous in the hands of a child.

The device must only be operated in residential settings.

Using the device for any purpose other than that described in this operating manual does not fall within the scope of intended use and will invalidate any warranty or liability.
4 Function and device overview
This device is part of the Homematic IP smart home system and works with the Homematic IP radio protocol. All devices of the system can be configured comfortably and individually with a smart phone via the Homematic IP app. Alternatively, you have the option of operating Homematic IP devices via the CCU3 or in conjunction with many partner solutions. The available functions provided by the system in combination with other components are described in the Homematic IP User Guide.
The Homematic IP Motion Detector with Switching Actuator – outdoor detects movements (e.g. a person) within the detection range and also registers the ambient brightness thanks to an integrated brightness sensor. The device is especially suited to outdoor use. The powerful motion detector can be used, for example, for lighting control or in security applications.
The internal actuator can be used together with other Homematic IP motion detectors to cover an individual and wide area. Other Homematic IP actuators can also be connected to the device's internal actuator. This means that several lights can be controlled simultaneously with one motion detector.
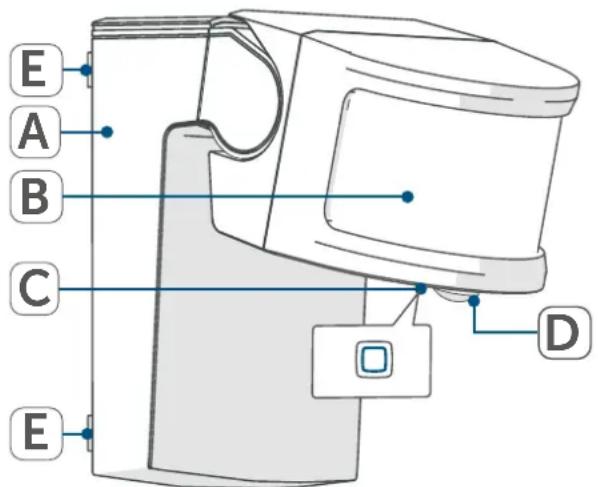
Device overview:
(A) Housing
(B) Motion sensor for main detection range
(C) System button / device LED
(D) Motion sensor for creep zone protection
(E) Latching lugs for releasing the mounting plate
text_image
E A B C D EFigure 1
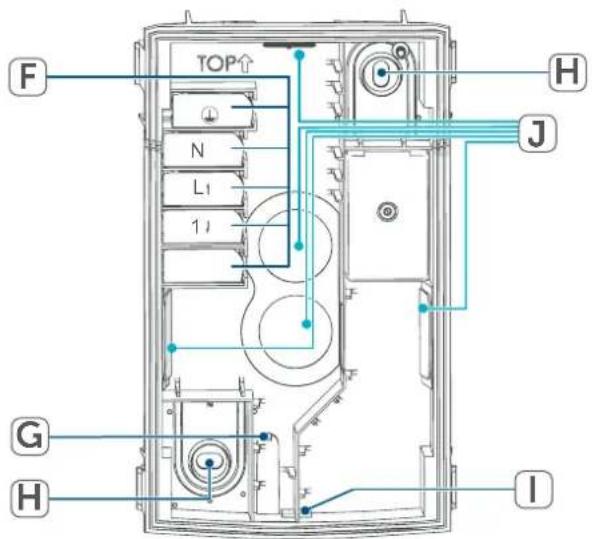
Mounting plate:
(F) WAGO© terminals
(G) Pressure equalisation duct
(H) Mounting holes
(I) Breakout opening for draining condensation
(J) Cable inlets
text_image
TOP F N L1 11 H J G H IFigure 2
5 General system information
This device is part of the Homematic IP Smart Home system and communicates via the Homematic IP wireless protocol. All devices of the system can be configured comfortably and individually with a smart phone via the Homematic IP app. Alternatively, you have the option of operating Homematic IP devices via the CCU3 or in conjunction with many partner solutions. The available functions provided by the system in combination with other components are described in the Homematic IP User Guide. All current technical documents and updates can be found at www.homematic-ip.com.
6 Detection range
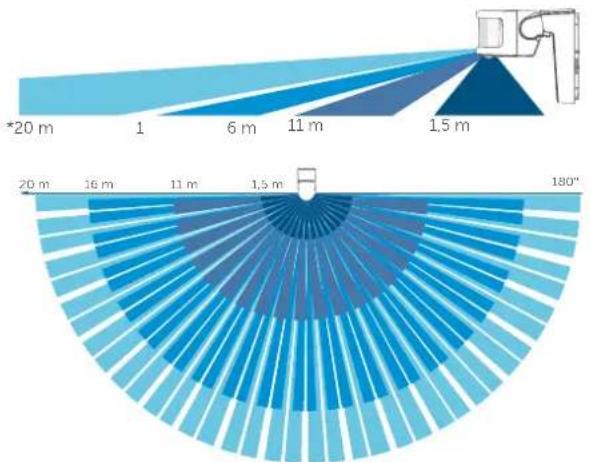
The SMO230 motion detector has a detection range of up to 20 metres* and a detection angle of 180^ . The stepwise tilting of the lens allows the device to be optimally adapted to local conditions.
The motion detector has a total of three separate motion detection zones (two main zones and the creep zone). The large detection angle of 180^ in the main detection range and numerous individual setting options allow scenarios such as the suppression of disturbance variables (passers by, cyclists or vehicles) to be implemented. The division into different zones allows the range of the other zones to remain unchanged.
polar_bar
| Section | Length (m) | |---|---| | Top Section | 20 | | Middle Section | 1 | | Bottom Section | 16 | | Bottom Section | 11 | | Bottom Section | 1 | | Bottom Section | 1.5 | | Bottom Section | 180* |Figure 3
Individual settings can be selected for your device using the Homematic IP app. For details, please refer to the Homematic IP User Guide, available for download at www.homematic-ip.com.
7 Installation
7.1 General notes on installation
The Homematic IP motion detector with switching actuator is equipped with a wall mounting bracket and is intended for wall mounting. After installation, the lens of the device can be tilted in steps.
Choose a suitable mounting location for the motion detector in the area to be monitored. Follow the instructions in the rest of this document when mounting the sensor.

All figures are based on an installation height of approx. 2.5 m.

The detection lens of the motion detector operates on multiple detection levels, each of which has 12 segments. This means that, with an aperture angle of 180^ , a range of up to 20 m can be achieved. The total possible detection range is shown in Figure 3.

The effectiveness of the detection procedure depends on the temperature difference between the moving object and the relevant background.

When installing the device, take care that the motion detector is not installed directly on or in the vicinity of large metal objects, as this would reduce the wireless range.

The detector responds best to movement across the detection range, i.e. past the motion sensor. The motion detector is least sensitive to direct movement towards or away from it.

Make sure that there is a mains supply nearby for connection of the device.
7.2 Avoiding false alarms
| Influencing factors Detection | Positive effect Negative effect Explanation | ||
| Ambient temperature | Large difference to body temperature | Small difference to body temperature | The sensors work with the difference between body temperature and ambient temperature. |
| Humidity Low humidity | High humidity Water vapour in the | air absorbs infrared radiation. | |
| Body temperature | Large difference to ambient temperature | Small difference to ambient temperature | The sensors work with the difference between body temperature and ambient temperature. |
| Bare skin area/thickness of clothing | Large bare area/thin clothing | Small bare area/thick clothing | A greater area that emits infrared radiation increases the likelihood that it will hit the sensors. |
| Speed of movement | Fast Slow Sudden changes in | temperature lead to a larger signal swing. | |
| Detection angle 90° | to the sensor surface | 0° / 180° to the sensor surface | Moving at right angles to the sensor: high sensitivity.Moving straight towards the sensor: low sensitivity. |
| Distance from sensor | Low High The closer to the | sensor, the higher the triggering sensitivity | |
7.3 Safety-relevant installation instructions

The circuit to which the device and load are connected must be protected by a circuit breaker in accordance with EN60898-1 (tripping characteristic B or C, max. 10 A rated current, min. 6 kA breaking capacity, energy limitation class 3). Installation regulations in accordance with VDE 0100 and HD382 or 60364 must be observed.

No SELV/PELV power circuits may be connected to the connecting terminals of the relay outputs.

The device may only be operated with the housing closed. The housing may only be removed during installation, configuration and maintenance.

When connecting to the device terminals, observe the cables and cable cross-sections permitted for this purpose.

When selecting a mounting location and drilling in the vicinity of switches or socket outlets, check for electrical wires and power supply cables.

The optimum installation location should be protected from the weather and not exposed to direct sunlight or other sources of heat radiation.
Permitted cable cross sections for connecting to the device are:
| Rigid cable [mm2] | Flexible cable with/without ferrule [mm2] |
| 0.75–2.50 0.75–2.50 | |

Note; only to be installed by persons with the relevant electro-technical knowledge and experience!*
Incorrect installation can put your own life at risk as well as the lives of other users of the electrical system. Incorrect installation also means that you are running the risk of serious damage to property, e.g. from fire. You risk personal liability for personal injury and property damage. Consult an electrician!
*Specialist knowledge required for installation: The following specialist knowledge is particularly important during installation:
- The "5 safety rules" to be used: Disconnect from the mains; Safeguard against switching on again; Check that system is deenergised; Earth and short circuit; Cover or cordon off neighbouring live parts;
- Select suitable tool, measuring equipment and, if necessary, personal safety equipment;
- Evaluation of measuring results;
- Selection of electrical installation material for safeguarding shut-off conditions;
• IP protection types;
• Installation of electrical installation material;
- Type of supply network (TN system, IT system, TT system) and the resulting connecting conditions (classical zero balancing, protective earthing, required additional measures etc.).
7.4 Installation
To install the motion detector outdoor, proceed as follows:
- Choose an appropriate installation location.
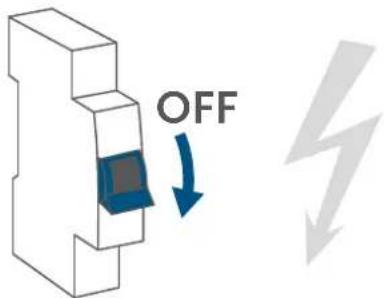
- Switch off the circuit breaker of the power circuit.
text_image
OFFFigure 4
- Check the condition of the power supply cable. Damage to the sheath and core insulation poses a risk for safety or functioning of the device.
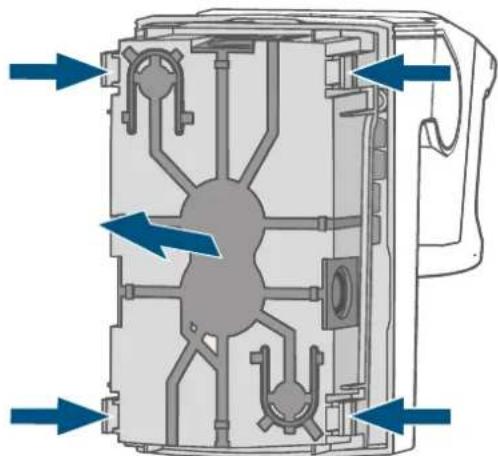
- Release the mounting plate on the rear of the device by pressing in the latching lugs (E).
natural_image
Technical diagram of a mechanical component with internal channels and directional arrows indicating flow or movement (no text or symbols present)Figure 5
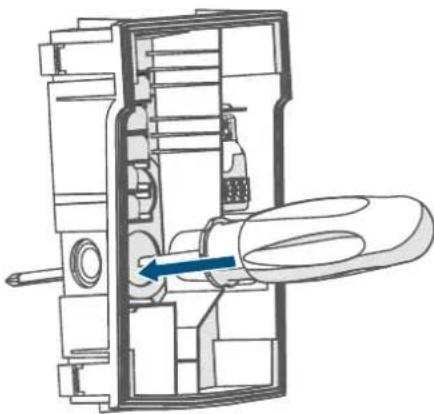
- Pierce one (or more) cable inlet using a suitable object, e.g. a screw-driver.
natural_image
Cross-sectional diagram of a mechanical device showing internal components and a blue arrow indicating direction (no text or symbols)Figure 6
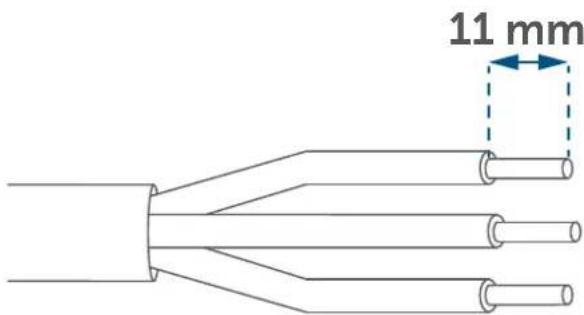
- Strip 11 mm of insulation from the cable.
text_image
11 mmFigure 7
• Measure the distance between the mounting holes (H) and drill the holes.
- Insert the dowels (included in the package contents).
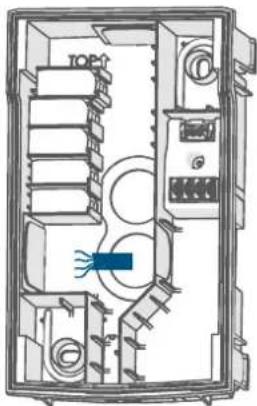
- Thread the power supply cable(s) through the cable inlet of the mounting plate.

The sheath insulation should be inserted at least 5 mm into the device to ensure the water-tightness of the device.
natural_image
Top-down schematic of an electronic device casing with internal components and a central indicator light (no text or symbols)Figure 8
- Position the mounting plate with the "TOP" mark and the arrow pointing upwards at a suitable point on a wall.
- Place the wall mounting bracket over the holes. Use the screws supplied to attach the mount to the wall.

text_image
TOP 2x 2xFigure 9

Never open several inlets without inserting a suitable cable into them, as otherwise the IP protection classification against the ingress of water and solids is not satisfied.
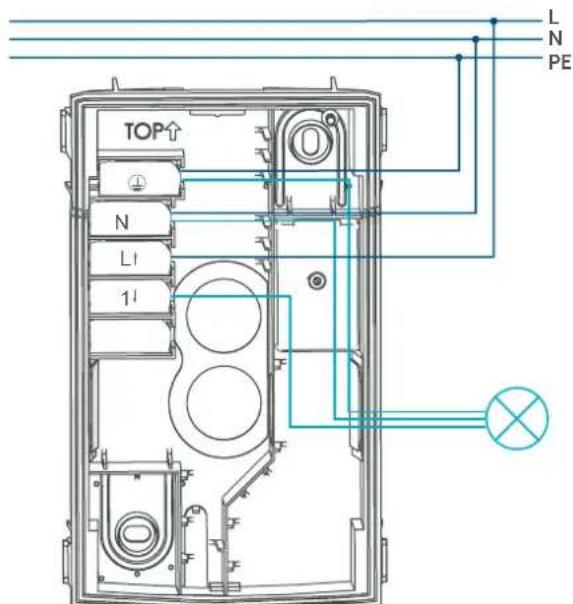
- Connect the device as shown in the connection diagram.
- To do this, connect the supply wires to the terminals of the motion detector as shown in the figure.
- Snap the terminals into the designated positions on the mounting plate.
text_image
TOP N L1 11 L N PEFigure 10
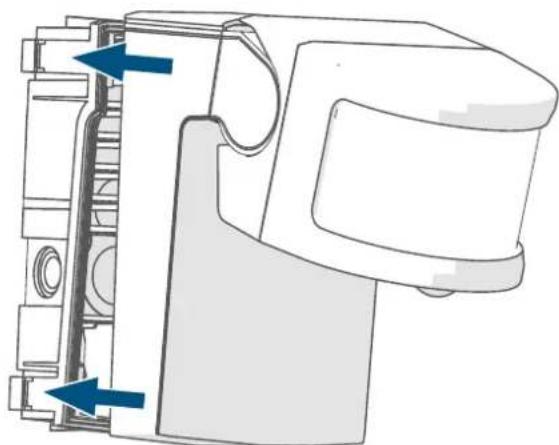
- Finally, push the motion detector onto the wall bracket until the device latches in place.

Ensure that the device is seated correctly. All latching points must engage.

Take care not to pinch any wires when pressing together.
natural_image
Technical diagram of a mechanical component with blue arrows indicating directional flow or movement (no text or symbols present)Figure 11
- Restore the power supply by switching the circuit breaker back on.
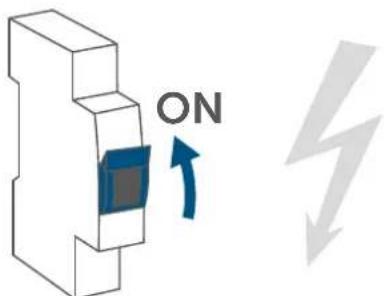
text_image
ONFigure 12

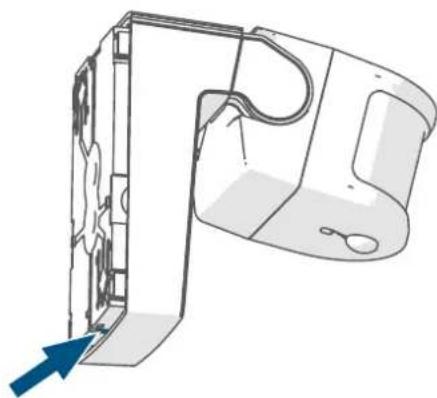
Depending on the installation location, it may be necessary to open the water drain of the device. If condensation forms, it can drain through the opening.
- Pierce the breakout opening (I) on the lower part of the mounting plate using a pointed object (e.g. screwdriver).
natural_image
Technical line drawing of a mechanical device with internal components and a blue arrow indicating direction (no text or symbols)Figure 13

Carry out this process only when the device is not connected to the power supply!
- If necessary, release the latching points via the latching lugs (E) (e.g. using a screwdriver) and at the same time pull the device off the mounting plate.
- Place the motion detector back on the mounting plate.
- Put the device back into operation.
8 Start-up

Please read this entire section before starting to use the device.

First set up your Homematic IP Access Point via the Homematic IP app to enable operation of other Homematic IP devices within your system. For further information, please refer to the Access Point operating manual.

You can pair the device with either the access point or the Homematic IP Central Control Unit CCU3. Further information can be found in the Homematic IP User Guide (available for download in the download section at www.homematic-ip.com).
To integrate the motion detector into your system and enable it to communicate with other Homematic IP devices, you must add the device to your Homematic IP access point first.
To add the motion detector, please proceed as follows:
- Open the Homematic IP app on your smart phone.
- Select "Add device".
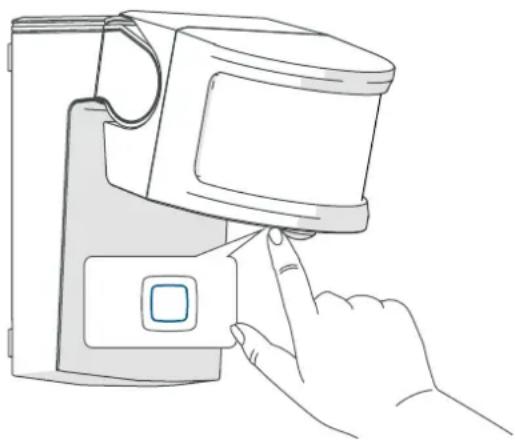
- After installation and restoration of the power supply, the device pairing mode is active for 3 minutes.

If the time has already been exceeded, you can restart pairing mode manually for another 3 minutes by pressing system button (C) briefly.
natural_image
Line drawing of a hand pressing a button on a device (no text or symbols)Figure 14
- Your device will automatically appear in the Homematic IP app.
- To confirm, enter the last four digits of the device number (SGTIN) in your app, or scan the QR code. The device number can be found on the sticker in the package contents or attached to the device.
- Wait until pairing is completed.
- If pairing was successful, the device LED (C) lights up green. The device is now ready for use.
- Select the desired solution for your device.
- Allocate the device to a room and give the device a name.

If the device LED (C) lights up red, please try again.

After switching on the power supply, the device requires approx. 30 seconds until it is ready for operation. No motion will be detected during this time.

After pairing has been completed, the function test of the motion detector starts (see „9 Function test“ on page 29).
9 Function test

The function test is only activated if the motion detector has already been added.
Up to 10 minutes after pairing or after switching on the power supply (if the device has already been paired), the main lens signals detected movements in the colour corresponding to the detection zone.
The lens flashes in colour each time a movement is detected. This allows the detection range and sensitivity to be checked directly at the sensor (see „10.3 Error codes and flashing sequences“ on page 30).
10 Troubleshooting
10.1 Command not confirmed
If at least one receiver does not confirm a command, the device LED (C) lights up red at the end of the failed transmission process. The reason for the failed transmission may be radio interference (see „13 General information about radio operation“ on page 31).
This may be caused by the following:
- Receiver cannot be reached.
- Receiver is unable to execute the command (load failure, mechanical blockade, etc.).
- Receiver is faulty.
10.2 Duty cycle
The duty cycle is a legally regulated limit of the transmission time of devices in the 868 MHz range. The aim of this regulation is to safeguard the operation of all devices working in the 868 MHz range.
In the 868 MHz frequency range we use, the maximum transmission time of any device is 1% of an hour (i.e. 36 seconds in an hour). Devices must cease transmission when they reach the 1% limit until this time restriction comes to an end. Homematic IP devices are designed and produced with 100% conformity to this regulation.
During normal operation, the duty cycle is not usually reached. However, repeated and radio-intensive pairing processes mean that it may be reached in isolated instances during start-up or initial installation of a system. If the duty cycle is exceeded, this is indicated by one long red flash of the device LED (C), and may be reflected in the device temporarily working incorrectly. The device starts working correctly again after a short period (max. 1 hour).
10.3 Error codes and flashing sequences
| Flashing code Meaning Solution | ||
| Fast orange flashing Configuration data is transmitted | Wait until the transmission is completed. | |
| 1x long green flash Operation | on confirmed (pairing or restoring factory settings) | You can continue operation. |
| 1x long red flash Operation | failed (pairing or restoring factory settings) or duty cycle limit is reached | Please try again (or see sec. see „10.2 Duty cycle" on page 29). |
| Short orange flashes (every 10 seconds) | Pairing mode active (for 3 minutes) | Enter the last four digits of the device serial number to confirm (see „9 Function test" on page 29). |
| Flashing green (for one second each) | Function test Please wait until the function test has finished after 10 minutes (see „9 Function test" on page 29). | |
| 6x long red flashes Device | defective Please see your app for error message or contact your retailer. | |
| 1x orange and 1x green light (after inserting batteries) | Test display You can continue once the test display has stopped. | |
| Alternating long and short orange flashing | Software update (OTAU) Wait until the update is completed. | |
| System LED (indicates the switching status of the internal actuator) | |
| Continuous green light Actuator is switched on | |
| LED off | Actuator is switched off |
| Main lens LED | |
| Brief red flashing (approx. 1 s) | Visualisation of a detected movement in zone 1 |
| Brief green flashing (approx. 1 s) | Visualisation of a detected movement in zone 2 |
| Brief blue flashing (approx. 1 s) | Visualisation of a detected movement in zone 3 |
| Brief yellow flashing (approx. 1 s) | Visualisation of a detected movement in zone 1 + 2 |
| Brief magenta flashing (approx. 1 s) | Visualisation of a detected movement in zone 1 + 3 |
| Brief turquoise flashing (ap-prox. 1 s) | Visualisation of a detected movement in zone 2 + 3 |
| Brief white flashing (approx. 1 s) | Visualisation of a detected movement in zone 1, 2 + 3 |

Visualisation of the individual zones overlaps and is not synchronised in time slots. Due to the large detection ranges and resulting time offset, the flashing sequences are mixed. For example, a yellow light can briefly change to red or green or vice versa. Individual zones can be switched off to obtain unambiguous flashing sequences, e.g. for a walking test. A detailed description can be found in section see „9 Function test" on page 29.
11 Restoring factory settings

The factory settings of the device can be restored. If you do this, you will lose all your settings.
To restore the factory settings of the motion detector, please proceed as follows:
- Press and hold down the system button (C) for 4 seconds until the LED starts to flash orange fast.
- Release the system button.
- Press and hold down the system button (C) again for 4 seconds, until the LED lights up green.
- Release the system button to conclude the procedure.
The device will perform a restart. After the restart, you can re-integrate your device into your Homematic IP system.
12 Maintenance and cleaning

Always switch off the mains voltage before working on the device terminal compartment (switch off the circuit breaker)! Only qualified electricians (to VDE 0100) are permitted to carry out work on the 230 V mains.
Clean the device using a soft, clean, dry and lint-free cloth. Do not use any detergents containing solvents, as they could corrode the plastic housing and label.
13 General information about radio operation
Radio transmission is performed on a non-exclusive transmission path, which means that there is a possibility of interference occurring. Interference can also be caused by switching operations, electrical motors or defective electrical devices.

The transmission range within buildings can differ significantly from that available in open space. Besides the transmitting power and the reception characteristics of the receiver, environmental factors such as humidity in the vicinity play an important role, as do on-site structural/screening conditions.
eQ-3 AG, Maiburger Strasse 29, 26789 Leer, Germany hereby declares that the radio equipment type Homematic IP HmIP-SMO230, HmIP-SMO230-A is compliant with Directive 2014/53/EU. The full text of the EU declaration of conformity is available at www.homematic-ip.com.
Information about conformity

The CE mark is a free trademark that is intended exclusively for the authorities and does not imply any assurance of properties.

For technical support, please contact your retailer.
14 Disposal
Instructions for disposal

This symbol means that the device must not be disposed of as household waste, general waste, or in a low bin or a yellow bag.
For the protection of health and the environment, you must take the product and all electronic parts included in the scope of delivery to a municipal collection point for old electrical and electronic equipment to ensure their correct disposal. Distributors of electrical and electronic equipment must also take back obsolete equipment free of charge.
By disposing of it separately, you are making a valuable contribution to the reuse, recycling and other methods of recovery of old devices.
Please also remember that you, the end user, are responsible for deleting personal data on any old electrical and electronic equipment before disposing of it.
15 Technical specifications
Device short description: HmIP-SMO230, HmIP-SMO230-A
Supply voltage: 230 V/50 Hz
Current consumption (max.): 5 A
Power consumption in standby: 0.5 W
Max. switching capacity: 1150 W
Relay: NO contact, 1-pole, μ contact, bistable
Cable type and cross section: rigid and flexible cable,
0.75–2.50 mm ^4
Protection rating: IP44
Ambient temperature: -20 to +55°C
Dimensions (W x H x D): 78 x 126 x 140 mm
Weight: 311 g
Radio frequency band: 868.0-868.6 MHz/869.4-869.65 MHz
Max. radio transmission power: 10 dBm
Receiver category: SRD category 2
Typical range in open space: 200 m
| Load type | Relay | |
| Resistive load | 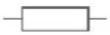 | 5 A |
| Incandescent lamp load |  | 1150 W |
| Self-ballasted lamps (LED/ compact fluorescent tube) | 200 W | |
| HV halogen lamps | 1150 W | |
| Electronic transformers for LV halogen lamps |  | 1150 W |
| Iron core transformers for LV halogen lamps |  | 1150 W |
| Fluorescent lamps (uncompensated) | [XABG] | 1150 W |
| Fluorescent lamps (parallel compensated) |  | 1150 W |
Subject to modifications.
Table des matières
text_image
E A B C D EFigure 1
Plaque de montage :
text_image
TOP F N L1 1 J H J G H IFigure 2
polar_bar
| Segment | Value (m) | |---|---| | Top Section | *20 m | | Bottom Section | 20 m | | Bottom Section | 16 m | | Bottom Section | 11 m | | Bottom Section | 1.5 m | | Bottom Section | 180° |Figure 3
www.homematic-ip.com.
7 Montage
natural_image
Cross-sectional diagram of a mechanical device showing internal components and directional arrows (no text or symbols)Figure 5
natural_image
Cross-sectional diagram of a mechanical device showing internal components and a blue arrow indicating direction (no text or symbols)Figure 6
natural_image
Technical diagram of a mechanical component with blue arrows indicating directional flow or movement (no text or symbols present)Figure 11
natural_image
Technical line drawing of a mechanical device with internal components and a blue arrow indicating direction (no text or symbols)Figure 13

natural_image
Line drawing of a hand pressing a button on a device (no text or symbols)Figure 14
text_image
E A B C D EFigura 1
Placa de montaje:
text_image
TOP F N L1 11 H J G H IFigura 2
natural_image
Technical diagram of a mechanical component with internal channels and directional arrows (no text or symbols)Figura 5
natural_image
Cross-sectional diagram of a mechanical device showing internal components and a blue arrow indicating direction (no text or symbols)Figura 6
natural_image
Top-down architectural floor plan of a room with furniture and a central blue indicator light (no text or symbols)Figura 8
natural_image
Technical diagram of a mechanical component with blue arrows indicating directional flow or movement (no text or symbols present)Figura 11
natural_image
Technical line drawing of a mechanical device with a blue arrow pointing to a component (no text or symbols present)Figura 13

natural_image
Line drawing of a hand pressing a button on a device (no text or symbols)Figura 14
text_image
E A B C D EFigura 1
text_image
TOP F N L1 11 H J G H IFigura 2
natural_image
Cross-sectional diagram of a mechanical device showing internal components and directional arrows (no text or symbols)Figura 5
natural_image
Cross-sectional diagram of a mechanical device showing internal components and a blue arrow indicating direction (no text or symbols)Figura 6
natural_image
Top-down schematic of a room layout with furniture and a blue indicator light (no text or symbols)Figura 8
natural_image
Technical diagram of a mechanical component with blue arrows indicating directional flow or movement (no text or symbols present)Figura 11
natural_image
Technical line drawing of a mechanical component with a blue arrow pointing to a section (no text or symbols present)Figura 13

natural_image
Line drawing of a hand pressing a button on a device (no text or symbols)Figura 14
text_image
E A B C D EAfbeelding 1
Montageplaat:
text_image
TOP F N L1 11 H J G H IAfbeelding 2
polar_bar
| Section | Value | |---|---| | Top Section | *20 m | | Bottom Section | 20 m | | Bottom Section (Bottom) | 16 m | | Bottom Section (Bottom) | 11 m | | Bottom Section (Bottom) | 1.5 m | | Bottom Section (Top) | 1.5 m | | Bottom Section (Top) | 11 m | | Bottom Section (Top) | 6 m | | Bottom Section (Top) | 1 m | | Bottom Section (Top) | 20 m |Afbeelding 3
natural_image
Technical diagram of a mechanical component with internal channels and directional arrows (no text or symbols)Afbeelding 5
natural_image
Cross-sectional diagram of a mechanical device showing internal components and a blue arrow indicating direction (no text or symbols)Afbeelding 6
text_image
TOP N L 11 L N PEAfbeelding 10
natural_image
Technical line drawing of a mechanical component with blue arrows indicating directional flow (no text or symbols)Afbeelding 11
natural_image
Technical line drawing of a mechanical device with a blue arrow pointing to a component (no text or symbols present)Afbeelding 13

natural_image
Line drawing of a hand pressing a button on a device (no text or symbols)Afbeelding 14
Relais: Maakcontact, 1-polig, μ-contact,
bistabiel
Kabeltype en -doorsnede: starre en flexibele kabel,
0,75–2,50 mm ^4
Free download of the Homematic IPapp!

text_image
Blue QR code image, scannable for digital content retrieval
Download on the
App Store

text_image
Blue QR code image, scannable for digital content retrieval
GET IT ON
Google Play
Bevollmächtigter des Herstellers: Manufacturer's authorised representative

eQ-3 AG
Maiburger Straße 29
26789 Leer / GERMANY
www.eQ-3.de