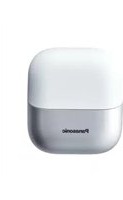
ES-WL80 - Shaver PANASONIC - Free user manual and instructions
Find the device manual for free ES-WL80 PANASONIC in PDF.

User questions about ES-WL80 PANASONIC
0 question about this device. Answer the ones you know or ask your own.
Ask a new question about this device
Download the instructions for your Shaver in PDF format for free! Find your manual ES-WL80 - PANASONIC and take your electronic device back in hand. On this page are published all the documents necessary for the use of your device. ES-WL80 by PANASONIC.
USER MANUAL ES-WL80 PANASONIC
Operating Instructions
Mode d'emploi
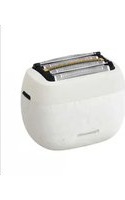
(Household use) Ladies Shaver
natural_image
Line drawing of a handheld electric shaver with two views: one showing internal grid and one showing a flat blade (no text or symbols)Thank you for purchasing this Panasonic product.
Before operating this unit, please read these instructions completely and save them for future use.
text_image
Diagram of a device with numbered parts for identification⑨
natural_image
Simple line drawing of a stylized cat face with two eyes and a mouth (no text or symbols)⑩
natural_image
Simple line drawing of a mechanical component with no text or symbols
text_image
Technical diagram of a device with numbered parts labeled ① to ⑧, showing internal structure and component layout.⑪
text_image
Technical diagram of a battery with labeled parts and an inset showing internal components numbered 12, 13, and 14.⑮
16
2
text_image
3 42

text_image
1 2
natural_image
Diagram of a handheld device with a button and mesh panel (no text or symbols)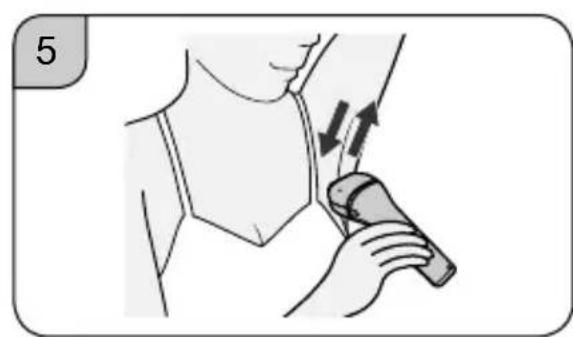
natural_image
Illustration of a person applying a medical or therapeutic device to another person's neck (no text or symbols present)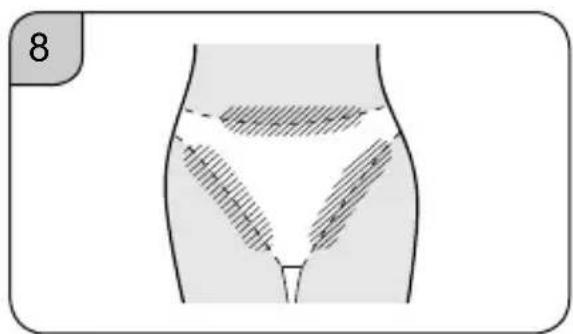
text_image
8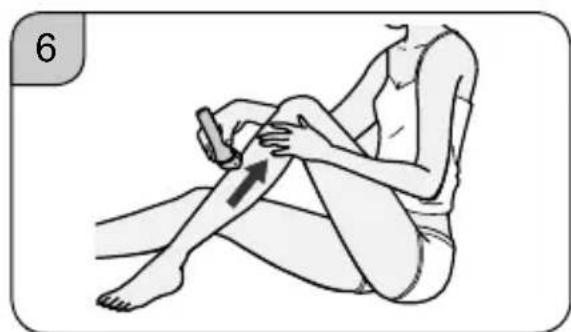
natural_image
Illustration of a person performing a seated leg massage or physical therapy technique (no text or symbols present)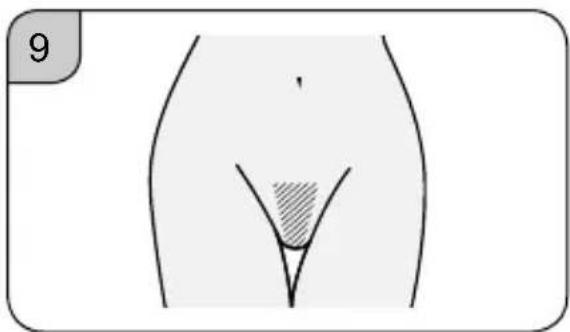
natural_image
Anatomical illustration of a human abdomen with a shaded internal area, labeled with number 9 (no text or symbols on the diagram itself)
natural_image
Illustration of a person applying a bandage to their lower abdomen, showing finger movement (no text or symbols)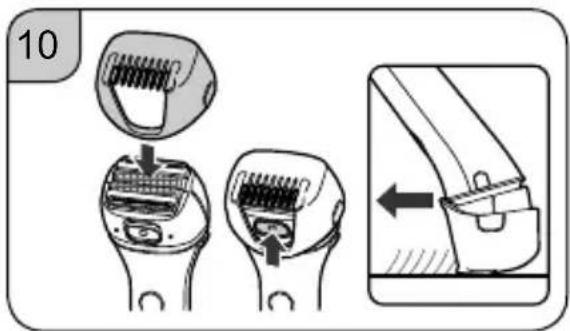
text_image
10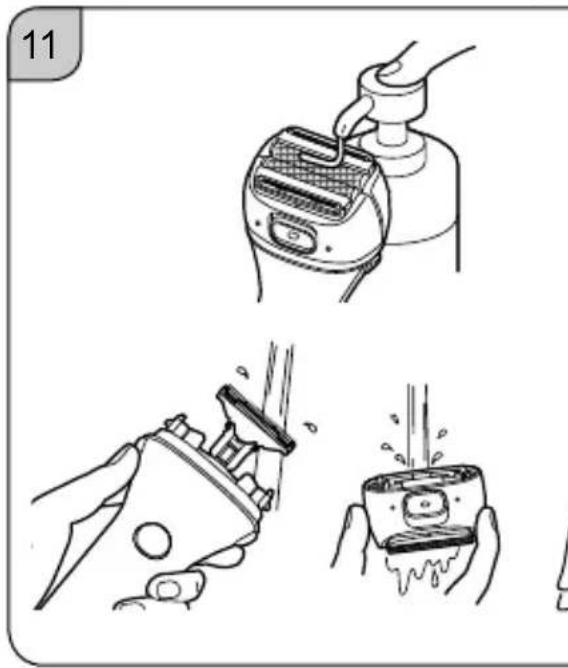
natural_image
Illustration showing three steps of hair cleaning: using a grater, opening a device, and pouring liquid into a container (no text or symbols)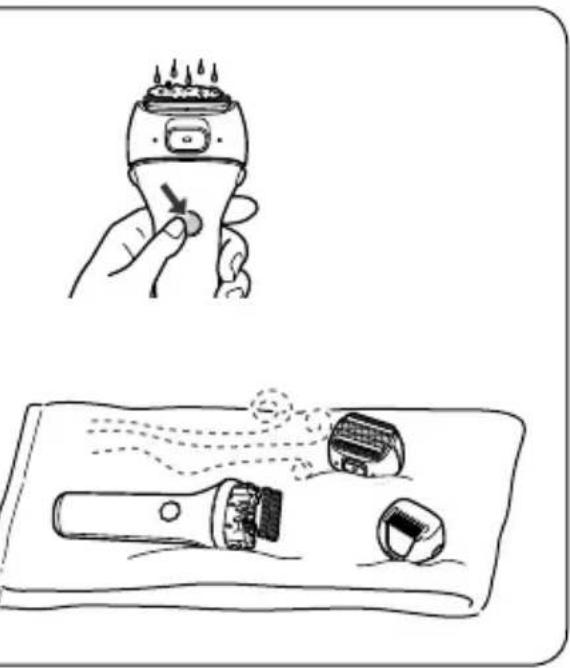
natural_image
Illustration showing a hand holding a brush and a tool on a tray, with no visible text or symbols.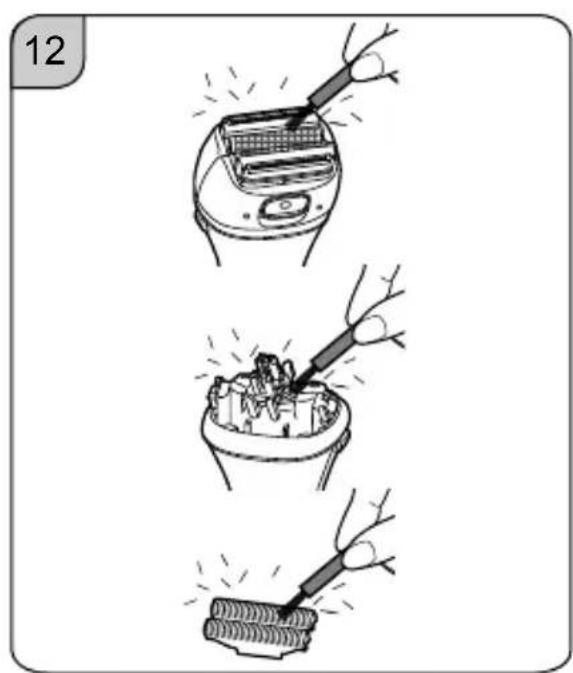
text_image
12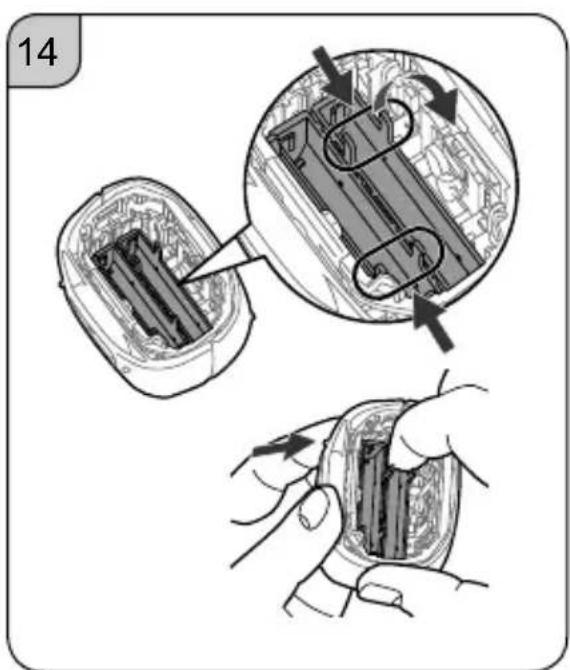
text_image
14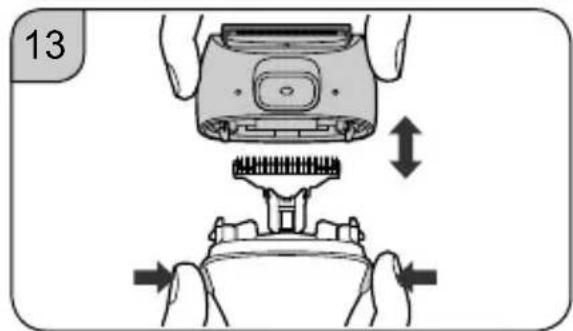
natural_image
Illustration of a hand using a device to press or install a mechanical component, showing no text or symbols.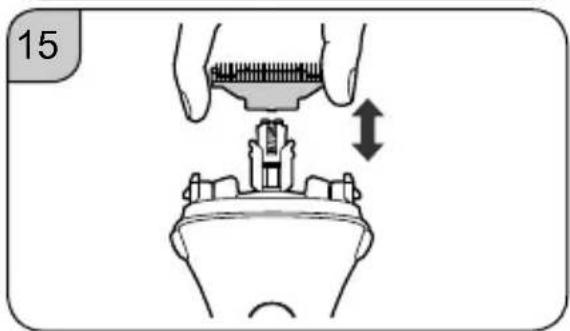
natural_image
Illustration of a hand holding a measuring tool above a mechanical component, with an arrow indicating direction (no text or symbols)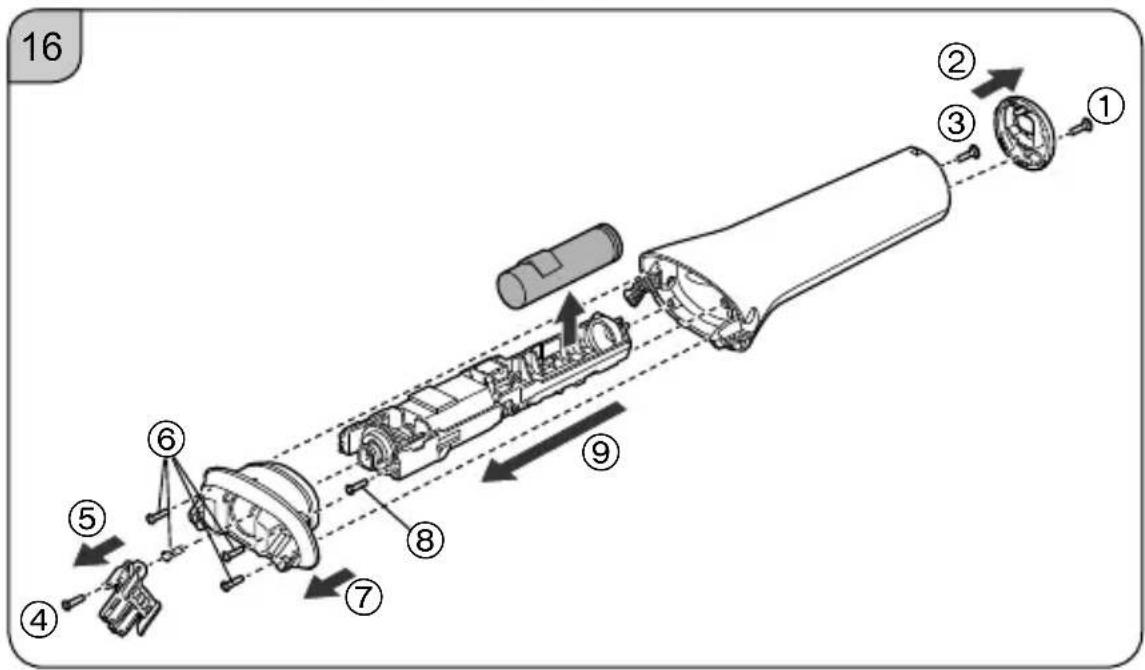
text_image
16 ① ② ③ ④ ⑤ ⑥ ⑦ ⑧ ⑨Contents
Safety precautions 6
Important information ....11
Parts identification .... 12
Charging....12
How to use 13
Cleaning 14
Replacing shaving head components 15
Troubleshooting 15
Battery life 16
Removing the built-in rechargeable battery 16
Specifications 17
Table des matières
Make sure to follow these instructions.
To prevent accidents, injuries or damage to property, please follow the instructions below.
| ⚠DANGER | Indicates potential hazard that will result in serious injury or death. |
| ⚠WARNING | Indicates potential hazard that could result in serious injury or death. |
| ⚠CAUTION | Indicates potential hazard that could result in minor injury or property damage. |
IMPORTANT SAFETY INSTRUCTIONS
When using an electrical appliance, basic precautions are required to always be followed, including the following.
Read all instructions before using this appliance.
DANGER To reduce the risk of electric shock:
- Except when charging, always unplug this appliance from the electrical outlet immediately after using.
- Unplug this appliance before cleaning.
WARNING
To reduce the risk of burns, fi re, electric shock, or injury to persons:
- This appliance is not intended for use by persons (including children) with reduced physical, sensory or mental capabilities, or lack of experience and knowledge, unless they have been given supervision or instruction concerning use of the appliance by a person responsible for their safety. Children should be supervised to ensure that they
do not play with the appliance.
- Use this appliance only for its intended use as described in this manual. Do not use attachments not recommended by the manufacturer.
- Never use this appliance if it has a damaged plug, when not working properly, if it has been dropped, damaged, or after it has been submerged under water. Return the appliance to a service center for examination and repair.
- Never drop or insert any object into any opening.
- Do not use outdoors or operate where aerosol (spray) products are being used.
- Do not use this appliance with a damaged or broken attachment as it has the potential to cause facial injury.
- Always attach the plug to the appliance first, then to the outlet. To disconnect, turn all controls to "off" then remove plug from outlet.
- Plug charger directly into receptacle - do not use an extension cord.
- Unplug charger before plugging or unplugging appliance.
SAVE THESE INSTRUCTIONS

WARNING
▶ Power supply
- Do not damage the power plug.
- Do not deface, modify, forcefully bend or pull the power plug.
- Do not immerse the AC adaptor in water or wash it with water.
- Do not place the AC adaptor over or near water filled sink or bathtub.
- Never use the appliance if the AC adaptor is damaged or if the power plug fi ts loosely in a household outlet.
Doing so may cause electric shock or fire due to a short circuit.
WARNING
- Do not connect or disconnect the AC adaptor to a household outlet with a wet hand.
Doing so may cause electric shock or injury.
- Do not use in a way exceeding the rating of the household outlet or the wiring.
Exceeding the rating by connecting too many plugs to one household outlet may cause fi re due to overheating.
- Do not use anything other than the supplied AC adaptor for any purpose. Also, do not use any other product with the supplied AC adaptor. (See page 12.)
Doing so may cause burn or fi re due to a short circuit.
• Always ensure the appliance is operated on an electric power source that matches the rated voltage as indicated on the AC adaptor.
• Fully insert the AC adaptor.
Failure to do so may cause fire or electric shock.
▶This product
- This product has a built-in rechargeable battery. Do not throw into flame or heat.
Doing so may cause fluid leak, overheating, or explosion.
- Do not modify or repair.
Doing so may cause fi re, electric shock, or injury. Contact an authorized service center for repair (battery change etc.).
- Never disassemble except when disposing of the product.
Doing so may cause fi re, electric shock, or injury.
▶ In case of an abnormality or malfunction
- Immediately stop using and remove the AC adaptor if there is an abnormality or malfunction.
Failure to do so may cause fire, electric shock, or injury.
· The main unit or the AC adaptor is deformed or abnormally hot.
· The main unit or the AC adaptor smells of burning.
- There is an abnormal sound during use or charging of the main unit or the AC adaptor.
Immediately request inspection or repair to an authorized service center.

WARNING
▶ Preventing accidents
- Do not place within reach of children or infants. Do not let them use it.
Doing so may cause an accident or injury due to accidental ingestion of the inner blades, brush, etc.
▶ Cleaning
- Regularly clean the power plug and the charging plug to prevent dust from accumulating.
Failure to do so may cause fi re due to insulation failure caused by humidity.
Disconnect the AC adaptor and wipe with a dry cloth.

CAUTION
▶ To protect the skin
• The following persons should not use this appliance:
Persons with sensitive or delicate skin, persons with allergies
- Do not use in the following body area:
· Face, vulva
- Injuries, rashes, moles, bruises, warts, pimples, etc., and the surrounding areas
- Flaccid skin
Doing so may cause injury, infl ammation of the skin, or bleeding.
- Do not apply strong pressure to the skin, move repeatedly over the same area or move back and forth in one area.
Also, do not use with a jabbing motion.
Doing so may cause injury or infl ammation of the skin, or increased pain.
- Do not forcefully press the outer foil. Also, do not touch the outer foil with fingers or nails when in use.
Doing so may cause injury to skin or reduce the life of the outer foil.
- Do not touch the blade section (metallic section) of the inner blades.
Doing so may cause injury to your hands.
CAUTION
- Before using, check that the outer foil is free from deformities, cracks, and damage.
- Use the bikini attachment to trim your pubic hair.
Failure to do so may cause injury to the skin.
- If skin problems appear after use, stop using the appliance and contact a dermatologist.
Failure to do so may cause symptoms to worsen.
- When storing or carrying, always attach the cap.
Failure to do so may cause injury to skin or reduce the life of the outer foil.
▶ This product
- Do not allow metal objects or trash to adhere to the power plug or the charging plug.
Doing so may cause electric shock or fire due to a short circuit.
- Do not share with your family or others.
Doing so may cause infection or infl ammation.
- Do not drop or subject to shock.
Doing so may cause injury.
Handling of the removed battery when disposing
⚠️DANGER
- The rechargeable battery is exclusively for use with this appliance. Do not use the battery with other products.
- Do not charge the battery after it has been removed from the product.
- Do not throw into fire or apply heat.
- Do not solder, disassemble, or modify the battery.
- Do not let the positive and negative terminals of the battery get in contact with each other through metallic objects.
- Do not carry or store the battery together with metallic jewellery such as necklaces and hairpins.
- Never peel off the tube.
Doing so may cause fluid leak, overheating, or explosion.
! DANGER
- The battery contains alkaline fluid. If it comes in contact with the eyes, do not rub the eyes, and thoroughly rinse with clean water, such as tap water.
Failure to do so may cause loss of vision.
Consult a physician immediately.
WARNING
• After removing the rechargeable battery, do not keep it within reach of children and infants.
The battery will harm the body if accidentally swallowed.
If this happens, consult a physician immediately.
- The battery contains alkaline fluid. If it comes in contact with the skin or clothes, rinse off with clean water, such as tap water.
Failure to do so may cause skin injury.
Important information
- This WET/DRY shaver can be used for wet shaving using shaving lather or for dry shaving. You can use this watertight shaver in the shower and clean with water. The following symbol means suitable for use in a bath or shower.

- Charge the appliance correctly according to these Operating Instructions. (See page 12 "Charging".)
- This appliance contains battery that is only replaceable by skilled persons. Please contact an authorized service center for the details of repair.
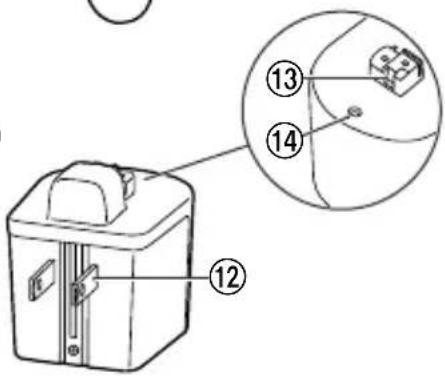
Parts identifi cation (Fig. 1)
① Outer foil
② Trimmer
③ Outer foil frame
④ Pop-up trimmer switch
⑤ Inner blades
⑥ Outer foil frame release buttons
⑦ Power switch
⑧ Appliance socket
⑨ Travel cap & holder (cap)
⑩ Bikini attachment
⑪ AC adaptor (RE6-71)
⑫ Power plug
⑬ Charging plug
⑭ Charging indicator lamp
Accessories
⑮ Cleaning brush
⑯ Pouch
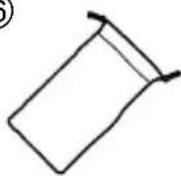
Attaching or removing the travel cap & holder
Press down on both sides of the cap to attach or remove. (Fig. 2)
- Check that all four protrusions on the shaver are inserted securely.
- The shaver can be kept vertically or horizontally. When carrying the shaver, you can use the cap to protect the outer foil and prevent erroneous operation of the switch.
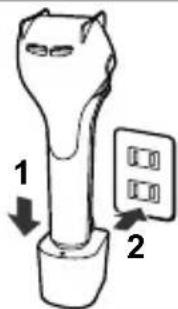
Charging (Fig. 3)
- Make sure that the shaver is turned off.
- Wipe off any water droplets on the appliance socket.
- You cannot operate the shaver while charging.
1 Place the shaver on the AC adaptor until it clicks.
2 Insert the power plug into a household outlet.
- It will take approximately 20 hours to fully charge the shaver.
- Check that the charging indicator lamp glows.
3 After charging is completed, unplug the power plug and then the shaver. (for safety and energy saving)
- The charging indicator lamp continues to glow after charging is completed. There is no indication to show that “charging is completed”.
- Charging the battery for more than 20 hours will not affect battery performance.
- Always unplug the shaver from the AC adaptor except when charging.
Notes
- If there is noise from the radio or other sources while using or charging the shaver, move to a different location to use it.
- The battery will deteriorate (leak battery fluid, etc.) if not used for over 6 months, so make sure to perform a full charge at least once every 6 months.
- When charging the shaver for the first time or when it has not been in use for more than 6 months, the charging time may change or the lamp on the AC adaptor may not glow for a few minutes, or the operating time may shorten. Please charge it for more than 30 hours in such cases.
- Recommended ambient temperature for charging is 0 °C – 35 °C (32 °F – 95 °F). Battery performance may decrease outside of the recommended temperature.
- A full charge supplies enough power for approximately 35 minutes of use. (Based on dry using at 20^ - 30^ ( 68^ - 86^ )) The operating time may differ depending on the frequency of use, the operating method and the ambient temperature.
- You can charge the battery before it is completely discharged. However, it is recommended to charge when the battery is completely discharged. The battery life depends mainly on factors such as how it is used and stored.
How to use
- Remove the cap and check that the outer foil is free from deformities, cracks and damage before use.
- The shaver may not operate in an ambient temperature approximately 0^ (32 °F) or lower.
Press the power switch and shave.
For the best results, move the shaver in back and forth motion, while keeping the shaver head at a right angle (90°) to your skin. Slide the pop-up trimmer switch up when using the pop-up trimmer to cut long hair. (Fig. 4)
Underarms Hold your arm up enough to stretch your skin and shave back and forth. (Fig. 5)
Legs Move the shaver from ankle to knee. (Fig. 6)
Arms Move the shaver from outside to inside. (Fig. 7)
Bikini line Make sure the line which you would like to shave, and then trim excessive hair with the pop-up trimmer. (Fig. 8)
The front of the bikini area
Trim your pubic hair with the bikini attachment. (Fig. 9)
• Always use the bikini attachment.
- Dry shaving is recommended.
- Stroke the hair against the flow before shaving to make the flat hair to stand.
Using the bikini attachment (Fig. 10)
- Attach the bikini attachment.
- Slide up the pop-up trimmer switch, and turn the power switch on.
-
Make the attachment firmly contact with the skin, and move the shaver slowly.
-
Moving the shaver too fast will cause the hair to get caught and prevent trimming. If hair gets caught in the bikini attachment, lift the shaver away from the skin and try again.
- To prevent injury, do not press the bikini attachment too firmly against your skin.
- Be careful to shave areas which are difficult to see. Otherwise it may cause injury to your skin.
Cleaning
- Regular cleaning will keep your shaver in a hygienic state and maintain the cutting performance.
- Make sure that the shaver is turned off.
- Do not wipe with alcohol or nail polish remover. Doing so may cause malfunction, cracking of the parts or discoloration.
Wet cleaning (Fig. 11)
- Apply some hand soap onto the outer foils.
- Turn the shaver on and turn off after few seconds.
- Press the outer foil frame release buttons to remove the outer foil frame.
- Rinse the inner blades and outer foil frame with cold or lukewarm water.
- Do not use hot water.
- Wipe the shaver with a dry cloth and dry them well.
Dry cleaning (Fig. 12)
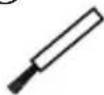
Clean the hair dust with the cleaning brush.
Storing
Attach the cap.
- Do not leave the shaver in a place with high temperature and high humidity. Doing so may cause malfunction.
Replacing shaving head components
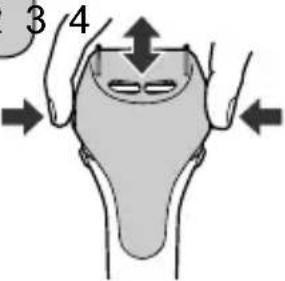
Replacing the outer foil
- Press the outer foil frame release buttons to remove the outer foil frame. (Fig. 13)
- Hold the knobs on the outer foil with your finger. Lift it up in the direction of the arrow while pushing the edge of outer foil from the outside. (Fig. 14)
- Align the directions of knobs as illustrated and insert the new outer foil into the frame. (Fig. 14)
- Insert the plastic edges into the frame until they click.
Replacing the inner blades (Fig. 15)
- Hold the inner blade at both ends firmly and pull it straight away from the shaver to remove one by one.
- Insert the new inner blade one by one by holding it at both ends and press it downward until it clicks.
Troubleshooting
The appliance does not operate.
• Fully charge the appliance.
- If the appliance and the AC adaptor are connected to the household outlet, disconnect from the household outlet before use.
• Perform wet-cleaning. (See page 14.)
The usage time gets short.
• Fully charge the appliance.
- Use the appliance in an ambient temperature approximately 0 °C (32 °F) or higher.
- Contact to skin with gentle force.
The appliance is not cutting as well as before.
- Clean the hair dust.
- Replace the blade.
■ Guidelines for replacement
| Outer foil Approximately | 1 year |
| Inner blades Approximately | 2 years |
If the problems still cannot be solved, contact the store where you purchased the appliance or a service center authorized by Panasonic for repair.
Battery life
The life of the battery is 3 years. Have the battery replaced by an authorized service center.
Removing the built-in rechargeable battery
ATTENTION:
A nickel metal hydride battery that is recyclable powers the product you have purchased. Please call 1-800-8-BATTERY for information on how to recycle this battery.

Remove the built-in rechargeable battery before disposing of the shaver.
- The battery is to be disposed of safely.
- This figure must only be used when disposing of the shaver, and must not be used to repair it.
- If you dismantle the shaver yourself, it will no longer be waterproof, which may cause it to malfunction.
How to remove the battery
- Remove the shaver from the AC adaptor.
-
Press the power switch to turn on the power and then keep the power on until the battery is completely discharged.
-
Perform steps ① to ⑨ and lift the battery, and then remove it. (Fig. 16)
• Take care not to short circuit the positive and negative terminals of the removed battery, and insulate the terminals by applying tape to them.
Specifications
| Power source See the name plate on the AC adaptor. | |
| Motor voltage | 1.2 V— |
| Charging time Approx. 20 hours | |
This product is intended for household use only.
Personal Care & Beauty Care Products
FOR USA ONLY
30-Day Quality Satisfaction Guarantee
If you are dissatisfi ed with any Panasonic Personal Care & Beauty Care Products for any reason, simply return it to the place of purchase with a dated proof of purchase, in the original packaging, with all accessories, parts and instructions, within 30 days of the date of purchase, for a full refund, or call Panasonic at 1-800-338-0552. Abuse or misapplication of this product voids the guarantee.
PRODUCT REGISTRATION
(U.S. customers only)
Go to www.panasonic.com/register and register your product now to receive these benefits:
Safety Notification
We contact our customers in case of recall
Owner Verification
Proof of purchase in case of product theft or loss
Efficient Warranty Service
In case there is a problem with your product
Special Offers and Promotions from Panasonic
FOR YOUR CONVENIENCE, WE HAVE ESTABLISHED A TOLL-FREE (IN USA ONLY) NATIONAL ACCESSORY PURCHASE HOT LINE AT 1-800-332-5368.
Panasonic Corporation of North America
Two Riverfront Plaza, Newark, NJ 07102-5490
IN CANADA CONTACT:
AU CANADA, COMMUNIQUEZ AVEC :
Panasonic Canada Inc.
5770 Ambler Drive, Mississauga, Ontario L4W 2T3
www.panasonic.com
Service • Assistance • Accessories
www.panasonic.ca/english/support (In Canada)
www.panasonic.ca/french/support (Au Canada)
http://www.panasonic.com
© Panasonic Corporation 2021
F
Printed in Thailand