
Synthesis SDR-38 - Receiver JBL - Free user manual and instructions
Find the device manual for free Synthesis SDR-38 JBL in PDF.

| Product Type | Immersive AV Receiver |
| Brand | JBL Synthesis |
| Model | SDR-38 |
| Dimensions (W x D x H) | 433 x 425 x 171 mm |
| Net weight | 18.1 kg |
| Packaged weight | 21.4 kg |
| Mains power | 110–120 V or 220–240 V, 50–60 Hz |
| Max power consumption | 1.5 kW |
| Standby power consumption | < 0.5 W |
| Output power (8 Ω, 2 channels, 20 Hz – 70 kHz, < 0.02% THD) | 170 W / 200 W |
| Output power (7 channels, 1 kHz, 0.2% THD) | 100 W / 180 W |
| Amplification | Class G, 7 channels |
| Native audio processing | 16 channels |
| Supported audio formats | Dolby Atmos, DTS:X, Auro 3D, IMAX Enhanced, Dirac Live, Logic 16 |
| D/A converter | ESS Sabre 9028 Pro (24 bits / 192 kHz) |
| HDMI inputs | 7 inputs (HDMI 2.1, HDCP 2.3) |
| HDMI outputs | 2 outputs (including eARC) |
| Network connectivity | Ethernet, Wi-Fi, Bluetooth aptX HD |
| Built-in radio | FM / DAB+ |
| Other connections | USB, Dante, RS232, IR, 12 V triggers, 9.1.6 pre-outs |
| Maintenance | Unplug before cleaning; use a soft dry cloth; no solvents |
| Safety | Double insulation (class II); do not expose to water or heat; ventilation required |
| Repairability | Refer all servicing to qualified personnel; no user-serviceable parts |
| Included accessories | Power cord, remote control with batteries, FM/DAB antenna, 3 Wi-Fi/Bluetooth antennas, calibration microphone, USB cable |
| Warranty | International 5 years (parts and labor); disc players 2 years |
Frequently Asked Questions - Synthesis SDR-38 JBL
User questions about Synthesis SDR-38 JBL
0 question about this device. Answer the ones you know or ask your own.
Ask a new question about this device
Download the instructions for your Receiver in PDF format for free! Find your manual Synthesis SDR-38 - JBL and take your electronic device back in hand. On this page are published all the documents necessary for the use of your device. Synthesis SDR-38 by JBL.
USER MANUAL Synthesis SDR-38 JBL
Please be sure to check wwwjobsynthesis.com for the latest version of this guide, Firmware updates, and other support material.
Safety Guidelines
Important Safety Instructions
- Read these instructions.
- Keep these instructions.
- Heed all warnings.
- Follow all instructions.
- Do not use this apparatus near water.
- Clean only with dry cloth.
- Do not block any ventilation openings. Install in accordance with the manufacturer's instructions.
- Do not install near any heatsources such as radiators, heat registers, stoves, or other apparatus (including amplifiers) that produce heat.
- Do not defeat the safety purpose of the polarized or grounding-type plug.
A polarized plug has two blades with one wider than the other. A grounding type plug has two blades and a third grounding prong. The wide blade or the third prong are provided for your safety. If the provided plug does not fit into your outlet, consult an electrician for replacement of the obsolete outlet.
- Protect the power cord from being walked on or pinched particularly at plugs, convenience receptacles, and the point where they exit from the apparatus.
- Only use attachments/accessories specified by the manufacturer.
- Use only with the cart, stand, tripod, bracket, ortable specified by the manufacturer, or sold with the apparatus.
When a cart is used, use caution when moving the cart/apparatus combination to avoid injury from tip over.
- Unplugthisapparatusduringlightningstormsorwhen unused for long periods of time.

- Refer all servicing to qualified service personnel.
Servicing is required when the apparatus has been damaged in any way, such as power supply cord or plug is damaged, liquid has been spilled or objects have fallen into the apparatus, the apparatus has been exposed to rain or moisture, does not operate normally, or has been dropped. - Object or liquid entry
WARNING – Take care that objects do not fall and liquids are not spilled into the enclosure through any openings. The equipment shall not be exposed to dripping or splashing. Liquid-filled objects such as vases should not be placed on the equipment. - Climate
The equipment has been designed for use in moderate climates and in domestic situations. - Cleaning
Unplug the unit from the mains supply before cleaning.
The case should normally only require a wipe with a soft, lint-free cloth. Do not use chemical solvents for cleaning.
We do not advise the use of furniture cleaning sprays or polishes as they can cause permanent white marks. - Power sources
Only connect the equipment to a power supply of the type described in the operating instructions or as marked on the equipment.
The primary method of isolating the equipment from the mains supply is to remove the mains plug. The equipment must be installed in a manner that makes disconnection possible. - Abnormal smell
If an abnormal smell or smoke is detected from the equipment, turn the power off immediately and unplug the equipment from the wall outlet. Contact your dealer and do not reconnect the equipment. - Damage requiring service
The equipment should be serviced by qualified service personnel when:
A. The power-supply cord or the plug has been damaged, or
B. Objects have fallen, or liquid has spilled into the equipment, or
C. The equipment has been exposed to rain, or
12. The equipment does not appear to operate normally or exhibits a marked change in performance, or
E. The equipment has been dropped or the enclosure damaged.

CAUTION: To reduce the risk of electric shock, do not remove cover (or back). No user serviceable parts inside. Refer servicing to qualified service personnel.
WARNING: To reduce the risk of fire or electric shock, do not expose this apparatus to rain or moisture.
The lightning flash with an arrowhead symbol within an equilateral triangle, is intended to alert the user to the presence of uninsulated 'dangerous voltage' within the product's enclosure that may be of sufficient magnitude to constitute a risk of electric shock to persons.
The examination point within an electrical triangle is intended to alert the user to the presence of important operating and maintenance (servicing) instructions in the literature accompanying the product.
CAUTION: In Canada and the USA, to prevent electric shock, match the wide blade of the plug to the wide slot in the socket and insert the plug fully into the socket.
Class II product
This equipment is a Class II or double insulated electrical appliance. It has been designed in such a way that it does not require a safety connection to electrical earth ("ground" in the U.S.)
Warning
Mains plug/appliance coupler is used to disconnect device and i. shall remain readily operable.
Safety Compliance
This equipment has been designed to meet the IEC/EN 60065 international electrical safety standard.
This device complies with Part 15 of the FCC Rules. Operation is subject to the following two conditions:
- This device may not cause harmful interference, and
- This device must accept any interference received, including interference that may cause undesired operation.
The building installation shall be regarded as providing protection in accordance with the rating of the wall socket outlet.
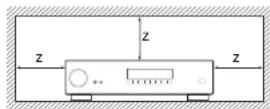
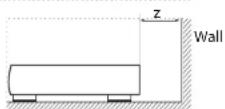
Caution on installation
For proper heat dispersal, do not install this unit in a confined space, such as a bookcase or similar enclosure.
☐ More than 0.3m (12in) is recommended.
☐ Do not place any other equipment on this unit.
FCC Information (for US customers)
PRODUCT
This product complices with Part 15 of the FCC Rules. Operation is subject to the following two conditions:
-
This device may not cause harmful interference, and
-
This device must accept any interference received, including interference that may cause undesired operation.
IMPORTANT NOTICE: DO NOT MODIFY THIS PRODUCT
This product, when installed as indicated in the instructions contained in this manual, meets FCC requirements. Modification not expressly approved by JBL SYNTHESIS may void your authority, granted by the FCC, to use the product.
NOTE
This product has been tested and found to comply with the limits for a Class B digital device, pursuant to Part 15 of the FCC Rules. These limits are designed to provide reasonable protection against harmful interference in a residential installation.
This product generates, uses and can radiate radio frequency energy and, if not installed and used in accordance with the instructions, may cause harmful interference to radio communications. However, there is no guarantee that interference will not occur in a particular installation. If this product does cause harmful interference to radio or television reception, which can be determined by turning the product CFF and ON, the user is encouraged to try to correct the interference by one or more of the following measures:
□ Reorient or relocate the receiving antenna.
□ Increase the separation between the equipment and receiver.
☐ Connect the product into an outlet on a circuit different from that to which the receiver is connected.
□ Consult the local retailer authorized to distribute this type of product or an experienced radio/TV technician for help
Safety Information (for European customers)
☐ Avoid high temperatures. Allow for sufficient height dispersion when installed in a rack.
□ Handle the power cord carefully. Hold the plug wh unplugging the cord.
☐ Keep the unit free from moisture, water, and dust.
□ Unplug the power cord when not using the unit long periods of time.
☐ Do not obstruct the ventilation holes.
□ Do not let foreign objects into the unit.
☐ Do not let insecticides, benzene, and thinner come contact with the unit.
☐ Never disassemble or modify the unit in any way.
□ Ventilation should not be impeded by covering ventilation openings with items, such as newspapers, tablecloths or curtains.
☐ Naked flame sources such as lighted candles shown not be placed on the unit.
□ Observe and follow local regulations regarding battery disposal.
☐ Do not expose the unit to dripping or splash fluids.
☐ Do not place objects filled with liquids, such as vas on the unit.
☐ Do not handle the mains cord with wet hands.
□ When the switch is in the OFF position, the equipment is not completely switched off from MAINS.
☐ The equipment shall be installed near the power supply so that the power supply is easily accessible.
A note about recycling
This product's packaging materials are recyclable and can be reused. Please dispose of any materials in accordance with the local recycling regulations.
When discarding the unit, comply with local rules or regulations.
or Batteries should never be thrown away or incinerated but disposed of in accordance with the local regulations concerning battery disposal.
This product and the supplied accessories, excluding the batteries, constitute the applicable product according to the WEE directive
Correct disposal of this product
These markings indicate that this product should not be disposed with other household waste throughout the EU.


Pb
To prevent possible harm to the environment or human health from uncontrolled waste disposal and to conserve material resources, this product should be recycled responsibly.
To dispose of your product, please use your local return and collection systems or contact the retailer where the product was purchased.
Welcome
Thank you and congratulations...
...for purchasing your JBL Synthesis Immersive Surround Sound Processor.
The JBL Synthesis SDF-38 Class C Immersive Surround Sound; AV Receiver and SDF-58 Surround Sound Processor are designed to ensure exceptional performance without compromise. With best-in-class audio and video signal integrity, 16 channels of native processing, Dolby ATMOS ^® , DTSX ^® , Auro 3D ^® , IMAX ^® Enhanced, Dirac Live ^® , Logic16 ^™ , Network Streaming, Dance ^® and Class G amplification; the JBL Synthesis ^® SDF-38 and SDF-58 deliver a powerful sensory-rich experience with uncivalent flexibility.
Immerse Yourself
Best in class audio and video signal integrity and processing, as well as uncompromising Class G amplification, ensure exceptional transparency even with the most demanding program material. An audiophile-grade 24Bit / 192kHz ESS Salore Pro DAC, combined with Direc Live room equalization and the exceptional dynamics and low distortion of Class G amplification ensure pristine sound for music and movies. The Harman proprietary Logic 15 up mixer allows content to envelop the listener with a rich and natural three dimensional sound, no matter the source format.
Your Content Your way
Many high-end AW's exclude real world everyday conveniences for the end user. The SDR 38 provides a variety of ways to experience content whether using an elaborate network media server over Ethernet or WiFi or simply streaming directly from your tablet or phone via Bluetooth with aptX™ HD. You can source content from a smart TV with high-resolution audio via a CASC, unlike Chromecast® built-in and Apalac® AirPlay 27%. Use the Musiclib® app to play your own music library from a computer or NAS drive, or play directly from a USB Flash drive. There is even a DAB/FM antenna for DIA radio.
Superior Video
Advanced circuitry and decades of know-how ensure the 4K "Ultra HD" video signal is perfectly clear and rock solid. The video stages are designed to harness the latest technology and deliver the best quality formats including Dolloy Vision™, HLG, HDR10, HDR10+, HDMI/2.1 with HDCP2.3, and 3D video capabilities built-in.
IMAX Enhanced
JBL Synthesis® SDF-38 and SDF-58 are IMAX Enhanced-co-tied AV processors and feature DTSX immersive audio decoding that is optimized to properly reproduce the full dynamic range of IMAX theatrical sound mixes available in IMAX Enhanced content. With meticulous adjustments modeled on the IMAX theatrical sound system, this procleretary IMAX audio milk is translated for home theater-environments and exclusively delivered using a special variant of the DTSX CODEC technology to deliver the IMAX signature sound experience in the home.
A More Dramatic TV Experience
Dolby Vision™ is superior HDR. Using the same underlying technology as the most advanced movie theatres, Dolby Vision enables an enhanced image through superior content and smarter TV display performance.
Audiophile Quality
The SDF-38 and SDF-58 leverage the 24kΩ/192 kHz ESS® Sabre 9026 Pro featuring 114dB dynamic range and -100 T-ID+N in and out for A/D and D/A conversion. The analog circuitry on the input and output stages is optimized for unequaled dynamic range, ultra-low distortion, and unmatched audio clarity. Carefully designed anti-jitter circuitry and ultra-clean power supplies are incorporated to ensure all audio paths including I/DMI, are uncompromised.
Class G Amplification – The Best of Both Worlds
The SDR-38 AV Receiver features seven channels of Class G amplification. Class G offers greater efficiency and transparency, with less wasted next energy than class A. Like a hybrid car engine, Class G implements multiple power supplies. The first power supply runs in pure Class A, which has no crossover distortion. If a dynamic signal is received that goes beyond the capability of this first, power supply, the secondary supply is gradually incorporated up to full rated power output as required. This efficient design means additional power is only used when required. Modern high speed silicon allows this switch to take place well beyond the audio bandwidth. Multiple output devices within the amplifier ensure your listening experience is powerful, dynamic and crystal clear.
Flexibility
With 15.1 decoding, 9.1.6 proamp inputs, plus seven channels of amplification, independent Zone 2 combined with RS232, Ethmeric, and app controls, the SDR-38 and SDR-58 offer exceptional versatility. Four of the sixteen channels allow independent volume and delay settings for added configuration options. Independent volume control for the subsectors allows fine-tuning, and front panel headphone and aux (3.5mm) jacks add convenience. The B1 Synthesis Control app enables complete control of the SDR-38 with an Android or iOS device. Flexible configuration, including Danio, IP, IR, and RS237 control and a Zone 2 with high-resolution audio, 4K video, III, triggers, and power option, make the SDR-38 an outstanding choice for a broad range of applications.
For the latest version of this guide, Firmware updates, and other support material, and links, please be sure to check www.jblsynthesis.com.
JBL Synthesis Development Team
Contents
Safety Guidelines EN-2
Welcome
Before You Begin... EN-6
Trademark Acknowledgments EN-8
Rear Panel Connections and Controls EN-9
Audio/Video Connections EN-10
Connection Guide EN-12
Radio & Wireless Audio Connectors EN-13
Other Connectors EN-14
Speakers
Connecting Speakers EN-16
Operation
Extended front panel menu EN-18
Updating firmware via USB EN-18
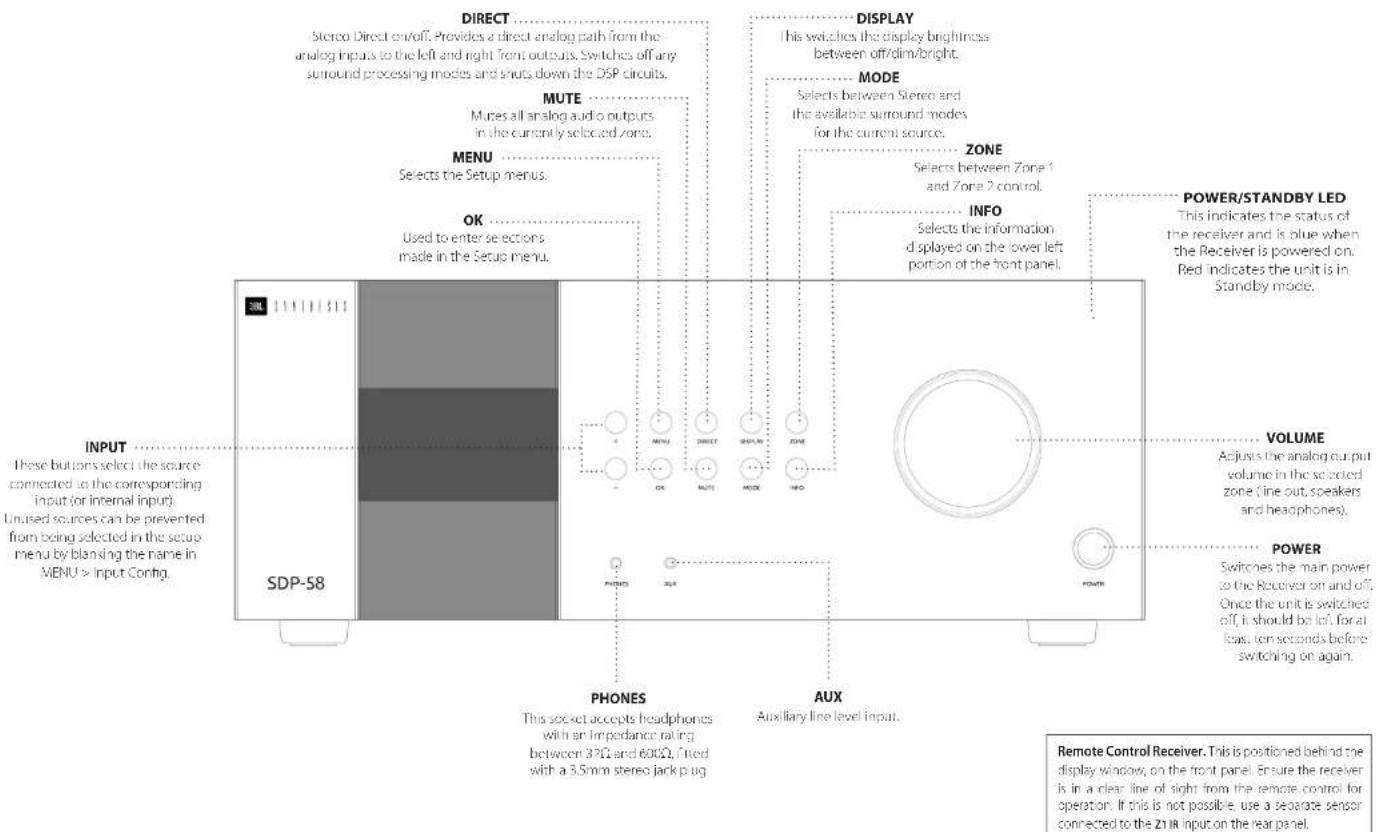
Front Panel Operation EN-19
Remote Control EN-20
Customising the Remote
Essential Setup
Auto Speaker Setup
Setup Menus
Connecting to a Network
EN-4
EN-15
EN-17
EN-22
EN-28
EN-29
EN-30
EN-34
Decoding Modes EN-35
Tuner Operation EN-37
Troubleshooting EN-38
Specifications EN-40
Worldwide Guarantee EN-42
Professional installation?
It may be that the Receiver has been installed and set up as part of your Hi-Fi installation by a qualified JBI Synthesis dealer. In this case, you may wish to skip the sections of this handbook dealing with installation and setting up, and move directly to the sections dealing with using the unit. Use the Contents list to juice you to these sections.
DIY setup?
The Receiver is a powerful and sophisticated piece of AV equipment. If you are setting the unit up yourself, it is recommended that you read this handbook thoroughly before beginning. For instance, correct speaker configuration and placement is a key to getting the most out of your Receiver and making sure that all the elements of your system work in harmony.
Before You Begin...
JBL Synthesis Receiver
The JBL Synthesis receiver and processor are high-quality and high-performance private-cinema processors and amplifiers built to JBL Synthesis' quality design and manufacturing standards. They combine digital processing with high-resolution audio and video components to bring you an univalled home entertainment experience.
The Receiver allows switching and control of seven analog and six digital audio sources in addition to internal EM and DAB+ radios – as well as networked audio sources – making any of the models an ideal hub for both home-cinema and two-channel stereo systems.
Since many of these source components are also capable of generating video signals, the Receiver includes broadcast quality switching for HDMI (x HDMI2.1 @ 40Gbit/s, HDCP2.3) video/audio signals. Control of the Receiver is either by front panel control buttons, R remote control, IP (Ethernet) control or RS232 port.
The remote control supplied with the Receiver is a multi-device 'universal' learning remote control which is simple to use, and once set up is able to control a complete system. It can be programmed using its vast internal code library to control CD and BD players, PVRs, TVs and other devices.
The installation of the Receiver in a listening room is an important process which requires care at every stage. For this reason, the installation information is very comprehensive and should be followed carefully to achieve an unrivalled level of performance.
The JBL Synthesis SDR-38 and SDF-58 are designed to ensure a powerful, sensory-rich experience with exceptional clarity and realism.
Placing the unit
Place the unit on a level, firm surface, avoiding dire sunlight and sources of heat or damp.
☐ Do not place the Receiver on top of a power amplifier or other source of heat.
☐ Do not place the amplifier in an enclosed spa such as a bookcase or closed cabinet unless there is good provision for ventilation (see page EN-2). The Receiver will run warm during normal operation.
☐ Do not place any other component or item on the airflow of the amplifier as this may obstruct airflow around the heat-sink, causing the amplifier to run hot. (The unit placed on top of the amplifier would become hot, too.)
☐ Make sure the remote-control receiver on the fro panel display is unobstructed, otherwise this will impair the use of the remote control. If line of sight is impractical, a remote-control repeater can be used with the rear panel connector (see page EN-34).
Do not place your turntable on top of this or turntables are very sensitive to the noise generated by mains power supplies which will be heard as a background 'hum' if the turntable is too close.
Power
The amplifier is supplied with a molded AC plug already attached to the cord. Check that the plug supplied fits your outlet – should you require a new power cord, please contact your JBL Synthesis dealer.
If your AC voltage supply or power cord is different, please contact your JB1 Synthesis dealer immediately.
The Receiver can be switched for operation between 220–240V (switch position 230V) and 110–120V (switch position 115V).
NOTE: Ensure that the Receiver is switched off and the power cord removed before changing the position of the voltage range switch.
Push the IEC plug end of the power cord into the socket on the back of the amplifier, making sure that it is pushed firmly. Plug the other end of the cord into your AC outlet.
the Receiver can be turned on using the power switch on the front panel. While switched on, the front panel HD will glow white.
Standby power
the Receiver can be switched into standby mode using the button on the remote control. While in standby mode, the front panel LED will glow red and (with default settings) power consumption is less than 0.5 Watts.
While in Standby mode, it may be possible to hear a slight residual hum coming from the mains transformer inside the amplifier. This is perfectly normal. However, if the unit is to be left unused for an extended period, we recommend that you disconnect it from the AC outlet to save power.
Interconnect cables
We recommend the use of high-quality shie-ded cables that are designed for the particular application. Other cables will have different impedance characteristics that will degrade the performance of your system (for example, do not use cabling intended for video use to carry audio signals). All cables should be kept as short as is practically possible.
It is good practice when connecting your equipment to make sure that the AC power-supply cabling is kept as far away as possible from your audio cables. Failure to do so may result in unwanted noise in the audio signals.
For information on speaker cables, please refer to the 'Speakers' section, beginning on page EN 16.
Radio interference
The Receiver is an audio device containing microprocessors and other digital electronics. Each model has been designed to very high standards of electromagnetic compatibility.
This is a Class A product. In a domestic environment this product may cause radio interference, in which case the user may be required to take adequate measures.
If the Receiver causes interference to radio or television reception (which can be determined by switching the Receiver off and on), the following measures should be taken:
☐ Re-orient the receiving antenna or route the antenna cable of the affected device as far as possible from the JBL Synthesis Receiver and its cabling.
☐ Relocate the affected device with respect to the JBL Synthesis Receiver.
1. Connect the affected device and the Receiver to different mains outlets.
If the problem persists, please contact your JBL Synthesis dealer.
Trademark Acknowledgments
| Dolby Atmos | Dolby Vision, Dolby Atmos, Dolby Audio |
| Dolby Audio | Manufactured under license from Dolby Laboratories, Dolby, Dolby Vision, Dolby Atmos, Dolby Audio, and the double-D symbol are registered trademarks of Dolby Laboratories. |
| dtsX® | DTS:X®For DTS patents see http://patentsdisc.com Manufactured under license from DTS Licensing Limited. DTS, the Symbol, DTS in combining ion with the symbol. DTSX and the DTSX logo are registered trademarks or trade marks of DTS, inc in the United States and/or other countries. DTS, Inc. All Rights Reserved. |
| dtsVIRTUAL | DTS Virtual:XTMFor DTS patents see http://patentsdisc.com Manufactured under license from DTS Licensing Limited. DTS, the Symbol, DTS and the symbol together, VirtualX and the DTS VirtualX logo are registered trademarks and/or trademarks of DTS, Inc. in the United States and/or other countries. DTS, Inc. All Rights Reserved. |
| IMAXENHANCED | IMAX® & DTS®Manufactured under license from IMAX Corporation. MAX® is a registered trademark of IMAX Corporation in the United States and/or other countries. For DTS patents, see http://patentsdisc.com Manufactured under license from DTS Licensing Limited. DTS, the Symbol, DTS and the symbol together are registered trademarks or trade marks of DTS, inc in the United States and/or other countries. DTS, Inc. All Rights Reserved. |
| • AURO30 | Auro-30°Auro 30° is a colored trademark of Auto Technologies. |
| AAC/AAC Plusacrilus is a trademark of Coding Technologies. See http://codtech.vhost.naris.net for note information. | |
| HOMI | HOMI, the HDMI logo and High-Dollin for Multimedia Interface are trademarks or registered trademarks of HDMI Learning LLC |
| Bluetooth® | The Bluetooth® word mask and logos are registered trademarks owned by the Bluetooth SIS, Inc. and any use of such marks by HARMAI International Industries, Incorporated is under license. Other trademarks and code names are chose of their respective owners. |
| Qualcomm/ Apple AirPlay | Qualcomm is a trademark of Qualcomm incorporated, registered in the United States and other countries. Stock is a trademark of Qualcomm Technologies International Ltd. registered in the United States and other countries. |
| Apple, AirPlay and the AirPlay logo, iPod, iPhone and iPad are trademarks of Apple Inc., registered in the U.S. and other countries. App Store lives service marks of Apple Inc.AirPlay 2 works with iPhone, iPad, and iPod touch with OS 11.4 or atter; Mac with OS X Mountain Lion or later, and PC with iTunes 10.2.2 or atter. | |
| WiFi CERTIFIED | The WiFi CERTIFIED: Logo is certification marks of the WiFi Alliance |
| ECO innovation | Google, Google Play, Cheeseans, and other related markets are trademarks of Google LLC, the Google Assistant requires an internet connection and is not available in certain countries and languages. Availability and reach of certain features and services are device, services, and networks-dependent and may not be available in all sites. Controlling certain services in your name requires compatible street devices. Subsion options for services and applications may be required and additional terms, conditions and/or charges may apply. |
| v1uner | This product is protected by certain intellectual property rights of NEWS and BridgeCo. Use or distribution of such technology outside of this product is prohibited without a license from NEWS and BridgeCo or an authorized subsidiary. |
| MP3 | VPI, GLayer-3 audio decoding technology licensed from Traunhoferlib and Thomson multimedia. |
| Spotify 4X | Licenses:The Spotify software is subject to third party licenses found here;https://develop.spotify.com/szdkthird-party/khome. |
| FLAC | FLAC Decoder Copyright © 2000, 2001, 2002, 2005, 2004, 2006, 2007, 2009 Josh Caillon |
| Redistribution and use in source and binary forms, with or without modification, are permitted provided that the following conditions are met. | |
| Redistributions of source code must retain the above copyright notice, this list of conditions and the following disclaimer. | |
| Redistributions in binary form must reproduce the above copyright notice, this list of conditions and the following disclaimer in the documentation and/or other materials provided with the distribution. | |
| Neither the name of the Xipong Foundation nor the names of its contributions may be used to encode or promote products derived from this software without specific prior within permission. | |
| THIS SOFTWARE IS PROVIDED BY THE COPYRIGHT HOLD IS AND CONTRIBUTIONS AS IS AND ANY EXPRESS OR IMPLICIT WARRANTIES INCLUDING BUT NOT INVOLDED TO THE IMPULD WARRANTIES OF MERCHANTABILITY AND FITNESS FOR A PARTICULAR PURPOSE ARE DISCLAIMED IN NO EVENT SHALL THE FOUNDATION OR CONTRIBUTORS BE LIABLE FOR ANY DIRECT INDIRECT, INCIDENTAL, SPECIAL, EXTERIORLY OR CONSEQUENTIAL DAMAGES INCLUDING BUT NOT LIMITED TO PROCUREMENT OF SUBSTITUTE GOODS OR SERVICES LOSS OF USE DATA OR PROFITS OR BUSINESS INTERRUPTIONS HOWEVER CAUSED AND ON ANY THEORY OF LIABILITY WHETHER IN CONTRACT STRICT LIABILITY OR TORT INCLUDING NEGLIGENCE OR OTHERWISE ARISING IN ANY WAY OUT OF THE USE OF THIS DOCUMENTLY IN ANY EQUIPMENT OF THE POSSIBILITY OR SUCH DAMAGE. |
| MQA | MQA (Master Quality Authenticated)MQA is an award-winning stitch technology that delivers the sound of the original master recording. The master VQA file is fully authenticated and is small enough to stream or download. Visit manuscript for more information JRI Synthesis AWs include MQA technology, which enables you to play back MQA studio files and starroads, delivering the sound of the original master recording. MQA on MQA Studio indicates that the source is decorating and playing an VQA stars are live and denotes convenience to ensure that the sound is critical to that of the source material. MQA studio indicates it is playing an MQA Studio file, which has other been approved in the studio by the artist producer or has been verified by the copyright owner. MQA and the Sound Wave Device are registered trade marks of MQA Limited in 2016 |
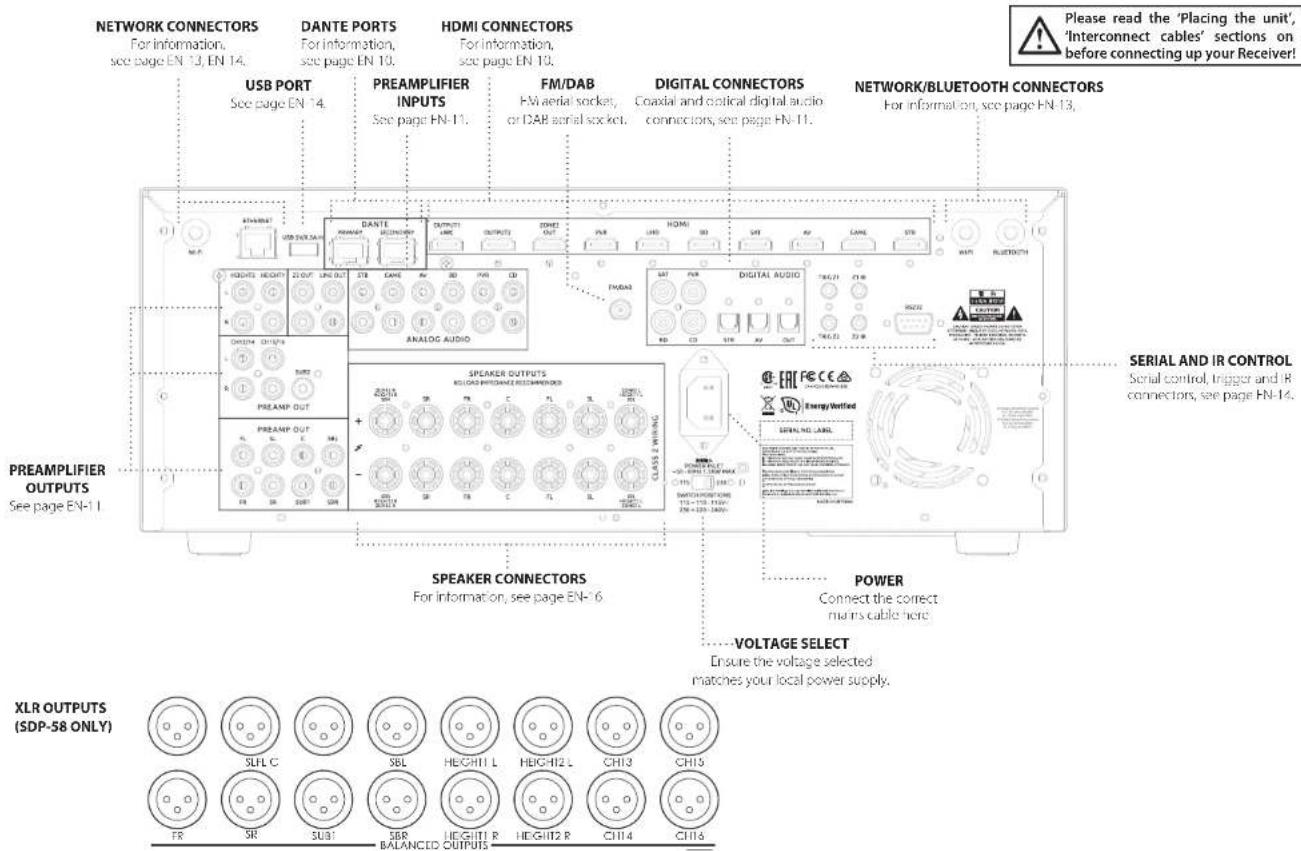
Rear Panel Connections and Controls
EN
Audio/Video Connections
Before connecting your Receiver to your source components and speakers, please read through the next five pages which will explain all the input and output, connectivity that is available. The 'Speakers' section explains how to connect up your speakers to avoid damage to the amplifier and how to arrange your speakers for best performance.
General
The inputs are named to make it easier to reference connected devices (e.g. Ibr) or by all have the same input circuit, so there is no reason why you should not connect a different device to any of the inputs. For example, if you had two BD players and the AV input was not being used, then the second BD player could be connected to the AV input.
When connecting a video source, its audio must be connected to the corresponding sockets. For example, if you had a satellite decoder plugged into a SARideo input, the audio must be connected to the SARDio inputs!
Making connections
Take care to place cables as far from any pro supply cables as is practical, to reduce hum and other noise problems.
NOTE: For each input, you must set the 'Video Source' and 'Audio Source' settings according to the connection type. (see "Input Config." on page EN-31)

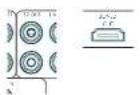
HDMI connectors
PVR, UHD, BD, SAT, AV, GAME, STB
Connect the HDMI video outputs of your source equipment to these corresponding HDMI inputs.
OUTPUT
Connect this output to the HDMI video input of your display device. Output1 is compatible with HDMI Enhanced Audio Return Channel (eARC). If you have a supported TW Smart TV then sound from the television's internal tuner or streaming platform (e.g. Roku, Netflix, Hulu) will be available using the Receiver's Display input.

DANTE ports
Dante is a licensed technology from Audinate® It uses standard Internet Protocols over a 100Kb or Gigabit network and is capable of transporting professional quality, low latency audio. Dante runs on standard computer networking hardware and specios not require dedicated network infrastructure, Ethernet switches transmit Dante clig ta media streams alongside ordinary data traffic. The physical Dante connections must be made using Category 5e or Category 6 cables 100mV/328ft between devices when using a Gigabit network. The two Dante (RI-4s) ports on the back of the SOR-38 and SOR-58 can be used to transmit high-resolution digital audio to other
Dante-enabled devices connected to the same network
Dante is configured and controlled using the Dante Controller software which is a free download for Windows or macOS, which can be downloaded at www.audinate.com/products/software/dante-controller
Dartc works independently of the unit control via the Ethernet jack on the SDF 38 and SDP 58;
Be sure to use the Dante Jacks only for Dante networking applications. For more information on Dante, please visit www.jblsynthesis.com
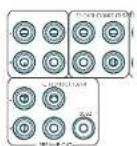
Digital audio connectors

SAT, PVR, BD, CD, STB, AV
Connect these inputs to the digital outputs of your available source equipment.
Zone 2 connectors
The 72 out HDMI connector can be used to connect the output of the Receiver to a system located in a second room.
Analog preamplifier outputs
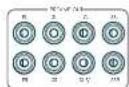
All preamplifier analog outputs are buffered, have a low output impedance, are at line level and follow the Zone 1 volume control setting, they are able to drive long cables or several inputs in parallel if required.
For more information on connecting speakers or additional power amplifiers, see pages EN-9 and EN-16.
he SDF-58 has XLR outputs in addition to the PCA (or unbalanced) pre-cuts for connection to an external amplifier.
Analog audio inputs
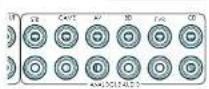
STB, GAME, AV, BD, PVR, CD
Connect the left and right inputs to the left and right outputs of your source equipment.
Front panel AUX input

The front panel AUX input can be used as an analog input, using a stereo 3.5mm lead.
Front panel headphone jack
This socket accepts headphones with an impedance rating between 32Ω and 500Ω, fitted with a 3.5mm stereo jack plug. The headphone socket is always active, except when Receiver is muted.
When the headphone plug is inserted, the speaker outputs and analog preamplifier outputs are automatically muted.
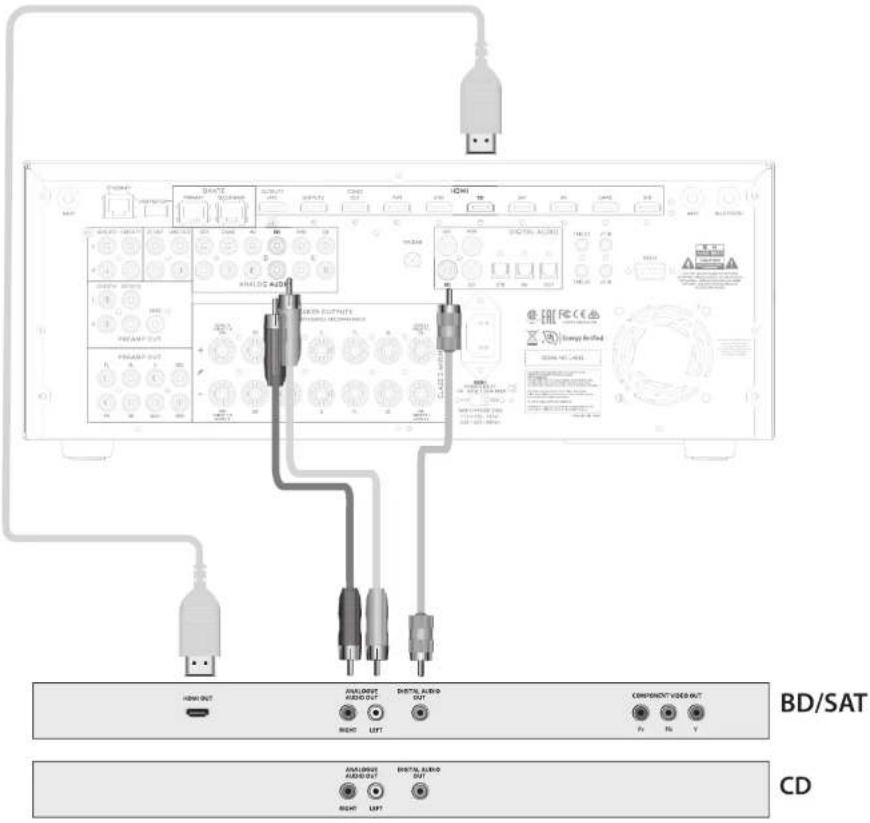
Connection Guide
Blu-ray Disc (BD)/DVD player
The diagram shows how to make audio and video connections from a typical BD/DVD player.
Whether HDMI, digits or analog connections are used, connecting using the input/inputs labeled BD on the Receiver will aid a operation.
Satellite receiver
A satellite receiver is connected with the same order of preference according to the outputs provided by the satellite receiver.
CD player
Connect the digital output to the digital CD input of the Receiver and analog output to the analog CD input of the Receiver, using a high quality interconnect cable.
NOTE: For each input, you must set the 'Audio Source' setting according to the connection type. (see "Input Config." on page EN-31)
Radio & Wireless Audio Connectors
EN
DAB/FM connector
The Receiver is fitted with an FM and a DAB/DAB1 receiver module. The type of aerial you need depends on your listening preferences and the local conditions
Your Receiver is capable of superb radio reception, but only it is receiving a good quality transmission signal.
Try the antennas supplied with your unit. If you are in a medium to strong signal area, these should be adequate for good reception. In areas with poor signal strength, you may require a roof or loft mounted aerial.
Contact your local JBL Synthesis dealer or aerial installation experts for advice about local reception conditions.
In strong signal areas, the DASM-FT were antenna supplices can be used with reasonable results. Mount the antenna as high up as possible on a wall.
In the UK the T-elements need to be positioned vertically for DAB reception since broadcasts are vertically polarised. In other localities, check with your JBL Synthesis dealer or try both horizontal and vertical positions for best reception.
Try each usable wall of the room to see which gives best reception and use tacks or adhesive tape to secure the aerial in a I shape, but note that no tacks should come into contact with the internal wire of the aerial.
When installed and receiving DAB/FM, check the signal strength by pressing the front panel or remote control's INFO button until the signal quality indicator is displayed.
In weak signal areas, a high gain, externally mounted or roof mounted antenna is desirable in order to receive the highest number of services.
In Band 11 transmission areas (such as the UK), use a multi-element Yagi aerial with the elements mounted vertically, as the transmissions are vertically polarized. If you are close to more than one transmitter, use an omnidirectional or foled dipole aerial
If the DAB services in your area are transmitted on I-band, then ask your dealer for advice for the best aerial to use.
Wi-Fi/Bluetooth

f using the Wi-Fi or Bluetooth features of the Receiver, please attach the single antenna for the Bluetooth and the two antennas for the Wi-Fi.
Other Connectors
Serial connector
RS232 serial connector

The connector is used with control devices having an RS232 serial port (for example, Crestron and AMX touch-screen controllers).
Network connector
Networking is a large subject and only the briefest guidelines are presented in this handbook. Please contact your JBI Synthesis dealer or specialist installer for more information about introducing the Receiver into your computer network
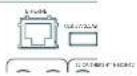
Ethernet
If an Ethernet cable is connected, the Receiver will automatically attempt to connect to your network.
You should use a CAT5 or above cable plugged into the RJ45 socket labelled ETHERNET on the rear panel.
If your network uses static IP addressing rather than DHCP, you will need to provide an IP address, gateway and DNS address; see page EN-34 for information on setting up the network.
USB connector
The Receiver can be updated via the USB port on the rear of the unit, if no network connection is available for an "Over the air" update.
Trigger connectors


The trigger connectors (TRIG Z1 and TRIG Z2) provide an electrical signal whenever the Receiver is switched on and the relevant zone enabled.
The trigger signal can be used to switch on and off compatible pieces of home entertainment equipment, for example, you could set up a trigger to turn on your television and BD player whenever the Receiver was switched on.
There are two trigger output sockets on the Receiver, each capable of outputting a 17V, 70mA switching signal. The socket is designed for more 3.5mm jacks tip is the trigger output, sleeve is ground.
TRIG Z1
Use for remotely turning on and off power amps or source equipment for Zone 1. On = 12V, Off = 0V
TRIG Z2
Use for remotely turning on and off power amps or source equipment for Zone 7. On = 12V, Off = 3V.
Infrared (IR) connectors

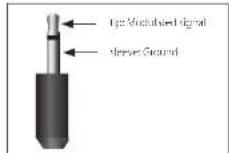
The infrared inputs (Z1 IR and Z2 IR) allow the connection of external IR receivers, either when the Receiver front panel IR receiver is fully or partially obstructed or to allow the use of a remote control in /one 7.
There are two IR inputs on the Receiver, each designed for stereo or mono 3.5mm jacks. Tip is the modulated signal, sleeve is ground.
Z1 IR
This input is intended for use with a local IR receiver when the front panel of the Receiver is blocked.
Z21R
This input is intended for use with an IIF receiver in Zone 2 to allow remote control of Receiver from a second room.
A supplier of infrared receivers and emitter accessories and systems is Xantech. See www.xantech.com for more information, or ask your JBI Synthesis dealer.
NOTE: The IR inputs on the Receiver are designed for modulated signals. If the external IR receiver demodulates the IR signal, it will not work. Also the unit does not provide power for external receivers on the IR jack, therefore an external power source will be required.
NOTE: Sockets referring to 'Z2' relate to connections used in multi-room installation. For more information on these connectors, see page EN-11.
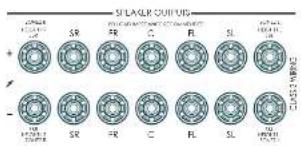
Speakers
The SDR-38 and SDP-58 allow you to connect up to sixteen speakers. The SDP-58 needs additional power amplifiers to utilize all 16 channels. The SDR-38 has 7 channels of amplification. 5 channels of amplification correspond to speakers installed in the front left, center, front right, surround left, surround right. The remaining 7 channels of amplification can be assigned as:
□ bi-amp the front left and right
□ surround back left and surround back right
□ height 1 left and right
□ Zone 2 left and right
Height front left, height front right, height back left, height back right and five more additional speakers can be attached using an additional power amplifier, see page EN 16 for more information.
With the addition of correctly installed and configured height channels. Do by Atmos for the home, DTS:X or Auro 3D brings the ultimate cinema sound experience to your home theatre to create powerful, moving audio that flows around you.
The configuration and placement of your speakers is very important. All speakers, with the exception of the subwoofer(s), should be arranged around your normal viewing/listening position. The SDR-38 and SDR-58 decode Dolby, DTS, and Auto3D surround formats. Each has unique requirements for speaker placement. In addition, the processors are equipped with Dirac Bass Management for multiple sub-woofers. The speaker placement and system calibration should be performed by a certified JBL Synthesis Dealer for optimum performance in all formats.
It is imperative that low frequencies are evenly distributed across all seating positions. This is best achieved using multiple sub-woofers. Best results are usually achieved by placing sub-woofers in all four corners of the room, performing precise measurements and making the proper adjustments to time, frequency and amplitude domains to minimize seal to sea, variation and maximise performance for the unique physical characteristics of a particular room.
Certified JBL Synthesis Calibrators are equipped with the experience and tools to implement the best possible calibration for each room.
For more information on room calibration and sound field management visit www.jblsynthesis.com
Connecting Speakers
To connect each of the speakers, unscrew the corresponding terminals on the back of the Recover, insert the speaker wires through the hole in each post and screw the terminals down. Make sure that the red (positive/+) terminal of the speaker is connected to the red (positive/+) terminal on the back panel, and the black (negative/-) terminal of the speaker is connected to the black (negative/-) terminal on the back panel.
It is important that, no stray strands of wire from these connections are allowed to touch another cable or the back panel. Failure to ensure this can cause a short circuit and damage your Receiver.
Ensure the unit is switched off while connecting speakers. Do not over-tighten the loudspeaker terminals, or use a wrench, pliers, etc., as this could damage the terminals and this would not be covered under the product's warranty.
Speaker cables
The speakers should be connected to the amplifier using high-quality copper cables. A heavy gauge (thick copper) and as short as practical is ideal. The gauge should be heavier (a lower number) for longer runs. Using speaker cables that are too long and/or thin gauge can significantly degrade the sound quality.
Connections to the speaker terminals should always be finger tight, whether using bare wires or spade connectors.
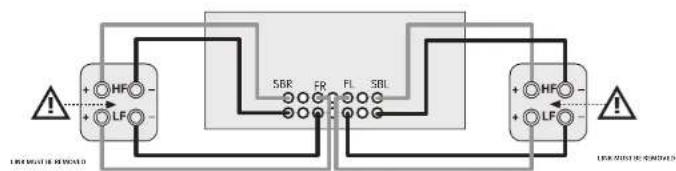
Bi-amping the Front Left & Front Right speakers
BI ramping is the use of two amplifier channels per speaker. BI ramping can provide better sound quality than conventional single wiring. If you do not have Surround Back speakers (i.e., you have a 5 in surround system, not a 7 in system) then you can use the spare Surround Back speaker outputs to bi-ampify the front left and right speakers, if your speakers support BI- ramping. The spare channels can alternatively be used to power stereo speakers in another room (Zone 2).
Speakers that support bi-amping have two sets of 17 terminals per speaker, usually linked together by metal strips. These metal strips MUST be removed when bi-amping; failure to remove them will result in damage to the amplifier that is not covered under warranty.
To oil-amp the front left and right speakers, remove the metal strips from the speaker terminals. Connect the woofer or LF terminals to the FL and RR terminals on the Receiver. Connect the tweeter or HF terminals to the SBL and SBR terminals on the Receiver. Finally, navigate to the Setup Menu 'Spor Types' and set the 'Use Channels 6+7 for' menu option to 'SIamp L+R'. see page EN-32.
flowchart
graph TD
    A["HF"] --> B["LF"]
    B --> C["SBR"]
    C --> D["FR"]
    D --> E["FL"]
    E --> F["SBL"]
    F --> G["HF"]
    G --> H["LF"]
    H --> I["Warning Symbol"]
    style A fill:#f9f,stroke:#333
    style B fill:#f9f,stroke:#333
    style C fill:#ccf,stroke:#333
    style D fill:#ccf,stroke:#333
    style E fill:#ccf,stroke:#333
    style F fill:#ccf,stroke:#333
    style G fill:#f9f,stroke:#333
    style H fill:#f9f,stroke:#333
    style I fill:#f9f,stroke:#333
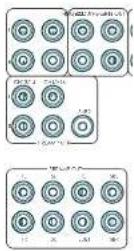
Connecting subwoofers
The Receiver also allows up to four active subwoofers to be connected to the SUB or Ch13/14/15/16 outputs. Refer to your subwoofer handbook for the correct setting up and connection procedure for your particular subwoofers).
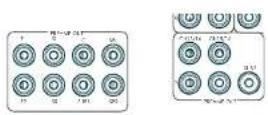
Using external power amplifiers
the internal power amplifier of the Receiver can be supplemented or replaced with external power amplification, such as the JBL Synthesis SDA 7120 or SDA 2200. Connect the PREAMP OUT sockets to your power amplifier inputs.
FL, FR
Connect these to the equivalent Right and Left front channels of your power amplifier.
C
Connect these to the Center front channel of your power amplifier.
SUB
Subwoofer outputs. Connect this to the input of your active subwoofer(s), if present.
SR, SL
Surround Right and Surround Left outputs. Connect these to the Surround Right and Left power amplifier inputs.
SBR, SBL
Surround Back Right and Surround Back Left outputs. Connect these to the Surround Back Right and Surround Back Left power amplifier inputs.
Height 1 (Height Front), Height 2 (Height Back)
Height Front and Height Back Connect these to the Height channel power amplifier inputs.
All preamplifier analog outputs are buffered, have a low output impedance and are at line level. They are able to drive long cables or several inputs in parallel if required.
Operating your Receiver
For information display we recommend you use the OSD (On-Screen Display) on your display device wherever possible. For set up and configuration we recommend accessing the internal webpage using a tablet or computer, or using the front panel display.
For more information on accessing the internal set up page visit www.jblsynthesis.com.
Switching on
Press the front panel power button in. The power LED will glow white. When initialization is complete, the display shows the volume setting and the name of the selected input.
Please wait until the unit has finished initializing before operating the Receiver. It is recommended that if the unit is switched off, you should wait at least 10 seconds before switching the unit back on.
Standby
The Receiver has a standby mode which can be entered by pressing STANDBY on the remote control. When in standby mode, the display is blank and the POWER lowa rod.
If the unit is to be left unused for an extended period, we recommend that you disconnect it from AC power to save power.
To switch on from standby
Press the STANDBY button on the remote control, any key on the front panel (other than the power button) or rotate the volume knob.
Front panel display
The Receiver is ready for use after about four seconds.
The display window shows the currently selected source and the last selected information view setting (this information line can be changed using the InFction).
The current volume setting for Zone 1 is displayed on the front panel. The volume setting for Zone 2 is displayed temporarily whenever it is adjusted.
The front panel display is also used for unit setup after pressing the menu on the front panel or remote.
Selecting a source
To select a particular source, press the INPUT- INPUT+ buttons until that source is shown on the front panel display, or (if available) press the corresponding source button on the remote. The following sources are available:
| STB Set Top Box input | |
| GAME Game console input | |
| AV Audio Visual input | |
| SAT Safe life input | |
| 3D Blu-ray Disc/DVD player input | |
| UHO UHD player input | |
| PVR Personal Video Recorder input | |
| CD | Compact Disc player input |
| FM | Internal tuner input |
| DAR | Internal tuner input (this source is marketdependent and may not be available onyour Receiver) |
| NHI Hicroni input | |
| USB | External USB solid-state device (e.g. pendrive) input |
| AUX | Auxiliary (front panel) input |
| DISPLAY | The Audio Return Channel (eARC) froma compliant display. Use this with acompliant television using internal TVtuners. |
Most audio inputs have both analog and digital connections. You must specify the type of connection used for each input, using the 'Audio Source' option in the 'Input Config' menu, see page EN 31. Note that an incorrect setting will result, in no sound — the default for inputs with HDMI is HDMI audio. If you are not using HDMI audio then this setting must be changed. For inputs that do not have HDMI, the default is digital audio.
The processing mode and Stereo Direct functions are remembered and recalled for each individual input.
Stereo Direct
to listen to a pure analog stereo input, press the DIRECT button. The Stereo Direct mode automatically bypasses all processing and any surround functions. In direct mode, digital processing including Dirac room eq. is shut down if desired. Digital noise within the processor will be reduced to an absolute minimum.
NOTE: When Stereo Direct mode is selected, no bass management is performed, meaning that bass signals will not be redirected to a subwoofer.
Volume control
It is important to realize that the level of the volume indicator is not an accurate indication of the power delivered to your loudspeakers. The Receiver often delivers its full output power long before the volume control reaches its maximum position, particularly when listening to heavily recorded music. In comparison, some movie sound tracks can appear very quiet, as many directors like to keep maximum levels in reserve for special effects sequences.
Headphones
to use headphones with the Receiver, plug the headphones into the PHONES jack in the center of the front panel.
When headphones are plugged into the front panel PHONES socket, the outputs for Zone 1 are muted and the audio will be down-mixed to two channels (2.0). The two-channel down-mix is required so that the center channel and surround information can be heard via the headphones.
Extended front panel menu
Pressing the MENU on the Front panel and holding it for longer than four seconds will bring up the Extended Menu, allowing you to perform the following:
Restore to factory defaults
This option allows you to restore all settings on your Receiver to the defaults from which it left the factory.
Check for update
Checks for an over-the-air firmware update (requires external network connection).
This option allows you to restore all settings to their state as saved using the 'Store secure backup' feature. This option is useful if settings are accidentally changed.
Store secure backup
This option allows you to save all the Receiver settings to a secure area of memory. The settings can be retrieved using the Restore option above.
Restore USB backup
This option allows you to restore all the settings from a file previously saved on a USB flash drive.
Store USB backup
This option allows you to save all the settings to a USB flash drive.
Region
Sets the region you are located - Europe, (RoW) US or Canada.
Change remote code
The default RCS system code the Receiver responds to is 16. If required, for example due to another device in your system also using this RCS system code; it can be changed to 19. The supplied remote can also be reprogrammed to use RCS system code 19 commands, see page EN-22.
Standby mode
"Auto" uses the power saying auto standby feature, which will cause the unit to go into standby after 20 minutes if no signal is prevent or user input occurs, "manual" allows the user full control of when the unit goes into standby.
Protection sensitivity
This option allows adjustment of the protection sensitivity of the power amplifier (not GDP-58). Caution should be used with this setting as it is deliberately configured for maximum protection and should only be adjusted when using speakers that are "complex loads".
Use display HDMI
If set to "no" the Receiver will ignore the EDID of the display and send all resolutions from the source through the Receiver.
Display type
Adjusts the position of the OSD depending on if a 16:9 & 71:9 display is being used.
Updating firmware via USB
The firmware in your Receiver can be updated from a USB flash drive containing firmware update files.
You can download the latest firmware file, together with upgrading instructions, from the JBL Synthesis website (www.jblsynthesis.com).
Front Panel Operation
EN
Remote Control
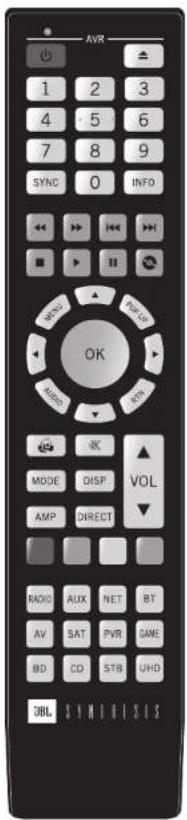
The universal remote controller
The Receiver is supplied with a sophisticated 'universal backlit' remote control that can control up to eight devices. It is pre-progrand for use with the Receiver and many other Harman products (FM/DAB tuners, CD players and BD players).
With its extensive built-in library of codes, it can also be used with thousands of third-party audio-visual components TVs, satellite and set-top boxes, PVRs, CD players, etc. See the list of codes at the back of this handbook.
It is a so a learning remote, so you can teach it almost any function from an old single-device remote.
Using the remote control
Please keep in mind the following when using the remote control:
☐ Ensure there are no obstacles between the remote control and the remote sensor on the Receiver. The remote has a range of about 25 feet. (If the remote sensor is obscured, the 21 R remote control input jack on the rear panel is available. Please consult your dealer for further information.)
Remote operation may become unreliable if strong sunlight or fluorescent light is shining on the remote sensor of the Receiver.
- Replace the batteries when you notice a reduction in the operating range of the remote control
Inserting batteries into the remote control
- Open the battery compartment on the back of the handset. To do this, press the catch on the battery cover as indicated by the arrow on the catch and remove the battery cover.
- Insert two 'AAA' batteries, as indicated in the battery compartment
- Replace the battery cover. To do this, locate the lug on the battery cover into the corresponding hole on the short edge of the battery compartment. Now press the opposite end of the battery cover (with the catch) cown so that the cover is flush with the main body of the remote and the catch clicks.
Notes on batteries:
☐ Incorrect use of batteries can result in hazards such leakage and bursting.
Do not mix old and new batteries together.
☐ Do not use non-identical batteries together – although they may look similar, different batteries may have different voltages.
- Ensure the plus (+) and minus (-) ends of each battery match the direction indicated in the battery compartment.
- Remove batteries from equipment that is not going to used for a month or more.
□ When disposing of used batteries, please comply with governmental or local regulations that apply in your country or area.
Useful information
Backlight
A backlight comes on for eight seconds whenever a key is pressed. This helps you use the handset in subdued lighting conditions.
LED blinks
Short blinks indicate a valid key press.
Multiple short blinks convey information (such as a device code) or signal the beginning and successful completion of a programming sequence.
The symbol is used in the manual to indicate an LED blink.
Timeouts and unassigned keys
Timeout - After 30 seconds the create exists the programming state and returns to normal operation.
Stuck key timeout – After any key is pressed continuously for 30 seconds, the remote stops sending IR transmission to conserve battery life. The remote remains off until all keys are released.
Unassigned keys – The remote ignores any unassigned key presses for a particular Device Mode and does not transmit IR.
Low voltage indicator
When the batteries are running down, the backlight flashes briefly whenever you press a button. If this happens, fit two new AAA alkaline batteries as soon as possible.
Device Mode/Source keys
As the remote can control your Receiver as well as a range of other equipment: many of the but ons have more than one function depending on the 'device mode' selected on the remote control.
The Device Made keys (shown below) select the source on the Receiver. If one of these keys is pressed briefly, a command is transmitted to change the source on the unit. Also the functionality of the remote control changes to operate the selected source device, it's like having a bundle of different remotes in your hand.
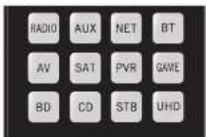
| HOLD | Internal FM or DAB tumor input |
| ALL | Auxiliary input |
| NET | Ethernet input (e.g. Internet radio) |
| MT | Bluetooth input |
| AV | Audio-visual input |
| SAT | Satellite input |
| PVR | Personal Video Recorder (or DigitalVideo Recorder) input |
| DHI | Games console input |
| BO | Blu-ray Disc or DVD player |
| CB | Compact Disc player input |
| STB | Sci Top Box decoder input |
| UHD | UHD player input |
Each Device Mode changes the behaviour of many of the remote keys to control the source device appropriately. For example, in CD mode #1 plays the previous CD track, but in AV mode #2 issues the TV channel down' command.
The remote remains in the last selected Device Mode so it is not necessary to press a Device Mode key before every command key if all you are doing is playing or skipping tracks on a CD, for example.
Navigation keys
The Navigation keys steer the cursor in Setup menus or on-screen menus. They also replicate the navigation functions of original remotes supplied with other home entertainment devices in your system. OK confirms a setting.
Volume control
By default, the remote is set up so that the volume control and mute buttons always control the volume of the Receiver, regardless of which Device Mode the remote is currently set for. This is known as volume 'punch through'.
For example, if you are listening to a CD, you will probably have the remote in CD Device Mode to control the CD player. You can use the volume controls on the remote directly to adjust the volume of the Receiver without first having to press AMP to put the remote into AMP Device Mode. The volume buttons 'punch through' the CD Device Mode on the remote to the AMP Device Mode
Volume 'punch through' can be disabled individually for any Device Note if desired.
Customising the remote
he remote offers a Code Learning feature that allows you to copy up to 16 functions from an original remote control onto the remote keypad. For details of this, and other customisation features, see "Customising the Remote" on page EN 22.
The remote complies with Part 15 of the FCC rules
This equipment has been tested and found to comply with the limits for a class B digital device, pursuant to part 15 of the HCC Rules, those limits are designed to provide a reasonable protection against harmful interference in a residential installation. This equipment generates, uses, and can radiate radio frequency energy and if not installed and used in accordance with the instructions, may cause harmful interference to radio communications. However, there is no guarantee that interference will not occur in a particular installation. If the equipment does cause harmful interference to radio or television reception, which can be determined by turning the equipment off and on, the user is encouraged to try to correct the interference by one or more of the following measures:
Scorien, or relocate the receiving antenna.
Increase the separation between the equipment and receiver.
Connect the equipment into an outlet or a circuit different from that to which the receiver is connected.
Consult the dealer or an experienced radio/IV technician for help.
Code learning
The supplied remote comes with a complete library of pre-programd codes. After you have set up the remote for your device, you may find that there are one or more functions on your original remote which do not have a place on the keypad. For convenience, the remote offers a Code Learning feature that allows you to copy up to 16 functions from an original remote control onto the remote keypad.
Before you start, make sure that:
■ The original remote control is working correctly.
■ The remotes are not pointing at your device.
■ The remotes have fresh batteries.
■ The remotes are not in direct sunlight or under strong
fluorescent lights.
NOTE: Learned functions are mode-dependent. You could assign up to eight different functions to a single key – a separate learned function for each mode.
Direct code setup (Method 1)
The first method is to program the remote with the 3 digit code number for the device you wish to control – see "device code tables". Make a note of the suggested number or numbers – the most popular code is listed first. Now power on the device.
- Press the Device key for the product you want to set up, together with the key. Hold down both buttons for three seconds until the LED stays lit.
You are now in setup mode, and you can release the buttons. - Enter a 3 digit code for the device.
If the 3-digit code number you entered is correct for the device, it will turn off. If it doesn't turn off, enter the next code number from your list until the device does turn off. - Once you have found the correct code, press the Device key again. The LED blinks three times 🔊 to confirm that the code has been successfully stored.
Library search setup (Method 2)
Library search allows you to scan through all the codes contained in the remote's memory. It can take a lot longer than the previous method, so only use this method if:
- Your device does not respond to the remote after yo have tried all the codes listed for your brand.
- Your brand is not listed at all in the Device Code tables
- Press the Device key for the product you want to set up, together with the 1 key. Hold down both buttons for three seconds until the HD stays lit.
- Point the remote control at the product you wish to control and press the 🔒 or ▼ button on the navigation pad. Each time the 🔒 or ▼ button is pressed, the code counts up (or down) one code number with a signal to power off the device.
- Continue pressing the up or down button, in approximately one second intervals, until the device turns off. (DO NOT alternate the up and down button you need to move in only one direction.)
- To store the correct code, press the Device key again. The IHD blinks three times 🐘 to confirm that the code has been successfully stored.
Learning setup (Method 3)
The third method involves 'teaching' the JBL Synthesis remote from the original remote for the device. The two remotes should be facing each other, about 4 inches (13cm) apart.
- Press the Device key for the product you want to set up, together with the a key. Hold down both buttons for three seconds until the LED stays lit.
- Press the button on the JBL Synthesis remote that you want to assign a command to. The LED blinks once ⚙ indicating that the remote is ready to learn the command.
- Press and hold the appropriate key on the other remote until the IHD blinks twice. This indicates the JBI Synthesis remote has learned the command from your other remote.
- Continue learning the commands from your other remote by pressing the next button on the remote and repeating steps 2 and 3.
- Once the remote has learned all the selected commands, press and hold the Device key you used to enter learning together with the Numerical key to store the learned commands.
NOTE: If the JBL Synthesis remote LED blinks five times 🐘❤️ there was an error in the learning process. In this case, please start the Learning Setup from the start.
The and keys do not learn commands.
Important notes
Once you start a Code Learning session, you have approximately ten seconds to conduct each step. Any longer, and a timeout means that you'll have to start the process again.
■ The Learning feature is mode-specific – you can copy one feature per mode onto a key.
■ The remote can learn approximately 16 functions in total.
■ To replace a learned function, simply assign a new function to the same key.
■ I carried functions are retained when you change batteries.
If Code Learning fails, try altering the distance between the two remones; make sure that the ambient light is not too bright.
Deleting the learned data
To delete all the learned data for a device:
- Press the Device key for the product you want to set up, together with the 3 key. Hold down both buttons for three seconds until the LED stays lit.
- Press and hold down the Device key for the product that you want to erase, together with the key for three seconds until the LED blinks twice.
- If no further key presses are made for 30 seconds after the IHD blinks twice, the remote leaves erase mode without, deleting the learned data.
- If you press the Device key together with the a key one more time within 30 seconds after LED blinks twice, you can finish the erase mode deleting all the data learned on the Device. The LED blinks three times to confirm.
NOTE On the following pages, a single 'blink' of the remote's power LED is indicated by the symbol
To delete the learned data for a key for a device:
- Press the Device key for the product you want to set up, together with the 3 key. Hold down both buttons for three seconds until the LED stays lit
- Press and hold down the key on which you want to delete the data for three seconds. The IHD blinks twice 📋. If any further key press is made, the remote escapes from erase mode without deleting the learned data.
- If any further key press is not made for 30 seconds, the LED blinks twice ⚙️, the remote escapes from the erase mode automatically without deleting the learned data.
- If you press the Device key together with the a key again within 30 seconds after the LED blinks twice, all the data learned for that Device is deleted and you leave erase mode. The LED blinks three times ★★★★ in confirmation.
Reading stored code numbers
- Press the Device key for the product that you want to set up together with the 4key. Hold down both keys for three seconds until the LED blinks
- Press the INFOy and count the number of blinks ( =1,=2,=3, etc.). There is a time gap between digits. (Note that 0 is represented by ten blinks:
Locking/unlocking a specific Device Mode
When you first unpack your remote and insert the batteries, it is able to control certain JBI Synthesis components automatically (e.g. 50 players, Amplifiers, Tuners and CD Players). We achieve this by programming specific JBI Synthesis device codes onto the relevant Device Mode keys, then locking the Device Modes so you don't reprogram them inadvertently.
If you want to override these locked default settings - to control a third-party BD player, for example - you will first need to unlock BD mode before setting up the remote using one of the learning methods described on the previous page.
Here are the factory default settings:
| Device Mode | Default status | Default codes |
| AMP | Locked 001 | (JBL Synthesis code 16) |
| BD | Locked 001 | (JBL Synthesis) |
| AV | Unlocked 103 | (Philips TV) |
| UHD | Unlocked Code learning only | |
| GAME | Unlocked Code learning only | |
| STB | Unlocked 030 | (Bush/Goodmany/Grundg, from SAT database) |
| SAT | Unlocked 128 | (Sky-Digital, from SAT database) |
| PVR | Unlocked 019 | (Humax PVR, from SAT database) |
| CD | Locked 001 | (JBL Synthesis) |
Alternative codes are available for multi-room solutions, or in the case of code clashes with other manufacturer's products. For example:
AMP (system code 19):007
Note that you need to change the system code on the product you wish to control, as well as the remote.
1 AMP, BD and CD are the Device keys that may be Locked or Unlocked.
Lock and Unlock are toggles (they change from Lock to Unlock to Lock, etc.).
2. Press and hold the Device and 6 keys together for three seconds.
The power LED stays it showing that it is in Lock/Unlock setup mode.
3. If there is no further key input for 30 seconds, the LED goes off and the remote leaves Lock/Unlock setup mode.
4. To toggle the status of a device and then verify the status of a device, press the keys in sequence.
If you have locked the device, the LED blinks three times.
If unlocked the device, the LED blinks five times.
5. If you press a valid Device key within 30 seconds, the LED binds three times: 🐘 and the remote leaves Lock/Unlock setup mode.
Controlling the volume of other devices
By default, the volume keys and mute key control the amplifier volume.
You can configure these buttons so they send volume commands to another device. In the following example, the volume commands are sent to a linked AV device (your television, for instance):
- Press AV for three seconds, until one EHTights and stays on.
2 Press VUE - Press AV again. The IFO blinks three times
The volume and mine keys will now send the volume commands to the TV.
To set the volume buttons to control the amplifier once more, repeat the above steps, except pressAMP in step 3.
Hidden commands
| Command | Effect |
| AMP + 📋 | Sends a Power On command |
| AMP + 🎨 | Sends a Power Off command |
| AMP + OK | Sends a Zone command |
| AMP + 🎩 | Cycles through HDMI outputs 1, 2, 1&2. |
| CD + 🎺 | Sends a Power On command |
| CD + 🎨 | Sends a Power Off command |
| BD + 📀 | Sends a Power On command |
| BD + 🎨 | Sends a Power Off command |
| BD + 🎠 | Sends a Resolution command |
Factory default reset
You can reset your remote to the original factory default settings.
Press and hold both the home) and MENU keys for about five seconds until the power LED blinks five times
All programming and setup codes that you have entered into the remote are erased and the remote returns to the original factory default settings.
Device codes
The tables that are in the final section of this Handbook list 2 figure codes for different manufacturers' devices.
Use these when setting your remote up to control your devices, as described in Direct code setup: Method 1 (see previous page).
If more than one code number is listed, by the first number. If the results are unsatisfactory, continue trying the numbers for that manufacturer to get the best 'hit' with the functionality required.
If the manufacturer of your equipment is not listed, you can try Library search setup: Method 2 (see previous page). This method allows you to scan through every code contained in the remote's memory.
AMP
AMP Device Mode
The AOPvice Mode button configures the remote to control the Receiver. Pressing this button does not affect the currently selected input on the Receiver.
The functionality of the remote is context sensitive for the internal sources and is described in the following table.
| Single press - Toggles Receiver power between standby and on in the current zone (zone in which the command is received).Press and hold- Forces all zones into standby; regardless of which zone the command was received in. | |
| 1..2 | The number keys can be used for direct entry of numeric values |
| SMC | Sync. Delays may be introduced into the video signal by video processing which causes a mismatch between the audio and video timing. You will notice this by speech sound being out of synchronization with the lip movements in the video. It compensate for this, you can adjust the lip sync delay. Press the SYNCtion and use the 🔒 and 🔒 navigation buttons. Press again to exit the lio sync trim menu. |
| RIS | Into cycles through the information displayed on the lower left portion of the front panel display when on TUNINET inputUSB |
| Brings up the DTSX dialog control adjustment. | |
| TUE | Displays the unit's setup menu on the On Screen Display. |
| TUEY | Toggles Dolby Volume on/off. |
| LINT | Toggles Dolby Live EQ on/off. |
| STN | Brings up a temporary subwoofer trim control. Use the ⬤ and ⬤ navigation buttons. Press RTN again to exit the sub trim control. As this is a temporary adjustment, the sub trim level is reset to the value set in the Speaker Levels menu when the unit is turned off or put into standby. |
| ※ | Toggles the music function of the AVR. |
| #21 | Adjust amplifier volume. |
| #005 | Cycles through the available surround and downmix modes. |
| #FF | Cycles through the front panel display's brightness options. |
| #FF | Testes remote to AMP mode. |
| #007 | Stereo direct on/off. Provides a direct analog path from the analog inputs to the left and right front outputs. Switches off any surround processing modes and shuts down the DSP circuits. |

Navigate the 12s and menus on the screen.
OK selects the highlighted file or enters the
highlighted menu on the screen equivalent
to 'Enter' or 'Select' on some remote controls.
Up
Left
Right
Down
AMP - Power on from stand by
AMP Standby from Power on
AMP - OK select Zone 2
Red button
Green button.
Yellow button
Blue button
Tuner input
Aux opur.
B1 input
USB input.
"AVinout.
SAT input
F8 | PyR input.
Game console input.
BD input
(1) C0 input.
STB input.
UHD UHD input.
Network commands
When using the network client, the keys below are used to navigate music files in AMP Device Made.
| Navigates the files on screen. OK selects/plays the highlighted file. | |
| K | Selects the previous/next track in the current playlist. |
| H | |
| I | Pause and playback of the current track. |
| ■ | Stups playback. |
| ID | Adds the currently displayed radio station to the favourites list when using the network client. |
| omu | Rromoves the currently displayed radio station to the favourites list when using the network client. |
| o | Returns navigation to the top level of the network client menus (Home) |
BD
BD/DVD Device Mode
The device Mode button configures the remote to control the functions of Hamman Blu-ray Disc and DVD players, although this can be changed. Pressing this button also selects BD as the source.
| logges power between standby and an. | |
| ▲ | Open/close disc tray. |
| ▲2 | Searches for and plays the track corresponding to the key pressed when playing a CD. |
| 3DF | Cycles through the front panel display's originalness options. |
| HOT | Cycles through the repeat options (track, disc, etc.). |
| ← | Fast rewind. |
| → | Fast forward. |
| →↑ | Press and release to skip back to the beginning of the current/previous track. |
| →↑ | Press and release to skip forwards to the beginning of the next track. |
| ■ | Stop playback of a BD or DVD. |
| ▶II | Pause and playback of the current track. |
| → | Start recording (on products that have this feature). |
| VCM | Disc menu. |
| POPUP | Activates BD/VCD player menu, if available. |

Navigate setup and BD/DVD program selection menus
OK selects the highlighted file or enters the highlighted menu on the screen equivalent to 'Enter' or 'Select' on some remote controls.
Up
④
Right
Down
BD + Power on from Stancoy
BD + Standby from Power on
BD → changes the picture resolution (for BD, only on the Home screen).
Returns navigation to the top level of the menu ("Home").
Changes audio decode format (Dolby Digital, DTS, etc.)
Resets remote to AMP mode.
RED button for BC
GREEN button for BD
YELLOW button for BD
BLUE button for BD.
AV
AV Device Mode
The AV device Mode button configures the remote to control the functions of a television or other display device. You will need to configure this Device Mode to work with your equipment. Pressing this button also selects AVs the source.
| Toggles power between standby and on. (Some TVs require you to use a number key to turn them on) | |
| Functions as original remote number key usually for channel selection. | |
| Display INFO or OSD (On Screen Display) function, if available. | |
| AV: this function is TV specific. | |
| Channel down. | |
| Channel up. | |
| Displays picture information; this function is TV specific. | |
| Guide. | |
| Naviga: setup and program selection menu. OK confirms a selection (equivalent to Enter or Select on some remote). | |
| Returns navigation to the top level of the menu (Home). | |
| Resets remote to AMP mode. | |
| RED Key for Text TV | |
| GREEN Key for Text TV | |
| YELLOW Key for Text TV | |
| BLUE Key for text TV. |
UHD
UHD Device Mode
The UHOvice Mode button selects asUHD source.
The UHD page allows code learning from a dedicated UHD remote – see "Customising the Remote" on page EN-27
STB
STB Device Mode
The STI by ce Mode button secels - asSTI the source. If configured to work with your set top box decoder or similar device, the remote can subsequently control the device.
| ○ | logges power between standby and on. |
| 0.5 | Functions as original remote number key usually for channel selection. |
| 12F | Display INFO or OSD (On Screen Display) function, it available. |
| VDD | Selects the Library or Media function. |
| ◀ | Rewind. |
| ▶ | Fast Forward. |
| ◀◀ | Channel down. |
| ◀◀ | Channel up. |
| ■ | Stop playback. |
| ▶II | Pause and playback of the current track. |
| ● | Record. |
| III.0 | Opens the EPG (Electronic Program Guide) on some satellite and cable set top boxes. |
| POP.IF | Turns on the Menu function if the set top box uses this feature. |
| Navigate setup and program selection menus. OK confirms a selection 'equivalent to 'Enter' or 'Select' on some romoles. | |
| Returns navigation to the top level of the menu (Home). | |
| AUX | Selects the Help function. |
| AVF | Results romole to AMP mode. |
| RED | RED button for set top box. |
| GPPS | GREEN button for set top box. |
| WHLM | YELLOW button for set top box. |
| JUC | BLUE button for set top box. |
SAT
SAT Device Mode
The SA device Make button selects as SA e source.
If configured to work with your satellite receiver, the remote can subsequently control the device
| Toggles power between standby and on. | |
| A.P | functions as original remote number key - usually for channel selection. |
| REF | Display INFO or OSD (On Screen Display, function, if available. |
| Channel down. | |
| Channel up. | |
| H.II | Displays program information. |
| POPUP | Guide (or Setup on some set top boxes). |
| Navigate setup and program selection menus. OK confirms a selection (equivalents to 'Enter' or 'Select' on some remokits). | |
| Returns navigation to the top level of the menu ("Home"). | |
| ITN | Back. |
| AVF | Resets remote to AMF mode. |
| FID | RED button for Satellite. |
| GREEN | GREEN button for Satellite. |
| YELLOW | YELLOW button for Satellite. |
| BLUE | BLUE button for Satellite. |
PVR
PVR Device Mode
the PVR device Made button selects a PVR source.
If configured to work with your personal (hard disc) video recorder or similar device, the remote can subsequently control the device.
| Joggles power between standby and on. | |
| 1.2 | Functions as original remote number key - usually for channel selection. |
| NEW | Display NFO or OSD (On Screen Display) function, if available. |
| NICE | Selects the Library or Media function. |
| ← | Rewind. |
| → | Fast Forward. |
| ← | Channel down. |
| → | Channel up. |
| ■ | Stop playback. |
| ▶II | Pause and playback of the current track. |
| Record. | |
| MINS | Opens the EPG (Electronic Program Guide) on some satellite and cable set top boxes. |
| RULF | Turns on the Menu function if the PyR uses this feature. |
| Navigate setup and program selection menus. OK confirms a selection (equivalent to 'Enter' or 'Select' on some remotes). |
| Returns navigation to the top level of the menu(Home). | |
| 2010 | Selects the Help function. |
| AMP | Resets remote to AMP mode. |
| RED | RED button for PVR. |
| GREEN | GREEN button for PVR. |
| YELLOW | YELLOW button for PVR. |
| BLUE | BLUE button for PVR. |
CD
CD Device Mode
The CD device Mode button selects a CD the source.
The button is configured to control the CD functions of JBL Synthesis CD players, although this can be changed (see "Locking/Unlocking a specific Device Mode" on page EN 73).
| ○ | loggbs power between standby and on. |
| ▲ | Open/close disc tray |
| ▲,▼ | Searches for and plays the track corresponding to the key presses. |
| TOP | Cycles through the front pane display's brightness options. |
| MOUT | Cycles through the repeat options (track, disc, etc.) |
| ← | fast rewind. |
| → | fast forward. |
| →← | Press and release to skip back to the beginning of the current/previous track |
| →→ | Press and release to skip forwards to the beginning of the next track. |
| ■ | Stop playback of a CD |
| ▶II | Pause and playback of the current track. |
| NUP | n 'normal play' file, the display does not show the letter P), press the 🔊 and ▼ keys to select the track and then MENES the track.n 'program play' mode, the MENES deletes the stored track. |
| Navigate setup and CD program: select on menus.OK selects the highlighted file or enters the highlighted menu on the screen - equivalent to 'Enter' or 'Select' on some remote controls.UpLeftRightDownCD + Power on from StandbyCD + Standby from Power on | |
| ATT | Reels remote to AMP mode |
| E200 | Plays the program track. |
Essential Setup
Before you use your Receiver it is essential that you enter some information into the Sc-up menu about your speaker configuration. This allows the Receiver to process any surround sound digital source to exactly match your system and give you the ultimate surround sound experience.
There are three pieces of vital information which are outlined in the sections: 'Speaker Types', 'Speaker Distances' and 'Speaker Levels'.
The way you enter this information manually into the Receiver is given later in the Setup Venus' section on page FN-30.
When calibrated using Dirac Live room equalization the speaker levels and delays will be established automatically and applied when the equalization is turned on, speaker types however must be manually entered. For use with equalization turned off, the speaker size, speaker distance and speaker levels settings must be entered manually. It is important to understand why these speaker settings must be entered, which is why this section is presented before the section on equalization.
Speaker types
You need to set the type of speakers that you have connected to your Receiver:
Large capable of full frequency range reproduction
Small not capable of full frequency range reproduction at the low frequency end
None speaker not present in your configuration
The terms 't' and 'small' do not necessarily relate to the physical size of your speakers. As a rule of thumb, if a speaker cannot reproduce a flat frequency response down to about 4GHz (and very few cents) it is often better to consider them as 'small' for setup purposes of home cinema.
When a speaker is set to "Small", very low frequency sounds are redirected away from that speaker to a "large" speaker or a subwoofer, which are far better suited to reproducing these low frequency sounds. Many order to set even very full-range speakers to "Small" to optimize the dynamic range of the system and to more fully utilize the Dirac Live Bass Management room EQ.
Note that it is not possible to set all speakers to 'Small' unless there is a subwoofer in your speaker configuration. If you do not have a subwoofer, you will be forced to set your front speakers to 'Large'.
(Some users may wish to automatically override the 'Small' speaker setting for purely stereo music listening when not watching movies. This can be achieved in the Input Config. menu - see page EN-51.
Crossover frequency
If you have set any speakers as being "Small", then you will be required to set a value for the crossover frequency. This is the frequency below which signals are filtered away from these small speakers and redirected to "Large" speakers or the subwoofer (if present). 80 Hz is usually the best crossover frequency, since it sends non-directional low frequencies to the subwoofers which are best-sailed to handle low frequencies and can be placed optimally to reproduce only the lowest frequencies.
A Certified JBI Synthesis Calibrator will select the appropriate settings during the calibration process.
Use Channels 6+7 for
If not used in the main zone, it is possible to assign the Surround Back channels to Height 1, bi-amp the Front Left/High channels or to provide an amplified output to Zone 7.
Speaker Levels
Finally the levels of all the speakers in the system need to be adjusted to match each other at the listening position, to create a proper surround effect. To help with this the Receiver can generate a test noise for each speaker which should be measured with a sound pressure level (SPL) meter. The motor should be set to C' weighting and slow response. Several smartphone/toblet apos are available which can also perform this function. The level of noise measured at the listening position from each speaker should be adjusted on the Speaker Trims page of the Setup' menu so that the meter reads 75dB SPL it does not matter what the system volume setting of the Receiver is before turning the test noise on as the volume setting is overridden for the duration of the speaker noise test.
NOTE: Mobile phone apps are limited in accuracy unless an external microphone is used. Consult your dealer for recommendations.
There are several basic SPL meters on the market at reasonable prices aimed at home cinema enthusiasm. Check your local technology store, search online or ask your doctor. If you do not have an SPL meter or suitable app, you can try to adjust the noise level of each speaker by ear. In this case it is not possible to adjust the speakers to the absolute 75oB SPL volume level, but you should aim for all speakers sounding equally loud. Setting speaker test noise levels by ear is not recommended as it is very difficult to do accurately. A Certified JOL Synthesis Calibrator will ensure all levels are set properly.
Speaker Distances
It is essential for the distance from each speaker to the listening position to be accurately measured and entered into the 'Setup' menu. This ensures that the sounds from the various speakers arrive at the listening position at the correct time to recreate a realistic surround effect. The distance can be entered in centimeters or inches.

DIRAC
Dirac Live with Bass Management
There is a proprietary automatic loudspeaker calibration function pull into your Receiver from Dina Research. Using a PC/VAC based application, this attempts to set the essential speaker settings for all the speakers in your system. It also calculates room equalization (loom HQ) if values to remove some of the worst effects of resonant frequencies in the listening room.
Your Receiver package is supplied with a basic calibration microphone, which should be inserted into a USB port on a PC or MAC connected to the same network as the Receiver and positioned as directed by the Dirac Live PC/MAC application. This microphone picks up the special calibration tones generated by the speakers when Dirac Live application is run. Optionally, a high quality, calibrated third-party microphone can be used for greater accuracy, such as the miniDSP UVIK 1. The Receiver then analyzes the signal and computes:
□ speaker de ays
F speaker level.
L. problem resonant frequencies in the room which need control by filtering.
To help the system be as accurate as possible when performing Dirac Live setup, there are a few guidance rules that should be followed.
1 Minimize any background sounds in the listening room and other nearby rooms.
L Close all windows and doors in the listening room.
L. Turn off all fars including air-conditioning systems.
Round the microphone or a tripod or similar.
Position the set up microphone pointing upwa at roughly head height when placed in the normal listening position. It is not necessary to point the microphone directly at the speaker generating she was long, the microphone should be pointing vertically towards the ceiling. It helps if you are able to position the microphone exactly where your head would normally be for listening, with the microphone in direct unobstructed view of all speakers! Assure all objects, such as chair backs are at least 18 inches (400 m) away from the microphone, ideally, move the seating away during measurements to prevent reflections that can reduce the accuracy of the equalization.
- If your system includes an active subwoofer, start setting its output level / gain control to a value roughly reaching the front speakers.
Although Dirac is designed to make the calibration process easier, a certified JBL Synthesis Calibrator has the training and tools to maximize performance results.
Problems
We advise you to look over the reported measurements on the screen following Dirac Live setup for any previously incorrect results, in particular to ensure the reported speakers match your configuration and that the speaker distances to the listening position appear roughly correct. If the results are not what you expected re-cun Dirac Live setup. The Dirac live setup function is normally quite accurate but occasionally false results can be generated. Problems may be as a result of:
□ external sounds or rumbling/handling noises picked up by the microphone
☐ sound reflections off hard surfaces (e.g. windows or walls close to the listening position,
very strong acoustic resonances within the room.
- obstacles (such as a sofa) between speakers and the microphone.
If you are still experiencing difficulties or you wish to have the most accurate results for ultimate surround performances, we recommend using the manual method of establishing speaker distances and levels.
Using subwoofers
If your system includes active subwoolers you may need to see the subwoofer output level/gain control set to a higher or lower value.
Please refer to the Dirac application and quick start guide for full details of how to use the system with your Receiver.
Downloading the Dirac Live application
To download the Dirac Live PC/MAC application and quick start guide, please visit: live.dirac.com
Using Dirac
You can store up to three Dirac EO curves in the Receiver, each input can use a different curve, for example a "Movie" curve on the BD input and "Music" curve on the CD input.
This can be set on a per in out basis using the AUDIO the remote.
Alternatively use the Room HQ menu item in the Audio settings menu to set the curve for each input. See "Room -C" on page EN-31.
NOTE: When Dirac is run for the first time the curve will be applied to all inputs. Subsequent curves will not be automatically applied; use the methods above to choose the required curve for the input in question.
Setup Menus
The Setup menus allow you to configure all aspects of your Receiver. The next few pages will go through the menu items accessible via the front panel, IR remote, or internal web page and explain their function. The majority of the Setup menus need only be configured once when you first install the system (or if your system changes, you move any large furniture or the listening locations, or you move).
Entering Setup mode
To enter the setup menu, press the MENUTON on the remote control or font panel. The front panel display shows the setup menu (pictured right).
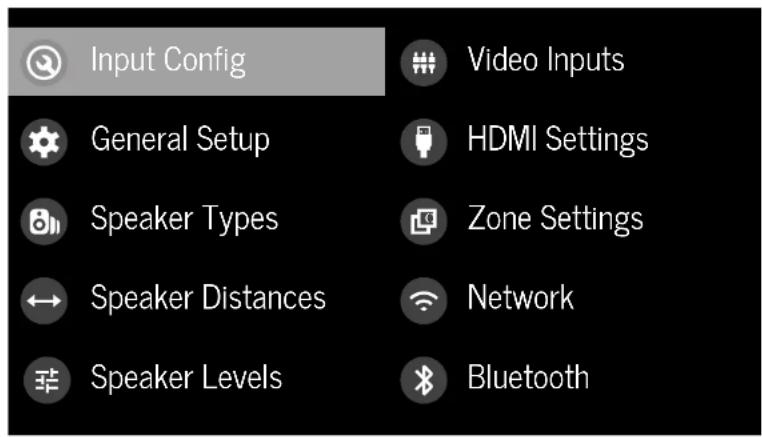
Navigating the setup menu
... using the remote control
The setup menu can be navigated by using the cursor (arrow) keys on the remote control. This is by far the easiest method.
- To enter the setup menu, press the MENU (which is located immediately under the navigation buttons).
- Use the ▲ and ▼ keys to navigate up and down the main section headings.
-
Once you have the main section that you require highlighted, use the ⬆ key to enter the section.
-
Use the ▲ and ▼ keys to navigate up and down the section settings in the right-hand panel. Some settings may be greyed out. These are either for information only (e.g. incoming sampling frequency) or are not currently selectable, Scroll bars on the sides of the right-hand panel indicate your position in the settings list where there are more items than can be displayed at once.
- Pressing oelects a setting to change it, pressing OK again de-selects the setting.
- At any time, press the MENUEN to exit the menu. Any changes to settings are saved.
... using the keys on the front panel
The Receiver front panel controls can be used to configure the unit. Follow the instructions for using the remote control, in this case using INPUTdown, for INPUT+ INFO for left and MODEight.
....using the internal configuration web page
The units have an internal configuration page that presents the same set up functionality front panel display on a web browser.
This enables the unit to be set up and configured from any browsing device connected to the same network as the unit. To access the internal configuration page, find the units' IP address by selecting Network >IP Address. Type the IP address in the browser window.
The menu headings and function are the same in the internal configuration page and the front panel and are described below.
Input Config.
The audio and video settings on this page of the Setup menu can be tailored specifically and independently for the currently selected input.
When a different input is selected on the input line, all the input-specific settings for that input are displayed below it. These settings are applied to the named Input only and are stored in memory and recalled each time the unit is powered up and whenever that input is selected.
Input - The currently selected input connectors to which the settings below relate.
Name The display name of the input. You can change the name of any input to more closely match your account. For example, if you had two satellite receivers, you could connect the main receiver to the SAT audio and video input connectors and change the Name to 'SAT 1'. You could then connect the second satellite receiver to the UHD audio and video input connectors, but change the UID Name to 'SAT 2'. It is then clearer to users of your Receiver which inputs they wish to select when scrolling though.
Lip Sync - Each input can have its own setting to add a time delay between the audio and video signals to compensate for the sound and picture not being synchronised. This is normally required when video processing is used in the system for scaling or de-interlacing video. The range of lip sync delay is 0 to 250 milliseconds.
The lip sync adjustment can only correct for delayed videos. If the audio is late set lip sync to its minimum.
Mode—Sets the initial audio decode mode for stereo sources on this input.
L. Last Mode recalls the last used setting for this input with a stereo source was applied. See section "Two-channel source modes" on page EN-35 for more information.
□ MCH. Mode - Sets the initial audio decode mode for multi-channel digital sources on this input.
- Last Mode recalls the last used setting for this input with a stereo source was applied. See section "Multi-channel source modes" on page EN-35 for more information.
Bass -
Treble –
These allow you to alter the bass and treble tone controls for all currently active speakers for each individual input. For example, if your PVR source sounds a little bass light, you can always correct for this by selecting PVR on the Input line at the top of this menu and ado 2 or 3oB to the Bass control. Then, whenever the PVR input is selected, the bass is automatically boosted for as long as that input is selected.
Room EQ - When the Dirac Live Bass Management application is run and EQ filters are downloaded into one of the three slots available, this can be selected.
☐ Not Calculated: (Information only); There are no EQ filters, so cannot be selected.
n Project Name: Dirac Live Room HQ is applied to the current source and will display the name of the project from the Dirac Live application.
☐ Off: Direct Live Room HQ is not applied to the current source.
Input Trim - Sets the maximum analog input signal level (sensitivity) on this input before the ADC (Analogue-to-Digital converter) signal path clips. Options are 1, 2 and 4 volts RMS maximum input. The default is 2Vms maximum. For example, analog sources with low output levels may benefit by choosing the 1V maximum setting. This helps to maximize signal to noise performance of the Receiver and also helps keep the various analog sources sounding about the same level for any given Receiver volume control setting.
Dolby Volume – Dolby Volume is an intelligent system that improves the perceived audio frequency response at lower listening levels and corrects for volume inconsistencies between sources (e.g. a rock radio station and a BID) and between programming (e.g. a TV show and advertisement breaks).
On: Dolby Volume is applied to this input.
☐ Off: (default.) Dolby Volume is not applied to this input.
Dolby Leveller - This setting of Dolby Volume controls how closely quiet and loud sources and program content are matched to each other, based on the ear's perception of loudness. The range of values is 0 (minimal leveling) to 10 (maximum leveling). The default setting is 2, however we recommend experimenting with higher values your source material is less closely matched in level. If the volume I leveller function is set off, no level matching between sources and program material is performed. Note however that turning the Dolby Leveller setting of Dolby Volume to 'Off' is not the same as turning the entire function of Dolby Volume to 'Off', as volume related frequency response processing is still active.
DV Calib. Offset - The Calibration Offset parameter of Dolby Volume allows you to compensate for speaker efficiencies and listening position. The default value is 0 and this should normally produce a good result when the Receiver speaker levels are set using a sound pressure level meter.
Stereo Mode – if you have configured your system to have a subwoofer, then you have the flexibility to choose how bass information is distributed between the front, left/right speakers and the subwoofer when listening to stereo (two channel only) analog and digital sources. Choose the option which gives you the most solid, even sounding bass. If you are using a subwoofer for stereo, please also see Sub Stereo below to set the level of the subwoofer. For best results test with a setup disc unless Dirac EO is active on the input. This setting can be used to override your normal speaker settings in the Sokr Types menu whenever the Receiver plays stereo material. It is quite common to some people find that two channel stereo music listening is best done with a slightly different sub/speaker setting than for surround moves.
☐ s Spkr Types: When an analog or digital stereo source
is played, your normal speaker configuration (as in Spkr Types menu) is used to reproduce the signal.
Left/Right: This setting provides a full-range 2-channel signal. All audio is sent, to the front left and right speakers only without any bass rediction. You can use this setting if you consider your front left/right speakers to be able to handle the full frequency range of music. If you have set your front left/right speaker side as Small in the Spkr types setup page, you may wish to use this option to override the setting to Large for stereo music listening, if you have full frequency range left/right speakers. It can often be beneficial to set full frequency range speakers to Small in the Spkr Types setup page for use with movies, if you have a subwoofer in your system. Doing so may deliver more impact on movie soundtracks as subwoofer are designed to hand re reproduction of high bass content. However some listeners may find that for stereo music a better overall result is obtained by not using the subwoofer and effectively treating the front left/right speakers as large.
☐ Left/Right+Sub: Full frequency range stereo is tied to the front left and right speakers and extracted bass is sent to the subwoofer. In this case the low frequency information is effectively duplicated which may result in unpredictable and colored low frequency reproduction. This setting is not recommended for accurate son's reproduction.
Sat+Sub: Use this setting if you really do have Small satellite front left and right speakers, or if you prefer the overall sound of bass being handled by the subwoofer. Full bass management is used so that analog and digital stereo sources are fed to the DSP where the bass is filtered off front left and right and redirected to the subwoofer.
NOTE: The Stereo Mode function is not available when using an analog source in Stereo Direct mode.
Sub Stereo - If Left/Right/Sub or Sat/Sub is selected in Stereo Mode above, this setting adjusts the level of the subwoofer when the source is two channel stereo.
IMAX Mode - Selects if IMAX mode is enabled from the incoming audio stream (auto) or forced on or off.
Auro-matic 3D - Selects the mode of the Auto-matic 3D upmixer.
Small: Adjusts the upmixer for a small-sized room.
☐ Medium: (default) Adjusts the upmixer for a medium-sized room
Large: Adjusts the upmixer for a large-sized room.
□ Movie: Adjusts the upmixer for film material.
□ Speech: Adjusts the upmixer to focus on speech intelligibility.
Auro-matic 3D Strength Adjusts the ratio of unprocessed-to-processed signal when using the Aero-Matic 3D upmixer.
Audio Source - Selects the particular connection type for each input. The default is HDMI for inputs with an HDMI connection and Digital for inputs without an HDMI connection. This setting must be changed if another connection is used.
Select from the list the audio type you are using on this source.
☐ HDMI: the unit is forced to use the HDMI audio input for this source.
Digital: the unit is forced to use the optical (TOSLINK) or coaxial (S/PDIF) digital audio input for this source
☐ Analogue: the unit is forced to use the analog audio input for this source.
CD Direct - Turns off the compressed audio detection mute delay and should only be used for sources that will only transmit PCM audio (e.g. a CD player).
General Setup
General information and system controls.
Source Input (Information only) The currently selected input to which the settings below relate.
Incoming Format - (Information only) The format of the digital audio stream connected to this input, if present.
Incoming Sample Rate – (Information only) The sample rate of the digital audio stream connected to this input, if present.
Incoming Bit Rate – (Information only); The bit rate of the digital audio stream connected to this input, if present.
Dialnorm – (Information only) If a Dolby Digital audio stream is connected to this input, this is the Dialog Normalization setting requested by the stream.
Incoming Resolution – (Information only) Shows the incoming video resolution.
Audio Compression – Allows selection of compression which is desired for late night listening. The compression effect increases the volume of the quiet passages and decreases the volume of the lower passages. Compression only applies to Do-by/DTS soundtrack formats that support this function.
☐ Off: (default) no audio compression is applied.
☐ Medium: compression is applied so that loud portions of a soundtrack are reduced in level. Any Do by True HD stream is compressed automatically as set by the incoming stream.
☐ High: the maximum amount of dynamic range compression is applied, so that the difference between loud and quiet portions of a soundtrack is minimized.
This setting applies to all inputs when a relevant digital audio stream is detected. It is stored in memory and recalled each time the unit is powered up.
Balance - To alter the sound balance temporarily between front left and right speakers. You can alter the sound stage to either she left or the right by up to bell. Note that it is not possible to shift the audio signal completely over to one channel. This function resets to equal left/right balance when the input is changed.
Dolby Center Spread Allows adjustment of the sound field for Dolby Surround mode decoding of two-channel sources. With Dolby Surround decoding, dominant center signal's come only from the center speaker, if no center speaker is present, the decoder splits the center signal equally to the left and right speakers to create a 'phantom' center image. The Center Spread control allows variable adjustment of the center image so it may be heard only from the center speaker; only from the left/right speakers as a phantom image; or from all three front speakers to varying degrees.
DTS Dialog Control – Sets the level of the dialog channel in compatible DTS audio streams.
Maximum Volume - Limits the maximum volume setting the system can be turned up to in the main zone. This is a useful feature to prevent accidental overdriving of low power-handling speakers (for example). It is stored in memory and recalled each time the unit is powered up.
Max On Volume - Limits the maximum volume the system operates in the main zone when it is switched on or comes out of Standby. The system comes on at this stored volume setting if the last used (possibly very low) volume exceeds this value. It is stored in memory and recalled each time the unit is powered up.
Display on time - Sets the time that the front panel display remains illuminated after receiving a command. The default is always on.
Control - enables or disables RS737 or IP (NF-); control, a system that allows control from various third-party home automation systems. Note, only RS232 or IP control can be used, not both.
Power on - Determines how the unit powers on.
□ Stby: in Standby mode
□ On: On
Last state: Last state (default).
Language - Select the language for the setup menu English, French, German, Spanish, Dutch, Russian, Chinese.
Speaker Types
Settings for the types of loudspeaker you have connected in your configuration. These settings are applied to all audio inputs and are stored in memory and recalled each time the unit is powered up.
Front Left/Right -
Center
Surr. Left/Right -
Surr. Back L/R -
Height Front –
Height Back
Here you set the type of speakers that you have connected to your Receiver:
Large: capable of full frequency range reproduction
☐ Small: not capable of full frequency range reproduction at the low frequency end
☐ None: speaker not present in your configuration
NOTE: It is not possible to set all speakers to Small unless there is a subwoofer in your speaker configuration. If you do not have a subwoofer, you will be forced to set your front speakers to Large.
Subwoofer – configures if the dedicated Sub Out connectors, "Sub1" and "Sub2" are used for a single subwoofer channel (either connector may be used.) For systems with two or more subwooters, use channels 13, 14, 15 & 16 for up to four independent subwooters, which can fully utilize Dirac Live Bass Management.
Channel 13 & 14 –
Channel 15 & 16 -
Configures the speaker positions that channels 13, 14, 15 & 16 are used for.
Height Type configures the type of height speakers - ceiling mounted or Dolby enabled.
Use Channels 6+7 for – If your main zone speaker set up does not include Surround Back Left and Right speakers, you can choose to use the Surround Back amplifier channels as the Height 1 amplifiers, to Bi Amp the Front Left and Right pair, or as a stereo power amplifier for Zone 2.
Filter Slope - Configures the filter slope used for bass management - 17dB, 24dB, 36dB, 48dB/octave.
Sub Gain - configures the output level trim for all outputs configured as subwoofers in -6dB steps from 0dB to -30dB.
Speaker Distances
Calibration settings for the distances between the loudspeakers and the listening position.
NOTE: Speakers that are not present in your configuration will be greyed out.
If Dirac Live is used, these settings will be shown in time (mS) and not distance.
These settings are applied to all audio inputs and are stored in memory and recalled each time the unit is powered up.
Units - Select whether you wish to measure distances in imperial or metric units.
Front Left -
Center-
Front Right -
Surr. Right –
Surr. Back Right –
Surr. Back Left -
Surr. Left -
Left Top Front –
Right Top Front -
Left Top Back
Right Top Back –
Subwoofer
Channel 13 –
Channel 14 –
Channel 15 –
Channel 16 –
As described in "Essential Setup" on page FN-78, measure the distance from each loudspeaker in your system to your ear in the main listening position and enter the values. This allows the Receiver to calculate the correct relative delay for each loudspeaker.
Speaker Levels
These settings allow adjustment of individual speaker levels if Dirac Live has not been used for setup. They should be adjusted using either internally generated test noise or an external source, such as a setup test disc.
NOTE: Speakers that are not present in your configuration will be greyed out.
These settings are applied to all audio inputs and are stored in memory and recalled each time the unit is powered up.
Test Tone – selects the internal test tone generator or allows the use of an external test tone from the currently selected HDMI input (e.g. played from a BD).
Front Left -
Center -
Front Right –
Surr. Right –
Surr. Back Right -
Surr. Back Left -
Surr. Left -
Left Top Front -
Right Top Front –
Left Top Back -
Right Top Back -
Subwoofer -
Channel 13 -
Channel 14 -
Channel 15 -
Channel 16 -
Use the 🔒 and ⬇ navigation buttons on the remote control to select the relevant speaker. Press OK to enable/disable the calibration noise and the 🔒 and ⬇ navigation buttons to adjust the noise level from each speaker.
As described in "Essential Setup" on page EN-28, adjust the level of the test noise from each speaker so that an SPL meter at the listening position measures 75dB SPL.
Video Inputs
Settings to optionally assign a video source to each of the normally audio-only inputs.
These settings are stored in memory and recalled each time the unit is powered up.
Video Input CD -
Video Input Aux –
Video Input FM -
Video Input DAB –
Video Input Net -
Video Input BT -
The default for each of the audio inputs is 'None'. You could, however, associate 'Sat' video with FM or Digital Radio audio to receive radio commentary of a sports game with pictures from sale-lite coverage, for example.
HDMI Settings
The settings in this menu control the output resolution from the video processor in the Receiver. These settings are applied to all video inputs and are stored in memory and recalled each time the unit is powered up.
Zone 1 OSD – Selects whether the main zone pop-up OSD messages are On or Off. It is stored in memory and recalled each time the unit is powered up.
☐ hEWO, all user adjustments that are made during the general use of the Receiver are displayed on screen as well as the front panel display. This includes the adjustment of volume, subwoofer level, lip sync, tone controls, etc. It is stored in memory and recalled each time the unit is powered up.
- When Off, the above user adjustments will not appear on screen, only on the front panel display. This leaves the picture on your display device clear of pop-up text. However, regardless of this setting the Setup menus are always displayed on screen.
Zone 1 Out - This setting controls the output for zone 1 from either output 1, output 2 or both.
Zone 1 Lipsync (Information only) Displays how much tip sync is automatically applied to the HDMI output to
compensate for video processing delays in the attached display device. Not all display devices support this function.
HDMI Audio to TV - his setting controls the audio being sent direct to the TV.
HDMI Bypass & IP – This setting controls the functionality of HDMI bypass & IP control while in standby. Selecting "Low Power" (default) will mean that IP control (network) and HDMI bypass are disabled. Selecting "HDMI & IP On" means that IP Control (network) & HDMI bypass is enabled.
HDMI Bypass Source – Selects which input is used for HDMI bypass function, either a specific input or the last input used.
CEC Control Selects if CEC control is enabled on output 1.
eARC Control – This setting enables/disables volume control from the display.
TV Audio - This setting enables/disables auto-switching to eARC audio from the display.
Power Off Control - This setting enables/disables auto-power control from other CEC enable devices.
Zone Settings
Lists the volume and control settings for Zone 2. These settings are applied to all audio inputs and are stored in memory and recalled each time the unit is powered up.
Z2 Input - Selects the input to be routed to Zone 2. The default is 'Hollow 71', i.e. the same source as currently selected in Zone 1.
Zone 2 Status Selects if Zone 2 is in Standby or On.
Zone 2 Volume – The current volume in Zone 2.
Zone 2 Max. Vol - Limits the maximum volume acting the system can be turned up to in the Zone 2. This is a useful feature to prevent accidental overdriving of low power-handling speakers, for example.
Zone 2 Fixed Vol - The Zone 2 volume control can be locked at the current value for use with an external amplifier with its own volume control in Zone 2.
Zone 2 Max On Vol - Limits the maximum volume. The system operates in the Zone 2 when it is switched on or comes out of Standby. The system comes on at this volume if the last used (possibly very loud) volume exceeds this value.
Connecting to a Network
Network
The Receiver is fitted with a network audio client which is capable of Airplay 7, and Google Chemrecast built-in as well as stored music on a network storage device such as a PC, or on NAS drive.
The wireless network is configured using the Apple Airplay setup or the Google Home app.
SSID (Information only) Displays the SSID the receiver is currently connected to, "wired" if a wired connection is used, or "not connected" if no connection is present.
IP Address (Information only) IP address assigned by the DHCP server, or if not using DHCP, the IP address you have assigned to the Receiver for your network.
MAC address – (Information only): The unique address of the network card in your Receiver.
Friendly name – (Information only) The network "friendly name" of your Receiver.
Bluetooth
The Receiver is fitted with a Bluetooth audio input.
Pair Device - Makes the Receiver discoverable by Bluetooth devices.
Clear Paired Device List – Clears the Receiver's list of paired Bluetooth devices.
Paired Devices = Displays a list of the devices paired with the Receiver.
In order to use the Airplay and ChromeCast functionality of the Receiver you will need to connect it to your home network via a wireless or wired connection.
The following sections detail how to do this.
Note: Before attempting to setup a wireless connection ensure the supplied wireless antennas are fitted to the antenna sockets on the rear of the Receiver.
Home Automation Control
When connected to a network the Receiver can be controlled and monitored remotely using dedicated home automation software.
The same controls are also available via the RS232 input. Various third party systems are available providing sophisticated control over all your entertainment devices. Contact your dealer or installer for details. The technical details of the remote control protocol are available upon request, by contacting JBI Synthesis at csupport@harman.com
For details of the available controls please refer to the control document which can be found at www.jblsynthesis.com for further information.
Airplay Setup
Wired Connection
Connect an ethernet cable to the Receiver.
To listen to audio via Airplay on your Receiver, ensure your Apole device is connected to the same network as the Receiver and simply select the Receiver as the Airplay audio playback device.
Note: The Receiver will appear as JBL modelname-xxxxx in the Airplay speaker menu, where xxxxx is the last 6 digits of the units MAC address.
Wireless Connection
Ensure your Apple device is connected to the wireless network you wish to connect the Receiver to.
Open the Wi-Fi settings menu on the Apple device and select the Receiver from the "Set up new airplay speaker" menu. Follow the instructions on screen. To listen to audio via Airplay on your Receiver, ensure your Apple device is connected to the same network as the Receiver and simply select the Receiver as the Airplay audio playback device.
Note: The Receiver will appear as JBL SYNTHESIS mode name-xoxxx in the Airplay speaker setup menu, where xoxxx is the last 6 digits of the units MAC address.
ChromeCast Built-In Setup
Wired Connection
Connect an ethernet cable to the Receiver.
Note: The Receiver will appear as JBI - modelname.xxxx in the playback menu, where xxxxx is the last 6 digits of the units MAC address.
Wired & Wireless Connection
Download and open the Google Home application.


You should be prompted that there is a device available for setup. If not simply tap "Add" followed by "Setup a Device". Select the Receiver and follow the instructions on screen.
a. listen to cast audio from any supported application on your Receiver, ensure your device is connected to the same network as the Receiver. Tap the ChromeCast built-in icon from within the application and select the Receiver as the playback device.
Note: The Receiver will appear as modelname-xxxx in the setup menu, where xxxxx is the last 6 digits of the units MAC address.
Spotify Connect
Use your phone, tablet or computer as a remote control for Spotify.
Go to spotify.com/connect to learn how.
MusicLife APP


The Music life™ app facilitates playback of your own music library stored on a computer, NAS drive, or USB flash drive.
Introduction
Your Receiver provides all the key decoding and processing modes for analog and digital signals, including the latest high definition audio formats over HDMI.
Modes for digital sources
Digital recordings are usually encoded to include information about their format type. The Receiver automatically detects the relevant format in a digital signal such as Dolby Atmos, TrueHD, Dolby Digital Plus, DTS-X, DTS+D Master Audio, Auro 3D, Dolby Digital, or DTS- and switches to the appropriate decoding.
Modes for analog sources
Analog recordings do not contain information about their encoding formats, so the desired mode - such as Dolby Surround - needs to be selected manually.
Mode memory
Dolby Digital or DTS audio (including the high definition formats) can be output in two mix modes, selected using the MODE button:
☐ Surround (e.g., five main channels plus a subwoofer for 5.1 source)
□ Stereo downmix
Two-channel audio, regardless of whether it is analog or digital can also be output in two mix modes, selected using the mode button;
L. Surround (e.g., Delay Surround, DTS NeuralX, etc.) L. Stereo.
The Receiver stores the settings for each source. Thus the decoding mode for the following groups of source material can be stored independently:
- Do by Digital (multi-channel) and DIS source material
- Two channel Dolby, PCM or Analogue source material
Two-channel source modes
The following decoding and surround modes are for treating multi-channel stereo modes from 2-channel sources. They are available on the Receiver for standard and high definition Dolby Digital 7.0, DTS 7.0, PCM or analog sources:
Stereo -
16 Channel Stereo -
Dolby Surround -
Dolby Virtual Height -
DTS Neural:X -
DTS Virtual:X -
Auro-matic 3D -
Stereo
In this mode the Receiver works as a conventional high quality audio amplifier. Note that if the subwoofer is enabled in stereo mode, then some processing of the signal is carried out.
□ Stereo Direct: this achieves the most direct signal path if an analog convection is present.
16 Channel Stereo: this produces an output from all speakers by copying the left output to all left speakers and the right output to all right speakers. The center speaker outputs a mix of left and right.
Dolby Surround
aDelloy Surround allows the Receiver to derive up to 16 outputs from a two or multi-channel source to take better advantage of a I amplifiers and speakers in your setup.
Dolby Virtual Height
Dolloy Virtual Height creates an immersive audio experience by virtualising height content over traditional speaker configurations without the need for height speakers. Note - this mode is NOT available if height speakers are selected.
DTS Neural:X
DIS NeuralX is an advanced up-mixer that renders up to 7.14 channels of immersive audio from nearly any lower channel count content.
DTS Virtual:X
DTS VirtualX creates an immersive audio experience by virtualising height content over traditional speaker configurations without the need for height speakers. Note - this mode is NOT available if height speakers are selected.
Auro-matic 3D
Automatic 3D creates an immersive audio experience by creating additional channels from the incoming audio to match the available output channels, enhancing the listening experience.
Logic 16
Logic16 is an advanced up-mixer which produces astonishingly natural three-dimensional sound. Designed by Harman research scientists and engineers, Logic 16 will up-mix any input source from mono up to 15.1, including all Dolby formats.
Multi-channel source modes
For many years, digital multi-channel source material was often provided as '5.1 audio'. The '5.1 channels' are comprised of left, center and right from speakers, two surround speakers and a low frequency effects (LFE) channel. Since the LFE channel is not a full range channel, it is referred to as:
Dolby Armos, DISX, DIS-HD, Auro 3D are high-resolution immersive surround formats which use object oriented audio technology to deliver additional sonic locations for the sound requiring additional speakers including height (ceiling) speakers. The SDR-38 and SDR-58 ratively decode 9.1.6, where the last number (6) represents the height speakers.
Decoding modes
The modes given in the following table are available for multi-channel digital sources.
Special modes such as DIS+S 6.1 discrete, Dolby Digital Plus, Dolby TrucHD, Dolby Atmos, DISX, DIS HD and IMAX® ENHANCED, Auro 3D are only available from the correct source material.
High resolution audio sources
| Dolby Atmos | Do by Atmos content is mixed as audio objects instead of traditional channels, so can take full advantage of the number and portion of your speakers. |
| Dolby TrueHD | Provides up to 7.1 full channels at 96kHz, 24bit resolution, with no losses in the compression process. Data rates can be up to 18Mbps. |
| Dolby Digital Plus | Provides up to 7.1 discrete channels of audio with less compression than traditional Dolby Digital encoding. Data rates can be up to 6Mbps. |
| DTS-HD Master Audio | Provides up to 7.1 full channels at 96kHz, 24bit resolution, with no losses in the compression process. Data rates can be up to 24.5Mbps. |
| DTSX® DTSX is a decoder package that renders immersive content which has been encoded with DTSX encoding. DTSX content consists of audio objects or a combination of audio channels and objects. The DTSX decoder package also pleys back legacy DTS formats including DTS HD Master Audio lossless and lossy streams.Supports greater than 7.1 channel output configurations (including height speakers);Provides "Dialog Control" so consumers can adjust the sound to their preference or the listening environment!Rename any DTS content to any speaker layoutSupports Blu-ray Disc (BD), DVD and streaming media formats, and legacy stream's up to 19kHzIncludes NeuralX, the latest upmixing/drawmixing technology from DTS. | |
| IMAX-FNHANCHS MAX® Enhanced products more: the highest level of standards, ensuring the best color, contrast, clarity and sound on the market. These are products endorsed by IMAX to fully deliver the most immersive at-home entertainment experience and leverage the full quality and scale of IMAX Enhanced content. The IMAX Enhanced program introduces a new standard in home entertainment. | |
| AURO 3D | AURO 3d is a decoder package that renders the audio at three levels - ear level, height level and the "Voice of God" level, creating an immersive sphere of audio. |
For Dolby Digital sources
| Dolby Digital 5.1 | Dolby Digital 5.1 sources deliver sound with five discrete full range channels, left corner, right, surround left, surround right, plus LTE channels. |
| Dolby Digital Stereo Downmix Provides a stereo downmix of the source material for use with headphones. | |
| Dolby Digital 5.1 + Dolby Surround | This mode is used to derive information for the individual surround back channels from the surround channels, using the Dolby Surround decoder. |
| For DTS sources | |
| DTS 5.1 Less common than the Dolby | Digital format, but generally recognized within the audio industry as being at superior sound quality. DTS 5.1 delivers surround sound with five full range channels plus an LTE channel. |
| DTS 5.1 Stereo Downmix Provides a stereo downmix of the source material for use with headphones. | |
| DTS-E5 6.1 Matrix | This is a 6.1 channel format based on DTS 5.1. It has the sixth channel matrix encoded into the surround left and surround right channels. The sixth channel is a surround center channel and is directed to the surround back left and surround back right speakers. |
| DTS-E5 6.1 Discrete | This is a two discrete 6.1 channel sound format. DTS-E5 discrete mode operates only on sources with DTS-E5 6.1 discrete audio encoding. |
| DTS96/24 | Provides up to 5.1 channels of audio at 96kl z 24bit resolution for superior sound quality compared to standard DTS 5.1 |
Tuner Operation
The Receiver is fitted with an TM/DA0/DA0+ (digital radio) tuned. DAB broadcasts are not available in all locations.
This section deals with tuner operation, for information on setting up the tuner and installing antennas, see page EN-13. When a tuner input is selected, the OSD shows a list of radio presets plus an information panel giving all available information about the current frequency (for HV) or station (for DAB).
The front panel will also give the same information, pressing the INFO will cycle through the various items of information:
FM
□ Processing mode (default)
□ Radiotext (if available)
Program type (if available)
□ Signal strength
DAB
□ Processing mode (default)
□ Radiotext (if available)
Program type
□ Signal quality
□ Bit-rate of transmission
Tuning/Channel Selection
When switching to the internal TUNER source, the Receiver enters the last used tuner band, be it FM or DAS. Repeatedly pressing RADDs through the available tuner bands on your Receiver.
FM analog radio
Frequency tuning on PM radio is performed using the 🔒 and 🔒 buttons on the remote control in TUN device mode. Individual presses move the frequency down and up one step if you press and hold either of the tuning buttons for two seconds, the tuner scans to the next strong signal. You can stop a scan at any time by pressing one of the tuning buttons again.
In Europe, the internal -M radio a capacile of receiving RDS (Radio Data System) radiocext signals that are transmitted on some stations. The RDS information typically includes the radio station name, the music or speech genre as well as additional information related to the current program. On music stations this is often information on the currently playing track.
DAB digital radio
Digital Audio Broadcasting (DAB) radio is becoming more widely available.
See www.worlddab.org/country_information for information on DAB availability.
You will need to scan for available stations before being able to listen to them.
to scan for DAB stations, first select the DAB tuner then press and hold ( ^® ) until the display indicates scanning has started. The Receiver will then scan at the DAB radio frequencies and compile a list of the stations that are available.
When the scan is complete, you can scroll through the station list using the 🔒 and 🔒 buttons on the remote control. To listen to the currently displayed station press the 🔒. If you do not press ⏱ within two seconds, the display will revert to displaying the currently playing station.
Saving and Selecting Presets
Preset selection uses the ⚠️ and ⚼ keys on the remote to browse and Ⓚ to select the preset when the remote is in TUN device mode.
Up to 50 presets can be stored and these can be from any band, for example Preset I could be an EMI station, preset two a DAE station, etc. Pressing the OK key causes the next available preset number to be displayed, then pressing the OK key again stores the current frequency/channel in that preset. If a different preset number is required, press the ▲ and ▼ keys until the desired number is displayed before pressing the OK key for a second time.
Deleting Presets
When in tumor browse mode (using ⚠ and ⏱ to scroll through the presets), the yellow button on the remote is used to delete the currently highlighted (but not playing) station or frequency.
Troubleshooting
| Problem Check the following | |
| There are no lights on the unit | ☐ The power cord is plugged into the receiver and into the AC power outlet. ☐ The power button is pressed in. ☐ If a red LED is present, the receiver is in standby mode. Press any button on the front panel or the standby button on the remote control. |
| The unit responds erratically or not at all to the remote control | ☐ There are fresh batteries in the remote control. ☐ The front panel window is visible and you are pointing the remote control towards it. |
| The front panel display is blank | ☐ The display hasn't been turned off. Press the DISPLAY button on the front panel or remote control. |
| No picture is being produced | ☐ Your viewing device is turned on and switched to display your receiver. Test by pressing the MEMON on the receiver or on the remote and look for the main menu screen on your display device. ☐ The correct video input is selected on the receiver. ☐ The video source is on, is operating normally, and is in 'play' mode if appropriate. |
| There are bright edges or 'ghosts' on the picture | ☐ Ensure the 'sharpness' control on your display device is switched off or set to near minimum. ☐ For hdm connections, try using a shorter cable or alternatively a different brand. |
| No sound is produced | ☐ The correct input has been selected. ☐ The audio source has been set correctly in the 'input config' Menu ☐ The source equipment is on, is operating normally and is in 'play' mode if appropriate. ☐ The volume is turned up to a reasonable level and the receiver is not in mute mode. |
| The sound is poor or distorted | ☐ You have not excessively increased the input sensitivity (i.e. Reduced the maximum input signal voltage) in the input config. Menu if an analog input is being used. ☐ You have selected the correct size of speakers to suit your system in the setup menu. |
| Problem Check the following | |
| Sound only comes from some of the speakers. | ☐ You have an appropriate surround source selected and playing. ☐ The 3D/DVD disc is encoded in the appropriate format, and the correct format has been selected in the disc start menu of the bo player (if applicable). ☐ The BD/DVD player has been set to output 'bilstream' audio on the digital output. ☐ The display window indicates that the disc you are playing is a multichannel recording (you may need to press the INR@y several times until you get to the 'incoming format' display). ☐ All the speakers are correctly connected to the speaker terminals and are secure. ☐ You have not selected 'stereo' as the decoding mode. ☐ Your speaker balance is correct. ☐ You have configured the receiver to include all the speakers in your system. |
| Unable to select Dolby or DIS decoding modes | ☐ The receiver can only apply Dolby an DIS decoding to sources which have been encoded in the same format. ☐ Check that: ☐ Digital source is selected and connected. ☐ The source is playing appropriately encoded material. ☐ The BD/DVD disc is encoded in the appropriate format and that the correct format has been selected in the disc start menu of the bid player (if applicable). ☐ The BD/DVD player has been set to output 'birstream' audio on the digital output. |
| When playing a Dolby BD/DVD, the AV selects Dolby Surround | ☐ You have a digital connection from your 3D/DVD player. ☐ Sometimes dolby BD/DVD discs contain material at either beginning or the end of the main movie that is not in full 5.1 format, but in two channels. |
| Hum on an analog input | ☐ All cables are making a good connection. If necessary remove the cable from the connector and plug it fully in again (turn the power off before doing this). ☐ The connectors inside the source cable connector are not broken or badly soldered. ☐ If the num originates only when one particular source component is connected, that an antenna cable, or save the connection to this source is ground isolated. Contact your installation contractor. |
Problem Check the following
| There is radio or television reception interference | ☐ Where the interference is coming from. Switch off each source component in turn, then any other equipment. Most electronic equipment does generate low levels of interference.☐ Try re-arranging cabling from the nuisance source away from other cabling.☐ Ensure that the cabling used is high quality, specified for its purpose, and is properly shielded.☐ If the problem persists, contact your dealer. |
| The source changes randomly or freezes on one source | ☐ There are no static or impulse interference problems caused by nearby power equipment switching, such as heating or air conditioning control. Switch the receiver off, wait ten seconds, then switch it on again to clear an operating problem. Contact your installer if the problem returns or persists.☐ There is no direct sunlight shining on the infra-red detector behind the front panel display. |
| Volume is always too loud when I turn on | ☐ The 'max on volume' setting is not set too high. |
| If files on a NAS drive cannot be played | ☐ The files are in a compatible format.☐ The computer is connected via a network and not USB – the Receiver USB port cannot be used for a direct connection to a computer |
| If you cannot connect to a wired network | ☐ The Ethernet cable you are using is correctly connected between the receiver and the network hardware.☐ The network is set up for fixed is addressing and you have the Receiver set to use DHCP.☐ The network is set up for DHCP and you have the receiver set to use fixed IP addressing. |
| If you cannot connect to a favourite internet radio station | ☐ The station is still broadcasting or is not congested – try again later. |
| If the internet radio station sound quality is poor or broken | ☐ The radio station has a low bit rate (use the INFO key to find this).☐ The network is not slow or congested. |
Specifications
SDP-58
| Stereo line inputs | |
| Maximum input | 4.5V rms |
| Nominal sensitivity | 1V, 2V, 4V (user adjustable) |
| Input impedance | 47kΩ |
| Signal/noise ratio (A-wid ref 100W)normal/stereo direct | 100dB/110dB |
| Frequency response | 20Hz 20kHz ± 0.1dB |
| Preamplifier outputs | |
| Nominal output level (single-ended/balanced) | 1V RMS/2V RMS (max. 5V RMS/10 V RMS) |
| Output impedance | 560Ω |
| THD+N (20Hz—20kHz) | -100c3 |
| Headphone output | |
| Maximum output level into 32Ω | 5Wrms |
| Output impedance | <100Ω |
| General | |
| Mains voltage | 110–120V or 220–240V, 50–60Iz |
| Power consumption (maximum) | 50W (thermal dissipation approx. 170 61.1/hour) |
| Power consumption (idle, typical) | 40W (thermal dissipation approx. 170 61.1/hour) |
| Power consumption (standby) | <0.5W |
| Dimensions W x D(including speaker terminals) x H (including feet) | 433 x 425 x 171 mm |
| Weight (net) | 10.6kg |
| Weight (packed) | 13.9kg |
| Supplied accessories | AC coreRemote control with 2 x AAA batteriesManualDAB/Td antenna3 x Wi-Fi/Bluetooth antennasCalibration microphoneUSB cable |
| E&OE | |
| NOTE: All specification values are typical unless otherwise stated. | |
Continual improvement policy: JBL Synthesis has a policy of continual improvement for its products. This means that designs and specifications are subject to change without notice.
SDR-38
| Continuous power output, per channel, 8Ω/4Ω | |
| 2 channels driven, 20Hz - 20kHz, <0.07% I-HI> | 120W/700W |
| 2 channels driven, 1kHz, 0.7% I-HI> | 140W/770W |
| 7 channels driven, 1kHz, 0.7% I-HI> | 100W/180W |
| Residual noise & hum (A wtd) | <0.15mV |
| Stereo line Inputs | |
| Maximum input | 4.5V rms |
| Nomina sensitivity | 1V, 2V, 4V (user adjustable) |
| Input impedance | 4/8Ω |
| Signal/noise ratio (A-wto ref 100W) norma/stereo direct | 100dB/110dB |
| Frequency response | 20Hz - 20kHz ± 0.1dB |
| Preamplifier outputs | |
| Nomina output level | 1V RMS (max. 5V RMS) |
| Output impedance | 560Ω |
| TIID-N (20I Hz - 20N Hz) | -100dB |
| Headphone output | |
| Maximum output level into 32Ω | 59ms |
| Output impedance | <100Ω |
| General | |
| Mains voltage | 110-120V or 220-240V, 50-60Hz |
| Power consumption (maximum) | 1.5kW (Thermal dissipation approx. 5200 BTU/hour) |
| Power consumption (idle, typical) | 100W (Thermal dissipation approx. 340 BTU/hour) |
| Power consumption (standby) | <0.5W |
| Dimensions W x D(including speaker terminals) x H (including feet) | 433 x 425 x 171mm |
| Weight (net) | 18.1kg |
| Weight (packed) | 21.4kg |
| Supplied accessories | AC cordRemote control with 2 x AAA batteriesManualDAB/HM antenna3 x WIH/Bluetooth antennasCalibration microphoneUSB cacle |
| E&OE | |
| NOTE: All specification values are typical unless otherwise stated. | |
Worldwide Guarantee
This enties you to have the unit repaired free of charge, during the first five years after purchase, provided that it was originally purchased from a Certified JBL Synthesis dealer. The JBL Synthesis dealer is responsible for all after-sales service. The manufacturer can take no responsibility for defects arising from accident, misuse, abuse, wear and tear, neglect or through unauthorized adjustment and/or repair neither can they accept responsibility for damage or loss occurring during transit to or from the person claiming under the guarantee.
The warranty covers:
Parts (excluding disc drives) and labour costs for five years from the purchase date (see below for additional terms and conditions). After five years you must pay for both parts and labour costs.
Disc drives (of any type) are covered under this warranty for two years from the purchase date.
The warranty does not cover battery replacement at any time.
The warranty does not cover transportation costs at any time.
Claims under guarantee
This equipment should be backed in the original packing and returned to the dealer from whom it was purchased. It should be sent with shipping costs prepaid by a reputable carrier – not by the post office. No responsibility can be accepted for the unit while in transit to the dealer or distributor and customers are therefore advised to insure the unit against loss or damage while in transit.
For further details contact JBL Synthesis at csupport@harman.com.
Problems?
If your JBL Synthesis dealer is unable to answer any query regarding this or any other JBL Synthesis product please contact JBL Synthesis Customer Support at the above address and we will do our best to help you.
On-line registration
You can register your product online at www.jblsynthesis.com.
JBL
SYNTHESIS®
PROCESSEURS DE SON AMBIOPHONIQUE IMMERSIF
SDR-38 / SDP-58
SAT, PVR, BD, CD, STB, AV
STB, JEU, AV, BD, PVR, CD
Configuration Airplay
Connexion par fil
Modes sources multicanaux
PVR, UHD, BD, SAT, AV, GAME, STB
Digitale Audioanschlüsse
SAT, PVR, BD, CD, STB, AV
STB, GAME, AV, BD, PVR, CD
PVR, UHD, BD, SAT, AV, GAME, STB
SAT, PVR, BD, CD, STB, AV
STB, GAME, AV, BD, PVR, CD
Verborgen commando's
Stand-by: in stand-by
□ Aan: /an
Tweekanaals bronmodi
PVR, UHD, BD, SAT, AV, GAME, STB
SAT, PVR, BD, CD, STB, AV
STB, GAME, AV, BD, PVR, CD
The Ground Truth image displays a single, solid horizontal line. According to Rule 2 (UNDERSCORE & LINE RULES), this is a stylistic or background line, not a placeholder underscore. Therefore, the OCR result must ignore it and output nothing or only meaningful text. The provided OCR content is "____", which consists of four underscores. This is an incorrect interpretation of the line as a placeholder, violating the rule that stylistic lines must be ignored. The OCR has hallucinated placeholder underscores where none should exist in the GT. Hence, the OCR result is inconsistent with the Ground Truth.
PVR, UHD, BD, SAT, AV, GAME, STB
SAT, PVR, BD, CD, STB, AV
STB, GAME, AV, BD, PVR, CD
PVR, UHD, BD, SAT, AV, GAME, STB
SAT, PVR, BD, CD, STB, AV
STB, GAME, AV, BD, PVR, CD
L Surround (ad es, Dolby Surround, DTS NeuralX, ecc.) C Stereo.
몰입형 서라운드 사운드 프로세서
SDR-38 / SDP-58
PVR, UHD, BD, SAT, AV, GAME, STB
SAT, PVR, BD, CD, STB, AV
STB, GAME, AV, BD, PVR, CD
| ○ | 한번 누름 --- --- --- --- --- --- --- --- --- --- --- --- --- --- --- --- --- --- --- --- --- --- --- --- --- --- --- --- --- --- --- --- --- --- --- --- --- --- --- --- --- --- --- --- --- --- --- --- --- --- --- --- --- --- --- --- --- --- --- --- --- --- --- --- --- --- --- --- --- --- --- --- --- --- --- --- --- --- --- --- --- --- --- --- --- --- --- --- --- --- --- --- --- --- --- --- --- --- --- --- --- --- --- --- --- --- --- --- --- --- --- --- --- --- --- --- --- --- --- --- --- --- --- --- --- --- --- --- --- --- --- --- --- --- --- --- --- --- --- --- --- --- --- --- --- --- --- --- --- --- --- --- --- --- --- --- --- --- --- --- --- --- --- --- --- --- --- --- --- --- --- --- --- --- --- --- --- --- --- --- --- --- --- --- --- --- --- --- --- --- --- --- --- --- --- --- --- --- --- --- ---- --- --- --- --- --- --- --- --- --- --- --- --- --- --- --- --- --- --- --- --- --- --- --- --- --- --- --- --- --- --- --- --- --- --- --- --- --- --- --- --- --- --- --- --- --- --- --- --- --- --- --- --- --- --- --- --- --- --- --- --- --- --- --- --- --- --- --- --- --- --- --- --- --- --- --- --- --- --- --- --- --- --- --- --- --- --- --- --- --- --- --- --- --- --- --- --- --- --- ------ --- --- --- --- --- --- --- --- --- --- --- --- --- --- --- --- --- --- --- --- --- --- --- --- --- --- --- --- --- --- --- --- --- --- --- --- --- --- --- --- --- --- --- --- --- --- --- --- --- --- --- --- --- --- --- --- --- --- --- --- --- --- --- --- --- --- --- --- --- --- --- --- --- --- --- --- --- --- --- --- --- --- --- --- --- --- --- --- --- --- --- --- --- --- --- --- --- --- --- ------- --- --- --- --- --- --- --- --- --- --- --- --- --- --- --- --- --- --- --- --- --- --- --- --- --- --- --- --- --- --- --- --- --- --- --- --- --- --- --- --- --- --- --- --- --- --- --- --- --- --- --- --- --- --- --- --- --- --- --- --- --- --- --- --- --- --- --- --- --- --- --- --- --- --- --- --- --- --- --- --- --- --- --- --- --- --- --- --- --- --- --- --- --- --- --- --- --- --- --- ----- --- --- --- --- --- --- --- --- --- --- --- --- --- --- --- --- --- --- --- --- --- --- --- --- --- --- --- --- --- --- --- --- --- --- --- --- --- --- --- --- --- --- --- --- --- --- --- --- --- --- --- --- --- --- --- --- --- --- --- --- --- --- --- --- --- --- --- --- --- --- --- --- --- --- --- --- --- --- --- --- --- --- --- --- --- --- --- --- --- --- --- --- --- --- --- --- --- --- --- — --- --- --- --- --- --- --- --- --- --- --- --- --- --- --- --- --- --- --- --- --- --- --- --- --- --- --- --- --- --- --- --- --- --- --- --- --- --- --- --- --- --- --- --- --- --- --- --- --- --- --- --- --- --- --- --- --- --- --- --- --- --- --- --- --- --- --- --- --- --- --- --- --- --- --- --- --- --- --- --- --- --- --- --- --- --- --- --- --- --- --- --- --- --- --- --- --- --- --- {{}} --- --- --- --- --- --- --- --- --- --- --- --- --- --- --- --- --- --- --- --- --- --- --- --- --- --- --- --- --- --- --- --- --- --- --- --- --- --- --- --- --- --- --- --- --- --- --- --- --- --- --- --- --- --- --- --- --- --- --- --- --- --- --- --- --- --- --- --- --- --- --- --- --- --- --- --- --- --- --- --- --- --- --- --- --- --- --- --- --- --- --- --- --- --- --- --- --- --- --- ● --- --- --- --- --- --- --- --- --- --- --- --- --- --- --- --- --- --- --- --- --- --- --- --- --- --- --- --- --- --- --- --- --- --- --- --- --- --- --- --- --- --- --- --- --- --- --- --- --- --- --- --- --- --- --- --- --- --- --- --- --- --- --- --- --- --- --- --- --- --- --- --- --- --- --- --- --- --- --- --- --- --- --- --- --- --- --- --- --- --- --- --- --- --- --- --- --- --- --- === --- --- --- --- --- --- --- --- --- --- --- --- --- --- --- --- --- --- --- --- --- --- --- --- --- --- --- --- --- --- --- --- --- --- --- --- --- --- --- --- --- --- --- --- --- --- --- --- --- --- --- --- --- --- --- --- --- --- --- --- --- --- --- --- --- --- --- --- --- --- --- --- --- --- --- --- --- --- --- --- --- --- --- --- --- --- --- --- --- --- --- --- --- --- --- --- --- --- --- --------------- --- --- --- --- --- --- --- --- --- --- --- --- --- --- --- --- --- --- --- --- --- --- --- --- --- --- --- --- --- --- --- --- --- --- --- --- --- --- --- --- --- --- --- --- --- --- --- --- --- --- --- --- --- --- --- --- --- --- --- --- --- --- --- --- --- --- --- --- --- --- --- --- --- --- --- --- --- --- --- --- --- --- --- --- --- --- --- --- --- --- --- --- --- --- --- --- --- --- ------- ------- ------- ------- ------- ------- ------- ------- ------- ------- ------- ------- ------- ------- ------- ------- ------- ------- ------- ------- ------- ------- ------- ------- ------- ------- ------- ------- ------- ------- ------- ------- ------- ------- ------- ------- ------- ------- ------- ------- ------- ------- ------- ------- ------- ------- ------- ------- ------- ------- ------- ------- ------- ------- ------- ------- ------- ------- ------- ------- ------- ------- ------- ------- ------- ------- ------- ------- ------- ------- ------- ------- ------- ------- ------- ------- ------- ------- ------- ------- ------- ------- ------- ------- ------- ------- ------- ------- ------- ------- ------- ------- ------- ------- ------- ------- ------- ------- ------- ---------------- ------- ------- ------- ------- ------- ------- ------- ------- ------- ------- ------- ------- ------- ------- ------- ------- ------- ------- ------- ------- ------- ------- ------- ------- ------- ------- ------- ------- ------- ------- ------- ------- ------- ------- ------- ------- ------- ------- ------- ------- ------- ------- ------- ------- ------- ------- ------- ------- ------- ------- ------- ------- ------- ------- ------- ------- ------- ------- ------- ------- ------- ------- ------- ------- ------- ------- ------- ------- ------- ------- ------- ------- ------- ------- ------- ------- ------- ------- ------- ------- ------- ------- ------- ------- ------- ------- ------- ------- ------- ------- ------- ------- ------- ------- ------- ------- ------- ------- ------- -------- ------- ------- ------- ------- ------- ------- ------- ------- ------- ------- ------- ------- ------- ------- ------- ------- ------- ------- ------- ------- ------- ------- ------- ------- ------- ------- ------- ------- ------- ------- ------- ------- ------- ------- ------- ------- ------- ------- ------- ------- ------- ------- ------- ------- ------- ------- ------- ------- ------- ------- ------- ------- ------- ------- ------- ------- ------- ------- ------- ------- ------- ------- ------- ------- ------- ------- ------- ------- ------- ------- ------- ------- ------- ------- ------- ------- ------- ------- ------- ------- ------- ------- ------- ------- ------- ------- ------- ------- ------- ------- ------- ------- ------- ------- ------- ------- ------- ------- ------- ----- ------- ------- ------- ------- ------- ------- ------- ------- ------- ------- ------- ------- ------- ------- ------- ------- ------- ------- ------- ------- ------- ------- ------- ------- ------- ------- ------- ------- ------- ------- ------- ------- ------- ------- ------- ------- ------- ------- ------- ------- ------- ------- ------- ------- ------- ------- ------- ------- ------- ------- ------- ------- ------- ------- ------- ------- ------- ------- ------- ------- ------- ------- ------- ------- ------- ------- ------- ------- ------- ------- ------- ------- ------- ------- ------- ------- ------- ------- ------- ------- ------- ------- ------- ------- ------- ------- ------- ------- ------- ------- ------- ------- ------- ------- ------- ------- ------- ------- ------- ------ ------- ------- ------- ------- ------- ------- ------- ------- ------- ------- ------- ------- ------- ------- ------- ------- ------- ------- ------- ------- ------- ------- ------- ------- ------- ------- ------- ------- ------- ------- ------- ------- ------- ------- ------- ------- ------- ------- ------- ------- ------- ------- ------- ------- ------- ------- ------- ------- ------- ------- ------- ------- ------- ------- ------- ------- ------- ------- ------- ------- ------- ------- ------- ------- ------- ------- ------- ------- ------- ------- ------- ------- ------- ------- ------- ------- ------- ------- ------- ------- ------- ------- ------- ------- ------- ------- ------- ------- ------- ------- ------- ------- ------- ------- ------- ------- ------- ------- ------- ------------- ------- ------- ------- ------- ------- ------- ------- ------- ------- ------- ------- ------- ------- ------- ------- ------- ------- ------- ------- ------- ------- ------- ------- ------- ------- ------- ------- ------- ------- ------- ------- ------- ------- ------- ------- ------- ------- ------- ------- ------- ------- ------- ------- ------- ------- ------- ------- ------- ------- ------- ------- ------- ------- ------- ------- ------- ------- ------- ------- ------- ------- ------- ------- ------- ------- ------- ------- ------- ------- ------- ------- ------- ------- ------- ------- ------- ------- ------- ------- ------- ------- ------- ------- ------- ------- ------- ------- ------- ------- ------- ------- ------- ------- ------- ------- ------- ------- ------- ------- --------- ------- ------- ------- ------- ------- ------- ------- ------- ------- ------- ------- ------- ------- ------- ------- ------- ------- ------- ------- ------- ------- ------- ------- ------- ------- ------- ------- ------- ------- ------- ------- ------- ------- ------- ------- ------- ------- ------- ------- ------- ------- ------- ------- ------- ------- ------- ------- ------- ------- ------- ------- ------- ------- ------- ------- ------- ------- ------- ------- ------- ------- ------- ------- ------- ------- ------- ------- ------- ------- ------- ------- ------- ------- ------- ------- ------- ------- ------- ------- ------- ------- ------- ------- ------- ------- ------- ------- ------- ------- ------- ------- ------- ------- ------- ------- ------- ------- ------- ------- -------------------------- | 10000000000000000000000000000000000000000000000000000000000000000000000000000000000000000000000000000 | 1000000000000000000000000000000000000000000000000000000000000000000000000000000000000000000000000 | 15000000000000000000000000000000000000000000000000000000000000000000000000000000000000000000000000000 | | 15000000000000000000000000000000000000000000000000000000000000000000000000000000000000000000000000 | 120000000000000000000000000000000000000000000000000000000000000000000000000000000000000000000000000001 | 180000000000000000000000000000000000000000000000000000000000000000000000000000000000000001 | 2500000000000000000000000000000000000000000000000000000000000000001 | 320000000000000000000000000000000000000000000000000000000001 | 380000000000000000000000000000000000000000000000001 | 4500000000000000000000000000000000000000001 | 52000000000000000000000000000000000000001 | 580000000000000000000000000000001 | 6200000000000000000000000000001 | 6800000000000000000000000001 | 7500000000000000000000000001 | 7800000000000000000000001 | 820000000000000000000001 | 8500000000000000000001 | 880000000000000000001 | 920000000000000000001 | 95000000000000000001 | 9800000000000000001 | 10200000000000000001 | 112000000000000001 | 1180000000000011111111111111111111111111111111111111111111111111111111111111111111111111111111111111111111111111112 | 1250000000000111111111111111111111111111111111111111111111111111111111111111111111111111111111111111112 | 1350000000011111111111111111111111111111111111111111111111111111111111111111111111111111111111111111112 | 145000000011111111111111111111111111111111111111111111111111111111111111111111111111111111112 | 1550000000111111111111111111111111111111111111111111111111111111111111111111111111111111111111111111112 | 165000000011111111111111111111111111111111111111111111111111111111111111111111111111111111112 | 17500000001111111111111111111111111111111111111111111111111111111112 | 185000000011111111111111111111111111111111111111111111111111112 | 195000000011111111111111111111111111111111111111111111112 | 205000000011111111111111111111111111111111112 | 21500000001111111111111111111111111111112 | 22500000001111111111111111111111111112 | 23500000001111111111111111111111112 | 2450000000111111111111111111112 | 25500000001111111111111111112 | 26500000001111111111111111112 | 27500000001111111111111111112 | 2850000000111111111111111112 | 295000000011111111111111112 | 30500000001111111111111112 | 31500000001111111111111112 | 3250000000111111111111112 | 335000000011111111111112 | 34500000001111111111112 | 35500000001111111111112 | 36500000001111111111112 | 37500000001111111111112 | 38500000001111111111112 | 3950000000111111111112 | 40500000001111111111112 | 41500000001111111111112 | 4250000000111111111112 | 4350000000111111111112 | 4450000000111111111112 | 4550000000111111111112 | 4650000000111111111112 | 4750000000111111111112 | 4850000000111111111112 | 4950000000111111111112 | 5050000000111111111112 | 5150000000111111111112 | 5250000000111111111112 | 5350000000111111111112 | 5450000000111111111112 | 5550000000111111111112 | 5650000000111111111112 | 5750000000111111111112 | 5850000000111111111112 | 5950000000111111111112 | 6050000000111111111112 | 6150000000111111111112 | 6250000000111111111112 | 6350000000111111111112 | 645000000011111111112 | 655000000011111111112 | 665000000011111111112 | 675000000011111111112 | 685000000011111111112 | 695000000011111111112 | 705000000011111111112 | 715000000011111111112 | 725000000011111111112 | 735000000011111111112 | 745000000011111111112 | 755000000011111111112 | 765000000011111111112 | 775000000011111111112 | 785000000011111111112 | 795000000011111111112 | 805000000011111111112 | 815000000011111111112 | 825000000011111111112 | 835000000011111111112 | 845000000011111111112 | 855000000011111111112 | 865000000011111111112 | 875000000011111111112 | 885000000011111111112 | 895000000011111111112 | 905000000011111111112 | 915000000011111111112 | 925000000011111111112 | 935000000011111111112 | 94500000001111111112 | 95500000001111111112 | 96500000001111111112 | 97500000001111111112 | 9850000000111111112 | 995000000011111112 | 1055000000 | 995555555555555555555555555555555555555555555555555555555555555555555555555555555555555555555555555555 | | 2555555555555555555555555555555555555555555555555555555555555555555555555555555555555555555555555555 | 265555555555555555555555555555555555555555555555555555555555555555555555555555555555555555555555555557 | 275555555555555555555555555555555555555555555555555555555555555555555555555555555555555555555555555556 | 285555555555555555555555555555555555555555555555555555555555555555555555555555555555555556 | 2955555555555555555555555555555555555555555555555555555555555555555555555555556 | 305555555555555555555555555555555555555555555555555555555555555555555555555555555555556 | 3155555555555555555555555555555555555555555555555555555555555555555555555555555555556 | 325555555555555555555555555555555555555555555555555555555555555555555555555555556 | 33555555555555555555555555555555555555555555555555555555555555555556 | 3455555555555555555555555555555555555555555555555555555555555556 | 355555555555555555555555555555555555555555555555555555555555556 | 36555555555555555555555555555555555555555555555555555556 | 375555555555555555555555555555555555555555555555555556 | 38555555555555555555555555555555555556 | 39555555555555555555555555555555556 | 405555555555555555555555556 | 4155555555555555555555556 | 42555555555555555555556 | 435555555555555556 | 4455555555555556 | 455555555555556 | 4655555555556 | 475555555556 | 48555555556 | 49555555556 | 5055555556 | 515566666666666666666666666666666666666666666666666666666666666666666666666666666666666666666666666666667 | 499999999999999999999999999999999999999999999999999999999999999999999999999999999999999999999999999998999999999999999999999999999999999999999999999999999999999999999999999999999999999999999999999999999 |
Chromecast built-in 설정
유선 연결
Note - for JBL Synthesis amps: 001 = RCS code 16 002 = RCS code19
| Lumen | 139 052 159 115(0)410 |
| DLI | 0.6 |
| Magratau | 066 151 152 228 |
| Akantiz | 006 028 331 393(0) 6 429 251250 79 289 |
| Makushi | 238 286 |
| Meridian | 100 012 213 |
| Muuklan | 2 2 242 201 |
| Mendial 157 158 04 | 2 013081 17 |
| Musical Tidality 847 | 848 |
| Myricus 276 293 | |
| Nod 113 283 478 479 | |
| Nolin | 531 534 535 |
| Nikomini | 640 344 245 177145 347 |
| Nrc | 1.76 |
| Nilat | 408 |
| Orkovo | 21 046 108 060239 272 |
| Ocimum | 526 |
| Outow 242 | |
| Panasonic | 052 155 219 177292 383 |
| Paseound | 129 30 132 251116 035 078 109490 |
| Philips 249 250 251 | 268119 806 |
| Floraxel | 074 011 259 159116 035 078 109490 |
| Pokasulo | 215 |
| Prismar | 461 467 467 464451 |
| Proclus 111 259 | |
| RCA | 010 09 117 156087 288 |
| Rodricle | 016 056 021 075074 14 |
| Vitel | 04 04 01 029 |
| Kurzond | 3 9 351 452 |
| Samsung | 016 804 |
| Samsa D40 548 110 | 100350 288 |
| Sanio | 247 |
| Scott | 019 051 |
| Shita | 026 091 026 175 |
| Sherwood | 021 102 105 777 |
| Silica | 355 |
| Sony 018 247 248 166 | |
| Summe | 101 34 218 271369 572 380 |
| SSI | 268 |
| Suguen | 430 |
| Sunfire | 144 145 3 636 |
| Systemine | 759 |
| Teac | 025 019 0 9 00212 217 |
| Terminix | 122 176 103 319128 78 297292 |
| Theta Digital | 156 |
| Toshiba | 060 087 139 278 |
| XM satellite Radio | 212 |
| Yamaha | 026 252 169 067 |
| 173 297 232 089 | |
| 254 274 283 375 | |
| 873 597 | |
| Zenith | 143 210 |
CD
| Album 062 432 | |
| Aloa 089 170 107 | |
| Alo 202 | |
| Azo 231 332 | |
| Artem | 107 218 275 |
| Ardo Ferres | 119 42 |
| Ado Fure | 85 |
| Ardo Technicals | |
| California Auto | 47 006 |
| Cambridge Auto 38 | |
| Caver 80 241 250 05/ | |
| Cavon 180 154 152 | 128 138 205 67 |
| Clave | 267 |
| Creek | 159 |
| Denut | 002 123 |
| Emerson | 042 |
| Fiber | 050 188 131 008 |
| Geressa | 010 |
| Goldsior | 000 |
| Lemon Kurson | 033 047 308 |
| Luchs | 042 175 |
| Israel 130 | |
| Inugria | 298 |
| Ingeva | 070 773 |
| Krepeny | 41 |
| Jermain | 158 |
| AC | 004 091 136 153 |
| Kawasaki | 215 214 242 244 |
| Kenwood | 135 092 025 025 |
| Kuwait | 071 372 92 237 |
| Yell | 247 259 |
| Kyushu | 025 |
| Linn | 295 |
| Lowe | 256 |
| Luxam | 011 026 070 245 |
| Mazawa | 254 |
| Maneda | 107 |
| Maneda | 071 021 077 157 |
| Manzhou | 223 216 |
| Manzhou | 212 217 |
| Manzhou | 010 |
| Mashan | 107 |
| Mashashi | 179 |
| Mondua 147 | |
| Musical Flexibility 250 284 | |
| Mixed 244 355 | |
| Nod 009 000 064 178 | 293 |
| Nolanichi | 217 218 |
| NFC | 662 |
| Nikan | 546 |
| Non 00 | |
| Ohtyo | 057 058 059 168 |
| 107 | |
| Doromus | 012 014 016 |
| Fanzaoka | 147 172 338 068 |
| 248 | |
| Fansound | 255 240 |
| Philips 241 107 249 | |
| Pioneer | 010 020 1/4 1/2 |
| 178 | |
| Fritume | 286 |
| Fraced 238 | |
| Friduci | 107 |
| Quasar | 147 008 |
| RCA | 017 012 150 |
| Reebuck | 012 050 061 187 |
| Fuel | 107 181 179 259 |
| SAT 107 | |
| Samui 107 108 171 | 190 |
| 176 | |
| Sanyo | 013 |
| Sharp | 036 038 251 |
| Shorecord | 051 096 117 115 |
| 115 166 | |
| Signature | 233 |
| Sony 949 091 097 26 | |
| 133 177 226 167 | |
| Soundesign | 251 |
| Sumo | 155 |
| Sylvania | 107 |
| Symphonic | 032 |
| Tandy | 210 |
| Teac | 051 052 233 079 |
| Technique | 147 72 184 008 |
| 656 | |
| TheraDigital | 214 215 |
| Toshiba | 036 067 091 160 |
| 148 | |
| Vikur | 004 222 |
| Woros | 185 043 |
| Yamaha | 234 040 04 186 |
| 183 245 |
DVD
| Alwa 76 | |
| Ako 281 | |
| Alpine 098 | |
| Apex Digital 207 202 115 | |
| Avamo 001 | |
| Brockov 132 | |
| Cambridge Audio 215 323 333 | |
| Clerware 261 | |
| Coby 260 | |
| Cycometer 271 | |
| Daim 138 000/ 73 358 | |
| Duchard (91) | |
| Dof 300 000 17 | |
| Ercuree 251 143 | |
| FSI 143 | |
| Fisher 147 | |
| Huns 142 | |
| Go | 0,0 |
| Go 2 des | 15/09/ 220 221 |
| Goldster | 0,0 |
| Hermann Kordon | 0,4/ 40 |
| Hochi | 10 |
| Intal | 282 |
| Insigna | 143 |
| Integra | 142 558 |
| JBC | 061 |
| JWC | 0,2 |
| Kemsecond 151 | |
| Kiss | 279 |
| KI-1135 | |
| Kiel 104 | |
| Lexicon | 1/3 |
| LS | 09 057 |
| Linn | 306 309 |
| Ltron | 314 |
| Locke | 3/3 500 |
| Magrawa 001 398 145 262 | |
| Marantz | 085 092 |
| Medikan 128 | |
| Microsoft | 0,2 |
| Miltek 282 | |
| Microsoft 001 | |
| Myed | 102 34 |
| Nad 388 533 | |
| Neurichki | 05 |
| Oriyo | 076 111 1/2 338 |
| Ojoco | 347 |
| Opimus | 107 |
| Oilon | 130 |
| Panasonic 012 138 111 150 | |
| Papiya 083 095 168 344 | |
| Priimis Magnesnow | 14 001 |
| Pintcr | 073 099 099 107 |
| 106 123 024 024 | |
| Poland | 255 |
| Polkaudio | 14 001 |
| Primare | 198 144 |
| Piocan | 0,0 |
| ISA | 0,0 |
| Hotel 350 580 | |
| Samsung | 0,6/ 6/ 1/0 16/ 39 275 |
| Sonsat 130 | |
| Sanyo | 1/7 |
| Sens 130 | |
| Starp | 09" |
| Sherwood 245 245 245 245 245 245 245 245 245 245 245 245 245 245 245 245 245 245 245 245 245 245 245 245 245 24 | |
| Sonyo 033 118 145 126 | |
| Soyano | 191 289 242 242 242 242 242 242 242 242 242 242 242 242 242 242 242 242 242 242 242 242 242 242 242 242 242 24 |
| Supersam 142 | |
| SoCOCO | 1/3 |
| Syloma | 1/3 |
| Synchonic | 1/3 |
| Tag Manager 158 | |
| Taung | 107 |
| Tuc | 107 |
| Thomson | 0/2 |
| Thomson | 0/8 |
| Thompson | 0/7 |
| Toshiba | 130 14 164 168 168 168 168 168 168 168 168 168 168 168 168 168 168 168 168 168 168 168 168 168 168 168 168 168 16 |
| Venturer | 149 |
| Xbox | 0/2 |
| Yamama | 042 089 166 138 138 138 138 138 138 138 138 138 138 138 138 138 138 138 138 138 138 138 138 138 138 138 138 138 13 |
| Zenix | 05/051 |
DVD-TV combo
| Aika 1/8 | |
| Aka 281 | |
| Durchband 143 | |
| Tau | 143 |
| Tunai | 143 |
| Vagnia | 143 |
| Magnaviz 283 | |
| Minters 282 | |
| Samsung | 143 |
| Wolanda | 143 |
| Sylvania | 143 |
| Synchonic | 143 |
| Schiba | 143 |
DVD-TV-VCR combo
| Emerson 142 | |
| Insigna | 143 |
| Magnesus 142 | |
| Parasitic 144 | |
| Supersson 43 | |
| Sykana | 143 |
| Toshita | 164 |
DVD-VCR combo
| Gz Video | 15/ |
| Panasonic 130 | |
| Philips 001 VCR functioners2007 | |
| Samsung | 15/10/ |
| Sensal 120 |
| Sony 175 '9' | |
| Toshiba | 1/1 |
| ZenLH | 091 / WCR functions (0 ) |
DVD-Recorder
| Cyberborne 271 | |
| Givictro | 220,221 |
| Kim | 279 |
| Parasano c. 138 | |
| Samsung | 301 |
| Sony 191 | |
| Tovinta | 109 |
Blu-ray/HD-DVD
| Dinner 25K | |
| LG | 011 |
| Nad 323 | |
| Unips | 558 |
| Panasonic 235 | |
| Pioneer | 50/524 |
| Samsung | 273 |
| Sony 256 | |
| Toshiba | 279/526 |
| Yamaha | 157 |
Satellite STB
| Acoustic Solutions | 329.060 |
| Aura | 002 900 016 578 100 |
| Alba | 222 378 020 002 027 570 244 058 06 278 118 |
| Antifreeze | 3/3 |
| Acori 044 | |
| Asda 002 009 | |
| Astrenc | 011 |
| Astro | 0,4 |
| Aucolinite 007 | |
| Aurex 002 | |
| Black Diamond | 292 |
| Boca 024 | |
| Bush 002 007 009 111 | |
| 078 020 023 027 029 038 010 024 052 033 058 062 064 059 073 078 092 058 102 103 113 | |
| Cerog | 074 |
| Crown | 222 |
| Curis | 082 |
| Curis | 06 2022 |
| CYMOS | 129 |
| Dawson | 01 128 |
| Djublusion 228 011 | |
| Delphome | 322 020 003 |
| Delphome 392 016 |
| Dollabstream | 095 |
| Due | 066 089 120 |
| Dreams | 118 |
| Dual | 020 |
| Duodbrand 002 020 025 | |
| Eberdias | 062 |
| Evelam | 020 |
| EZ Box | 101 |
| Ferguson | 001 012 013 020074 062 072 073 |
| TelcoTV | 086 |
| Telco 071 100 | |
| Tecom 045 | |
| Teca 017 | |
| Ferrari | 009 0 |
| Gorso | 024 |
| Goodmans | 00.01 019 02002.02 025 02600.044 058 05400.060 071 088102 102 |
| Grunting | 001 002 004 00402.02 004 004 05903.061 085 083004 071 084 088 |
| Hirschman 024 | |
| Hitachi | 00.020 082 |
| Humax | 072 018 028 026049 049 050 051051 108 115 118117 |
| Kan 034 | |
| Kesypit | 098 090 095 |
| Inverio | 021 |
| Koche Fugria | 047 057 |
| Koche Frigida 043 | |
| Langair | 076 104 |
| Lirair | 001 030 035 073079 |
| Lidus 002 | |
| Logit 223 013 000 056 | 061 065 067 067 |
| Logiter | 014 |
| Levy | 073 085 |
| Luzon | 074 073 076 |
| Manhattan | 020 076 |
| Mashin 020 | |
| Masu | 002 011 061 |
| Madison | 024 |
| Mac | 051 081 |
| Metroni | 007 048 047 067066 072 073 07407 079 |
| Mou 016 | |
| Moyama SL | 024 |
| Muraly | 100 |
| Nulimer 023 | |
| Nikola | 085 |
| Omn | 007 026 |
| Pace | 057 078 075 |
| Pacific | 002 |
| Policorn | 017 |
| Panasonic 066 | |
| Pianx 097 | |
| Papiro 007 0 431 | 033 |
| 054 080 014 | |
| Pommer 548 254 052 16 | |
| Profile | 322 016 329 026 057 |
| Sagprom | 256 036 |
| Sagem | 308 015 054 101 |
| Samsung | 057 028 051 111 |
| Scientific Artrica SIS 322 | 08 |
| Santana | 007 |
| Shara | 676 579 293 088 |
| Sky | 043 054 115 |
| Sky digital 127 | |
| Sky HD | 130 |
| Sky | 138 |
| Skymatra 0.7 | |
| Sony CIS 110 | |
| Strong | 003 |
| ITC 391 | |
| Technia 302/0.00 0.00 0.00 | |
| Teledrome | 375 086 087 |
| Teledyneurite | 059 040 041 126 |
| Teledyneurite | 007 |
| Teledwood | 002 020 025 122 |
| Tevest 023 | |
| Leilon | 027 017 025 194 |
| Thompson | 000 002 042 015 079 13 |
| Top-Up TV 327 | |
| Topfide | 590 |
| Lodiba | 002 |
| Triax | 024 083 088 |
| TV Canada | 013 036 021 122 173 74 |
| TVF Digital | 227 |
| Virgin Media | 014 025 |
| Wales | 020 |
| Wiakeland | 002 020 075 |
| Wink | 257 |
| Xenius | 073 |
| Yamada | 026 |
| Zona 029 |
Satellite Radio
| Box | 555 |
| Depri | 515 |
| Polaradio | 515 |
| Ginio 555 | |
| Sony | 300 |
| XM Satellite Radio | 515 |
TV
| A25 Systems 163418 | |
| Acl | 299 |
| Achriad | 058 137 204 245 246 |
| Adjuvant | 159 219 |
| Avg 031 158 123 249 | 203 287 266 319 401 |
| Ag | 292 |
| Abi sions 131 | |
| Abstay | 144 |
| A## 27/38/07:09 | |
| 153 104 106 106 | |
| 142 149 153 156 | |
| 252 255 279 250 | |
| 255 275 279 280 | |
| 257 267 269 269 | |
| Akita Bao | |
| Aluia | 064 044 259 103 |
| 171 127 207 410 | |
| 428 430 431 | |
| Aliu | 655 254 259 876 |
| 128 127 152 75 | |
| 222 219 250 264 | |
| 325 307 309 | |
| Aliu | 964 |
| Alumar | 108 251 |
| Aliu | 250 |
| Amhut | 675 674 123 171 |
| 245 241 266 407 | |
| 403 | |
| Anan | 285 |
| Ankesson | 125 |
| Antech | 108 185 219 251 |
| 207 277 410 | |
| Anionc | 108 |
| Aneluru | 064 |
| Aoc | 016 |
| Arc En Cel | 173 175 |
| Arcell | 085 086 255 |
| Artem 085 250 | |
| Artem 127 250 | |
| Argos 150 | |
| Artsora | 109 111 119 122 |
| 270 | |
| Ara | 087 101 105 204 |
| Asborg | 185 267 |
| Araa | 171 410 |
| Atmosonic | 108 |
| Atura 149 | |
| Atitndic | 069 150 |
| Atusonic | 024 160 052 129 |
| 112 154 164 171 | |
| 185 218 250 263 | |
| 257 260 | |
| Aurora | 130 171 210 |
| Atorox | 123 158 159 165 |
| 187 259 262 | |
| Ava | 108 |
| Avaton | 127 |
| Avatun 109 | |
| Band | 052 188 |
| Bang 3 Gulben | 204 229 |
| Bark Line 033 108 | 120 170 |
| 216 267 277 | |
| Dour | 036 042 048 074 |
| 227 206 037 06 | |
| 111 131 132 14 | |
| 158 171 211 212 | |
| 216 217 233 253 | |
| 255 266 038 414 | |
| Boysonk 415 | |
| Beno 019 105 205 300 | |
| 128 117 130 95 | |
| 225 250 253 263 | |
| 259 | |
| Bestar | 108 116 245 |
| Best 222 | |
| Bestar | 066 106 245 |
| Bacc Diamond | 120 249 |
| Bacc Partner | 765 |
| Bluepoint 091 S32 085/97 | |
| 096 119 252 756 | |
| Blue Sky | 109 172 247 240 |
| 204 278 252 289 | |
| 407 | |
| Bluestar | 063 108 |
| Buenan | 262 |
| Buenos | 163 |
| Eudford | 419 |
| Brands | 173 179 193 195 |
| 270 | |
| Berkeley 204 265 | |
| Berkeley 205 | |
| Brother | 416 |
| Beans | 204 |
| Her | 144 147 |
| Born 201 051 069 074 | |
| 108 115 121 125 | |
| 135 144 212 245 | |
| 246 262 292 383 | |
| 296 297 323 514 | |
| 407 407 | |
| Camper | 285 |
| Cello | 301 312 511 512 |
| 315 318 | |
| Century | 165 204 |
| Eagle 165 245 265 270 | |
| Corn | 295 339 398 564 |
| Cle | 325 394 708 166 |
| 170 171 | |
| Canal | 272 |
| Chico | 501 294 697 |
| Carney | 161 252 228 |
| Casmonic | 364 374 108 109 |
| 141 158 185 186 | |
| 165 171 185 218 | |
| 249 252 275 301 | |
| 257 282 288 297 | |
| 292 457 433 410 | |
| Condor | 108 109 143 171 |
| 220 295 250 267 | |
| 418 | |
| Conic | 219 |
| Conoc | 225 |
| Conac | 141 252 |
| Cond 250 265 | |
| Continental / 2 | |
| Continental Edison | 172 178 179 195 |
| Conoco | 108 |
| Croway | 148 166 221 257 |
| Cowen | 053 085 086 090 |
| 109 144 171 185 | |
| 245 252 255 265 | |
| 261 257 257 282 | |
| 286 423 402 418 | |
| Co-Elect. units | 354 159 163 |
| Cat In | 111 363 |
| Dilutive | 108 407 |
| Danwick | 108 120 127 170 |
| 207 407 | |
| Danski | 219 410 |
| Dartes | 304 250 |
| Daytek | 194 |
| De Seaf | 194 |
| Dunica | 053 056 069 108 |
| 128 158 161 184 | |
| 189 407 | |
| Delker 249 | |
| Denmark | 604 127 292 403 |
| Desmer | 108 |
| Daim 27 | |
| Driason 225 | |
| Digmont 231 | |
| Dyge 197 | |
| Disney 062 | |
| Dimach 219 236 504 208 370 | |
| Dimachreal | |
| Included | 122 |
| Dornus 108 | |
| Dual 106 123 127 158 | |
| Current 087 102 105 109 | |
| Dunichland 249 780 | |
| F Max 164 | |
| bis 265 117 250 | |
| bdson 1/2 | |
| bdson Minew 1/2 | |
| Blue 06 07 1139 120 | |
| 44 100 195 203 229 242 246 259 407 | |
| Ellin 108 278 | |
| Elu 164 | |
| Elcain | 109 |
| Elcain Co | 250 |
| Elcua | 108 111 159 171 410 |
| Dickmania 285 108 116 274 | |
| Echma | 03 074 202 294 407 |
| Ellin 287 108 152 | |
| Ellie 251 113 210 | |
| Elcain | 144 185 |
| Hei 128 171 410 | |
| Emerson 296 103 216 449 | |
| Esc | 108 |
| Eton | 242 |
| buroline 295 | |
| Burshio+ | 053 144 158 160 61 165 |
| Ferrody | 42 407 |
| Evelux | 108 1 6 |
| Erica 1089 | |
| Esquak | 108 1 0 |
| Fenner | 108 171 249 251 |
| Fengsun | 032 078 165 162 19 158 155 273 201 270 |
| Fibels | 108 |
| Finlanda | 033 04 105 188 96 |
| Firlix | 031 066 069 074 102 123 126 165 159 181 128 140 111 155 159 161 166 226 234 251 273 276 279 295 307 |
| FinsLine | 108 144 158 206 401 253 264 273 294 |
| Hoffer | 03 102 226 158 1 9 221 233 |
| Hint 275 | |
| Force | 123 194 286 |
| Former | 108 109 110 119159 239 420 |
| Frasca | 108 343 |
| Hornachy | 106 129 106 171220 |
| Fulvio Certera | 098 159 197 247 |
| Fural | 279 264 285 293110 |
| Galaxy | 109 185 255 265 |
| Galaxy | 255 |
| Galeria | 17 |
| Gux. 137 147 168 161 | 171 198 262 269 |
| Gree | 179 147 199 186411 |
| Gezoto | 064 116 144 143164 171 |
| General | 171 |
| General Technic | 1 71 |
| Garlson 167 222 300 | |
| Goldfunk | 249 264 |
| Goldhard | 159 171 |
| Goldring 271 | |
| Goldman 318 074 000 08 | |
| Gooding | 110 165 144 149169 169 171 191216 237 247 250265 268 268 410 |
| Goodmuns | 172 |
| 031 063 061 068274 108 109 109110 115 120 123158 170 171 176187 194 195 194225 249 250 251261 268 269 270276 285 286 287325 305 306 307107 309 | |
| Goverje | 086 090 103 118249 374 784 |
| Grom 204 410 | |
| Graderine | 038 |
| Grace | 108 152 134 141145 147 149 156270 247 248 249250 263 265 41441 |
| Gran Nix | 061 127 234 407 |
| Granade 022 027 029 052 | |
| 233 035 039 041242 043 045 049251 047 050 076279 081 082 083288 084 085 091102 108 109 111118 128 134 135140 145 156 159167 184 189 191208 218 227 251276 331 34 | |
| Gurduh | 059 273 |
| Great Wall 074 128 | |
| Gurndig 031 063 069 073 | |
| 251 267 036 046252 100 101 106117 130 135 152187 194 207 210242 250 258 267457 | |
| Oak Road | |
| Oak Road | |
| Kale 282 | |
| Kale 313 |
| Hartucci | 267/085 100/1081/100 127/13716/144 149/13817/161 225/225229/218 253/251269/212 235/305102/24/12 |
| Hartucci | 161 |
| Hanlu | 159 |
| Hanva | 297 |
| Ili | 282 |
| Hi Bringer | 172 |
| Hon | 108/159 171/277410 |
| Lithieu | 173/79 |
| Limad | 064/108 177/22424/400 |
| Histova | 273 |
| Hisense | 812 |
| Hit | 294 |
| Hitachi | 022/069/04/03809/340/355/36904/011/333/35405/016/357/394108/115/120/125127/128/129/134145/140/147/147156/159/161/165186/189/183/219210/255/253/276249/285/251/411413/415/417/421423 |
| Iliu-273 | |
| III | 108/195/251 |
| Johor | 089/117/123/249250 |
| Harsa | 294 |
| Hyus-159/183/171 | 123 |
| Hosuri | 263/069/07/1081/8125/269/250263/064/293/207 |
| Lyanda 152/155 180/235 | 17 |
| Lombia | 44 |
| ce | 064/108/199/17409/400 |
| dea | 291/07 |
| Impela 138/135 113/12 | 124 |
| Ine | 154/165/229/24325/269/267/297 |
| Nogeli | 132/141/147/146212/111/273/279 |
| Ingersoll'171 | |
| Ino-Hc | 127/129/161/189237/215 |
| Inovastur 110 | |
| Intercial | 233 |
| Interluk | 067/108/132/114137/147/143165/176/212/24257/265/305/316 |
| Inevision | 285/085/108/113144/156/131/210 |
| porcar | 171 |
| nR11/11/5/24 | |
| nR14/Kynner | 323 |
| nrad | 024/108/163/237249/264/420 |
| skla 220 | |
| sc | 144/129 |
| tl | 171 |
| Ia. | 061 158 171 929410 |
| Jr. | 041 232 117 352144 140 141 144145 147 118 156158 242 241 250268 414 419 |
| Jetpoint 253Jm. 263Jssel 069 274 282 283Jc.K. Canada 107KabuKabulKamomsonKaposhKancherKahoreKanoKorinoKerinesKiryatKitonKresselKreching 386 764 274Koena 405Korino 410Kuba-IdemonicLaserLaserLaserLaserLaserLateral 426Lg.Lj | 120 159 279 709136 136 273127 269 273290 410289 141 147 48197241 247 108 109117 165 252 273274 263 269 407416187KaweKondoKondoKondoKondoKondoKondoKondoKondoKondoKondoKondoKondoKondoKondoKondoKondoKondoKondoKondoKondoKondoKondoKondoKondoKondoKondoKondoKondoKondoKondoKondoKondoKondoKondoKondo KondoKondoKondoKondoKondoKondoKondoKondoKondoKondoKondoKondoKondoKondoKondoKondoKondoKondoKondoKondoKondoKondoKondoKondoKondoKondoKondoKondoKondoKondoKondoKondoKondoKonskokokokokokokokokokokokokokokokokokokokokokokokokokokokokokokokokokokokokokokokokokokokokokokokokokokokokokokokokokokokokokokokokokokokokokokokokokokokokokokokokokokokokokokokokokokokokokokokokokokokokukokokokokokokokokokokokokokokokokokokokokokokokokokokokokokokokokokokokokokokokokokokokokokokokokokokokokokokokokokokokokokokokokokokokokokokokokokokokokokokokokokokokokokokokokokokokokokokokokokokokakokokokokokokokokokokokokokokokokokokokokokokokokokokokokokokokokokokokokokokokokokokokokokokokokokokokokokokokokokokokokokokokokokokokokokokokokokokokokokokokokokokokokokokokokokokokokokokokokokokoktokokokokokokokokokokokokokokokokokokokokokokokokokokokokokokokokokokokokokokokokokokokokokokokokokokokokokokokokokokokokokokokokokokokokokokokokokokokokokokokokokokokokokokokokokokokokokokokokokokokokoskokokokokokokokokokokokokokokokokokokokokokokokokokokokokokokokokokokokokokokokokokokokokokokokokokokokokokokokokokokokokokokokokokokokokokokokokokokokokokokokokokokokokokokokokokokokokokokokokokokukukukukukukukukukukukukukukukukukukukukukukukukukukukukukukukukukukukukukukukukukukukukukukukukukukukukukukukukukukukukukukukukukukukukukukukukukukukukukukukukukukukukukukukukukukukukukukukukukukukukutukukukukukukukukukukukukukukukukukukukukukukukukukukukukukukukukukukukukukukukukukukukukukukukukukukukukukukukukukukukukukukukukukukukukukukukukukukukukukukukukukukukukukukukukukukukukukukukukukukukuhukukukukukukukukukukukukukukukukukukukukukukukukukukukukukukukukukukukukukukukukukukukukukukukukukukukukukukukukukukukukukukukukukukukukukukukukukukukukukukukukukukukukukukukukukukukukukukukukukukukufukukukukukukukukukukukukukukukukukukukukukukukukukukukukukukukukukukukukukukukukukukukukukukukukukukukukukukukukukukukukukukukukukukukukukukukukukukukukukukukukukukukukukukukukukukukukukukukukukukukUKukukukukukukukukukukukukukukukukukukukukukukukukukukukukukukukukukukukukukukukukukukukukukukukukukukukukukukukukukukukukukukukukukukukukukukukukukukukukukukukukukukukukukukukukukukukukukukukukukukuk UKukukukukukukukukukukukukukukukukukukukukukukukukukukukukukukukukukukukukukukukukukukukukukukukukukukukukukukukukukukukukukukukukukukukukukukukukukukukukukukukukukukukukukukukukukukukukukukukukukukukunkukukukukukukukukukukukukukukukukukukukukukukukukukukukukukukukukukukukukukukukukukukukukukukukukukukukukukukukukukukukukukukukukukukukukukukukukukukukukukukukukukukukukukukukukukukukukukukukukukukukulkukukukukukukukukukukukukukukukukukukukukukukukukukukukukukukukukukukukukukukukukukukukukukukukukukukukukukukukukukukukukukukukukukukukukukukukukukukukukukukukukukukukukukukukukukukukukukukukukukukukukaufu kultak uks kultak uks kultak uks kultak uks kultak uks kultak uks kultak uks kultak uks kultak uks kultak uks kultak uks kultak uks kultak uks kultak uks kultak uks kultak uks kultak uks kultak uks kultak uks kultak uks kultak ukes kultak uks kultak uks kultak uks kultak uks kultak uks kultak uks kultak uks kultak uks kultak uks kultak uks kultak uks kultak uks kultak uks kultak uks kultak uks kultak uks kultak uks kultak uks kultak uks kultak ukauf kultak uks kultak uks kultak uks kultak uks kultak uks kultak uks kultak uks kultak uks kultak uks kultak uks kultak uks kultak uks kultak uks kultak uks kultak uks kultak uks kultak uks kultak uks kultak uks kultak ukuuf kultak uks kultak uks kultak uks kultak uks kultak uks kultak uks kultak uks kultak uks kultak uks kultak uks kultak uks kultak uks kultak uks kultak uks kultak uks kultak uks kultak uks kultak uks kultak uks kultak aks kultak aks kultak aks kultak aks kultak aks kultak aks kultak aks kultak aks kultak aks kultak aks kultak aks kultak aks kultak aks kultak aks kultak aks kultak aks kultak aks kultak aks kultak aks kultak aks kultak |
| Magnafion | 195 199 |
| Magnavonik | 108 |
| Magnarau | 251 |
| Magnuri | 601 674 252 25325467 |
| Manihatan | 249 254 |
| Maruti 108 | |
| Marival | 664 |
| Mamori 231 374 779 607 | |
| Marex | 108 |
| Marsut 275 012 051 | 060 |
| 362 063 069 072375 096 100 108116 36 154 159171 37 196 202269 250 407 405416 | |
| Mara-1 | 349 |
| Maraur 031 407 | |
| Medich | 631 674 108 110127 28 104 275269 29 252 254279 285 287 293407 408 |
| Megat | 225 |
| Magnores | 410 |
| Memory 285 | |
| Ment | 152 |
| Menter 135 | |
| Meta 034 152 259 397 | |
| 100 01 108 219269 254 364 265322 525 | |
| Mineroxay | 574 249 793 366282 295 |
| Mikami | 286 |
| Minerva 092 097 100 122232 | |
| Mira | 110 427 |
| Minshun 071 075 076 077 | |
| 079 29 130 204225 249 | |
| Mvar | 158 191 209 225259 367 562 |
| Miro | 531 323 003 |
| Mirova | 109 152 299 418 |
| Micaiic | 219 251 |
| Mi Legi 250 | |
| ML | 285 131 154 |
| Multitex 249 254 407 | |
| Multitech | 691 255 030 304159 29 471 183267 |
| Mungano 251 | |
| Nelio | 407 |
| Nekimura | 170 |
| Neuris | 137 |
| Neudermann | 037 013 258 393024 064 092 092100 01 16 119119 34 135 137159 49 564 311212 76 772 233252 29 351 205256 274 404 |
| No | 664 108 423 |
| Neutuni 125 249 250 | |
| Neus 293 | |
| Nike 106 | |
| Nike 219 | |
| Nikei 2 9 264 |
| Nikko | 108 |
| Nissen | 268 |
| Nobiliko | 188 222 267 |
| Nogomatis | 173 179 |
| Nokia | 602 074 112 113134 105 106 52140 112 113 26158 2 274 257275 376 794 4 |
| Nordamerika | 665 126 1 17 173179 193 195 749251 270 282 290 |
| Nordway | 213 |
| North | 108 |
| Norak 249 261 | |
| Nove | 987 |
| Newmont | 108 |
| Gromic 232 101 104 | 137142 156 76 |
| Okoro | 108 255 |
| Oreza 264 138 139 409 | 409 |
| 410 | |
| Ope's | 250 |
| Oreza | 690 008 129 120 |
| Ochiber | 980 |
| Orion | 692 058 293 392253 09 069 070374 108 118 26152 185 187 98152 205 207 29235 243 250 251259 407 409 410 |
| Orion 1H 262 041 08 | 118228 2 9 107 410 |
| Ormond 219 | |
| Oulai | 108 |
| Oulke | 059 060 111 115 |
| Ouwa | 418 |
| Oil | 981 088 204 282 |
| Oto-Versand | 656 627 036 042256 262 005 069274 081 082 083294 092 094 097122 101 108 101111 110 118 12112 131 152 159176 185 191 57159 213 214 215183 202 207 21225 215 216 217259 220 222 237259 270 277 280122 292 205 406423 412 |
| Oyo 050 098 108 | |
| Pacific | 663 169 738 749250 |
| Palladium | 601 106 118 122131 137 161 62171 279 242 249250 253 360 376253 307 |
| Panasonic 148 67 | 168 254421 407 403 404452 |
| Petro Linneta | 144 |
| Petro Marconi | 175 149 |
| Petro 164 144 149 | 124135 702 243 555262 262 |
| Philips | 357 008 009 019 |
| 620 021 055 062 | |
| 655 092 138 169 | |
| 111 112 116 119 | |
| 122 230 251 406 | |
| 451 412 | |
| Phoenix 11/190 22:2:0 | |
| Phoenix 090 108 110 | |
| Florier | 128 132 195 407 |
| Florier | 393 |
| Playmeric | 650 750 |
| Footpoint | 172 |
| Frontier | 166 209 |
| Frontier Finance | 147 161 |
| Frontier | 169 |
| Phe# 213 | |
| Phe# 249 | |
| Phe# 261 | |
| Po 201 407 | |
| Pele# 196 1/1 267 | |
| Pele# 031 071 108 291 | |
| 407 | |
| Postron# 128 185 | |
| Postne 128 120 138 29 | |
| 200 229 245 262 | |
| 270 268 285 297 | |
| Prun## 1'8 | |
| Pruch# 07 108 2 9 249 | |
| 264 | |
| Prinkler 056 128 109 120 | |
| 267 478 | |
| Pyc 108 109 351 | |
| Qu### 123 249 265 295 | |
| 251 | |
| Qu### 267 257 255 291 | |
| 242 237 284 282 | |
| 229 252 265 218 | |
| 212 236 213 212 | |
| 211 205 204 157 | |
| 195 195 171 159 | |
| 166 162 165 159 | |
| 158 163 144 142 | |
| 141 140 135 131 | |
| 139 138 116 112 | |
| 131 138 125 122 | |
| 101 105 057 395 | |
| 092 050 069 087 | |
| 086 047 042 092 | |
| 059 012 012 019 | |
| 036 037 025 | |
| Rodr#e 055 067 108 251 | |
| 430 | |
| Rodr#en# 108 61 164 | |
| Rodr#en# 161 | |
| Rodr#en# 374 085 085 71 | |
| 140 094 407 410 | |
| Ment#s#y#y | 252 |
| Murthy | |
| Roc# 128 269 | |
| Rod#f#tion | 137 |
| Rodr#ar | 397 467 |
| R#n# | 108 749 764 793 |
| Deo 229 | |
| Dov# | 131 |
| Roc 088 089 137 161 | |
| 297 345 246 247 | |
| Lift | 064 080 116 132 |
| 204 | |
| Eri 2000 | 008 291 261 |
| Roadslar | 063 055 082 108 |
| 117 144 245 253 | |
| 251 262 264 292 | |
| 289 | |
| Rubbrat# | 201 |
| Bol## | 17 |
| Bovesa | 249 283 |
| Rood | 277 410 |
| Rood#Jux | 282 |
| Sake 071 127 1-8 76 | |
| 373 179 193 195 | |
| 497 970 | |
| Nagom | 206 272 |
| Saito 1025 060 069 070 | |
| 536 159 270 | |
| Saklo | 167 410 |
| Suisse | 022 06/09/10 |
| 104 105 116 118 | |
| 132 134 155 157 | |
| 140 145 159 159 | |
| 237 212 219 221 | |
| 215 219 229 | |
| Simbers 101 103 264 | |
| Samsung | 05 006 108 126 |
| 159 171 220 221 | |
| 257 258 259 266 | |
| 410 | |
| Sonya | 108 |
| Sonyi 108 249 264 | 410 |
| Sony | 193 |
| Sonya 033 033 151 | 159 |
| 274 089 087 106 | |
| 123 159 189 218 | |
| 271 243 290 407 | |
| 414 420 | |
| Schulz Lorient | 024 108 1 6 117 |
| 130 161 167 48 | |
| 156 171 167 749 | |
| 250 254 255 271 | |
| 296 210 | |
| Schneider | 069 069 069 288 |
| 159 116 137 41 | |
| 152 158 159 766 | |
| 233 242 255 219 | |
| 250 251 267 269 | |
| 282 504 509 | |
| Schneider I 255 257 251 | |
| Seeker 255 | |
| Seg | 056 108 1 5 123 |
| 144 158 162 171 | |
| 185 219 219 261 | |
| 267 269 269 293 | |
| 410 | |
| Sachch | 767 407 |
| Sears 288 089 109 | 110 |
| 137 195 197 226 | |
| 239 265 269 747 | |
| 249 751 410 | |
| Soloc | 264 |
| Santos | 117 |
| Serrero 273 | |
| Sc | 024 |
| Sharp 023 031 032 038 | |
| 231 111 224 224 | |
| 410 | |
| System 106 749 | |
| Syntosh | 98 |
| Syndak | 76 44 249 264 |
| Sunera 128 161 185 201 | |
| Sentinel | 07 092 666 557 |
| 100 101 218 219 | |
| 221 256 294 | |
| Stee | 069 |
| Silva | 213 407 |
| Silva Schneider | 031 07 282 286 |
| 294 437 | |
| Silver | 064 074 171 204 |
| 277 410 | |
| Singr 225 | |
| Singr 009 109 104 | 185 |
| 204 241 | |
| Sindrace | 929 062 063 069 |
| 274 118 148 158 | |
| 167 195 196 204 | |
| 212 049 213 282 | |
| 407 | |
| Sky | 187 197 207 |
| Six | 204 407 |
| Smunders | 172 |
| Sino | 418 | |
| Solekar 2/2 | ||
| Sontron 129-307 | ||
| Sorica | 194 | |
| Sontrone 2/9 | ||
| Sunrun 140-156 | ||
| Sunarc | 108 | |
| Sany 072.2 1:212 213 | ||
| Sunderolor | 274 215 215 217 | |
| Sunderolor | 274 108 549 564 | |
| Sundero | 107 | |
| Standard 1/6 | ||
| Stefler 128 128 | ||
| Stefler 128 128 | ||
| Stefler 128 128 | ||
| Stefler 128 128 | ||
| Stefler 128 128 | ||
| Stefler 128 128 | ||
| Stefler 128 128 | ||
| Stefler 138 138 | ||
| Stefler 138 138 | ||
| Stefler 138 138 | ||
| Stefler 138 138 | ||
| Stefler 138 138 | ||
| Stefler 138 138 | ||
| Stefler 138 138 | ||
| Stefler 2/2 | ||
| Stefler 2/2 | ||
| Stefler 2/2 | ||
| Stefler 2/2 | ||
| Stefler 2/2 | ||
| Stefler 2/2 | ||
| Stefler 2/2 | ||
| Stefler 2/2 | ||
| Stefler 2/2 | ||
| Stefler 2/2 | 19 104 205 209 | |
| Stefler 2/2 | ||
| Stefler 2/2 | ||
| Stefler 2/2 | ||
| Stefler 2/2 | ||
| Stefler 2/2 | ||
| Stefler 2/2 | ||
| Stefler 2/2 | ||
| Stefler 2/2 | ||
| Stefler 2/2 | ||
| Stefler 2/2 | ||
| Stefler 2/2 | ||
| Stefler 2/2 | ||
| Stefler 2/2 | ||
| Stefler 2/2 | ||
| Stefler 2/2 | ||
| Stefler 2/2 | ||
| Stefler 2/2 | ||
| Stefler 2/2 |
| Tesla 095 214 091 708 | |
| 309 116 127 144 | |
| 1 0 160 204 229 | |
| 249 260 269 264 | |
| 275 282 407 | |
| Textron 127 225 269 255 | |
| 264 28 254 402 | |
| 408 | |
| Ikena | 409 |
| Thomson | 134 1/3 129 196 |
| 195 28 292 | |
| Thomson 12000 | 204 235 308 |
| Thomson Fas. 80 | 310 211 312 |
| Thom | 226 328 032 033 |
| 606 643 645 248 | |
| 92 765 057 267 | |
| 075 076 075 267 | |
| 097 102 155 126 | |
| 10 138 112 116 | |
| 120 128 132 138 | |
| 141 145 156 156 | |
| 160 160 169 169 | |
| 1 03 167 157 193 | |
| 189 165 168 168 | |
| 200 20 211 214 | |
| 216 224 232 242 | |
| 247 25 270 471 | |
| 414 415 416 | |
| Thorn-Houghton | 168 188 195 268 |
| 200 | |
| Tuba | 1 71 470 |
| Loyes 268 | |
| Lopine | 249 264 |
| Lopiston | 586 |
| Takahua 026 027 036 287 | |
| 042 043 045 047 | |
| 068 049 050 053 | |
| 091 100 073 203 | |
| 208 232 215 250 | |
| 268 284 415 | |
| Torumi 250 | |
| Towaca | 144 185 |
| Trans Conners | 569 |
| Telus | 120 264 293 |
| TriStar | 664 410 |
| Triumpa 075 219 734 | |
| TWF | 349 |
| TWF | 328 |
| Uber 089 108 13 | 149 |
| 786 139 238 249 | |
| Ultrasus | 108 148 164 182 |
| 209 | |
| Unmori 085 086 | |
| United 083 092 103 170 | |
| 250 263 262 288 | |
| Ursenium 005 074 082 | |
| 097 100 102 108 | |
| 104 105 108 128 | |
| 116 118 118 151 | |
| 118 119 122 129 | |
| 232 237 243 245 | |
| 269 260 263 270 | |
| 274 275 276 278 | |
| 389 393 | |
| Lincoln | 204 |
| Nestal | 128 110 124 125 |
| 243 249 254 265 | |
| 293 303 | |
| West | 414 |
| Alstomson 42: | |
| Alstomson | 410 |
| Alstomson 16: | |
| Alstomson | 18 194 |
| Videuton 141/145 173/95 | |
| 2014/10 | |
| Wistn | 108 149 249 |
| Videmaraga | 167 |
| Vog | 069 |
| Wavon 137 231 | |
| Walen 286 | |
| Waldan 134 165 159 171 | |
| 1/8 | |
| Waldon 2910/91 108 127 | |
| 179 71 194 216 | |
| 264 293 410 | |
| Ward Ratic 148 158 36 | |
| Wergencu 243 249 264 282 | |
| 408 | |
| Wolten | 230 |
| Wolthink 108 110 | |
| Worton 4 3 | |
| Wharfssale | 213 418 |
| White | 108 701 492 263 |
| West Nazchase | |
| Wierola 228 | |
| Wilson | 249 |
| Wilson 250 | |
| Wolten | 110 120 225 275 |
| 207 | |
| Xeniu | 298 |
| Xyon | 323 |
| Yamu 254 | |
| Yoko | 064 128 196 144 |
| 159 69 170 171 | |
| 272 410 | |
| Zerlek | 221 |
| Zengal 137 197 | |

Harman International Industries, Incorporated 8500 Balboa Boulevard Northridge, CA 91329 USA