
Armor 500 - Surveillance Camera Xblitz - Free user manual and instructions
Find the device manual for free Armor 500 Xblitz in PDF.

| Product type | Outdoor IP surveillance camera |
| Brand | Xblitz |
| Model | Armor 500 |
| Max resolution | 2880×1620p (5 Mpx) |
| Sensor | 1/3" color CMOS |
| Lens | 3.6 mm / F2.0 |
| Zoom | 6x digital |
| Viewing angle | Horizontal 77°, vertical 45° |
| Motorized rotation | Horizontal 0–355°, vertical 0–90°, speed 30°/s |
| Video codec | H.265 / H.264 |
| Wi-Fi connectivity | Wi-Fi 2.4 GHz 802.11b/g/n |
| Wired connectivity | Ethernet RJ45 10/100 Mbps |
| Mobile app | Tuya Smart (iOS / Android) |
| Smart detection | Motion and person detection and tracking |
| Night vision | IR up to 25 m (8 IR LEDs + 4 white LEDs) |
| Two-way audio | Built-in speaker and microphone |
| Power supply | DC 12 V / 2 A |
| Protection rating | IP66 |
| Local storage | Micro SD card up to 128 GB |
| Cloud storage | Yes (via Tuya Smart subscription) |
| Operating temperature | -30 °C to +60 °C |
| Dimensions | 100 × 150 × 155 mm |
| Weight | 450 g |
| Package contents | Camera, power adapter, mounting accessories, user manual |
| Warranty | 24 months |
Frequently Asked Questions - Armor 500 Xblitz
User questions about Armor 500 Xblitz
0 question about this device. Answer the ones you know or ask your own.
Ask a new question about this device
Download the instructions for your Surveillance Camera in PDF format for free! Find your manual Armor 500 - Xblitz and take your electronic device back in hand. On this page are published all the documents necessary for the use of your device. Armor 500 by Xblitz.
USER MANUAL Armor 500 Xblitz
natural_image
White Xblitz security camera with antenna and control panel (no visible text or symbols on body)Table of contents
Spis treści
6 INSTRUKCJA OBSŁUGI PL
11 USER MANUAL EN
17 BENUTZERHANDBUCH DE
22 NÁVOD K POUŽITÍ CZ
C1
flowchart
graph TD
    A["10"] --> B["11"]
    B --> C["12"]
    C --> D["13"]
    D --> E["14"]
C2
PL
INSTRUKCJA OBSŁUGI
KAMERA IP
Please read the enclosed operating instructions and safety notes carefully before use to avoid accidental damage to the equipment or unintentional injury.
PRODUCT PURPOSE
The Xblitz Armor 500 is an outdoor IP camera with 2.4GHz Wi-Fi for monitoring a property or other objects and their surroundings. Thanks to the Tuya Smart applicati on installed on the phone, it is possible to view the image in real ti me, which makes the control of the area around the house or facilities available at any place and ti me.
01. CONTENTS OF THE KIT
1. IP camera
- Power supply
- Mounting accessories
- Operating instructions
02. PRODUCT DESCRIPTION
SEE FIGURE A
- Reset/Micro SD card slot
- Microphone
- Lens
- Light sensor
- Loudspeaker
- Wi-Fi antennas
- IR diodes
- LEDs
- Power socket
- LAN socket (RJ45)
- Reset butt on
03. MAIN FEATURES
- Remote control via app
- Smart IR/Night Mode
- Moti on/human detecti on and tracking
- Noti fi cati ons and alarms in the app
- Two-way voice communication
- Live view
04. SAFETY RULES
NOTE!
This equipment complies with all relevant EMF standards and is safe to use provided it is used as described in the instructions for use.
Carefully read the instructions in this manual before using the device.
Adult assembly is required. Keep small parts away from children during assembly.
The camera is not a toy. Do not allow children to play with the camera or its accessories. Do not allow a child to put kit parts in the mouth.
Keep cables out of the reach of children and pets.
Do not use the unit near water or a heat source.
Use only and exclusively the power supply supplied with the device.
Do not touch the contacts of the power socket with sharp or metallic objects.
Leave the charging cable in a safe place out of the reach of children and pets.
Failure to do so may result in dangerous situations (e.g. electric shock).
Use only the original charger for the original set. Failure to follow the instructions may result in damage to the device or other dangerous situations.
05. HOW TO START
1. Download the applicati on - SEE FIGURE B
Android/iOS: scan the QR code and download the Tuya Smart app in the Google Play/App Store
2. Registrati on and login
Launch the app on your smartphone. Register and then log in to the account you have created.
3. Add device
- Connect the camera to the power supply and wait until you hear an audible noti fi cati on.
- Press and hold the RESET butt on for 5 to 10 seconds.
- Wait until you hear the „wait for connecti on“ noti fi cati on.
- The camera is ready to connect to the app on the phone.
- Make sure your phone is connected to the Wi-Fi network the device will be connecting to.
- Press the (+) symbol in the top right corner of the applicati on interface or select „Add device”.
- From the product categories, select „Camera & Lock“ and then „Wireless Camera (Wi-Fi or 2.4GHz&5GHz/Dual Band)”.
- Ensure that the device is reset and ready to connect („wait for connection” message repeated).
4. Connecti on modes available
In the top right corner, select the camera's network connecti on mode and proceed to the next step.
- QR code (recommended) - Connecti on mode by scanning with the camera lens a QR code generated in the application.
- Wi-Fi mode:
Mode AP - Connecti on mode via a hot spot created on the phone (network name: „SmartLife-xxxx”).
EZ mode - Automati c mode. In this mode, the applicati on searches for the camera itself.
• Cable - LAN connecti on via network cable.
Once the connecti on mode has been selected, follow the instructi ons in the app. The camera will inform you of the next connecti on steps with the sound messages „connect router“, „connect internet“, „device access“.
NOTE: do not disconnect the camera from the power supply during connection.
Once the device is successfully connected, give it a name of your choice in the application.
5. Removing the device
On the home screen, hold down the tab with the name of any device. Then select one or more devices you want to delete and click the recycle bin icon.
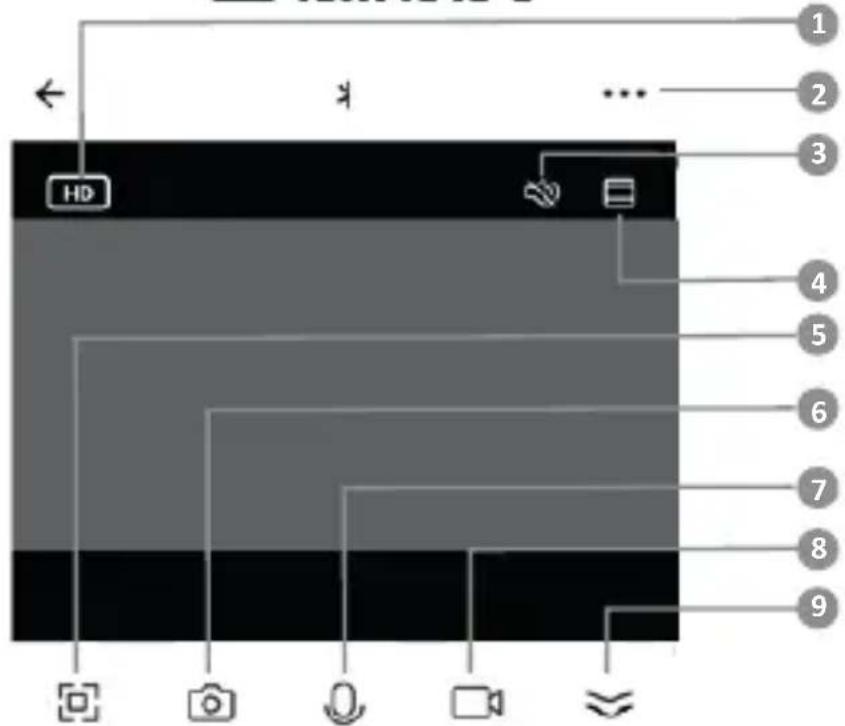
06. HOME SCREEN APPLICATION FUNCTIONS - SEE FIGURE C1
1. Change of resolution: HD/SD
When this option is selected, the quality of the displayed image in the application can be set.
2. Setti ngs:
• Device - possible to change the name of the device and add a location.
- Device information - information on the device owner's account, IP address, device ID, time zone and Wi-Fi signal.
- Press to start scenes - conditi onal programming for quick acti vati on of selected device functi ons. The programming setti ngs can be accessed from the home screen of the Tuya app by clicking on the ,Smart Home' tab. Then, in the automati on opti ons, select the ,Create scene' butt on and set the desired device acti ons and their acti vati on conditi ons.
• External control - Amazon Echo, Google Home.
- Hibernati on - on/off.
- Basic functi on setti ngs - reverse screen setti ngs, acti vati on/deacti vati on of date and ti me watermark in recordings, audio mode setti ngs (one-way or two-way).
- Night mode - IR LED operati on setti ngs for night mode - on/off or automati c mode.
- IR night vision functi on - on/off or automati c mode.
- Alarm detecti on setti ngs - acti vati on/deacti vati on of moti on detecti on, moti on tracking, siren and schedule setti ngs.
- ONVIF - on/off.
• Purchase VAS - access to purchases on the Tuya Smart app.
- Message Noti fi cati on - SMS emergency noti fi cati ons are possible aft er adding a telephone number.
- Telephone noti fi cati ons - once a telephone number has been added, telephone emergency noti fi cati ons are possible.
• Offi ine noti fi cati ons - on/off
- FAQ & Feedback - questions and answers about the operation of the device and user support.
- Shared devices - setting up the sharing of a device with other Tuya Smart app users.
- Add voice assistant to home screen - settings for a shortcut for quick access to the device interface from the phone's home screen.
- Device update - information on the current soft ware version the device is using and the possibility of enabling/disabling automatic updates.
- Device restart
- Delete device - remove a device from among those connected in the Tuya Smart app.
- Speaker - on/off
- In-app preview - closer/further away
- Full screen - on/off
- Screenshot
- Communicati on - one-way/two-way
- Recording
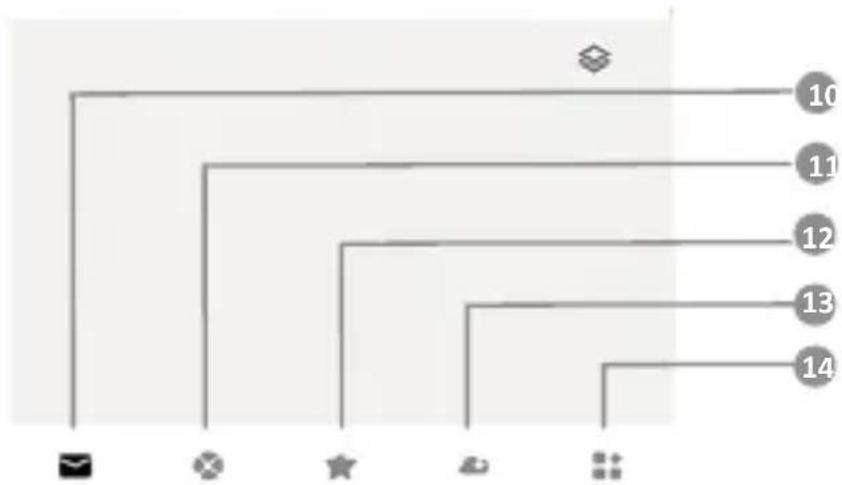
-
Minimising the settings bar
-
Alarm noti fi cati ons
-
Remote image control
-
Saved private scene settings
-
Cloud recording settings
-
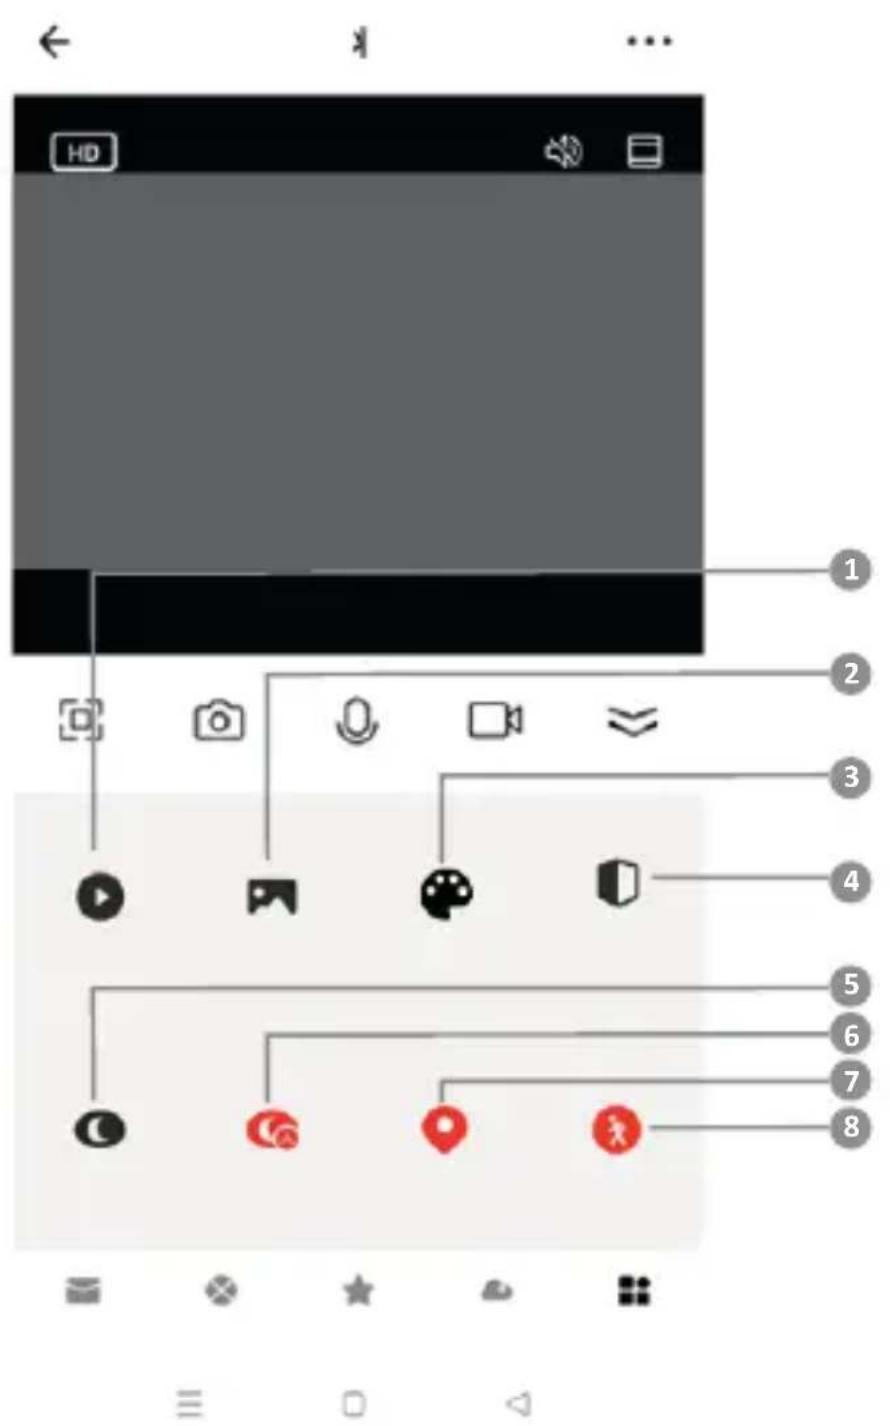
Functi on setti ngs - SEE FIGURE C2
1) Play back the recordings stored on the micro SD card.
2) Gallery: saved screenshots and recordings.
3) Applicati on colour: light/dark.
4) Private mode: on/off.
5) Night mode: Colour/IR/Intelligent.
6) Night mode switch: on/off /automati c.
7) Moti on tracking - on/off.
8) Moti on detecti on - on/off.
9) It is possible to freely configure the functions displayed in the application using the „Edit” function.
07. PLAYING BACK RECORDINGS FROM A MICRO SD CARD
To play back recordings from the memory card on your computer, you will need to download the Media Player Classic soft ware from the following link: htt ps://xblitz.pl/download/media-player-classic-home-cinema.exe. Then, by copying the encoded recordings from the card to the player, you can view them.
08. SPECIFICATION
• Max. resoluti on: 2880x1620p (5Mpx)
• Frame rate: up to 25fps
• Sensor: 1/3" PS Color CMOS
• Lens focal length: 3.6mm/F2.0
- Lens sensiti vity: 0.05LUX/F1.2 colour; 0.005LUX/F1.2 (IR on, B/W)
- Zoom: 6x digital zoom
• Field of view: horizontal 77°; vertical 45°
• Angle of rotati on: horizontal 0-355°; verti cal 0-90°
• Horizontal/verti cal rotati on speed: 30°/s
• Codec: H.265/H.264
• Wi-Fi: 2.4GHz WiFi 802.11b/g/n
• Network interface: LAN (RJ45 10m/100m)
• Mobile application: Tuya Smart
• Moti on and character detecti on/tracking: YES
• ONVIF (Open Network Video Interfaces Forum): YES
- Features: AWB (automati c white balance), AGC (automati c gain control), AES (automati c electronic shutt er), D-WDR (wide dynamic range lighti ng), 3D DNR (digital noise reducti on in video)
• Light emitting diodes: 8 IR/4 white LEDs
• Range of IR illuminator: up to 25m
• Operating modes: colour/black and white/intelligent
• Operating temperature: -30^ to +60^
• Micro SD card support: max 128 GB/cloud storage
• Built-in speaker and microphone: two-way communicati on
• Power supply: DC12V/2A
• Waterproof class: IP66
• Operating frequency range: 2400-2483.5 MHz
• Max. frequency power in the operating range: 19dBm
• Dimensions: 100x150x155 mm
- Weight: 450g
09. WARRANTY/ COMPLAINTS CARD
The product comes with a 24-month warranty. Warranty terms and conditi ons can be found at: htt ps://xblitz.pl/gwarancja/
Complaints must be made using the complaint form found at: htt p://reklamacje.kgktrend.pl/
Details, contact and service address can be found at: www.xblitz.pl. Specific cati ons and contents are subject to change without noti ce. We apologise for any inco- venience.
KGK Trend declares that the Xblitz Armor 500 complies with the essenti al requirements of Directi ve 2014/53/EU. The text of the declarati on can be found at the link: htt ps://xblitz.pl/download/DOC/deklaracja-UE-Xblitz-Armor500