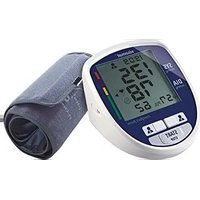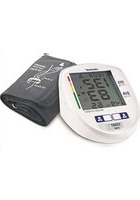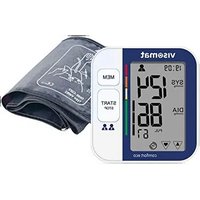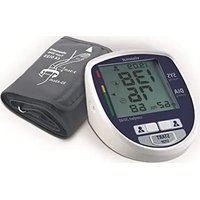
Visomat comfort 20/40 - Blood pressure monitor UEBE - Free user manual and instructions
Find the device manual for free Visomat comfort 20/40 UEBE in PDF.


User questions about Visomat comfort 20/40 UEBE
0 question about this device. Answer the ones you know or ask your own.
Ask a new question about this device
Download the instructions for your Blood pressure monitor in PDF format for free! Find your manual Visomat comfort 20/40 - UEBE and take your electronic device back in hand. On this page are published all the documents necessary for the use of your device. Visomat comfort 20/40 by UEBE.
USER MANUAL Visomat comfort 20/40 UEBE
Instructions for use
Mode d'emploi
A Intended use Maintaining the device 36
B Safety instructions
- Important patient information 37
- Important technical information 38
C Operating the device
- Device description 41
- Display 42
- Important usage information 43
- Initial operation of the device 44
- Inserting/replacing batteries 44
- Activating and setting the date/time 44
- Attaching the cuff 46
- Body position during the measurement 47
- Selecting the user 48
- Measuring blood pressure 48
- Classification of the measured values (WHO) 50
- Pulse pressure 51
- Irregular pulses and cardiac arrhythmia 51
- Motion control 52
- Using the memory 52
D What you should know about blood pressure
- The systolic and diastolic blood pressure value 54
- Why you measure different values 54
- Why should you measure blood pressure regularly? 54
E Technical information
- Error messages 56
- Customer service 58
- Technical data 58
- Original spare parts and accessories 59
- Metrological inspection 60
- Explanation of symbols 60
- Disposal 61
EN-34 EN-35
Table of contentsTable of contents
F 62
G Warranty 63
Thank you for choosing the visomat® comfort 20/40 upper arm blood pressure monitor (hereinafter also referred to as the device).
These instructions for use are intended to help the user operate the device safely and efficiently. The unit must be used in accordance with the procedures contained in these instructions for use and must not be used for any other purposes.
It is important that you read all the instructions carefully before using the device. Please pay particular attention to the chapter "Important usage information" on page 43.
A
Intended use
This device is intended for adults for non-invasive measuring of the systolic and diastolic blood pressure, determining the pulse rate and calculating the pulse pressure. • Taking blood pressure
The device uses the oscillometric method for blood pressure and pulse measurement. The cuff is connected to the device and then placed on the arm. A sensor measures the small pressure oscillations generated by the expansion and retraction of the arteries with each heartbeat. The amplitude of the pressure waves is measured in millimetres of mercury (mmHg) and shown in the display as a digital value.
Safety instructions
B
1. Important patient information
ents on children requires
specialist knowledge. Consult your doctor if you want to measure a child's blood pressure. Under no circumstances must the device be used on an infant.
- During pregnancy and in cases of pre-eclampsia, the device may only be used after consulting your doctor.
- Do not under any circumstances place the cuff over a critical area, e.g. a wound, aneurysm, etc. or on an arm with an arteriovenous shunt. Risk of injury! Any supply via an intravascular access point (infusion) or other medical monitoring devices could possibly be interrupted.
- Do not use the device without first consulting your doctor if you are having dialysis treatment or are taking anticoagulants, platelet aggregation inhibitors or steroids. These circumstances may cause internal bleeding.
- The display of the pulse frequency is not suitable for checking the frequency of cardiac pacemakers. Cardiac pacemakers and blood pressure monitors do not influence each other in terms of their mode of operation.
• The device is not suitable for use with electrosurgical devices. - Do not use the device in explosive environments such as in the vicinity of flammable anaesthetics or in an oxygen chamber.
- Ensure that the air hose is not kinked. A kinked air hose may prevent the cuff from deflating, thus interrupting the blood flow in the arm for too long.
- Please wait a few minutes between successive measurements, otherwise the blood flow in the arm is interrupted for
B
too long and injuries could occur.
- The device contains small parts that could be swallowed by children. The air hose poses a strangulation hazard. Do not leave the device unattended with children.
- Do not take a blood pressure measurement on the same side as a mastectomy with simultaneous removal of the axilla lymph nodes.
- Discuss the measured values with your doctor. Do not assess the measurement results yourself. Never change the dose of medicines prescribed by your doctor.
- Before carrying out your self-measurement, please pay attention to the chapter "Important usage information" on page 43.
2. Important technical information
- The unit contains sensitive parts and must be protected from extreme temperature fluctuations, humidity, shocks, dust and direct sunlight.
- Do not knock or drop the device.
• The device is not waterproof. - Do not apply pressure to the display. Do not place the device with the display facing downwards.
- The unit must only be operated with the cuff and accessories provided (see "Original spare parts and accessories" on page 59). Using different cuffs or accessories can lead to incorrect measurement results. The warranty will be invalidated if the unit is damaged by third-party accessories!
EN-38 EN-39
Safety instructions Safety instructions
B
- A consistently good power supply to the device is necessary for fault-free blood pressure measurements.
- Only use long-life alkaline batteries (LR6).
- Always replace all batteries simultaneously during battery replacement. Do not mix new and old batteries or batteries of different types.
- You will require 4 x 1.5 V batteries. Rechargeable batteries only have a voltage of 1.2 V and are therefore not suitable.
- When using the device with a mains adapter, please only use the visomat® mains adapter, which has been specially tested for medical devices.
- When using the mains adapter, do not press on the output connector of the mains adapter while taking a measurement.
- If the device is not to be operated for an extended period of time, please remove the batteries. In principle, all batteries can leak.
- Do not remove batteries from the device or separate it from the mains adapter when the device is switched on.
- The use of this device in the vicinity of mobile phones, microwaves or other devices with strong electromagnetic fields can cause malfunctions.
- Never open or modify the device or the cuff (except for replacing the batteries). If the unit has been opened, it must be subjected to a metrological inspection by an authorised institution.
• The cuff may be inflated on the arm only. - To avoid inaccurate readings, please adhere to the intended operating and storage conditions. See "Technical data" on page 58.
B
Safety instructions
- The inflating and measuring procedure can be interrupted by pressing the Start/Stop button or by removing the cuff. The device then stops the inflation procedure and deflates the cuff.
EN-40 EN-41
Operating the device
C
1. Device description
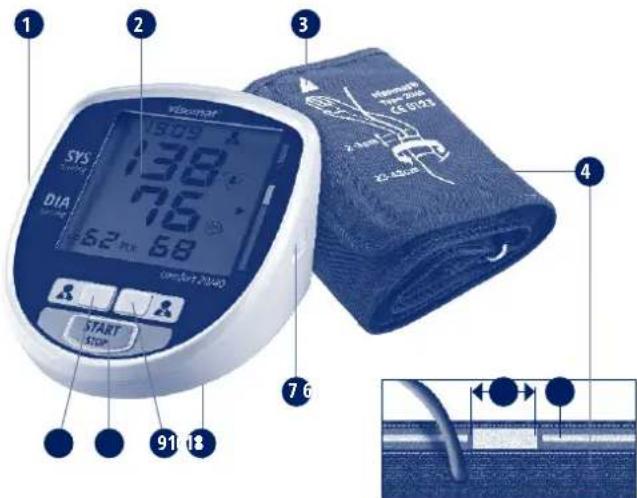
text_image
1 2 3 4 5 6 7 8 9 10 11 12 13 14 15 16 SYS DIA COVID-19 COVID-20 COVID-21 COVID-22 COVID-23 COVID-24 COVID-25 COVID-26 COVID-27 COVID-28 COVID-29 COVID-30 COVID-31 COVID-32 COVID-33 COVID-34 COVID-35 COVID-36 COVID-37 COVID-38 COVID-39 COVID-40 COVID-41 COVID-42 COVID-43 COVID-44 COVID-45 COVID-46 COVID-47 COVID-48 COVID-49 COVID-50 COVID-51 COVID-52 COVID-53 COVID-54 COVID-55 COVID-56 COVID-57 COVID-58 COVID-59 COVID-60 COVID-61 COVID-62 COVID-63 COVID-64 COVID-65 COVID-66 COVID-67 COVID-68 COVID-69 COVID-70 COVID-71 COVID-72 COVID-73 COVID-74 COVID-75 COVID-76 COVID-77 COVID-78 COVID-79 COVID-80 COVID-81 COVID-82 COVID-83 COVID-84 COVID-85 COVID-86 COVID-87 COVID-88 COVID-89 COVID-90 COVID-91 COVID-92 COVID-93 COVID-94 COVID-95 COVID-96 COVID-97 COVID-98 COVID-99 COVID-1001 Cuff connection
2 Display
3 Measurement arrow for arm circumference
4 Cuff
5 Marking for arm circumference
6 Artery marking
7 Connecting socket for mains adapter
8 Battery compartment
9 Memory button user 2 (memory recall button)
10 Start/Stop button
11 Memory button user 1 (memory recall button)

- Display 3. Important usage information
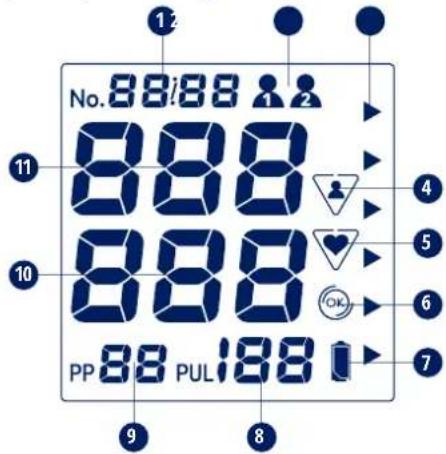
text_image
No. 88/188 11 10 PP 88 PUL 188 4 5 6 7 8 9 121 Memory space or date/time
2 User
3 WHO classification (page 50)
4 Motion control
5 Pulse signal display or irregular pulses
6 Cuff position check
7 Battery indicator
8 PUL 1/min = pulse
Calculated pulse frequency per minute
9 Pulse pressure
10 DIA = diastole
11 SYS = systole
EN-42 EN-43
Operating the deviceOperating the device

The measurement results of automated blood pressure monitors can be influenced by the measuring location, posture, previous exertion and general physical condition. Please pay attention to the usage information in order to obtain accurate readings.
- Do not consume alcohol, caffeine or smoke for at least one hour before measuring.
- Rest for at least 5 minutes before taking the measurement. Depending on the previous degree of exertion, you may even need to rest for up to an hour.
- Expose the upper arm. Under no circumstances may clothes hinder the blood flow to or from the arm, as this affects the blood pressure at the measuring point and can lead to incorrect readings.
- Do not move or talk during measuring.
- Breath slowly and deeply. Do not hold your breath.
- Check the display for irregular pulse signals. If required, repeat the measurement when conditions have improved.
- In order to exclude side differences and to obtain comparable measurement results, it is important to always take the measurement on the same arm. Ask your doctor which side it is advisable for you to measure.
• Always take your daily blood pressure measurements at around the same time.
• Blood pressure is not a fixed value. It can go up or down by more than 20 mmHg in patients within a few minutes.
C
4. Initial operation of the device4. Initial operation of the device
Insert the batteries provided into the device.
If the device is to be operated using mains power, the cable connector of the mains adapter (not supplied) must be plugged into the socket on the right-hand side of the device. The batteries are automatically switched off.
Please only use the visomat® mains adapter. See "Original spare parts and accessories" on page 59.
5. Inserting/replacing batteries
- Remove the battery compartment cover on the underside of the device.
- Remove the old batteries from the device and insert the new ones. Please ensure correct polarity (marking in battery compartment).
- Close the battery compartment by clipping the battery cover back into the device.
When the "empty battery" symbol first appears in the display, you are still able to take around 30 measurements. Please replace the batteries within this time frame.
6. Activating and setting the date/time
The device has a date/time function that can be activated as required. This function is deactivated on delivery.
When the date/time function is activated, the measurement results are saved along with their date and time. This can make it easier to view the readings at a later point.
EN-44 EN-45
Operating the deviceOperating the device
C
Activating and deactivating the date/time function
Press the Start/Stop button to activate the date/time function. Then immediately press one of the two Memory buttons while the full display is still visible. The function can be deactivated at any time using the same procedure.
When the date/time function is activated, the device continues to display the time even when it is switched off. The power consumption for this is extremely low.
Setting the date/time
Initially, the display will show the four-digit year number (Figure 1). Press Memory button 1 to reduce the year number or Memory button 2 to increase the year number. Confirm the entry by pressing the Start/Stop button.
2016
You are now able to set the month. (Figure 2). Press Memory button 1 to reduce the value or Memory button 2 to increase the value. Set the correct month and confirm the entry by pressing the Start/Stop button.
18/05
Repeat these steps to enter the day (Figure 2) and the hours and the minutes (Figure 3).
Figure 2
After replacing the batteries, you will have to reset the date and time.
19:09
Changing the date/time
To change the date and time, take the batteries out and wait until the display goes off. Then you can reset the date and time.
Figure 3
C
7. Attaching the cuff
Before applying the cuff, please check that the circumference of your upper arm is within the range specified on the cuff. An incorrect cuff size could result in inaccurate readings.
- Expose your upper arm.
- Push the cuff onto the arm until the lower edge of the cuff is 2-3 cm above the crook of the arm (Figure 1, Figure 2).
- When placed on the left arm, the air hose runs down the middle of the crook of the arm to the device. This automatically positions the 4 cm long artery marking centrally above the pulse position (Figure 3).
- When placed on the right arm, the cuff must be rotated to the left until the artery marking is on the pulse position. The air hose then runs along the inner side of the upper arm (Figure 4).
- The cuff should not be too tight. You should be able to insert two fingers between the arm and the cuff. Tip: - Angle the arm slightly
- Slightly tense the upper arm muscle
- This increases the circumference of the arm slightly
- Now pull the free end of the cuff tight and close the Velcro fastener (Figure 5).
- Check that the measurement arrow on the cuff is within the "Marking for
EN-46 EN-47
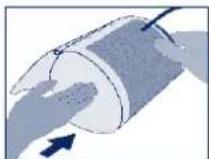
Figure 1
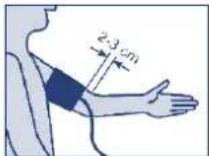
Figure 2
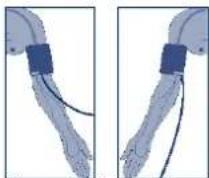
Figure 3 Figure 4
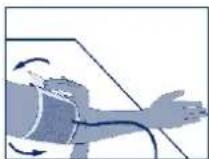
Figure 5
Operating the device Operating the device
C
arm circumference" on the cuff edge (Figure 6).
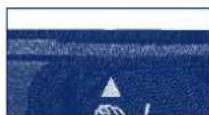
Figure 6
- Connect the plug of the cuff to the cuff connection on the left-hand side of the device. Ensure that the plug is fully inserted into the device.
- Place the arm with the cuff on a table so that it is loosely stretched out and hold it very still during the measurement, do not talk. The palm of your hand should be facing upwards.
8. Body position during the measurement
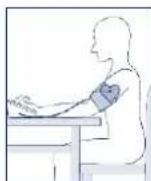
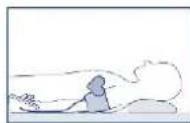
The measurement should preferably be performed in a sitting position. Measurements in a lying position are also permitted in exceptional cases. The body must be in a relaxed position.
Measurement in a sitting position
- Sit at a table (preferably at the height of a dining table, not a coffee table).
- Sit with your back against the backrest of the chair.
- Rest your entire lower arm on the table with the palm facing upwards.
- Put your feet on the floor and do not cross your legs.
Measurement in a lying position
- Lie on your back. Look up at the ceiling during the measurement. Keep still and do not move.
C
- Ensure that the measuring point on the upper arm is approximately level with your heart. If the measuring point is lower than the heart, the measured values may be higher. If the measuring point is higher than the heart, the measured values may be lower.
The results for measurements taken in a sitting and lying position may differ slightly.
9. Selecting the user
The device is designed for two users. The values for the two users are stored separately and can also be evaluated separately.
You may also use the two user memories to evaluate measurements taken in morning and those taken in the evening separately. To do this, carry out the measurement in the morning using user 1 and in the evening using user 2.
- Before taking the measurement, check that the correct user is displayed.
• To change the user, press the user button for whose memory bank you want to switch over to. - Now carry out the measurement.
Also, you will be given another opportunity to assign the measurement to the correct user after the measurement has been taken (see page 49).
10. Measuring blood pressure
- Switch the device on using the Start/Stop button. The following display appears (Figure 1):
EN-48 EN-49
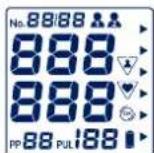
Figure 1
Operating the deviceOperating the device
C
• After the device has completed its calibration against the ambient air pressure (Figure 2), the automatically controlled inflation process starts. The cuff slowly inflates during the measurement procedure.
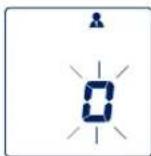
Figure 2
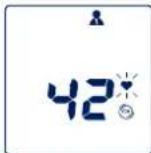
Figure 3
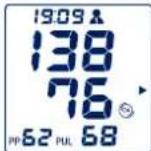
Figure 4
- Shortly after the inflation procedure begins, Figure 2 a check is carried out to ensure that the cuff has not been applied too loosely. If the cuff is applied correctly, the symbol is displayed. If the symbol is not displayed by the time the pulse signal starts, the cuff is too loose. In this case, you should repeat the measurement after you have applied the cuff correctly (see page 46).
• The measurement is carried out during inflation. The symbol flashes in the display (Figure 3). In addition, beeps denote the pulse. - Inflation stops as soon as the measured values are determined; the cuff is then automatically deflated. A long beep denotes the end of measurement.
• The determined systole, diastole and pulse values, as well as the pulse pressure (PP) are shown in the display (Figure 4). - When the measurement is finished, you will be given another opportunity to change the memory to which the measured value is to be saved. To do this, press the Memory button of the user for whom the measured value is to be saved.
- The device switches itself off after approximately 3 minutes. You can also switch the device off before this by pressing the Start/Stop button.

11. Classification of the measured values (WHO) 12. Pulse pressure
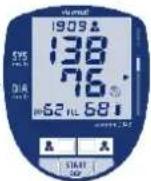
The device categorises the blood pressure readings according to the 1999 guidelines of the World Health Organisation (WHO). You can determine the classification after each measurement using the triangle in the display and the colour fields next to the display.
| Classification | Systolic pressure = top value mmHg | Diastolic pressure = bottom value mmHg |
| Stage 3 hypertension ≥ 180 ≥ 110 | ||
| Stage 2 hypertension 160-179 100-109 | ||
| Stage 1 hypertension 140-159 90-99 | ||
| High-normal 130-139 85-89 | ||
| Normal 120-129 80-84 | ||
| Optimal < 120 < 80 |
The WHO classification is stored along with the measured values and both can be recalled from the memory.
Depending on age, weight and general health, the blood pressure values can be different. Only a doctor can determine the right blood pressure range for you and assess whether your blood pressure has reached a dangerous level for you. Discuss your blood pressure values with your doctor.
EN-50 EN-51
Operating the deviceOperating the device

The pulse pressure – not to be confused with the pulse beat – provides an indication of the elasticity of the blood vessels. A stiff system of vessels can have a negative effect on the cardiovascular system. Studies show that the cardiovascular risk increases if the pulse pressure value is permanently higher than 65 mmHg.
The heart works in two phases, the contraction phase (expulsion phase, systole) and the relaxation phase (filling or resting phase, diastole). The pressure difference between systole and diastole is called the pulse pressure or pulse amplitude. The higher the pulse pressure, the stiffer your vessels are thought to be.
| High pulse pressure Above 65 mmHg | |
| Increased pulse pressure 55 to 65 mmHg | |
| Normal pulse pressure | Below 55 mmHg |
If your pulse pressure is permanently above 55 mmHg, consult your doctor.
13. Irregular pulses and cardiac arrhythmia
If the device detects irregular pulses during the measurement, the ♥ symbol is displayed once the measurement is complete.
This can be triggered by cardiac arrhythmias, movement, talking or even by deep breathing. The symbol is stored with the respective measurement.
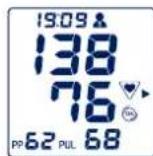
A more frequent appearance of the symbol may indicate cardiac arrhythmia and must be discussed with your doctor! Measurement results accompanied by irregular pulses should therefore

be viewed as critical and repeated under more favourable conditions.
14. Motion control
Movements during the measurement may result in incorrect measurement readings. The motion control registers stronger movements and these are indicated by the ▼ symbol in the display. If this symbol appears, please repeat the measurement and avoid moving.
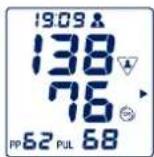
The symbol is stored with the respective measurement.
15. Using the memory
The device stores the measured values in two memories (one per user). Each memory can store up to 120 readings and the average value (A). The average value is calculated from the last three measurements taken.
The measured results are automatically saved in the memory. If more than 120 measured values are saved, the oldest measured value (no. 120) is deleted so that the latest value (no. 1) can be recorded.
Data retrieval
Set the user whose data you wish to retrieve.
To retrieve data, press the Memory button of the user you wish to retrieve the data for while the device is switched off. The average value is displayed with "A" (Figure 1).
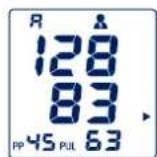
Figure 1
EN-52 EN-53
Operating the deviceOperating the device

Press the Memory button again to display the most recently measured values (Figure 2). If the date/time function is activated, the memory number (Figure 2), the date (Figure 3) and the time (Figure 4) are displayed alternately.
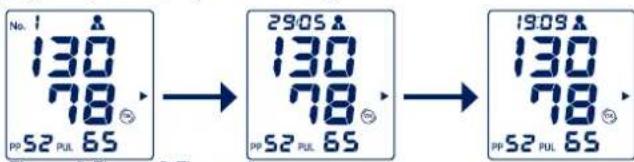
text_image
No. 1 130 78 PP 52 PUL 65 → 2905 130 78 PP 52 PUL 65 → 1909 130 78 PP 52 PUL 65Figure 2 Figure 3 Figure 4
Press the Memory button repeatedly to recall further measured values.
You can switch between the two memories by pressing Memory button 1 or 2.
The stored data remain visible in the display for around 30 seconds. The device then switches itself off.
Deleting data
To delete individual measured values, recall the measured value you wish to delete.
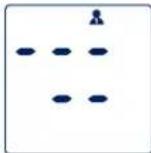
Press the Memory button again and hold down until the display firstly flashes and is then replaced with dashes.
To delete the entire memory, retrieve the respective average value (A), press the Memory button again and hold down until the average value firstly flashes and is then replaced with dashes.

D
1. The systolic and diastolic blood pressure value
The circulatory system has the important task of supplying all organs and tissues in the body with sufficient blood, and of removing metabolites. The heart does this by contracting and expanding at a regular rhythm of around 60-80 times per minute. The pressure created by the blood flow on the artery walls when your heart contracts is referred to as systole. The pressure in the subsequent relaxation phase when the heart fills with blood again is referred to as diastole. In your daily measurement, you will measure both values.
2. Why you measure different values
Our blood pressure responds to internal and external influences like a sensitive measuring instrument. Affected by mental, physical and environmental influences, it varies all the time and never remains constant.
Reasons for fluctuating blood pressure values can be: moving, speaking, eating, consuming alcohol or nicotine, nervousness, inner tension, emotions, room temperature, recent urination or bowel movements, environmental influences such as movements and sounds, etc. Even changes in the weather and climate can have an effect on your blood pressure.
This explains why values measured at the doctor are often higher than those you obtain at home in your usual environment.
3. Why should you measure blood pressure regularly?
Even the time of day has an effect on your blood pressure. The values are at their highest during the day. In the course of the afternoon and in the evening, they drop slightly. They are low while you are sleeping, but rise again relatively quickly once you get up.
EN-54 EN-55
What you should know about blood pressureWhDvo
One-off and irregular measurements therefore say little about your actual blood pressure. A reliable assessment is only possible when measurements are taken regularly. Discuss the measured values with your doctor.
E
- Error messages
| Error Possible cause | Use Remedy | |
| Display Err - 300 | Excessive cuff pressure.The cuff was inflated to its maximum due to the movement of the arm or body.The air hose may be kinked or the air plug blocked. | - Repeat the measurement- Do not move your arm- Do not speakInspect the hose line and air plug for blockages |
| Display Err - 1 Measurement error;measurement could not be carried out due to movement or speaking. | - Repeat the measurement- Do not move your arm- Do not speak | |
| Display Err - 2 Inflation error; pressure built up too slowly. | Check that the air connector is fitted properly, repeat measurement. | |
| Display 00 | Start/Stop button was accidentally pressed while the batteries were being replaced or while the mains adapter was being plugged in. | - Repeat the measurement- Do not move your arm- Do not speak |
| ♥ | Arrhythmia, movement disorders, trembling, wobbling (objects), deep breathing etc. | Repeat measurement after resting for 3-5 minutes.Listen out for the device's pulse beep signals. Possible influences on the measurement results (depending on the severity of the arrhythmia) must be discussed with your doctor! |
EN-56 EN-57
Technical information Technical information
E
| Error Possible cause | Use Remedy | |
| The motion control detected movement during the measurement. | - Repeat the measurement- Do not move your arm- Do not speak | |
| Measured values/pulse values are extremely high or low. | Too little rest before taking the measurement. Movement or talking during the measurement. | Repeat the measurement after a break of 3-5 minutes. Pay attention to the usage information on page 43. |
| Incorrect measurement posture | Repeat the measurement and maintain the correct posture. (Page 47) | |
| Measurements taken in direct succession produce different measured values. | Blood pressure is not a fixed value. It can go up or down by more than 20 mmHg within a few minutes. | In order to obtain comparable results, always carry out the measurements under the same conditions. |
| Measurement was interrupted, the cuff deflated to 0 and the measurement restarted. | Device detects a fault or that the diastolic value is too low. | Device shows no fault. Repeat measurement |
| Movement during measurement | If necessary, interrupt measurement and repeat after 5 minutes' rest. | |
| No display after device is switched on | Batteries inserted incorrectly | Check position of batteries. |
| Batteries flat Replace batteries. | ||
| Battery contacts dirty. Clean battery contacts with a dry cloth. | ||
| Dashes in display after pressing Memory button | No measured values have been stored. | Repeat measurement |
| Measurement is interrupted | Batteries flat Replace batteries. | |
| The time is visible in the display, but the measurement is interrupted and the symbol appears. | Batteries flat Replace batteries. | |
E
| Error Possible cause | Remedy | |
| Date and time are not visible in the display | - Function was unintentionally deactivated | Activate the date and time function as described on page 44. |
2. Customer service
Device repairs may only be performed by the manufacturer or an expressly authorised body. Please contact:
UEBE Medical GmbH
Zum Ottersberg 9
97877 Wertheim, Germany
Tel.: +49 (0) 9342/924040
Fax.: +49 (0) 9342/924080
Email: info@uebe.com
Website: www.uebe.com
3. Technical data
| Model: visomat | * comfort 20/40 |
| Size: L = 127.3 mm x W | = 162.3 mm x H = 96 mm |
| Weight: approx. 338 g without batteries and cuff | |
| Display: LCD display (liquid crystal display) for measured values and check displays | |
| Memory: 2 memories each capable of storing 120 readings | |
| Measurement method: | Oscillometric determination of systole, diastole and pulse |
| Reference method of the clinical test: | Auscultatory measurement |
| Pressure display range: | 3-300 mmHg |
| Measurement range: Systolic: 50-250 mmHgDiastolic: 40-150 mmHgPulse measurement: 40-160 pulses/minute | |
EN-58 EN-59
Technical information Technical information
E
| Measurement precision: | Blood pressure measurement (cuff pressure): ± 3 mmHgPulse rate: ± 5% |
| Power supply: 4 x 1.5 V | AA LR6 alkaline manganese batteries |
| Optional: visomat® mains adapter, output 6 V DC, 500 mA | |
| Power consumption: max. 4 W | |
| Cuff: | Cuff type 2040 for an arm circumference of 23-43 cm, applied part type BF |
| Operating conditions: | Ambient temperature 10°C to 40°C, relative humidity 15% to 85% non-condensing, air pressure 700 to 1060 hPa |
| Conditions for storage and transport: | Ambient temperature -20°C to +60°CRelative humidity 10% to 95%, non-condensing |
| Inflation and deflation: | Regulated automatically |
| IP rating: | IP 20: Protected against solid foreign bodies with a diameter from 12.5 mm, no protection against water. |
| Protection against electric shock: | Internal power supply, applied part type BF (cuff) |
| Operating mode: | Continuous operation |
| Classification: | Internal power supply using batteries. |
4. Original spare parts and accessories
The following original spare parts or accessories are available through specialist retailers:
• Universal cuff 23-43 cm, type 2040 Part no. 2404001 PZN 01021375
• visomat ^® mains adapter Part no. 2400020 PZN 11870684
Subject to technical modifications.
E
5. Metrological inspection
Generally, it is recommended that a metrological inspection is performed every two years. However, professional users in Germany are obligated to do so in accordance with the "Medical Products Operator Ordinance" (Medizinprodukte-Betreiberverordnung).
This can be performed either by UEBE Medical GmbH, an authority responsible for metrology or an authorised maintenance service. Please refer to your national regulations.
Upon request, responsible authorities or authorised maintenance services receive a "Test instruction for metrological inspection" from the manufacturer.
Important: No modifications, e.g. opening the device (except to replace the batteries), may be made to this device without the manufacturer's permission.
6. Explanation of symbols
CE 0123
This product complies with Council Directive 93/42/EEC of 5 September 2007 concerning medical devices and bears the mark CE 0123 (TÜV SÜD Product Service GmbH).

Degree of protection against electric shock TYPE BF
Consult the instructions for use

Conditions for storage and transport: Ambient temperature -20°C to +60°C Relative humidity 10% to 95%, non-condensing

Keep dry
EN-60 EN-61
Technical information Technical information
E

Device serial number

Reference number = item number

Protected against solid foreign bodies with a diameter from 12.5 mm, no protection against water.

Manufacturer
Mains adapter information
When using the optionally available mains adapter:

Protection class II (double insulation)

For indoor use only

Internal fuse
Polarity inside plus
7. Disposal

Technical equipment and batteries do not belong in household waste. They must be disposed of at appropriate collection and disposal points.
F
Maintaining the device
- Keep the device clean. Check for cleanliness after use. Please use a soft, dry cloth for cleaning. Do not use benzene, thinners or other strong solvents.
- The cuff may absorb sweat and other fluids. Inspect the cuff for marks or discolourations after each use. Please use a synthetic detergent for cleaning and carefully wipe the surface. Do not scrub or machine-wash. Air-dry thoroughly.
• Make sure that liquid cannot get into the air hose.
• Take care when storing the device. Ensure that no heavy objects are resting on the device or the cuff and that the air hose is not kinked. Do not wind the air hose too tightly. - Do not apply force when folding or bending the cuff.
• To separate the cuff from the main device, please do not pull the air hose, but grip the air connector and gently pull it off. - If the device was stored at temperatures below 0°C, allow it to stand at room temperature for at least 1 hour before using it.
- If the device is not to be operated for an extended period of time, please remove the batteries. Store the batteries out of the reach of children.
EN-62 EN-63
Warranty
G
The device has been manufactured and tested with all due care. Nevertheless, in the event of defects upon delivery, we provide a warranty under the following conditions:
During the warranty period of 3 years from the date of purchase, we remedy such defects at our discretion and at our expense in our plant through repair work or replacement delivery of a defect-free device.
The warranty does not cover normal wear and tear of wearing parts or damage caused by failure to observe the instructions for use, improper handling (e.g. unsuitable power sources, breakage, leaking batteries) and/or disassembly of the device by the buyer. Furthermore, the warranty does not constitute grounds for asserting claims for damages against us.
Warranty claims can only be asserted during the warranty period and upon presentation of the proof of purchase. In the case of a warranty claim, the device along with the proof of purchase and a description of the complaint must be sent to:
UEBE Medical GmbH
Service-Center
Zum Ottersberg 9
97877 Wertheim, Germany
The cost of returning the device to our factory shall be borne by the sender. Complaints that are sent back without prepayment will not be accepted by UEBE.
The statutory claims and rights of the buyer against the seller (for example, defect claims, producer liability) are not restricted by this warranty.
Please note: In the case of a warranty claim, please make sure to enclose the proof of purchase.
E Informations techniques
Figure 2 Figure 3 Figure 4
visomat and UEBE are internationally protected trademarks of:

UEBE Medical GmbH
Zum Ottersberg 9
97877 Wertheim
Germany
Phone: +49 (0) 93 42 / 92 40 40
Fax: +49 (0) 93 42 / 92 40 80
Email: info@uebe.com
Website: www.uebe.com
Subject to technical modifications.
Reprinting, including of extracts, is prohibited.
© Copyright 2016 UEBE Medical GmbH
UEBE Germany est.1890