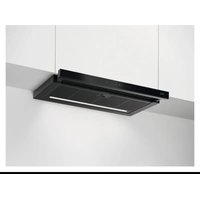
NDG966AB - Basket AEG - Free user manual and instructions
Find the device manual for free NDG966AB AEG in PDF.

User questions about NDG966AB AEG
0 question about this device. Answer the ones you know or ask your own.
Ask a new question about this device
Download the instructions for your Basket in PDF format for free! Find your manual NDG966AB - AEG and take your electronic device back in hand. On this page are published all the documents necessary for the use of your device. NDG966AB by AEG.
USER MANUAL NDG966AB AEG
natural_image
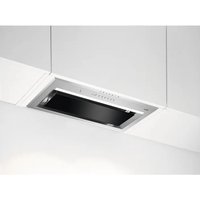
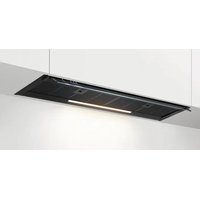
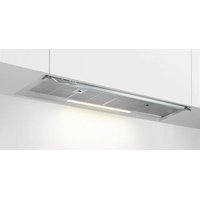
Simple line drawing of a wireless router with signal waves (no text or symbols)GDG961AL
GDG966AL
GDG969AL
NDG961AB
NDG966AB
NDG969AB
text_image
QR code with a document icon in the center, likely linking to a digital resource or webpage.natural_image
Technical line drawing of a rectangular structural component with an arrow indicating direction (no text or symbols)natural_image
Diagram of a window with a grid pattern and a curved arrow indicating rotation (no text or symbols)natural_image
Three identical diagrams showing a mechanical or electrical component with arrows indicating movement, no text or symbols present.i
text_image
Diagram illustrating a biological or chemical process with labeled components and directional arrows, including numbered parts 1 and 2.natural_image
Technical line drawing of a rectangular structural component with an arrow indicating direction (no text or symbols)natural_image
Diagram showing a grid-patterned panel with an arrow indicating rotation or movement (no text or symbols)natural_image
Three diagrams showing mechanical or electrical components with arrows indicating movement, no text or symbols present.i
text_image
Diagram showing a device with labeled components and a circular diagram illustrating rotational or mechanical behavior around a central circular component.natural_image
Technical line drawing of a rectangular recessed space with an arrow indicating direction (no text or symbols)natural_image
Diagram showing a grid-patterned panel with a curved arrow indicating rotation or movement (no text or symbols)natural_image
Three diagrams showing a mechanical or electrical component with arrows indicating movement, no text or symbols present.i
text_image
Diagram illustrating a biological or chemical process with labeled components and directional arrows, likely from a scientific or engineering context.natural_image
Technical line drawing of a rectangular recessed space with an arrow indicating direction (no text or symbols)natural_image
Diagram of a window with a grid pattern and a curved arrow indicating rotation (no text or symbols)natural_image
Three diagrams showing mechanical or electrical components with arrows indicating movement, no text or symbols present.
text_image
Diagram showing a device with labeled components and a magnified circular view highlighting internal structure.natural_image
Technical line drawing of a rectangular structural component with an arrow indicating direction (no text or symbols)natural_image
Diagram of a solar panel with a grid pattern and directional arrow indicating rotation (no text or symbols)text_image
Diagram showing a grid layout with numbered arrows and curved arrows indicating direction or movement, possibly illustrating a mechanical or electrical system.natural_image
Three diagrams showing a mechanical or electrical setup with arrows indicating movement, no text or symbols present.
text_image
Diagram showing a device with labeled components and a circular diagram illustrating particle movement or flow direction.natural_image
Symbol of a trash bin crossed with a diagonal line, representing no waste or discharge (no text or labels)natural_image
Recycling symbol with three arrows forming a triangle (no text or labels)natural_image
Technical line drawing of a rectangular structural component with an arrow indicating direction (no text or symbols)natural_image
Diagram of a solar panel with a curved arrow indicating rotation or movement, no text or symbols presenttext_image
Diagram showing a grid layout with directional arrows labeled 1 and 2, indicating movement or flow in a technical or mathematical context.natural_image
Three diagrams showing mechanical or electrical components with arrows indicating movement, no text or symbols present.
text_image
Diagram showing a device with labeled components and a circular diagram illustrating cellular or microbial structure with numbered arrows.Welcome to AEG! Thank you for choosing our appliance.

Get usage advice, brochures, trouble shooter, service and repair information:
www.aeg.com/support
Subject to change without notice.
CONTENTS
- SAFETY INFORMATION AND INSTALLATION.... 64
- PRODUCT DESCRIPTION....64
- DAILY USE....65
- CARE AND CLEANING....69
- TROUBLESHOOTING....71
- ENVIRONMENTAL CONCERNS....72
1. SAFETY INFORMATION AND INSTALLATION

WARNING!
Refer to the separate Installation Instructions booklet for Safety Information and Installation. Read carefully the Safety chapters before any use or maintenance of the appliance.
2. PRODUCT DESCRIPTION
2.1 Control panel overview
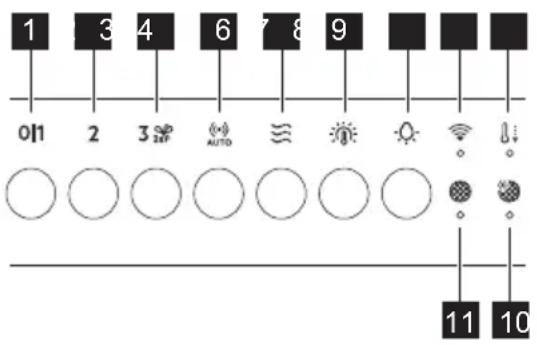
text_image
1 3 4 6 7 8 9 011 2 3 AUTO SUN Wi-Fi 11 10Function Description
1
First Speed / Off The motor switches to first speed level. Second press or long press while other functions operate, turns off the appliance.
2
Second speed The motor switches to second speed level. Second press turns off the appliance.
| Function Description | |
| 3 | Third speed / Boost function The motor switches to third speed level. Press and hold for 2 seconds to activate the Boost function. Second press turns off the appliance. |
| 4 | AutoSense Activates and deactivates the AutoSense function. |
| 5 | Breeze The hood operates on the lowest speed. After 60 minutes the motor turns off. |
| 6 | Light colour temperature Changes the light colour temperature. |
| 7 | Lamp Turns the lights on and off. Changes the light intensity. |
| 8 | WiFi indicator Indicates WiFi connection status. |
| 9 | Automatic cool down Indicates that the Automatic cool down is active. |
| 10 | AutoSense filter notification Reminds to change or clean the AutoSense filter. |
| 11 | Filter notification Reminds to change or clean the charcoal filter and clean the grease filter. |
3. DAILY USE
3.1 Using the hood - manual mode
Check the recommended speed according to the table below.
| 0|1 | While heating up food, cooking with covered pots. |
| 2 | While cooking with covered pots on multiple cooking zones or burners, gentle frying. |
| 3 | While boiling and frying big quantities of food without a lid, cooking on multiple cooking zones or burners. |
| While boiling and frying big quantities of food without a lid, big humidity. After 8 minutes the appliance returns to previous setting. | |
| Refreshes the air in kitchen after cooking at a very low noise level. The function turns off automatically after 60 minutes. Use after cooking only. |

It is recommended to leave the hood operating for approximately 15 minutes before and after cooking.
Activating the appliance
To operate the hood:
Press the desired fan speed button.
Deactivating the appliance
To turn off the fan touch the activated speed again or long press 011
Perfect Illumination - Lighting

The hood lighting works independently to other hood functions.
Activating and deactivating the lighting
To illuminate the cooking surface press button. Press the button again to change the light intensity in the following order: Maximum, Medium, Low, Off.
To switch off the lights, press and hold the button for 3 seconds.
Setting the light colour temperature

The hood remembers the last setting of the light intensity and colour temperature.
There are two ways to set the light colour temperature:
- Press the button to change the colour temperature from neutral, through warm to cold.
- Press and hold the button to move smoothly between light colour temperatures.
Release it once you reach the desired setting.
AuroraTech®
It is a function that automatically adjusts the illumination colour and intensity based on the time of day, creating an optimal ambiance. Use the app to activate this function.
i
After activating from the app, the function will operate each time the lighting is switched on. You can still manually adjust the lighting settings using the
and 📷 Buttons. However, the AuroraTech® function will be deactivated.
3.2 Hob ^2 Hood function
It is a function that connects the hob to a hood. Both the hob and the hood are equipped with an infrared signal communicator. The fan speed is determined based on the mode setting and the temperature of the hottest cookware on the hob. Alternatively, you can manually control the fan using the hob. This function can be activated from the hob's control panel.
i
For more information how to use the function, refer to the hob user manual.
i
For information on how to use the function together with AutoSense function, refer to the AutoSense chapter.
3.3 Activating Boost Function
When you press and hold 2, the Boost function starts to operate for 8 minutes. After that time, the appliance returns to its previous speed settings.
3.4 AutoSense
The function automatically adjusts the fan speed level basing on the TVOC sensor (Total Volatile Organic Compounds), air temperature, and relative humidity coming from the hob.
- Press to turn on the function. The function indicator lights up.
- To turn off the function, press or any other speed level button on the hood control panel.

WARNING!
If your hob is equipped with the Hob ^2 Hood function, switch its mode to H1 to use it together with the AutoSense. In this mode, the AutoSense function and lighting are activated automatically each time the hob is turned on. Refer to hob user manual.

WARNING!
During the first 96 hours after plugging in the appliance, the function runs in a dedicated startup mode for air sensor tuning. Hood reactions may vary at the startup mode. During that time the (**) AUTO indicator pulsates.

WARNING!
A blackout or unplugging and plugging in the appliance again causes internal sensor self-tuning. It may take up to 24 hours for the function to regain full capability.

The AutoSense function can run for a maximum of 5 hours.

Pressing the button with the hood off will start the AutoSense function at Breeze speed by default. When another speed has been already selected and the fan is working, the AutoSense function will start at that speed.

CAUTION!
This function is sensitive to cleaning agents. After cleaning, wait at least half an hour before turning on the function to avoid unintentional activation of the Boost function.

When used with a gas hob, the function may operate at higher speeds due to gas combustion.

While preparing food that generates little odour over an extended period (e.g. simmering), the hood may stop and then restart within a few seconds. If the hob power level is very low, the generated odour may not be sufficient for AutoSense to function properly. If your hood switches off and does not restart, use manual mode to operate it.
To permanently deactivate the function:
- Make sure the fan and the lighting are turned off.
- Press and hold the and buttons. AUTO and indicators blink twice.
To activate the function again:
- Make sure the fan and the lighting are turned off.
- Press and hold the AUTO and buttons . AUTO and indicators blink once.
3.5 Automatic cool down
This function turns on automatically when the temperature of the hood exceeds 70^ C. The hood continues to operate on the third speed to cool down. The indicator with the symbol ☐ on the panel turns on.

For safety reason, if the temperature grows higher while the function is active, the hood turns off and symbol starts to blink. The hood can be turned on again when the indicator stops blinking.
3.6 Filter notification
The filter alarm serves as a reminder to clean the grease filter and either replace or clean the charcoal filter, depending on its type. The indicator and blinks regularly for 30 seconds if the grease filter must be cleaned.
The indicator and blinks twice per every second for 30 seconds if the charcoal filter must be replaced or cleaned. Reset can be performed during or out of the notification period.

This function is activated after 40 hours of the operation of the hood when the grease filter requires cleaning and after 160 hours when the charcoal filter requires cleaning or replacement.

Refer to cleaning the grease filter in Care and cleaning chapter.

Refer to cleaning the charcoal filter or replacing the charcoal filter in Care and cleaning chapter.
To reset the function counter:
For grease filter, press and hold for 3 seconds.
For charcoal filter, press and hold 2 for 3 seconds.
The indicator stops blinking for the correct reset in the notification period. The indicator blinks once for correct reset out of the notification period.
To activate or deactivate the filter notification for charcoal filter:
- Make sure the fan and the light are turned off.
- Press and hold 2 and for 3 seconds. The function is activated if both indicators blink once. The function is deactivated if both indicators blink twice.
3.7 AutoSense filter notification
Filter alarm reminds to clean the AutoSense filter. The indicators and blink regularly for 30 seconds if the filter must be cleaned.

Refer to Care and cleaning chapter.
A reset can be performed during or out of the notification period.
To reset the function during the notification period:
- Press and hold the button for 3 seconds.
Indicators (++) and stop blinking for the correct reset.
To reset the function out of the notification period:
-
Make sure that the fan is turned off.
-
Press and hold the button for 3 seconds.
The indicator blinks once for the correct reset.
3.8 Deactivating and activating panel sounds
To deactivate or activate the sounds of the panel:
-
Make sure the fan and the lighting are turned off.
-
Press and hold and buttons. Both indicators blink once if sounds are enabled and twice if sounds are disabled.

The on/off sounds for the hood cannot be disabled.
3.9 WiFi connectivity setup
This feature enables you to connect your appliance to a WiFi network and pair it with your mobile device. Using this feature, you can access additional functions, control and monitor your appliance from your mobile device, and receive notifications.
To connect the appliance you need:
- Wireless network with the Internet connection,
- Mobile device connected to your wireless network.
Frequency/Protocol WiFi: 2.4 GHz / 802.11 bgn
Power WiFi 2.4 GHz: <20 dBm
Encryption WPA-PSK, WPA2-PSK, WPA3-SAE
Installing the app
Take the following steps to connect the appliance to WiFi :
- Make sure that the appliance is plugged into a power socket and turned on.
- Make sure that your mobile device is connected to the same wireless network you want to add your appliance to.
- To download the app, use your mobile device's camera to scan the QR code located on the back cover of the user manual. You can also download the app directly from Google Play (Android) or App Store (iOS).
- Open the app and register to create an account.
Configuring the appliance wireless connection
Follow the instructions in the app to complete the onboarding process:
-
Press and hold and buttons on
your appliance, the indicator flashes continuously. The onboarding process is ongoing. -
Continue to follow the instructions in the app to complete the onboarding process.

To stop the onboarding process, press the 01 or any of the speed level buttons.
After the successful onboarding, the indicator stops flashing and becomes steady.
i
If the onboarding process exceeds 1 minute, the control panel enters standby mode, the indicator turns off, and the app provides feedback on the onboarding status.
If the onboarding process is unsuccessful, the indicator flashes rapidly for 6 seconds and then turns off. Repeat the procedure.
i
Each time the action is performed using the app, the indicator blinks 3 times.
Disabling / Enabling the appliance wireless connection To temporarily disable the WiFi connection, press and hold 📋 and
buttons. The and indicators blink twice and the indicator turns off.
To enable the WiFi connection again, press and hold ≈ and 🔍 buttons, and indicators blink once.
Resetting the appliance wireless connection
To offboard the WiFi network, press and hold ≈ and 🔊 buttons. The indicator blinks until the successful reset.
This action results in the removal of the appliance from the WiFi network. To re-establish the connection, repeat all the steps described in the 'Configuring the appliance wireless connection' section.
4. CARE AND CLEANING
4.1 Notes on cleaning
Cleaning Agents
Do not use abrasive detergents and brushes. Clean the surface of the appliance with a soft cloth with warm water and a mild detergent.
After cooking some parts of appliance can get hot. To avoid stains appliance must be cooled down and dried with clean cloth or paper towels.
Clean stains with a mild detergent.
Keep the hood clean
Clean the appliance and grease filters each month. Clean the interior and grease filters carefully from fat. Fat accumulation or other residue may cause fire.
Grease filters can be washed in a dishwasher. The dishwasher must be set to a low temperature and a short cycle. The grease filter may discolour, it has no influence on the performance of the appliance.
Charcoal filter
The time of saturation of the charcoal filter varies depending on the type of cooking and the regularity of cleaning the grease filter. Refer to leaflet included in the accessory.
i
Before carrying out any maintenance, make sure there is no cookware on the hob and that the hood and the hob are disconnected from the power supply.
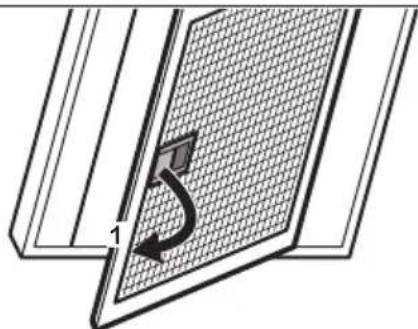
4.2 Cleaning the grease filter
Filters are mounted with the use of clips and pins on the opposite side.
To clean the filter:
- Pull the cover to open it.

natural_image
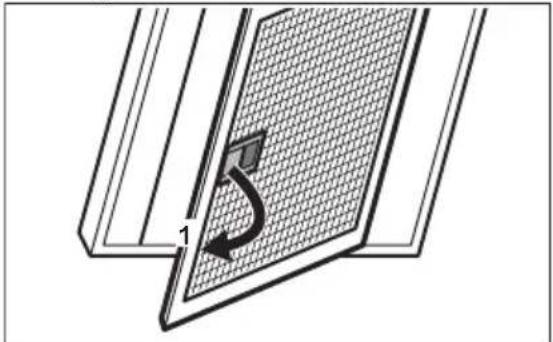
Technical line drawing of a rectangular structural component with an arrow indicating direction (no text or symbols)- Pull the handle on the filter underneath the hood and slightly tilt the front of the filter down.
natural_image
Diagram of a solar panel with a grid pattern and a curved arrow indicating rotation (no text or symbols)- Clean the filters using a sponge with non abrasive detergents or in a dishwasher.
i
The dishwasher must be set to a low temperature and a short cycle. The grease filter may discolour, it has no influence on the performance of the appliance.
- To mount the filters back follow the first two steps in reverse order. Repeat the steps for all filters if applicable.
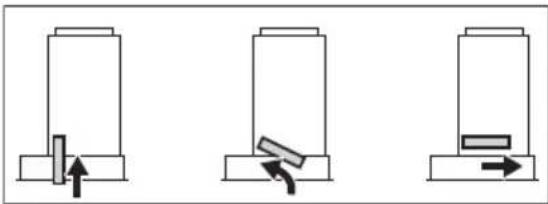
4.3 Replacing the charcoal filter - optional
i
Depending on type, filter can be or cannot be regenerated. Refer to the leaflet provided with the filter.
To replace the filter:
- Remove the grease filters from the appliance.
Refer to "Cleaning the grease filter" in this chapter. - Pull the tabs towards the bottom part of the filter.

text_image
1 1 2- Slightly tilt the front of the filter downwards, then pull.
- To install a new filter, perform the steps in the following order.
natural_image
Three schematic diagrams showing mechanical or electrical components with arrows indicating movement, no text or symbols present.i
Refer to the separate Installation Instructions booklet.
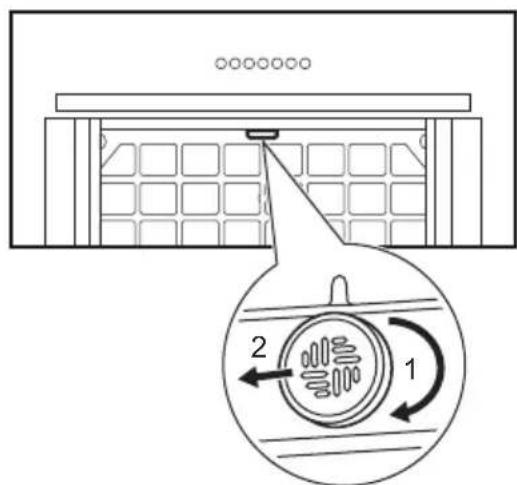
4.4 Cleaning the AutoSense filter
i
The AutoSense filter must be cleaned when the filter notification is on. Refer to the "AutoSense filter notification" chapter.
To remove the filter:
- Remove the grease filters from the appliance.
Refer to the "Cleaning the grease filter" chapter. - Turn the filter clockwise (1) and then pull (2).
text_image
Diagram showing a device with labeled components and a magnified circular diagram illustrating cellular or microbial structure.- Wash the filter in hot water without using detergent.
- To install the filter back, perform the steps in reverse order.
!
CAUTION!
The filter has to be fully dried before installing it back into the appliance.
4.5 Replacing the lamp
This appliance is supplied with a LED lamp and separate control gear (LED driver).
These parts can be replaced by a technician only. In case of any malfunction refer to "Service" in the "Safety Instructions" chapter.
5. TROUBLESHOOTING

WARNING!
Refer to Safety chapters.
5.1 What to do if...
| Problem Possible cause Remedy | ||
| You cannot activate the appliance. The appliance is not connected to a power supply or it is connected incorrectly. | Check if the appliance is correctly connected to the electrical supply. | |
| You cannot activate the appliance. Lack of electrical power supply. | Check the fuse or the main switch. If the fuse or the switch continue to break the circuit, contact a qualified electrician. | |
| You cannot activate the appliance. Cabinet doors are not aligned with the cabinet frame. | Align the cabinet doors. | |
| The lamp does not operate. The lamp is defective. Replace the lamp. Refer to the "Care and Cleaning" chapter. | ||
| The brightness level or light colour temperature is not as described in the instructions. | Incorrect Perfect illumination setting. | Press the button to check if you are able to change all three colour temperatures. |
| The lamp is defective. Contact an Authorised Service Centre. | ||
| The appliance does not absorb enough vapours. | The motor speed is not adequate to the appearing vapours. | Change the speed of the motor. |
| The indicator pulsates. | The internal sensor of the function is in the self-tuning mode. | Refer to the AutoSense in "Daily use" chapter. |
| The indicator blinks rapidly three times, and the AutoSense function does not start. | The function is permanently deactivated. | Activate the function. Refer to the AutoSense in "Daily use" chapter. |
| The indicator blinks rapidly for three seconds, and the AutoSense function does not start. | There is a malfunction. Contact an Authorised Service Centre. | |
| The filter alarm indicator is on together with or . 2 | The filter alarm is on. The grease filter must be cleaned or the charcoal filter (optional) must be replaced or cleaned. | Refer to the filter notification in "Daily use" chapter. |
| The filter alarm indicator on together withAUTO | The AutoSense filter alarm is on. The filter must be cleaned. | Refer to the AutoSense filter notification in "Daily use" chapter. |
| The App cannot connect to the appliance. | Connectivity issues. | Check the wireless signal. |
| Make sure that the wireless connection is on. Refer to "WiFi connectivity setup" chapter. | ||
| Check if your mobile device is connected to the wireless network. | ||
| Check your home network and router. | ||
| Restart the router. | ||
| Contact your wireless service provider if there are further problems with the wireless network. | ||
| The appliance, the mobile device, or both need to be configured again because a new router has been installed or the router configuration has been changed. Refer to "WiFi connectivity setup" chapter. | ||
| The App cannot frequently connect to the appliance. | Connectivity issues. | Make sure that the wireless signal reaches the appliance. Try to move the home router as near the appliance as possible or consider purchasing a wireless range extender. |
| Make sure the wireless signal is not disrupted by a microwave. Turn the microwave off. Avoid using the microwave and the remote control of the appliance at the same time. | ||
6. ENVIRONMENTAL CONCERNS
Recycle materials with the symbol . Put the packaging in relevant containers to recycle it. Help protect the environment and human health by recycling waste of electrical and electronic appliances. Do not dispose of
appliances marked with the symbol with the household waste. Return the product to your local recycling facility or contact your municipal office.
natural_image
Technical line drawing of a rectangular structural component with internal channels and a curved arrow indicating direction (no text or symbols)natural_image
Diagram of a solar panel with a curved arrow indicating rotation or movement, no text or symbols presentnatural_image
Three identical diagrams showing a mechanical or electrical component with arrows indicating movement, no text or symbols present.
text_image
Diagram showing a device with labeled components and a circular diagram illustrating a biological or mechanical process with arrows and numbered parts.natural_image
Technical line drawing of a rectangular structural component with an arrow indicating direction (no text or symbols)natural_image
Diagram of a solar panel with a curved arrow indicating rotation or movement, no text or symbols presenttext_image
Diagram showing a grid layout with directional arrows labeled 1 and 2, indicating movement or flow in a rectangular area.- Kallutage filtri esiosa kergelt allapoole, seejärel tömmake.
- Uue filtri paigaldamiseks teostage samad toimingud vastupidises järjekorras.

natural_image
Three diagrams showing mechanical or electrical components with arrows indicating movement, no text or symbols present.i
Vt eraldi paigaldusjuhiste brošüüri.
4.4 AutoSense filtri puhastamine
i
text_image
Diagram illustrating a biological or chemical process with labeled components and directional arrows, including numbered parts 1 and 2.natural_image
Technical line drawing of a rectangular structural component with internal channels and a curved arrow indicating direction (no text or symbols)natural_image
Diagram of a solar panel with a grid pattern and a curved arrow indicating rotation (no text or symbols)natural_image
Three diagrams showing a mechanical or electrical setup with arrows indicating movement, no text or symbols present.
text_image
Diagram illustrating a biological or chemical process with labeled components and directional arrows, including numbered parts 1 and 2.natural_image
Technical line drawing of a rectangular structural component with internal channels and a curved arrow indicating direction (no text or symbols)natural_image
Diagram of a door panel with a grid pattern and a curved arrow indicating rotation (no text or symbols)text_image
Diagram showing a grid layout with labeled arrows and curved arrows indicating direction or flow, possibly illustrating a physics or engineering concept.natural_image
Three diagrams showing mechanical or electrical components with arrows indicating movement, no text or symbols present.i
text_image
Diagram showing a device with labeled components and a circular diagram illustrating rotational flow or movement between two parts.3. SVAKODNEVNA UPORABA
3.1 Uporaba nape - ručni način rada
natural_image
Technical line drawing of a rectangular structural component with an arrow indicating direction (no text or symbols)- Povucite ručicu na filtru ispod nape i lagano nagnite prednji dio filtra prema dolje.
natural_image
Diagram of a solar panel with a grid pattern and a curved arrow indicating rotation (no text or symbols)- Očistite filtre pomoću spužve s neabrazivnim deterdžentima ili u perilici posuđa.
i
text_image
Diagram illustrating a biological or chemical process with labeled components and directional arrows, including numbered parts 1 and 2.-
Operite filtar u vrućoj vodi bez uporabe deterdženta.
-
Za instaliranje filtra, ponovite korake obrnutim redoslijedom.

OPREZ!
Prije ugradnje nazad u uređaj filtar se mora potpuno osušiti.
4.5 Zamjena žarulje
natural_image
Technical line drawing of a rectangular structural component with internal channels and a curved arrow indicating direction (no text or symbols)natural_image
Diagram of a solar panel with a grid pattern and directional arrow indicating rotation (no text or symbols)text_image
Diagram showing a grid layout with directional arrows labeled 1 and 2, indicating movement or flow in a technical or mathematical context.natural_image
Three schematic diagrams showing mechanical or electrical components with arrows indicating movement, no text or symbols present.
text_image
Diagram illustrating a biological or chemical process with labeled components and directional arrows, including numbered parts 1 and 2.natural_image
Technical line drawing of a rectangular structural component with internal channels and a curved arrow indicating direction (no text or symbols)natural_image
Diagram of a solar panel with a grid pattern and a curved arrow indicating rotation (no text or symbols)natural_image
Three identical diagrams showing a mechanical or electrical component with arrows indicating movement, no text or symbols present.i
text_image
Diagram showing a device with labeled components and a circular diagram illustrating cellular or microbial structure with numbered arrows.natural_image
Technical line drawing of a rectangular structural component with an arrow indicating direction (no text or symbols)natural_image
Diagram of a solar panel with a curved arrow indicating rotation (no text or symbols)text_image
Diagram showing a grid layout with numbered arrows and curved arrows indicating direction or movement, possibly illustrating a mechanical or electrical system.natural_image
Three diagrams showing a mechanical setup with a block, a tool, and a rectangular block on a base (no text or symbols)i
text_image
Diagram showing a device with labeled components and a circular diagram illustrating particle movement or flow direction.natural_image
Technical line drawing of a rectangular structural component with an arrow indicating direction (no text or symbols)natural_image
Diagram of a door panel with a grid pattern and a curved arrow indicating rotation (no text or symbols)natural_image
Three schematic diagrams showing mechanical or electrical components with arrows indicating movement (no text or symbols)i
text_image
Diagram showing a device with labeled components and a circular diagram illustrating cellular or mechanical interaction with arrows.The software in this product contains components that are based on free and open source software. AEG gratefully acknowledges the contributions of the open software and robotics communities to the development project.
To access the source code of these free and open source software components whose license conditions require publishing, and to see their full copyright information and applicable license terms, please visit: http://aeg.opensoftwarerepository.com (folder NIUS)