
PSB 400 - Soundbar PEAQ - Free user manual and instructions
Find the device manual for free PSB 400 PEAQ in PDF.

| Product type | Soundbar with subwoofer |
| Brand | PEAQ |
| Model | PSB 400 |
| Dimensions (soundbar) | 950 x 71 x 112 mm |
| Dimensions (subwoofer) | 240 x 420 x 240 mm |
| Power supply | 100-240 V~, 50/60 Hz |
| Output power (RMS) | 30 W x 2 + 60 W + 120 W |
| Bluetooth version | 4.2 |
| Bluetooth range | 10 m |
| Connectivity | HDMI eARC, HDMI IN 1, HDMI IN 2, USB, Optical, Coaxial, AUX 3.5 mm |
| Supported audio formats | Dolby Atmos, Dolby Audio, PCM |
| Sound modes | Music, Movie, Sport, Voice, Vertical Surround |
| Remote control functions | On/Off, source selection, volume, bass, treble, mute, play/pause, fast forward, rewind |
| Remote control batteries | 2 x LR03/AAA (1.5 V) |
| Included accessories | Power cables (x2), HDMI cable, stereo audio cable, stereo RCA audio cable, wall mount kit, wall brackets, remote control |
| Wall mountable | Yes, with included wall brackets |
| Protection class | II (double insulation) |
| Intended use | Sound playback via Bluetooth, wired inputs and USB |
| Cleaning | Slightly damp cloth, no solvents |
| Maintenance | Disconnect before cleaning, do not repair yourself |
Frequently Asked Questions - PSB 400 PEAQ
User questions about PSB 400 PEAQ
0 question about this device. Answer the ones you know or ask your own.
Ask a new question about this device
Download the instructions for your Soundbar in PDF format for free! Find your manual PSB 400 - PEAQ and take your electronic device back in hand. On this page are published all the documents necessary for the use of your device. PSB 400 by PEAQ.
USER MANUAL PSB 400 PEAQ


Deutsch 9-9
English: 10 - 6
Español 17 - 23
François 24 - 30
E2yak31 35
balano 46 - 52
Sicherheitshinweise
Important Safety Instructions. Please read the instructions carefully and keep them for later use.
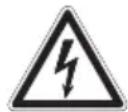
The lightning flash with arrow head within an equilateral triangle is intended to alert the user to the presence of uninsulated “dangerous voltage” within the product’s enclosure that may be of sufficient magnitude to constitute a risk of electric shock to persons and animals.

The exclamation point within an equilateral triangle is intended to alert the user to the presence of important operating and maintenance instructions in the literature accompanying the device.

For safety reasons, this class II product is provided with double or reinforced insulation as indicated by this symbol.
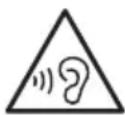
Danger! Excessive sound pressure from earphones and headphones can cause hearing loss. If you listen to loud music for a long time, your hearing may be impaired. Set to a moderate volume.
- If you would like to connect an external device with this product, a good quality shielded cable must be used, which ensures the electromagnetic compatibility of the product and the used cable as a whole.
- This product is only intended for audio entertainment. Do not use the product for any other purpose than described in this manual in order to avoid any hazardous situation. Improper use is dangerous and will void any warranty claim.
- For household use only. Do not use outdoors.
- Danger! Excessive sound pressure from earphones and headphones can cause hearing loss. If you listen to loud music for a long time, your hearing may be impaired. Set to a moderate volume.
-
Danger of suffocation! Keep all packaging material away from children.
-
Only use under normal room temperature and humidity conditions.
- The product is only suitable for use at moderate degrees of latitude. Do not use in the tropics or in particularly humid climates.
- Do not move the product from cold into warm places and vice versa. Condensation can cause damage to the product and electrical parts.
- Do not use attachments or accessories other than recommended by the manufacturer or sold with this product. Install in accordance with this user manual.
- Do not install near any heat sources such as radiators, heat registers, stoves or other products (including amplifiers) that produce heat.
- Do not shift or move the product when powered on.
- Do not touch, push or rub the surface of the product with any sharp or hard objects.
- Danger! To reduce the risk of fire or electric shock, do not expose this product to rain or moisture.
- The product shall not be exposed to dripping or splashing and no objects filled with liquids, such as vases, shall be placed on the product.
- Care should be taken so that no objects or liquids enter the enclosure through openings.
- No naked flame sources, such as lighted candles, should be placed on the product.
- Refer all servicing to authorised service agent. Do not attempt to repair the product yourself. Servicing is required when the product has been damaged in any way, such as the supply cord or plug are damaged, liquid has been spilled, objects have fallen into the product, the enclosure is damaged, the product has been exposed to rain or moisture, does not operate normally, or has been dropped.
- Before connecting the product to a socket outlet, make sure the voltage indicated on the product corresponds to your local mains.
- Only use the product with the provided adapters.
- Regularly check if the cord, product or extension cable is defective. If found defective, do not put the product into operation. Immediately pull the plug.
- Place the cord and, if necessary, an appropriate extension cable in such away that pulling or tripping over it is impossible. Do not allow the cord to hang down within easy reach.
- Do not jam, bend or pull the cord over sharp edges.
- The power supply is used as the disconnect device; the disconnect device shall remain readily operable. To completely disconnect the power input, disconnect the power supply.
- The product may not function properly or not react to the operation of any control due to electrostatic discharge. Switch off and disconnect the product; reconnect after a few seconds.
- Protect the supply cord from being walked on or pinched particularly at the plug, convenience receptacles and the point where it exits from the product.
- Never touch the power supply with wet hands.
- Disconnect the power supply in case of faults during use, during lightening storms, before cleaning and when not using the product for a longer period of time.
- Danger! Before cleaning, switch the product off and disconnect the power supply from the socket.
- When the product has reached the end of its service life, make it defective by disconnecting the plug from the socket and cutting the cord in two.
- Caution! There is danger of explosion from improper replacement of the batteries. Replace batteries only with the same or equivalent type of battery.
- Always change the entire battery pack. Do not mix old and new batteries, or batteries with different charge state.
- Make sure the batteries are correctly inserted. Observe the polarity (+) plus / (-) negative on the battery and the housing. Improperly inserted batteries can lead to leakage or, in extreme cases, a fire or an explosion.
- Remove used batteries. Remove the batteries if you know that the product will not be used for a longer period of time. Otherwise, the batteries could leak and cause damage.
- If the batteries leak, remove them with a cloth and dispose of them accordingly. Prevent battery fluid from coming into contact with skin and eyes. If you do get battery fluid in your eyes, flush them thoroughly with lots of water and consult a physician immediately. If battery fluid comes into contact with your skin, wash the affected area with lots of water and soap.
- When installing the device, leave sufficient space for ventilation. Do not install in bookcases, built-in cabinets or the like.
- Do not impede ventilation by covering the ventilation openings with items, such as newspapers, table-cloths, curtains, etc. Do not insert any objects.
- Warning! Do not ingest the battery, Chemical Burn Hazard.
- Keep new and used batteries away from children.
- If you think batteries might have been swallowed or placed inside any part of the body, seek immediate medical attention.
- If the battery compartment does not close securely, stop using the product and keep it away from children.
- Never expose batteries to excessive heat (e.g. bright sun, fire), and never throw them into fire. The batteries could explode.
- Remove the batteries from the product before disposal.
- If the battery is swallowed, it can cause severe internal burns in just 2 hours and can lead to death.
Intended use
The product is intended only for sound playback via Bluetooth® and sound reproduction via audio cable inlet (AUX, HDMI, HDMI eARC, OPTICAL, COAXIAL) or USB storage. Use the product only as described in this manual.
The Imtron GmbH assumes no liability for damage to the product, for property damage or for personal injury due to careless or improper usage of the product, or usage of product which does not meet the manufacturer's specified purpose.
Partlist
A. Mains socket AC\~
B. COAXIAL socket
C. OPTICAL socket
D. USB socket
E. AUX socket
F. HDMI OUT / TV eARC socket
G. HDMI IN 1 socket
H. HDMI IN 2 socket
- On / off button
J. Volume button +
K. Volume button -
L. Mode selection button
M. HDMI cable
N. Power cord (2x)
O. Stereo audio cable
P. Stereo Cinch audio cable
Q. Wall mounting set
R. Flat head screws for wall mounting
S. Wall mounting bracket
T. Mains socket AC\~
U. Pairing button PAIR
V. Control LED
W. Subwoofer
X. Soundbar
Y. Display
Accessories
2 x Power cord
1 x Stereo audio cable
1 x Stereo cinch audio cable
1 x Wall mounting set
2 x Wall mounting bracket
1 x HDMI cable
Remote control
-
On / off button
-
AUX button
-
USB button
-
HDMI 1/2 button
-
Back button
-
BASS + button
-
Mute button
-
BASS - button
-
VERTICAL SURROUND button
-
VOICE button
-
MOVIE button
-
DIMMER button
-
Battery compartment with cover
-
MUSIC button
-
SPORT button
-
Volume - button
-
TREBLE - button
-
TREBLE + button
-
Volume + button
-
Forward button▶▶
-
Play / pause button ▶II
-
HDMI eARC button
-
OPT/COA button
-
BT (Bluetooth)
Note
The keys on the remote control function the same way as the keys on the device. All main functions can be accessed with the remote control. If the remote control does not work, please check the followings:
– Try with a brand new battery.
- Is the battery installed with correct polarity (+ to +,- to -)?
- If there any object between the product and remote control causing obstruction.
– Try to darken the room or to reduce the distance between device and remote control.
Before first time use
Remove the product and accessories from the original packaging carefully. For disposal of the original packaging, follow applicable legal requirements. If you have questions about correct disposal, contact your local authority. Check the package contents for completeness and damage. If the package content is incomplete or damages can be found, contact your place of purchase immediately.
Connections
POWER SUPPLY
Connect the plug with a power socket when you have completed the following assembly steps.
Using the connectors
Note: The HDMI eARC port on the soundbar can only be connected to TVs and other devices that have an HDMI ARC (Audio Return Channel) connection 1. If standard HDMI outputs and inputs are used on the playback device and TV, etc., connect the playback device to HDMI 1 or 2 and the output device (TV) to HDMI OUT of the soundbar 2.
If available on your TV, you can also connect the soundbar with cables of the type OPTICAL or COAXIAL 3 or with a audio cable 4.
You can also play audio files (mp3) from USB sticks by connecting an USB stick containing audio files.
Note: If you want to connect an external device to this product, a good quality shielded cable must be used, which confirms the electromagnetic compatibility of the product and the cable used as a whole.
For using Dolby Atmos®
Dolby Atmos ^® is available only in HDMI mode. For the details of the connection, please refer to "HDMI Connection".
-
To use Dolby Atmos ^® in HDMI 1 / HDMI 2 / HDMI ARC mode, your TV has to support Dolby Atmos ^® .
-
Make sure that "No Encoding" is selected for bitstream in the audio output of the
connected external device (e.g. Blu-ray DVD player, TV etc.).
- If Dolby Atmos / Dolby Digital / PCM format is received, the soundbar will show DOLBY ATMOS / DOLBY AUDIO / PCM AUDIO.
Remote control – inserting/replacing battery
Slide the battery compartment cover in the direction of the arrow and pull it out. Insert 2 new batteries type LR03/AAA, paying attention to correct polarity. Slide the battery compartment cover back on and let it snap into place.
Installation
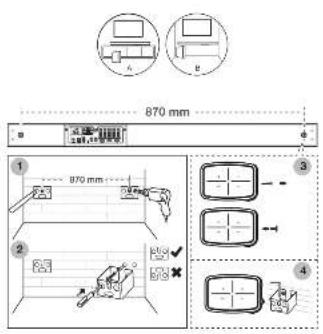
There are 2 options regarding the structure of the soundbar. Note that there must be an electrical outlet nearby. Note the following sections.
1. Placing the soundbar
Place the soundbar and the subwoofer with the rubber feet on a flat and horizontal surface (e.g. under and in front of a TV). Both components must be installed near a mains socket outlet.
Alternatively, you can attach the soundbar to the wall using the wall brackets (e.g. above and behind the TV). Please note the following chapters.
2. Wall mounting - preparation
- The provided wall mount brackets can be used to fix the soundbar to a wall. The wall mount brackets are designed for use on vertical walls constructed of solid concrete or bricks.
- When installing on a hollow brick wall, verify first that they have the wall thickness suitable for wall plugs with 2.5 cm length.
- If you are uncertain about the construction of your wall, please consult a qualified contractor or installer for assistance.
- Additional tools (not included) are required for the installation.
- Use an electronic stud finder to check the wall type before drilling and mounting.
- During mounting, keep away children and pets.
- Make sure the soundbar is mounted in reach to the next wall outlet.
Mounting soundbar on the wall
- Drill 4 holes (∅ 3-8 mm each according to wall type) with correct distances. Insert wall plugs into the drilled holes (use a hammer if necessary) fix the brackets with the 4 screws. Make sure that you fix the brackets the right way round.
- Unscrew the two screws on the back and screw in the supplied flat head screws firmly.
- Plug the power cords into the AC\~ power connections of the soundbar and subwoofer. Plug the desired audio transmission cable into the corresponding socket on the back of the soundbar.
Note: If the soundbar is to be attached to a wall and connected via an HDMI cable, you will need an HDMI cable with an angled plug.
- Now attach the soundbar onto the brackets. Make sure both screw heads are properly seated in the holes.
Operation
Turn on the soundbar by pushing on / off button at the device or at the remote control. A blue, green or orange LED turns on.
Bluetooth®
To play via Bluetooth ^® , press the BT button on the remote control or the mode selection button at the on-state soundbar until bt is shown in display.
Turn on the Bluetooth® connection on the playback device and search for devices. Connect (pair) your playback device to the Soundbar labelled PSB 400. If the connection is successful, an acoustic signal ("paired") sounds. Future use of the same player will automatically connect to the soundbar when the Bluetooth® feature is enabled on both devices. Start playback.
If supported by your playback device you can operate the functions play / pause ▶, skip forward ▶ and back using the remote control.
Audio input
Press the mode selection button at the on-state soundbar or the AUX, BT, USB, OPT/COA, HDMI1/2 or HDMI eARC button to activate audio input. The current audio input mode is shown in display.
Adjust the volume on the playback device or with the volume buttons - / + on the remote control in 32 steps.
Mute the soundbar with the mute button if necessary.
Switch the soundbar to standby mode with the on / off buttons at the device or remote control. The selected input is retained when it is switched on again.
Cleaning and care
- Pull the power plug from the electrical outlets before cleaning.
- Clean the exterior with a lightly damp cloth.
- Do not use petrol, alcohol or other abrasive cleansers to clean the exterior.
- Do not allow liquids to spill into any openings.
- Use the original packaging if it is necessary to transport the unit.
Declaration of conformity
Hereby, Imtron GmbH declares that the radio equipment type PSB 400 is in compliance with Directive 2014/53/EU. The full text of the EU declaration of conformity is available at the following internet address:
http://www.peaq-online.com/nc/suche/
Disposal

Do not dispose of this appliance as unsorted municipal waste. Return it to a designated collection point for the recycling of WEEE. By doing so, you will help to conserve resources and protect the environment. Contact your retailer or local authorities for more information.

Please dispose of batteries in an environmentally friendly manner Do not put batteries into the household waste. Please use the return and collection systems in your community or contact the dealer where you purchased the product.
Troubleshooting
If there are any problems during operation, please refer to the following table. If problems cannot be solved as indicated under Solution, please contact your manufacturer.
| Problem Possible causes Solution | ||
| Appliance does not work | Power plug not connected properly | Check if the power plug is properly connected to an electrical outlet |
| No sound • Volume is set too low • Increase the volume level | ||
| Bad audio quality • Bad Bluetooth® reception • Shorten the distance between the Bluetooth® device and the appliance and make sure that no obstacles are disturbing the connection | ||
| Remote control does not work | Battery empty or not correctly inserted | Check that the battery is correctly inserted or, if necessary, replace |
| Distance between appliance and remote control is too big | Reduce the distance between the remote control and the soundbar and make sure there are no obstacles between them. Aim the remote directly at the Infrared receiver on the soundbar | |
| Appliance does not react to pressed buttons | Malfunction due to electrostatic discharge | Disconnect the appliance from the power supplyConnect the power plugs again to an electrical outlet |
Technical Data
Rated voltage : 100 - 240 V\~ 50/60 Hz
Rated power : 30 W
Protection class : II
Remote control
Batteries : 2 x 1.5 V , LR03/AAA ---
Connectivity
Bluetooth®-Profile : A2DP, AVRCP
Bluetooth®-range : 10 m
Input : Stereo 3.5 mm Line in, HDMI (eARC), USB, Optical, Coaxial
Speaker
Output power (RMS) : 30 W x 2 + 60 W + 120 W
Frequency range : 40 Hz - 20 KHz
Dimensions : 950 x 71 x 112 mm (Soundbar)
240 x 420 x 240 mm (Subwoofer)