SCD-130P - Vacuum Cleaner WOOZOO - Free user manual and instructions
Find the device manual for free SCD-130P WOOZOO in PDF.

User questions about SCD-130P WOOZOO
0 question about this device. Answer the ones you know or ask your own.
Ask a new question about this device
Download the instructions for your Vacuum Cleaner in PDF format for free! Find your manual SCD-130P - WOOZOO and take your electronic device back in hand. On this page are published all the documents necessary for the use of your device. SCD-130P by WOOZOO.
USER MANUAL SCD-130P WOOZOO
For indoor/household use only
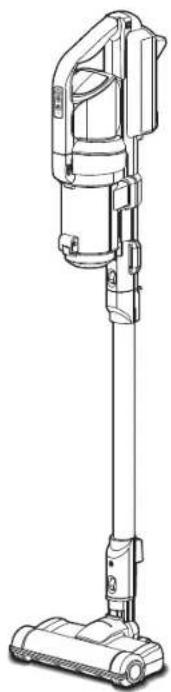
Cordless Vacuum Cleaner
SCD-130P
Instruction Manual
natural_image
Line drawing of a vacuum cleaner with handle and base (no text or symbols)SpecificationsContents
Specifications 2
Safety precautions 3
Usage precautions 5
Parts 6
Preparation 8
How to use 10
Cleaning and maintenance 13
How to dispose of the product 16
Troubleshooting 17
| Dust cup capacity | Dust cup capacity | 0.3L |
| Maximum capacity | 0.35L | |
| Charging temperature 5~35 | °C | |
| Battery run time*1 (about) | Normal 20 minutes | |
| Turbo 7 minutes | ||
| Auto | 30 minutes (depends on the usage) | |
| Vacuum | 50 minutes (depends on the usage) | |
| Battery | Lithium-ion secondary battery | |
| Battery capacity 1,300mAh | ||
| Battery lifetime | Repeated charging of 1,500 times | |
| Rated voltage 18.5V | --- | |
| Charger power Charging adapter | Input | 100-240V~, 50-60Hz, 0.5A |
| Output 23V, 0.5A --- | ||
| Charging time (about) | 3.5 hours (charging time may become longer depending on the room temperature, usage time, etc.) | |
| Product size (about) (including the floor head and extension pipe) | W252 x D220 x H1,060mm | |
| Product weight (about) | Main unit only | 1.5kg |
| Including the floor head and extension pipe | 2.2kg | |
| Accessories | Charging adapter, thin nozzle, exhaust filter x 5 pieces (1 piece is installed in the cleaner) | |
*1 Initial temperature of the battery in a fully charged status: 20°C.
*2 The battery's lifetime according to the usage environment and condition, including the ambient temperature and how often it is used.
* The specification of the product is subject to change without prior notice.
Safety precautions
Make sure to follow the "Safety precautions" first in order to use the cleaner correctly.
The safety precautions describe the matters required to observe in order to prevent a personal injury or property damage.
Examples of symbols

This symbol means "Reminding"

This symbol means "Prohibited"

This symbol means necessary "Recommend"

Warning
The symbol means risks which may lead to death or serious injury during faulty operation.
Caution about the battery

Be sure to
● Flush your eyes immediately if any electrolyte solution gets into them Failure could cause damage to your eyes. Seek medical attention immediately after flushing your eyes.

Do not disassemble
- Do not disassemble the battery Failure could cause heating or an explosion, resulting in a fire or an injury.

Prohibited
- Do not install any battery except the installed battery
- Do not charge the battery in any way except as specified

Prohibited
● Do not use the battery of this cleaner for any other devices
- Do not charge the battery in a hot place or a place which is exposed to direct sunlight
● Do not put the battery into fire or heat it
- Do not drop the battery from a high place, or throw, put a nail in, hammer or stamp on the battery
- Do not wet the battery
Failure could cause heating, an explosion, or leakage, resulting in a fire, an injury or soiling of the surrounding area.

Warning
The symbol means matters which may lead to death or serious injury during faulty operation.

Unplug the product
● In the case of any abnormality or machine failure, stop using the cleaner immediately and unplug the charging adapter Failure could cause smoke, a fire, or an electric shock.
[Example of abnormalities]
• Abnormal sound or smell
• The charging adapter overheats abnormally
→Stop using the cleaner and contact the store where the product was purchased from or the Iris Call Center.

Avoid getting the product wet
- Do not use the machine in places having the possibility of getting wet, such as outside in the rain, wet areas, or in a bathroom
- Do not wet the product or the charging adapter, or immerse either unit in water Failure could cause a fire or an electric shock.

Be sure to
● The appliance is only to be used with the unit provided

Prohibited
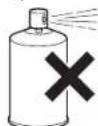
- Do not spray liquids onto the cleaner and vacuum liquid substances (such as insecticides, hair care products, or lubricating oil)
- Do not use the cleaner with flammable or combustible substances (such as kerosene, gasoline, thinner, copy machine toner, etc.)
- Do not use the cleaner to vacuum oil, smoke or steam
- Do not use the cleaner to vacuum foamed substances or liquid substances, such as carpet cleaning agents
- Do not use the cleaner near combustible substances, lit cigarettes, or incense sticks Failure could cause a fire.

Be sure to
● This appliance can be used by children aged from 8 years and above and persons with reduced physical, sensory or mental capabilities or lack of experience and knowledge if they have been given supervision or instruction concerning use of the appliance in a safe way and understand the hazards involved. Children shall not play with the appliance. Cleaning and user maintenance shall not be made by children without supervision
Safety precautions (continued)
Use the charging adapter correctly

Be sure to
- Remove dust from the charging adapter periodically
Accumulation of dust may cause poor insulation due to humidity, resulting in a fire or an electric shock.
● Insert the charging adapter into the socket thoroughly
Failure could cause a short circuit, resulting in a fire or an electric shock.

Avoid getting the product wet
- Do not insert or remove the charging adapter with a wet hand
Failure could cause an electric shock, a burn, or an injury.

Prohibited
- Do not use the charging adapter when it is damaged or inserted into the socket loosely
Failure could cause a short circuit, resulting in a fire or an electric shock. - Do not operate the cleaner at any voltage except the rated voltage
Failure could cause a fire or an electric shock. - Do not let infants touch the charging adapter
Failure could cause an injury or an electric shock.

Do not
disassemble
- Do not disassemble, repair, or modify the cleaner Failure could cause a fire, an electric shock or an injury. For repair, contact the store where the product was purchased from or the Iris Call Center.

Do not touch
- Do not touch the soft roller brush of the floor head while operating the cleaner Failure could cause your finger to get caught in the cleaner, resulting in an injury. Do not use the cleaner especially when you are near children.
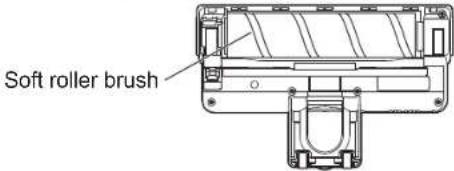
text_image
Soft roller brushCaution about the battery

Be sure to
- Keep the battery away from fire if any electrolyte solution is leaking from it or there is an odor
Failure could cause ignition.
- Wash your skin or clothes immediately if in contact with any electrolyte solution Failure could cause skin inflammation or damage to clothes.

Prohibited
- Do not use the battery if any electrolyte solution is leaking from it or there is an odor
Failure could cause heating, ignition, and soiling in the surrounding area.
- Keep the battery away from infants when disposing of it
Failure could cause an electric shock or an injury.

Caution
The symbol means risks which may lead to a personal injury or property damage if the cleaner is used incorrectly.

Prohibited
- Do not use the cleaner for any purpose except for cleaning
Failure could cause a malfunction or a fire. - Do not use the cleaner for any purpose except for household use (for business purpose, etc.)
This cleaner is designed for household use only. If the cleaner is used for any purpose except for household use, including a business purpose, such use may cause a fire, etc.

Prohibited
- Do not remove the dust cup while operating the cleaner
Failure could cause an accident.

Prohibited
- Do not keep operating the cleaner with the suction port closed
● Do not close the exhaust port
Failure could cause overheating, resulting in deformation, a malfunction, or a fire.

Avoid fire
- Keep the cleaner away from fire and heating equipment
Failure could cause an air current to fan the flame of heating equipment, resulting in a fire.
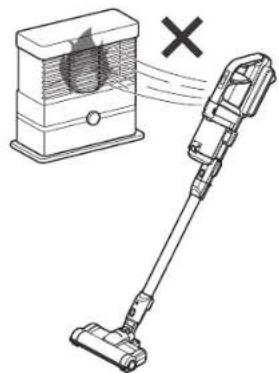
natural_image
Illustration of a vacuum cleaner next to a box with a circular logo and a cross symbol (no text or labels)
Prohibited
● Do not climb onto or lean on the cleaner
- Do not use the cleaner at a place within the reach of children
- Do not allow children to play with the cleaner
Failure could cause an injury.
- Do not use the cleaner outdoors
Failure could cause a malfunction, resulting in a short circuit or a fire.

Unplug the product
● Hold the charging adapter instead of pulling on the charging cord to unplug the charging adapter
Failure could damage the cord, resulting in a fire or an electric shock.
● Be sure to remove the charging adapter from the socket after using it
Failure could cause a fire or an electric shock.
Disposal of this product
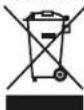
● This marking indicates that this product should not be disposed with other household wastes throughout the EU. To prevent possible harm to the environment or human health from uncontrolled waste disposal, recycle it responsibly to promote the sustainable reuse of material resources. To return your used device, please use the return and collection systems or contact the retailer where the product was purchased. They can take this product for environmental safe recycling
Usage precautions
● The non-slip rubber is only temporarily left along the wall to avoid the risk of falling.
● When not in use, do not store it upright to avoid the risk of falling.
- Do not put fragile objects around.
- Keep out of the reach of children and pets.
- Do not allow vacuuming of the following substances. Failure could clog the filter or cause a malfunction.
- water, liquid, wet waste
- large volume of powder (extinguishing agent of a fire extinguisher, etc.)
- sharp metal objects and glass, such as needles and bottles
• large volume of sand and pebbles
- item stained with pet excrements
- large of waste
- large-sized waste
- things that can easily cause the inside of the cleaner to clog, such as plastic bags and stockings
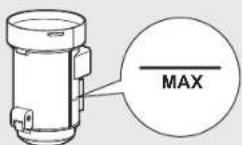
● Dispose of waste in the dust cup before the level of dust exceeds the dust-disposal line (as a guideline).
● This cleaner is not designed as an anti-magnetic cleaner. Please keep an objects that may be easily affected by magnetism, such as watches and magnetic cards (credit cards), away from the cleaner.
Consumables
- Please contact retail shop for an optional items.
Exhaust filter
(optional)
CFT102
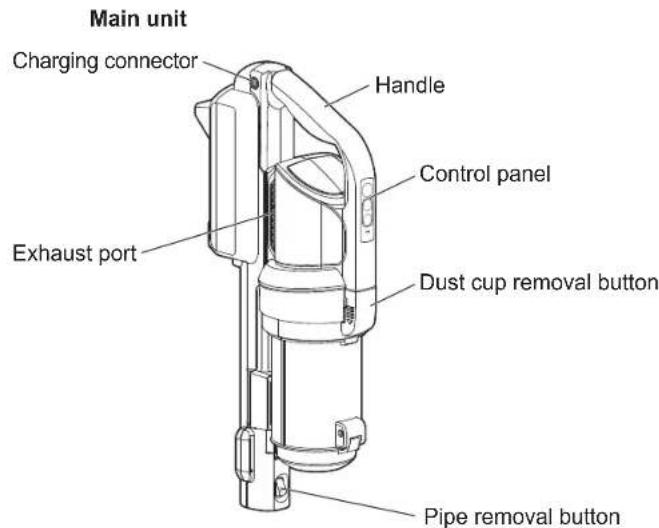
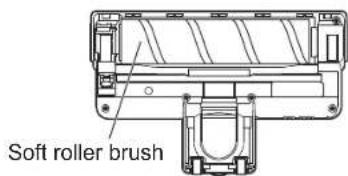
Parts
text_image
Main unit Charging connector Handle Control panel Exhaust port Dust cup removal button Pipe removal button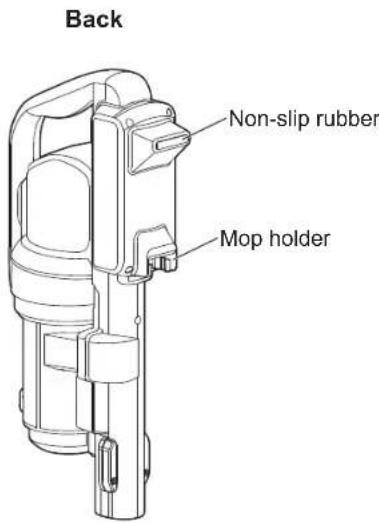
text_image
Back Non-slip rubber Mop holderExtension pipe

text_image
Floor head removal buttonDust cup
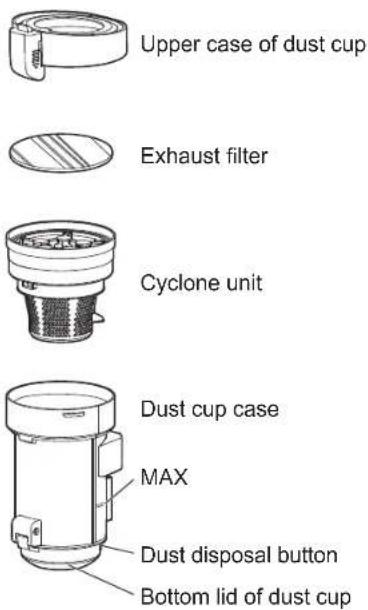
text_image
Upper case of dust cup Exhaust filter Cyclone unit Dust cup case MAX Dust disposal button Bottom lid of dust cupFloor head
natural_image
Line drawing of a vacuum cleaner with a cylindrical top and mechanical base (no text or symbols)Bottom of floor head
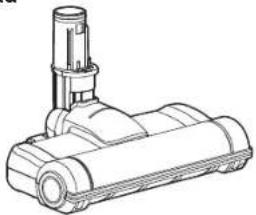
text_image
Soft roller brush■ Accessories
Charging adapter
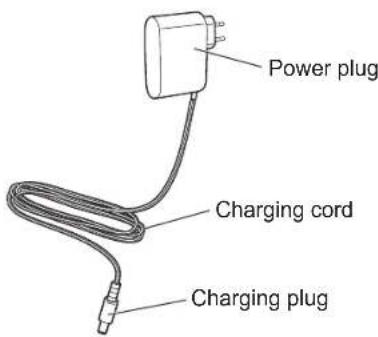
text_image
Power plug Charging cord Charging plugOperating panel
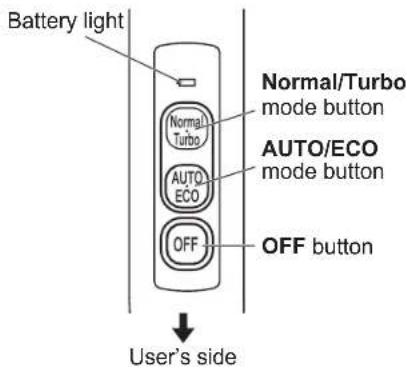
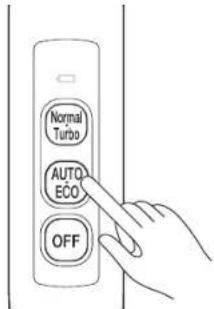
text_image
Battery light Normal/Turbo mode button Normal Turbo AUTO/ECO mode button AUTO ECO OFF OFF button User's sideThin nozzle
Exhaust filter
x5 pieces
(one piece is installed in the cleaner)
Preparation
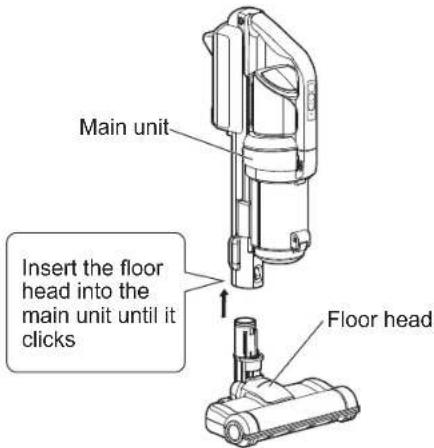
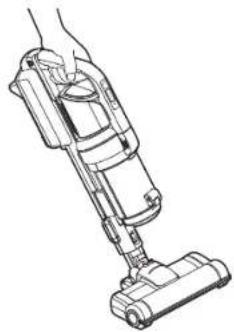
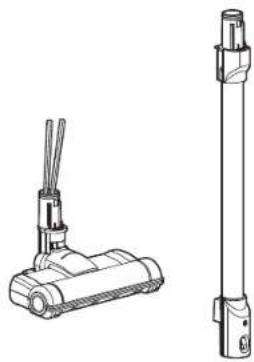
■ Assembly of the cleaner To use the cleaner as a stick cleaner
Assemble the main unit, extension pipe, and floor head
①Insert the extension pipe into the main unit.
②Attach the floor head to the extension pipe.

text_image
Main unit Insert the extension pipe into the main unit until it clicks Extension pipe Insert the floor head into the extensionpipeuntil it clicks Floor head* Place the cleaner on the stand after assembly, or lean it against the wall with non-slip rubber attached, so that it will not fall down.
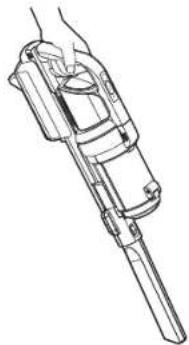
To use the cleaner as a handheld cleaner
- Attach the floor head or thin nozzle with the cleaner directly to the main unit.
text_image
Main unit Insert the floor head into the main unit until it clicks Floor head* Lay the cleaner on its side after assembly so that it will not fall down.
How to remove the extension pipe and floor head
• To remove the floor head, pull it out while holding down the floor head removal button.
- To remove the extension pipe, pull it out while holding down the pipe removing button.
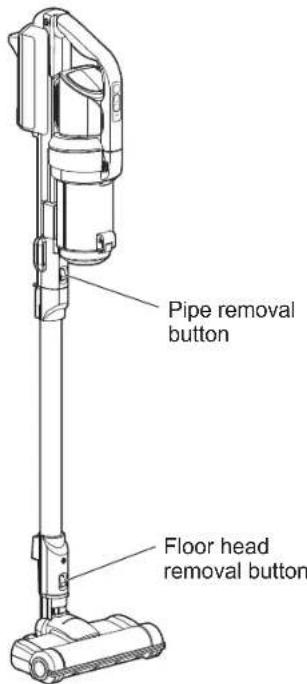
text_image
Pipe removal button Floor head removal buttonCharging
- The battery is not fully charged at the time that you purchase this unit. Accordingly, be sure to charge the battery before using the cleaner.
- It requires about three and half hours to complete charging.
1 Insert the charging adapter into the socket

2 Connect the charging plug to the main unit
Insert the charging plug to the charging connector on the top of the main unit thoroughly.
- Then, the battery light illuminates and charging starts.
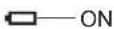
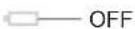
- Once charging is complete, the battery light turns off.
Battery
Although the battery and charging adapter may become warm during charging, it is not abnormal.
● The charging time and the usage time may vary according to the temperature and usage conditions.
- Charge the battery at a room temperature of 5\~35°C. If the room's temperature is low or rises due to direct sunlight, such conditions may cause incorrect charging of the battery resulting in a shorter usage time or longer charging time.
- If the battery is left without charging for a long time (more than 10 days), be sure to charge it before using the cleaner.

● Hang it on the stand to charge it, to avoid the risk of tipping over.
■ Battery Status/Battery indicator
- If the remaining battery power is low, the battery light blinks to indicate the status.
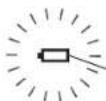
Blinking
| Battery light | Remaining battery power |
| The light blinks slowly Low | |
| The light turns off after blinking slowly | No remaining battery power |
- Charge the battery when the light blinks.
How to use
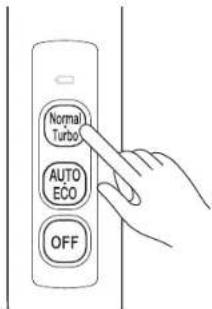
1 Select the operating mode by pressing the button
AUTO/ECO mode
- By pressing the AUTO/ECO mode, the cleaner starts operating in the Auto mode. By pressing the AUTO/ECO mode again, the cleaner starts operating after switching to the ECO mode.
- The auto mode and ECO mode can be switched by pressing the AUTO/ECO mode button.
text_image
Normal Turbo AUTO ECO OFF- In the Auto mode, suction power is adjusted according to the dust level detected by the dust sensor.
- In the ECO mode, operating time in the Auto mode becomes longer as the soft roller brush is not rotating.
* When the cleaner is used for cleaning a carpet, bedding, etc., the cleaner may operate continuously with higher suction power in order to detect loose hair and house dust inside the cleaner.
Dust sensor
- The light color on the back of the dust cup changes according to the dust level detected by the dust sensor. During operation in the AUTO/ECO mode, the suction power changes in conjunction with the change of the dust sensor's light color.
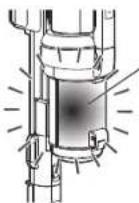
Dust sensor light (the back of the dust cup illuminates)
| Dust level Light color Suction power | |
| High Red Strong | |
| Medium Yellow Strong | |
| Low Green Weak | |
Normal/Turbo mode
- By pressing the Normal/Turbo mode, the cleaner starts operating in the Normal mode. By pressing the Normal/Turbo mode again, the cleaner switches to the Turbo mode and starts operating. The Normal/Turbo mode can be switched by pressing the Normal/Turbo mode button.
text_image
Normal Turbo AUTO ECO OFF- Switch the Normal/Turbo mode by referring to the light color as a guideline.
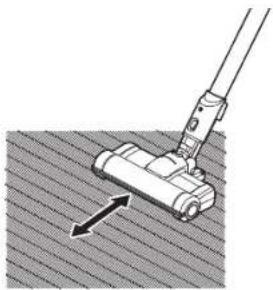
2 Cleaning
Floor, etc.
- Move the floor head back and forth to Vacuum the dust.
• To clean a tatami mat, move the floor head along the mat's grain.
natural_image
Diagram of a mechanical tool interacting with a textured surface, showing an arrow indicating direction (no text or symbols present)3 Press the OFF button to stop operating the cleaner when cleaning is complete
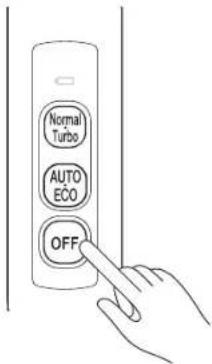
text_image
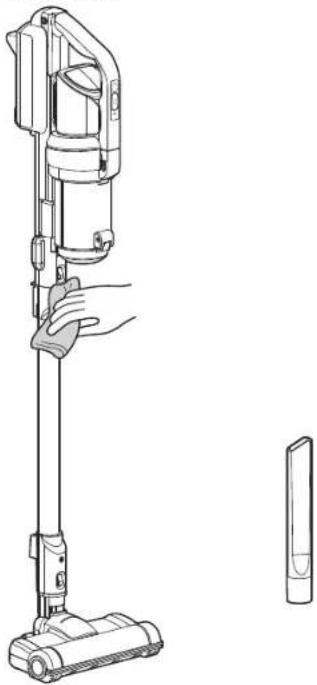
Normal Turbo AUTO ECO OFF■ Using the cleaner as a handheld cleaner
- The cleaner can be used as a handheld cleaner by removing the extension pipe.
natural_image
Line drawing of a hand using a vacuum cleaner (no text or symbols present)■ How to use the thin nozzle
- Use the thin nozzle to Vacuum dust in the narrow areas.
natural_image
Line drawing of a mechanical device with handle and shaft (no text or symbols)How to use (continued)
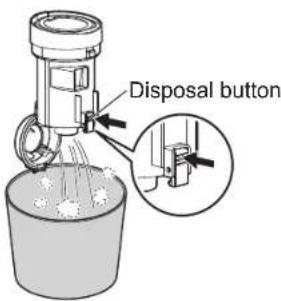
Disposal

- Be sure to turn off the power and stop operating the cleaner before disposing of dust.
- Do not open the dust cup while operating the cleaner.
- Dispose of dust before the level of dust exceeds the MAX (as a guideline).
●Do not accumulate dust excessively. Dispose of dust.
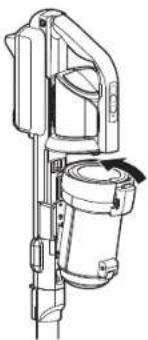
1 Remove the dust cup
- The dust cup can be removed by sliding the dust cup removal button. Remove the dust cup by pulling it toward yourself.
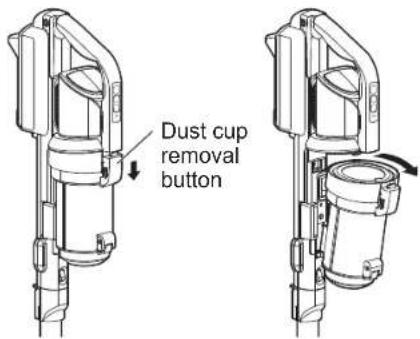
text_image
Dust cup removal button2 Disposing of dust
- By pressing the disposal button of the dust cup, the dust cup's bottom lid will open to drop the dust from it. * Be sure to open the bottom lid over a bin so that dust does not scatter.
text_image
Disposal button- Close the bottom lid of the dust cup until you hear a click sound after disposing of the dust.
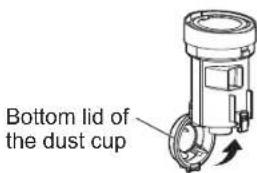
text_image
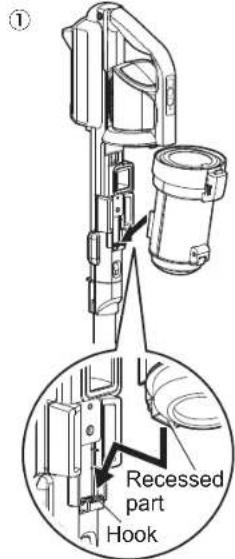
Bottom lid of the dust cup3 Attach the dust cup to the main unit
①Fit the recessed part on the bottom of the dust cup to the main unit's hook.
②Press down the upper part of the dust cup until you hear a click sound.
* Ensure that the dust cup removal button is closed securely.
①
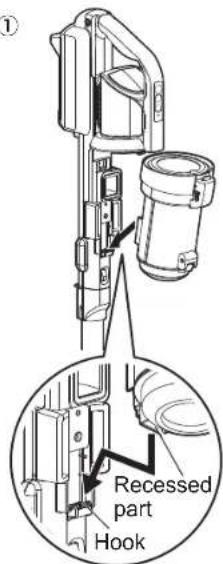
text_image
① Recessed part Hook②
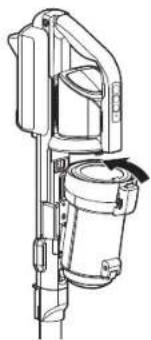
natural_image
Technical line drawing of a mechanical device with no visible text or symbolsCleaning and maintenance

- Be sure to stop operating the unit and unplug the charging adapter each time before cleaning.
-
Do not wet the cleaner and charging adapter. Failure could cause an electric shock, an injury, or a malfunction.
-
Do not use cleaning solvent, thinner, benzene, or bleach.
- Do not use a chemically-treated cleaning cloth.
Main unit, exterior of the floor head and the thin nozzle
About once a week
- Wring soft cloth soaked with water or lukewarm water (below 40°C) well and wipe off any stains.
- If it is hard to remove a stain, wipe it off with a soft cloth soaked with dishwashing liquid and wipe it again with the cloth wrung out nearly dry so that the dishwashing liquid does not remain.
natural_image
Line drawing of a hand holding a vacuum cleaner next to a separate device (no text or symbols present)Floor head/extension pipe
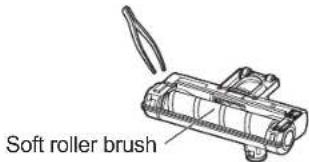
when it is clogged with dust
- If dust is tangled in the soft roller brush or suction port, remove it with tweezers.
text_image
Soft roller brush- If the inside of the floor head or extension pipe is clogged with dust, the suction power declines. Check the inside of the floor head or extension pipe periodically and remove any dust with tweezers or use disposable chopsticks if it is clogged with dust.
natural_image
Technical line drawing of a vacuum cleaner with two cylindrical components (no text or symbols)Dust sensor
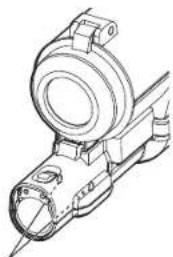
Clean the dust sensor once a week
- Wipe the sensors on the left and right of the suction port with a cotton bud or finger covered with tissue paper, etc.
- If dust adheres to the sensor, such dust may cause a malfunction. Accordingly, clean the sensor periodically.
natural_image
Technical line drawing of a mechanical component with no visible text or symbolsSensor (left and right)
Maintenance (continued)
Soft roller brush if stains becomes obvious
If stains becomes obvious,
1 Remove the brush cover
- To remove the brush cover, pull the brush cover toward yourself while holding down the brush cover's hook.
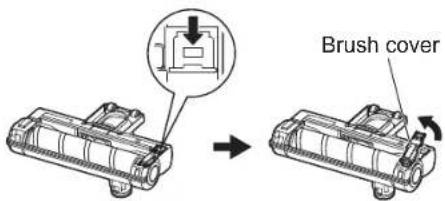
text_image
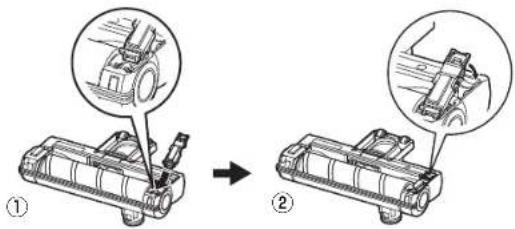
Brush cover2 Remove the soft roller brush
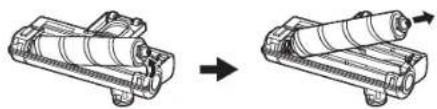
natural_image
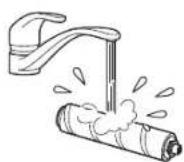
Diagram showing two mechanical components before and after assembly, with arrows indicating direction (no text or symbols)3 Wash the soft roller brush with water
* Remove dust adhering to the soft roller brush with scissors or tweezers before washing it with water. - Dry the brush well after washing it with water.
4 Attach the soft roller brush
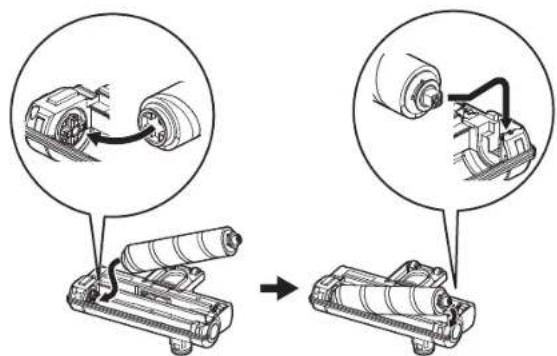
text_image
Diagram illustrating mechanical assembly steps with magnified views showing component alignment and assembly.5 Attach the brush cover
①Fit the tip of the brush cover to the inside of the front end of the floor head. ②Attach the brush cover by pressing it down until you hear a click sound.
text_image
Diagram showing mechanical assembly steps with labeled parts and magnified viewsDust cup Clean about once in two months
1 Remove the dust cup from the main unit
- The dust cup can be removed by sliding the dust-cup removing button. Remove the dust cup by pulling it toward yourself.
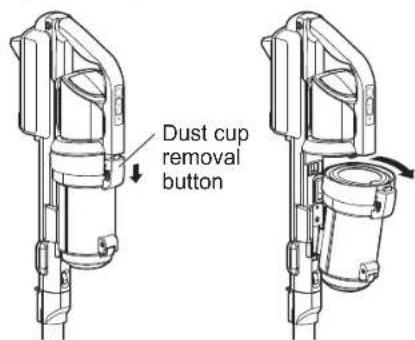
text_image
Dust cup removal button* Dispose of dust in the dust cup, if any.
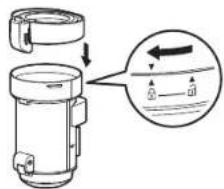
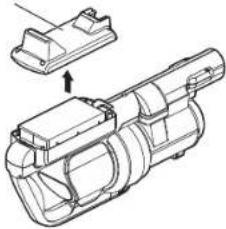
2 Remove the upper case of the dust cup
- Remove the upper case of the dust cup by turning it until ▼ of the upper case lines up with ▲ of the lower case.
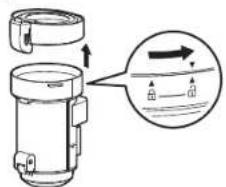
text_image
Diagram showing a mechanical component with an arrow indicating direction and water level indicator3 Remove the cyclone unit
- Replace the exhaust filter with a new unit every two or three months (as a guideline).

text_image
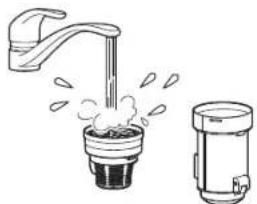
Exhaust filter Cyclone unit4 Remove dust and wash the cyclone unit and dust cup case with water
- Wash the cyclone unit and dust cup case with water after brushing off any dust.
natural_image
Illustration of a faucet emitting steam from a cup and a water dispenser (no text or symbols)- Drain and dry the cyclone unit and dust cup well after washing them.
* If water still remains on the cyclone unit or dust cup, such water may get absorbed, resulting in a malfunction of the motor. Accordingly, dry the cyclone unit, including its interior completely in a well-ventilated place.
5 Assemble the dust cup in the reverse order of the removal procedure
①Place the cyclone unit in such manner that the protruding part of the cyclone unit meets the recessed part of the dust cup.
②Place the exhaust filter on the cyclone unit.
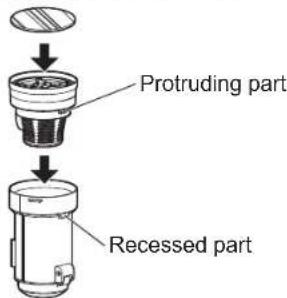
text_image
Protruding part Recessed part③ Insert the upper case of the dust cup in such manner that ▼ of the upper case lines up with ▲ of the dust cup case and turn it until ▼ of the upper case lines up with ▲.
text_image
Diagram showing a mechanical device with an arrow indicating direction and a magnified view of the component's internal structure.6 Attach the dust cup to the main unit
①Fit the recessed part on the bottom of the dust cup to the hook of the main unit.
②Press down the upper part of the dust cup until you hear a click sound.
text_image
① Recessed part Hook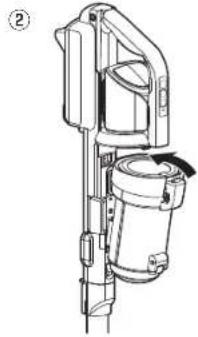
natural_image
Technical line drawing of a mechanical device with no visible text or symbolsHow to dispose of the product
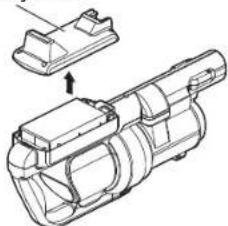
To dispose of the cleaner, remove the battery and dispose of it in accordance with your local municipal government's regulations.
■ How to remove the battery
1 Drain the battery until the cleaner stops completely
- Press the operation button to ensure that the cleaner does not start.
2 Remove the battery cover
① Remove the screws.
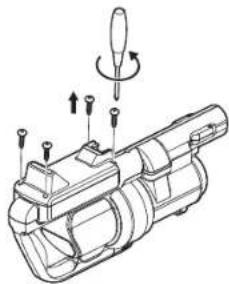
natural_image
Technical line drawing of a mechanical device with adjustment knobs and a tool (no text or symbols)②Remove the cover.
Battery cover
natural_image
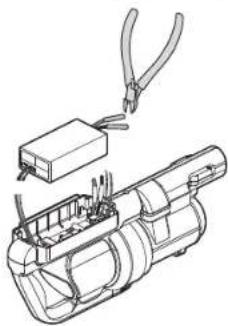
Technical line drawing of a mechanical component with an arrow indicating assembly (no text or symbols present)3 Cut the red lead wire and insulate it with plastic tape
- Remove the battery and cut the red lead wire connecting the battery to the main unit with nippers etc. and wrap it with plastic tape to insulate it.

natural_image
Technical line drawing of a mechanical device with pliers and wiring (no text or symbols)4 Cut the remaining lead wires and wrap them with plastic tape to insulate them
- Cut one lead wire and wrap it with vinyl tape to insulate it. Cut all the lead wires by repeating this process.
natural_image
Technical line drawing of a mechanical device with pliers and a box, no text or symbols presentUsed battery
* Bring a used battery removed from the cleaner to a store that cooperates for resource recycling. Do not dispose of used batteries as household waste.

Recycle lithium-ion batteries
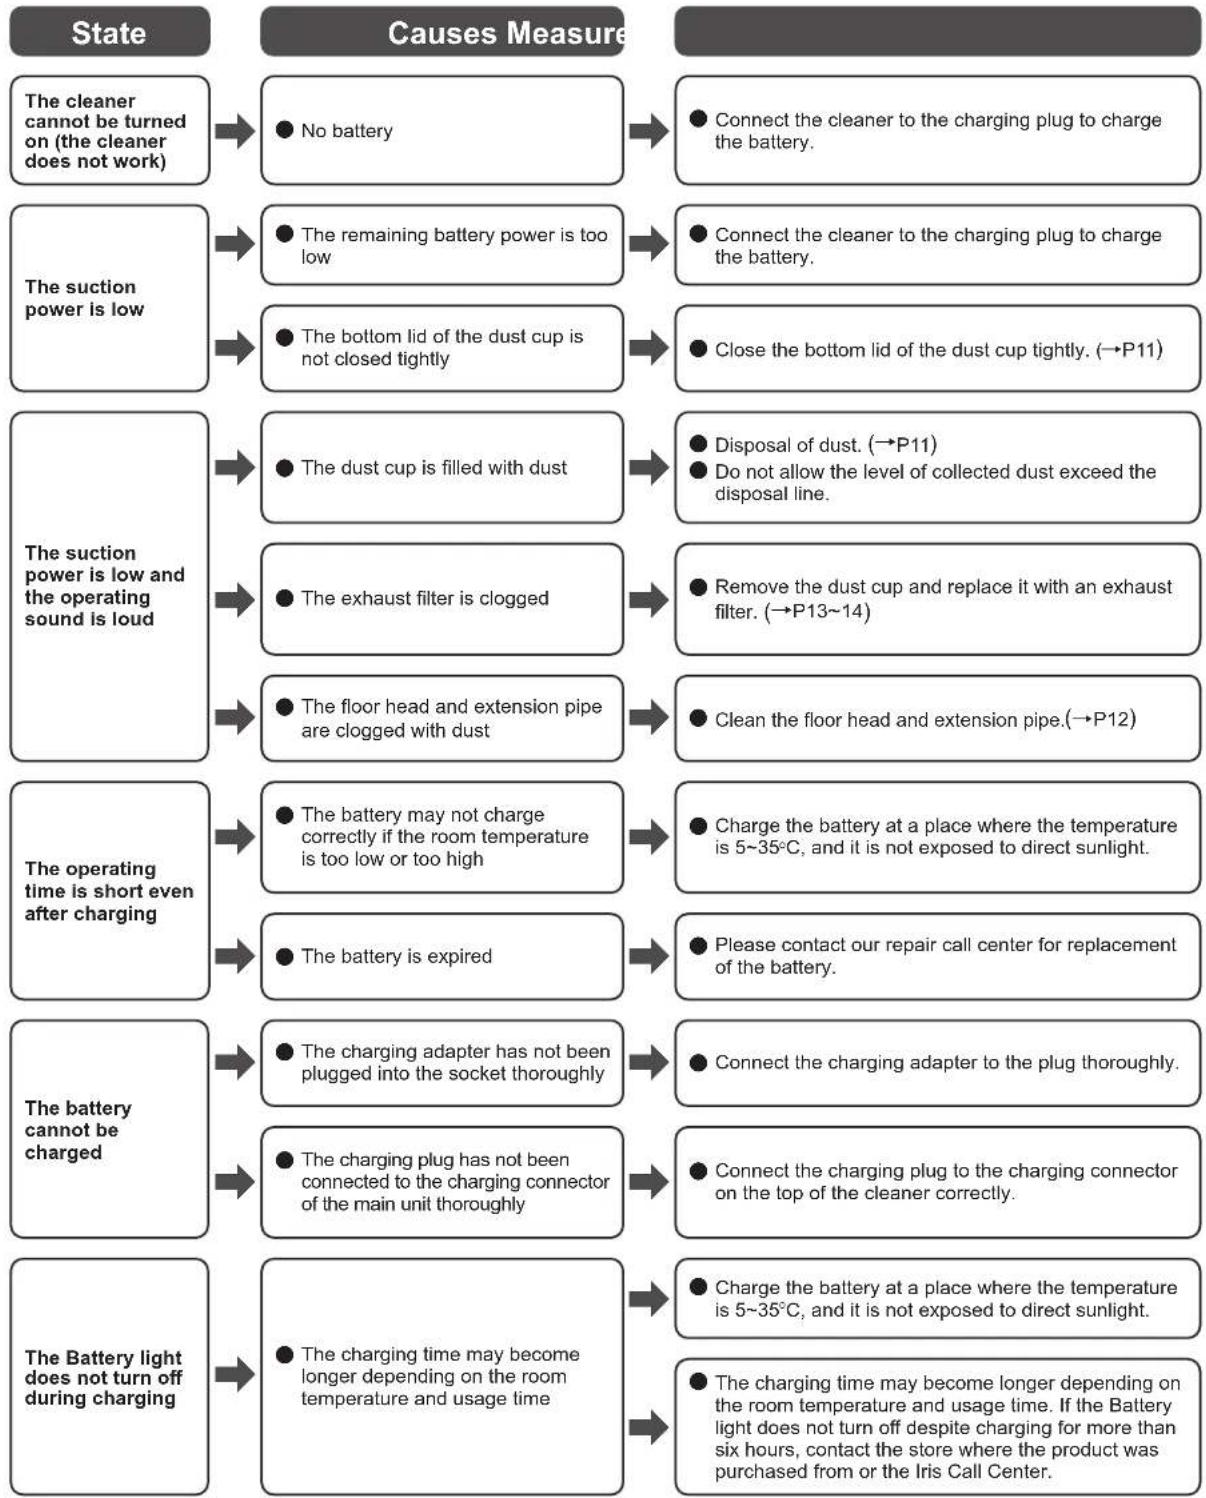
Troubleshooting
Please confirm the following problems after reading the operation manual carefully before you entrust to repair it.
flowchart
graph TD
    A["State"] --> B["Causes Measure"]
    B --> C1["The cleaner cannot be turned on (the cleaner does not work)"]
    B --> C2["The suction power is low"]
    B --> C3["The suction power is low and the operating sound is loud"]
    B --> C4["The operating time is short even after charging"]
    B --> C5["The battery cannot be charged"]
    B --> C6["The Battery light does not turn off during charging"]

    C1 --> D1["No battery"]
    C2 --> D2["The remaining battery power is too low"]
    C2 --> D3["The bottom lid of the dust cup is not closed tightly"]
    C3 --> D4["The dust cup is filled with dust"]
    C3 --> D5["The exhaust filter is clogged"]
    C3 --> D6["The floor head and extension pipe are clogged with dust"]
    C4 --> D7["The battery may not charge correctly if the room temperature is too low or too high"]
    C4 --> D8["The battery is expired"]
    C5 --> D9["The charging adapter has not been plugged into the socket thoroughly"]
    C5 --> D10["The charging plug has not been connected to the charging connector of the main unit thoroughly"]
    C6 --> D11["The charging time may become longer depending on the room temperature and usage time"]

    D1 --> E1["Connect the cleaner to the charging plug to charge the battery."]
    D2 --> E2["Connect the cleaner to the charging plug to charge the battery."]
    D3 --> E3["Close the bottom lid of the dust cup tightly. (→P11)"]
    D4 --> E4["Disposal of dust. (→P11)"]
    D5 --> E5["Remove the dust cup and replace it with an exhaust filter. (→P13~14)"]
    D6 --> E6["Clean the floor head and extension pipe.(→P12)"]
    D7 --> E7["Charge the battery at a place where the temperature is 5~35°C, and it is not exposed to direct sunlight."]
    D8 --> E8["Please contact our repair call center for replacement of the battery."]
    D9 --> E9["Connect the charging adapter to the plug thoroughly."]
    D10 --> E10["Connect the charging plug to the charging connector on the top of the cleaner correctly."]
    D11 --> E11["Charge the battery at a place where the temperature is 5~35°C, and it is not exposed to direct sunlight."]
    D12 --> E12["The charging time may become longer depending on the room temperature and usage time. If the Battery light does not turn off despite charging for more than six hours, contact the store where the product was purchased from or the Iris Call Center."]
Troubleshooting (continued)

flowchart
graph TD
    A["The dust sensor light turns yellow or red even when the cleaner is not sucking dust"] --> B["● The dust sensor is stained"]
    B --> C["● Clean the dust sensor.(→P12)"]
    D["The dust sensor light does not turn yellow or green"] --> E["● The cleaner is used on a carpet or bedding"]
    E --> F["● The sensor may continuously turn red because it senses loose hair and house dust inside the cleaner."]
    G["The sensor light does not turn red"] --> H["● If the cleaner is used without the head or nozzle, the dust sensor may be interrupted by natural light, causing a malfunction of the cleaner"]
    H --> I["● Attach the floor head or the attachment supplied before operating."]
    J["Suction power remains the same even after the color of the dust sensor light has changed"] --> K["● The cleaner works in the normal mode or turbo mode"]
    K --> L["● In the normal mode or turbo mode, the cleaner keeps operating in the selected mode regardless of the color of the dust sensor light. To change the suction power in conjunction with the light color, operate the cleaner in the AUTO mode. (→P9)"]
    M["The soft roller brush stops operating"] --> N["● Dust or a string has wound around the rotating unit, or the rotating unit is clogged"]
    N --> O["● Clean the floor head.(→P12)"]
    P["The main unit and charging adapter become warm during battery charging"] --> Q["● The battery or circuit generates a little heat because the charging current is flowing"]
    Q --> R["● This is not an error."]
    S["The main unit becomes warm while the cleaner is operating"] --> T["● The main unit becomes a little warm due to the heating of the battery and motor"]
    T --> U["● This is not an error."]
    V["The dust cup cannot be attached"] --> W["● The recessed part on the bottom of the dust cup does not fit onto the hook"]
    W --> X["● Press down the upper side of the dust cup after ensuring that the recessed part on the bottom of the dust cup is attached to the hook. (→P11)"]
If you cannot resolve the problem after implementing the above actions;
Please contact the store where the product was purchased from or the Iris Call Center.
IRIS OHYAMA EUROPE Customer Service E-mail
CustomerService@iriseurope.fr

● Do not try to disassemble, repair or modify the cleaner yourself.
WOOZOO®
by Ohyama
natural_image
Line drawing of a vacuum cleaner with handle and base (no text or symbols)natural_image
Technical line drawing of a mechanical assembly with no visible text or symbolsnatural_image
Illustration of a vacuum cleaner emitting exhaust smoke, with no text or symbols present.
Verboten
natural_image
Line drawing of a vacuum cleaner (no text or symbols)natural_image
Diagram of a hand operating a mechanical component with an arrow indicating force direction (no text or symbols present)natural_image
Line drawing of a hand using a vacuum cleaner (no text or symbols)natural_image
Technical line drawing of a mechanical device with no visible text or symbolsnatural_image
Technical line drawing of a mechanical device with no visible text or symbolsnatural_image
Line drawing of a vacuum cleaner with hand operating the lever and next to a separate cylindrical component (no text or symbols)natural_image
Technical line drawing of a vacuum cleaner with two cylindrical components (no text or symbols)Staubsensor
natural_image
Technical line drawing of a mechanical component with no visible text or symbolsnatural_image
Diagram showing two mechanical components before and after assembly, with arrows indicating direction (no text or symbols)text_image
Diagram illustrating the process of mechanical assembly or rolling, showing two stages with rollers and connecting rods.text_image
Technical diagram showing mechanical assembly steps with labeled components and magnified viewstext_image
Diagram showing a mechanical device with an arrow indicating direction and water level indicatornatural_image
Illustration of a faucet emitting steam from a water dispenser into a smaller cylindrical container (no text or symbols)text_image
Diagram showing a mechanical device with an arrow indicating direction and internal components, including a magnified view of the component.natural_image
Technical line drawing of a mechanical device with no visible text or symbolsnatural_image
Technical line drawing of a mechanical device with arrows indicating motion or assembly (no text or symbols)natural_image
Technical line drawing of a mechanical component with an arrow indicating assembly direction (no text or symbols present)natural_image
Technical line drawing of a mechanical device with pliers and housing (no text or symbols)natural_image
Technical line drawing of a mechanical assembly with pliers and a component (no text or symbols)Gebrauchter Akku
natural_image
Line drawing of a vacuum cleaner with handle and base (no text or symbols)text_image
Brosse rotativenatural_image
Illustration of a vacuum cleaner emitting exhaust smoke from a box, with a cross symbol indicating no text or symbols.
Interdite
natural_image
Mechanical diagram showing a lever pressing a component on a textured surface with an arrow indicating motion (no text or symbols present)natural_image
Line drawing of a hand using a vacuum cleaner (no text or symbols)E
natural_image
Line drawing of a mechanical device with handle and shaft (no text or symbols)Utilisation (Continuation)
Mise au rebut

natural_image
Technical line drawing of a mechanical device with no visible text or symbols②
natural_image
Technical line drawing of a mechanical device with no visible text or symbols
natural_image
Line drawing of a vacuum cleaner with hand and close-up view (no text or symbols)text_image
Brosse rotativenatural_image
Technical line drawing of a vacuum cleaner with two vertical cylindrical components (no text or symbols)natural_image
Technical line drawing of a mechanical component with no visible text or symbolsMaintenance (Continuation)
natural_image
Diagram showing a mechanical assembly before and after transformation, with no visible text or symbols.text_image
Diagram illustrating mechanical assembly steps with labeled components and directional arrowstext_image
Diagram showing mechanical assembly steps with labeled parts and magnified viewstext_image
Diagram showing a mechanical component with an arrow indicating direction and a magnified inset illustrating water flow or fluid movement.natural_image
Illustration of a faucet emitting steam from a cup, next to a smaller water dispenser (no text or symbols)text_image
Diagram showing a mechanical component with an arrow indicating direction and a magnified inset illustrating water level changes.natural_image
Technical line drawing of a mechanical device with no visible text or symbolsnatural_image
Technical line drawing of a mechanical device with arrows indicating motion or assembly (no text or symbols)②Retirez le couvercle.
natural_image
Technical line drawing of a mechanical component with an inset view showing a separate housing (no text or symbols present)natural_image
Technical line drawing of a mechanical device with pliers and internal components (no text or symbols)natural_image
Technical line drawing of a mechanical device with clamps and a box, no text or symbols presentBatteries usagées
flowchart
Flowchart detailing causes of possible solutions across French pannées, including batteries, batteries, and charge correction.natural_image
Line drawing of a vacuum cleaner with attached device (no text or symbols)natural_image
Illustration of a vacuum cleaner emitting exhaust smoke from a box, with a cross symbol indicating no exhaust (no text or symbols present)
Prohibido
natural_image
Mechanical diagram showing a lever mechanism interacting with a textured surface (no text or symbols)3
natural_image
Line drawing of a hand using a vacuum cleaner (no text or symbols)natural_image
Line drawing of a handheld mechanical device with handle and lever (no text or symbols)natural_image
Technical line drawing of a mechanical device with no visible text or symbolsnatural_image
Line drawing of a vacuum cleaner with hand operating the lever and next to a separate component (no text or symbols)natural_image
Technical line drawing of a two-port robotic device with dual ports and a vertical cylindrical component (no text or symbols)Sensor de polvo
natural_image
Technical line drawing of a mechanical component with no visible text or symbolsnatural_image
Mechanical assembly diagram showing two stages of a cylindrical component with arrows indicating motion (no text or symbols)text_image
Diagram illustrating mechanical assembly steps with labeled components and directional arrows5 Coloque la tapa del cepillo
text_image
Diagram showing mechanical assembly steps with labeled parts and magnified viewstext_image
Diagram showing a mechanical device with an arrow indicating direction and water level change, labeled in English.natural_image
Illustration of a water dispenser pouring liquid into a tap, with steam rising (no text or symbols)text_image
Diagram showing a mechanical component with an arrow indicating direction and water level indicatornatural_image
Technical line drawing of a mechanical device with no visible text or symbolsnatural_image
Technical line drawing of a mechanical device with no visible text or symbols②Retire la tapa.
Tapa de la batería
natural_image
Technical line drawing of a mechanical component with an arrow indicating assembly (no text or symbols present)natural_image
Technical line drawing of a mechanical device with clamps and tubing (no text or symbols)natural_image
Technical line drawing of a mechanical device with pliers and a box, no text or symbols presentBaterías utilizadas
Iris Ohyama France SAS
990 Avenue Marguerite Perey 77127 Lieusaint FRANCE
t: +33 (0) 1 60 60 58 58
www.iriseurope.com
875112
200721_TAN_DIM_02