STF-DC15T - Fan WOOZOO - Free user manual and instructions
Find the device manual for free STF-DC15T WOOZOO in PDF.
User questions about STF-DC15T WOOZOO
0 question about this device. Answer the ones you know or ask your own.
Ask a new question about this device
Download the instructions for your Fan in PDF format for free! Find your manual STF-DC15T - WOOZOO and take your electronic device back in hand. On this page are published all the documents necessary for the use of your device. STF-DC15T by WOOZOO.
USER MANUAL STF-DC15T WOOZOO
Preparation before use
Safety precautions. 2
Usage precautions. 4
Parts 4
Remote control. 6
Usage instructions
How to use. 7
Cleaning method 13
Others
Troubleshooting 14
About long term usage 15
Specifications 15
Warranty and after-sales services. 15
Warranty card. Back cover
Safety precautions
Please read the "Safety precautions" carefully and strictly follow when using the product, in order to avoid injury to people as well as unnecessary property damage.
Meanings of signs

The contents to be noticed.

The contents to be prohibited.

The contents to be implemented.

Warning
Faulty operation may lead to dangers or serious injury.
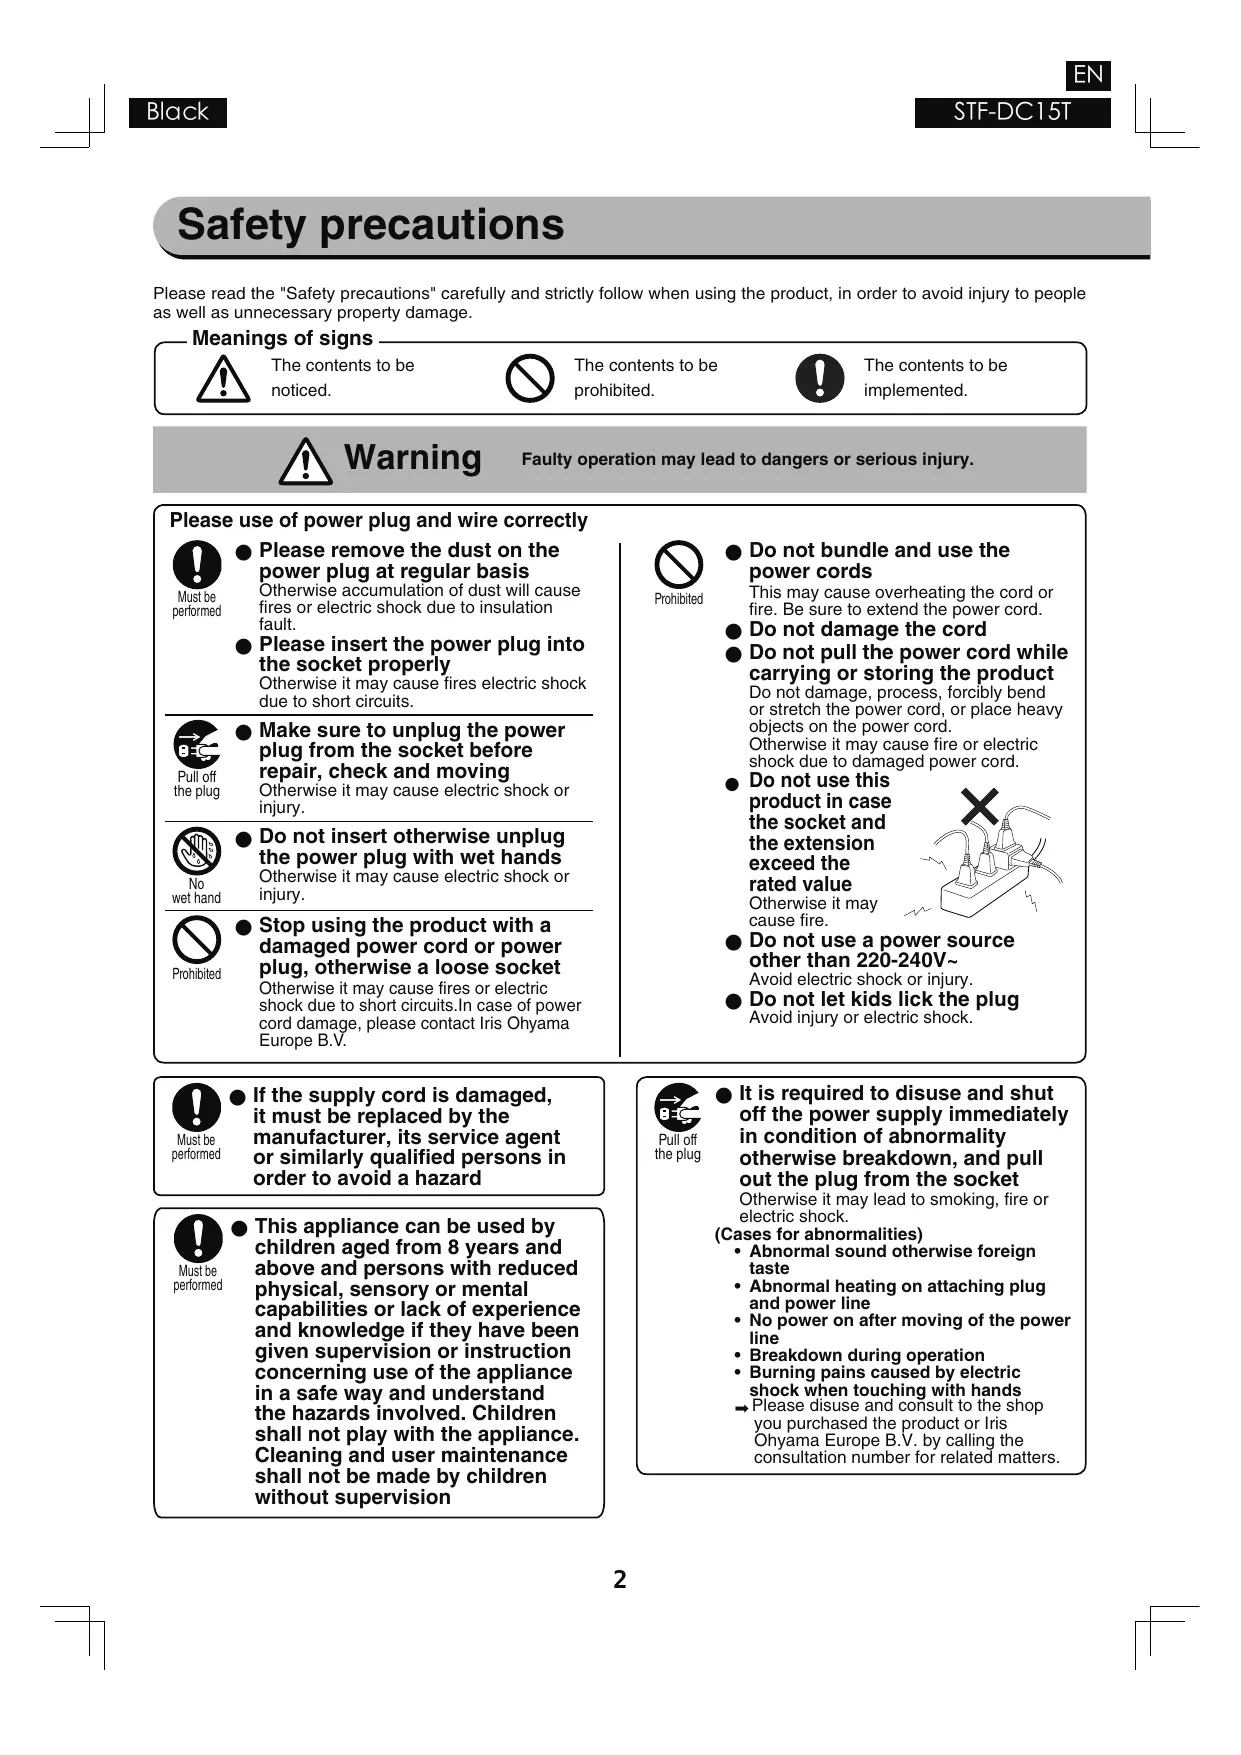
Please use of power plug and wire correctly

Must be performed
Please remove the dust on the power plug at regular basis
Otherwise accumulation of dust will cause fires or electric shock due to insulation fault.
Please insert the power plug into the socket properly
Otherwise it may cause fires electric shock due to short circuits.

Pull off the plug
Make sure to unplug the power plug from the socket before repair, check and moving
Otherwise it may cause electric shock or injury.

No wet hand
Do not insert otherwise unplug the power plug with wet hands
Otherwise it may cause electric shock or injury.

Prohibited
Stop using the product with a damaged power cord or power plug, otherwise a loose socket
Otherwise it may cause fires or electric shock due to short circuits. In case of power cord damage, please contact Iris Ohyama Europe B.V.

Prohibited
Do not bundle and use the power cords
This may cause overheating the cord or fire. Be sure to extend the power cord.
Do not damage the cord
Do not pull the power cord while carrying or storing the product
Do not damage, process, forcibly bend or stretch the power cord, or place heavy objects on the power cord.
Otherwise it may cause fire or electric shock due to damaged power cord.
Do not use this product in case the socket and the extension exceed the rated value
Otherwise it may cause fire.

Do not use a power source other than 220-240V~
Avoid electric shock or injury.
Do not let kids lick the plug
Avoid injury or electric shock.

Must be performed
If the supply cord is damaged, it must be replaced by the manufacturer, its service agent or similarly qualified persons in order to avoid a hazard

Must be performed
This appliance can be used by children aged from 8 years and above and persons with reduced physical, sensory or mental capabilities or lack of experience and knowledge if they have been given supervision or instruction concerning use of the appliance in a safe way and understand the hazards involved. Children shall not play with the appliance. Cleaning and user maintenance shall not be made by children without supervision

Pull off the plug
It is required to disuse and shut off the power supply immediately in condition of abnormality otherwise breakdown, and pull out the plug from the socket
Otherwise it may lead to smoking, fire or electric shock.
(Cases for abnormalities)
- Abnormal sound otherwise foreign taste
- Abnormal heating on attaching plug and power line
- No power on after moving of the power line
- Breakdown during operation
- Burning pains caused by electric shock when touching with hands Please disuse and consult to the shop you purchased the product or Iris Ohyama Europe B.V. by calling the consultation number for related matters.

Prohibited
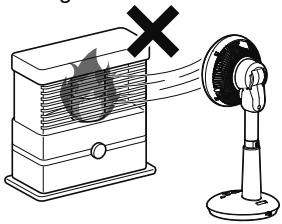
Do not point this product to a furnace or other heating devices
Otherwise it may cause spark flying, carbon monoxide poisoning or fire due to incomplete combustion of the furnace or other heating devices.
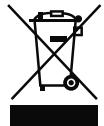
Correct Disposal of this product

This marking indicates that this product should not be disposed with other household wastes throughout the EU. To prevent possible harm to the environment or human health from uncontrolled waste disposal, recycle it responsibly to promote the sustainable reuse of material resources. To return your used device, please use the return and collection systems or contact the retailer where the product was purchased. They can take this product for environmental safe recycling

Prohibited
Do not operate this product near flammable liquids (Such as kerosene, gasoline, thinner, etc), objects with spark, or flammable dust
Please do not spray mist to the body(Insecticide, hairdressing mist spray, lubricating oil, etc)
Otherwise it may cause fires.


No contact
with water
Please do not use this product in damp places such as gas stoves or bathrooms
Do not apply otherwise spray water to the body of the product
Otherwise it may cause fires or electric shock.

No disassembling
Please do not disassemble, repair or remould this rpoduct by yourself
Do not disassemble, repair, or modify the product except as stated in the user manual, when it is assembled for use at the beginning, or when the product is disassembled for storage.
Otherwise it may cause fire accident, electric shock or injury. For repairs, please consult the store at the time of purchase or Iris Ohyama Europe B.V.

No
Touching
Do not put your hands or foreign objects in the gap between the front shield and the back shield
Otherwise it may cause electric shock or injury.

Notice
Faulty operation may lead to dangers or serious injury.

Prohibited
Do not use this product for purposes not described in this manual
Otherwise it may cause fire or accident. Please use this product for household use only
This product is designed for household use. Do not use it for any purposes other than household use, otherwise it may cause fire.

Prohibited
Do not use this product while installing the fan blades and shield
Otherwise it may cause injury, electric shock or fire.

Prohibited
Do not let children play with this product
Please keep the product out of reach of children

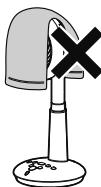
Prohibited
Keep your face, body and clothes away from the rotating part when the product is running
Do not use this product near objects that are easily caught in curtains or blinds
Otherwise it may damage the surrounding objects or cause personal injury.
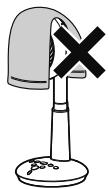
The product is utilized indoors only Do not use this produc around objects that block the wind flow

Prohibited
Do not sit or lean on this product Otherwise it may cause electric shock or injury.
Safety precautions
Continue

Pull off the plug
Please be sure to hold the power plug part and do not pull the power cord when pulling out the power plug
Otherwise it may cause electric shock, short circuit, or fire due to damaged power cord. Please be sure to pull the power plug out of the socket
If it will not be used for a long time.

Prohibited
Do not use this product under the cover of cloth, paper or plastic bags
Do not use this product in dusty places
Otherwise it may malfunction and cause short circuit or fire.
Usage precautions
Do not use this product in kitchens and other humid and smoky places
Do not use this product for a long time in the above places, so as to prevent dust from accumulating inside the product, which is difficult to remove with a vacuum cleaner.
Please keep this product away from radios and televisions
Otherwise it may generate electromagnetic interference which will affect the normal operation of this product.
Do not place this product in direct sunlight or near electric heaters, furnaces or refrigeration equipment
Otherwise it may cause deformation, discoloration or abnormal circulation running.
Waste Treatment
Do not discard the product and packing materials carelessly. Please dispose them in accordance with local regulations.
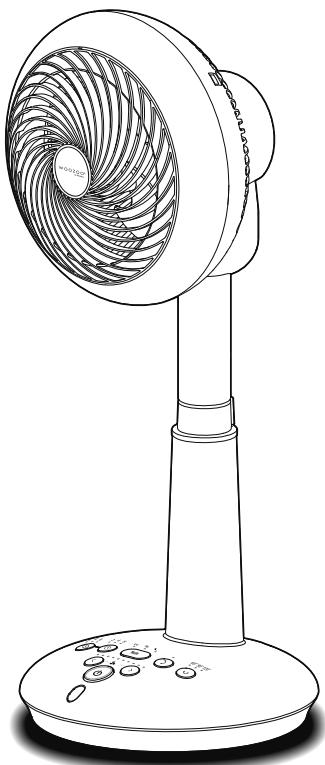
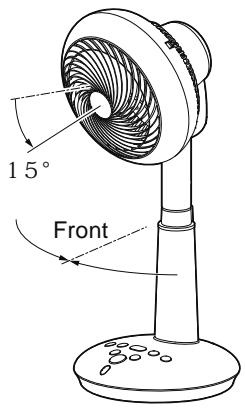
Parts
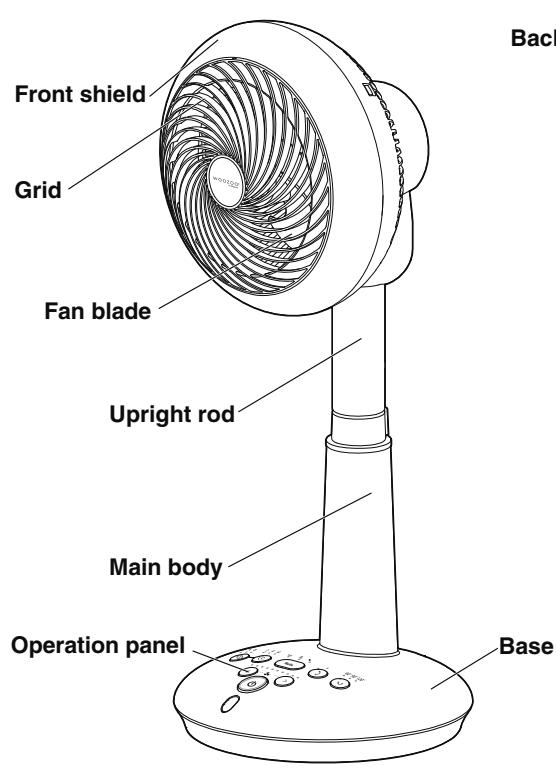
Front
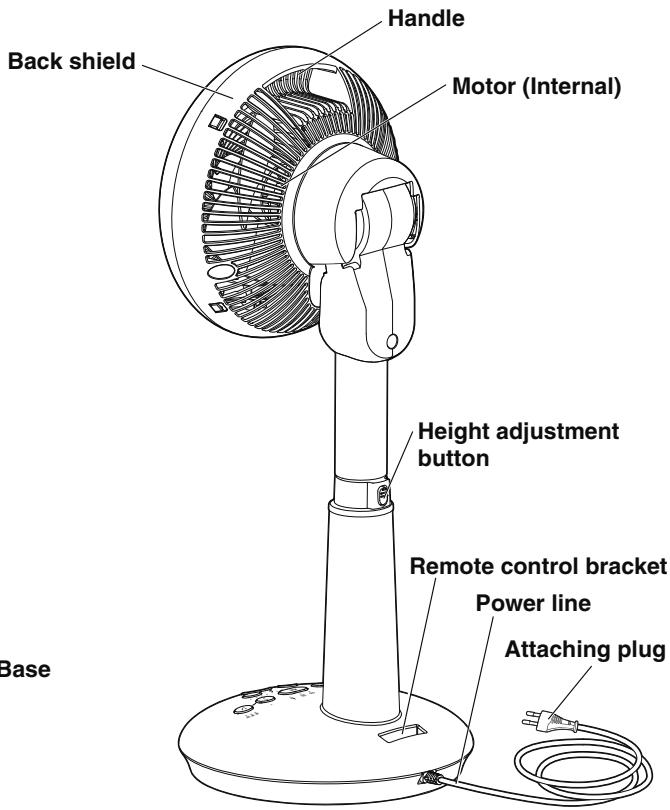
Back
Parts
Continue
Operation panel
Timed power-on button · Indicator light Select the time of timed power-on.
Air Supply button · Indicator light Select the air supply mode Press and hold the button to switch the brightness of the indicator light.
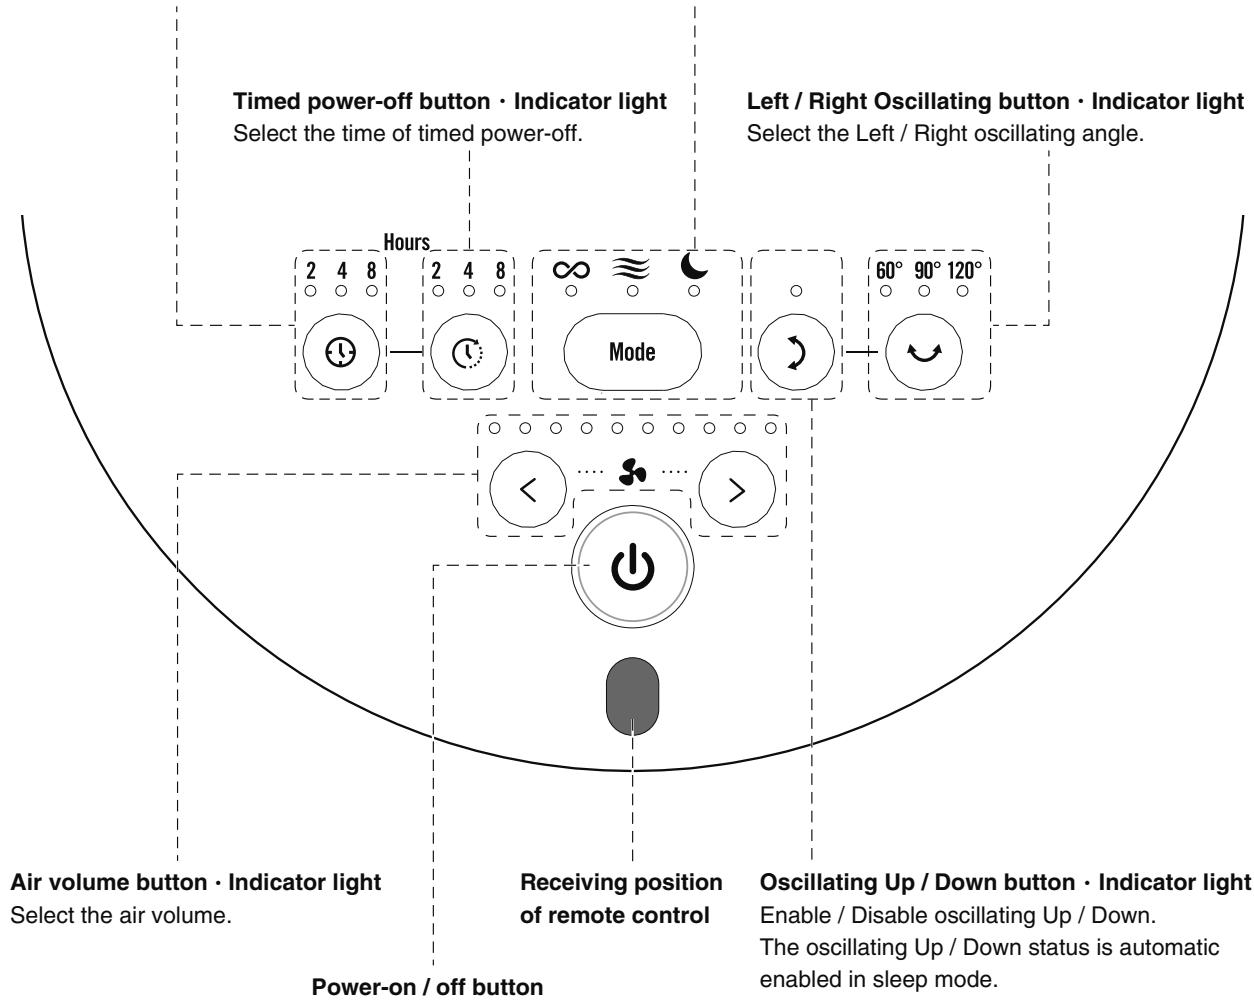
Power-on / off button
Power On / Off.
Remote control
※ Please operate the remote control by pointing the IR light-emitting position towards the light-receiving position of the remote control.
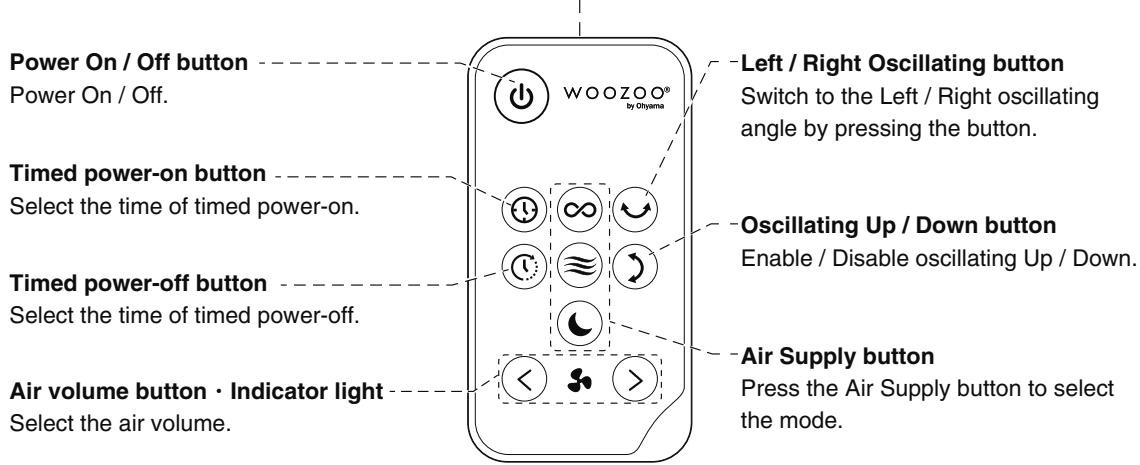
IR light-emitting position
How to Replace the Battery
Install the supplied battery on the remote control before use.
If the operating radius is reduced or the operation button does not work, please replace the battery with a new one.(CR2025)
1 Pull out the battery holder
- Press the gripper in the direction of the arrow and pull out the battery.
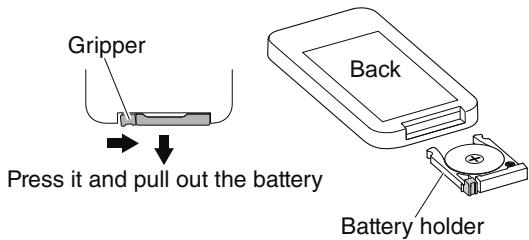
2 Install a new battery
- Install the new battery into the battery holder in the correct electrode direction and insert the battery holder into the remote control.
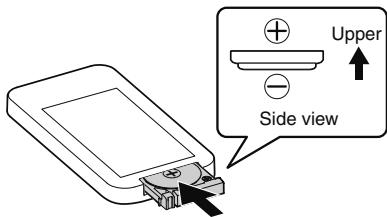
Install the battery according to the correct electrode.
※ Please dispose of used batteries properly.
Precautions about the battery

Must be performed
Please install the battery in the correct electrode direction in accordance with the user manual
Otherwise it may cause fire or damage to surrounding objects due to battery damage and battery leakage arising from incorrect installation.
Please remove the battery when it is not in use for a long time
Otherwise it may cause fire, injury or damage to surrounding objects due to battery leakage. In case of battery leakage, please clean the liquid on the battery holder and install a new one.
In case of accidental contact with the leaked battery, please rinse with plenty of water.

No disassembling
Do not disassemble the battery
Otherwise it may cause damage to skin or clothes.

Prohibited
Do not place or store the product with metal materials
Otherwise it may cause battery leakage or damage due to short circuit.
Do not use batteries other than the specified model
Otherwise it may cause fire, damage or contamination to surrounding objects due to short circuit.
Do not charge the battery
Otherwise it may cause fire, injury or empyrosis due to battery leakage.
How to use
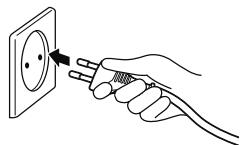
1 Place the product in a smooth place and insert the power plug into the socket
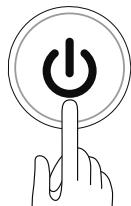
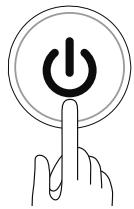
2 Press the Power On / Off button to power on the product
- If the power plug is not unplugged, it will operate in the mode set before the previous shutdown.
- You can also operate using the power button on the remote control.
※ Power on the product in the closed state of oscillating Up / Down, then the fan starts to run in the downward state. If it faces towards the front, change the direction manually or change the direction after turning On / Off the Oscillating Up / Down button.
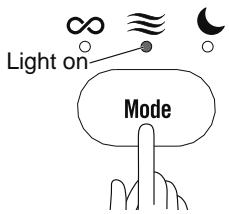
3 Select the air supply mode as required
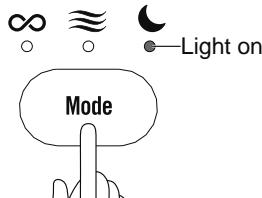
Each time the Air Supply button is pressed, the mode is switched once.
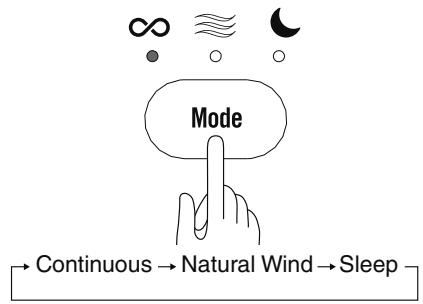
- Please use the remote control to press the button of the desired mode.
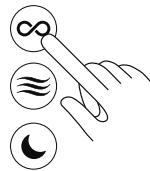
Continuous
Operate according to the air volume set by pressing the Air Volume button.
Natural Wind
The air volume is switched to the natural wind mode. ( P12)
Sleep
It switches to the Oscillating Up / Down mode. The positive and upward operation directions change the intensity, blowing the wind that is best for sleep. ( P12)
Remember the air volume and oscillating settings selected in each mode. If the mode is reselected while the power cord is connected, it will run in the mode set before the previous shutdown.
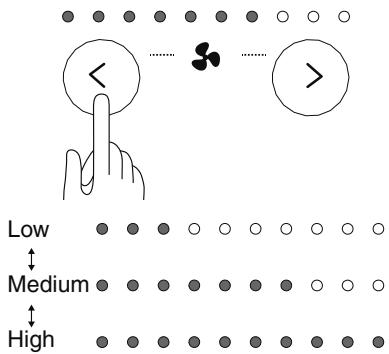
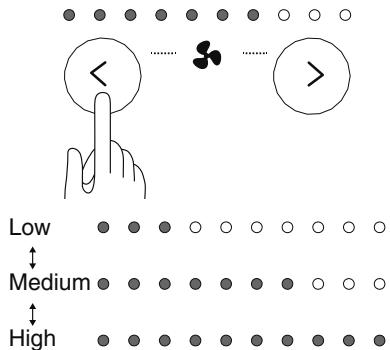
4 Set the air volume
- Set the air volume by pressing the Air Volume button.
Press the High button, the air volume becomes higher; press the Low button, the air volume becomes lower. - In the Continuous mode, press and hold the Air Volume button, then the air volume changes continuously.
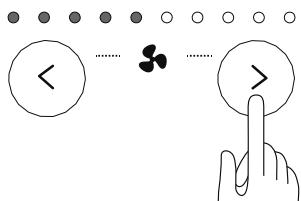
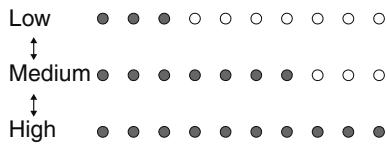
- The Continuous mode has 10 shifts, and both of the Natural Wind and Sleep modes have three shifts.
Natural Wind mode, Sleep mode
How to use Continue
How to Stop the Product
You can press the Power On / Off button to stop the product.
- You can also stop the product by pressing the Power On / Off button on the remote control.
- When the power is off, the product will stop running.
※ Unplug the power plug after the product stops running.
※ If the Left / Right oscillating or the air circulation fan does not face the front, the product will stop running after facing the front. During this period, the 3 Left / Right oscillating indicators will flash.
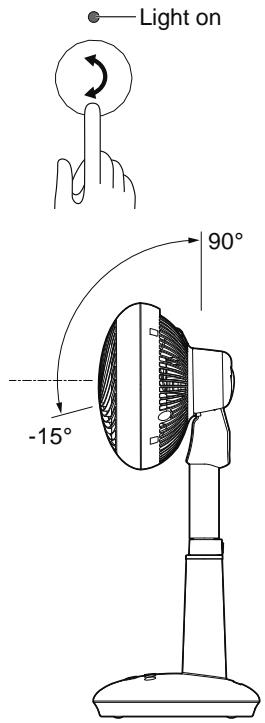
※ If the oscillating Up / Down or the air circulation fan is not 15^ downward, the air circulation fan will stop after it is 15^ downward. During this period, the oscillating Up / Down indicator light will flash.
Timed Power-on / off
Press the Timed Power-on button, then the product will start running after the set time.
Press the Timed Power-off button, then the product will stop running after the set time.
You can also combine the two timers to operate the product.
$$ (\rightarrow \mathrm {P} 9) $$
Press the Timed Power-on button only
- When you only press the Timed Power-on button, please set the product to Power Off mode.
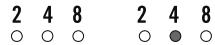
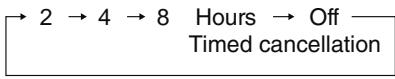
- Press the Timed Power-on button, then the indicator lights flash in the following order. After 5 seconds from the last operation, the indicator lights will be on and the Timed Power-on will be enabled.
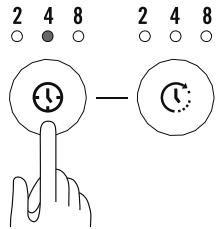
Hours

- When the timed power-on is set (The indicator light is flashing), you can also set the timed power-off, air supply mode, oscillating Up / Down, Left / Right oscillating, and air volume.
Each indicator light will turn on during the setting process. After 5 seconds from the last operation, the timed power-on indicator light is turned on and the lights other than the timer indicator are turned off. - After the timed power-on is enabled, the indicator light will be switched according to the remaining time. It will start running after the set time has exceeded.
8 4 2 Start running
(The timed power-on indicator light is off)
Press the Timed Power-on button only
- When the floor-type air circulation fan is running, press the Timed Power-off button, then the indicator lights flash in the following order.
Hours

- After the timed power-off is enabled, the indicator light will be switched according to the remaining time. It will stop running and be disconnected to the power after the set time has exceeded.
$$ 8 \rightarrow 4 \rightarrow 2 \rightarrow \text {S t o p r u n n i n g} $$
(The indicator light is off
Cancel the timer while running
Press the Power On / Off button
- After all timer indicator lights are off, the power is disconnected and the timer is cancelled.

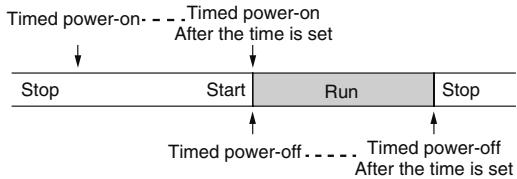
Combined Timer
Set the timed power-on first and then set the timed power-off
- If the timed power-on is set (The timed power-on indicator light is flashing) when the product stops running (The power is on), you can set the timed power-off. (The timed power-off indicator light is on) After 5 seconds from the last operation, the timed power-on indicator light is on and the lights other than the timer indicator are turned off.
- After the timed power-on is enabled, the indicator light will be switched according to the remaining time. It will start running after the set time is exceeded.
- After the timed power-on starts, the timed power-off will be enabled. The timed power-off indicator light will be switched according to the remaining time. It will stop running and be disconnected to the power after the set time has exceeded.
※ Please set the timed power-off when the timed power-on indicator light is flashing.
Set the timed power-on when the timed power-off is enabled
- If you want to set the timed power-on when the timed power-off is enabled, the product will stop running after the set time of timed power-off is exceeded, and only the timed power-on indicator light is on.
- The timed power-on indicator light will be switched according to the remaining time. It will start running after the set time is exceeded.
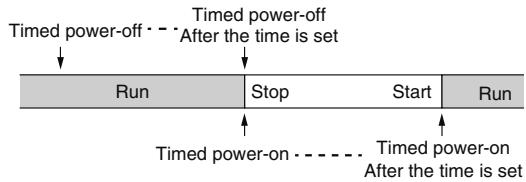
In the state that the timed power-off is enabled, when the timed power-on is set, the timed power-off is running. When the fan stops running, the orientation of the floor-type air circulation fan keeps unchanged. When the oscillating mode (Left / Right or Up / Down) is enabled, the product stops running and then starts running according to the current direction, and the oscillating mode is resumed. When the Left / Right oscillating mode is disabled, the product directs stops running without returning to the front. When the oscillating Up / Down mode is disabled, the product directs stops running without returning to 15^ downward.
How to use Continue
Height Adjustment
- Press the Height Adjustment button and slide the upright rod, then you can adjust the height as required (4 shifts is available).
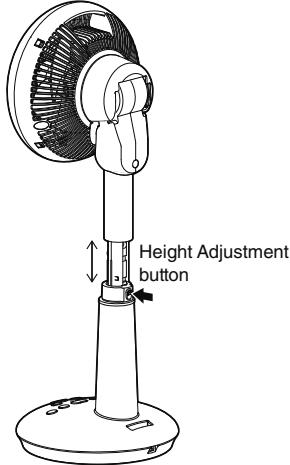
Please press the upright rod to the lowest place and fix it while moving the upright rod.
Oscillating
Left / Right Oscillating
Each time the Left / Right Oscillating button is pressed, the indicator light will turn on in the following order and then oscillate left and right.
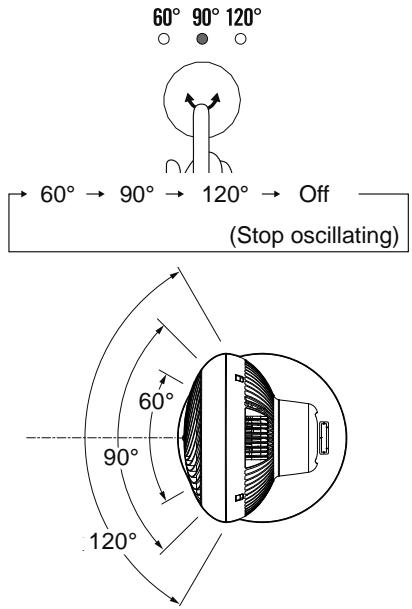
The Left / Right oscillating angle cannot be manually changed. Be sure to press the Left / Right Oscillating button in the order of Oscillating Down Stop to change the angle.
Oscillating Up / Down
Each time the Oscillating Up / Down button is pressed, it switches to On / Off. When it is set to On, the indicator light turns on.
- If the Sleep mode is selected, the oscillating Up/Down automatically switches to On after it is Off. ( P12)
- You can manually change the Left / Right oscillating angle.
After the oscillating Up / Down angle is manually changed, the product will stop at the upper or lower end for a few seconds. This is normal.
Brightness Adjustment
You can reduce the brightness of the indicator light when you are sleeping.
- When the Air Supply button is pressed for more than 2s during operation, the brightness of the indicator light will decrease.
※ The brightness cannot be adjusted using the remote control.
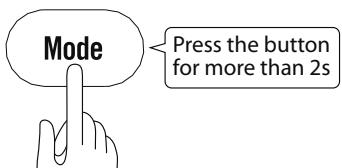
- When the Air Supply button is pressed again for more than 2s, the brightness of the indicator light will recover.
Usage Instructions
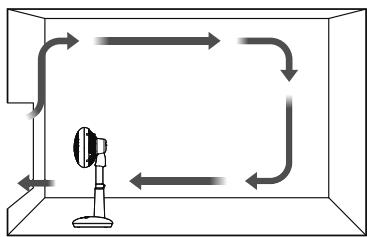
The following is the usage instructions on the air circulation fan in the Continuous mode.
You can improve the efficiency of air conditioning and heating devices by circulating the indoor air to help save power.
While using an air-conditioning
- Keep the circulation fan back to the air conditioning, so that the cool air is fully circulated from the bottom to the top to form a airflow, which improves the cool feeling.
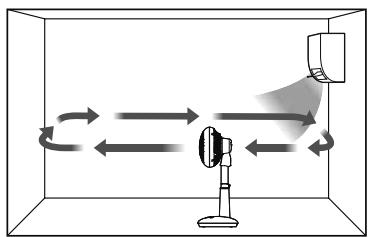
While using a heating device
- Blow down towards the corner of the room (Air conditioning) to circulate the upper warm air and warm the soles of the feet.

During circulation
- Use the product towards the ceiling to circulate the air in the room, thus reducing the unevenness of air temperature in the room.
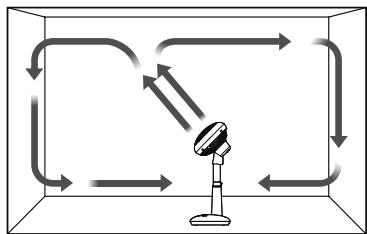
During air change
- Drain the air out of the room while sucking in the fresh air outside the room.
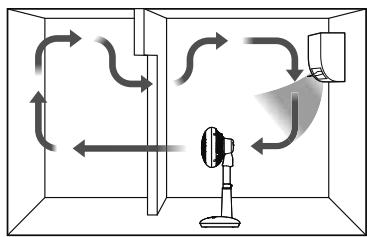
Circulation between two rooms
- You can perform air circulation in two connected rooms to reduce the unevenness of room temperature.
How to use Continue
Natural Wind Mode
Natural wind is simulated by changes of air volume.
- Press the Air Supply button and select Natural Wind.
- In the Natural Wind mode, you can press the Air Volume button to adjust the intensity of air volume (3 shifts). The indicator lights with different intensity turn on in the following order.
Sleep Mode
It automatically switches to an oscillating Up / Down mode, and the intensity of the air volume is changed in the front and up directions, which blows the wind that is best for sleep.
- Please select the Sleep mode by pressing the Air Supply button.
- It blows breeze in the frontal range, which becomes stronger upwards. During this period, the air volume will gradually change. The direct wind in the front is mild, and the indirect wind is formed when it blows up to the wall, which helps the air convection in the room.
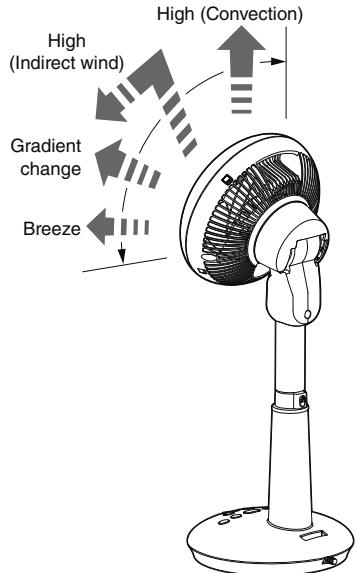
- In the Sleep mode, the intensity of air volume (3 shifts) can be adjusted by pressing the Air Volume button. The indicator lights with different intensity turn on in the following order.
Cleaning method
It may lead to breakdown in condition of using with accumulated dust. Please maintain at regular intervals as per the dust accumulation degrees.

Notice
Make sure to cut off the power supply and pull up the power line before maintenance. The motor keeps heating after operation. Make sure to maintain after the motor is cooling down.
Please do not use diluents, alcohol, volatile oil, alkaline detergent, decolorizer, etc. Otherwise it may lead to discoloration, transformation, deterioration, damage or breakdown.
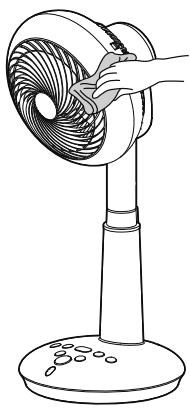
Cleaning
- Wipe with a soft and dry cloth.
- When it is difficult to clean the product, please dip a cloth with diluted neutral detergent, wring out the cloth, then wipe the product repeatedly.
Storage
- In condition of no use for a long term, cover the main body of the product with a plastic bag, and then store it in a dry and cool place with no direct sunshine.
Troubleshooting
In condition that any abnormality is detected during usage, please confirm the following problems after reading the operation manual carefully before you entrust to repair it.
Status
Not running
Keep oscillating
No oscillating (Up / Down); Abnormal sound
The direction of the air circulation fan does not recover after stopping
After the Power On / Off button is pressed, it will not stop running immediately
The product cannot be controlled by the remote control
Large running noise
The product makes big noises while oscillating
The fan blades do not rotate or rotate slowly (They stop rotating after 5 times)
Low air volume
Possible cause
Plug is not inserted into the outlet correctly
Enable the Sleep mode
The oscillating Up / Down angle is automatically changed
The timed power-on is set when the timed power-off is enabled
The oscillating mode is running
The battery runs out
The battery is placed in wrong direction (Anode and the cathode)
There is an obstacle between the remote control receiving part and the remote control
The remote is not pointing in the right direction
The product is shaking as it is not placed in a good position
The front shield is not completely inserted
While oscillating, the characteristic sound of the motor will become louder
Dust accumulation
Dust accumulation
Remedy
Reinstate the plug and turn on.
The oscillating Up / Down mode is enabled automatically in the Sleep mode. (P12)
Stop at the upper part or lower part for a few seconds to adjust the oscillating range, then there is abnormal sound, which is normal.
After the timed power-on is set when the timed power-off is enabled, the direction of the air circulation fan will stop running directly but not return to the front and 15^ downward.
If the product stops running when the oscillating mode is enabled, it will stop running after returning to the front and 15^ downward.
Please replace the battery. (P6)
Please place the battery in correct direction. (P6)
Please remove the obstacle.
Please point the infrared emission unit of the remote control to the front receiving part of the remote control within a distance of 5m
Please place it on level ground.
Please install the front shield correctly.
It is normal.
Please clean up the dust on the fan blades. (P13)
Please maintain the product and clean dust.
If the problem is not solved with the above measures Please consult to the shop or Iris Ohyama Europe B.V. by calling the consultation number.

Warning
Do not disassemble, repair or transform the product without approval.
About long term usage
In any of the following phenomenon due to long term use, please cut off the power line immediately and pull up the power plug from the socket. Then consult to the shop otherwise Iris Ohyama Europe B.V. by calling the consultation number.
In case of the following conditions
The product does not work after pressing the Power button
There is abnormal sound when the fan blades are rotating
The adapter power cord is damaged, bent, and aged
The fan blades will suddenly rotate or stop rotating once the adapter power is touched
It has a burnt smell

Stop using
Turn off the power immediately and unplug the power cord from the socket. Please consult the store at the time of purchase or Iris Ohyama Europe B.V.

Notice
Deterioration or breakdown may be caused due to multiple factors. In condition that any of the above abnormal phenomena appears before the recorded standard service life, please disuse immediately, and consult to the shop or Iris Ohyama Europe B.V. by calling the consultation number.
Specifications
| Rated voltage | 220-240V~ |
| Rated frequency | 50Hz |
| Rated power | 25W |
| Product size(About)(No power line is included) | W240xD240xH600mm |
| Product weight(About)(Power line is included) | 2.4kg |
| Length of cables(About) | 1.7m |
| Protection against electric shock | Class II |
※No other notification will be delivered in condition of changes on specifications of the product.
Warranty and after-sales services
Please make sure to carefully read the following contents.
Purchase Receipt
Be sure to request the Purchase Receipt from the sales shop when you purchase the product.
The repair fee needs to be paid if you cannot present the Purchase Receipt. Therefore, please keep the Purchase Receipt safely.
Within the warranty period
Warranty period: Time limit specified by warranty card (Back cover).
The company will provide free repair as per the "Warranty Provisions" in condition of fault within the warranty period.
Over the warranty period
Please consult to the retail shop or the customer service center of Iris, and you need to pay for related repair expenses. It is available to maintain the functions of the product after repair, and certain repair charge is collected as per the requirements of the customers.
■ About the remaining period of spares parts
The remaining period of the important parts of the company is 2 years after the stop production of the product. Performance spare parts mean the spare parts needed to maintain the functions of the product.
About the after-sales service
Please consult to the retail shop or the customer service center of Iris for other after-sales matters.
Circulator STF-DC15T
Warranty card
The purchase receipt is the certificate for you to enjoy free repair as per the following repair stipulations within the following period since the purchase day.
| Purchase date ※ Year Month Day | Warranty period 2 years since the purchase day Except for consumables | |||
| Customer | Name: | ※ Retail shop | Shop name: Address: | |
| Postal code: Address: | ||||
| Telephone number ( ) - | Telephone number ( ) - | |||
Notice to retail shops: Please fill in the items with ※ and then deliver to customers.
Warranty Provisions
- The company will provide free repair or replacement in condition of fault or damage under normal operating conditions as per the matters needing attention on the labels pasted on the operation manual and the product.
- The repairs under warranty may only be carried out by an authorized service centre. When making a claim under the warranty, the original bill of purchase (with purchase date) must be submitted.
- The warranty contents are only limited to free repair on the product. No other warranty service is provided even within the warranty period. The warranty only covers defects in material or workmanship.
- If it is impossible to entrust the retail shop filled in the warranty card due to shop relocation or the product is given as a present, please consult to the customer service center of Iris.
- The warranty will not apply in cases of:
(1) Normal wear and tear
② Incorrect use, e.g. overloading of the appliance, use of non-approved accessories
③ The faults and damages caused by falling down after purchase. Use of force, damage caused by external influences
(4) The faults and damages caused by fire, earthquake or other natural disasters
⑤ Damage caused by non-observation of the user manual, e.g. connection to an unsuitable mains supply or noncompliance with the installation instructions
(6) The faults and damages during the handling and transportation process after purchase
⑦ Partially or completely dismantled appliances
⑧ Can not show the purchase receipt
The warranty card is not filled with purchase date, customer name, retail shop name or any of the above cortenes is modified
-
The warranty card is only valid in Europe.
-
The warranty card in original, and please keep it appropriately.
Memorandum for repair
The purchase receipt is the certificate for repair and exchange conditions clearly stipulated in the user's manual. But the warranty card restrains the customers to enjoy any legal right from the company (warranty responsible person) and other dealers.
Please consult to the retail shop or the customer service center of Iris for repair matters after the warranty period.
※ Please consult "Warranty and After-sales Service" for repair after warranty period and retain period of spare parts.
Client : IRIS Ohyama Inc.,
Address : 2-12-1, Gokyo, Aoba-ku, Sendai-shi, Miyagi-ken, Japan
Factory : DALIAN IRIS HOME PRODUCTS CO.,LTD
Address : DALIAN EXPORT PROCESSING ZONE IIB-45,P.R.CHINA
Exclusive Distributer:
Iris Ohyama Europe B.V.
Address: Gesworenhoekseweg 1, Tilburg - The Netherlands Post code: 5047 TM TEL:+31-(0)13-5780022
Website: www.irisohyama.co.jp (Japanese) www.iriiseurope.com FAX:+31-013-5780023
WOOZOO®
by Ohyama
Innenraum • Zuhause
Luftumwalzer
STF-DC15T
Bedienungsanleitung


Inhaltsverzeichnis
| Faible | ● | ● | ● | ○ | ○ | ○ | ○ | ○ | ○ |
| Moyen | ● | ● | ● | ● | ● | ● | ○ | ○ | ○ |
| Fort | ● | ● | ● | ● | ● | ● | ● | ● | ● |
Mode veille
Client : IRIS Ohyama Inc.,
Adresse : 2-12-1, Gokyo, Aoba-ku, Sendai-shi, Miyagi-ken, Japon
Usine : DALIAN IRIS HOME PRODUCTS CO.,LTD
Adresse : DALIAN EXPORT PROCESSING ZONE IIB-45,P.R.CHINA
Distributearxclusif:
Iris Ohyama Europe B.V.
Website: www.irisohyama.co.jp (Japanese)
TEL:+31-(0)13-5780022
FAX:+31-0)13-5780023
WOOZOO®
by Ohyama
Indoor enTHIS
Circulator
STF-DC15T
Gebruiksaanwijzing